





1. Introduction
Diffusiophoresis has been studied as a mechanism for the motion of colloidal particles due to chemical gradients since its discovery by Derjaguin et al. (Reference Derjaguin, Sidorenkov, Zubashchenkov and Kiseleva1947). In recent microfluidic studies (Shin et al. Reference Shin, Um, Sabass, Ault, Rahimi, Warren and Stone2016; Ault et al. Reference Ault, Warren, Shin and Stone2017; Battat et al. Reference Battat, Ault, Shin, Khodaparast and Stone2019; Gupta, Shim & Stone Reference Gupta, Shim and Stone2020b; Singh et al. Reference Singh, Vladisavljević, Nadal, Cottin-Bizonne, Pirat and Bolognesi2020; Wilson et al. Reference Wilson, Shim, Yu, Gupta and Stone2020; Alessio et al. Reference Alessio, Shim, Mintah, Gupta and Stone2021), a dead-end pore configuration is used to set up a transient one-dimensional (1-D) diffusion of solutes; significant colloidal dispersion is observed, which the typical models are unable to capture. In addition to the dead-end pore geometry, experimental data in other microfluidic configurations have been reported in which colloidal dispersion can be observed but remains unexplained quantitatively (Abécassis et al. Reference Abécassis, Cottin-Bizonne, Ybert, Ajdari and Bocquet2008, Reference Abécassis, Cottin-Bizonne, Ybert, Ajdari and Bocquet2009; Palacci et al. Reference Palacci, Abécassis, Cottin-Bizonne, Ybert and Bocquet2010, Reference Palacci, Cottin-Bizonne, Ybert and Bocquet2012; McDermott et al. Reference McDermott, Kar, Daher, Klara, Wang, Sen and Velegol2012; Paustian et al. Reference Paustian, Angulo, Nery-Azevedo, Shi, Abdel-Fattah and Squires2015; Nery-Azevedo, Banerjee & Squires Reference Nery-Azevedo, Banerjee and Squires2017; Shimokusu et al. Reference Shimokusu, Maybruck, Ault and Shin2019).
The reports in the literature do acknowledge that diffusioosmosis along the channel walls induces flow of the bulk liquid, which causes colloidal dispersion (Keh & Ma Reference Keh and Ma2005; Kar et al. Reference Kar, Chiang, Ortiz Rivera, Sen and Velegol2015; Shin et al. Reference Shin, Um, Sabass, Ault, Rahimi, Warren and Stone2016, Reference Shin, Ault, Feng, Warren and Stone2017; Ault, Shin & Stone Reference Ault, Shin and Stone2019; Rasmussen, Pedersen & Marie Reference Rasmussen, Pedersen and Marie2020). However, only a few studies have combined the influences of diffusiophoresis and diffusioosmosis in order to investigate particle motion in more realistic settings (Shin et al. Reference Shin, Ault, Feng, Warren and Stone2017; Singh et al. Reference Singh, Vladisavljević, Nadal, Cottin-Bizonne, Pirat and Bolognesi2020; Williams et al. Reference Williams, Lee, Apriceno, Sear and Battaglia2020; Alessio et al. Reference Alessio, Shim, Mintah, Gupta and Stone2021). In our previous article, we demonstrated that particle motion due to diffusiophoresis and a diffusioosmotic-slip-driven flow field that neglects the smallest dimension of the pore does predict a non-zero dispersion of colloids (Alessio et al. Reference Alessio, Shim, Mintah, Gupta and Stone2021). Physically, diffusioosmosis along the sidewalls creates a flow structure that stretches the particle distribution along the pore, and generates an apparent motion of particles that is analogous to Taylor dispersion (Taylor Reference Taylor1953; Aris Reference Aris1956; Doshi, Daiya & Gill Reference Doshi, Daiya and Gill1978; Stone & Brenner Reference Stone and Brenner1999; Aminian et al. Reference Aminian, Bernardi, Camassa, Harris and McLaughlin2016; Chu et al. Reference Chu, Garoff, Tilton and Khair2021; Migacz & Ault Reference Migacz and Ault2022). Still, our two-dimensional (2-D) model yielded a lower quantitative dispersion value than experiments and thus the agreement between the model and experiments remained qualitative.
To enable widespread use of diffusiophoresis in lab-on-a-chip applications such as energy storage and desalination devices (Bone, Steinrück & Toney Reference Bone, Steinrück and Toney2020; Gupta et al. Reference Gupta, Rajan, Carter and Stone2020a; Gupta, Zuk & Stone Reference Gupta, Zuk and Stone2020c), particle separation (Lee et al. Reference Lee, Kim, Yang, Seo and Kim2018; Seo et al. Reference Seo, Park, Lee, Lee and Kim2020; Shin Reference Shin2020), colloidal focusing and delivery (Banerjee et al. Reference Banerjee, Williams, Azevedo, Helgeson and Squires2016; Shi et al. Reference Shi, Nery-Azevedo, Abdel-Fattah and Squires2016; Gandhi et al. Reference Gandhi, Mac Huang, Aubret, Li, Ramananarivo, Vergassola and Palacci2020), ion-exchange membranes (Florea et al. Reference Florea, Musa, Huyghe and Wyss2014), zeta potential measurement (Shin et al. Reference Shin, Ault, Feng, Warren and Stone2017) and macromolecule transport in biological systems (Bruno et al. Reference Bruno2018; Hartman, Božič & Derganc Reference Hartman, Božič and Derganc2018; Yang et al. Reference Yang, Jennings, Borrego, Retterer and Männik2018), understanding and quantifying dispersion is crucial. Recently, studies have modelled the dispersion of a patch of particles that spread due to diffusiophoresis (Raynal & Volk Reference Raynal and Volk2019; Chu et al. Reference Chu, Garoff, Tilton and Khair2020, Reference Chu, Garoff, Tilton and Khair2021; Gupta et al. Reference Gupta, Shim and Stone2020b; Migacz & Ault Reference Migacz and Ault2022). However, these studies assume a model configuration where the flow due to sidewalls is not considered. In practice, since the concentration gradients are often created in a microfluidic configuration, there is diffusioosmotic flow present due to the sidewalls. Therefore, motion of particles in such microfluidic systems is often a complex combination of diffusiophoresis, diffusioosmosis and imposed fluid flow (Shim Reference Shim2022). To this end, the objective of this article is to quantify the effect of dispersion that arises from the diffusioosmotic flow.
To achieve the aforementioned objective, in our modelling approach, we now consider the 3-D flow that arises from the sidewalls, and present a Taylor dispersion analysis for fast and convenient calculation of dispersion. Additionally, in our experiments, we modified the dead-end pore configuration to observe the dispersion of a patch of particles, which enables an easier and more direct comparison with the model. In particular, in § 2 we present dead-end pore experiments demonstrating typical scenarios that require understanding of the 3-D flow structure. By using a particle patch in pores with the same width but different heights, we show that simpler 1-D and 2-D models cannot provide sufficient information about the particle distribution since they lack the details of the velocity that drive the dispersion. In § 3, we derive the generic form of the 1-D cross-sectional average of the advective-diffusion equation for particles undergoing diffusiophoresis in the flow field set up by diffusioosmosis along the walls, with specific forms of the 1-D representation of model 2-D pore and 3-D pores presented in Appendix A. In § 4, analyses of the dispersion equations are presented for various system parameters including the pore geometry and the properties of particles and walls. Finally, in § 5, a detailed comparison is made of the experiments and the 1-D model representation of the 3-D pores, where the particle size is varied to investigate the effect of changing the particle rate of diffusion on the overall dispersion. We find good agreement with the predictions of the cross-sectional average model for long-pore systems.
2. Diffusiophoresis of a patch of particles in a dead-end pore geometry
We use dead-end pore geometries with different heights to demonstrate diffusiophoresis of a particle patch and the influence of diffusioosmosis. A finite number of particles are introduced at the inlet of dead-end pores of the same width and length ( $w=100\ \mathrm {\mu }$m and $\ell =1$ mm), and different heights ( $h=25, 50$ and $100\ \mathrm {\mu }$m; figure 1a,b). Initially, a concentration gradient of NaCl is established by filling the pore with a 10 mM solution and the main channel, in which there is flow, with a 1 mM solution; the injected particles are then advected into the pore by diffusiophoresis. Experimental details for establishing the initial condition are explained in § 5.
Diffusiophoresis and diffusioosmosis-induced dispersion of a patch of particles in a dead-end pore. (a) Schematic of a microfluidic channel with dead-end pores of length  $\ell$. Pores with different heights ( $h=25,50$ and $100\ \mathrm {\mu }$m) were tested in our experiments. (b) Schematic of an experiment using a particle patch that invades the pore. Details of the experimental set-up are explained in § 5. (c) Fluorescent images obtained from dead-end pore experiments. Particle distributions in pores of three different heights are shown. Scale bar is 100 $\mathrm {\mu }$m. (d) Pore-width-averaged intensity plotted vs distance along the pore ( $x$). The profiles are obtained at non-dimensional time $\tau =tD_{s}/\ell ^2=1$, where $D_{s}$ is the solute diffusivity. (e) Peak locations measured in the experiments are plotted vs non-dimensional time. Colours used in all graphs of this article are chosen from the palettes for colour blindness (Krzywinski Reference Krzywinski2020).

Transport of the particle patch in the three pores looks similar at the beginning, but we observe quantitative differences as the particle distribution evolves in pores with different cross-sectional aspect ratios (figure 1c). Because the effect of different  $h$ is not captured in the 2-D analyses that neglect the effect of the smallest dimension of the pore, i.e. considering a model pore with $\ell$ and $w$ as its dimensions, the experimental results in figure 1(c) suggest that differences in the particle distribution cannot be simply explained by such 2-D models.
Since the particle distribution varies in the experiments in the three different pores, the peak locations can be compared by analysing the pore-width-averaged intensity profiles (figure 1d). We observe that the peak locations measured in the three pores are similar up to dimensionless time  $\tau = t D_{s} / \ell ^2 \approx 0.1$, where $D_{s}$ is the diffusivity of ${\rm Na}^+$ ions, but deviate from each other at later times (figure 1e). The width-averaged intensity plotted vs distance along the pore motivates the question of determining an effective 1-D representation of the particle transport.
As we demonstrate below, diffusiophoresis and diffusioosmosis acting in tandem result in the transport and spreading of the particle patch that is analogous to the flow-driven dispersion that occurs in pressure-driven flow in a rectangular channel. For example, for the flow-driven dispersion in a pipe flow (Taylor Reference Taylor1953; Aminian et al. Reference Aminian, Bernardi, Camassa, Harris and McLaughlin2016), particles move on average with the mean flow speed and dispersion about the mean occurs due to Brownian motion as well as the non-uniform velocity profile throughout the cross-section of the channel. In our experiments, particles translate into the pore with the (transient) diffusiophoretic speed, and the wall-driven diffusioosmotic flow velocity stretches the particle distribution along the pore. Note that mass conservation inside the dead-end pore enforces zero net volumetric flux for the fluid, and the velocity distribution in the channel cross-section drives the axial dispersion of the particle patch. Therefore, for a particle patch that moves along the narrow pore with the diffusiophoretic velocity, we next apply Taylor dispersion analysis, within the lubrication approximation, to account for the flow structure in the rectangular cross-section to obtain a simplified 1-D description of the particle distribution.
3. Derivation of a 1-D cross-sectionally averaged concentration equation for colloids undergoing diffusiophoresis in a diffusioosmotic slip-driven flow
For the channel flow configurations of interest here, the concentration  $N$ of colloidal particles undergoing diffusiophoresis can be described by an advective-diffusion equation. The particles diffuse at characteristic rate $D_{p}$ relative to the mean fluid velocity and advect due to both a diffusiophoretic velocity field $\boldsymbol v_{DP}$ and a fluid flow field $\boldsymbol v_{f}$ produced by a diffusioosmotic slip velocity $\boldsymbol v_{s}$ on the channel walls. Both the diffusiophoretic $\boldsymbol v_{DP}$ and diffusioosmotic slip $\boldsymbol v_{s}$ velocities are driven by the diffusion of a background solute with concentration $C$ such that $\boldsymbol v_{DP}\propto \boldsymbol \nabla \log C$ and $\boldsymbol v_{s}\propto \boldsymbol \nabla \log C$. We introduce the particle velocity $\boldsymbol v_{p} = \boldsymbol v_{f} + \boldsymbol v_{DP}$ and write the advective-diffusion equation
 \begin{equation} \frac{\partial N}{\partial t} + \boldsymbol\nabla\boldsymbol\cdot(\boldsymbol v_{p}N) = D_{p}\nabla^2 N. \end{equation}
Previous studies compare dead-end pore experiments with numerical solutions of the 1-D advective-diffusion equation (Ault et al. Reference Ault, Warren, Shin and Stone2017; Chu et al. Reference Chu, Garoff, Tilton and Khair2020; Gupta et al. Reference Gupta, Shim and Stone2020b; Wilson et al. Reference Wilson, Shim, Yu, Gupta and Stone2020), which exclude  $\boldsymbol v_{f}$. While this approach simplifies calculations and provides for a qualitative comparison of the mean colloidal motion, it leaves out the effect of spreading of the particles due to the flow field. By introducing a Taylor dispersion model, we account for flow-driven spreading effects in a 1-D equation for the cross-sectionally averaged colloid distribution. In this section, we derive a general form of this 1-D effective transport equation.
We consider a pore with axial dimension  $x=\boldsymbol x\boldsymbol \cdot \boldsymbol e_x$. The typical scale of the fluid velocity ( $\boldsymbol {v}_{f}$) is of the order of magnitude of the wall slip velocity ( $v_{s} \approx \varGamma _{w}/\ell$, where $\varGamma _{w}$ and $\ell$ are, respectively, the diffusioosmotic mobility and pore length), and an estimate of the Péclet number for the solute, $Pe_{s} = v_{s} \ell /D_{s}$ where $D_{s}$ is the solute diffusivity, yields $Pe_{s} \approx \varGamma _{w}/D_{s} \lesssim 1$ (Gupta et al. Reference Gupta, Shim and Stone2020b). Therefore, inside a narrow dead-end pore, the solute concentration field $C(x,t)$ can be assumed one-dimensional so that 1-D diffusiophoresis of particles is achieved, i.e. ${\boldsymbol v}_{DP}=v_{DP} \boldsymbol e_x$.
Defining the perpendicular components of the position vector as  $\boldsymbol x_\perp \equiv \boldsymbol x - x\boldsymbol e_x$, away from the pore entrance the velocity fields have the form of a wall slip velocity $\boldsymbol v_{s}=v_{s}(x,t)\boldsymbol e_x$, fluid velocity $\boldsymbol v_{f}(\boldsymbol x,t)=v_{s}(x,t)f_x(\boldsymbol x_\perp,t)\boldsymbol e_x + \boldsymbol v_{{f}\perp }(\boldsymbol x,t)$, where $\boldsymbol e_x\boldsymbol \cdot \boldsymbol v_{f\perp }=0$, and $\boldsymbol v_{DP}=v_{DP}(x,t)\boldsymbol e_x$, where we assume an incompressible flow such that $\boldsymbol \nabla \boldsymbol \cdot \boldsymbol {v}_{f}=0$. The advective-diffusion equation (3.1) becomes
 \begin{equation} \frac{\partial N}{\partial t}+\boldsymbol v_{f}\boldsymbol\cdot\boldsymbol\nabla N+\frac{\partial}{\partial x}(v_{DP}N) = D_{p}\nabla^2N. \end{equation}
This equation can be solved numerically for  $N$, although to do so would require a 2-D or 3-D computational scheme. To simplify our calculations, we revisit the analysis of Taylor (Reference Taylor1953) to derive a 1-D equation for the cross-sectionally averaged concentration by integrating the effects of the fluid flow, with the important differences that the fluid velocity field in the pore here has zero cross-sectional average and varies in $x$ and $t$ according to $v_{s}$; note that ${\boldsymbol v}_{f}$ varies with the transverse coordinates and time.
We start by defining the perturbation concentration  $N'({\boldsymbol x}, t)$
 \begin{equation} N'({\boldsymbol x}, t) = N({\boldsymbol x}, t) -\langle N \rangle (x,t), \end{equation}
where the cross-sectional average is defined as
 \begin{equation} {\langle f \rangle } (x,t)=\frac1A\int_Af\, {\rm{d}}A',\end{equation}
for cross-sectional area  $A$ with normal vector in the $x$-direction. We expand (3.2) using these definitions to find
 \begin{equation} \frac{\partial}{\partial t}(\langle N \rangle +N')+v_{{f}x}\frac{\partial\langle N \rangle }{\partial x}+\boldsymbol v_{f}\boldsymbol\cdot\boldsymbol\nabla N'+\frac{\partial}{\partial x}(v_{DP}(\langle N \rangle +N')) = D_{p}\left(\frac{\partial^2\langle N \rangle }{\partial x^2}+\nabla^2N'\right), \end{equation}
and take the cross-sectional average, which yields
 \begin{equation} \frac{\partial\langle N \rangle }{\partial t}+\langle {\boldsymbol v_{f}\boldsymbol\cdot\boldsymbol\nabla N'}\rangle +\frac{\partial}{\partial x}(v_{DP}\langle N \rangle ) = D_{p}\frac{\partial^2\langle N \rangle }{\partial x^2},\end{equation}
where we have used, by definition,  $\langle N' \rangle =0$, $\langle {v_{{f}x}}\rangle =0$ and $\partial \langle N \rangle /\partial \boldsymbol x_\perp = \boldsymbol 0$.
Now we subtract (3.6) from (3.2) to obtain (still an exact expression)
 \begin{equation} \frac{\partial N'}{\partial t}+v_{{f}x}\frac{\partial\langle N \rangle }{\partial x}+\boldsymbol v_{f}\boldsymbol\cdot\boldsymbol\nabla N'-\langle{\boldsymbol v_{f}\boldsymbol\cdot\boldsymbol\nabla N'}\rangle + \frac{\partial}{\partial x}(v_{DP}N') = D_{p}\nabla^2 N', \end{equation}
at which point we must make approximations to go further. As originally developed by Taylor (Reference Taylor1953), we consider the lubrication approximation
 \begin{equation} | \nabla_\perp^2N'|\gg \left |\frac{\partial^2N'}{\partial x^2}\right |, \end{equation}
where we define  $\nabla _\perp ^2\equiv \nabla ^2-\partial ^2/\partial x^2$. Assuming $O(v_{DP})=O(v_{{f}x})$, $| N' |\ll N$, we apply the approximation
 \begin{equation} O\left(v_{{f}x}\frac{\partial\langle N \rangle }{\partial x}\right) \gg O\left(\boldsymbol v_{f}\boldsymbol\cdot\boldsymbol\nabla N', \langle{\boldsymbol v_{f}\boldsymbol\cdot\boldsymbol\nabla N'}\rangle, \frac{\partial}{\partial x}(v_{DP}N')\right). \end{equation}
 Finally, assuming the perturbation concentration becomes independent of the initial particle distribution, we take the steady-state limit  $\partial N'/\partial t\to 0$ to arrive at an equation for the perturbation concentration,
 \begin{equation} v_{fx}\frac{\partial\langle N \rangle }{\partial x} = D_{p}\nabla_\perp^2N', \end{equation}
which must be solved for  $N'(\boldsymbol x)$ by applying no-flux conditions at the pore walls and requiring that $\langle {N'}\rangle =0$. Equation (3.10) is analogous to the equation for the perturbation field of a solute obtained in the original analysis of Taylor (Reference Taylor1953). The steady-state limit neglects the effect on $\partial N'/\partial t$ of the time dependence of $v_{f}$, which arises from the time dependence of $v_{s}$. This is equivalent to assuming that the colloids reach a steady-state distribution throughout the cross-section instantaneously upon a change in $v_{f}$. We justify this assumption by comparing the time scale of particle diffusion through the cross-section, $A/D_{p}$, where $A$ is the cross-sectional area, with the time scale of axial particle transport, $\ell /v_{DP}$. Introducing particle diffusiophoretic mobility $\varGamma _{p}$, we have $v_{DP}\approx \varGamma _{p}/\ell$. Furthermore, as the diffusiophoretic motion cannot outpace its source, the diffusion of the solute, we can write $v_{DP}\lesssim D_{s}/\ell$. Thus, for any system that obeys $A/\ell ^2\ll D_{p}/D_{s}$, the steady-state limit $\partial N'/\partial t\to 0$ is valid.
Motivated by (3.10), it is convenient to define the quantities
 \begin{gather} f_x(\boldsymbol x_\perp) = \frac{v_{{f}x}(\boldsymbol x,t)}{v_{s}(x,t)}, \end{gather}
 \begin{gather}N'= {-}v_{s}(x,t)\frac{\partial\langle N \rangle }{\partial x}\frac{f_{N'}(\boldsymbol x_\perp)}{D_{p}}, \end{gather}
 \begin{gather}\nabla_\perp^2f_{N'} ={-}f_x(\boldsymbol x_\perp), \end{gather}
where (3.11c) is to be solved with no-flux boundary conditions at the pore walls and the requirement that  $\langle {f_{N'}}\rangle =0$.
The quantity  $\langle {\boldsymbol v_{f}\boldsymbol \cdot \boldsymbol \nabla N'}\rangle$ therefore has the form
 \begin{equation} \langle{\boldsymbol v_{f}\boldsymbol\cdot\boldsymbol\nabla N'}\rangle = \left\langle v_{s}f_x\frac{\partial N'}{\partial x} + \boldsymbol v_{f\perp}\boldsymbol\cdot\boldsymbol\nabla_\perp N'\right\rangle = \left\langle v_{s}f_x\frac{\partial N'}{\partial x} + \boldsymbol\nabla_\perp\boldsymbol\cdot(\boldsymbol v_{f\perp} N') - N'\boldsymbol\nabla_\perp\boldsymbol\cdot\boldsymbol v_{f\perp} \right\rangle . \end{equation}
Applying the incompressible flow condition
 \begin{equation} \boldsymbol\nabla\boldsymbol\cdot\boldsymbol v_{f} = f_x\frac{\partial v_{s}}{\partial x} + \boldsymbol\nabla_\perp\boldsymbol\cdot \boldsymbol v_{f\perp} = 0, \end{equation}
we substitute for  $\boldsymbol \nabla _\perp \boldsymbol \cdot \boldsymbol v_{f\perp }$ and apply the product rule of differentiation to obtain
 \begin{equation} \langle{\boldsymbol v_{f}\boldsymbol\cdot\boldsymbol\nabla N'}\rangle = \left\langle f_x\frac{\partial}{\partial x}(v_{s}N') + \boldsymbol\nabla_\perp\boldsymbol\cdot(\boldsymbol v_{f\perp} N') \right\rangle . \end{equation}
With the definitions of the cross-sectional area average in (3.4) and the perpendicular derivative vector  $\boldsymbol \nabla _\perp$, denoting $\boldsymbol e_\perp$ as the normal vector to the boundary, using the divergence theorem and noting that there is zero fluid penetration at the pore walls, we finally arrive at
 \begin{equation} \langle{\boldsymbol\nabla_\perp\boldsymbol\cdot(\boldsymbol v_{f\perp}N')}\rangle = \frac1A\oint \boldsymbol e_\perp\boldsymbol\cdot\boldsymbol v_{f\perp} N'\, {\rm{d}}s = 0, \end{equation}
where the line integral is performed over the boundaries of the pore cross-section. This simplifies (3.14) by eliminating the perpendicular velocity components. Invoking the definition in (3.11c), we have the result
 \begin{equation} \langle{\boldsymbol v_{f}\boldsymbol\cdot\boldsymbol\nabla N'}\rangle ={-}\frac1{D_{p}} \langle{f_xf_{N'}}\rangle\frac{\partial}{\partial x}\left(v_{s}^2\frac{\partial\langle N \rangle }{\partial x}\right). \end{equation}
Substituting this result into (3.6), we have a 1-D partial differential equation (PDE) for the cross-sectionally averaged colloid concentration
 \begin{equation} \frac{\partial\langle N \rangle }{\partial t} = \frac{\partial}{\partial x}\left(K\frac{\partial\langle N \rangle }{\partial x}-v_{DP}\langle N \rangle \right), \end{equation}
where the modified diffusion coefficient is defined as
 \begin{equation} K\equiv D_{p} + \frac1{D_{p}}\langle{f_xf_{N'}}\rangle (v_{s}(x,t))^2. \end{equation}
 In Appendix A we calculate  $\langle {f_xf_{N'}}\rangle$ by solving (3.11c) for the forms of $v_{{f} x}$ in both the 2-D and 3-D narrow pores depicted in figure 2. We note that the results are equivalent to the well-known 2-D result and additionally the 3-D result introduced by Chatwin & Sullivan (Reference Chatwin and Sullivan1982) upon replacing the diffusioosmotic slip velocity with the mean velocity of a pressure-driven flow. Furthermore, the elements of our Taylor dispersion model have been introduced in part by previous studies. For example, Chu et al. (Reference Chu, Garoff, Tilton and Khair2021) present a Taylor dispersion model of diffusiophoretic motion of particles; however, the flow field is driven by an external pressure gradient and does not include the effect of a diffusioosmotic slip-driven flow field. Furthermore, due to their use of cylindrical geometry, they do not examine the effect of the channel cross-section aspect ratio on the dispersion. It would be straightforward to include features of their model such as a colloidal reaction term, an externally driven flow, and a cylindrical channel geometry into our model. Migacz & Ault (Reference Migacz and Ault2022) also present a Taylor dispersion model of diffusiophoretic colloids with an externally driven flow field; their focus is on a narrow 2-D channel for which they neglect the diffusioosmotic wall slip. It would be straightforward to include in our model the zeta-potential dependence on the solute concentration featured in their model, although to incorporate their characterization of early-time dynamics requires further research. Stone & Brenner (Reference Stone and Brenner1999) present a dispersion model for radial outflow between two disks, which exhibits streamwise variation in the mean velocity. Our model of diffusiophoresis and diffusioosmosis generalizes the above studies by including a multi-directional, longitudinal direction-dependent and time-dependent flow with zero mean in a channel geometry, allowing for accurate direct comparison of the model with dead-end pore diffusiophoresis experiments (see § 5).
Schematic of 2-D and 3-D descriptions of the velocity profile in dead-end pores, depicted in panels (a) and (c), respectively. Coordinate axes are defined with the origin at the upstream corner. Pore length, height and width are defined, respectively, as  $\ell$, $h$ and $w$. Velocity profiles are depicted in the $x$-direction. Dispersion of the colloid concentration over time scale $\tau =\tau _1\to \tau _2$ is depicted in the 2-D description (panel (a)) and the cross-sectional average of the colloid concentration is shown in panel (b), where the full width half-maximum $\varDelta$ is visually defined as the distance between the two points in the distribution with values of half the maximum. Panel (d) is a qualitative plot demonstrating the effect of dispersion on a colloid distribution. Introducing a third dimension, as depicted in panel (c), causes an increase in dispersion, as is well known in the Taylor dispersion literature (Doshi, Daiya & Gill Reference Doshi, Daiya and Gill1978; Chatwin & Sullivan Reference Chatwin and Sullivan1982).

4. Analysis of dispersion equations
4.1. Comparison of the dispersion equation with the 2-D advective-diffusion equation
Numerical solutions for the diffusiophoretic motion of colloids in a 2-D dead-end pore (figure 2a) based on (3.1) are compared with numerical simulations of the dispersion model based on (3.17)–(3.18). The 2-D pore is simulated in order to validate our Taylor dispersion model with numerical tests; for comparison with our experiments, a 3-D model must be implemented. We introduce non-dimensional quantities  $\boldsymbol X = \boldsymbol x/\ell$, ${\boldsymbol V}\equiv {\boldsymbol v} \ell / D_{s}$ (for all velocities), $\tau \equiv tD_{s}/\ell ^2$ and $n\equiv N/N_0$, where $N_0$ is the initial maximum concentration of the colloid, $\ell$ is the pore length as depicted in figure 2 and $D_{s}$ is the characteristic diffusivity of the diffusing solute whose gradient drives the colloid diffusiophoresis and the diffusioosmotic slip velocity on the pore walls. For simplicity we consider a monovalent, binary salt as the solute, whose concentration can be described by one quantity. We define $C$ as the concentration of the solute, which is made non-dimensional by $c\equiv C/C_0$ for initial maximum concentration $C_0$. Substituting in our non-dimensional quantities, (3.1) becomes
 \begin{equation} \frac{\partial n}{\partial\tau} + \boldsymbol\nabla\boldsymbol\cdot( \boldsymbol V_{p}n ) = \frac{D_{p}}{D_{s}}\nabla^2n,\end{equation}
where we redefine  $\boldsymbol \nabla \equiv [\partial /\partial X,\partial /\partial Y]$ and note that the velocity $\boldsymbol V_{p} = \boldsymbol V_{f} + \boldsymbol V_{DP}$ is the sum of the fluid and diffusiophoretic velocities. We define the non-dimensional modified diffusion coefficient as
 \begin{equation} \mathcal{K} \equiv \frac{D_{p}}{D_{s}} + \frac{V_{s}^2}{D_{p}/D_{s}}\frac{\langle{f_Xf_{n'}}\rangle}{\ell^2},\end{equation}
where  $\langle {f_Xf_{n'}}\rangle /\ell ^2\equiv \langle {f_xf_{N'}}\rangle = (h/\ell )^2/210$, well known for pressure-driven parabolic flow in a 2-D channel, is computed in Appendix A.1, see (A6). We see that introducing the non-dimensional quantities reveals a set of two non-dimensional parameters to describe our system: $D_{p}/D_{s}$ and $h/\ell$. Now, making (3.17) non-dimensional, we have
 \begin{equation} \frac{\partial\langle n \rangle }{\partial\tau} = \frac\partial{\partial X}\left(\mathcal{K}\frac{\partial\langle n \rangle }{\partial X} - V_{DP}\langle n \rangle \right). \end{equation}
Equation (4.2) can be adapted to describe the solute concentration  $c$
$c$
 \begin{equation} \frac{\partial\langle c \rangle }{\partial\tau} = \frac\partial{\partial X}\left(\mathcal{K}_{s}\frac{\partial\langle c \rangle }{\partial X} - V_{f}\langle c \rangle \right), \end{equation}
where we define the solute modified diffusion coefficient as
 \begin{equation} \mathcal{K}_{s}\equiv 1 + \frac{(h/\ell)^2}{210}V_{s}^2. \end{equation}
As described in § 3, with a solute Péclet number  $Pe_{s} \approx \varGamma _{w}/D_{s} \lesssim 1$ the solute concentration is approximately one-dimensional and can be accurately calculated with a 1-D diffusion equation. This ensures furthermore that the solute concentration can be calculated with the dispersion equations (4.4) and (4.5) in the lubrication approximation (Taylor Reference Taylor1953; Aris Reference Aris1956; Chu et al. Reference Chu, Garoff, Tilton and Khair2021), with accuracy greater than or equal to the simple diffusion model. We include the dispersion effect on the solute as a general description of our model. Comparisons between the dispersion model and a 1-D diffusion model of the low Péclet number solute revealed only minor differences.
We assume constant particle and wall zeta potentials and a vanishing ratio of Debye length to particle radius. Therefore, the diffusiophoretic and diffusioosmotic velocities  $v_{DP}$ and $v_{s}$ depend on the constant particle and wall zeta potentials $\psi _{p,w}$, the gradient of the logarithm of the solute concentration and the diffusivity difference factor $\beta =(D_+-D_-)/(z_+D_+-z_-D_-)$ of the electrolyte with ionic diffusivities $D_+$ and $D_-$ and valences $z_+$ and $z_-$. The zeta potentials are made non-dimensional by defining $\varPsi = e\psi /(k_{B}T)$, where $e$ is the elementary charge, $k_{B}$ is the Boltzmann constant and $T$ is the absolute temperature of the solution. It is convenient to introduce the velocity prefactor $\alpha = \epsilon k_{B}^2 T^2 / (e^2 \mu D_{s})$, where $\epsilon$ is the electrical permittivity of the solution and $\mu$ is the solution viscosity. We define diffusiophoretic mobility $\varGamma _{p}$ and diffusioosmotic mobility $\varGamma _{w}$, which are made non-dimensional by the solute diffusivity and related to the particle and wall zeta potentials by the approximate form (Prieve et al. Reference Prieve, Anderson, Ebel and Lowell1984; Keh & Ma Reference Keh and Ma2005; Velegol et al. Reference Velegol, Garg, Guha, Kar and Kumar2016)
 \begin{equation} \frac{\varGamma_{p,w}}{D_{s}} = \alpha\left(\beta\varPsi_{p,w} + \frac{\varPsi_{p,w}^2}8\right). \end{equation}
The diffusiophoretic velocity and the diffusioosmotic slip velocity are then given by
 \begin{equation} \boldsymbol V_{DP} = \frac{\varGamma_{p}}{D_{s}}\boldsymbol\nabla \log c, \end{equation}
and
 \begin{equation} V_{s} = \frac{\varGamma_{w}}{D_{s}}\left[\frac{\partial \log c}{\partial X}\right]_{Z=0,h/\ell}. \end{equation}
where  $Z=0$ and $Z=h/\ell$ correspond to the pore walls.
We can consider the Taylor dispersion limits to simplify our expressions for the velocities. Taylor dispersion most accurately models systems with a low Péclet number, which is the ratio of particle transport time scales
 \begin{equation} Pe_{TD} \equiv \frac{\text{time scale to diffuse through channel cross section}}{\text{time scale to transport to end of channel}}\ll1 . \end{equation}
In our system, the mechanism of bulk particle transport along the pore length is the diffusiophoretic velocity. If we reintroduce dimensional quantities, we see that  $v_{DP}$ scales with $\varGamma _{p}/\ell$. The diffusiophoretic mobility $\varGamma _{p}$ cannot be greater than $D_{s}$, the characteristic diffusivity of the solute. This gives us the condition
 \begin{equation} \left(\frac h\ell\right)^2\ll \frac{D_{p}}{D_{s}},\end{equation}
for which we expect our Taylor dispersion model to describe 2-D pore diffusiophoresis and diffusioosmosis with reasonable accuracy. The equivalent condition for the dispersion of the solute would be  $(h/\ell )^2\ll 1$, which is always true in the lubrication approximation that we have employed for the velocity profiles. Therefore, we can approximate all $c(\boldsymbol X,\tau )$ with $\langle c \rangle (X,\tau )$, giving us the simplified velocities
 \begin{equation} V_{DP} = \frac{\varGamma_{p}}{D_{s}}\frac{\partial \log\langle c \rangle }{\partial X}, \end{equation}
and
 \begin{equation} V_{s} = \frac{\varGamma_{w}}{D_{s}}\frac{\partial \log\langle c \rangle }{\partial X}. \end{equation}
 Simulated colloid concentrations from the 2-D advective diffusion model (see (4.1)) and the 2-D reduced-order dispersion model (see (4.3) and (A6)) are directly compared in figure 3. Particle diffusivity and the ratio  $(h/\ell )^2/(D_{p}/D_{s})$ are both varied over three orders of magnitude, demonstrating better agreement of the colloid distributions as the Taylor dispersion limit is better satisfied. Diffusiophoretic focusing is observed in panels (d)–(i), where the colloids increase in concentration as time increases, and is most prominent for the smallest ratios (panels (f) and (i)). This is consistent with the form of (4.2), where an increase in $(h/\ell )^2/(D_{p}/D_{s})$ corresponds to an increase in dispersion. Panels (a)–(c) do not demonstrate diffusiophoretic focusing, however, as the large value for particle diffusivity dominates the dispersion effect.
Comparison of the cross-sectionally averaged diffusiophoretic colloid concentration  $\langle n \rangle$ in a dead-end pore with diffusioosmotic slip-driven flow at the walls. Solid lines show numerical solutions to the full 2-D model, (4.1), and dashed lines show numerical solutions to the 1-D model with 2-D dispersion, (4.3) and (A6). The two different numerical solutions have matching initial Gaussian distributions and no-flux conditions at the pore walls and inlet. The diffusiophoretic velocity and the diffusioosmotic slip are driven by a solute diffusing out of the pore into an infinite reservoir. The initial solute condition is $\langle c \rangle (\tau =0)=1$ and the boundary conditions are $\langle c \rangle (X=0)=0.1$ and no-flux conditions at the pore walls. Three diffusivities of the colloidal particles and three pore heights are considered. Excellent agreement is observed between the two models for $(h/\ell )^2=D_{p}/D_{s}/10$ and $(h/\ell )^2=D_{p}/D_{s}/100$, as predicted by the Taylor dispersion limit (4.9), and consistent with the steady-state limit $\partial N'/\partial t\to 0$.

We next report the full width half-maximum (defined in figure 2b), where larger magnitudes indicate greater dispersion. The full width half-maximum as a function of time for the colloid distributions determined from (4.3) and (A6) are displayed in figure 4. The full width half-maximum is compared for varying particle diffusivity across three orders of magnitude and varying pore wall zeta potential: a typical experimental value (Alessio et al. Reference Alessio, Shim, Mintah, Gupta and Stone2021)  $\varPsi _{w} = -4$ (panels (a)–(c)), a strongly negative value $\varPsi _{w} = -10$ (panels (d)–(f)) and a positive value $\varPsi _{w} = 4$ (panels (g)–(i)). The strongly negative value corresponds to a large slip velocity and thus to increased dispersion. Equation (4.6), considering that $\beta$ is negative for ${\rm Na}^+$ and ${\rm Cl}^-$, indicates that the positive value corresponds to a small slip velocity and thus to decreased dispersion. Furthermore, each panel shows the full width half-maximum of the colloid distribution for three values of the ratio $(h/\ell )^2/(D_{p}/D_{s})$: 1, 1/10 and 1/100. This effect is weakest for the leftmost column (panels (a), (d) and (g)), as the large value of particle diffusivity dominates the dispersion effect similarly to the simulations of figure 3.
The full width half-maximum  $\varDelta (\langle n \rangle )$ (see figure 2b) vs time $\tau$ of colloidal particle distributions $\langle n \rangle$, as obtained by solving (4.3) and (A6). The colloid distributions have Gaussian initial distributions and no-flux conditions at the pore walls and inlet. The diffusiophoretic velocity and the diffusioosmotic wall slip are driven by a solute diffusing out of the pore into an infinite reservoir. The initial solute concentration is $\langle c \rangle (\tau =0)=1$ and the boundary conditions are $\langle c \rangle (X=0)=0.1$ and no-flux conditions at the pore walls. The full width half-maximum is compared for varying particle diffusivity ( $D_{p}/D_{s} = 10^{-2}, 10^{-3}, 10^{-4}$) and varying pore wall zeta potential ( $\varPsi _{w} = -4, -10, 4$). Furthermore, each panel shows the full width half-maximum for three values of the ratio $(h/\ell )^2/(D_{p}/D_{s})$: 1, 1/10 and 1/100.

4.2. Parameter analysis of the 3-D dispersion equation
To achieve quantitative agreement between the experiments of § 5 and the reduced-order dispersion simulations requires the consideration of the variation of the flow in three spatial dimensions. In Appendix A.2 we introduce the pore width  $w$ such that the walls are located at $Y=0$ and $Y=w/\ell$ and $h < w$, and present the corresponding modified diffusion coefficient.
We modify the model in § 4.1 by substituting  $\mathcal {K}(X,\tau )$ with the 3-D coefficient, defined in (4.2) and (A14) where $\langle {f_Xf_{n'}}\rangle /\ell ^2\equiv \langle {f_xf_{N'}}\rangle$, into (4.3). Note that we use the same method to make the coefficient non-dimensional, and furthermore that the non-dimensional coefficient for solute dispersion in (4.4) is replaced with the 3-D version in a similar manner. Finally, we include no-flux conditions for each wall of the pore.
The full width half-maximum vs time for colloid distributions determined from (4.3) and (A14) are shown in figure 5(a–c). The results indicate enhanced dispersion as the width of the distribution increases with stronger dispersion. As in § 4.1, we present the effect of pore wall potential  $\varPsi _{w}$ on the dispersion in figure 5. Figure 5(d,e) shows the non-dimensional modified coefficient of diffusion vs the non-dimensional particle diffusivity, averaged across the length of the pore and across the timespan $\tau =0\to 0.4$ (panel (d)), and vs time, averaged across the length of the pore (panel (e)). Panel (d) demonstrates a minimum in dispersion for intermediate values of particle diffusivity as predicted by (4.2). Panel (e) highlights how there is a multiple-order-of-magnitude decrease in the modified coefficient of diffusion at early times.
(a)–(c) The full width half-maximum  $\varDelta (\langle n \rangle )$ vs time $\tau$ of the colloid distributions $\langle n \rangle$ solved from (4.3) and (A14). The colloid distributions have Gaussian initial distributions and observe no-flux conditions at the pore walls and inlet. The diffusiophoretic velocity and the diffusioosmotic slip are driven by a solute diffusing out of the pore into an infinite reservoir. The initial solute condition is $\langle c \rangle (\tau =0)=1$ and the boundary conditions are $\langle c \rangle (X=0)=0.1$ and no-flux conditions at the pore walls. The full width half-maximum is evaluated for varying pore wall zeta potential ( $\varPsi _{w}=-4,-10, 4$). (d) The non-dimensional modified coefficient of diffusion $\mathcal {K}$ vs non-dimensional particle diffusivity $D_{p}/D_{s}$. The double bracket indicates an average over the length of the pore and the timespan $\tau =0\to 0.4$. A minimum is seen in each curve for an intermediate value of particle diffusivity. (e) The non-dimensional modified coefficient of diffusion vs time. The single bracket indicates an average over the length of the pore. Particle diffusivity is chosen to be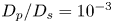 $D_{p}/D_{s}=10^{-3}$. A sharp decrease is seen for early times. Each panel demonstrates the effect of increasing cross-sectional aspect ratio $h/w$ to decrease dispersion, indicated by decreasing full width half-maximum (a–c) and decreasing modified coefficient of diffusion (d,e).

Each panel of figure 5 demonstrates the trend for dispersion to increase as the aspect ratio  $h/w$ decreases. This is a natural consequence of dispersion being enhanced by the influence of the side walls. Furthermore, the inclusion of the 3-D effect of $h/w$ strictly increases the dispersion of the colloid distributions compared with those calculated from the dispersion model of the 2-D channel (Doshi, Daiya & Gill Reference Doshi, Daiya and Gill1978; Chatwin & Sullivan Reference Chatwin and Sullivan1982).
5. Experimental methods and comparison with the 1-D equation
We designed experiments using a dead-end pore with  $w=100\ \mathrm {\mu }$m, $h=50\ \mathrm {\mu }$m and $\ell =5$ mm to compare with the model of the 1-D representation of the (3-D) dispersion; $\ell \gg h, w$. Three different particle sizes (diameter $d_{p}=1, 0.5$ and $0.2\ \mathrm {\mu }$m; see Appendix D for particle information) were used to examine the influence of particle diffusivity $D_{p}$, which is related to particle diameter by the Boltzmann constant $k_{B}$, the absolute temperature $T$ of the solution and the viscosity $\mu$ of the solution through the Stokes–Einstein equation
 \begin{equation} D_{p} = \frac{k_{B} T}{3{\rm \pi}\mu d_{p}}. \end{equation}
In order to establish an initial condition that a finite number of particles are trapped in the inlet region of the pore, we use three successive steps separated by two air bubbles (figure 6a). The polydimethylsiloxane (PDMS) microfluidic channel is made by standard soft lithography and the channel block is bonded to a thin sheet of PDMS to ensure the same surface properties for all walls.
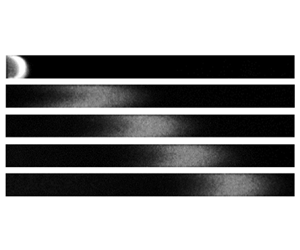
Experiments in a long pore ( $w=100\ \mathrm {\mu }$m, $h=50\ \mathrm {\mu }$m and $\ell =5$ mm). (a) Schematic of typical experimental steps. (ai) The pore is initially filled with the 10 mM NaCl solution. The 10 mM NaCl solution with suspended particles, separated from the original solution by a first air bubble, is flowed in the main channel, then comes in contact with the liquid in the pore. (aii) Flow in the main channel introduces penetration of streamlines into the pore at the pore inlet (penetration depth $\approx w$), which allows a patch of particles to form at the inlet region of the pore. Then, separated by the second air bubble, a 1 mM NaCl solution is flowed into the main channel to create a concentration gradient in the pore. (aiii) Finally, we obtain diffusiophoresis of a finite number of particles toward the dead-end. (b) Fluorescent images obtained from the experiments with carboxylate-modified polystyrene (c-PS; diameter $d=0.5\ \mathrm {\mu }$m) particles. Image intensity is enhanced for visualization. Original images are included in Appendix C (figure 10). Scale bar is 100 $\mathrm {\mu }$m.

The pore is initially filled with a 10 mM NaCl solution. Then, the 10 mM NaCl solution with suspended polystyrene (PS) particles, separated by a first air bubble from the original solution, is introduced in the main channel (width, height and length are, respectively,  $W=1.2$ mm, $H=200\ \mathrm {\mu }$m and $L =5$ cm) at a mean flow speed $\langle u\rangle \approx 2.5$ mm s $^{-1}$ (figure 6a-i). Once the two solutions come in contact with each other, particles start to accumulate at the pore inlet by the slight penetration of streamlines (penetration depth $\approx w$) (Battat et al. Reference Battat, Ault, Shin, Khodaparast and Stone2019). One minute after the particle suspension flows in the main channel, a second air bubble is introduced, followed by a 1 mM NaCl solution (figure 6a-ii). Once the 1 mM NaCl solution contacts the liquid in the pore, the main channel flow speed is reduced to $\langle u\rangle =25\ \mathrm {\mu }$m s $^{-1}$. Fluorescent images are then recorded every 10 s using an inverted microscope (Leica DMI4000B; figure 6a-iii). Typical experimental images are shown in figure 6(b) as a time sequence.
For the three values of  $d_{p}$, we compare the experiments with the 1-D model with 3-D dispersion (figure 7). Details of the model are given in § 4.2. The particle zeta potential has a strong influence on the peak location of the colloid distribution, and the wall zeta potential has a strong influence on the dispersion of the colloid distribution. The dimensionless particle zeta potential $\varPsi _{p}$ and wall zeta potential $\varPsi _{w}$ were calculated as fitting parameters for each experiment. The fitted parameters used in the simulations of each panel are: (a) $\varPsi _{p}=-2.84, \varPsi _{w}=-3.91$, (b) $\varPsi _{p}=-3.31, \varPsi _{w}=-3.26$ and (c) $\varPsi _{p}=-3.04, \varPsi _{w}=-2.06$. The zeta potentials are each calculated within $\varPsi \pm 0.002$ using a least squares method that compares model and experiment.
Comparison of experimental data (solid) with simulated data (dashed) for different colloidal particle diameters. The concentration distributions in a given experiment, in order of peak location from left to right, correspond to times  $\tau =0.1, 0.2, 0.3$ and $0.4$. Fitting parameters are the dimensionless particle zeta potential $\varPsi _{p}$ and wall zeta potential $\varPsi _{w}$. Unique values of the fitting parameters were calculated for the simulations of each panel: (a) $\varPsi _{p}=-2.84, \varPsi _{w}=-3.91$, (b) $\varPsi _{p}=-3.31, \varPsi _{w}=-3.26$ and (c) $\varPsi _{p}=-3.04, \varPsi _{w}=-2.06$. Despite a bias due to particle size in the fitted values of the wall zeta potential, there is very good agreement between the experiments and the simulations.

Some variation in particle zeta potentials is expected due to the independent manufacturing of all three sizes of particles used. However, the variation in fitted wall zeta potentials is unexpected as pore walls properties were not changed between experiments. It is possible that deviations from the predicted fluid velocity profile at the pore inlet, not captured by the Taylor dispersion model, enforce a bias of the particle size on the apparent dispersion of the colloid distribution (Battat et al. Reference Battat, Ault, Shin, Khodaparast and Stone2019). The sharp concentration gradient near the pore inlet at  $\tau =0$ causes a three to four order-of-magnitude decrease in the modified coefficient of diffusivity over the span of $\tau =0\to 0.05$ (figure 5e), meaning the majority of the dispersion occurs near the inlet during this timespan. A small effect of particle size on the dispersion in this region can strongly impact the apparent dispersion of the colloid distribution throughout the pore. Therefore, it is not feasible with our current set-up to accurately measure the wall zeta potential. In Appendix C, we perform an experiment holding particle size constant and calculate fitted potentials that demonstrate good agreement, supporting our claim that a particle-size dependence of the dispersion in the inlet region may be responsible for variations in the fitted values of the wall zeta potential.
The complex nature of the inlet region in microfluidic dead-end pores may also explain overestimation of the fitted particle zeta potentials. This effect is not due to imprecise measurements. In particular, in Appendix C we demonstrate precise fitting of zeta potentials for particles of the same batch. Full 3-D analysis including complex flow structure near the pore inlet may be helpful to further develop the dispersion system so that a direct mapping of the particle distribution versus the wall or particle potential values is possible for a wide range of surface properties. Additionally, it is possible that differences in manufacturing of each size of particle affected the diffusive behaviour; a wide variation in particle zeta potential within a batch of one size could introduce an apparent spreading that contributes to the dispersion. Despite the imprecise fitted values of wall zeta potential, the very good agreement between the experimental data and the fitted simulation data supports our model.
6. Conclusions
We implemented a Taylor dispersion model of diffusiophoresis-driven particle motion in a dead-end pore. By integrating the effects of a 3-D diffusioosmotic slip-driven flow into a 1-D advective-diffusion equation, we performed direct comparisons between reduced-order simulations and experimental measurements. We also compared the effective dispersion model with direct numerical simulations, and obtained quantitative agreement for parameters up to the limit of applicability of the approximations typical of Taylor dispersion.
Our model builds upon previous studies of diffusiophoresis by including the effect of diffusioosmosis-driven dispersion. Furthermore, we extend previous analyses of Taylor dispersion by calculating the general form of a coefficient for a slip-driven flow with zero mean, accounting for spatial and temporal variations in the coefficient and including the diffusiophoretic velocity in the reduced-order advective-diffusion equation.
Going forward, while our analysis focuses on the dead-end pore geometry with zero mean flow, it is straightforward to extend the analysis to other geometries and account for pressure and shear-driven flows (Chu et al. Reference Chu, Garoff, Tilton and Khair2021). Similarly, while the results in this paper are for electrolytic diffusioosmosis, (3.18) can be utilized to calculate dispersion for non-electrolytic diffusioosmosis. Our analysis can also be combined with self-diffusiophoretic colloids that may have variance in mean velocities (Peng & Brady Reference Peng and Brady2020). In summary, our dispersion model will enable rapid calculation of diffusioosmotic spreading for a wide variety of geometries, background flows and physical processes.
An accurate calculation of dispersion in the presence of charged sidewalls can be exploited for various applications. For instance, lab-on-a-chip applications such as directed delivery of particles (Banerjee et al. Reference Banerjee, Williams, Azevedo, Helgeson and Squires2016; Shi et al. Reference Shi, Nery-Azevedo, Abdel-Fattah and Squires2016; Lee et al. Reference Lee, Kim, Yang, Seo and Kim2018; Gandhi et al. Reference Gandhi, Mac Huang, Aubret, Li, Ramananarivo, Vergassola and Palacci2020; Seo et al. Reference Seo, Park, Lee, Lee and Kim2020; Shin Reference Shin2020) and zeta-potential measurement (Shin et al. Reference Shin, Ault, Feng, Warren and Stone2017) rely on accurate prediction of particle concentration, which in turn is closely associated with colloidal dispersion. In physical systems such as energy storage and desalination devices (Biesheuvel & Bazant Reference Biesheuvel and Bazant2010; Florea et al. Reference Florea, Musa, Huyghe and Wyss2014; Bone et al. Reference Bone, Steinrück and Toney2020; Gupta et al. Reference Gupta, Rajan, Carter and Stone2020a,Reference Gupta, Zuk and Stonec; Henrique, Zuk & Gupta Reference Henrique, Zuk and Gupta2022) it is common to observe ion concentration gradients inside charged pores, where one can expect colloidal transport and dispersion to be important. Finally, biophysical systems such as blood cells, bacteria, phospholipid vesicles (Ahmed & Stocker Reference Ahmed and Stocker2008; Bruno et al. Reference Bruno2018; Hartman et al. Reference Hartman, Božič and Derganc2018), plasmodesmata (Peters et al. Reference Peters, Jensen, Stone and Knoblauch2021) and cell growth in microfluidic set-ups (Yang et al. Reference Yang, Jennings, Borrego, Retterer and Männik2018) also consist of charged surfaces, where diffusioosmosis plays a crucial role.
Funding
We thank the High Meadows Environmental Institute at Princeton University for partial support of this research and for supporting a summer internship for B.M.A. HAS thanks the NSF for support via grant CBET-2127563.
Declaration of interest
The authors report no conflict of interest.
Appendix A. Deriving the coefficient of dispersion for a 2-D and a 3-D channel
The Taylor dispersion model introduced above, which we have generalized to account for streamwise and temporal variations in the dispersion coefficient for a channel geometry, a zero average fluid velocity and a background 1-D diffusiophoretic velocity field, is shown in this appendix to produce identical coefficients of dispersion as calculated many times previously for laminar flow between parallel plates in two dimensions and a rectangular conduit in three dimensions (Chatwin & Sullivan Reference Chatwin and Sullivan1982). In this appendix we give a detailed calculation of the dispersion coefficients for slip-driven flow in narrow pores in two and three dimensions, depicted by figure 2.
A.1. Two-dimensional pore
Here, we calculate the modified diffusion coefficient in slip-driven viscous flow for colloidal particles in a 2-D dead-end pore of length  $\ell$ and height $h\ll \ell$, where $x$ spans $0\to \ell$ and $z$ spans $0\to h$. The definition of the cross-sectional average from (3.4) becomes
 \begin{equation} \langle f \rangle \equiv \frac 1h\int_{0}^{h}f\, {\rm{d}}z, \end{equation}
and (3.10) reduces to
 \begin{equation} v_{fx}\frac{\partial\langle N \rangle }{\partial x} = D_{p}\frac{\partial^2N'}{\partial z^2}, \end{equation}
where the  $x$-direction fluid velocity is (Alessio et al. Reference Alessio, Shim, Mintah, Gupta and Stone2021)
 \begin{equation} v_{fx} = v_{s}\left(1 - 6\frac{z(h-z)}{h^2}\right). \end{equation}
Equation (3.11c) becomes
 \begin{equation} \frac{\partial^2 f_{N'}}{\partial z^2} ={-}f_x= 6\frac{z(h-z)}{h^2}-1, \end{equation}
where  $f_x = v_{fx} / v_{s}$. We integrate (A4), apply the no-flux condition $\partial f_{N'}/\partial z(z=0, h)=0$ and require that $\langle {f_{N'}}\rangle =0$ to obtain
 \begin{equation} f_{N'} = \frac{z^4}{2h^2} - \frac{z^3}h + \frac{z^2}2 - \frac{h^2}{60}, \end{equation}
from which we calculate
 \begin{equation} \langle{f_xf_{N'}}\rangle = \frac{h^2}{210}. \end{equation}
We note that this is the standard coefficient for a channel flow with dispersion proportional to the square of the mean velocity.
A.2. Three-dimensional pore
We now consider a 3-D pore, by introducing the width  $w\ll \ell$, where $y$ spans $0\to w$ and $h < w$. In this case, the definition of the cross-sectional average from (3.4) becomes
 \begin{equation} \langle f \rangle \equiv\frac1{wh}\int_{0}^{w}\int_{0}^{h}f\, {\rm{d}}z\,{\rm{d}}y,\end{equation}
and (3.10) becomes
 \begin{equation} v_{fx}\frac{\partial\langle N \rangle }{\partial x} = D_{p}\left(\frac{\partial^2}{\partial y^2}+\frac{\partial^2}{\partial z^2}\right)N', \end{equation}
where the  $x$-direction fluid velocity is, defining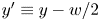 $y'\equiv y-w/2$,
 \begin{gather} v_{fx} = v_{s}\left(1 - 6{\tilde V} \left( \frac{z(h-z)}{h^2} - \frac 8{{\rm \pi}^3}\sum_{\substack{n\text{ odd}\\\ge 1}}^\infty \frac{\cosh\left(n{\rm \pi}\dfrac{y'}h\right)\sin\left(n{\rm \pi}\dfrac zh\right)}{n^3\cosh\left(\dfrac12n{\rm \pi}\dfrac wh\right)} \right)\right), \end{gather}
 \begin{gather}{\tilde V} \equiv \left(1 - \frac{192}{{\rm \pi}^5}\frac hw\sum_{\substack{n \text{ odd}\\\ge 1}}^\infty \frac{\tanh\left(\dfrac12n{\rm \pi}\dfrac wh\right)}{n^5} \right)^{{-}1}. \end{gather}
We note that the form of the fluid velocity in a channel is well known for the case of pressure-driven flow, and for our case of slip-driven flow, the form of the velocity is identical upon transforming from the frame of the mean flow speed to the frame of the slip velocity (Alessio et al. Reference Alessio, Shim, Mintah, Gupta and Stone2021).
Equation (3.11c) becomes
 \begin{equation} \left(\frac{\partial^2}{\partial y^2}+\frac{\partial^2}{\partial z^2}\right)f_{N'} ={-}f_x, \end{equation}
where  $f_x=v_{fx}/v_{s}$. Following the example of Chatwin & Sullivan (Reference Chatwin and Sullivan1982), we represent the velocity in the convenient double cosine form, noting that in our case the cross-sectional average of the velocity is zero,
 \begin{equation} f_x \!=\! \sum_{\substack{p \text{ even}\\\ge2}}^\infty \alpha_{p0} \cos\left(p{\rm \pi}\frac yw\right) \!+\! \sum_{\substack{q \text{ even}\\\ge2}}^\infty \alpha_{0q}\cos\left(q{\rm \pi}\frac zh\right) \!+\! \sum_{\substack{p \text{ even}\\\ge2}}^\infty\sum_{\substack{q \text{ even}\\\ge2}}^\infty \alpha_{pq} \cos\left(p{\rm \pi}\frac yw\right)\cos\left(q{\rm \pi}\frac zh\right). \end{equation}
The coefficients are calculated from (A9) using the Fourier method,
 \begin{gather} \alpha_{p0} = {-}\frac{384 wh{\tilde V}}{{\rm \pi}^5}\sum_{\substack{n \text{ odd}\\\ge1}}^\infty \frac{\tanh\left(\dfrac12n{\rm \pi}\dfrac wh\right)}{n^3\left(n^2w^2+p^2h^2\right)}, \end{gather}
 \begin{gather}\alpha_{0q} ={-}\frac{24{\tilde V}}{q^2{\rm \pi}^2}\left(1 + \frac8{{\rm \pi}^2}\sum_{\substack{n \text{ odd}\\\ge1}}^\infty \frac{q^2}{n^2\left(n^2-q^2\right)}\frac{\tanh\left(\dfrac12n{\rm \pi}\dfrac wh\right)}{\dfrac12n{\rm \pi}\dfrac wh} \right), \end{gather}
 \begin{gather}\alpha_{pq} ={-}\frac{768wh{\tilde V}}{{\rm \pi}^5}\sum_{\substack{n \text{ odd}\\\ge1}}^\infty \frac{\tanh\left(\dfrac12n{\rm \pi}\dfrac wh\right)}{n\left(n^2-q^2\right)\left(n^2w^2 + p^2h^2 \right)}. \end{gather}
We solve (A10) with the boundary conditions  $({\partial f_{N'}}/{\partial z})(z=0, h)=({\partial f_{N'}}/{\partial y})(y=0, w)=0$ and the requirement that $\langle {f_{N'}}\rangle =0$ to obtain:
 \begin{align} f_{N'} &= \sum_{\substack{p \text{ even}\\\ge2}}^\infty \left(\frac w{p{\rm \pi}}\right)^2\alpha_{p0} \cos\left(p{\rm \pi}\frac yw\right) + \sum_{\substack{q \text{ even}\\\ge2}}^\infty \left(\frac h{q{\rm \pi}}\right)^2\alpha_{0q}\cos\left(q{\rm \pi}\frac zh\right)\nonumber\\ &\quad + \sum_{\substack{p \text{ even}\\\ge2}}^\infty\sum_{\substack{q \text{ even}\\\ge2}}^\infty \left(\left(\frac w{p{\rm \pi}}\right)^2 + \left(\frac h{q{\rm \pi}}\right)^2\right)\alpha_{pq} \cos\left(p{\rm \pi}\frac yw\right)\cos\left(q{\rm \pi}\frac zh\right). \end{align}
Finally, we calculate
 \begin{gather} \langle{f_xf_{N'}}\rangle = \left(\frac{12{\tilde V}h}{{\rm \pi}^3}\right)^2\left( 2\sum_{\substack{p \text{ even}\\\ge2}}^\infty \beta_{p0}^2 + 2\sum_{\substack{q \text{ even}\\\ge2}}^\infty \beta_{0q}^2 + \sum_{\substack{p \text{ even}\\\ge2}}^\infty\sum_{\substack{q \text{ even}\\\ge2}}^\infty \beta_{pq}^2 \right), \end{gather}
 \begin{gather}\beta_{p0} ={-}\frac{16}{p{\rm \pi}^3}\sum_{\substack{n \text{ odd}\\\ge1}}^\infty \frac{\tanh\left(\dfrac12n{\rm \pi}\dfrac wh\right)}{n^3\left(n^2+p^2\left(\dfrac hw\right)^2\right)}, \end{gather}
 \begin{gather}\beta_{0q} ={-}\frac{1}{q^3}\left(1 + \frac8{{\rm \pi}^2}\sum_{\substack{n \text{ odd}\\\ge1}}^\infty\frac{q^2}{n^2\left(n^2-q^2\right)}\frac{\tanh\left(\dfrac12n{\rm \pi}\dfrac wh\right)}{\dfrac12n{\rm \pi}\dfrac wh}\right), \end{gather}
 \begin{gather}\beta_{pq} ={-}\frac{32}{{\rm \pi}^3}\frac{h/w}{p^2\left(\dfrac hw\right)^2 + q^2}\sum_{\substack{n \text{ odd}\\\ge1}}^\infty\frac{\tanh\left(\dfrac12n{\rm \pi}\dfrac wh\right)}{n\left(n^2-q^2\right)\left(n^2 + p^2\left(\dfrac hw\right)^2\right)}, \end{gather}
where  ${\tilde V}$ is defined by (A9b).
Appendix B. Applicability of 2-D and 3-D velocity profiles in experimental analyses
As explained in the main text, dispersion of a particle patch cannot be fully described with a 2-D model. Schematics of  $z$-projection imaging are shown in figure 8. Compaction experiments typically show an exclusion boundary that indicates an influence of the $z$-averaged flow velocity inside a pore. This can be approximated by a 2-D parabolic velocity (figure 9c). Three-dimensional dispersion of a particle patch requires understanding the 3-D velocity distribution inside a dead-end pore (figure 8b), as the 2-D projected particle distribution reveals 3-D flow profiles.
Schematics showing the difference between compaction and dispersion experiments. (a) Schematics describing the compaction configuration. In a rectangular pore, particles compact more along the centreline than near the wall ( $z=0$) due to the flow structure introduced by diffusioosmosis. In the compaction experiments, typical imaging shows the z-averaged compaction boundary, which can be estimated with a flow velocity obtained for a 2-D pore. (b) Schematics illustrating the dispersion configuration. Particles disperse more along the centreline than the wall region. Typical experiment images do not average out the dispersion across the pore height. Instead, the 2-D imaging of dispersion experiments reveals the 3-D flow structure, which cannot be fully described by the 2-D pore model.

Qualitative interpretation of the particle dispersion in short pores (figure 1) by the difference in flow velocities. (a) Comparison between the z-averaged flow velocity obtained from the 3-D pore and the 2-D parabolic flow velocities. The cross-section of the 3-D pore is  $w = 100\ {\rm \mu}{\rm m}$ and $h = 50\ {\rm \mu}{\rm m}$, and the 2-D pore has the same width. (b) Images obtained from the pores with $w = 100\ {\rm \mu}{\rm m}$, $\ell = 1\ {\rm mm}$ and three different heights ( $h = 25$, 50, and $100\ {\rm \mu}{\rm m}$). (c) Flow velocities obtained from different pores plotted versus width. Two z-positions are selected: $z = 5\ {\rm \mu}{\rm m}$ (from the wall), and $z = h/2$ for all three pores, and difference in the flow velocities $v_f (x,y,h/2)$ − $v_f (x,y,z=5\ {\rm \mu}{\rm m})$ can qualitatively describe the variation in the particle distributions.

Figure 6(b) without intensity enhancement. Scale bar is 100  $\mathrm {\mu }$m.

In the current experiment, while the particle patch is moving toward the dead-end by 1-D diffusiophoresis, each particle experiences different flow speeds at different locations inside the pore. If the initial particle distribution was uniform along the pore and diffusiophoretic compaction occurs, we obtain the particle exclusion boundary that is affected by the  $z$-averaged flow velocity (figures 8a and 9c), due to the 2-D projection nature of imaging. In contrast, when there is diffusiophoresis of a particle patch, the stretched particle distribution due to 3-D flow in the pore is revealed in the $z$-projection images, as illustrated in figures 1(c), 8(b) and 9(a,b).
In the particle-patch experiments performed with short pores (figure 1), PS particles aligned with the flow velocity in the pores with different heights (figure 9a,b). Flow velocities at two different  $z$ locations ( $z=5\ \mathrm {\mu }$m from the wall and $z=h/2$) indicate that variation in the dispersion profiles in different pores is due to different flow speeds (figure 9b).
Comparison of experimental data (solid) with simulated data (dashed) for two different values of initial solute concentration ratio: (a)  $c_{m}/c_{p} = 0.1$ and (b)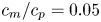 $c_{m}/c_{p} = 0.05$. The distributions, in order of peak location from left to right, correspond to times $\tau =0.1, 0.2, 0.3$ and $0.4$. Fitting parameters are dimensionless particle zeta potential $\varPsi _{p}$ and wall zeta potential $\varPsi _{w}$. The fitted zeta potentials were calculated to be: (a) $\varPsi _{p}=-3.31, \varPsi _{w}=-3.26$ and (b) $\varPsi _{p}=-3.46, \varPsi _{w}=-3.29$. Good agreement is found between (a) and (b).

Independent estimation of wall zeta potential  $\varPsi _{w}$ in our typical experimental set-up. (a) Particle entrainment front was tracked at two separate locations ( $X=0.2, X=0.3$), and the centreline velocity was compared with calculations. For the pores with $w/h=2$, the particle speed along the centreline is $V_{{DP}}+|V_{{s}}|$. (b,c) A choice of the wall potential value $\varPsi _{w}=-3.3$ is seen to reasonably agree with the measurements, supporting the consistency of our zeta-potential fitting.

Appendix C. Experiments with variation of solute concentration
In order to investigate the particle-size dependence on the dispersion (§ 5), we performed an experiment holding particle size constant ( $d_{p}=0.5\ \mathrm {\mu }\text {m}$). The solute concentration ratio $c_{m}/c_{p}$ was set to 0.05 to compare with the previous experiment with a ratio of 0.1, where $c_{m}$ is the initial solute concentration in the main channel and $c_{p}$ is the initial solute concentration in the pore.
In figure 11 we show the two experiments for (a)  $c_{m}/c_{p} = 0.1$ and (b) $c_{m}/c_{p} = 0.05$ compared with simulations with fitted particle and wall zeta potentials, calculated to be: (a) $\varPsi _{p}=-3.31, \varPsi _{w}=-3.26$ and (b) $\varPsi _{p}=-3.46, \varPsi _{w}=-3.29$. The zeta potentials were fit with a least squares routine to $\varPsi \pm 0.002$. The values of $\varPsi _w$ were consistent with an estimate we made using a different set-up, where the particle entrainment front was tracked to measure the flow velocity (see figure 12). Independence of fitting parameters on the solute concentration ratio is expected; the particles are of the same batch so are expected to have the same zeta potential, and the possible particle-size effect on the dispersion is eliminated by holding particle size constant. The close agreement in the zeta potentials of each experiment supports our model and the possibility of a particle-size effect on the dispersion near the pore inlet.
Appendix D. Particles used in the experiments
In the experiments, three different particles are used to visualize diffusiophoresis and dispersion in the dead-end pores. Particle information is listed in table 1.
Particles used in the experiments.


 Open access

