
A. MonumentalFootnote 1
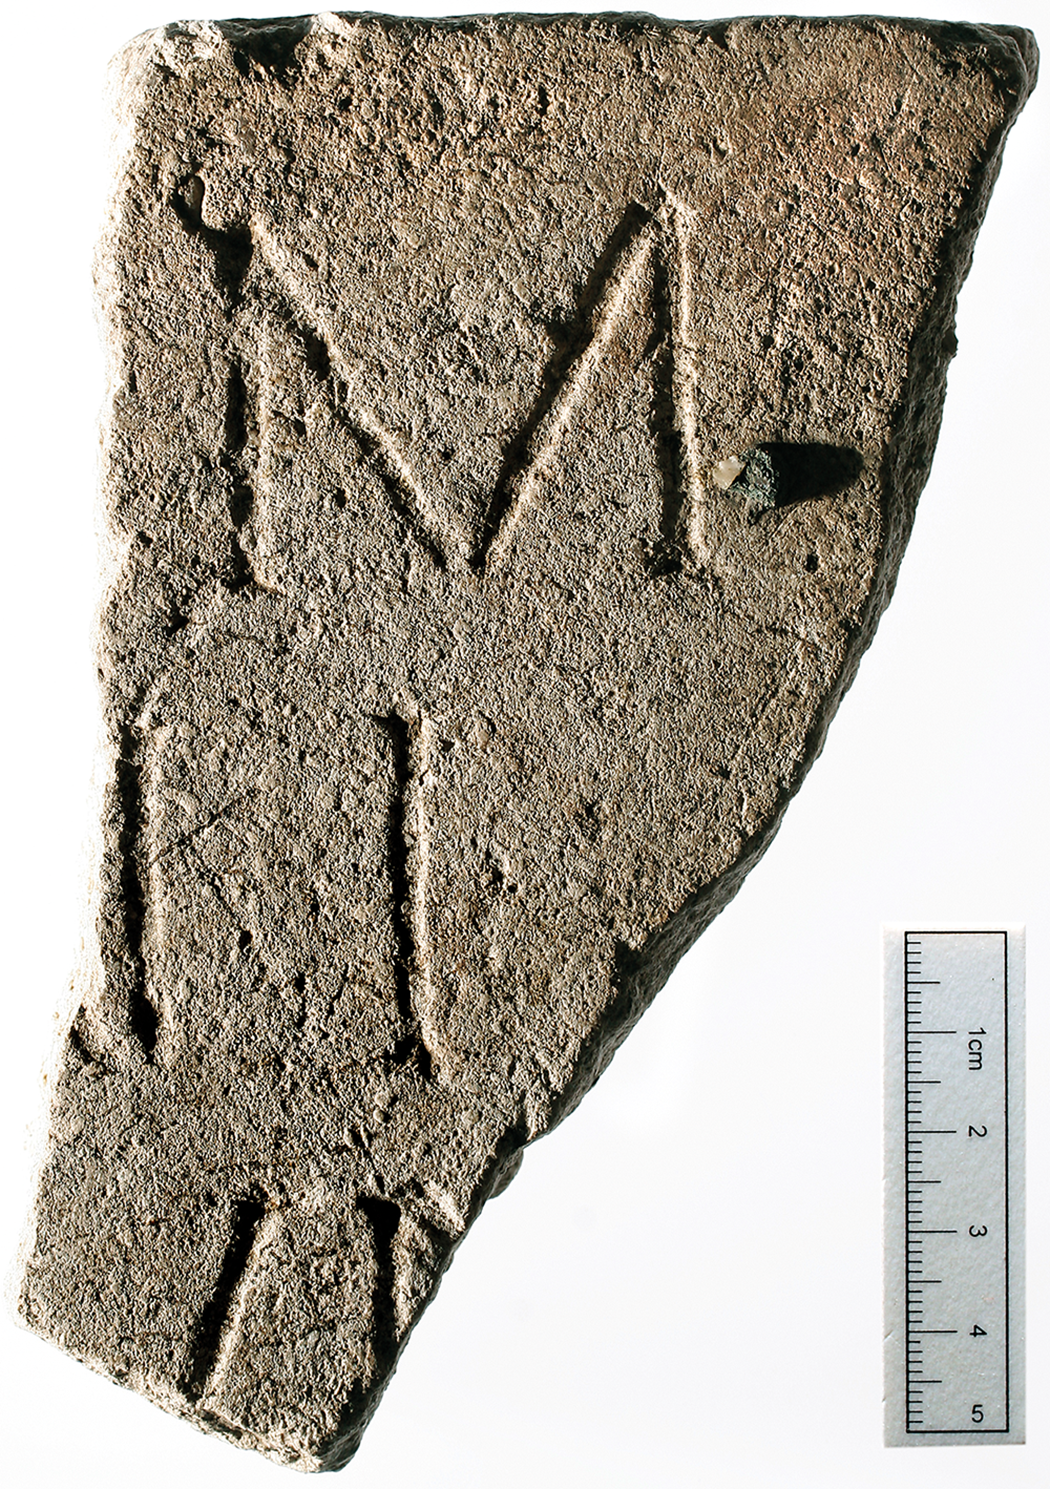
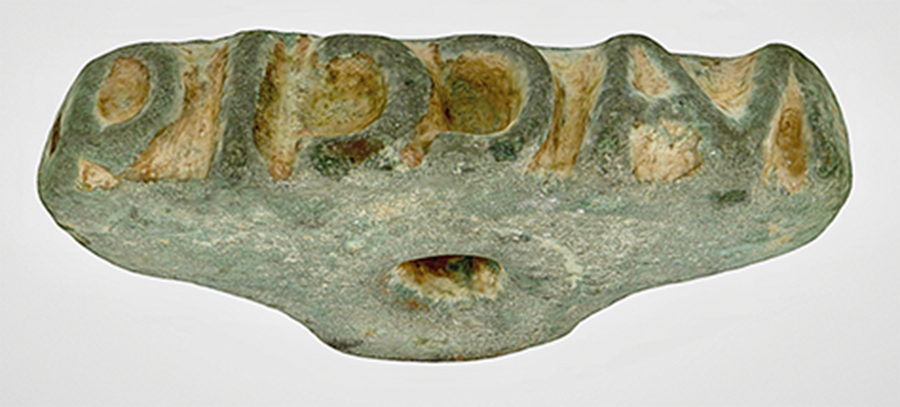
1. Canterbury (Durouernum Cantiacorum, TR 14862 57923) High Street, the Beaney Institute, Kent (Fig. 1). Fragment of oolitic limestone, probably Marquise stone, from a thin slab, 95 by 150 mm, 32.5 mm thick, foundFootnote 2unstratified in 2010. The top edge is original, but the others are broken. Incised: […]M[…] | […]NI […] | […]VM[…] | […], probably [D(is)] M(anibus) | […]ni | [annor]um | […]. ‘To the Shades of the Dead (and) of […]nus, (aged) … years …’
Canterbury, tombstone fragment (No. 1) (photo: Canterbury Archaeological Trust).

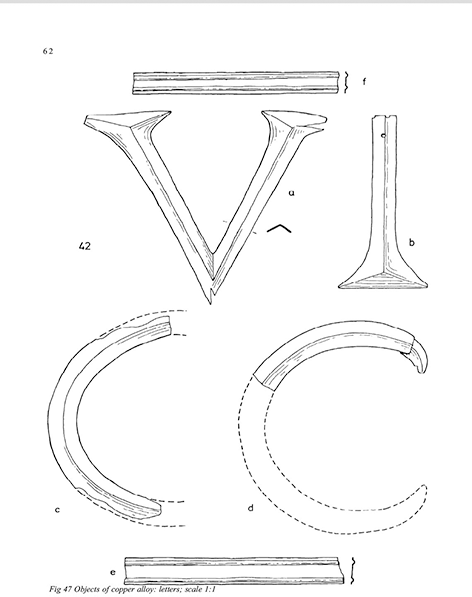
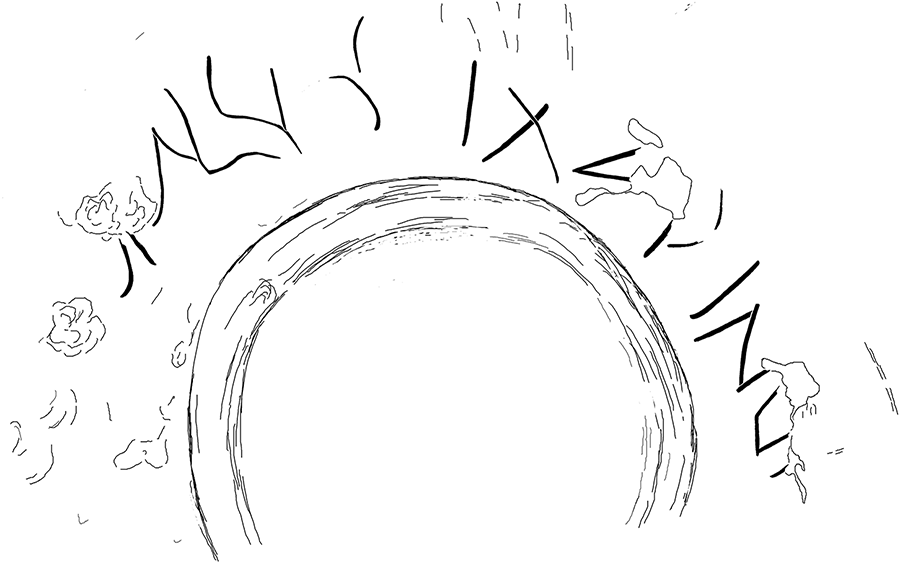
2. Kelvedon (Canonium, TL 864 190), Essex (Fig. 2). Four copper-alloy votive letters, c. 90–100 mm in height, foundFootnote 3in 1971. Only one is complete: V. Another is a vertical stem terminating in a serif: most likely I, but possibly L or T. The other two are semi-circular fragments: one probably C (unless G); the other probably O (unless C, G or Q). Also found were two indeterminate fragments.
Kelvedon, copper-alloy votive letters (No. 2) (drawing: Council for British Archaeology).

3. Great Walsingham (TF 94 38) Roman temple site, Norfolk. Copper-alloy votive letter, 18 by 46 mm, weight 9.3 g, foundFootnote 4in the 1990s. Narrow V, with two studs behind for attachment.
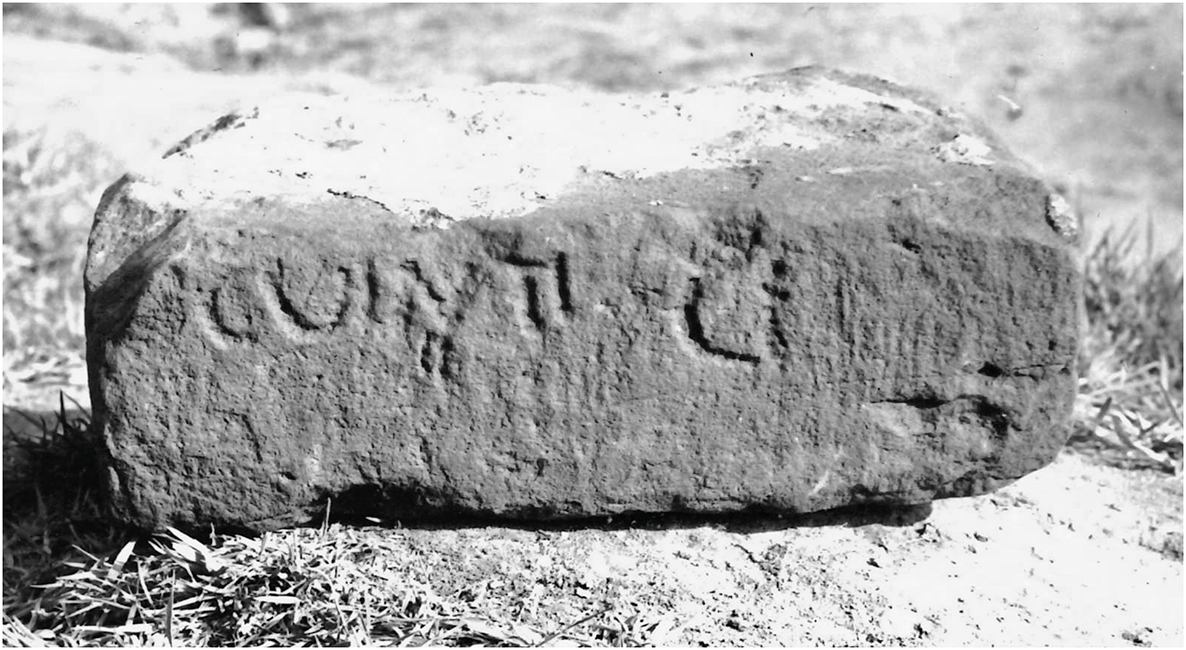
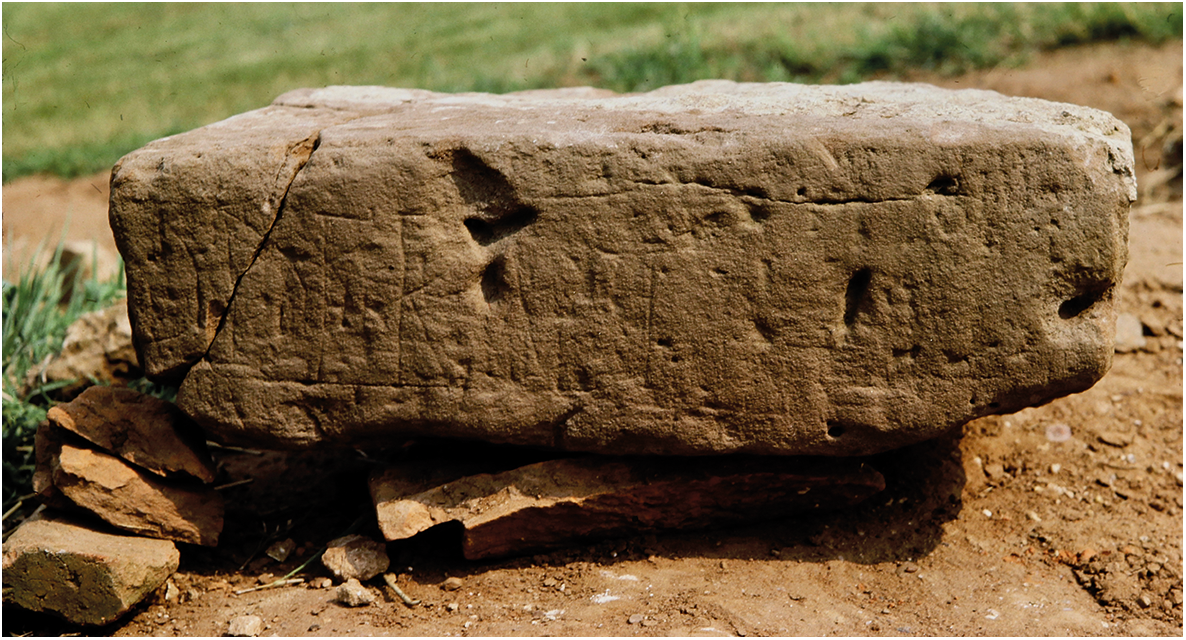
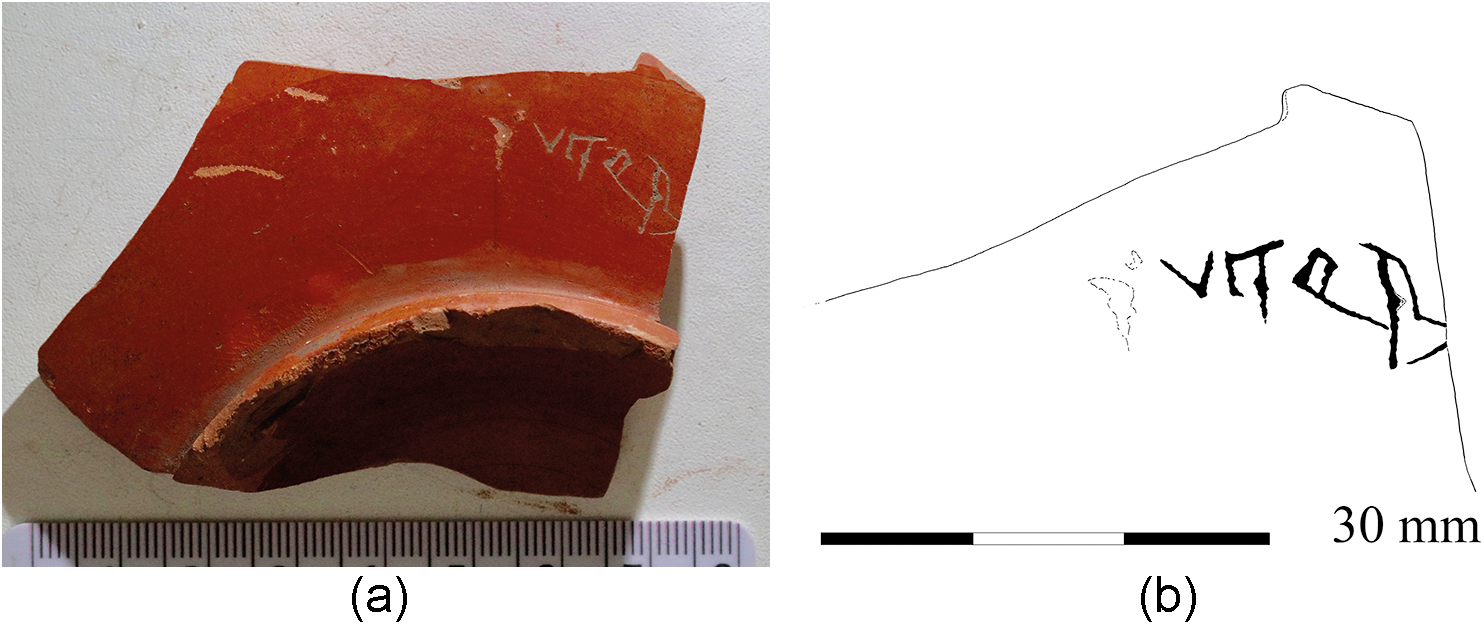
4. Wall (Letocetum, SK 098 066), Staffordshire (Fig. 3). Reddish-brown sandstone building-stone, 0.38 by 0.11 m, foundFootnote 5in 1977. The face is coarsely inscribed: CVINTI ḶỊ, Cuinti LI. ‘[?…] of Quintus …’Footnote 6
Wall, inscribed building stone (No. 4) (photo: A.A. Round).

5. Ibid. (Fig. 4). Reddish-brown sandstone building-stone, 0.43 by 0.12 m. Within a panel defined by two parallel lines above and below, thinly inscribed: ↃDỊṚṾṬ[…], (centuria) D… Footnote 7
Wall, inscribed building stone (No. 5) (photo: A.A. Round).

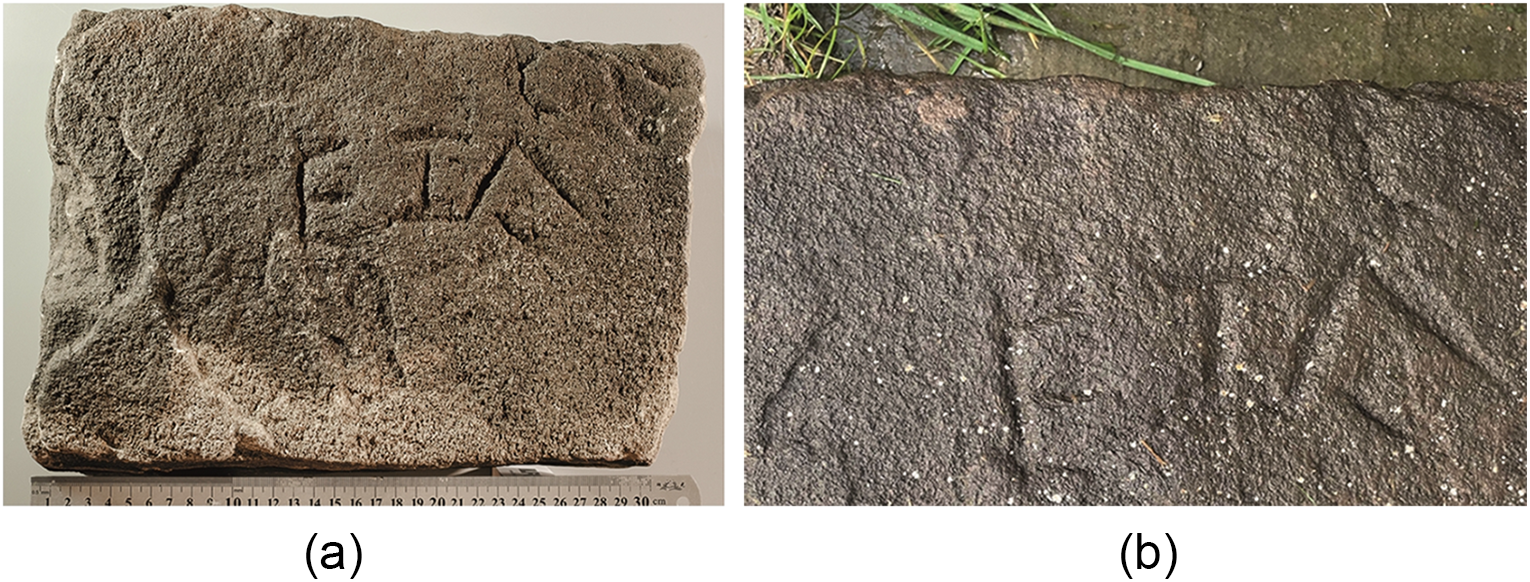
6. Whitley Castle (Epiacum, NY 69824 48683) Roman fort, Northumberland (Fig. 5). Buff sandstone slab, 0.32 by 0.23 m, tapering in thickness from 0.15 m, foundFootnote 8in 2024. One face is coarsely incised: G̣ETA, perhaps Geta.Footnote 9
(a) Whitley Castle, inscribed slab (No. 6) (photo: Gordon Monk); (b) detail of the lettering (photo: Elaine Edgar).

7. Birdoswald (Banna, NY 6161 6625) Roman fort, Cumbria. Local red sandstone fragment, 0.14 by 0.21 m, 0.19 m deep, foundFootnote 10in 1987–92. It is apparently part of the capital and die of an altar, the capital with a pattern of leaves carved in relief. All that survives of the inscription is two letters at the top of the die: […]OM[…], [I(ovi)] O(ptimo) M(aximo) | […]. ‘To Jupiter Best (and) Greatest …’Footnote 11
B. Instrumentum domesticum
Berkshire
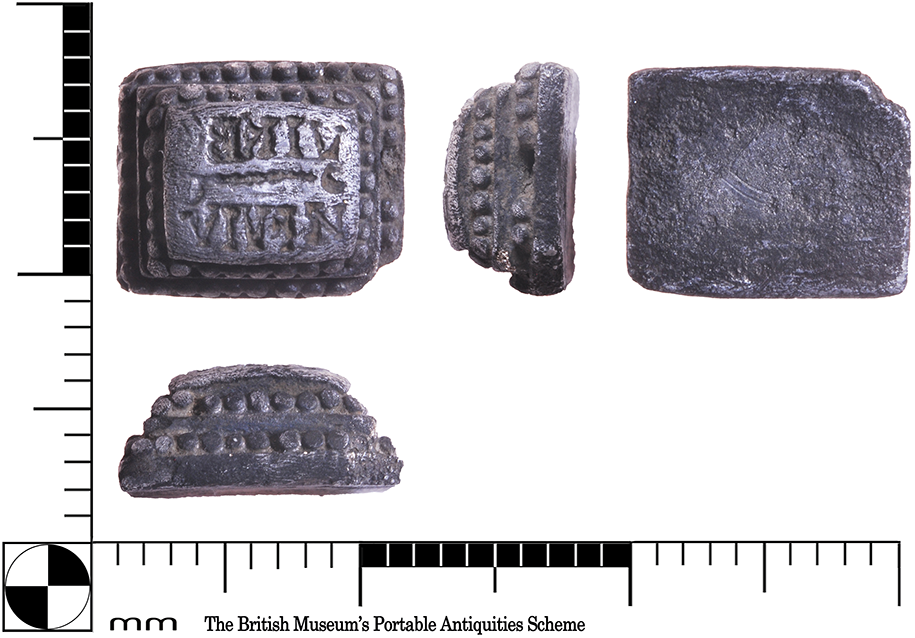
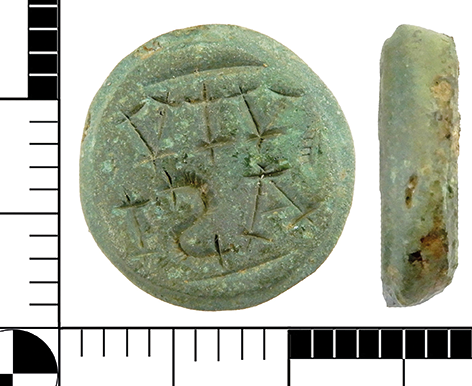
8. Chiseldon, Swindon (SU 17 79) (Fig. 6). Rectangular silver ring bezel, 10.9 by 9.1 mm, 5.2 mm thick, weight 2.94 g, foundFootnote 12in 2024. Incised retrograde: VIRBỌ|NEVIV, uir bo|ne uiu(as). ‘Long life to you, good man.’Footnote 13
Chiseldon, silver ring bezel (No. 8) (photo: PAS).

Cumbria
9. Carlisle (Luguvalium, NY 397 561). Small off-cut of shoe leather, 47 by 103 mm, foundFootnote 14in 1998–2001, incised with the letters: C C M, C(aius) C(…) M(…) Footnote 15
10. Ibid. Small off-cut of leather, 27 by 125 mm, crudely incised with two sets of letters, now incomplete: (a) C C M, or possibly C V M. (b) C C […]Footnote 16
11. Ibid. Small off-cut of leather thought to be from a tent, 94 by 129 mm, impressed with the stamp: S o D o V, S(extus) D(…) V(…) Footnote 17
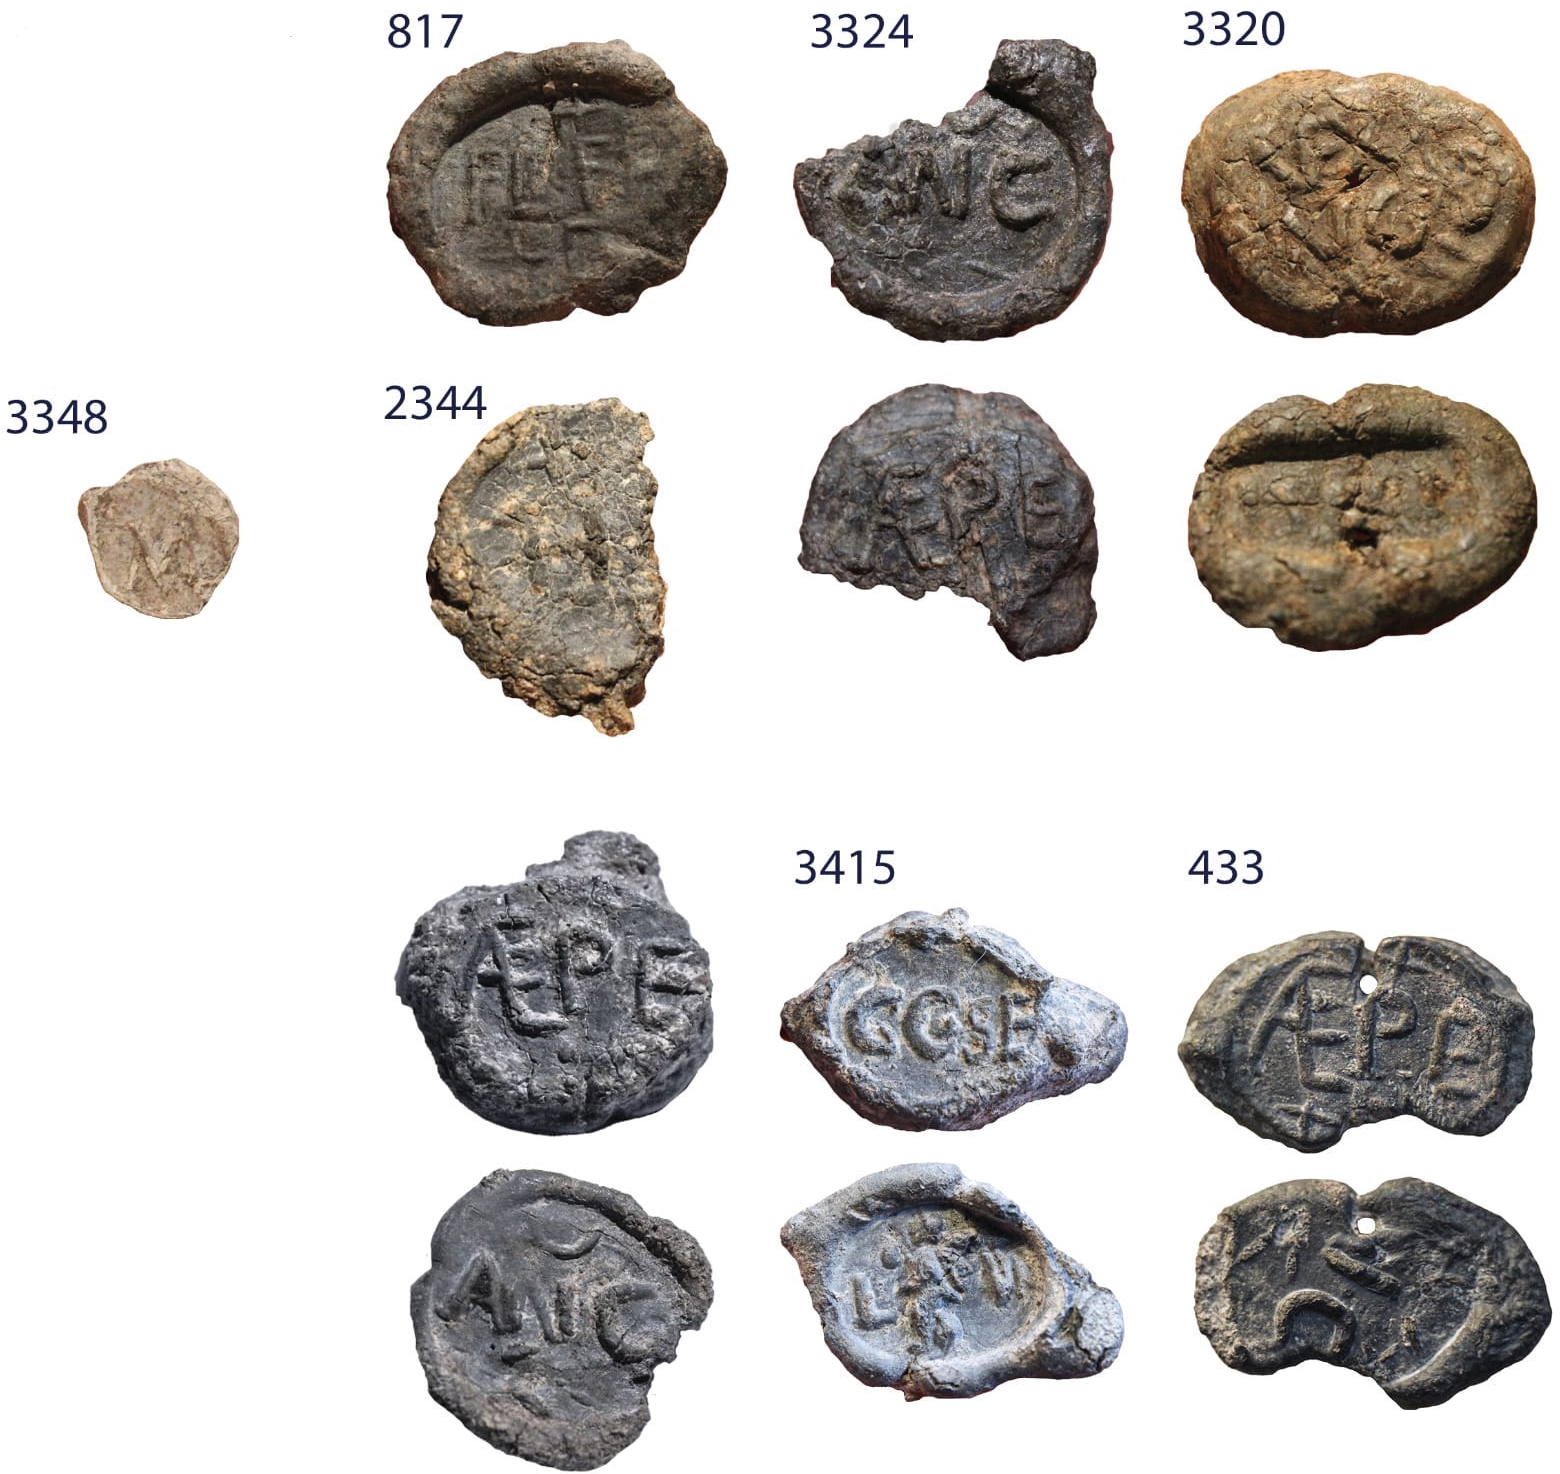
12. Stanwix (Uxelodunum, NY 399 567) Roman fort and uicus (Fig. 7, bottom left, not numbered). Lead sealing foundFootnote 18in c. 2024, impressed on both faces with letters moulded in relief. Obverse:  $\overparen{\unicode{x039B}\text{LE}}$ PE, al(a)e Pe(trianae). ‘(Sealing) of the ala Petriana.’Footnote 19Reverse, below a crescent: ANC, probably A(ulus) N(…) C(…). The name of a decurion, abbreviated.Footnote 20
Stanwix, eight lead sealings (including Nos. 12–17) (photo: Anna Giecco for Wardell Armstrong).

13. Ibid. (Fig. 7, No. 3324). Carlisle Cricket Club, the Roman bath-house. Lead sealing foundFootnote 21in 2017/22, impressed on both faces with letters moulded in relief. Obverse, with a ‘star’ above, the lower ‘star’ now lost:  $\overparen{\unicode{x039B}\text{LE}}$ PE, al(a)e Pe(trianae). ‘(Sealing) of the ala Petriana.’ Reverse, below a crescent: ANC, probably A(ulus) N(…) C(…). The name of a decurion, abbreviated. Both dies are the same as in the previous item.
14. Ibid. (Fig. 7, No. 3415). Lead sealing impressed on both faces with letters moulded in relief. Obverse: standing figure of Victory between the letters L and VI, l(egionis) VI. ‘(Sealing) of the Sixth Legion’. Reverse: GC o SE, probably G(aius) C(aledonius) Se(cundus).Footnote 22
15. Ibid. (Fig. 7, No. 3320; Fig. 8). Lead sealing impressed on both faces with letters moulded in relief. Obverse, above a palm branch:  $\overparen{\text{VE}}$X[.] | VC̣Ọ, uex(illatio) … Footnote 23Reverse: rectangular die, almost illegible.Footnote 24
Stanwix, lead sealing (No. 15), (a) obverse, (b) reverse (photos: Frank Giecco).

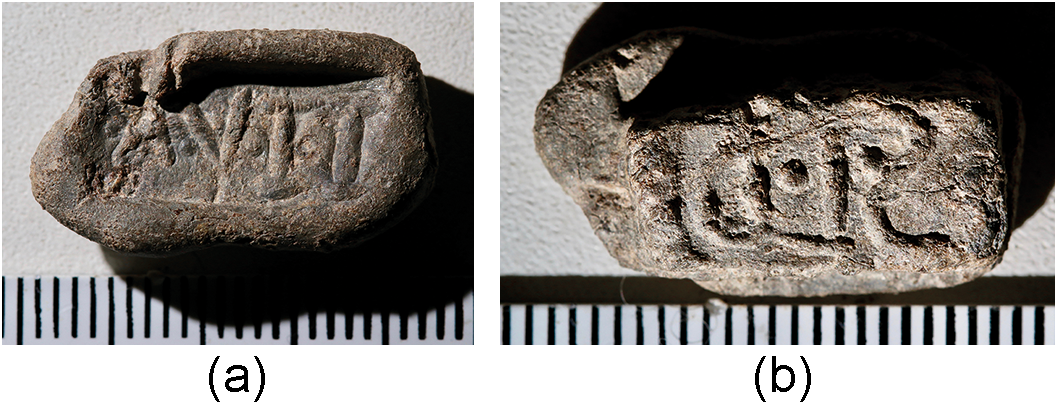
16. Ibid. (Fig. 7, No. 2344). Half of a lead sealing impressed on one face. Below a ‘star’, H[…] | D, perhaps H(…) [R(…)] | d(ecurio).Footnote 25
17. Ibid. (Fig. 7, No. 3348). Unusually small round lead sealing, impressed on one face: MFootnote 26
18. Ibid. Hypocaust of the Roman bath-house. Ninety more square tiles were foundFootnote 27in early 2025, all still in place, impressed with the stamp:  $\overparen{\text{IMP}}$, probably imp(eratoris). ‘(Property) of the Emperor.’
Derbyshire
19. Derby (SK 349 373), Strutt’s Park Roman fort (Fig. 9). Base sherd of a samian dish (Dr. 18) foundFootnote 28in 2011 in an early-Flavian pit. Neatly scratched on the wall above the foot-ring, in cursive letters after firing: VITOR[I]Ṣ, Vi<c>tor[i]s. ‘(Property) of Victor.’Footnote 29
Derby, Strutt’s Park, samian graffito (No. 19) (photographed and drawn by R.S.O. Tomlin).

Devon
20. Topsham (SX 963 895) (Fig. 10). Seven conjoining sherds of a black-burnished cooking pot (south-east Dorset BB1, late-third/early-fourth century), foundFootnote 30in 2024. On the shoulder, coarsely incised after firing: C CɅṆ[…], probably C(…) Can[…] Footnote 31
Topsham, black-burnished ware graffito (No. 20) (photo: Wessex Archaeology).

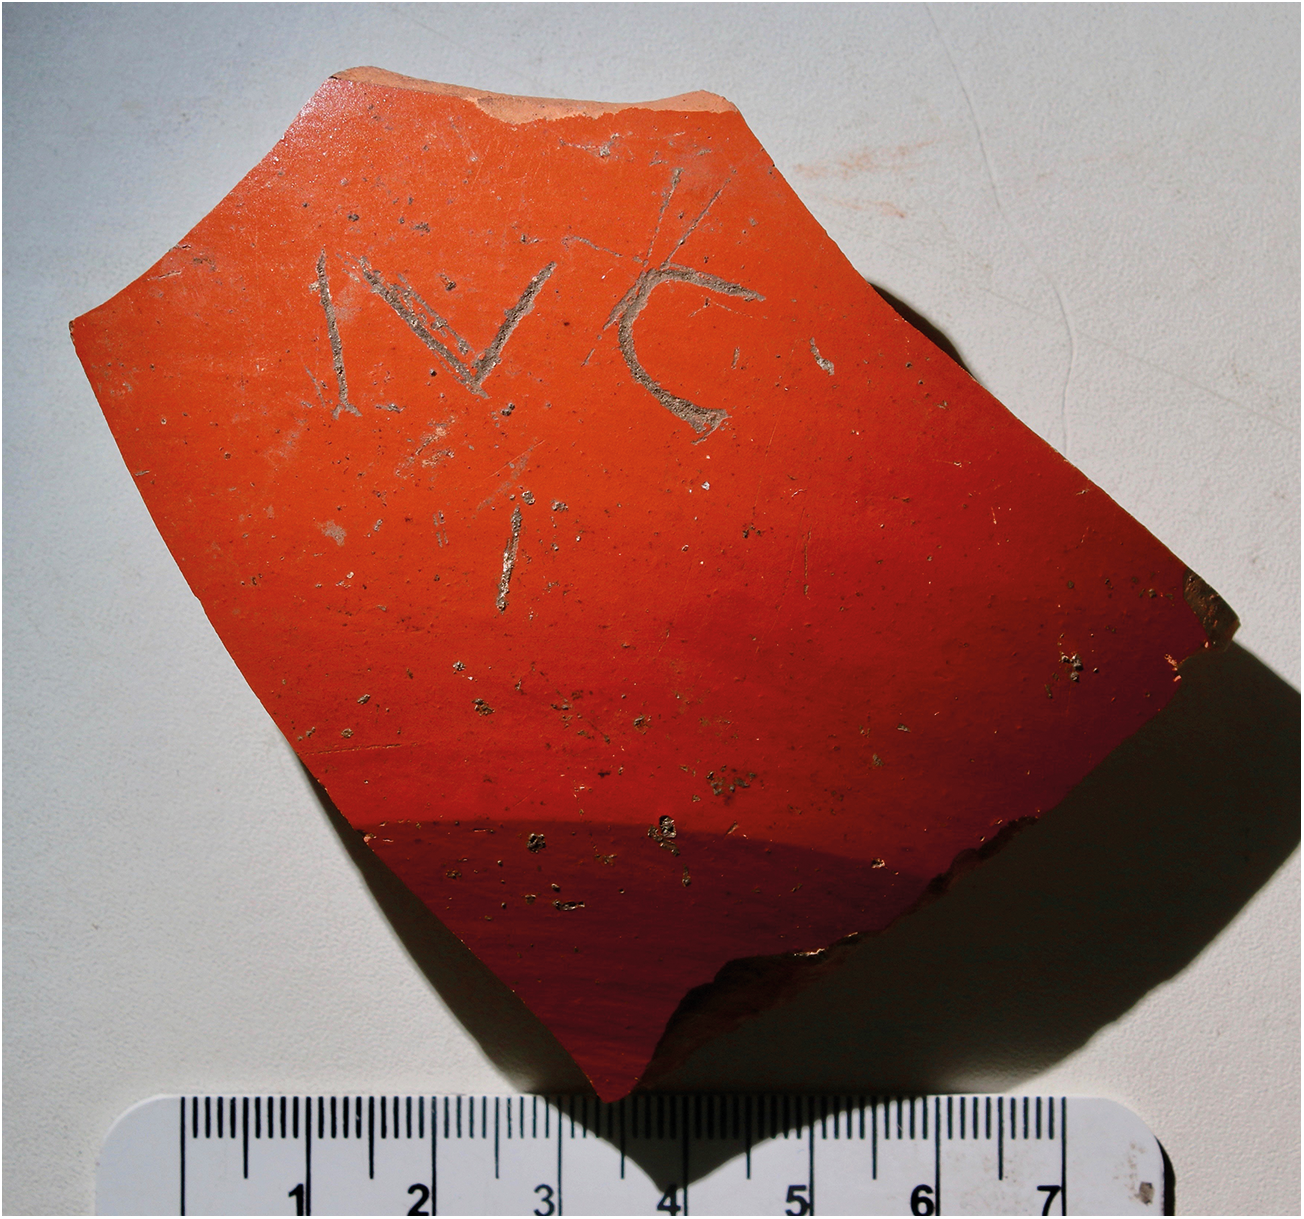
Co. Durham
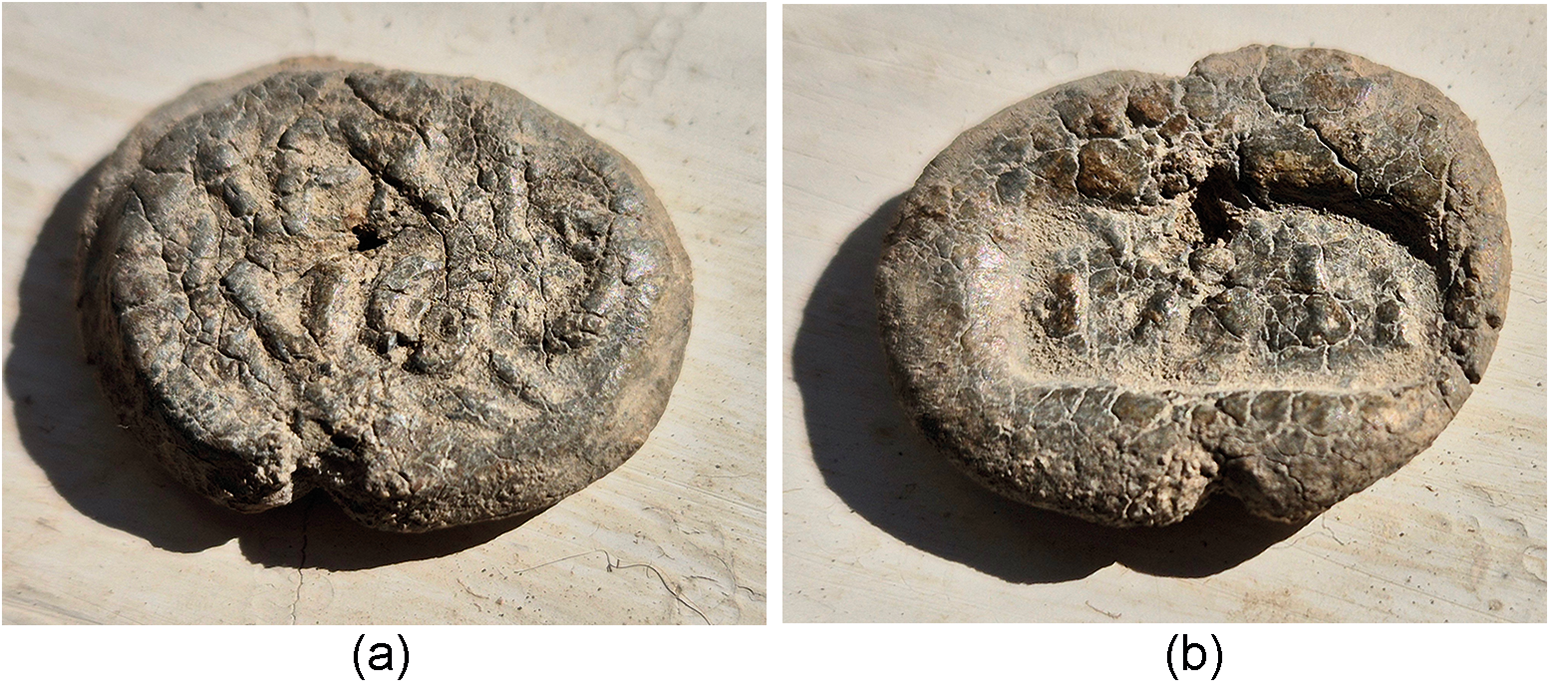
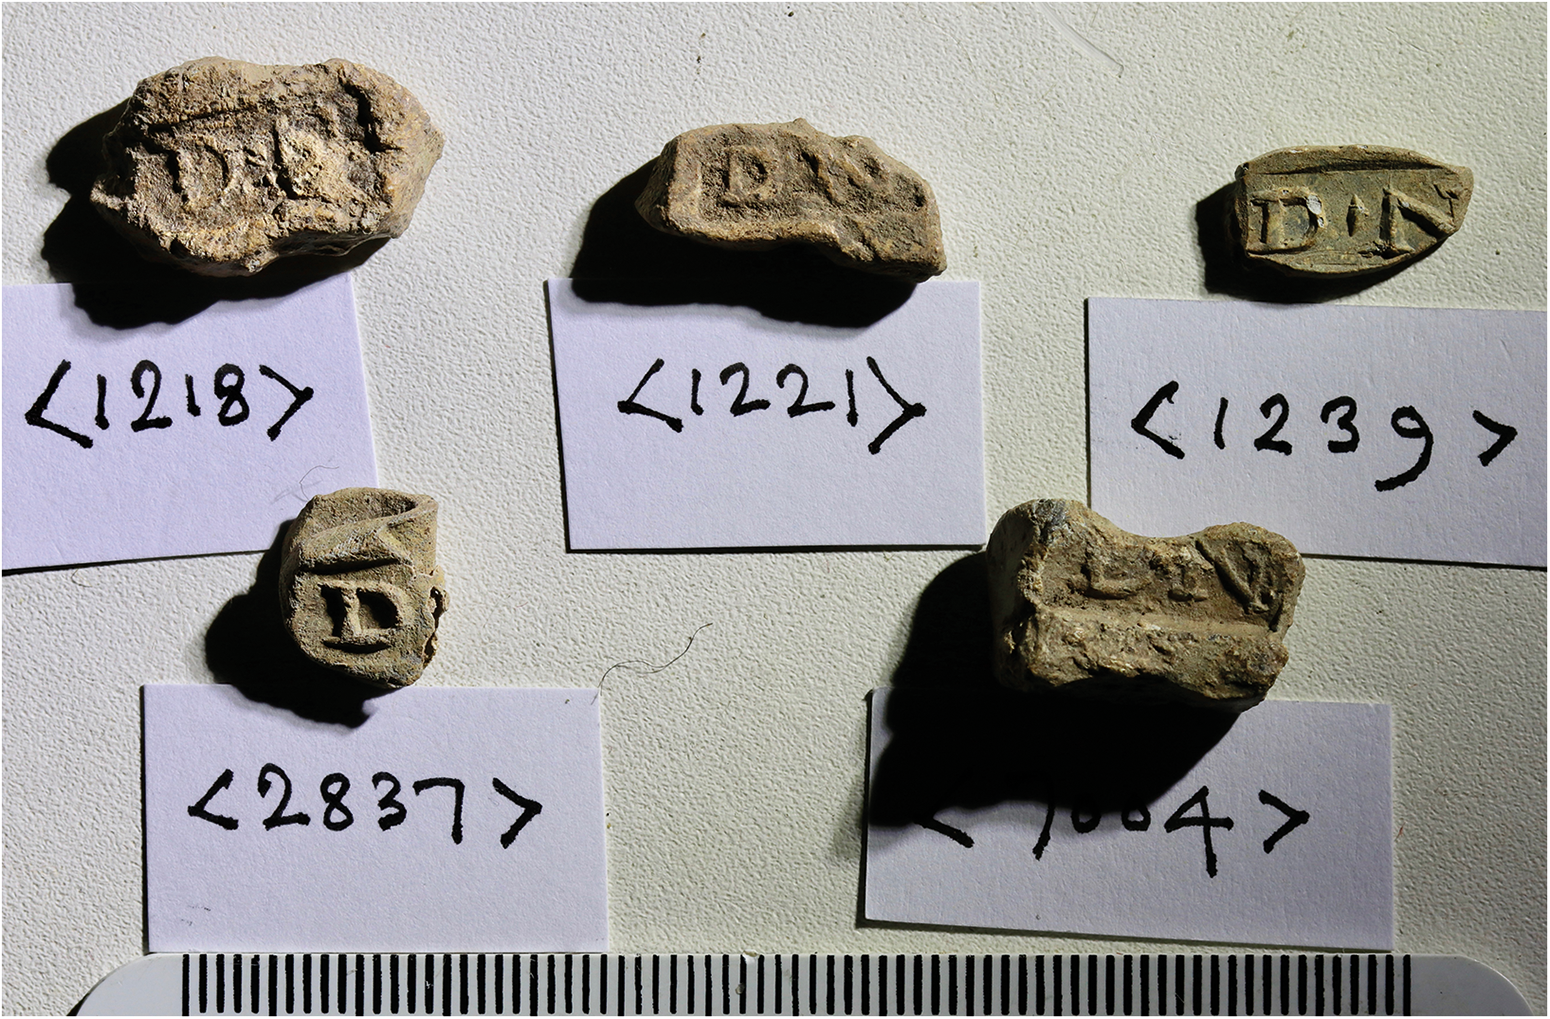
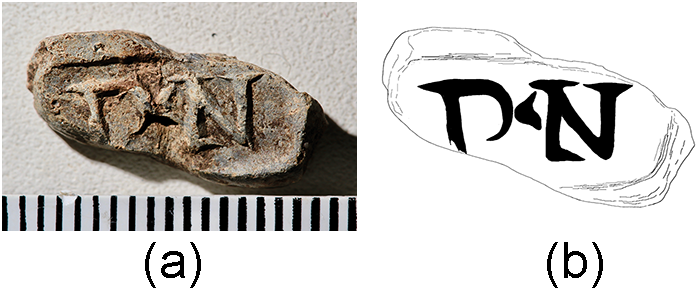
21. Binchester (Vinovia, NZ 2095 3135), Roman fort and uicus (Fig. 11, sf 1218). Lead sealing, 19.33 by 12.48 mm, 4.99 mm thick, weight 5.58 g, foundFootnote 32in 2009–17. Moulded letters in relief within a rectangular panel: D o N, d(omini) n(ostri). ‘(Sealing) of Our Lord (the Emperor).’Footnote 33
Binchester, five D N lead sealings (Nos. 21–25) (photo: R.S.O. Tomlin).

22. Ibid. (Fig. 11, sf 1221). Lead sealing, 15.53 by 6.52 mm, 4.09 mm thick, weight 3.67 g. Moulded letters in relief within a rectangular panel: D N, d(omini) n(ostri). ‘(Sealing) of Our Lord (the Emperor).’
23. Ibid. (Fig. 11, sf 1239). Lead sealing, 14.04 by 7.25 mm, 2 mm thick, weight 1.46 g. Moulded letters in relief within a rectangular panel: D Δ N, d(omini) n(ostri). ‘(Sealing) of Our Lord (the Emperor).’
24. Ibid. (Fig. 11, sf 2837). Lead sealing folded upon itself, 9.62 by 10.95 mm, 3.39 mm thick, weight 2.00 g. Moulded letters in relief within a rectangular panel: D N, d(omini) n(ostri). ‘(Sealing) of Our Lord (the Emperor).’Footnote 34
25. Ibid. (Fig. 11, sf 7004). Incomplete lead sealing, 16.22 by 10.28 mm, 6.55 mm thick, weight 9.08 g. Moulded letters in relief within a rectangular panel: D o N, d(omini) n(ostri). ‘(Sealing) of Our Lord (the Emperor).’Footnote 35
26. Ibid. (Fig. 12). Lead sealing, 23.38 by 17.05 mm, 5.06 mm thick, weight 8.25 g. Moulded letters in relief within an oval panel. Obverse:  $\overparen{\text{AL}}$ $\overline{\text{II}}$ A|Ṣ, al(ae) II A|s(turum). Reverse: H T D, H(…) T(…) d(ecurio). ‘(Sealing) of the Second ala Asturum. H(…) T(…) decurion.’ Footnote 36
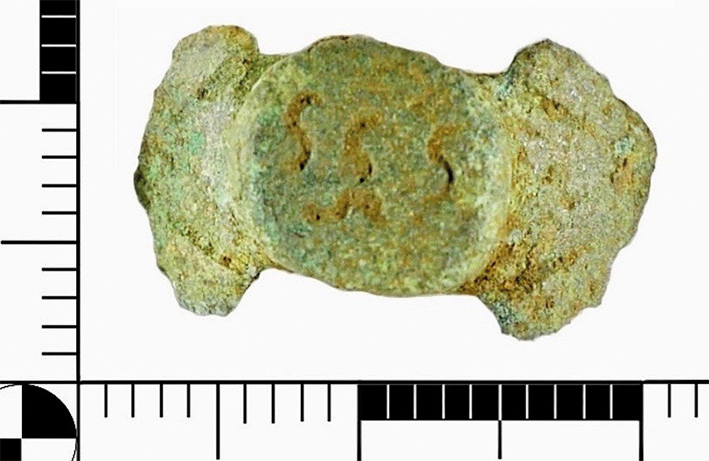
Binchester, lead sealing (No. 26), (a) obverse, (b) reverse (photos: R.S.O. Tomlin).

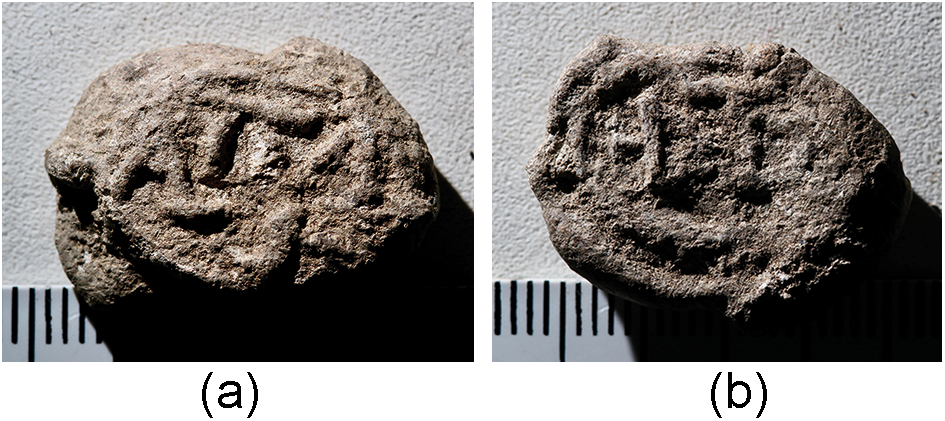
27. Ibid. (Fig. 13). Lead sealing, 21.37 by 11.55 mm, 5.43 mm thick, weight 5.55 g. Moulded letters in relief within a rectangular panel. Obverse: AoVoTT, a(lae) V<e>tt(onum).Footnote 37Reverse: S o L o D retrograde, S(…) L(…) d(ecurio). ‘(Sealing) of the ala Vettonum. S(…) L(…) decurion.’ Footnote 38
Binchester, lead sealing (No. 27), (a) obverse, (b) reverse (photos: R.S.O. Tomlin).

28. Ibid. (Fig. 14). Lead sealing, 23.62 by 20.83 mm, 6.58 mm thick, weight 11.03 g. Moulded letters in relief within an oval panel. Obverse: ALE | VẸT above a palm branch, al(a)e Vet(tonum). Reverse:  $\overparen{\text{VLP}}$ KL above three ‘stars’ and a crescent, below a palm branch, Ulp(ius) Kl(…). ‘(Sealing) of the ala Vettonum. Ulpius Kl(…) (decurion).’Footnote 39
Binchester, lead sealing (No. 28), (a) obverse, (b) reverse (photos: R.S.O. Tomlin).

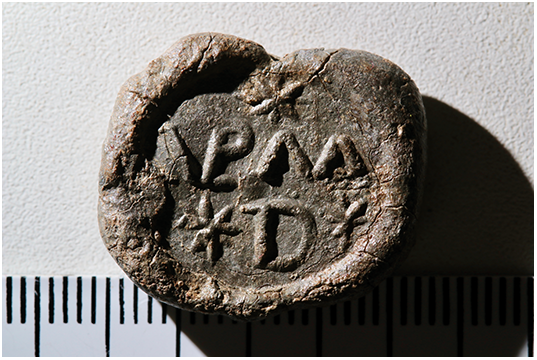
29. Ibid. (Fig. 15). Lead sealing, 23.08 by 19.56 mm, 4.21 mm thick, weight 9.71 g. One face is impressed with moulded letters in relief within an oval panel: star |  $\overparen{\text{VLP}}$ M | star D star, Ulp(ius) M(…) | d(ecurio). ‘Ulpius M(…), decurion.’Footnote 40
Binchester, lead sealing (No. 29) (photo: R.S.O. Tomlin).

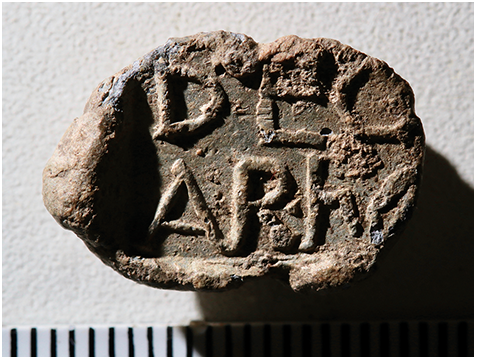
30. Ibid. (Fig. 16). Lead sealing, 19.03 mm by 12.86 mm, 7.36 mm thick, weight 7.39 g. One face is impressed with moulded letters in relief within a rectangular panel: DEC | AR o h., probably dec(urio) | Ar(…) H[o](…). ‘Ar(…) Ho(…), decurion.’Footnote 41
Binchester, lead sealing (No. 30) (photo: R.S.O. Tomlin).

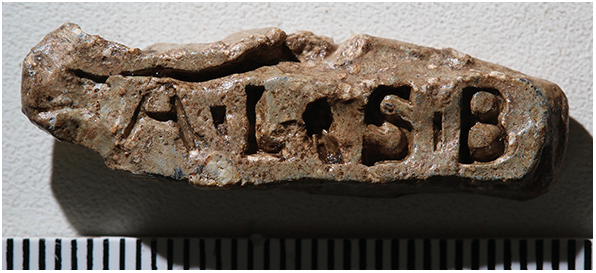
31. Ibid. (Fig. 17). Lead sealing, a narrow rectangular strip 33.75 mm by 9.63 mm, 4.57 mm thick, weight 9.94 g. One face is impressed with four letters, not moulded in relief but incised: A ı L \ S ı B, A(…) L(…) and S(…) B(…) Footnote 42
Binchester, lead sealing (No. 31) (photo: R.S.O. Tomlin).

Essex
32. Colchester (Camulodunum, TL 991 253), St Mary’s Hospital, Balkerne Hill (Fig. 18). Oculist’s collyrium stamp, foundFootnote 43in 2001, a rectangular die of fine-grained greenish stone, 46.7 by 15.3 mm, 8.6 mm thick, inscribed on three of its four edges in capital letters retrograde. (a) One long edge: CɅLḤ $\overparen{\text{NE}}$B $\overparen{\text{HE}}$RɅFootnote 44
, Cal(…) ?h(ygra) NEB ?h(ygra) ERA. The practitioner’s name abbreviated, and two eye salves.Footnote 45(b) Other long edge: CɅL. The practitioner’s name abbreviated again. (c) One short edge: CHEM, (ad) chem(osim). ‘For chemosis [inflammation of the cornea]’.Footnote 46
$\overparen{\text{HE}}$RɅFootnote 44
, Cal(…) ?h(ygra) NEB ?h(ygra) ERA. The practitioner’s name abbreviated, and two eye salves.Footnote 45(b) Other long edge: CɅL. The practitioner’s name abbreviated again. (c) One short edge: CHEM, (ad) chem(osim). ‘For chemosis [inflammation of the cornea]’.Footnote 46
Colchester, oculist’s stamp (No. 32), (a) long edge, (b) other long edge, (c) short edge (drawn by R.S.O. Tomlin from photographs by Colchester Archaeological Trust).

33. Colchester (Camulodunum, TL 99 25) (Fig. 19). Sherd from the shoulder of a Dressel 20 amphora, found before 2001.Footnote 47Incised after firing: GIIM, Gem(inus).Footnote 48
Colchester, amphora graffito (No. 33) (photo: Colchester Museums).

34. Colchester (Camulodunum, TM 00117 24391), Garrison GAL Area (Fig. 20). Three conjoining sherds from the wall of a large storage jar, foundFootnote 49in 2010, incised after firing: […].VEDO, probably [A]vedo.Footnote 50
Colchester, coarseware graffito (No. 34) (drawn by R.S.O. Tomlin from a rubbing by Mark Hassall).

Kent
35. Richborough (Rutupiae, TR 32 60) Roman fort (Fig. 21). Silver finger-ring, 24 by 25 mm, maximum width 8 mm, weight 6.9 g, foundFootnote 51‘during the 1920s and 1930s’. Brancaster type, late-Roman.Footnote 52Incised on the rectangular bezel, 8 by 10 mm, a monogram formed by five capital letters in a clockwise sequence: BASIA, basia (me). ‘Kiss (me).’Footnote 53
Richborough, silver ring with monogram (No. 35) (photo: English Heritage).

Leicestershire
36. Narborough, Copt Oak Road (SK 531 977). Samian sherd foundFootnote 54in 1983, said to be ‘inscribed on the inside with the graffito DEO’.Footnote 55
Lincolnshire
37. Ancaster (SK 98 44) (Fig. 22). Gold and silver bezel of a finger-ring, probably late-Roman Brancaster type.Footnote 56Thin gold disc, 8.82 mm in diameter, soldered onto a larger silver disc now incomplete, total weight 0.91 g, foundFootnote 57in 2024. Incised with a man’s face and shoulders facing left, surrounded by the retrograde letters: PECTɅCVS, Pectacus.Footnote 58
Ancaster, gold and silver ring bezel (No. 37) (photo: PAS).

38. Scredington (TF 094 405) (Fig. 23). Square bezel of a silver finger-ring, 16.28 by 14.72 mm, 1.99 mm thick, weight 2.19 g, foundFootnote 59in 2024. Incised: DEO | TOT, deo | To(u)t(ati). ‘To the god Toutatis.’Footnote 60
Scredington, silver ring bezel (No. 38) (photo: PAS).

North Lincolnshire
39. Roxby cum Risby (SE 92 15) (Fig. 24). Copper-alloy flat-sided blade tapering to a point now broken, perhaps a nail-cleaner, 48 by 8 mm, foundFootnote 61in 2024. Crudely incised: ḌEṢSI $\overparen{\text{MA}}$GLVSFIC̣IT, Dessimaglus f<e>cit. ‘Dessimaglus made (this).’Footnote 62
Roxby cum Risby, copper-alloy blade (No. 39) (photo: PAS).

Norfolk
40. Scole (Villa Faustini, TM 146 788) (Fig. 25). Samian rim sherd foundFootnote 63in 1993–4. Incised after firing on the wall: LVNɅRIS, Lunaris.Footnote 64
Scole, samian graffito (No. 40) (drawing: Norfolk Archaeological Unit).

41. Sporle with Palgrave (TF 848 113) (Fig. 26). Part of a copper-alloy finger-ring reportedFootnote 65in 2023. The oval bezel is incised: SSSFootnote 66
Sporle with Palgrave, copper-alloy ring bezel (No. 41) (photo: PAS).

Northumberland
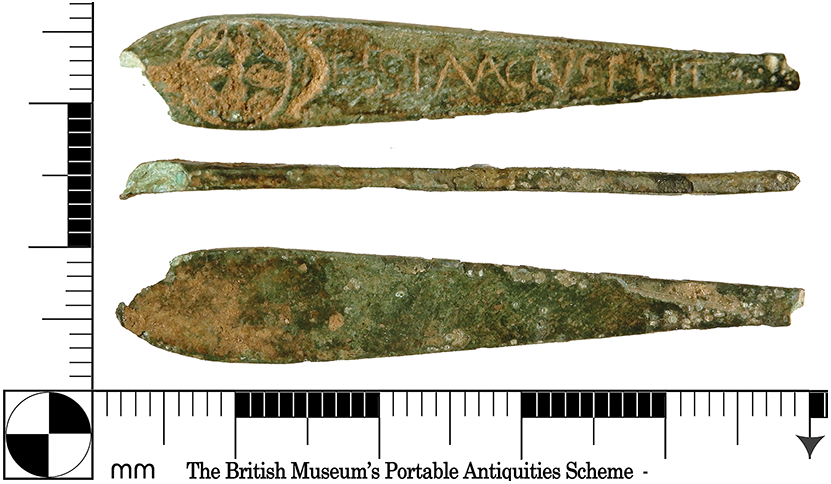
42. Vindolanda (NY 769 663) (Fig. 27). Three conjoining fragments of a stylus writing-tablet, 112 by 30 mm, foundFootnote 67in 1987. All four edges are broken; the left edge, although still straight, has lost its raised borders front and back. (a) One face is divided by the broad central groove for the witnesses’ seals to a legal document, but was re-used to write this address in cursive letters: (left panel) Coriṣ | Rumano | […] (right panel) ueṇạ[tori] | […]. ‘At Coria [Corbridge], to Rumanus the huntsman …’Footnote 68(b) The other face is inscribed with five lines of cursive letters, but they are a palimpsest and incomplete to the right. A few words are legible, including ut remittas (‘that you may send’), but no continuous text.Footnote 69
Vindolanda, three fragments of a stylus tablet (No. 42), (a) outer face, (b) inner face (drawn by R.S.O. Tomlin).

Nottinghamshire
43. Stokeham (SK 78 77) (Fig. 28). Copper-alloy finger-ring bezel, 12 mm in diameter, reportedFootnote 70in 2023. Incised retrograde: VIV|ASI, uiu|as i[…]. ‘May you live …’Footnote 71
Stokeham, copper-alloy ring bezel (No. 43) (photo: PAS).

Oxfordshire
44. Chilson (SP 32 19) (Fig. 29). Copper-alloy potter’s die, its lettered face 33.5 by 10.3 mm, weight 25.1 g, foundFootnote 72in 2024. Moulded letters in relief, retrograde:  $\overparen{\text{MA}}$CCIO, Macci o(fficina). ‘Workshop of Maccius.’Footnote 73
Chilson, copper-alloy potter’s die (No. 44) (photo: PAS).

Somerset
45. Green Ore, Wells, Rookery Farm (ST 5767 5140). Lead ingot or pig, 0.60 by 0.16 m, 0.12 m deep, foundFootnote 74in 1992. It carries four inscriptions. Moulded on top: IMP VESPASIAN AVG, imp(eratoris) Vespasian(i) Aug(usti). ‘(Property) of the Emperor Vespasian Augustus’. Moulded on front: BRIT EX ARG VEB, Brit(annicum) ex arg(entariis) Veb(…). ‘British (lead) from the Veb(…) lead-silver works’. Stamped on back: TI CL [TRIFER], Ti(berius) Cl(audius) [Trifer(na)]. Stamped on one end: [L] RAD.Footnote 75
Suffolk
46. Icklingham (TL 774 727) (Fig. 30). Pewter bowl, 114 mm in diameter, 25 mm deep, foundFootnote 76in 1853. Two graffiti, both incomplete, have been crudely incised on the wall above the foot-ring by different hands: (a) […].ẠLL.S; (b) IXẠ.INṾ.[…], Ixa[r]inu[s] Footnote 77
Icklingham, pewter graffito (No. 46) (drawn by R.S.O. Tomlin from photographs provided by Ipswich Museum).

47. Ibid. (Fig. 31). Pewter tazza, a pedestal vase with angular rim, 168 mm in diameter, 77 mm deep. Crudely incised underneath within the foot-ring: […]IXẠ[…], probably Ixa[rinus].Footnote 78
Icklingham, pewter graffito (No. 47) (drawn by R.S.O. Tomlin from photographs provided by Ipswich Museum).

48. Wangford (TM 465 795) (Fig. 32). Pewter bowl, 73 mm in diameter, 23 mm deep, foundFootnote 79before 1936. Incised underneath within the foot-ring: CAR, Car(…).Footnote 80
Wangford, pewter graffito (No. 48) (drawn by R.S.O. Tomlin from photographs provided by Ipswich Museum).

Surrey
49. Bagshot (SU 9115 6345), 42 London Road (Fig. 33). Jet finger-ring, now incomplete, estimated internal diameter 19 mm, foundFootnote 81in 1993. The rectangular bezel, 9 by 7 mm, is intact. Incised: Rho-Cross, a reduced form of the Chi-Rho ( $\overparen{\text{XP}}$) monogram.Footnote 82
Bagshot, jet ring with incised monogram (No. 49) (photo: Surrey Heath Archaeological and Heritage Trust).

Yorkshire East Riding
50. Elloughton-cum-Brough (SE 94 26) (Fig. 34). Complete silver finger-ring reportedFootnote 83in 2023. The square bezel has a raised central circular panel incised: TOT, To(u)t(atis).Footnote 84
Elloughton-cum-Brough, silver ring bezel (No. 50) (photo: PAS).

North Yorkshire
51. Aldborough (Isurium Brigantum, SE 4072 6678) (Fig. 35). Lead sealing, 16 by 7 mm, 2 mm thick, foundFootnote 85in 2024 unstratified, c. 70 m outside the North Gate. Within a rectangular panel, DΔN, d(omini) n(ostri). ‘(Sealing) of Our Lord (the Emperor).’Footnote 86
Aldborough lead sealing (No. 51) (photographed and drawn by R.S.O. Tomlin).

52. Ibid. (Fig. 36). Wall sherd of a samian bowl (Rheinzabern, Ludowici Sb, c. a.d. 150–250), foundFootnote 87in 2024. Neatly incised after firing: IVC, Iuc(undus). The owner’s name, abbreviated.
Aldborough samian graffito (No. 52) (photo: R.S.O. Tomlin).

53. Cowesby (SE 46 89) (Fig. 37). Incomplete gold finger-ring of Brancaster type (c. AD 350–450) foundFootnote 88in 2023. The integral square bezel is incised: Ʌ  $\overparen{\text{XP}}$ [.], α $\overparen{\unicode{x03C7}\unicode{x03C1}}$ [ω]. ‘alpha Chi-Rho omega’.Footnote 89
Cowesby, gold ring with Chi-Rho (No. 53) (photo: PAS).

C. Addenda et corrigenda
(a) RIB 128(a) (Chedworth Roman villa) (Fig. 38). Stone slab, its lower face deeply incised with a Chi-Rho monogram. On either side is shallowly incised a much smaller (5 mm high) Greek letter, alpha to the left and omega to the right: α  $\overparen{\text{XP}}$ ωFootnote 90
Chedworth, Chi-Rho between alpha and omega (Add. (a)) (photographed and drawn by Stephen Cosh).

(b) RIB II.3, 2425.9 (Hawkedon) (Fig. 39). Copper-alloy gladiatorial helmet found in Suffolk, stamped on the upper surface of the neck-guard at the back.Footnote 91This ‘much weathered inscription’ was tentatively read as […]OƧ, but comparison with a gladiatorial helmet found at Pompeii suggests a better reading. This is stamped in the same place (Fig. 40): P Δ CARFootnote 92 , which would suggest [P Δ ]CAR for Hawkedon.Footnote 93
Hawkedon, helmet stamp (Add. (b)) (photo: British Museum).

Pompeii, helmet stamp (photo: Naples Archaeological Museum).

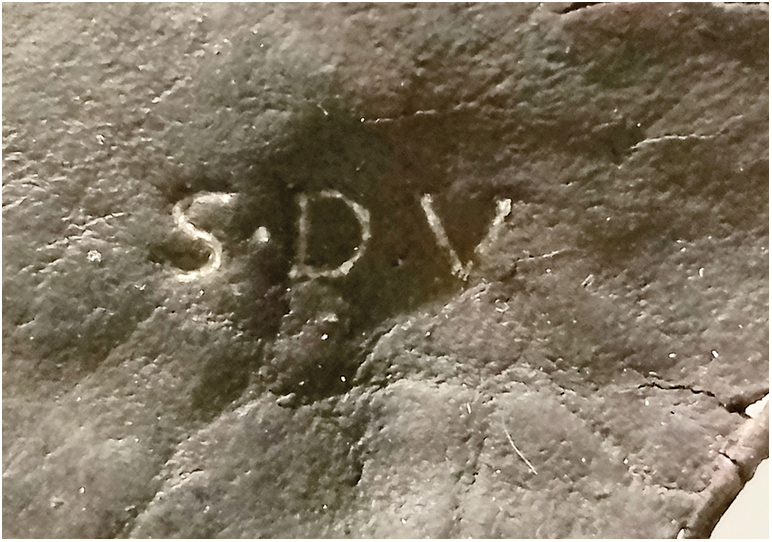
(c) RIB II.4, 2445.12 (Newstead) (Fig. 41). The initials S o D o V stamped on a patch of leather. A recent photograph shows that the letters are less coarse than they were drawn in RIB.Footnote 94
Newstead, stamped patch of leather (Add. (c)) (photo: Fraser Hunter).

(d) RIB II.8, 2503.119 (Colchester). The ‘Colchester Vase’ has been re-examined.Footnote 95The reading is unchanged, but new photographs show the lettering much better than the drawing in RIB. They illustrate its calligraphic quality, and confirm that the graffito was made before firing, not ‘after firing’ as stated in RIB.
(e) Britannia 27 (1996), 454, No. 42 (South Shields) (Fig. 42). Rim sherd of a black-burnished bowl or dish, foundFootnote 96in 1983. Incised after firing on the outer wall just below the rim: VIC[…], probably Vic[tor].Footnote 97
South Shields, black-burnished ware graffito (Add. (e)) (photographed and drawn by R.S.O. Tomlin).

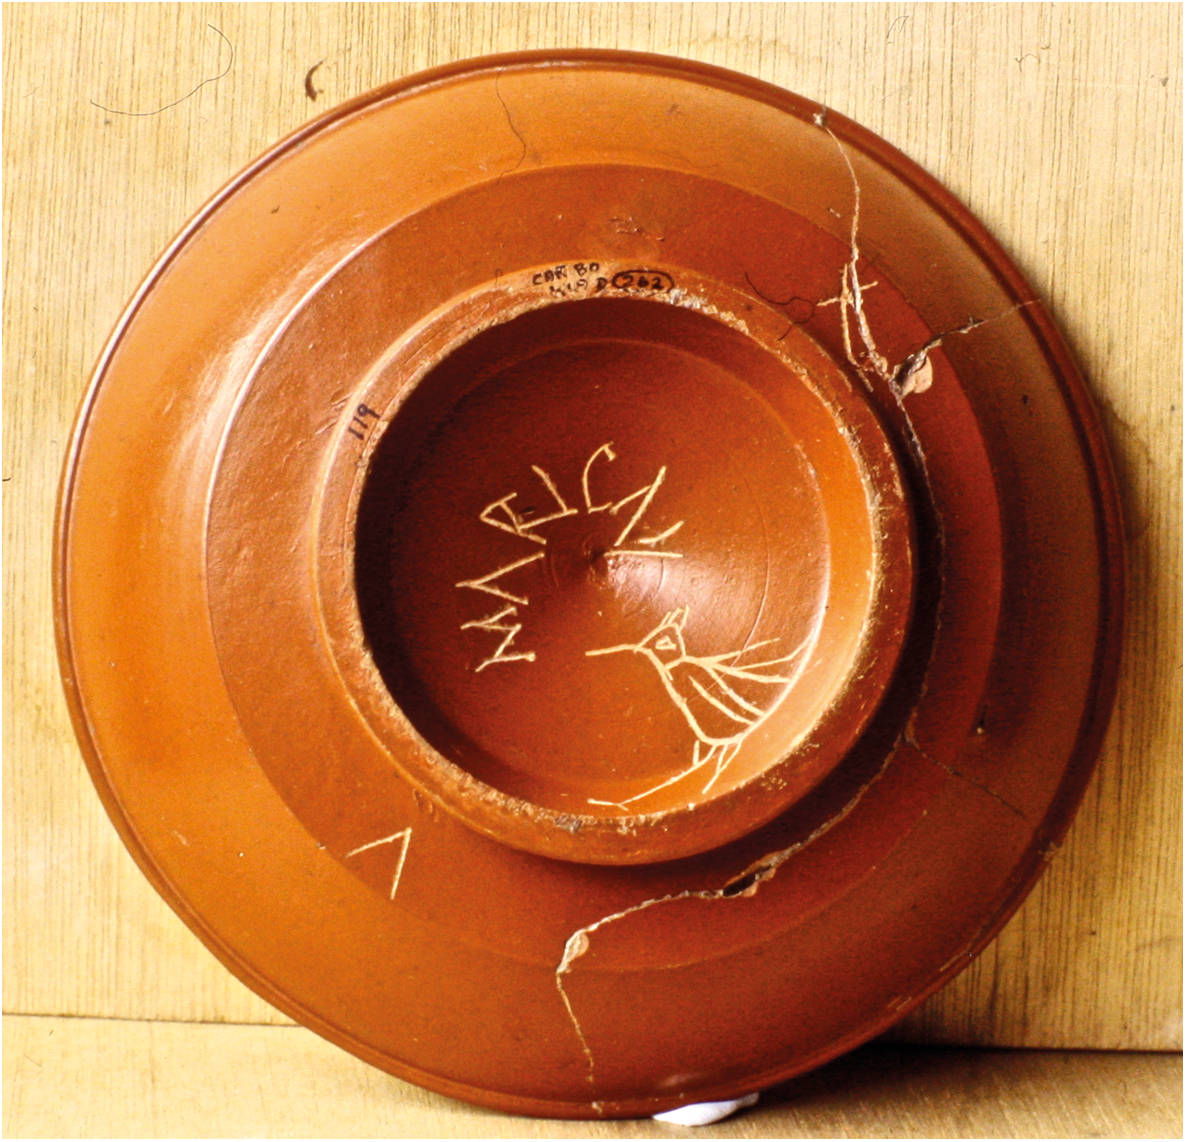
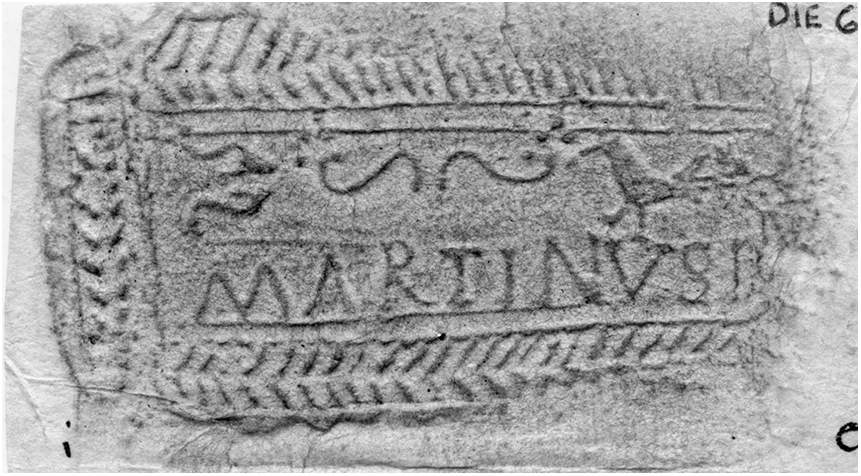
(f) Britannia 28 (1997), 461, No. 20 (Carlisle) (Fig. 43). Samian dish (Drag. 18/31) incised underneath with MɅRICɅII, Maricae, the owner’s name in the genitive, and the drawing of a bird. With its crest and exaggerated beak, it can be seen as a woodpecker (picus), since this bird was sacred to the god Mars.Footnote 98The poet Ovid calls it ‘the bird of Mars’.Footnote 99Depicted on a dish belonging to Marica, it recalled the ‘Mars’ element in her name, like the similar bird (Fig. 44) which accompanies the name of the potter Martinus on his stamped mortarium at Colchester.Footnote 100
Carlisle, inscribed samian dish (Add. (f)) (photo: Carlisle Archaeological Unit).

Colchester, mortarium stamp of Martinus (rubbing by Kay Hartley).

(g) Britannia 54 (2023), 435, No. 13 (Stanwix). As noted above, the reverse impression of this lead sealing should be read as [A]NC, [A(ulus] N(…) C(…).Footnote 101
D. Alienum
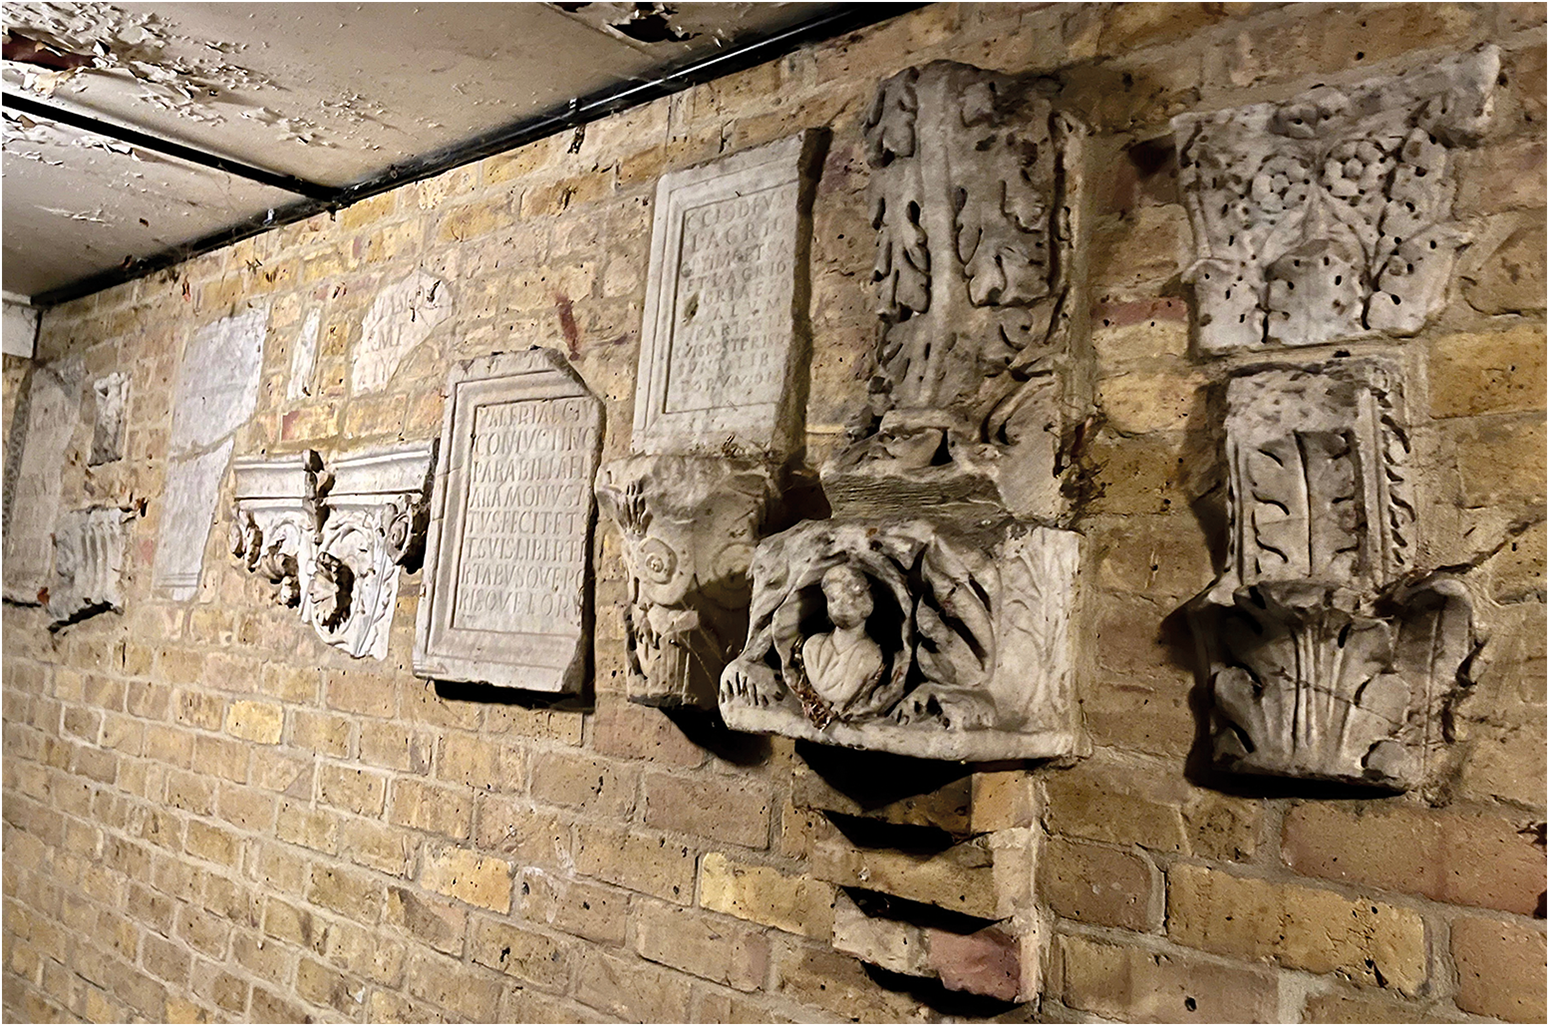
(a) Powell-Cotton Museum, Quex House, Birchington, Kent. Built into a wall are the Roman marble fragments shown in Fig. 45, which include inscribed tombstones. In 1884 they came from the garden of Clarence House, Herne Bay, where they had been owned by William Newton (1786–1861), a civil engineer with antiquarian interests.Footnote 102Like the half-slab in the middle of the top row, they must be ‘Grand Tour souvenirs’ imported from Rome.Footnote 103
Powell-Cotton Museum, inscribed marble fragments (Alienum (a)) (photo: Ed Griffiths).

E. Falsum
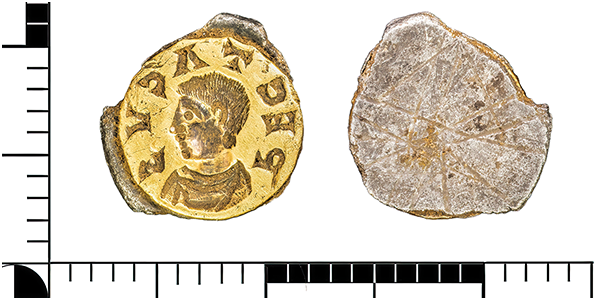
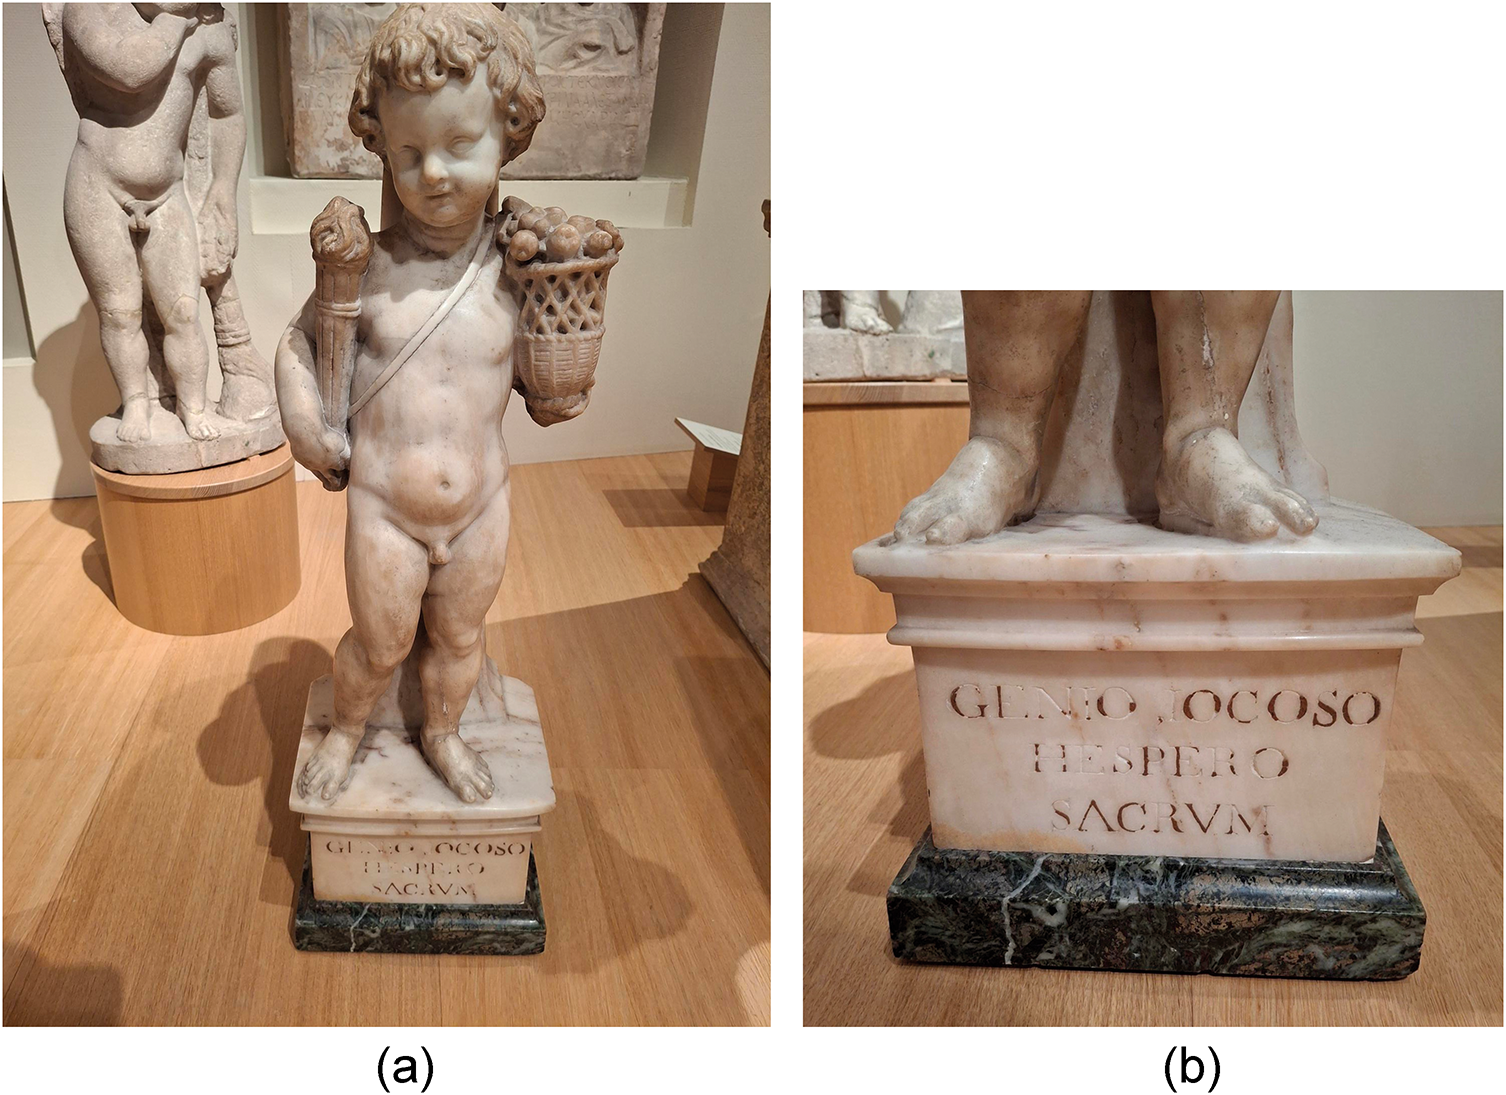
(a) AE 1931, 134 (London, ‘hôtel de Buckingham’) (Fig. 46). Marble statue base inscribed: GENIO IOCOSO | HESPERO | SACRVM, genio iocoso | Hespero | sacrum. ‘Sacred to the cheerful genius Hesperus.’ On it stands the marble figure of a boy with a torch and a basket of fruit, a table-support (trapezophoros) 0.80 m high, restored but probably second-century in date. But the inscription below is not original: it was added in the late-sixteenth/early-seventeenth century, probably in Venice, and is thus not Roman but falsum.Footnote 104
(a) Marble statue on an inscribed base, seen in London in 1637. (b) Detail of the inscribed base (falsum) (photos: National Museum of Antiquities, Leiden).


 Open access