
The Portable Antiquities Scheme (PAS) was established in 1997 as an initiative to record archaeological objects found by members of the public. Following a pilot phase, it was extended to England and Wales from 2003 onwards.Footnote 1From 2004 surveys of Roman period finds documented by the PAS have been published in Britannia. This twenty-second annual summary outlines the general character of Roman finds reported in 2024 and reports significant individual artefact discoveries recorded by Finds Liaison Officers (FLOs).Footnote 2
Overview
In 2024 34,469 objects of Roman date were documented by the PAS within 16,955 object records. The number of objects exceeds the number of records since a single record often documents more than one item, especially in cases of coin hoards as well as in assemblages of ceramics or building materials. As in 2023, the number of objects recorded and records made in 2024 represent a significant increase on the preceding years, now being more comparable to those before 2020, reflecting the diminishing residual impact of the Covid-19 pandemic on object discovery, reporting and documentation.Footnote 3The spatial distribution of finds reported in 2024 is similar to that generally reported in previous years, with the highest numbers of records made from eastern and central southern counties in England.Footnote 4The lowest numbers of artefacts documented and records created in 2024 were in northern England, the westernmost counties of south-west England and Wales as well as in urban areas (with the exception of London). The causes of this uneven distribution of reported artefacts remain as previously noted, the circulation and deposition of metal objects in the Roman period, historic and current land-use, especially agricultural practice and urbanisation, and the constraints on metal-detecting, the predominant mode of discovery of objects reported to the PAS.Footnote 5
As in every single previous year of reporting, the documented discoveries of coins and brooches in 2024 massively outnumber those of all other Roman artefacts. 12,304 coins were recorded in 11,994 records (i.e. as ‘coin’ entries on the PAS database) and approximately a further 10,170 in 98 ‘coin hoards’ and ‘hoards’. This is a slightly lower percentage of all objects discovered than normal, but further coins as well as other objects, especially ceramic sherds, were also recorded among the 5,000+ objects in the 43 ‘assemblage’ records. Including the examples recorded in 2024, c. 482,000 Roman coins have now been recorded by the PAS, as quantified by these annual summaries. As ever, the high numbers of coins reflect both their preponderance among objects discovered and the emphasis placed by the PAS on recording Roman coin assemblages in toto.Footnote 6The distribution of coins mirrors the distribution of all finds, the highest numbers being from the same counties as noted above and the smallest in urban areas and in northern and western England and Wales. As for brooches, c. 41,150 examples have been documented by the Scheme since 2003, including a further 2,248 in 2024. These totals include brooches dated to the period from the last decades of the Iron Age to Late Antiquity.Footnote 7The distribution of brooches reported in 2024 corresponds to the general distribution of PAS records, i.e. being focused predominantly on eastern and central English counties. The noted disparity between regions in the ratio of Roman period brooch to coin finds continued to apply in 2024, this ratio being higher in Wales and some neighbouring English counties than elsewhere.Footnote 8
Artefact descriptions
The entries below publish highlights among the finds made or recorded in 2024 by PAS staff and the Treasure Department at the British Museum and their research collaborators.Footnote 9They are selected for their contribution to the study of the material and visual culture of Roman Britain, in particular where they advance comprehension of object forms, their typological and decorative variability and/or their distribution. They are reported in approximate geographical sequence, beginning in northern England. The alphanumeric reference for each find identifies the individual object record on the PAS website: <www.finds.org.uk>. Some entries report objects also treated as Treasure cases and are therefore also designated with their Treasure number in the format of year and reference number (20XX/TXX).Footnote 10
The precious metal and copper-alloy artefacts presented in this report illustrate the diversity of function, style and motif documented in portable metal objects from the Roman era in Britain, broadly defined, from the first century b.c. to fourth and fifth centuries a.d. They include artefacts belonging to similar functional categories as presented in previous years, figurines representing divinities, human beings and animals, weapons and other military objects, vessels and associated mounts (including a miniature vessel in bird form), brooches, a late antique belt plate and other dress and harness items, personal ornament including an ear-ring or pendant, as well as rings with figural devices, a mirror handle, a key handle and furniture fittings, a lamp and possible staff terminal. Although they are not reported here, we note discovery of and research on significant object assemblages from England and Wales, above all the metalwork deposits from Melsonby, N. Yorks, found through metal detecting in 2022 and continuing to undergo conservation and analysis at Durham University.Footnote 11
Northumberland
(1) Chollerton (NCL-533E55) (Fig. 1)Footnote 12A complete though broken copper-alloy brow-guard from a Hagenau- or Weisenau-type helmet (a.d. 10–120). With both pieces fitted together, the maximum width of the curving brow-guard from one terminal to another is 204 mm. The guard has broken in a diagonal line close to its centre point. On its inner face there is a small rectangular projection to secure it in place and prevent it from pivoting on the terminal rivets. The ridging on one face is likely produced by repeated hammer strikes, either during the guard’s creation or in later repair. The strikes concentrate at the ends of the guard and along its outer edge, suggesting that it had become distorted and that an attempt was being made at correction. The irregularity of the impacts and their absence from the centre apex would suggest that they are not decorative.
Chollerton, brow-guard (No. 1). Scale 1:2 (Photo: A. Agate; © Tyne and Wear Museums).

It is impossible confidently to assign the guard to a type without the corresponding bowl, though a comparable example from Nijmegen is suggested to be from a Hagenau type.Footnote 13The Weisenau type is more commonly an iron helmet, though copper-alloy examples are known.Footnote 14The dating of both helmet forms is contentious, but the Hagenau was probably the earlier, being gradually phased out during the first century a.d., to be replaced by the Weisenau form, which may have been the dominant type by the time of the Claudian invasion.Footnote 15Certainly by the time the army had moved into northern Britain under the later Flavians the Weisenau was the more common form.
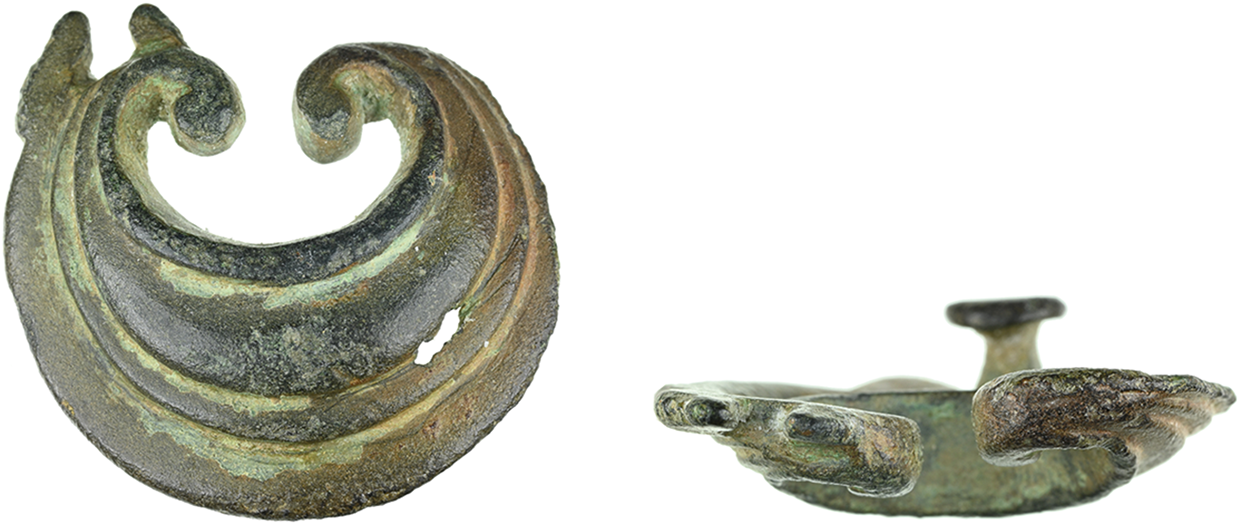
(2) Lowick (NCL-5F5DED) (Fig. 2)Footnote 16An incomplete copper-alloy button and loop fastener with enamelled decoration, with a mid-green patina with pitting and traces of iron corrosion. It is 33 mm long and weighs 31 g. The fastener is spindle-shaped with a thick central body and flattened terminals carrying similar decoration, i.e. opposed comma motifs in reserved metal set in red-enamel inlaid recesses. Each comma head encloses a small circular recess, likewise inlaid. Two elements project from the fastener’s central body, one stud-like ending in a flattened terminal, the other the corroded in situ stubs of the iron loop.
Lowick, button and loop fastener (No. 2). Scale 4:3 (Photo: A. Agate; © Tyne and Wear Museums).

Many button and loop fasteners of late Iron Age to second century a.d. date have been documented by the PAS. To the 177 noted by 2008, already more than the corpus used by Wild’s typology (165), more than 600 further examples of these possible clothing or bag fasteners can now be added, concentrating especially in north and east Yorkshire and northern Lincolnshire.Footnote 17The Lowick fastener is not represented in Wild’s corpus and finds very few close parallels, one being from Sadberge, Darlington (DUR-EE5753), where the disc terminals carry a chequerboard of yellow and another (decayed) colour, or Kilpin, E. Yorks (LVPL-A23710), with similar decoration. These are generally larger than the similar but more numerous ‘dumbbell’ form of fastener, also not represented in Wild’s corpus.Footnote 18The presence of enamelled decoration is sometimes documented in the wider corpus, but the attachment method is distinguished by the presence of the stud as well as the loop, and the use of iron for the latter.Footnote 19
North Yorkshire
(3) Giggleswick (SWYOR-FA6BC5) (Fig. 3)Footnote 20An almost complete copper-alloy zoomorphic brooch of continental origin, well preserved with a smooth olive-green patina. It is 40.2 mm long and weighs 7.4 g. The brooch takes the form of a hound catching a hare, both on a ground line to which they connect by slender limbs. The hound is artfully modelled in the act of seizing its prey. Its body arches, back legs extended beneath to give it purchase, forelimbs and head stretching towards the hare, grasping its back in its jaws. The musculature is simply but effectively moulded in low relief, as is the long narrow head, with ears flat, orbital ridge prominent and long snout. The hare’s form is compressed, limbs extended to run but caught by the dog, its ears upright on its outsize head. The pin lug is on the back of the dog’s haunch while the catch plate is positioned behind the hare.
Giggleswick, brooch (No. 3). Scale 3:2 (Photo: I. Whitehead; © West Yorkshire Archaeology Advisory Service).

The closest affinity lies with a handful of brooches of mid-imperial date, from Piercebridge, Lyon and Komárom, identical in their configuration of the hare and hound but with a double design, opposing images of the pair across the central bar.Footnote 21Other brooches combining these animals are documented by the PAS but share fewer similarities in detail.Footnote 22Similarly two small brooches from Baldock show highly stylised examples of the same pairing with enamelled decoration.Footnote 23In general brooches showing this pairing have affinities with continental forms, but the scene itself is widely attested as a decorative motif.Footnote 24
(4) Moulton (DUR-5AE48F) (Fig. 4)Footnote 25A complete copper-alloy lunate mount, probably from a harness, with a dark grey-green patina. The mount is 29.1 mm wide and weighs 6 g. It takes the form of a crescent with inward curling terminals, one of which retains two small projections that perhaps once formed an integral suspension loop. The face has curved moulding connecting the terminals in concentric lines, echoing the patterns of sagging cloth or shell growth. The mount fits Nicolay’s B16 category, though Nicolay notes that lunate mounts became less common from the second century.Footnote 26The fungiform stud on the reverse suggests a date from the Antonine period into the third century (c. a.d. 130–230), when this was a common form of attachment. Lunate mounts with a suspension loop on the body of the crescent and the horns pointing downwards have been more commonly documented.Footnote 27
Moulton, mount (No. 4). Scale 3:2 (Photo: B. Westwood; © Durham County Council).

Hoss and Nicolay note the apotropaic power of lunate mounts, with some examples paired or fused with phallic symbols to increase the perceived protection.Footnote 28A strikingly similar, and possibly more complete mount recorded by the PAS from Lathbury, Milton Keynes (BH-9E7196), could be interpreted thus since it arguably features a stylised phallus pointing into the hollow of the lunula, i.e. perhaps with a more direct sexual reference. Perhaps the remaining projections on this mount once supported further motifs of this kind, accounting for the odd placement of the stud, since a second would have been present on a now missing piece.
(5) Grassington (SWYOR-FBC3E6) (Fig. 5)Footnote 29A complete cast copper-alloy mount in the form of a youthful bust, facing to the left, carefully modelled and well preserved if heavily worn, with a green-brown patina and possible traces of surface white metal. It is 49.8 mm tall and weighs 40.5 g. A Phrygian cap with soft peak sits high above the head, fitting more closely on the right; on the left a short flap projects above where the ear might have been. The hair visible beneath the cap frames a clean-shaven and full-cheeked face, its features once rendered in detail but now worn, little remaining of the eyes and nose above a narrow mouth. The cloak’s diagonal folds fall away across the bust with details enhanced by cold-working, including circular punches on the brooch at the right shoulder and repeated crescentic stamps on the thickened fringe, perhaps indicating fur edging. The flat back carries traces of a possible oxidised lead or lead alloy, perhaps the remains of solder.
Grassington, mount (No. 5). Scale 1:1 (Photo: P. Cockerill; © The Portable Antiquities Scheme).

Size and form indicate that this was once a likely furniture mount. The distinctive Phrygian cap raises several possibilities for identification of the youth as an ‘eastern’ mythological hero. The Grassington mount joins others documented by the PAS which shows similar subjects, but stands out for its more sophisticated three-dimensional modelling.Footnote 30Attis is the most likely subject, frequently figuring in small-scale busts in bronze and other media.Footnote 31A vehicle fitting from Cologne shows a cloaked figure of similar form, head turned to the left, as does a central medallion from a Hildesheim treasure dish, albeit with a torc and lunar crescents rising behind.Footnote 32The distinctive flap on the left side is harder to parallel, but likely echoes the side extensions frequently seen in Phrygian caps worn by Attis.
York
(6) Heworth Without (SUR-EFF326/2024T674) (Fig. 6)Footnote 33One half of a cast gold gimmel signet ring of likely Roman date, well preserved although the bezel scene is quite worn. It has an internal diameter of 19.6 mm. The surviving half retains the bezel, framed within the ring’s shoulders, the openwork decoration of which formed C-motifs when complete (gimmel rings are made in two parts, divided along the hoop’s midline). The bezel carries an incised design within a linear border, depicting two men in short-sleeved short tunics, one upright and wielding a knife in his left hand over the body of a sheep restrained by the other kneeling figure. Despite heavy wear the modelling’s finesse is evidence in the surviving detail of gesture, clothes and wool. Beneath the bezel a narrow rectangular slot likely enabled the joining of this half-ring with its lost pair, which combined would have tapered to a narrow hoop.
Heworth Without, ring (No. 6). Scale 3:2 (Photo: S. Maslin; © Surrey County Council).

The gimmel form is very rare among Roman rings, being better known as a sixteenth/seventeenth-century type. However, it finds a parallel in an incomplete silver ring of third-century date, attached to its partner by a rivet fitting and with similar openwork decoration at the bezel.Footnote 34The missing half in this case was perhaps connected in the slot beneath the bezel with a ring-key component for a betrothal ring.Footnote 35The sacrifice motif is hard to parallel directly. The clothing of the sacrificers as well as the animal’s identity and placing (a sheep rather than a ram) make it unlikely that this represents the sacrifice of Isaac by Abraham, a scene otherwise widely depicted in early Christian art. Sacrifice of other species, however, is frequently shown in gem scenes, even if not directly paralleling the current case.Footnote 36For example, on a paste gem now in Wurzburg, a man in a loincloth sacrifices a bull by stabbing it in the neck from above, while a chalcedony intaglio from Epidaurum/Cavtat (Croatia), now in the Ashmolean (inv. 1941.351), carries a similar scene of a man sacrificing a quadruped.Footnote 37Martin Henig (pers. comm.) suggests that such sacrifices might be oath-making scenes, here perhaps linked to the sharing of the halves of the gimmel ring.
Lancashire
(7) Paythorne (YORYM-047B79) (Fig. 7)Footnote 38An incomplete copper-alloy brooch with a dark brown patina and enamelled decoration, dated to the late Iron Age or early Roman period, c. 100 b.c.–a.d. 100. The brooch is 52.9 mm long and weighs 8.4 g. The double-turn coil of its head extends into the pin in one direction and into the bow in the other. The bow thickens into a rectangular plate, from which a tapering elongated foot extends; behind the latter is a worn catch plate. The bow carries an off-centre quatrefoil motif, two petals of which contain traces of yellow enamel while one of the triangular fields contains orange. The foot divides into two panels, the upper separated into four curving fields of opposed arcs and triangles, the lower into triangles, one also inlaid with yellow enamel. No direct parallel for this form has been identified. It combines a coiled spring typical of late Iron Age La Tène III brooches, for example a well-preserved brooch from Scarborough (YORYM-8A0ACE), with the enamelled decoration characteristic of later brooches and related objects. The quatrefoil motif on the bow is paralleled on other objects, for example button and loop fasteners.Footnote 39
Paythorne, brooch (No. 7). Scale 1:1 (Photo: R. Griffiths; © York Museums Trust).

Denbighshire
(8) Llandegla (LVPL-F9C5E8) (Fig. 8)Footnote 40An elegant copper-alloy penannular brooch, very well preserved with a uniform dark brown patina, its pin intact, dating to the early Roman period. The frame is 44.6 mm at its widest (outer diameter); it weighs 16.8 g. The near-circular frame swells into opposed terminals formed by two collars, smaller and larger, delineated by grooves. The terminals are decorated by repeated worn grooves, recalling the buffer terminals of Iron Age and Roman torcs (N. Harlow pers. comm.). The broken pin is formed from a simple tube tapering to a point at one end and hammered flat and wrapped around the frame at the other. Another short copper-alloy wire is wrapped around the frame, an otherwise unparalleled feature.
Llandegla, brooch (No. 8). Scale 1:1 (Photo: H. Beeton; © National Museums Liverpool).

This brooch belongs to the type classified initially by Fowler as A4, subsequently differentiated in Booth’s revised typology as a separate form (I), distinguished by its grooved disc terminals. A similar example has been recorded on the PAS database from West Ashby, Lincs (LIN-0C71BD). Mainly documented in southern and western Britain, including Roman urban sites, the dating of its emergence to the mid-first century a.d. is supported by occasional stratified examples, for example at Fishbourne.Footnote 41
Lincolnshire
(9) Holton le Clay (LIN-90A6C1) (Fig. 9)Footnote 42An incomplete cast copper-alloy figurine, well modelled in the round although worn and corroded, probably rendering Vulcan, god of fire. The figurine is 75 mm tall and weighs 163.7 g. Missing its head from an old break, this male figure raises his arms and sits with legs slightly crossed, the right over the left. The right foot is extended, perhaps to touch the ground. The exomis (short sleeveless tunic) covers the right shoulder and leaves the left bare; it extends diagonally across the body and its carefully modelled folds reach to just above the knee. Limbs are well formed though surface detail is lost. The flattened buttocks and the angled sole of the right foot likely reflect contact with the seat on which the figure was once set.Footnote 43
Holton le Clay, figurine, (No. 9). Scale 2:3 (Photo: L. Brundle; ©Lincolnshire County Council).

In the absence of the head, and thus of the pileus (conical cap) which might identify the god, the exomis is the key attribute in this case for identifying the figure with Vulcan.Footnote 44Confidently identified examples of the god from Britain typically stand holding a hammer and tongs. Unlike this example, the exomis usually covers the left shoulder and leaves the right bare; in this reversal the figurine finds a parallel in the metal-detected find from North Bradley, Wiltshire.Footnote 45Seated images of the god are rarer, being also represented in Britain by a muscular nude from Richborough.Footnote 46Similar figures of the god in bronze and stone are known in neighbouring provinces and may derive from older types.Footnote 47These representations typically find the god seated on a rock, one arm raised to wield a hammer or other tool, the other either resting on the leg or steadying the object being made.Footnote 48The raising high of both arms in this case is otherwise hard to parallel, making it not impossible that a human artisan is rendered here. The gesture also recalls that of Atlas raising the world, though atlantes typically kneel rather than sit.Footnote 49
(10) Snarford (SWYOR-861B2E) (Fig. 10)Footnote 50An incomplete copper-alloy zoomorphic miniature vessel, now separated into two parts found c. 10 m apart. The container and lid combine to form the body and back of a stylised swimming bird, missing its head. The differential corrosion, brown on the exterior and bright blue on the interior, suggest that until recently the parts were joined. The vessel is 32.6 mm long and 17 mm wide, weighing 10.5 g; the lid is smaller and lighter. From the container’s flat oval base the sides rise to form its rounded body. At the front the breast swells to a damaged rod-like neck. The head was either cast separately or has broken off. The upper edges of the sides and tail are flattened to allow the teardrop-shaped lid to rest on the vessel. A ‘shelf’ at the back of the neck enables the same, set deeper on the left side, seemingly allowing the lid to turn, also enabled by the latter’s matching asymmetry. Both lid and body end in rounded tails, with corresponding perforations, to join them and/or to enable suspension. Possible white metal traces occur along the lid’s edges.
Snarford, miniature vessel (No. 10). Scale 1:1 (Photo: I. Whitehead; © West Yorkshire Archaeology Advisory Service).

As a container the vessel can only have held minute quantities, perhaps of cosmetic substances. As a miniature object it joins a much larger provincial Roman corpus.Footnote 51Martin Henig draws our attention to the similar though larger container in waterbird form from Rotherley, Wilts, bearing a human face on its back.Footnote 52The most familiar Roman bird-shaped vessel forms are the enamelled roosters documented from Britain and occasionally beyond, though these are of very different form. Footnote 53The likely vessel mounts in the form of small stylised water birds, not uncommon copper-alloy finds, manifest a different link between motif and container.Footnote 54
Cambridgeshire
(11) Boxworth (CAM-4E170C) (Fig. 11)Footnote 55An incomplete copper-alloy anthropomorphic bust, with a greenish brown patina, heavy wear and corrosion masking the detailed modelling of a likely male youth, perhaps a sceptre mount. It is 46.4 mm in height and weighs 100 g. The very full head of hair is moulded in tousled locks radiating from the crown and descending to the nape of the slender neck. The features are finely modelled on a face that tapers to the chin, large eyes set beneath their lids, a broad nose and narrow mouth. The drapery on the bust falls cloak-like in concentric folds from the neck. At the front where the neck meets the textile is an aperture through which the bust was liked attached to a support. The broken edge at the right shoulder preserves part of a further perforation.
Boxworth, terminal (No. 11). Scale 1:1 (Photo: H. Fowler; © Cambridgeshire County Council).

Preservation and the delicate rendering of head and neck make it a little difficult to be confident of the figure’s gender, but the coiffure (with no bun or other gathering of hair) and cloak suggest an identification as a male youth. The full head of hair better echoes portraits of mid-second- to early third-century date. Although smaller than most examples, the clearest affinities of the object are with the sceptre-heads also documented mainly in East Anglia, with several findspots like Boxworth on the fen edge near Cambridge. Admittedly these are typically of bearded imperial subjects.Footnote 56It is hard to offer more than speculative identifications in this case, perhaps either a younger prince or a deity such as Apollo.Footnote 57
Norfolk
(12) Thompson (ESS-0583DF) (Fig. 12)Footnote 58A small cast copper-alloy female figurine of late Iron Age to Roman date, with a dark green patina and patches of corrosion and abrasion. It is 66.9 mm tall and weighs 46.1 g. The nude subject is modelled with grace, the posture suggesting a moment within a dance. The head turns rightwards, the right arm rises (with hand lost) and extends sideways from the shoulder; the left is lower and stretches to the left, the hand being open with palm extended. What survives of the right leg suggests it was straight, a point for balance while the left leg mirrors the left arm’s extension, tapering to a slender left foot. The torso seems well modelled, though wear has obscured anatomical detail. The hair sweeps backwards from her face, perhaps into a bun on the back of her head. Her forehead slopes gently to lenticular eyes, the nose protrudes, the lips are faintly defined.
Thompson, figurine (No.12). Scale 2:3 (Photo: L. Rogerson; © Colchester and Ipswich Museum Service).

Dancing figures are uncommon among Roman figurines. The nude dancers in the celebrated Neuvy-en-Sullias (Loiret) deposit represent rare possible counterpart examples. However their poses, female and male, are quite different to the Thompson figurine, as is the calculated disproportion of their bodies and limbs, with their maker argued to be working at the edges of contemporary conventions.Footnote 59The relative suppleness and movement of this figure, as well as its coiffure, are more evocative perhaps of dancing Roman figures, such as those on the Mildenhall dishes, than the Iron Age nudes of Neuvy-en-Sullias, with possible echoes too of the running athletes from the late Roman Piazza Armerina mosaics, though like other female athletes the latter are not nude.Footnote 60
Essex
(13) Near Radwinter (ESS-10739A/2024T144) (Fig. 13)Footnote 61An incomplete hollow conical gold pendant or earring of the Hercules club type,Footnote 6239.6 mm long and weighing 3.8 g, formed from a rolled gold sheet. Damage at the narrow end where the gold sheet folds over means that the loop from which the object was suspended is now lost. At the wider end the sheet ends are folded over, but it is not clear how the cone was closed in this case; there is no evidence of the claw setting or applied pellets seen on some other examples.Footnote 63Twisted wires encircling the pendant at both ends and close to its narrow end helped to maintain the integrity of the object. The surface is decorated with three rows of three drop-shaped applied wire loops, possible attached by solder; no evidence survives for there once having been settings within them.
Near Radwinter, ear-ring or pendant (No. 13). Scale 1:1 (Photo: L. Rogerson; © Colchester and Ipswich Museum Service).

‘Hercules club’ ornaments of this type have been documented across the Roman empire. Some were worn as earrings, others as pendants, or even as necklace elements; the loops in some cases contained coloured glass and related decoration. The present example sits within the wider documented range of sizes for the ornament.Footnote 64Three metal-detected likely examples have been documented as fragments by the PAS, extending the distribution of the type within Britain; the limited contextual data suggests use throughout the Roman period.Footnote 65
(14) Willingale (ESS-BF01CD) (Fig. 14)Footnote 66An incomplete enamelled copper-alloy H-shaped strap fitting, 19.7 mm long and weighing 5.1 g. A hole pierces the short central bar that connects the enamelled arms. On the reverse are two symmetrical T-shaped projecting studs. The enamel is symmetrically configured and comprises alternating squares in a red/white/blue/white/red sequence, the white and blue containing millefiori rosettes. A near-identical fitting from Kirtlington, Oxon (OXON-A6C0ED) contains more degraded inlay; other similar examples are recorded by Boucher as type B2, dated c. a.d. 80–250.Footnote 67The twisted appearance of the T-shaped studs perhaps suggests they too were designed to be seen. Other similar enamelled fittings in circular as well as zoomorphic form share these T-shaped studs or rivets.Footnote 68The central piercing is also a common feature of mounts recorded with these rivets. In some cases, for example at Kirtlington (see above) or Binham, Norfolk (NMS-410B73), the iron corrosion within likely represents the remains of a loop, perhaps part of a bag closure or other form of strap connection.
Willingale (No. 14). Scale 1:1 (Photo: L. Rogerson; © Colchester and Ipswich Museum Service).

Suffolk
(15) Near Bury St Edmunds (SF-204CA6) (Fig. 15)Footnote 69A copper-alloy pan with its handle, rim and base better preserved than the vessel walls, which are partly lost to corrosion and breakage. The bowl was 86.2 mm high when complete and the pan, including rim and handle, was 30 cm long. The flat waisted handle expands to a rounded terminal with a central circular aperture for suspension, edged by a raised moulding. Grooves define edges of handle and terminal. Where they meet is a triangular zone of punched circles and a curved maker’s stamp.Footnote 70The bowl itself has an out-turned rim and bulging wall, pairs of circumferential grooves on its exterior, below the rim and above the base, and a tinned interior. The convex base, with a central circular boss, is strongly articulated by concentric mouldings on interior and exterior.
Near Bury St Edmunds, vessel (No. 15). Scale 1:3 (Photo: Anna Booth; © Suffolk County Council).

This is an example of a well-known copper-alloy handled pan type or trulla, perhaps closest typologically to Eggers’ type 140.Footnote 71Made in Campania and in Gaul, possibly used for heating wine and sometimes linked to the Roman army, such flat-handled pans are very widely distributed across Europe in contexts dated to the first and first half of the second centuries a.d.Footnote 72Numerous other examples are documented from Suffolk and the wider region.Footnote 73
Excavation after discovery showed that it had been buried in a small pit within a Roman period ditch.Footnote 74The absence of other finds suggests a deposition as a smaller-scale version of the vessel deposit from Crownthorpe, buried at the time of the Boudican revolt, which included a similar flat-handled pan. Further afield the vessel deposit from Kingston Deverill, Wilts, includes similar pans, as at Crownthorpe associated with strainer bowls.Footnote 75
Gloucestershire
(16) Willersey (GLO-F72CDB) (Fig. 16)Footnote 76Two near-complete long swords or spathae with components and fittings indicating their burial in their scabbards. The swords, excavated by the organisers after their discovery during a metal-detecting rally, had been deposited end to end with a copper-alloy bowl and were also found with possibly associated animal bones. The two blades, 920 and 850 mm long, are missing their hilt assemblies and the organic components of the scabbard have been lost which might suggest that the hilts were completely organic, consistent with Roman swords of this period. X-ray analysis revealed that one blade had a pattern-welded construction, formed of four ferrous bars of varying carbon content folded together to form a herringbone pattern.Footnote 77The cutting edges had then been welded on either side of this core.Footnote 78The X-ray indicated that the other blade had been constructed quite differently, either from a single ferrous bar as with the Hod Hill blade or using two low-carbon layers to sandwich a higher-carbon core.Footnote 79Of the copper-alloy scabbard fittings the most intact pieces are the two chapes, one of which is affixed to the iron blade. Both are of a closed pelta type, general parallels for which are noted by Miks.Footnote 80
Willersey, sword with chape (No. 16). (Photo: K. Adams; © Corinium Museum).

Spathae became increasingly dominant during the second century a.d., eventually replacing the gladius as the main infantry weapon as well as retaining their place as a cavalry weapon.Footnote 81Perhaps the only partial parallel for this deposit is that of the two swords buried with two late second- to early third-century inhumations in Canterbury.Footnote 82However, while in that case the human remains and their apparent unceremonious burial within the city’s walls provided a context (perhaps a concealed murder), these two swords may have been buried as a singular deposit of their own. Impressions of organic material preserved on one chape may represent the remains of packing material, perhaps from a bag. This and the possible association of animal bone and the copper-alloy bowl strengthen the possibility that these weapons form a ritual deposit. It is tempting to assign these objects a direct military association, and while this is a strong possibility, civilians were not forbidden from owning and carrying such weapons.Footnote 83While it is unlikely that serving soldiers would deposit such items essential to their everyday role, it is certainly possible either that they represent ritual depositions made by veterans upon their retirement, by civilians, or even a form of cenotaph.Footnote 84
While swords are rare, scabbard fittings of a similar date to those discussed here are distributed across the Central Belt and Anglian Plain of England with few examples in south coast counties.Footnote 85These, along with other finds of militaria, might suggest a more active and pervasive military presence across the ‘civil’ zone of Britannia in the mid-imperial period than is traditionally argued.Footnote 86
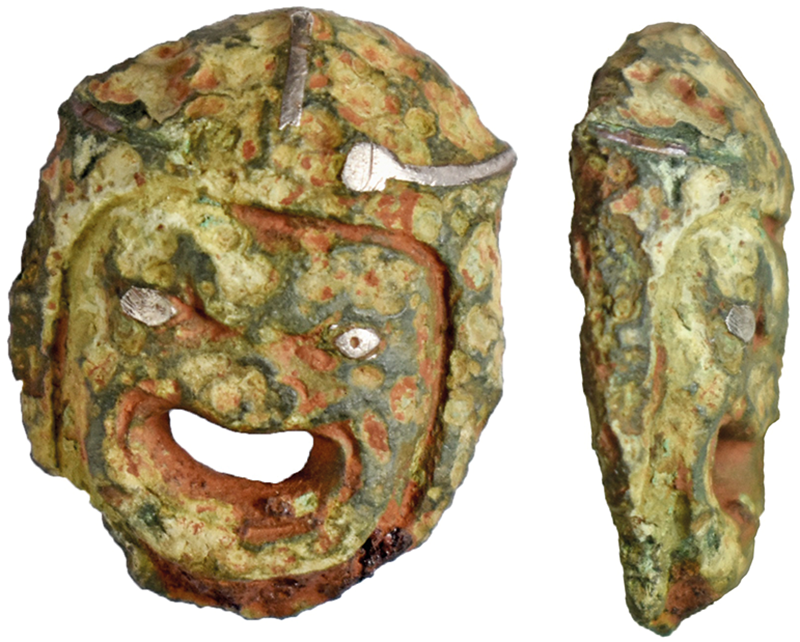
(17) Clapton-in-Gordano (GLO-6F9F0D) (Fig. 17)Footnote 87A heavily worn and corroded copper-alloy mount in the form of a theatrical comic mask. The mount measures 25 by 20 mm and weighs 9.2 g. Much surface detail is lost to pitting and corrosion, but sufficient survives to identify the subject. A cap of hair carries surviving white metal inlay, with bands curving from the sides of the head to the centre and from front to back, likely survivals from a diadem-like head decoration. A groove separates hair and face; the latter is very worn, but the white metal-inlaid pupils survive beneath arched brows. A snub nose sits above the gaping outsized mouth, the stretched lips emphasized by a groove. The concave reverse may contain iron staining.
Clapton-in-Gordano, mount (No. 17). Scale 2:1 (Photo: K. Adams; © Bristol City Council).

The distorted features, above all the gaping mouth, allow the subject to be identified as the mask worn by the young slave character in Greek New Comedy.Footnote 88Small masks are widely documented as furniture and vessel fittings, but while typical subjects comprise hooded figures, gorgons, maenads and so on, recognisable theatrical masks are rare.Footnote 89Some possible examples have been documented by the PAS,Footnote 90but as motifs theatre masks are a little better documented in other media in Britain.Footnote 91As fittings they are better attested in neighbouring provinces. What survives of the Gordano mount suggest that it might have been as sophisticated as other better preserved copper-alloy images of masks, for instance vessel handle attachments found at Elferen (near Cologne) and Trier or first-century casket fittings from burials at Troia, near Setúbal (Portugal).Footnote 92Given its generic quality, the image is better seen as a motif borrowed to embellish or to protect than as direct evidence for theatrical culture in Britannia.
Oxfordshire
(18) Hinton Waldrist (OXON-E7450E) (Fig. 18)Footnote 93A near-complete copper-alloy harness pendant in the form of male genitals (a.d. 40-150), with a dark green patina. The pendant is 34.1 mm long and weighs 9.1 g. The upper part is broadly triangular, representing the pubic zone; this widens into moulded testes below a flaccid phallus. Curving transverse ridges on the upper section represent stylised pubic hair. Above an integrally cast suspension loop is aligned perpendicular to the pendant’s main body.
Hinton Waldrist, harness pendant (No. 18). Scale 1:1 (Photo: Lindsey Smith; © Oxfordshire County Council).

Mounts in the form of male genitalia are common among Roman harness fittings.Footnote 94The type represented here, Nicolay’s type B4, is paralleled at Nijmegen.Footnote 95Such finds have been identified as military equipment.Footnote 96However, the examples documented on the PAS database are widely distributed across England, including harness fittings similar in size and form but all varying in details, for example in the stylisation of pubic hair.Footnote 97Hoss suggests that depictions of phalluses fell out of use during the latter second century after greater prominence in the preceding period.Footnote 98Flaccidity in this case contrasts with the more common erect forms, though no doubt served its apotropaic effect equally well, deterring the evil eye of ‘fascinators’.
Hampshire
(19) Kingsclere (BERK-1DDAF5) (Fig. 19)Footnote 99A copper-alloy sword pommel of late Iron Age date, in the form of a male head, well preserved if worn with a green patina, 29.6 mm long and weighing 22.5 g. The distinctive coiffure is carefully modelled by shallow grooves, straight and parallel on sides and back. On the top of the head is a crown-like whorl; below it symmetrically arranged rows of curls frame the temple. The ears are modelled as single curves, around which the hair arches. The prominent brows curve from sides to centre where they meet to form a narrow nose. The orbits house lentoid eyes, with pupils delineated. The slot mouth is framed by moustache and beard, the latter better preserved on the right side, thickening around the mouth as short curving grooves. Within the hollow interior are traces of lead, perhaps from attachment to the hilt. This fitting joins other anthropomorphic sword pommels documented by the PAS across England and Wales.Footnote 100These belong to the wider European group classified by Clarke and Hawkes, this one having affinities with type G, projecting more fully beyond the hilt and more fully modelled in terms of facial features, likely dated to the first centuries b.c. or a.d.Footnote 101The portrait form is shared by contemporary mounts and fittings.Footnote 102
Kingsclere, pommel (No. 19). Scale 1:1 (Photo: P. Smither; © The Portable Antiquities Scheme).

(20) near Basingstoke (SUR-2179ED) (Fig. 20)Footnote 103A copper-alloy vessel lid, possibly from a cylindrical canister or pyxis, incomplete with green patina and traces of corrosion. At its widest the lid measures 56.4 mm across; it weighs 37 g. Its domed lid rises to a waisted terminal, from one side of which a pair of parallel incised lines extends to the edge, framing faint hatching; on the underside a similar pair is incised. The top of the terminal and the centre of the lid’s underside are dimpled from lathe finishing.
Near Basingstoke, pyxis lid (No. 20). Scale 1:1 (Photo: S. Maslin; © Surrey County Council).

Finds from Britain of pyxides, containers for cosmetic preparations, are rare. The most famous is the small circular tin-alloy canister, deposited in a mid-second-century ditch fill in the Tabard Square temple precinct, Southwark, still containing its animal-fat based ointment.Footnote 104Copper alloy is less well documented as a material for pyxides than bone and glass.Footnote 105A complete boxwood pyxis from late first-century a.d. Vindolanda is a reminder from Britain that hardwood examples were likely once as common as metal, if not more so, as spectacularly demonstrated at Les Martes de Veyre cemetery.Footnote 106
West Sussex
(21) Sutton (SUSS-DDAE5A) (Fig. 21)Footnote 107Part of a cast copper-alloy drop handle in the form of a stylised dolphin, with dark green patina, 105.9 mm long and weighing 115.6 g. The dolphin’s beak expands into a ridged central collar, ending in a worn break where it once connected to an opposed cetacean. The body forms a near S-curve, tapering to the tri-pronged tail. The latter arches back to join the body, forming a loop through which the split-spike loops for attaching the handle to furniture could be threaded. As well as the worn dorsal crest (behind the head rather than in its natural position on the back) the figure carries extensive cold-worked surface detail, especially on the zones at head, neck and tail. The decoration on the head is organised around the eye, complete with pupil and eyebrow, with repeated lash-like diagonal hatching above and below. The beak carries rows of semi-circular incisions, arranged symmetrically, the mouth grasping the central moulding. From the eye a curving motif extends onto the body, its sides defined by pairs of parallel lines enclosing hatched zones. The body and tail are decorated with near-circular scales, each with an open triangle at the base from which short diagonal strokes radiate. Each projection from the tail has a central groove flanked by further hatching. On the reverse the collar and body of the dolphin are recessed and hollow but the tail is flat.
Sutton, furniture handle (No. 21). Scale 1:2 (Photo: J. Clark; © Sussex Archaeological Society).

Drop handles of this type, serving as handles on the sides and tops of boxes, are widely documented in the Roman provinces.Footnote 108For the few from Britain diverse findspot types are attested, for instance Phoenix House in London, the South Shields fort, Fishbourne villa and ordinary rural sites like Woodcutts, the latter found with other fittings and casket contents.Footnote 109Other examples from rural settings have been documented by the PAS.Footnote 110Finds of such handles are much more frequent in neighbouring provinces, with abundant examples in older collections in Belgium and Germany, and many known from Augst alone.Footnote 111The Sutton handle (and other examples from Britain) takes the form of one of the common variants, distinguished by the dolphins meeting at a central collar, rather than at a shell or bust, a likely first- to second-century form to judge from examples excavated at Augst.Footnote 112Its size, comparable to some of the other largest examples, suggests that it was attached to a substantial box or chest.Footnote 113Its form resembles some continental examples, for example, the four identical handles probably found at Flobecq-Ellezelles, Hainaut, in the mid-nineteenth century, but not closely enough confidently to suggest a workshop connection.Footnote 114As yet the fine detail also cannot be specifically paralleled among the features revealing workshop links between some surviving handles and moulds.Footnote 115
(22) Near Findon (SUSS-FF6F09/2024T47) (Fig. 22)Footnote 116Three small copper-alloy zoomorphic figurines of late Iron Age to early Roman date, found separately c. 10 m apart. Modelled quite schematically, all are worn with green patinas and have lost surface details and limb ends.
a–c near Findon, figurines (No. 22). Scale 2:3 (Photo: J. Clark; © Sussex Archaeological Society).

One takes the form of a recumbent boar, 43.6 mm in length and weighing 27.5 g. The head tapers to a flattened snout, a slot for the mouth, faint grooves at its corners for tusks, otherwise lacking facial features. Worn ears frame a crest running to the tail, hatched on both sides. Thin legs, extending outwards at the sides and front, end in worn breaks; a looped tail survives between the hind legs. Between the forelegs a corrosion patch indicates a likely mounting with an iron pin to a now lost base.
A similar smaller standing boar is 29.7 mm long and weighs 11.7 g. A crest also runs the length of its back, flanked by upturned ears at the head. The latter tapers to a flattened snout, without further facial detail. The body narrows at the hips. From the rounded shoulders and haunches narrow legs extend, all broken in antiquity. There are no visible traces of attachment.
A long-bodied dog, 52.8 mm long and weighing 26.6 g, lies with head raised and hindlegs tucked beneath. The elongated head is more delicately modelled, tapering to a rounded snout grooved to render the mouth and lower jaw. Simple ears project upwards, their tips broken in antiquity. From the narrow shoulders and haunches three narrow legs taper to worn stumps; one is missing entirely. The tail survives as a stub. An iron shank through the figure’s centre enabled its attachment to a now lost base.Footnote 117
These examples join the growing corpus of animal figurines documented by the PAS.Footnote 118The boars’ stylisation is less marked than the famous Hounslow (Middlesex) boars, but not all boars supposed to be of Iron Age date share this characteristic and it is not easy in this case to decide between a late Iron Age and Roman date.Footnote 119The first object recalls the Muntham Court boar, i.e. the copper-alloy plaque excavated from a Roman context from Findon close by, perhaps associated with a shrine.Footnote 120Sussex and its environs are rich in boar images, including examples documented by the PAS.Footnote 121Assemblages of this kind, however, are rarer discoveries. A connection of animal figurines and related objects to religious ritual is likely.Footnote 122
East Sussex
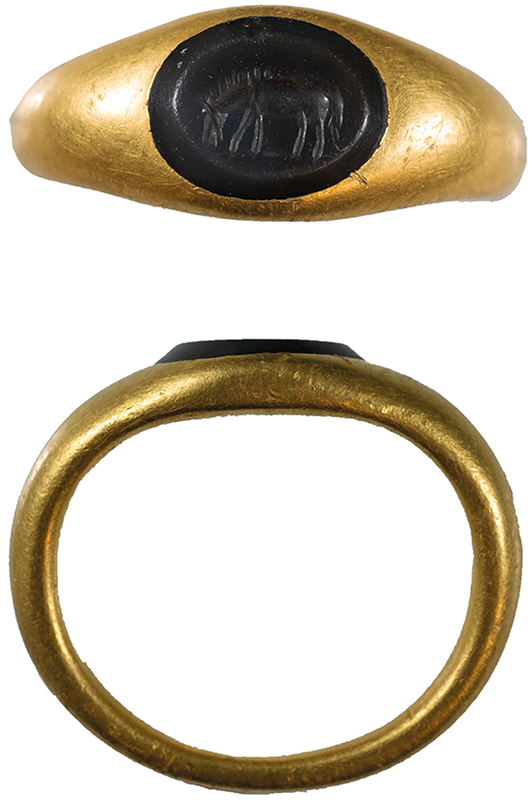
(23) near Plumpton (SUSS-780E3B/2024T464 (Fig. 23)Footnote 123A complete well-preserved solid gold finger-ring, with an intaglio depicting a grazing horse. Its external maximum diameter is 22.1 mm; the intaglio is 9.2 mm long. It weighs 7.7 g. The narrow oval hoop is D-shaped in cross-section, widening into smooth plain shoulders, framing an oval bezel set with a black oval intaglio of chalcedony or nicolo, Henig flat type 2 in profile, being slightly raised from the bezel surface with bevelled sides. The intaglio (unworn) presents a grazing horse on a grooved baseline, facing left with its left foreleg advanced. Its neck bends to the ground and the mouth is slightly open to graze. Additional incisions render the upright mane and details of the tail.
near Plumpton, ring (No. 23). Scale 3:2 (Photo: J. Clark; © Sussex Archaeological Society).

Finger-rings like this of Guiraud’s type 2d (Henig’s type II) date from the first to early third centuries, but gold examples are uncommon.Footnote 124However, similar rings have been documented by the PAS, including a ring with an almost identically engraved intaglio found in north-west Norfolk.Footnote 125For the intaglio image, comparanda include a nicolo depicting a browsing horse from Gloucester’s North Gate excavations, as well as better-cut parallels of likely Flavian date, a dark green jasper (two horses) from the outlet drain at Bath, and a black nicolo (racehorse) from Fishbourne, found in late third-century villa deposits, perhaps an heirloom.Footnote 126The use of black nicolo in gold finger rings is noteworthy, since the material is more commonly found in silver jewellery. Unlike the Fishbourne racehorse, this intaglio is not cut to the highest standard.
Kent
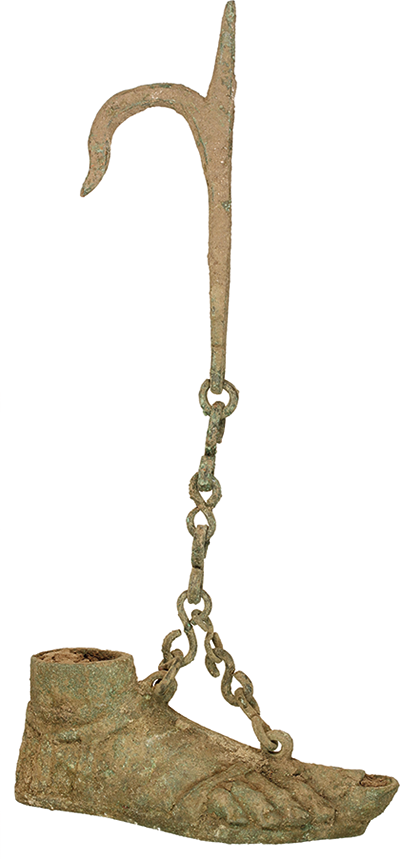
(24) Hythe (KENT-EE88CA/2024T1333) (Fig. 24) Footnote 127A copper-alloy ‘plastic’ lamp in the form of a small sandalled right foot, with attached chain and hook, both with a light green patina, found during metal-detecting in the environs of excavations at the Roman fort at Lympne.Footnote 128The lamp is 74.5 mm long, weighing 70.2 g. The big toe extends to form the nozzle, while the filling hole is above the ankle. Vertical strips around the ankle and across the toes represent strapping, with thin strips on the heel forming further thongs. A thin sole, now detached, forms the base of the lamp. The careful modelling, a demonstration of virtuosity by its maker, is exemplified by the detailed rendering of toenails. A further ridge along the top of the foot connects the ankle and toe straps and carries two suspension loops, each connected to short lengths of chain which meet to join a short chain and hook, the latter enabling the lamp to be hung from the wall. The lamp and suspension mechanism were found after excavation to be associated with a ragstone outcrop in an area disturbed by burrowing, in association with a small pottery assemblage.Footnote 129
Hythe, lamp and hook (No. 24). Scale 1:2 (Photo: J. Whitmore; © Kent County Council).

Hythe, lamp only (No. 24). Scale 1:1 (Photo: J. Whitmore; © Kent County Council).

Copper-alloy lamps of all types are scarce in Britain, with only four other examples recorded on the PAS database and a modest corpus known from other sources.Footnote 130Suspension hooks found in isolation are more widely documented.Footnote 131Plastic lamps in any medium are also uncommon discoveries in Britain, with only a handful otherwise recorded, none of those in copper alloy with a modern excavation provenance. Only three (all ceramic) are documented in foot form, two from Southwark and one from Corsham.Footnote 132The Lympne find is therefore the only copper-alloy plastic lamp with an excavated findspot in Britain. Given the possible first-century date (see below), as well as the frequent association of such objects with Roman military sites, it joins other evidence from Lympne for activity preceding the construction of the late third-century Saxon shore fort.Footnote 133
Despite the low number from Britain, a much larger wider corpus of lamps modelled as feet is attested across the empire, admittedly with poor provenance information; the form is usually dated to the first century a.d.Footnote 134The claimed connection to specific gods, especially Serapis, is hard to substantiate, though a frequent magico-religious significance is clear.Footnote 135The general preference for the right side in plastic lamps and other representations of feet speaks to the foot’s potential apotropaic value, although as Shaw has demonstrated, this preference varies with medium and is sometimes exaggerated.Footnote 136
Wiltshire
(25) Steeple Langford (WILT-58A95D) (Fig. 25)Footnote 137A copper-alloy buckle plate, dated to c. a.d. 350–450. The narrow plate, damaged at one end, is 73 mm long and 15 mm wide. It weighs 9.1 g. It is folded in half at the hinged end where it once articulated with the buckle proper. Incised figural decoration covers its front surface, framed by a punched border. The decoration divides into two zones, separated by a ‘tree of life’ motif, i.e. a line incised across the buckle with branches and fruit formed by punched crescents and triple dots. With the branches in three opposed pairs, this forms a double tree, one for each of two short-legged peacocks which face it. With elongated bodies and tails, these are set side-on in mirror pose along the buckle plate. Both have a large circular eye and curving beak, with feathered crest above the head. The plumage is rendered by parallel incisions set in herring-bone configuration (lower body) and short punched crescents densely set in rows (upper body). The tail carries similar decoration. Tail and body are respectively outlined by punching and incision. Where tail and body join a crescent motif hangs above both birds. On the other side of the ‘tree of life’ are three human busts, one larger across the width of the plate, two smaller side by side. On the larger the ovoid face tapers to the chin; from the high temple strands of hair (or head-dress elements) radiate in parallel curving incisions, with beaded ends formed by a pellet. Facial features are schematic, a transverse line for the mouth and a longitudinal line for the nose, from which eyebrow curves extend. The latter, thickened by short incisions, more prominent on the right than on the left, frame lentoid eyes. The ears are circular recesses framed by curving incisions. The upper body is a trapezoidal zone, fringed by repeated loops created by curving incisions, likely rendering clothing; the outermost loops, with differentiated articulation point, may represent arms, especially on the figure’s right side. The two smaller busts are very similar, albeit with fewer strands of hair lacking the beaded ends, no ears, thicker eyebrows and simple panel-like busts. From each smaller bust, articulated by a circular recess, a stumpy arm extends along the edge of the buckle plate towards the larger figure. Beyond these smaller busts a further tree of life motif extends along the centre of the buckle to its broken edge. The gender of the figures is not obviously expressed.
Steeple Langford, belt plate (No. 25). Scale 3:2 (Photo: S. Hawke; © Salisbury and South Wiltshire Museum).

This clearly belongs to the distinctive type I buckles of fourth- to fifth-century a.d. date identified by Hawkes and Dunning.Footnote 138Once argued to signify the holding of military or bureaucratic office, the belts to which these buckles belong are now considered more generic status designators, perhaps emulating badges of office rather than marking their holding, and potentially worn by women or men.Footnote 139Since the initial study the corpus of belt fittings of this kind has substantially increased, largely through metal-detected examples.Footnote 140This example joins a small number which carry distinctive figural decoration, most often peacocks facing across a tree of life. Peacocks also dominate the more numerous figures on strap ends of belts of the same type, vividly illustrated by a well-preserved example found in 2024 in East Hendred.Footnote 141This image likely held a religious significance, the birds’ potential to signify everlasting life marking a Christian appropriation of their connections to pagan deities.Footnote 142
Despite its affinities with this group, the Steeple Langford plate stands out both in its arrangement of decoration, in particular the placing of the peacocks side-on, and in the presence of the busts, otherwise unparalleled on belt fittings of this kind. They likely represent the translation of a hierarchically organised figural grouping from other media, but identifying this grouping is challenging, especially in the absence of recognisable attributes. The possibilities include Christian figures, for example Christ and the apostles, imperial figures, for example senior and junior, or a familial group.Footnote 143Other interpretations are also possible. The distinctive hair might render a tonsure (Martin Henig pers. comm.), but it does not match the suggested reconstructions of the Celtic monastic tonsure.Footnote 144An alternative identification, suggested to us by Daniel McCarthy, is to read the image in astronomical terms, identifying the figures as observers of a sun–moon configuration symbolised in the triple dots on the tree of life.Footnote 145If the identity of the figures remains uncertain, the stylistic transformation to hieratic images is unambiguous, but this too creates further uncertainty. The figures’ distinctive schematising has affinities in later belt buckles, for example from seventh-century Burgundy and Lombardic burials.Footnote 146However the date for the belt form would be difficult to reconcile with this.
Somerset
(26) Beckington (WILT-E829FA) (Fig. 26)Footnote 147A copper-alloy zoomorphic plate brooch, worn with a green patina, with little of its enamelled decoration surviving, 36.3 mm long and weighing 8.5 g. It takes the form of two opposed horse-like heads in profile, together forming a reversed S. Each head, dominated by a circular recess for the eye, narrows in the muzzle and flares at the mouth. Behind the large ear each curving neck carries a trumpet-shaped cell inlaid with (traces of) red enamel, its narrow tip below the ear, its mouth meeting another circular recess where the heads join. Features are emphasised by deep incisions; the edges carry continuous angled short incisions, perhaps rendering hair. On the reverse, lugs holding the axis bar and remnants of pin and catchplate survive.
Beckington, brooch (No. 26). Scale 1:1 (Photo: S. Hawke; © Salisbury and South Wiltshire Museum).

Among Roman zoomorphic brooches direct parallels have not been identified. In only one case, from Powerstock, Somerset (DEV-E9FD83), are opposed animal forms (sea-monsters) combined in this way, similarly inlaid. A first- or second-century date seems likely, based on the general dating for enamelled plate brooches and the echoes of other stylised or fantastic animal forms like Dragonesque brooches, though this example’s findspot is far from the zone in which the latter concentrate.Footnote 148
Dorset
(27) Gussage St Michael (DOR-0A93D7) (Fig. 27)Footnote 149A copper-alloy hollow-cast key handle in the form of a dog protome, well preserved, if worn, with a green patina. It is 85 mm long and weighs 111.4 g. The dog leaps forwards with forelimbs outstretched. Facial features are modelled in detail, if worn. The mouth gapes, the eyes are opened wide and ears are flattened against the head, as if the animal is chasing. Around the neck a thick studded collar divides fur modelled with care, swept back from the head and tousled on the body. The dog emerges from a six-petalled calyx and ridged collar. Square-sectioned and hollow within, the object would have housed the shank of an iron key.
Gussage St Michael, key handle (No. 27). Scale 2:3 (Photo: C. Hayward Trevarthen; © Somerset County Council).

Other key handles in canine form include examples from Ashcott, Somerset (SOM-B0C429), Wing, Bucks (BUC-BDD866) and Collingham, Lincs (LVPL-3B57B6) where the animals are similarly posed but more stylised. Perhaps the closest parallels are from Springhead which sees a hare grasped in the dog’s paws, and from Les Essarts (Vendée).Footnote 150The pose is also paralleled by a mid-second-century example from Verulamium that depicts the forequarters of a boar.Footnote 151Feline forms, especially lions, are much more common with over ten examples documented by the PAS, as well as excavated handles from sites of varied types.Footnote 152While Schüster notes that these handles may date as early as the first century a.d., the Baldock and Verulamium examples are both from third/fourth-century contexts.Footnote 153
(28) Toller Fratrum (DOR-7D6391) (Fig. 28)Footnote 154A copper-alloy mirror handle, broken in two pieces, with an even green patina. It is 123.3 mm long and weighs 137.3 g. The handle takes the form of three conjoined curvilinear elements separated by transverse oval collars, a near-circular terminal, central oval loop and mount for attachment to the mirror plate. The mount’s paired loops taper as they close, accommodating a narrow slot in which the mirror plate was secured. The surviving plate fragment carries decoration on both sides, in near-identical configurations framed by each loop. A figure-of-eight in reserved metal is formed by overlapping crescent motifs which both frame two perforations and demarcate cusps distinguished by basket-weave cross-hatching. The fragments indicate that the plate took a familiar ‘kidney’ form, with a distinctive indent or kink where it met the handle.Footnote 155
Toller Fratrum, mirror handle (No. 28). Scale 2:3 (Photo: C. Hayward Trevarthen; © Somerset County Council).

As a late Iron Age (late second century b.c. to later first century a.d.) mirror this discovery is one of 15 further examples to add to the 58 documented by Joy.Footnote 156Its findspot lies within a dense cluster of mirrors centred on central and southern Dorset and is not far from other metal-detected examples from Langton Herring and Portesham.Footnote 157While this mirror has clear affinities with this south-western group, especially the larger mirrors with kidney-shaped plates and complex decoration, its form is very distinctive.Footnote 158Inscribing decoration on both sides of the plate in the spaces framed by the attachment mount seems only rarely to be paralleled, for example on the Pegsdon mirror.Footnote 159The handle echoes Joy’s D4 type, but its central oval loop and double-looped attachment mount are not seen in the wider corpus, although the latter echoes the rings which sometimes extend from or are framed within the arms attaching handles to other mirrors; some such rings similarly provide a planned ‘window’ onto the decoration.Footnote 160A double roundel provides the focus of decoration on other mirrors, either the whole surface (e.g. St Keverne) or details (e.g. Birdlip).Footnote 161However, by expressing its roundels through perforation, the Toller Fratrum mirror complements the more familiar ‘positive’ (hatched) and negative (reserved metal) motifs.Footnote 162The subtle variation, rewarding the viewer’s close attention, exemplifies these mirrors’ beguiling properties.Footnote 163
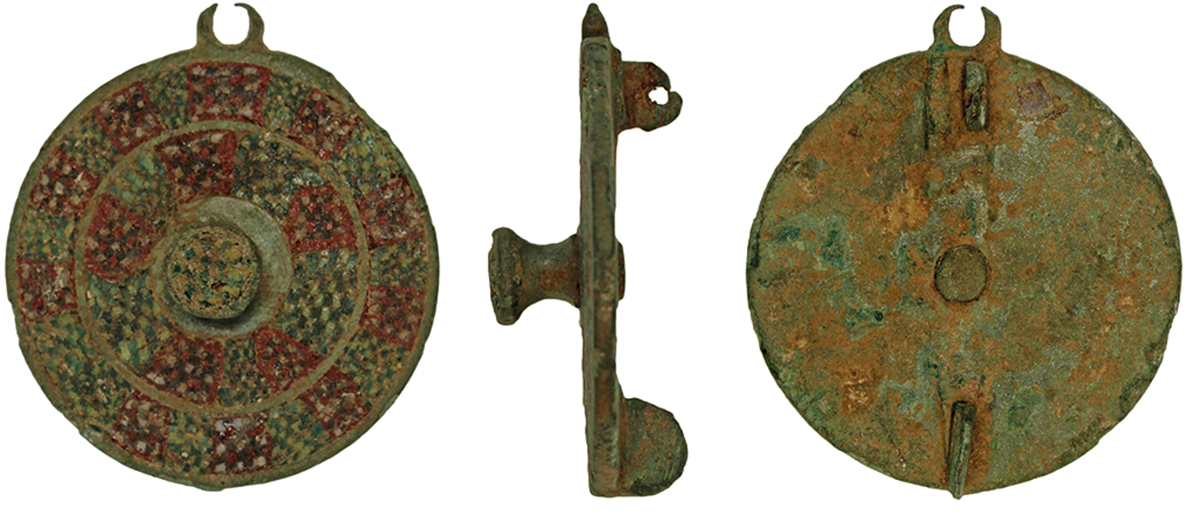
(29) Frampton (DOR-62E541) (Fig. 29)Footnote 164A large though incomplete copper-alloy enamelled disc brooch, with a maximum diameter of 35 mm and weighing 10 g. The brooch face carries millefiori enamelling in two concentric bands, separated by reserved metal. These bands frame a waisted central boss, attached through a central hole and carrying similar decoration. Within the bands the enamelling is configured as alternating chequerboards, one in turquoise and white, the other in red, blue and white, the latter framed by a red border. The boss carries turquoise and white squares, also in chequered configuration. On the reverse a lug for the pin’s axis bar and a small catchplate survive. The lugs are adjacent to the broken loop projecting from the edge of the brooch which once served to attach a chain.
Frampton, brooch (No. 29). Scale 1:1 (Photo: C. Hayward Trevarthen; © Somerset County Council).

Millefiori enamelling, created by fusing coloured glass rods, stretching the resultant bundle into a cane and applying slices cut from that cane once cooled is widely used to decorate Roman copper-alloy objects including brooches. Several such brooches with chequerboard decoration arranged in concentric rings have been documented by the PAS across England.Footnote 165They add to the wide distribution of this mid-imperial brooch form in Britain and neighbouring provinces.Footnote 166


 Open access