Chapter 2 has already examined the question of settlement patterns and regional policies of land management through regional case studies and several characteristics of the period were explored. The characteristics included the increasing territorial pressures created by the fragmentation of the state and inter-regional territory annexation; the maintenance and adaptation of New Kingdom military institutions, and the creation of new fortresses in areas of important strategic and politico-economic junctures based on new political borders; the establishment of a more inward-looking regional policy of local populations and the need for populations to be clustered in more close-knit kin groups, following a Libyan social influence, particularly in the Delta where Libyan influence was most felt; and finally, the growing power of regional centres may have influenced the urbanisation of the country and created hinterlands with more urbanised centres under strong powerful local leaders. This chapter moves on to assess the built archaeological remains of the Third Intermediate Period and moves from a macro-analysis (settlement patterns) to a micro-analysis (the settlements themselves) by discussing these remains. The archaeological remains of the Third Intermediate Period settlements are made up of two main types of material culture: the built environment, consisting mainly of mud-brick and stone structures, and the ceramics and wider object world. This chapter discusses the former, while the latter will be discussed in Chapter 4.
The chapter begins by establishing the locations of preserved Third Intermediate Period domestic settlement remains to assess the different regional built environments of settlements and the way in which settlements developed spatially over time. The settlements are further analysed to define the way in which Late Period urban policies affected the development and preservation of Third Intermediate Period urban topography within the archaeological record. The maintenance of or changes in urban topography of the Third Intermediate Period are discussed in the light of the top-down policies of a new political regime in a re-unified government and state in Late Period Egypt. Based on the characteristics identified previously in Chapter 2, the present chapter assesses whether the settlements in the Third Intermediate Period developed as independent entities within specific regions or if there was a general pattern of settlement policy across different political boundaries and geographical regions. It also assesses characteristics of new ideologies, both political and religious, and the economic limitations of different regions through examination of the construction of monumental architecture (walls, temples, and palaces), the nucleation of domestic architecture around monumental constructions, the development of architectural design in administrative, religious, and domestic architecture, and the self-sufficient nature of local populations by way of grain storage and food supply. The case studies at the outset of the chapter describe the development of habitation within Third Intermediate Period settlements and are discussed in geographical order from south to north (Map 18).
Sites mentioned in Chapter 3.


The Spatial Development of Third Intermediate Period Settlements
1 Thebes
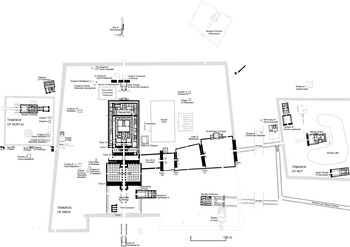
The New Kingdom and Third Intermediate Period settlement on the East Bank of Thebes lies buried beneath the modern city of Luxor, as shown in the excavations at Abu el-Gud,1 and to the west of the Mut temple at Karnak (Fig. 3),2 and probably stretched between the temples of Luxor and Karnak. A Twenty-First Dynasty stela of the HPA Menkheperre3 describes the encroachment of an Asiatic domestic population into the walls of the Great Amun temple at Karnak,4 which indicates early Third Intermediate Period settlement in the south-east area of Karnak. After the construction of Menkheperre’s wall, based on associated excavation plans, the area was utilised for the construction of small chapels to Osiris. The area is now built over by the Late Dynastic temple enclosure (Fig. 4). On the West Bank, a New Kingdom papyrus5 indicates that small settlements grew up in the areas in between the New Kingdom mortuary temples, acting as local support service communities, while many others flourished as Thebes grew in prosperity under the New Kingdom pharaohs, particularly at Deir el-Medina and Malqata. By the early Third Intermediate Period, the communities on the West Bank had moved into the temple of Ramesses III at Medinat Habu (Fig. 5). As a result, the West Bank population density had increased within the confines of Medinat Habu and the density of the settlements most probably decreased across the wider West Bank floodplain, although the exact development of wider floodplain settlement systems is difficult to assess with the current evidence. The increase in tribal raids and the decreased security on the West Bank would have facilitated a move behind the walls of Medinat Habu, over concerns for safety and protection.
Area of Third Intermediate Period settlement to the west of the Mut temple at Karnak. (Sullivan, 2013: fig. 6.4).

Map of Karnak showing the location and extent of the known New Kingdom and Third Intermediate Period temple landscape (Dodson, 2012: xxiv, map 7). (Courtesy of Dr A. Dodson.) Location of bastion of Menkheperre and early Twenty-First Dynasty settlement area added by the author.

Plans of the temple enclosure of Medinat Habu during the Third Intermediate Period, compared with the sizes of the New Kingdom settlement of Deir el-Medina and the workmen’s village at Amarna (Kemp, 2018: fig. 8.17).

2 Matmar
At Matmar, the Third Intermediate Period domestic structures found within the Seth temple of Ramesses II were aligned to the southern mud-brick enclosure wall, and the east–west axial alignment area of the limestone chippings represented the former position of the temple (Fig. 6).6 The presence of circular grain silos on the exterior of the temenos wall may suggest some form of settlement outside the enclosure.
Reconstruction of the Matmar temenos area in the Third Intermediate Period.

3 Hermopolis
At Hermopolis the Third Intermediate Period population continued to live in a settlement in an already established New Kingdom occupation sector to the west of the Amun temple (Fig. 7).7 British Museum excavations traced the Third Intermediate Period settlement in the north-west at ‘Site W’.8 Early German excavations, particularly in ‘Graben IV’, located to the east side of ‘Site W’, found Third Intermediate Period settlement remains stretching for 170 m in a north-westerly direction from the exterior of the New Kingdom temple enclosure wall, but these were labelled as ‘Spätzeit’ (Late Period). These ‘Spätzeit’ layers had Third Intermediate Period material mixed within them.9 Other deposits designated ‘Spätzeit’ were present in Graben II further south of the enclosure. In Graben II, the Third Intermediate Period buildings were themselves constructed over occupation levels of the New Kingdom. The deep stratigraphy of Graben II suggests the ancient settlement during the dynastic period was located in the south-eastern part of the tell.10 Evidence of the Third Intermediate Period settlement was found to the south-east of the high mound of Kom Qassum (Test Area 2). The presence of Third Intermediate Period ceramics in the surface dumps suggests the Third Intermediate Period settlement extended to the south-west of the New Kingdom temenos for a considerable distance.11
Map of Hermopolis showing the New Kingdom Amun temple and areas of Third Intermediate Period settlement in the north-west of the tell (Site W), Graben II–IV, and test pit 2 (Spencer, 1993: pl. 1).

4 Memphis
There is a small amount of evidence for temple construction and funerary structures at Memphis during the Third Intermediate Period (Fig. 8). The Third Intermediate Period occupation levels excavated by the EES at Memphis (Kom Rabia) in the southern-western corner of the Ptah temple were, however, poorly preserved, with only some areas of flooring and walls remaining, but they do provide evidence for the spatial orientation of the Memphite settlement around the outside of the Ptah temple. The builders of the Third Intermediate Period settlement placed the walls in shallow foundation trenches cut into a relatively uniform deposit covering the remains of the earlier Ramesside structures. It is possible that the deposit into which the Third Intermediate Period walls were cut was levelled flat as a preparation for the new buildings. By the time the Third Intermediate Period houses were built, the Ramesside ground plan had partially or entirely disappeared.12 The Third Intermediate Period structures, based on the small area excavated, appear to follow the architectural orientation of the New Kingdom, or they lie slightly more south-east–north-west.13 The walls no longer respected the open space of an earlier Ramesside courtyard, but the New Kingdom Ptah temple enclosure, or the small Ptah temple of Ramesses II outside the main temenos wall, dictated the uniformity of the Third Intermediate Period settlement. The New Kingdom Memphite temples therefore preserved the original alignment of the New Kingdom ground plan into the Third Intermediate Period.14 The temple of Merenptah at Kom el-Qala dictated the axial alignment of later domestic structures, as they were aligned to the western side of the temple courtyard. The alignment of the Kom el-Qala houses in a south-east–north-west direction corresponds with the Third Intermediate Period Kom Rabia houses, suggesting a general south-east–north-west alignment of houses at Memphis in conjunction with the New Kingdom temples.
Third Intermediate Period temple and funerary structures at Memphis (Dodson, 2012: xxi, map 5).

5 Kom Firin
Along the western exterior wall of the Ramesside temple at Kom Firin, but within the temple enclosure, early Third Intermediate Period occupation was found, along with early Third Intermediate Period settlement in the north-east and north-west of the temple enclosure (Figs. 9–11).15 The magnetic survey along the route from the Ramesside gateway to the temple forecourt suggests this area may have been relatively clear of civic buildings. If this was the case, then it would suggest that any post-New Kingdom structures, built here after the Ramesside enclosure and temple fell out of use, were destroyed, or the original Ramesside processional route remained clear throughout the Third Intermediate Period.16 A similar scenario is observed at Medinat Habu, where the route from the gateway of the temple of Ramesses III was kept clear, while the Third Intermediate Period settlement developed on both sides.
Kom Firin showing the location of the Ramesside temple and enclosure and the Third Intermediate Period settlement (Spencer, 2008: fig. 2).

Tripartite house structure in the north-east corner of the Ramesside temenos at Kom Firin, Phase E V–VI (Spencer, 2014: fig. 30).

Tripartite house structure in the north-east corner of the Ramesside temenos at Kom Firin, Phase E V–VI (Spencer, 2014: fig. 31).

6 Mendes
At Mendes, the Third Intermediate Period settlement was located to the south of the temple of Banebdjed, while to the north and west of the temple there is, so far, no evidence of Third Intermediate Period settlement. The wider settlement, therefore, retained its axial layout as it would have existed in the twelfth century bce.17 Nineteenth- and twentieth-century farming has reduced the ninth- and eighth-century bce occupation levels in the south of the tell, but there is evidence of sub-floor basements in the houses. These basements overlay houses of the First Intermediate Period settlement, indicating a re-use of old districts of the settlement which may have fallen into ruin.18 The New Kingdom enclosure wall was already in a state of disrepair and was being cut into for both domestic and funerary purposes. To the south of the Banebdjed temple, along its western side, there was a Third Intermediate Period/Saite Period casemate building pre-dating the Twenty-Ninth Dynasty burial of Pharaoh Nepherites I. This building may have been a monumental tomb of the Libyan Period. Further to the west of this casemate structure, it is tentatively suggested that the area was used for mud-brick tomb chambers of the Mendesian Third Intermediate Period elite,19 but the area was destroyed by Late Period redevelopment.
7 Kom el-Hisn
A survey of Kom el-Hisn in 1996 by the EES demonstrated that part of the Third Intermediate Period settlement was located to the west of the early Ramesside/Third Intermediate Period temple of Sekhmet-Hathor. Auger boring and test pitting in the area showed there to be substantial settlement deposits dating from the late New Kingdom, the Third Intermediate Period, and into the early Saite Period (Fig. 12).20 Test Pit 4 on the western edge of the kom revealed late New Kingdom and Third Intermediate Period deposits. The auger coring taken across an east–west axis of the tell demonstrated the development of the settlement in the west from the early Ramesside Period. Moving slightly to the west of the temple there was a relatively deep series of deposits which may represent the early Ramesside settlement that grew up alongside the western wall of the temple of Ramesses II. The survey and excavations could not define whether the entire settlement was within the walls of the temple enclosure, or if there had been additional settlement outside. The isolated nature of late New Kingdom and Third Intermediate Period deposits, and the distinct difference in deposit depths compared with those further west, could indicate a concentrated area of settlement for an extended period. There is a distinct decrease in the depth of the settlement deposits further to the west.21 The alignment of the Third Intermediate Period walls in Test Pit 4 in association with the back wall of the temple and the earlier Ramesside houses attests to the ongoing usage of the New Kingdom built environment as a basis for the layout of succeeding building phases.22
Plan of the New Kingdom/Third Intermediate Period/Saite temple of Sekhmet-Hathor at Kom el-Hisn with coring and test pit locations (Kirby, Orel, and Smith, 1998: 24, pl. 1).

8 Tell el-Balamun
A widespread domestic occupation consisting of mud-brick houses and grain silos dating to the late New Kingdom/early Twenty-First Dynasty was found within the New Kingdom temple enclosure (Fig. 13). This settlement was later removed to build a new temple of Shoshenq III.23 By the time of the early Third Intermediate Period, the New Kingdom temenos wall was already in a state of disrepair, while there is evidence for a new Third Intermediate Period enclosure to the south–east, enclosing the Shoshenq III temple. To the south-east of the Third Intermediate Period enclosure a small section of settlement dating to the end of the eighth or the start of the seventh century bce was found,24 but the stratigraphic connection between the Third Intermediate Period enclosure and the settlement cannot be ascertained as the later temple of Psammetik I cut through the deposits between the two areas (Fig. 14). Therefore, it is not known whether this settlement was located within the temple enclosure or outside it. The south-western part of this settlement area had fewer traces of buildings than the northern part, suggesting this was an area relatively free of structures, containing deposits of rubbish and builder waste instead.25
Temple enclosure of Tell el-Balamun (Leclère, 2008: pl. 6.3).


Developments in the Spatial Layout of Third Intermediate Period Settlements
The spatial layout of Egyptian settlements in the Third Intermediate Period continued to be formed by the construction of domestic buildings which nucleated around the main temple enclosures. These buildings retained the axial alignment of the earlier New Kingdom settlements in relation to the main cult temple. In the Delta, as a result of the limitations of tell space, new domestic areas were built on earlier abandoned domestic and funerary zones. This shows a reorganisation of domestic settlement into new areas. In the late New Kingdom and early Twenty-First Dynasty, ephemeral settlements saw the development of domestic communities within the New Kingdom temple enclosures as responses to local civic insecurity, while attempts at domestic encroachment on religious and civic areas in the main political centres are demonstrated at Thebes and Memphis.
The Late Period Palimpsest
The evidence for Third Intermediate Period settlement remains, such as complete housing plans and religious and secular civic buildings, is limited. Reasons for the lack of surviving remains include the natural progression of tell sites and the taphonomic nature of their development. The research focus for many archaeological missions was on temple enclosures that since the Third Intermediate Period have undergone substantial adaptations in the built environment, through the enlargement and rebuilding of temenoi walls, the re-use of monuments, and the complete redesign of temple complexes in later periods.
At Thebes, the Third Intermediate Period settlement to the west of the Mut temple at Karnak was enclosed by a Late Period wall,26 which no doubt levelled a large area of Third Intermediate Period settlement including administrative buildings associated with the temple. At Hermopolis the construction of the new Thirtieth Dynasty temple enclosure also removed a large amount of the Third Intermediate Period settlement which was located to the west of the New Kingdom temple.27 In the Delta at Kom Firin, as part of a change in the sacred topography of the settlement, the Twenty-Sixth Dynasty builders constructed a new enclosure wall which levelled a large area of ground inside the previous Ramesside enclosure wall, and in turn levelled a substantial part of the Third Intermediate Period settlement.28 In the eastern Delta at Tell el-Balamun, the Saite ruler Psammetik I redeveloped the entire area of the Third Intermediate Period temple complex.29 As at Kom Firin, this was done as a result of the change in the sacred topography of the settlement, with the new enclosure extending over much of the southern part of the tell30 and most likely destroying vast areas of Third Intermediate Period settlement to make way for the new temple enclosure. Finally, at Tanis, the new Saite enclosure will have levelled a large part of the Third Intermediate Period settlement outside the enclosure of Psusennes I (Fig. 15).
Map of Tanis showing the Third Intermediate Period temenos and the expansion of the temenos in the Saite Period.

At the juncture between the end of the Third Intermediate Period and the reunification of the country under the Twenty-Sixth Dynasty, those temples which were ruined or had squatters or domestic encroachment provided an important reason for the renewal of temple buildings and a chance to redevelop the sacred topographies of the settlements. The encroachment of domestic and industrial structures on New Kingdom temples in the Third Intermediate Period is clearly visible in the archaeological and textual evidence, but for other temples there may have been other motives for renewal and redevelopment, perhaps dictated by royal ideology. The Third Intermediate Period temples were taken down and levelled ready for new temples to be built on their foundations, such as at Tell el-Balamun31 and Tanis,32 while others were extended, replaced, or their blocks used in other temples like those at Bubastis33 and Tanis.34 This means that the reason Third Intermediate Period settlements known to us are so poorly preserved, both above ground and within the vertical deposits, is down to the subsequent Saite Dynasty’s policy of sacred landscape change. Previous settlement layouts, including those of the New Kingdom and Third Intermediate Period, were obliterated to accommodate new built environments. The Late Period cityscapes now facilitated the removal of large proportions of the population from settlement zones that had grown up inside and around the New Kingdom and Third Intermediate Period temple enclosures. These removals included both administrative and religious buildings, including elite burials. The Saite Period and Late Dynastic policies contrast sharply with the Third Intermediate Period policy of the adaptation and continued re-use of the settlement plans and structures of the previous New Kingdom. As a result, the discussion of the spatial development of settlements seems limited, but when the Late Period restructuring is taken into account, the spatial changes may have been more extensive and involved a larger population than seems to be the case at first sight. The small-scale Third Intermediate Period remains could thus be considered as a proxy for larger datasets, but the actual size of the Third Intermediate Period settlement data is unknown.
The Built Architecture of the Third Intermediate Period
This section focuses on the monumental architecture of the Third Intermediate Period, including walling, temples, and palaces. Monumental walls documented in both the archaeological record and ancient texts are analysed to understand the nature and extent of the monumental wall building policy for the period at political, economic, and social levels. The section assesses the condition of the existing built environment of the New Kingdom urban wall projects and its integration into the settlements of the Third Intermediate Period. It discusses the way in which New Kingdom walls were adapted, whether through extensions, reinforcements, and re-orientation, or if they were demolished to make way for new Third Intermediate Period structures. The processes identified will highlight aspects of pragmatic settlement design, and raise issues of regional economies and ideology, as well as regional security, as reasons to construct walls around the important resources of the settlement.
This section goes on to examine the structures inside and outside the walled enclosures to establish whether there are clear divisions between the New Kingdom and the Third Intermediate Period, the extent to which they represent a continuity or change over time, and the implications for the social and economic lived experience of the Third Intermediate Period population. Temple building is assessed to see if there were changes in the design and construction of religious buildings, and the extent to which new temples and shrines were constructed in the settlements. Following on from the discussion of temples, the other primary institution within the settlement, the royal palace, is documented. The location of Third Intermediate Period palaces is discussed to assess whether New Kingdom palaces continued to be used by the Third Intermediate Period rulers, or if new palaces were constructed. Furthermore, the taphonomic processes within the settlements are determined for both the lived experience of the population and the post-occupational phases of Third Intermediate Period houses. This is done to understand the way in which taphonomic processes have affected the way we understand the living conditions and development of domestic lifecycles. The architectural plans of surviving houses that were occupied in the Third Intermediate Period are compared to see whether there are parallel housing designs and architectural developments across the country as a response to specific political, historical, and environmental regions, or whether there was a continuation of the New Kingdom house format. Finally, other intramural physical and social structures of the Third Intermediate Period settlements – grain storage, cemetery positions, waste disposal, and livestock husbandry and rearing areas – are analysed to identify the social fabric and living conditions during the Third Intermediate Period.
Enclosure Walls
The urban wall traditions of ancient Egypt were first developed and favoured in the third millennium bce at el-Kab, and Elephantine.35 Settlement walls often invite functionalist approaches, with defence the most common reason quoted, but often the underlying reasons and rationale for their construction can be multi-faceted.36 Prior to the Third Intermediate Period, in the second millennium bce most large-scale enclosure walls were built around temples rather than the wider settlement, with many of them incorporating buttresses and crenulations into the design which mimicked contemporary defensive architecture.37 The temple enclosure walls represented a large investment of resources but are difficult to explain as defensive in nature, and unlike settlement walls, temple enclosures were not an optional extra within the settlement’s built landscape, but an essential part of the architecture of the shrine.38 The evidence suggests that except for planned settlements such as Deir el-Medina, there were no enclosure walls constructed around urbanised areas during the New Kingdom, unlike in the third millennium bce at Elephantine and Edfu.39 Protection in response to a physical threat was therefore not a primary concern and this is reflected in the political situation for most of the New Kingdom.40 The temple walls, however, provided protection against both potential physical (inundation waters, khamsin winds, ‘natural’ dangers) and metaphorical dangers, but more importantly in the New Kingdom, the wall acted to separate the sacred space within from the world around it.41 The separation of the shrine by way of these walls would have acted as a social exclusion barrier between the sacred and the profane.
Third Intermediate Period Wall Terminology
There are several terms used during the Third Intermediate Period to denote walls or walling elements. Those identified within the texts are ![]() sbty,
sbty, ![]() sꜣ(t), and to a lesser extent
sꜣ(t), and to a lesser extent ![]() ꜥ ı҆nt and
ꜥ ı҆nt and ![]() ṯsmt. The term
ṯsmt. The term ![]() sbty is attested in the New Kingdom,42 and can be translated as ‘wall/ramparts’,43 or ‘enclosure wall’.44 This term can be used to indicate the wall of a settlement or a temple,45 and is the most frequently used term for walls during the Third Intermediate Period. The Twenty-First Dynasty stela of Menkheperre46 records that in his Year 48,
sbty is attested in the New Kingdom,42 and can be translated as ‘wall/ramparts’,43 or ‘enclosure wall’.44 This term can be used to indicate the wall of a settlement or a temple,45 and is the most frequently used term for walls during the Third Intermediate Period. The Twenty-First Dynasty stela of Menkheperre46 records that in his Year 48, ![]() sbty ꜥꜣ wr ‘a very great wall’ was built on the north side of the temple of Amun at Karnak. The HPA Menkheperre made this new wall as
sbty ꜥꜣ wr ‘a very great wall’ was built on the north side of the temple of Amun at Karnak. The HPA Menkheperre made this new wall as ![]() bḫn ‘a citadel’, ‘fortress’. The function of this ‘wall/rampart’, if the restoration of the text is precise, should be read as
bḫn ‘a citadel’, ‘fortress’. The function of this ‘wall/rampart’, if the restoration of the text is precise, should be read as ![]() sḥꜣp, which has the meaning ‘conceal, cover or hide’,47 and can be translated as ‘to protect/save’.48 The wall constructed by the HPA Menkheperre was intended not to conceal the Amun temple at Karnak from view, but to mark the boundary between the sacred and the profane in the same way as the earlier New Kingdom walls around shrines.49 Furthermore, the wall was constructed to
sḥꜣp, which has the meaning ‘conceal, cover or hide’,47 and can be translated as ‘to protect/save’.48 The wall constructed by the HPA Menkheperre was intended not to conceal the Amun temple at Karnak from view, but to mark the boundary between the sacred and the profane in the same way as the earlier New Kingdom walls around shrines.49 Furthermore, the wall was constructed to ![]() twr r ḥꜣw-mrw ‘purify (get rid of) the Haou-merou’, who were an Asiatic group of people who had built their houses encroaching on to the temple,50 indicating a social exclusion. Later, in the Twenty-Second Dynasty, the term
twr r ḥꜣw-mrw ‘purify (get rid of) the Haou-merou’, who were an Asiatic group of people who had built their houses encroaching on to the temple,50 indicating a social exclusion. Later, in the Twenty-Second Dynasty, the term ![]() is used in the title of the settlement
is used in the title of the settlement ![]() pꜣ-sbty-n-ššnḳ ‘The Walls/Ramparts of Shoshenq III’, documented on the donation stela Cairo JE 45610 found near Heliopolis.51 The possible location of this settlement near the strategically important entrance of the Wadi Tumilat, the fact the Army Leader Bakennefi A dedicated the stela, and that the construction of the name of the settlement is similar in style to the important military checkpoint of the Middle Kingdom ‘Walls of the Ruler’, would indicate this settlement and its walls had a primary defensive/security function.
pꜣ-sbty-n-ššnḳ ‘The Walls/Ramparts of Shoshenq III’, documented on the donation stela Cairo JE 45610 found near Heliopolis.51 The possible location of this settlement near the strategically important entrance of the Wadi Tumilat, the fact the Army Leader Bakennefi A dedicated the stela, and that the construction of the name of the settlement is similar in style to the important military checkpoint of the Middle Kingdom ‘Walls of the Ruler’, would indicate this settlement and its walls had a primary defensive/security function. ![]() is frequently used in the Piankhy Stela,52 where the text refers to many
is frequently used in the Piankhy Stela,52 where the text refers to many ![]() ‘walls/ramparts’ in the settlements across Middle Egypt.
‘walls/ramparts’ in the settlements across Middle Egypt. ![]() sbty walls are documented at Meidum, Per Sekhemkheperre, Medinat el-Faiyum, Bahnasa, Kom el-Ahmar, ‘all the nomes of the South’, and all of the
sbty walls are documented at Meidum, Per Sekhemkheperre, Medinat el-Faiyum, Bahnasa, Kom el-Ahmar, ‘all the nomes of the South’, and all of the ![]() ‘towns’ of the west. Later we learn, prior to the Kushite invasion, Nimlot the ruler of Hermopolis had destroyed the
‘towns’ of the west. Later we learn, prior to the Kushite invasion, Nimlot the ruler of Hermopolis had destroyed the ![]() sbty of Jarris (Neferusy).53 The section of the narrative which deals with the invasion of the Kushite forces uses the term
sbty of Jarris (Neferusy).53 The section of the narrative which deals with the invasion of the Kushite forces uses the term ![]() for the walls at Hermopolis,54 and Memphis,55 while Piankhy also found the
for the walls at Hermopolis,54 and Memphis,55 while Piankhy also found the ![]() of Itj-Tawy sealed.56 There is a deliberate distinction between the sbty at Itj-Tawy, which was the main fortified enclosure, and the inbw-walls of the buildings, which were full of soldiers.57
of Itj-Tawy sealed.56 There is a deliberate distinction between the sbty at Itj-Tawy, which was the main fortified enclosure, and the inbw-walls of the buildings, which were full of soldiers.57
The next term, ![]() sꜣ(t), can be translated as ‘wall’,58 while others define the term as ‘ramparts’ like
sꜣ(t), can be translated as ‘wall’,58 while others define the term as ‘ramparts’ like ![]() .59 The assault of Piankhy on Egypt states that el-Hibeh had its
.59 The assault of Piankhy on Egypt states that el-Hibeh had its ![]() demolished or overthrown,60 at Per Sekhemkheperre
demolished or overthrown,60 at Per Sekhemkheperre ![]() were built up,61 and at Heracleopolis
were built up,61 and at Heracleopolis ![]() were recorded in the context of each allied chief knowing which section of it (the wall) to man and protect.62 The settlement at Memphis, in addition to
were recorded in the context of each allied chief knowing which section of it (the wall) to man and protect.62 The settlement at Memphis, in addition to ![]() , had
, had ![]() ;63 Piankhy’s troops are ordered to mount the
;63 Piankhy’s troops are ordered to mount the ![]() and enter them.64 During the New Kingdom, and from the Eighteenth Dynasty onwards, the term sꜣ(t) designated a stone wall which could be inscribed, and this continued to be the case into the late New Kingdom.65 During the Third Intermediate Period the term was used less accurately, and by the time of the Twenty-Fifth Dynasty sꜣ(t) was used as a non-specific term for a ‘wall’, not differentiating between mud-brick and stone.66
and enter them.64 During the New Kingdom, and from the Eighteenth Dynasty onwards, the term sꜣ(t) designated a stone wall which could be inscribed, and this continued to be the case into the late New Kingdom.65 During the Third Intermediate Period the term was used less accurately, and by the time of the Twenty-Fifth Dynasty sꜣ(t) was used as a non-specific term for a ‘wall’, not differentiating between mud-brick and stone.66
A third term used during the Third Intermediate Period to refer to a type of boundary is recorded on the Twenty-First Dynasty stela of Smendes I. The term is the compound term ![]() ꜥ ı҆nt. Previously this stela has been interpreted as documenting the reconstruction of a Theban ‘canal wall’ of Thutmose III which formed the limits of Thebes after a catastrophic flood.67 The text preserved is inaccurately published, making the certainty of the reading doubtful. The first word group is
ꜥ ı҆nt. Previously this stela has been interpreted as documenting the reconstruction of a Theban ‘canal wall’ of Thutmose III which formed the limits of Thebes after a catastrophic flood.67 The text preserved is inaccurately published, making the certainty of the reading doubtful. The first word group is ![]() ꜥ, which refers to a dyke or riverbed,68 and the second word
ꜥ, which refers to a dyke or riverbed,68 and the second word ![]() ı҆nt is a doubtful reading. The word is probably a mistranscription of
ı҆nt is a doubtful reading. The word is probably a mistranscription of ![]() ı҆nt, ‘desert/valley’,69 with the omission of the
ı҆nt, ‘desert/valley’,69 with the omission of the ![]() phonetic sign. The structure Smendes refers to is a ‘valley/desert dyke’ that surrounded and protected the settlement of Thebes on its East Bank, which had fallen into disrepair as a result of a catastrophic flood.
phonetic sign. The structure Smendes refers to is a ‘valley/desert dyke’ that surrounded and protected the settlement of Thebes on its East Bank, which had fallen into disrepair as a result of a catastrophic flood.
The final term, ![]() ṯsmt, can be translated as bastions.70 This term comes from the Piankhy Stela where it described the besiegement of Memphis. The sbty walls of Memphis had been reinforced by the construction of
ṯsmt, can be translated as bastions.70 This term comes from the Piankhy Stela where it described the besiegement of Memphis. The sbty walls of Memphis had been reinforced by the construction of ![]() , which were controlled by strong men. On the New Kingdom Israel Stela of Merenptah, messengers are sheltered from the sun by
, which were controlled by strong men. On the New Kingdom Israel Stela of Merenptah, messengers are sheltered from the sun by ![]() , while on the Onomasticon of Amenemope,
, while on the Onomasticon of Amenemope, ![]() are listed between sbty and inb, suggesting they were a prominent feature of walls. In the Twenty-Fifth Dynasty, the mayor of Thebes, Montuemhat, rebuilt the sbty of the Amun temple at Karnak and re-erected in brick
are listed between sbty and inb, suggesting they were a prominent feature of walls. In the Twenty-Fifth Dynasty, the mayor of Thebes, Montuemhat, rebuilt the sbty of the Amun temple at Karnak and re-erected in brick ![]() which had fallen to the ground.71
which had fallen to the ground.71
The texts show that during the Third Intermediate Period, sbty was the most commonly used term for ‘wall’ and it most likely relates to the enclosure wall of the temple or the wider settlement. The terms sbty and sꜣ(t) could be used synonymously and do not appear to denote specific types of wall construction, or material type, as was the case in the New Kingdom with sꜣ(t) referring to the inscribed stone temple walls. Without additional qualifiers to these terms, any attempt at defining specific zones of walling through an analysis of the ancient settlements of the Third Intermediate Period cannot, at this moment, be achieved. Other terms include ![]() , which referred to a wall designed to prevent flood waters coming from the wadis and destroying settlements, while
, which referred to a wall designed to prevent flood waters coming from the wadis and destroying settlements, while ![]() refers to the large corner towers on mud-brick enclosures.
refers to the large corner towers on mud-brick enclosures.
Third Intermediate Period Walling: Archaeological Evidence
Newly built monumental walls of the Third Intermediate Period are known at Tanis, el-Hibeh, Nazlet esh-Shurafa, Gebelein, Higazeh, Thebes, and Elephantine. In the Twenty-First Dynasty, King Psusennes I constructed a new enclosure for the Great Temple of Amun at Tanis. The wall formed an elongated pentagon and enclosed around 6 ha. The width of the wall is 26–27 m at the corner towers, with buttresses along the wall.72 The southern section of wall may have been built to avoid a pre-existing building, hydrological feature, or a break in the natural gezira. The foundation of Psusennes’ enclosure follows the natural topography of the gezira, but the nature of the terrain and the high elevations could have caused the builders to abandon a straight-sided enclosure, to conserve as much space in the temenos as possible.73 In Middle Egypt, at el-Hibeh, a new enclosure wall was constructed by the Twenty-First Dynasty HPA Pinudjem I, and subsequently either later repaired or added to by the HPA Menkheperre (Fig. 16). The preserved section of wall of Pinudjem I had a convex design and ran for ca. 600 m on its eastern side and was 12.6 m thick, with a surviving height of 10 m. The wall was built on top of earlier New Kingdom occupational strata and enclosed the existing settlement.74
The location of the surviving part of the settlement enclosure at el-Hibeh with the remains of ancient buildings of different dates. The small temple of Shoshenq I (redrawn from Wenke, 1984: 3, map 1.2).

Menkheperre also constructed monumental walls at Nazlet esh-Shurafa, Gebelein, and Higazeh as part of a chain of fortified positions securing access into and out of Middle Egypt. Another wall of the Twenty-First Dynasty was constructed by Menkheperre at Karnak and formed part of the thick (10 m wide) corner of the temenos of the Amun temple (Fig. 17). The wall was destroyed and levelled during the Ptolemaic Period.75 The wall is most likely the same wall recorded on the Year 48 stela of Menkheperre,76 built to prevent the houses of the Asiatic population from encroaching the Amun temple.77 In the far south at Elephantine, the New Kingdom settlement does not appear to have had a wall, but in the Twenty-First Dynasty, a new encircling wall was constructed. It was replaced by a second wall, dated by ceramics as having a terminus post quem of the Twenty-Fourth Dynasty, possibly as a reaction to an unsecured border and the threat of Kushite invasion, or the result of an undocumented assault during the Third Intermediate Period. In a third phase, the wall was subsequently buttressed in the Twenty-Fifth Dynasty.78 The refortification of Elephantine in the Twenty-Fifth Dynasty would correspond to the erection of the Kushite fort at Abu Id as part of a chain of southern forts in the First Upper Egyptian Nome.
The enclosure wall of the High Priest of Amun Menkheperre at Karnak (Coulon, Leclère, and Marchand, 1995: pl. XIIIb).

Representational Evidence of Third Intermediate Period Enclosure Walls
The only pictorial relief that provides evidence for the design of Third Intermediate Period Egyptian walls is from a relief slab from the palace of Assurbanipal at Nineveh dated to ca. 660 bce (Fig. 18).79 The scene shows the siege and assault of an unknown Egyptian settlement. The walls depicted in this scene show evidence of bastions and corner towers with walkways along the tops of the walls. Emanating from the walls are what appear to be spears angled down towards the ground to prevent either siege towers getting close to the walls or siege ladders being flush to the wall. Finally, there appears to be a central tower or secondary gateway complex located behind the main wall. A ladder rests on the main walls of the settlement to reach the higher tower complex.
Relief showing the siege of an Egyptian settlement by the Assyrian army, from the palace of Assurbanipal at Nineveh (Hall, 1928: 44, pl. xl).

Enclosure Walls as Defence
The Piankhy Stela and the relief of Assurbanipal both indicate that Third Intermediate Period walls were required to take on a more focused role in terms of defensive capabilities, alongside the cultic and symbolic aspects of the walls which were a prominent reason for their construction in the New Kingdom. One aspect identified by the movement of populations into some of the New Kingdom Egyptian enclosure walls was the need for refuge from attack. Many scholars now see walls as also having a symbolic function and this is certainly one aspect of the Egyptian New Kingdom and Third Intermediate Period constructions.80 It is likely the aspect of symbolism and symbolic protection, which was prominent in the New Kingdom, was retained but now expanded into the need for a physical protection of the local communities and the civic structures during the Third Intermediate Period. The status of both a settlement and a ruler can be expressed through the creation of a large wall, which demonstrates the ability to invest in labour forces to work on these large projects. The intra-regional perception of threat developed throughout the transitory phase at the end of the Twentieth Dynasty and into the Twenty-First Dynasty, with evidence coming from the West Bank of Thebes during the reign of Ramesses IX. There were skirmishing and pillaging groups of ‘Libyans’ (the Meshwesh, Rebu, and Desert People/Foreigner groups) who conducted razzias. The ability to conduct these raids was no doubt a result of the breakdown of security, which had caused some members of the communities to become frightened of the presence of these groups on the fringes.81 A systematic and gradual breakdown of law and order occurs in Years 13–17 of Ramesses IX, seen in the robbing of royal tombs in the Valley of the Kings, alongside the degeneration of temple buildings through the re-use of the stone and mud-bricks for new temples, administrative buildings, and in domestic settings.
Walls constructed for defensive purposes are now evident around military settlements such as Per Sekhemkheperre, the walls of Shoshenq III in the north-eastern Delta, and at el-Hibeh, Nazlet esh-Shurafa, Higazeh, Gebelein, and Elephantine. These walls were intended for the defence of local populations and the control of access into politically crucial junctures of the country, while they may have fulfilled important secondary roles of food storage, livestock, and other resource protection such as precious metals and luxury goods for trade.
The settlements at Kom Firin, Matmar, and Medinat Habu were in strategically exposed locations leading out into desert routes and at important traffic junctures, which caused people to live inside the walls. The concentration of new wall constructions at the start of the Third Intermediate Period is contemporary with the high possibility of raids in the Twenty-First Dynasty in the regions around the wadi entrances into the Eastern and Western Desert. This is the case at Thebes, where there had been brigand raids from ‘Libyan’ tribes earlier, combined with a general breakdown in security such as tomb robbing. If the Meshwesh and Libu tribes were military in nature, then they may have influenced the construction policy in settlements such as the erection of high fortified walls, and brought a new mentality to security having observed walled settlements elsewhere. The threat and realisation of interstate warfare from the Twenty-Second Dynasty onwards in functionally specific military settlements may be observed in the new military foundations of the walls of Shoshenq III, most likely in the region of the entrance to the Wadi Tumilat, and Per Sekhemkheperre around the Faiyum entrance. The underlying threat of warfare between the Libyan extended family networks is explicitly expressed by Osorkon II on a stela which was erected in the temple of Amun at Tanis.82 Osorkon II petitions Amun regarding his family, requesting:
[You will fashion] my issue, the seed that comes forth from my limbs, [to be] great [rulers] of Egypt, princes, high priests of Amunresonther, great chiefs of the Ma, [great chiefs] of foreigners, and prophets of Arsaphes … You will turn their hearts towards the Son of Re, Osorkon II, you will cause them [to walk] on my path. You will establish my children in the [posts] [which] I have given them, so that brother is not jealous (?) of brothe[r].
The statement of Osorkon II clearly shows his concern that his children may become jealous of each other with the potential for conflict. Prior to the reign of Piankhy, the nature of intra-state Egyptian warfare is characterised by a preference for avoiding hand-to-hand contact; instead raiding and besieging is the preferred method. The military technology used by the Egyptians for siege warfare comprised ladders to scale walls. In the early Middle Kingdom, mobile wooden siege towers were used, as shown in the tomb of the general Intef (TT 386) at Thebes.83 There is no evidence of siege warfare conducted between Egyptian settlements and different political houses during the Third Intermediate Period. Egyptian settlements were only subject to siege warfare by the Kushite and Assyrian invading forces. During the early Iron Age, new forms of weapon technologies and battle tactics developed in the Near East which could have created environments of aggression within which Egyptian fortifications had to be adapted. The Piankhy Stela provides textual evidence of new siege technology being used against Egyptian settlements, such as ![]() iwn n ms, siege towers,84
iwn n ms, siege towers,84 ![]() ṯrry, siege mounds,85 and
ṯrry, siege mounds,85 and ![]() bꜣk, siege platforms,86 and shows a development of military technology during the early first millennium bce. The large walls which were erected around the most valuable assets of the Egyptian settlement indicate that one feature of the wall was to protect the economic foundations of the settlement. These included the temples themselves which controlled large aspects of the economy because of their storage facilities. The temple also represented the cultic engine of the settlement, and the population could identify with this sacred ancestral area and the locations which featured prominently in the mythic cycles of the settlement.87 The temple was closely connected with the local elite who had a personal stake in maintaining its integrity and that of the storage magazines. The walls enclosed and defended the royal and elite burials like those at Tanis, Heracleopolis, and Medinat Habu. The enclosed locations emphasised places vital to the social wellbeing of the settlement and required defending through physical means.88 The walls protected the royal palace and residences of the local leaders, including people who might be taken away as prisoners or killed, which in turn would create social unrest and perhaps conflict. The Piankhy Stela explicitly mentions the female royal family members of Nimlot at Hermopolis who were housed behind the walls. Other important individuals in danger of abduction or death included government officials and religious personnel who were tasked with keeping both the economic, political, and religious life of the settlement intact. Military units were housed within the walls, with, for example, stabling such as at Tell el-Retaba and the housing of soldiers in barracks if attacked. The enclosures housed the large grain silos in association with large houses that supplied and controlled the distribution of the grain supply to smaller family units, for example at Kom Firin and Matmar, while livestock would have been secured for primary and secondary consumption products. Temple workshops and production centres may have been protected along with the raw materials and finished products for external and internal trade. The enclosure walls provided the minimum requirements to maintain life in the settlement and those institutions which had to be defended to prevent the social disintegration of the settlement.89
bꜣk, siege platforms,86 and shows a development of military technology during the early first millennium bce. The large walls which were erected around the most valuable assets of the Egyptian settlement indicate that one feature of the wall was to protect the economic foundations of the settlement. These included the temples themselves which controlled large aspects of the economy because of their storage facilities. The temple also represented the cultic engine of the settlement, and the population could identify with this sacred ancestral area and the locations which featured prominently in the mythic cycles of the settlement.87 The temple was closely connected with the local elite who had a personal stake in maintaining its integrity and that of the storage magazines. The walls enclosed and defended the royal and elite burials like those at Tanis, Heracleopolis, and Medinat Habu. The enclosed locations emphasised places vital to the social wellbeing of the settlement and required defending through physical means.88 The walls protected the royal palace and residences of the local leaders, including people who might be taken away as prisoners or killed, which in turn would create social unrest and perhaps conflict. The Piankhy Stela explicitly mentions the female royal family members of Nimlot at Hermopolis who were housed behind the walls. Other important individuals in danger of abduction or death included government officials and religious personnel who were tasked with keeping both the economic, political, and religious life of the settlement intact. Military units were housed within the walls, with, for example, stabling such as at Tell el-Retaba and the housing of soldiers in barracks if attacked. The enclosures housed the large grain silos in association with large houses that supplied and controlled the distribution of the grain supply to smaller family units, for example at Kom Firin and Matmar, while livestock would have been secured for primary and secondary consumption products. Temple workshops and production centres may have been protected along with the raw materials and finished products for external and internal trade. The enclosure walls provided the minimum requirements to maintain life in the settlement and those institutions which had to be defended to prevent the social disintegration of the settlement.89
Enclosure Walls as Reflections of Royal Strategy and Ideology
The construction of a wall was one of the most expensive and time-consuming civic projects a community could undertake. Large urban walls were one of the most visible and enduring physical objects, and must have held a considerable significance for the local community.90 No government or regulatory body of any period or location would allow the construction and expenditure of resources and human labour without explicit approval.91 An analysis of Third Intermediate Period walling allows one to understand the rationale for wall programmes and policies, to detect political motives and policies, and to understand how the processes of ‘walling’ reflects on the political framework, the allocation of power, and the accessibility of resources for settlement building.
The size of the walls could be used to project not only an urban community’s status but the self-image and status to which it aspired.92 In the New Kingdom, it was the role of the pharaoh to proclaim and authorise the construction of new wall programmes. The New Kingdom attests to such proclamations at Thebes,93 and they continued in the early Twenty-First Dynasty under Smendes I and HPA Menkheperre. The policy of building walls, or inscribing proclamations concerning wall building, appears to be abandoned after the early Twenty-First Dynasty as there are no edicts from local pharaohs or chiefs proclaiming new urban wall projects until the Twenty-Fifth Dynasty under Taharqa and Shabaka. In the Twenty-Fifth Dynasty, Shabaka donated a stela94 which documents the restoration of the ![]() ‘wall/fortification/rampart’ at Dendera, and Taharqa proclaimed at Medinat Habu that he restored the
‘wall/fortification/rampart’ at Dendera, and Taharqa proclaimed at Medinat Habu that he restored the ![]() of the mound of Djeme.95 The earlier stela of Shabaka provides an indication of a general restoration of all
of the mound of Djeme.95 The earlier stela of Shabaka provides an indication of a general restoration of all ![]() of the country. This royal edict may have been because of the general lack of maintenance during the Twenty-Second to Twenty-Fourth Dynasty, and the later edicts because of the damage the wars of Tefnakht and Piankhy had caused in the urban centres of the Egyptian settlements, or as a reaction to the growing threat of Assyria. There is clear evidence of this in Thebes as Montuemhat rebuilt the sbty walls of the Amun temple and re-erected the bastions which had fallen, no doubt because of Assyrian aggression. The lack of wall building proclamations for the Twenty-Second to Twenty-Fourth Dynasty highlights the political nature of the local chiefs and rulers. They were restricted from building either politically, or by lack of resources, such as wood for beam slots and sand for casemate void fillings. Although access to and provision of mud-bricks would have been possible, the corvée workers necessary may not have been available for some reason. The large walling programmes would have needed large numbers of people to build these walls. The New Kingdom Papyrus Anastasi does shed some light on the details of a
of the country. This royal edict may have been because of the general lack of maintenance during the Twenty-Second to Twenty-Fourth Dynasty, and the later edicts because of the damage the wars of Tefnakht and Piankhy had caused in the urban centres of the Egyptian settlements, or as a reaction to the growing threat of Assyria. There is clear evidence of this in Thebes as Montuemhat rebuilt the sbty walls of the Amun temple and re-erected the bastions which had fallen, no doubt because of Assyrian aggression. The lack of wall building proclamations for the Twenty-Second to Twenty-Fourth Dynasty highlights the political nature of the local chiefs and rulers. They were restricted from building either politically, or by lack of resources, such as wood for beam slots and sand for casemate void fillings. Although access to and provision of mud-bricks would have been possible, the corvée workers necessary may not have been available for some reason. The large walling programmes would have needed large numbers of people to build these walls. The New Kingdom Papyrus Anastasi does shed some light on the details of a ![]() stꜣ,96 which was a mud-brick casemate construction, the same type as those documented on the Piankhy Stela for scaling the high enclosure walls. The papyrus documents that to cut down on mud-brick production, casemates were filled with wooden beams and reeds. While it does not provide details of the amount of mud-bricks used in these construction types or the workforce such a construction would have required, it does state that those who were employed or tasked with the creation of these large casemate structures were soldiers. Unlike in the New Kingdom, there is no evidence of the military class being involved in civic construction work during the Third Intermediate Period. In most settlements, it would have been easier to use farmers, during off-periods, and either coerce or engage them in mud-brick manufacture on newly irrigated lands or beside the river. The evidence suggests there were many crumbling walls in a constant state of decline in the Third Intermediate Period, in politically important settlements such as Mendes, Tell el-Balamun, and even Thebes itself, and further suggests that even under the control of powerful local leaders, renovations were not conducted. Conversely, many settlements may have had no justification for incurring the expense of constructing or maintaining walls to create a protective boundary, such as at Kom Firin, where the population began to dismantle the enclosure for the re-use of the mud-bricks for domestic purposes, indicating there were no perceived threats at certain periods, or in certain regions.
stꜣ,96 which was a mud-brick casemate construction, the same type as those documented on the Piankhy Stela for scaling the high enclosure walls. The papyrus documents that to cut down on mud-brick production, casemates were filled with wooden beams and reeds. While it does not provide details of the amount of mud-bricks used in these construction types or the workforce such a construction would have required, it does state that those who were employed or tasked with the creation of these large casemate structures were soldiers. Unlike in the New Kingdom, there is no evidence of the military class being involved in civic construction work during the Third Intermediate Period. In most settlements, it would have been easier to use farmers, during off-periods, and either coerce or engage them in mud-brick manufacture on newly irrigated lands or beside the river. The evidence suggests there were many crumbling walls in a constant state of decline in the Third Intermediate Period, in politically important settlements such as Mendes, Tell el-Balamun, and even Thebes itself, and further suggests that even under the control of powerful local leaders, renovations were not conducted. Conversely, many settlements may have had no justification for incurring the expense of constructing or maintaining walls to create a protective boundary, such as at Kom Firin, where the population began to dismantle the enclosure for the re-use of the mud-bricks for domestic purposes, indicating there were no perceived threats at certain periods, or in certain regions.
Palaces
In the New Kingdom, pharaohs had multiple palaces operating concurrently, each with its own unique form and special duty.97 The main types of palaces included ceremonial, governmental, and residential types, while in many cases the boundaries between the different forms were indistinct.98 The two most important types can be identified as non-residential and residential. The non-residential palace represented a place of pre-eminent political and ideological importance which was the stage of the king’s activities when he was not engaged in foreign wars or religious duties.99 The non-residential palaces acted as seats of governance, where the pharaoh received foreign visitors and bureaucrats, addressed the court, issued decrees and orders, and took part in the administration of the country, but the structure did not function as a permanent residence for the royal family, and often had private apartments for short-term usage.100 This type of palace was therefore mostly ceremonial or symbolic. The residential palaces differed from the ceremonial and governmental types, as they would serve as a more permanent house for members of the royal family.101 The standard form for the New Kingdom royal residence included the same elements (with the addition of the throne room) identified in the large New Kingdom houses at Amarna.102 During the New Kingdom, the pharaohs had access to a network of palaces across the country, both residential and ceremonial. The geo-political situation of the Third Intermediate Period would have prevented the rulers from using this network at times of political fragmentation. The different political houses would have utilised the local palaces for their own family networks. The palaces may have been redesigned to facilitate the combination of both a residential and ceremonial palace. They were likely to have been situated in the same location as the New Kingdom palaces, inside the temenos walls and situated to the east of the main temple. It was assumed that palaces of the Third Intermediate Period maintained the same general elements and layout of the New Kingdom;103 however, there are no surviving ground plans of Third Intermediate Period palaces, so assuming clear links to New Kingdom palatial structures is somewhat premature.
Third Intermediate Period Palace Terminology
During the Third Intermediate Period, texts that describe the physical location of a royal ‘palace’ are limited.
Previously in the New Kingdom the terms ![]() ꜥḥ,104
ꜥḥ,104 ![]() pr ꜥꜣ,105
pr ꜥꜣ,105 ![]() stp sꜣ,106 and
stp sꜣ,106 and ![]() pr nswt107 can all be translated as ‘royal house/palace’, while the term
pr nswt107 can all be translated as ‘royal house/palace’, while the term ![]() ẖnw is commonly translated by Egyptologists as ‘residence’ or even as ‘capital city’, but it is difficult to define to what extent our modern notions of a national capital are applicable to the Egyptian state in the first millennium bce.108 The terminology used during the Twenty-First to Twenty-Fourth Dynasty to refer to a royal palace/residence is
ẖnw is commonly translated by Egyptologists as ‘residence’ or even as ‘capital city’, but it is difficult to define to what extent our modern notions of a national capital are applicable to the Egyptian state in the first millennium bce.108 The terminology used during the Twenty-First to Twenty-Fourth Dynasty to refer to a royal palace/residence is ![]() ẖnw. The first example is recorded on the Twenty-First Dynasty Dibabeya inscription of Smendes109 where Smendes issued decrees from
ẖnw. The first example is recorded on the Twenty-First Dynasty Dibabeya inscription of Smendes109 where Smendes issued decrees from ![]() ẖnw=f, ‘his residence’ in Memphis, and not from Tanis, the new capital. The text does not refer to a specific ‘palace’ structure from which the decree was issued, but merely to the presence of Smendes at ‘his residence’, Memphis. The decree on the stela records that Smendes I received news of the flooding of the Luxor temple while he was in the columned hall, most likely of the main Ptah temple of Memphis. This indicates that Memphis was still the political capital of the period, where all state business was conducted, and therefore the king may have had some form of residence at Memphis, but there is no indication as to its location within the settlement. The second example is on the early Twenty-Second Dynasty Gebelein inscription of Shoshenq I,110 which mentions
ẖnw=f, ‘his residence’ in Memphis, and not from Tanis, the new capital. The text does not refer to a specific ‘palace’ structure from which the decree was issued, but merely to the presence of Smendes at ‘his residence’, Memphis. The decree on the stela records that Smendes I received news of the flooding of the Luxor temple while he was in the columned hall, most likely of the main Ptah temple of Memphis. This indicates that Memphis was still the political capital of the period, where all state business was conducted, and therefore the king may have had some form of residence at Memphis, but there is no indication as to its location within the settlement. The second example is on the early Twenty-Second Dynasty Gebelein inscription of Shoshenq I,110 which mentions ![]() pꜣ ẖnw ı҆st pꜣ kꜣ ꜥꜣ ḥr ꜣḫty, ‘the Residence of the Temple Estate of Per Iset (The House of Isis), the Great Ka of Re Horakhty’. Again, this indicates not a specific ‘palace’ structure, but a central political centre. Later in the Twenty-Fifth Dynasty, the Piankhy Stela documents the terms
pꜣ ẖnw ı҆st pꜣ kꜣ ꜥꜣ ḥr ꜣḫty, ‘the Residence of the Temple Estate of Per Iset (The House of Isis), the Great Ka of Re Horakhty’. Again, this indicates not a specific ‘palace’ structure, but a central political centre. Later in the Twenty-Fifth Dynasty, the Piankhy Stela documents the terms ![]() ꜥḥ and
ꜥḥ and ![]() pr-nsw for the ‘palace’.111 The two terms are used interchangeably for the term ‘palace’. In the late Twenty-Fifth Dynasty and Saite Period the terminology to describe the royal residence emerges as a prototypical image of royal authority. The palace was defined by the presence of the king and can be circumscribed by expressions such as bw ẖrı҆ ḥm=f, ‘the place where his majesty dwells’.112
pr-nsw for the ‘palace’.111 The two terms are used interchangeably for the term ‘palace’. In the late Twenty-Fifth Dynasty and Saite Period the terminology to describe the royal residence emerges as a prototypical image of royal authority. The palace was defined by the presence of the king and can be circumscribed by expressions such as bw ẖrı҆ ḥm=f, ‘the place where his majesty dwells’.112
Archaeological Evidence for Third Intermediate Period Palaces
The New Kingdom palace of Ramesses III at Medinat Habu was redesigned in the Twenty-First Dynasty on the same spot for the mayors of Thebes,113 and a palace of the Chiefs of the Ma was identified at Mendes. The Twenty-First Dynasty ‘palace’ at Medinat Habu reflects a pragmatic and legitimising approach to palace construction through the utilisation of the already existing New Kingdom space and association with an earlier Ramesside sacred and political building. At Mendes, the palace identified to the east of the temple of the ram god Banebdjed was built in the eleventh century bce (based on ceramic analysis), at the time of the rise to power of Smendes I who, based on the name (Egyptian: Nesubanebdjed), most likely came from Mendes. The palace continued to function into the Saite Period. It was a rectangular structure measuring ca. 30 m from east to west and ca. 30 m or more from north to south. In some places the walls were 2 m thick, indicating that it had a second storey. The entrance was most likely on the northern side, while a modern road on the palace’s western side has covered a passage that connected with the main ram temple. A door jamb rests on top of the mound bearing the outline of a Libyan chief.114 The south side of the compound, downwind of the rooms for habitation, was for food production, and contained ovens and hearths. The final function of the building, after its near-destruction by the Persians, was as a place of pottery preparation.115 The Great Chiefs of the Ma may have refurbished the temple and their accommodation in the palace,116 but there was evidence of neglect to the main temenos walls within which the palace and temple stood. At Hermopolis the Piankhy Stela states that, as the temenos walls of Hermopolis were overrun, the local ruler Nimlot went from his palace and proceeded to the temple of Thoth to make offerings.117 This indicates the palace was inside the main temenos, as Nimlot would not have been able to exit the main temple enclosure while it was being besieged.
Temples
In the absence of large amounts of religious written evidence, the most obvious physical reflection of the condition of the state religion, and the continuity in the religion of the New Kingdom pharaohs, is the construction of new temples and shrines across the country and the preservation of these institutions within the built landscape. The Third Intermediate Period has long been viewed as a period of stagnation in temple construction, but the lack of investment in temple building can be traced from the late New Kingdom. The last great temples of the New Kingdom were constructed under Ramesses III, and after the reign of Ramesses IV the construction of new monumental royal mortuary temples declined and finally ceased;118 the demolition of existing temples and the robbing of stone began, while the mud-brick temple enclosures were collapsing at many of the main political centres such as Medinat Habu, Mendes, Tell el-Balamun, and Kom Firin. The temple landscape inherited by the Twenty-First Dynasty administration was in a poor state, and economic as well as new geo-political factors meant that access to resources for new temple buildings, such as quarries located in the south, was difficult. As a result, many earlier monuments were re-used, most evidently at the new northern capital of Tanis, which was constructed from dismantled monuments of Piramesse. It was not until the country once again became briefly unified under the early Twenty-Second Dynasty that temple construction resumed on a more substantial scale (see Appendix 2). The main temple builders of the period were those of the Twenty-Second Dynasty, Shoshenq I, Osorkon I, Osorkon II, and Shoshenq III, while other rulers contributed small ephemeral structures and refurbishments to temples across Egypt. The emerging evidence shows that temple building was not stagnant in the Third Intermediate Period and, in many cases, temples were constructed in the Delta in the arenas of northern power.
The Twenty-Fifth Dynasty Kushite rule of Egypt implemented a grand policy of temple building activity in Thebes and Upper Egypt, but only modest temple constructions in the north.119 The temple remains that have survived for the Twenty-First to Twenty-Fourth Dynasty in the south suggest that little changed between the Ramesside and the Third Intermediate Period. The temple structures made during this period show that the builders and architects continued New Kingdom traditions as closely as possible, and political, religious, and cultural changes in the wider society did not have an impact on the construction and design of new temple buildings.120 Only one architectural element indicates a future development in the temple architecture of the period, and this comes from the temple of Shoshenq I at el-Hibeh. This innovation was a freestanding sanctuary within the interior of the temple at the rear, which was to become a common feature in the later Ptolemaic and Roman periods.121
The Third Intermediate Period rulers constructed new temples at Tanis, Bubastis, el-Hibeh, and Tell el-Balamun. Alongside these new temples, they enlarged the existing New Kingdom temples in several different ways, such as the addition of columned forecourts, pylon entrances, small gateways, screen walls, and small external shrines, all of which could be inserted into the pre-existing temple complexes and temenoi with less overall expense.
Defining Third Intermediate Period Housing Phases
It is a common feature of Egyptology to break down typological studies of artefacts and architectural features into rigidly structured dynastic divisions based on the Manethoic tradition. Such divisions may be appropriate for ruling families, or political phases, but they are perhaps less appropriate when applied to material culture in the same way, and especially architectural elements in organically created settlements, as has been already indicated by the continuation of New Kingdom traditions in the design of religious architecture from the New Kingdom into the Third Intermediate Period. Time and divisions are fundamental to the study of history as these divisions organise and form the framework by which events and material culture are organised. Discussing domestic architecture through dynastic attributions may be appropriate in the case of state-planned settlements in their initial stages, such as Deir el-Medina or Amarna, but even the finished form of any house may only have lasted for a limited period.122 The inhabitants’ rapid reworking of the spaces in which they lived caused them continuously to reshape the urban landscape which they inhabited.123 The reworking of space constitutes an organic development and immediately disguises the original architectural plan. Both the existing urban and natural environments shaped the development of housing, while it is also possible that the desires of the current inhabitants brought the primary changes, and what they believed to be both essential and achievable within the built environment and their own social and economic boundaries.124 The change of a house plan would correspond to the changing household’s circumstances, and would have often occurred rapidly, or repeatedly with seasonal variations.125 The replacement and development of houses (or substantial areas) were conditioned by the ‘use-life’ as dictated by both the construction material and the household activities which occurred within the buildings.126 A study of mud-brick housing in Syria has indicated an expected use-life of thirty to fifty years,127 which is broadly consistent with that of modern mud-brick houses at Amara West in Nubia,128 while modern Egyptian mud-brick houses could be fifty to sixty years old, and such houses in Gurna may have been even older.129 It can also be difficult to define physical house boundaries in Egypt owing to the surviving nature of the remains, because of environmental and sebakhin effects, as well as the nature of the taphonomic development of urban areas on tells with restricted space. Egyptian houses often shared walls, and the subsequent remodelling makes it difficult to distinguish the edges of a single house, or phase of a house. The counting of courtyards, assuming each family had access to one open air space, has been one method of calculating housing units.130 By contrast, many small villages and ‘houses’ contain a single-family group but with several family units, and using ‘family’ may not be a useful indicator for defining house boundaries. The issue of socio-economic status, household composition (presence of servants), and multiple floor levels make defining house division complicated.131 A further problem is that most of the evidence for the housing of the Third Intermediate Period was collected in the early twentieth century. The excavations at that time occurred before standard scientific recording techniques were widely used in household archaeology studies. The detailed recording of the phases, assemblages, strata, and micro-archaeological contexts of the structures was poor compared with modern standards. One of the most important aspects of interpreting household archaeology is defining floor levels, boundaries, contemporary living surfaces (and associated artefacts), and the general taphonomic process of the development of the house, particularly at the point of abandonment and collapse. The boundaries of single house units in organically developed settlements can be difficult to define. Some ethnographical studies in the Middle East have begun to provide clues for locating house boundaries, but the issue is still unresolved.132 At Amarna, the larger New Kingdom residential establishments show evidence for the nesting or embedding of smaller households within the grounds of a larger unit enclosed by a boundary enclosure.133 How much this practice may have continued into the Third Intermediate Period is so far unknown.
These issues mean that the primary problem is the location of contemporaneous housing layers and phases. The houses at Medinat Habu and Matmar demonstrate the problem in separating occupation phases from early excavations. It was stated for the Medinat Habu houses that ‘due to the extensive destruction of the settlement it was impossible to distinguish between buildings of the Twenty-First to Twenty-Fourth Dynasty while only a relative dating was applied’.134 Similarly, the original recording of the Matmar houses by Brunton documented a few walls with no indication of the phasing of the structures.135 The perpetual re-layering and restoration of architectural features such as mud floors, walls, living spaces, subterranean floors, ceilings, and multiple storeys make defining floor levels complicated. Defining these layers and occupational phases is particularly difficult in the case of collapsed buildings.136 Ceilings in kitchens and animal rearing areas were also lower than those in sitting and storage rooms, and so it was difficult to differentiate the structures when they collapsed together.137 When mud-brick houses collapse, the elements of the house may be compacted and combined, including the rooftop living spaces with the ground floors, the interior wall elements such as windows, hanging food produce, niche emplacements, or the gypsum covered walls. It is possible that after the initial occupation phases, the function of the house was changed, and the abandoned structure was used as space for the grazing of animals, or children may have played there, collecting various objects such as rocks, seeds, and toys. Abandonment of the house would accelerate the deterioration; wind erosion and a lack of maintenance would undermine the walls.138 The abandoned buildings would affect surrounding houses and become a danger, thus speeding the eventual restricting or abandonment of the area owing to structural insecurities, as many houses shared architectural elements such as boundary and partition walls. The new post-occupation phases might become a new living (or activity) surface which could be separated by one or more generations from the original household phase,139 thus complicating observations on the way in which the household developed.
Amarna from the Eighteenth Dynasty has been the representative dataset for an analysis of different house types within Egypt. The house types were probably a broad sample of Egyptian houses of the New Kingdom, although the houses may have been more regular and less dense than was often the case in longer-lived settlements because there were fewer spatial constraints.140 Typologies of houses from Amarna have been developed along with other house types from workmen’s villages at both Amarna and Deir el-Medina. When looking at a longer-lived organically developed settlement, matters are more complicated. Relying on architecture is problematic as the ground plan of an excavated house is commonly used for the classification of houses within an overall settlement. Such reliance on architectural plans is not a problem at Amarna, Deir el-Medina, Deir el-Ballas, and Malqata where settlements have relatively short life spans or a single occupation phase. Understanding house plan and thus type becomes difficult when dealing with settlements with long phases of continuous occupation for many generations. During this time the size of the household, the composition of the family, the function of the house, and the changing activities over time can produce changes in the house plan. The later phases could completely differ in function, which may be the case in the Karnak priestly houses: there we cannot be sure as to the original ground plans, and whether Late Period alterations have distorted the Third Intermediate Period building plans or choice of layout for specific architectural elements. The choice of location for a house may affect its design and scope for development. For example, the construction of a new design of house on a previously uninhabited part of the settlement not bounded or spatially limited by a pre-existing built environment allows for more flexibility and scope in a horizontal plan such as those at Amarna. Houses constructed within a temple enclosure or in an already organically developed settlement bounded by pre-existing fixed structures, such as between the walls of Medinat Habu, which is restricted within a horizontal plan, are dictated by the availability of space in which new extensions and designs can occur. The production of architectural typologies must consider these factors. Otherwise, the assumption is that no change occurred of any kind from the original foundation until the final abandonment of the house.141
A secondary problem, and one of the most important in developing typologies, is that few, if any, Egyptian settlements have been excavated in their entirety, while the most important, such as the capitals of Memphis and Thebes, have a limited amount of domestic architecture preserved for the entirety of the Pharaonic Period. A lack of a wider settlement plan is problematic as the ground plans of a few excavated houses are not necessarily representative of the whole variety of existing house types across the country. Therefore, interpretation of house typologies should not be based on a single house and should not be taken as characteristic of the whole settlement, or country as a whole.142 Finally, the transposition of results from one region to another should not be undertaken without a detailed consideration of the potential for regional variation, particularly in the Delta and Nile Valley. Consequently, the construction and modification of house plans was a fluid and flexible development, which may have continued across different dynasties. Analysis based on dynastic divisions is, therefore, not appropriate for house plans of organically developed settlements, and it may be better to classify the structures into occupation and architectural phases based on adaptation and change.
Household Archaeology and Egyptology
Household archaeology differs from the study of the built environment in the way it infers behaviour from the archaeological record. It comprises the social, material, and behavioural components, the demographic unit based on kinship, the dwelling, its installations, and artefacts found therein, and the activities conducted by the household inside the housing.143 Several contributions have been made to the creation of a methodological groundwork for household studies in the Mediterranean,144 with discussions on several important issues relating to the terminology being used and innovative future approaches, mainly using computer-aided archaeological methods to analyse buildings.145
The first attempt to assess a settlement in Egypt, including finds and ethnographic records and considering the themes of the household, was conducted in the Middle Kingdom–Second Intermediate Period settlement on Elephantine.146 The significance of the associated artefacts in the context of an abandoned settlement was rejected, and the analysis was built around the functional analysis of the layout of the rooms, the built-in features, and the details of the construction. Evidence from the workmen’s village at Deir el-Medina and Amarna was reviewed by comparing the house models and the textual data to come to a functional separation of rooms in the different house types.147 Many other studies have also provided contributions to household studies in Egypt, mainly for the New Kingdom.148 Themes have focused on the potential status symbols in domestic architecture, the socio-economic background, the subsistence strategies at the household level, the question of gender-specific areas, the three-dimensional experience, including climate control and heating of areas, household lifecycles, and the access route(s) in houses. In the Late Period, family archives and the tracking of household lifecycles by linking them to the archaeological record have become new fields of research.149
Much of the analysis has focused on Amarna, Deir el-Medina, and Kahun and was restricted to the earlier periods such as the Middle and New Kingdoms. The analysis presented here provides a countrywide coverage of Third Intermediate Period housing and aims to offer conclusions on aspects of Third Intermediate Period domestic architectural developments within the framework of the household and assess the potential of an integrated approach in examining the archaeological evidence of domestic architecture.
Review of the Early Excavations at Third Intermediate Period Sites
As with any dataset, there are limitations to the evidence and the nature and extent of observations and conclusions, and this is particularly true when assessing complete ground plans of Third Intermediate Period domestic structures to assess the development and continuation in architectural styles and the introduction of new elements. The countrywide preservation of complete house plans is poor and does not allow for overall house area sizes to be calculated to assess social ranges across different regions of Egypt.
Plans of domestic structures and contexts that have construction and occupation dates of the Third Intermediate Period have been found in both Upper Egypt and the Nile Delta and provide a good dataset with which to assess architectural developments across the period and to compare with the previous New Kingdom. Examples of Third Intermediate Period domestic architecture which preserve enough of the overall ground plan of domestic structures for them to be assessed and compared have been found in the Delta at Kom Firin, Tell el-Retaba, and Memphis, while in Upper Egypt house plans have been found at Lisht North, Amarna (el-Hagg Qandil), Hermopolis, and Medinat Habu and in Luxor at Abu el-Gud. Other excavations, at Tell el-Balamun, Sais, and Buto in Lower Egypt and at Matmar, Akoris, and Elephantine in Upper Egypt, have uncovered domestic remains of the period but insufficient evidence is preserved of an overall ground plan or only fragments are preserved, such as partial remains of domestic walls or installations such as silos and workshop areas. These examples do not form part of the discussion on house plans but are used in the comparisons of ancillary elements of domestic settlements, while their associated domestic material culture is discussed later in Chapter Four. Modern excavations, such as at Kom Firin, Tell el-Retaba, Memphis, and Hermopolis, have provided more detailed evidence sets for household archaeology of the period, particularly in regard to the artefact contexts and micro-archaeological analysis, but supply only fragmentary ground plans. Conversely, early twentieth-century excavations at Medinat Habu and Lisht North used an expansive digging strategy, leading to evidence composed almost exclusively of the ground plans of the ‘house’, but the excavators did not systematically record the artefacts well, and contexts and micro-archaeological analysis were largely absent. Through a combination of both approaches, an analysis of the development of Third Intermediate Period domestic architecture can be conducted. A re-analysis of the earlier excavated domestic evidence shows that some of the structures from Karnak, Medinat Habu, and Memphis used to analyse house plans in the past must be viewed with caution.
The Karnak Priestly Houses
The re-analysis of early excavations, particularly the pottery assemblages found within some of the priests’ houses south-east of the sacred lake at Karnak, has enabled the re-dating of some of them, at least the last occupational phases and post-depositional activity, to later in the Saite Period (Fig. 19).150 These houses have been one of the main sources for architectural comparisons of the Third Intermediate Period and have influenced interpretations of housing design for the period. The houses were built up against the enclosure wall of Thutmose III, with six of the houses excavated between 1969 and 1970,151 and a seventh house in 2001 as part of a follow-up reassessment of the area’s stratigraphic and chronological development.152 The first six houses were originally dated to the Twenty-First Dynasty based on the finds in House II. This was based on a stamped mud-brick of the HPA Menkheperre found at the ground level of the house,153 while an onomastic survey of an in situ door post found in House II belonging to the Priest Ankhefenkhonsu gave the excavators reason to believe the house had a Twenty-First Dynasty construction and occupation date.154 House II was entirely filled with rubble and the items in the fill phase of the building represent not the original date of the construction of the houses, but a phase of later occupation and collapse from the surrounding structures or of later dumping of material into the houses. The re-analysis of the objects from within the houses in 2001 argued that the doorpost of Ankhefenkhonsu was not guaranteed evidence for precise dating and the lintel could have belonged to a priest much later in date, as there was no associated royal name.155 The re-dating of the ceramics from the 1969–70 excavations also does not support an occupation phase in the Twenty-First Dynasty.156 Although a date in the later Twenty-Sixth to Twenty-Seventh Dynasty was suggested, it must be acknowledged that the owners of the houses may have modified them over the intervening five hundred years into the Saite Period.157 The case for modifications is hard to confirm with the available evidence. The 2001 excavation of House VII provided some clarification to the original occupation dates for the house compound. The ceramics from House VII provided a date range from the Saite to Persian Period.158 The early dating for the construction of the priestly houses is now highly debatable, based on the door lintel with no associated royal name and the ceramic data from the Saite/Persian Period, and there is no justification for the buildings to be dated to the Twenty-First Dynasty; however, it does not rule out the possibility of the presence of an earlier Third Intermediate Period priestly quarter somewhere around the Sacred Lake based on the associated finds.159 It is not appropriate to use the Karnak priestly housing plans in this architectural study as a comparative resource for securely dated Third Intermediate Period structural remains and occupational phases.
Plan of the priests’ houses at Karnak (Masson, 2007: pl. 1).

The Memphite Doorways in the South-west of the Ptah Temple
At Memphis, the remains of architectural elements of buildings were found in a trial trench cut at the back of the small Ramesside Ptah temple. The only items published were the stone doorways (Fig. 20).160 One of the doorways was inscribed by the priest of Ptah and the House of Osiris, Lord of Rostau, Ptah-Kha, and was erected for his father, Ashakhet, while the other more fragmentary example did not preserve the owner’s name. Both stone doorways were erected during the Twenty-First Dynasty in the reign of Psusennes I. There is debate as to the function of these buildings. Originally the doorposts were encased in brickwork and were interpreted as possible chapels161 or tombs.162 It is suggested that they represent the doorways to priests’ houses like the Karnak examples discussed above.163 As the evidence now suggests the construction date of the Karnak doorposts and the priestly houses was not in the early Third Intermediate Period, a comparison of the two sets of buildings therefore cannot be made, and the function of the building these doorposts belonged to cannot be determined at this moment. An assessment of these structures as houses is not achievable as no mud-brick walls or rooms were associated with the doorposts.
Doorway of Ptah-Kha (lintel originally cut away in publication photos) (Anthes, 1965: pl. 321 a. 26–8).

The House of Butahamun at Medinat Habu
At Medinat Habu, the best-preserved structure near the Western Fortified Gate belonged to the Overseer of the Treasury, Butahamun. It is the only known house of the period so far found which is associated with a named individual. This building has the potential, in combination with the associated architecture, to provide an insight into the role of the person and the household agency. The presence of an associated name with the house, in general, is a rarity, because the lack of individuals associated with house architecture is a ‘near universal problem’, particularly within household archaeology.164
The building dates to the reign of Ramesses XI or Smendes I, as Butahamun is last attested in Year 13 of Smendes I and by Year 16 was succeeded by his son Ankhefenamun.165 The remaining structural elements of Butahamun’s building were in a fragmentary state of preservation. The house plan shows a wide doorway into the first (transverse/court) room before the main room. Only the sill of the door was extant. Inside the room were two stone columns. The mud-brick foundations were all that remained of the room. From this room, one would enter the main (or secondary court) room. Four columns were regularly spaced across the room supporting a roof. All four of these columns still stood upright. The rear (western) wall of the room had the remains of two stone pilasters. There were the remains of a rectangular stone dais against the west wall. To the right of the dais there was a narrow doorway. Unfortunately, the rear rooms were not preserved. There was the possibility of a secondary doorway on the left-hand side of the dais.166 Other remains in the vicinity may well have belonged to additional rooms of the building.167 The assessment of the architecture, particularly its position within the Medinat Habu enclosure next to the entrance of the West Fortified Gate and the central room arrangement, which has a four-columned central hall with raised stone dais, calls into question the identification of this structure as the house of Butahamun. The structure was compared to the ‘South’ or ‘Queen Tiy’s’ palace at Malqata, which was suggested to be an administrative office connected with the palace stores. If the structure of Butahamun was an office, it would correspond with his position as the ‘Overseer of the Royal Treasury’.168
Based on the current analysis of the housing at Karnak, Memphis, and Medinat Habu, the problems in analysing architectural plans and elements assumed to represent houses from previous excavations become clear. Therefore, these so-called ‘house plans’ are unreliable for analysis and should not be used within the analysis of Third Intermediate Period house architecture.
Architectural House Plans of the New Kingdom
This section documents the architectural design of domestic houses in the preceding New Kingdom to provide a baseline for housing design prior to the Third Intermediate Period. Only then can the houses found in settlements with Third Intermediate Period occupation phases be analysed to see whether there was a continuation of New Kingdom architectural styles or whether new designs and architectural elements were introduced into the Third Intermediate Period domestic architectural repertoire.
In the early New Kingdom, there was a continuation of the Middle Kingdom style of housing which comprised a large rectangular, columned central hall, flanked by two smaller rectangular side rooms.169 In the Amarna Period, there was a transition to the central hall house.170 The houses at Amarna show a large variety of scale, with areas ranging from less than 10 m2 to more than 400 m2 (Fig. 21).171 The larger of these houses were set within their own enclosures, which included several ancillary structures, among them other smaller houses. The Amarna houses exhibit a strict patterning of spatial layout from both the smallest and the largest structures, and show a tripartite division, with only the smallest houses lacking front rooms.172 The central hall house style comprised a square, central hall living space with a brick dais against one wall and smaller rooms radiating from it. A rectangular pillared antechamber or reception fronted the central square room.173
Amarna house types (Bietak, 1996: 24).

Examples of tripartite houses are found in Egypt as early as the Old Kingdom, while staircases were a prominent feature of the New Kingdom Amarna houses.174 After the Amarna Period, it was suggested that the house style reverted back to the traditional style of the Middle Kingdom; however, this is not observed across the country.175 At the Ramesside capital of Qantir, the Nineteenth Dynasty houses had a tripartite layout in a continuation of the Amarna house style.176 This was also the case in Thebes where the Nineteenth Dynasty houses behind the ‘temple palace’ of Medinat Habu were based on the Amarna architectural style, with a rectangular vestibule, a square central room surrounded by two rooms, and an antechamber.177 Other houses at Medinat Habu, except for the so-called ‘house’ of Butahamun, reverted to the conventional Middle Kingdom style.178 At Thebes, the Ramesside houses at Abu el-Gud were in the Amarna style,179 but at the late New Kingdom/early Third Intermediate Period fort of el-Ahawaih, the houses do not show a continuation of the Amarna middle court plan.180 The Ramesside Period houses at Deir el-Medina had similar designs to Amarna housing, with their square, columned main room, while the larger houses at Deir el-Medina had rooms surrounding the main room, a plan reminiscent of the Amarna style.181 Finally, at Memphis, the Ramesside Period housing followed a similar plan to the Amarna style, but at the same time the Ramesside phase was founded upon and copied the earlier Eighteenth Dynasty house design. The Ramesside phase, therefore, was influenced in its design by the earlier Eighteenth Dynasty structures, while the area showed a large amount of continuity from the New Kingdom.182 The design of housing after the Amarna Period shows a preference for a continuation of the Amarna styles in many regions of the country, but at the same time architects reverted to the Middle Kingdom style.
Although the evidence is limited, the review of Nineteenth Dynasty/late New Kingdom house designs shows different architectural styles were concurrent with each other, and no dominant architectural style was used across the country. The concurrent use of different housing styles may reflect the contemporaneity of space within more urbanised settlements, as new styles were built next to old styles, but had contemporary occupational phases. The late New Kingdom settlements were made up of a multiplicity of different housing styles, which were subject to adaptation and change over time based on the needs and socio-economic restrictions of the owners.
The Architectural Styles of the Third Intermediate Period in Upper Egypt
1 The Central Room with Double Column and Dais
There is considerable evidence to suggest the central room with double column and dais found in the Amarna Period houses continued to be a prominent feature in Third Intermediate Period house architecture. This style is observed in a late New Kingdom/early Third Intermediate Period house at Amarna itself (el-Hagg Qandil) (Fig. 22)183 and throughout the period at Medinat Habu (Figs. 23–25),184 but this combination of elements has not been documented at other settlements for the period beyond the Twenty-First Dynasty.
House from Amarna (el-Hagg Qandil) dated to the late New Kingdom/Twenty-First Dynasty, showing the central columned room and dais (redrawn from Peet and Woolley, 1923: pl. XLI).

Medinat Habu second phase houses, showing the central columned hall and dais (redrawn, after Hölscher, 1954: fig. 6).

Two houses side by side at Medinat Habu second phase house, showing central columned hall and dais (redrawn, after Hölscher, 1954: fig. 5).

Medinat Habu third phase (Twenty-Fifth Dynasty): houses against the enclosure wall showing the central columned hall and dais.

2 Amarna Style House Plans
At Lisht North, after the end of the Eighteenth Dynasty, the casing of the pyramid of Amenemhat III was removed and used as a source of building material, creating large rubbish heaps around the base of the pyramid. During the Twentieth Dynasty, a settlement grew up on top of the rubble mounds and was inhabited by a low social class, probably the workpeople who were tasked with removing the casing of the pyramid.185 The housing itself was built up against the west side of the pyramid.186 The objects found in the houses suggest the inhabitants were farmers who had a cottage industry manufacturing glass and beads, although the primary occupation was tomb robbing.187 The extent of the occupation phases remains uncertain as there were no controlled excavations carried out on the settlement when it was excavated by Mace between 1906 and 1922.188 The evidence suggests the settlement continued to be in use until its abandonment during the Twenty-Second Dynasty. The architectural plans were described as ‘haphazard in design with walls at any angle and of no conceivable plan, and with narrow streets that terminated in people’s private courtyards’.189 A reassessment of the house plans in the 1990s showed the houses conformed to the lower end style layouts of the middle-class houses from Amarna and Deir el-Medina, and represent the typical house plans of the Amarna Period.190
At Abu el-Gud, 120 m to the south of the Mut Complex at Karnak, a neatly planned series of mud-brick houses of the Nineteenth Dynasty were excavated, with wide entrances with stone door jambs and thresholds,191 and a rectangular twelve-roomed storage magazine, or casemate for a stone structure. The structure seems to have related to a small temple of Ramesses II with an open court, followed by a colonnade, and behind that a sanctuary.192 No plans of the complex were published, but based on the combination of buildings it appears to represent a small temple complex of Ramesses II. Directly on top of the Nineteenth Dynasty temple complex were large domestic structures dated by the excavators to the Third Intermediate Period/Late Period. It is not known if the Ramesside temple continued to function after the New Kingdom. The Mut Complex houses were centred around a main room, each house supplied with a pair of pillars to support the ceiling.193 The descriptions of the architectural layout would suggest an Amarna style house, but this cannot be confirmed without published plans.194 At Medinat Habu, at some point in the Twenty-Fifth Dynasty, several new houses were constructed. These newly built houses retained the New Kingdom dais element as discussed above, but now resembled the long narrow houses of the New Kingdom at Deir el-Medina, with a front room and a main room followed by two rear rooms or a staircase, all along the same line.195 The long narrow house style of the New Kingdom can be observed to some extent in the house built on the so-called ‘pomerium’ of Ramesses III, which dates to the Twenty-Second–Twenty-Fourth Dynasty phase (Fig. 26).196
Second phase Third Intermediate Period house on the pomerium of Ramesses III, resembling the long narrow houses of Deir el-Medina (redrawn after Hölscher, 1954: fig. 8).

In the Twenty-Fifth/Twenty-Sixth Dynasty, at Medinat Habu a group of larger houses in Phase III were constructed within the temple’s inner enclosure wall and retained parts of the Amarna type plan. Houses 1–2 and 5–6 had two square central rooms in a variety of layouts (Fig. 27). Several houses, of suggested Twenty-First Dynasty date, built upon the palace of Merenptah at Kom el-Qala were excavated by Fischer, but they remain unpublished.197 An additional group of houses were also found upon the nearby temple of Merenptah at Kom el-Qala by Petrie in the early twentieth century (Fig. 28).198 The houses were all of small size and built close by one another. The ground plans of these houses were similar to the second phase houses (tenth to eighth century bce) from Medinat Habu and the late New Kingdom/early Third Intermediate Period houses at el-Hagg Qandil (Amarna).199 Considering these comparisons, it is argued that the nearby houses, which Fischer found at Kom el-Qala with similar designs and dating to the Twenty-First Dynasty, may be of a later Twenty-Second Dynasty construction date.200 Without a detailed stratigraphic analysis of the structures found by Petrie and Fischer, combined with artefact contexts and micro-archaeological analysis, any assumed dating of these houses to a Twenty-Second Dynasty occupation phase must be taken with caution. The partial nature of the plans of many of the structures makes it difficult to assess whether there were different styles of housing used concurrently at Kom el-Qala, while the evidence from other settlements across the country shows different housing types could be contemporary with one another.
Twenty-Fifth Dynasty houses from Medinat Habu (redrawn after Hölscher, 1954: fig. 19).

Plan of the Third Intermediate Period houses overlying the temple of Merenptah at Memphis.

Excavations carried out by the EES at Kom Rabia found domestic remains dating to the Third Intermediate Period.201 The remains overlaid the settlement of the New Kingdom, with approximately 20 m2 of Third Intermediate Period stratigraphy preserved; they seem to have followed the same Amarna style layout of the previous New Kingdom phase.
Excavations at Kom Firin found early Third Intermediate Period parts of houses along the eastern wall of the Ramesside temple and, in Phases 5 and 6 (EV–I), in the north-eastern sector of the temenos area. A full house plan was not preserved, which makes it difficult to understand the spatial arrangement of the whole house. The inhabitants of the house conducted developments and adaptations of the house between Phases 5 and 6. The houses in the north-eastern sector of the Ramesside enclosure wall were built after successive silo installations of the early Third Intermediate Period. The rooms of the house were built against the interior faces of the temple enclosure, indicating the redevelopment of space. The use of the enclosure wall to provide support for housing is like the second phase domestic occupations of Ramesside temple enclosures at Matmar and Medinat Habu. The partial plans of the structure were consistent with a house, such as the small three rooms against the enclosure wall, preceded by a central space with perhaps a staircase to one side. The arrangement of the rooms of the Kom Firin house would fit with the broadly tripartite arrangement of New Kingdom houses.202
3 Other Domestic Architectural Designs
Several Third Intermediate Period houses from across Egypt, based on the preserved remains, do not incorporate known architectural elements such as the columns or dais, or adhere to the styles of architecture and housing layout of the previous Middle and New Kingdom traditions, particularly those of Amarna.
The first set of these houses were those found in grid square e5 at Medinat Habu (tenth to eighth century bce), situated on an angular, hilly street, with various steps at short intervals to connect different occupation levels. Four complete houses were identified (Fig. 29). The first house, ‘House 1’, had two rooms but no subsidiary chambers, while House 2 had two rooms and a small courtyard in the front. The corresponding part of House 3, as far as can be ascertained, was not closed off from the street and behind it was a stairway that led up to the socle of the Great Girdle Wall. Based on this evidence it can be said that House 3 had a second storey. House 4 had its main room paved with baked bricks, while there was a second, now destroyed room to the east. House 4, based on the trapezoidal form at the front with its thin walls, was most likely an open court.203 Secondly, at Medinat Habu, as well as some of the larger Twenty-Fifth Dynasty houses having Amarna style layouts, a new style was found (Houses 3–4) that diverged from the square central hall pattern and instead had a large rectangular main room surrounded by a series of three small rooms, and two long rectangular rooms making an L-shape around the first grouping.
Group of houses at Medinat Habu (redrawn, after Hölscher, 1954: fig. 7).

In the Wadi Tumilat at Tell el-Retaba, in Area 3, two houses were partly excavated; one, ‘House 2’, had walls approximately 1 m thick. The wall thickness suggests a second or even a third storey. This structure was interpreted as the basement of the house, which was accessed by the upper floor as no doors or windows were found.204 A main road running from the large western gate of the fortress which led to the main temple divided Area 3 from a second area of housing, ‘Area 5’, but the houses on this side of the road were markedly different in design, with much thinner walls (0.3 m wide and smaller). The road appears to have separated two functionally different parts of the settlement, but it is possible the much larger and thicker-walled house represents a later phase of house design at Tell el-Retaba corresponding to the larger thicker-walled houses found at Hermopolis and in the later larger Twenty-Fifth Dynasty structures at Medinat Habu. In Area 9 at Tell el-Retaba, a third area of Third Intermediate Period structures again represented a different form of housing, consisting of small houses that have so far been attributed a general Third Intermediate Period phase dating. The initial stages of the Area 9 housing had only two rooms like in the smaller houses at Medinat Habu.205 Finally, at Hermopolis in Grabung I and Graben IV there were domestic occupation levels of the Third Intermediate Period (Figs. 30–32).206 The publication is of limited use for understanding the housing plans of the period because the ceramics collected all dated from the Eighteenth Dynasty to the Ptolemaic Period, and the described pottery is only partially illustrated.207 Later excavations discovered the remains of Third Intermediate Period housing in ‘Site-W’. Three construction phases were identified. Level 3 (the earliest phase) dates to before the eighth century bce, Level 2 dates to the late eighth century bce, and Level 1, which consisted of a large housing foundation overlying the foundations of the Level 2 house, dates from ca. 700–600 bce, placing its construction at the end of the Third Intermediate Period and the transition phase into the Saite Period.208 The Level 3 (pre-eighth century bce) house had eight rooms designed without a central hall, as in the standard Amarna plan, while the houses in Levels 2b–1 did not exhibit an Amarna style and appear to be random in their layout. The final phase (Level 1b) consisted of a large square house foundation of mud-brick and was built as single project with only a few minor later additions.209 The brickwork formed a network of walls without interconnecting doorways, which appears to be similar to Late Period tower-house architecture.210
Level 3 house at Hermopolis in squares J.10–K.10 (Spencer, 1993: pl. 10).

Level 1 house at Hermopolis in squares J.11–K.11 (Spencer, 1993, pl. 18).

Level 1b house at Hermopolis in squares J.10–K.10 (Spencer, 1993, pl. 3).

The preserved architectural plans of Third Intermediate Period housing demonstrate the maintenance of the New Kingdom Amarna design, with the central columned room and dais, while in some settlements a less regular architectural design began to be developed. These non-Amarna plans developed in response to increasing spatial limitations within the settlements and the requirements of the family group, and the economic and social hierarchy of the occupants of the household.
Other Architectural Domestic Features
Staircases, Columns, Stone Fittings, Ovens, Wall Decoration, and Mud-bricks
In some excavations, smaller elements from houses can be useful in understanding the capacity of settlements in the Third Intermediate Period. Staircases within homes demonstrate the need for vertical expansion of the household, indicating a spatial horizontal restriction within the settlement. Furthermore, they provide economic indications of individual households and the financial ability to build multi-storey dwellings. The presence of ovens within designated houses indicates food production within the home, and not being reliant on external, government-run food preparation areas, which again provides an economic indicator to the family unit and the self-sufficient nature of the domestic population in specific areas of the settlement. Finally, the application of wall decoration indicates the financial ability to afford coloured and decorated walls and expresses a desire by the family to express aesthetic and cultural trends and elite emulation.
Staircases have been found in several Third Intermediate Period houses throughout the period at Hermopolis,211 Medinat Habu,212 and Kom Firin.213 An assessment of whether they were for accessing a second storey or a roof area is difficult, but if the walls had widths of 1 m or more, then a second storey could have been supported. The roof spaces would have been open areas in which craft work and storage areas would have been located, as is common in modern Egyptian houses.214
The rooms and courtyards of the early Third Intermediate Period settlement at Kom Firin were fitted with limestone architectural elements, which was typical in middle and high-ranking formal buildings: door jambs, lintels, thresholds, and column bases. Thirteen examples of limestone door sockets were found, including a fired clay example. The diameter of the pivot holes varied from 3.2 cm to 14 cm. The pivot holes are sometimes cut into slab-shaped pieces of stone, perhaps suggesting re-use, although others are no more than chunks of stone. The presence of multiple depressions may indicate re-use of the stone for a second doorway, and these door sockets could be made from recycled stone.215 At Memphis, limestone blocks were used as thresholds or sills.216
At Kom Firin, the limestone fragments found in the domestic houses may have once been part of tables, seats, and stools.217 At Memphis, four examples of limestone tables were found. They all exhibit the same features, with upper and outer surfaces which are flat and smooth.218 Low tables of this type were used in the New Kingdom at Amarna, with one example still in situ on a mud-brick bench (mastaba),219 while shallow limestone tables or stools with three legs 25 cm in diameter and 5–7 cm thick were found at Medinat Habu.220
Fragments from New Kingdom temples are also re-used in domestic contexts, and as architectural features of the houses, showing that temple structures were accessible as quarries. Large amounts of limestone fragments were found in the early Third Intermediate Period occupation phases at Kom Firin, but inscribed fragments were rare. One fragment bears the bottom of a Ramesside cartouche and was likely to have been part of a door jamb or lintel. It may have come from the temple, an official building, storeroom, or even a private house, but it was re-used in the Third Intermediate Period occupation phase as a door socket, along with other limestone fragments probably coming from earlier monumental Ramesside buildings, most likely the monumental gateway to the Ramesside enclosure.221 Column bases were well carved but of quite poorly preserved stone. One example had the base drilled with a shallow depression in its upper surface, possibly to secure a wooden column, or as part of some secondary re-use.222 There was no evidence that well-dressed slabs from the Ramesside temple were used in the Third Intermediate Period occupation phases at Kom Firin.223 At Matmar, there is evidence the local Ramesside temple was robbed of its stone to be used as architectural supports for the grain silos.224 At Hermopolis a pivot block from the 700–600 bce house phase had re-used an Amarna block from the New Kingdom temple.225 The re-use of stone reflects the economic pressures of the period regarding access to stone supply and the provision of stone by royal and governmental agencies. This is the case in the Delta as the geo-political restrictions created by regional political and administrative fragmentation would have restricted access to quarries in Upper Egypt, forcing the population to recycle the stone elements around them. This applied to local rulers in their efforts to construct new temples.
The Third Intermediate Period houses continue to retain designated areas for cooking and the preparation of food, with small brick ovens identified in the domestic levels at Sais, Kom Firin, and Hermopolis, and it can be assumed that these housing areas were open to the air to allow the smoke to escape, although they may have been in designated spaces as in the case of some modern Egyptian village houses. Evidence of wall decoration in the domestic settlements of the period rarely survives, but there is evidence the walls were coated in mud plaster at Matmar226 and in the Phase 5 house at Tell el-Retaba.227 Mud plaster permitted the formation of a smooth flat surface which could be decorated, but the extent of painted decoration is debated because not enough has survived across the dynastic period. Representations of houses from tomb models and scenes indicates they were most likely coated in a whitewash, which would have helped reflect the heat, particularly in the summer months.228
As in the New Kingdom, Third Intermediate Period houses continued to be constructed of mud-bricks, as well as considerable quantities of re-used mud-bricks from earlier New Kingdom buildings, particularly New Kingdom temple enclosure walls. Mud-bricks can be analysed through a systematic recording of brick sizes,229 while mud can to some extent be distinguished through its chemical components.230 Measuring the sizes of bricks can allow the identification of brick factories or batches or manufacturing teams, for the purpose initially of internal comparison for a site chronology. Brick size analysis has many factors, which must be considered when using them for statistical analysis. Each brick has its own unique complex topography, and the reasons for the irregularity, even though made in moulds, include the amount of shrinkage during the drying process and disturbance during the drying process from the removal of the moulds.231 The measuring of a brick to the nearest millimetre cannot be done as the brick’s axis does not represent the true planes,232 and the measurements collected for the Third Intermediate Period, as for all other periods, are a compromise.
After the Old Kingdom, and up until Late Antiquity, the broad spread of brick size values seems to have been around 15 x 30 cm.233 The corpus of brick sizes collected from across the country in this analysis of the Third Intermediate Period is derived from average brick sizes taken from walls at Medinat Habu, Tell el-Balamun, Hermopolis, Elephantine, Karnak, Akoris, Matmar, and Tell el-Retaba. Two examples of stamped bricks exist, not in situ: one, with the name of the HPA Menkheperre, comes from the priestly house (House II) at Karnak and measured 27 x 15 x 7 cm, representing a fairly small size; the other, a large mud-brick with the name of Ini from Elephantine, measured 40 x 18 x 10 cm and may even have been longer.234 This brick is most likely to have come from a monumental structure or even part of a floor, like the large 40 x 40 x 7 cm mud-bricks found in the floor of Houses 1 and 2 (Grid g12–13) at Medinat Habu. The remainder of the mud-brick examples from across the period all come from walls in domestic contexts and fit well within the norm for domestic brick sizes of the period, showing no deviation away from normal brick size averages for the Old Kingdom until Late Antiquity. The average brick size for the period is 33 x 16 x 9 cm, which fits well within the average domestic brick size of dynastic Egypt, and therefore differentiating chronological time phases based on brick sizes is not possible for the Third Intermediate Period.
Granaries and Storage Areas
The presence of storage facilities is a major feature in the urban makeup of pharaonic settlements, particularly those for the storage of grain and other agricultural commodities. Secure magazines were constructed for high-value items, such as precious metals, stones, and weaponry.235 The Third Intermediate Period shows a continuation from the New Kingdom with the construction of circular grain (wheat and barley) silos as they are found in association with almost every domestic structure so far excavated, and there is no evidence for a fundamental change in grain silo design. What does become apparent is the quality of the construction of the smaller family unit sized silos. Successive smaller silos, which were on average around 1.5–2 m in diameter, were built one on top of the other over short spaces of time. This suggests that silos were maintained more frequently, or silo construction at the lower-class domestic scale was rudimentary and of a poorer construction quality, resulting in short use-lives, which required the constant construction and rebuilding of silo installations; therefore they are a prominent feature of Third Intermediate Period domestic architecture. The period sees large numbers of smaller silos built in previously open spaces, and at the same time they were constructed over and upon the remains of earlier housing phases, such as earlier walls and rooms, or even in disused or crumbling religious and administrative buildings of the New Kingdom, showing that grain storage for family units was a priority. These large areas of small, successively built family unit silos are a characteristic of the Third Intermediate Period.
Grain silo capacities can indicate their function and whether they were used by a self-sufficient single or extended family, or by the wider community as part of a governmental redistributive system. The circular granaries found in Third Intermediate Period settlements have no preserved heights recorded, and to estimate their fill capacities, this book adopts the approach of Kemp who suggests an estimated 2.5 m maximum fill height for domestic and administrative grain silos.236 Using the grain ration estimates of one soldier per day can provide an approximate weight of grain needed for an average person. A male soldier required 0.375 kg of wheat and 0.225 kg of barley per day, which was a total of 0.6 kg of grain per day.237 Circular grain silo capacity estimates are derived from silos at Matmar,238 Kom Firin, Akoris, Kom Rabia (Memphis), Medinat Habu, and el-Hagg Qandil (Amarna).
The Kom Firin and Akoris (Areas L and M) silos were made of fragmentary and whole mud-bricks laid predominantly in stretcher-bond formation and only a single brick thick; the bonding and thickness of the other silos was not recorded in the excavation reports. The inhabitants of Matmar took stone from the Ramesside temple to construct supports for the silos. It is unclear from the reports whether the stone was used as an external structural support to the silo owing to its size, or if the stone was placed under the silo as a raised base. If it were the latter, then having the stones under the silos would have acted to reduce moisture and prevent rodents and insects from eating the grain.
The silo capacity estimates (Tables 4 and 5) show the maximum amount of grain required for the needs of the associated population of the settlement, because the grain was put to multiple uses including as surplus in the event of famine and surplus for the year ahead. The estimated capacities of the silos found in the silo courts of the large houses in the temple temenoi at Kom Firin and Matmar indicate their part in the taxation and ration system of the earlier New Kingdom, in which the workers were given a ration of grain as a form of payment.239 Small group housing complexes of extended families and communities, such as at Medinat Habu, had one large grain silo in a designated room leading off from the central pillared hall with dais. The position of the silo indicates that those who wanted access to the grain had to go through the main room and past the owner/scribe/administrator seated on the dais, possibly indicating a level of control over grain resources for a small housing complex from the patriarchal head of the family or family group. Clusters of small family grain silos were constructed within walled areas which offered more protection of family stores and indicate that, unlike in the larger house groups which provided specific rooms for the protection of grain bins, these smaller silos were owned by families with restricted space in their own homes, so they had to resort to communal protected grain storage. The grain silo analysis has demonstrated the continuing function of the New Kingdom bureaucratic system of taxation and grain rationing to the wider community, and shows that small family groups maintained control over grain supplies within their own homes, while families with limited domestic space could secure their grain supplies in group silo areas.
Animal Stabling and Husbandry Areas
Chapter 2 identified a reduction of stable establishments outside the main political centres controlled by kings and local leaders within the Akoris to Atfih region from the end of the New Kingdom into the Third Intermediate Period. It is possible that the stables had, by the end of the Third Intermediate Period, been removed from the hinterland settlements and were concentrated in large civic stables inside the main temenos walls, as at Tell el-Retaba, and at Hermopolis as documented on the Piankhy Stela. The Piankhy Stela also indicates that civic stabling at Memphis was for horses as well as oxen.240 The only archaeological evidence of stabling dated to the Third Intermediate Period is at Tell el-Retaba in Area 6 within the mud-brick enclosure (Fig. 33),241 while a royal stable at Qantir dating from the late Nineteenth to late Twentieth Dynasty, and probably extending into the early Third Intermediate Period, is of the same type as that discovered at Tell el-Retaba;242 this shows a continuity in the architectural design of stables between the New Kingdom and Third Intermediate Period. Excavations at Sais in the Third Intermediate Period levels have also found considerable amounts of horse bones, which may suggest the presence of stables in the area.243 The range of animals which were part of the domestic life of the Third Intermediate Period Egyptians can be gauged from the faunal evidence from the settlements of Kom Firin and Sais in the Delta. The animals included ducks, geese, cattle, dogs, cats, goats, donkeys, horses, and pigs.244 Domesticated animals are likely to have been kept in two main locations: within the house, as is observed in the modern Egyptian village at Sa el-Hagar, where donkeys and goats are kept within the house, and near the house in designated grazing areas. Evidence from before the Third Intermediate Period shows that at Tell el-Daba, Memphis, and Amarna pigs were farmed, and depictions of swine herds show them outside the settlement, but it is possible that pigs were reared within the settlements, including at the larger houses of the Middle Kingdom settlement of Wah-Sut at Abydos.245 In the Delta, the faunal assemblages of the Third Intermediate Period suggest that pigs were the main source of protein within the diet of the inhabitants of Sais (39.3 per cent) and Kom Firin (43.43 per cent),246 and pigs also constituted an important part of the diet at Akoris in Middle Egypt.247 Faunal reports from other Third Intermediate Period settlement phases are not yet published and this makes it difficult to see whether this was a countrywide development.
Plan of the Third Intermediate Period stables from Tell el-Retaba (Jarmužek, 2011: 132, plan 4).

The presence of designated areas for the grazing of animals during the period has been suggested at Akoris in the ‘South Area’, in association with the many small silos. Large amounts of hay and dung accumulation in Area M indicate that this was an animal pen area.248 Defined animal penning areas would have accommodated many of the domesticated animals of the household including goats and even donkeys. At Kom Firin, 1.136 per cent of the identified taxa was donkey bones, while horses (4.54 per cent) were common at Sais.249 As horses were exclusively related to the elite classes, donkeys would have remained the working animals of the domestic settlements and agricultural families. The best evidence of donkey usage comes from the New Kingdom, when they were used for a wide variety of purposes and would have transported goods such as water, wood, grain, hay, and firewood, and pulled carts. Dung would have been removed from the settlements by the donkeys, and at night, the donkeys would have been stabled within the home for protection.250
Evidence of the keeping of animals within the home, no doubt for protection at night from predators or even theft from surrounding families or external thieves, is found at Sais and Hermopolis. The Third Intermediate Period house phase at Sais showed evidence of a storehouse or animal pen with a small 50 cm door threshold.251 Just outside the doorway was a pile of pottery including some jar bases which still contained substantial amounts of chaff, perhaps from dried and partly decomposed manure.252 Samples from the deposits were dominated by wheat glume bases, and represent charred material cleaned out of a domestic oven/hearth, in which cereal processing waste was used as the primary fuel.253 This material had been dumped outside the house. The pottery had been thrown upon the ground surface at the base of a stone door pivot for the door to a small circular feature. The presence of the broken sherds may imply they were used in some way inside the animal pen, perhaps to cover the floor. If the building was an animal pen, then the circular shape may have been typical as well as the dividing cross wall of the structure.254 In the central part of the Level 2b house at Hermopolis was a long open space that may have housed animals as there was an animal fodder bin present.255
It is likely that most Egyptian households had a dung heap within or immediately adjacent to the enclosed housing space occupied by a household or inter-related family, often in the courtyard, where the valuable sources of animal nutrition and agricultural manure would remain under the control of the family or families inhabiting the area and owning the yard.256
Areas for Refuse Disposal with the Settlements
The Egyptian diet was dependent on cereals, dried legumes, and preserved foods, alongside cheese, fruit, vegetables, fish, meat, grains, aromatic seeds, and condiments, with garlic and onions available all year round. Most of the ancient food waste was created during the preparation stage of the meals. In the nineteenth century, the amount of domestic waste produced per person, excluding sullage, was estimated at 567 kg a year,257 equivalent to 1.5 kg a day. Leftover edible food after a meal was likely to have been minimal, as in modern rural villages. The females of the house, again as in modern times, were most likely responsible for the food management and the clearing of the food waste.258 If leftovers were present they were likely to have been incorporated into the next meal. The hot climate did not always make it safe for leftovers to be consumed later, as food-spoiling microorganisms, some of which caused gastroenteritis and food poisoning, would quickly reach unacceptable levels for human consumption.259 The food waste created by the families during the food-processing stages would have been thrown out deliberately and would have caused rubbish to accumulate within the household if not dealt with daily and removed from the property. The organised disposal of organic and inorganic waste is a vital part of the functioning of any settlement. The ability to remove waste and refuse from the home and the surrounding environment has an impact upon the health and quality of the life of the inhabitants. This section discusses the methods and practices by which the Third Intermediate Period population disposed of their household and human waste. Developments in house design from the courtyard style house into a roofed hall during the Second Intermediate Period at many settlements in Egypt enhanced the cleanliness of the large central space of the house through measures such as the separation of the street.260 The separation of the street reduced the amount of dust settling in the former courtyard area, and enhanced the impetus to keep the space clean.261
Auxiliary parts of the house were the waste-producing activity areas, with the large mansions of the Middle Kingdom at Kahun exhibiting this division as well as small-scale New Kingdom houses.262 At the workmen’s village of Amarna, quern emplacements, mortars, ovens, and animal troughs were in the front and back of rooms of the small houses, but they were never in the central living room, where there was a bench and hearth for heating.263
In the Third Intermediate Period, the Level 1b (late Third Intermediate Period) house at Hermopolis shows that domestic waste was swept to the edge of what appears to be an outer room, possibly a courtyard, of the main house to the west, where it was left to accumulate, rather than removing it from the house itself. The accumulation of refuse along the edges of the walls is common in Egyptian settlements.264 In smaller Third Intermediate Period dwellings, damaged or uninhabitable rooms were used as makeshift refuse areas. In other instances, entire houses which were uninhabitable were utilised as containers for local refuse. For example, at Tell el-Retaba, after the inhabitants of the Area 9 house left, the house was turned into a refuse area and filled with large quantities of bone and pottery.265 Finally, at Sais (Kom Rebwa) in the ‘Phase II’ early Third Intermediate Period levels, pottery vessels were used to collect waste from inside the building, which was then dumped outside the main building door.266
The evidence suggests that auxiliary parts and external areas of the house were the place where refuse was dumped. Uninhabited and abandoned settlement zones and tell areas were prime locations for refuse disposal during the period, while movable elements such as vessels were used as refuse collection points. Food waste created during the preparation and cooking process was deliberately fed to animals, particularly pigs, as an efficient use of the waste products.
The pig has a similar range of nutrient requirements to those of humans and can recycle nutrients from food consumption, which was of considerable benefit in the removal of gone-off and non-edible (for humans) food waste.267 Evidence for animals such as pigs being used within settlements to aid in waste removal comes from Abu Salabikh in Iraq, which suggests juvenile pigs ran free in the streets, disposing of waste and garbage thrown out of doors.268 Further ethnographic observations in Greek villages suggest pigs could run free. If the pigs are let out during the day from a pen, where buckets of water and feed are available for them to return to as needed, they can forage up to a radius of ca. 1.6 km from where they are kept.269
Evidence from Egypt suggesting that pigs were an essential part in the waste refuse process comes from the previous New Kingdom. Several tomb scenes show pigs being driven into the open by swineherds.270 They could have passed through the streets going to and from home on their way to the fields.271 The degree to which pigs were free to roam or restricted is impossible to define. Pigs certainly belonged to temples during the New Kingdom, but areas such as inner parts, where even people were not allowed, would probably have been off limits to pigs scavenging through the heaps of waste immediately adjacent to the enclosure walls. While not all waste would be of nutritional value to domestic scavengers, the ability of pigs to consume both garbage and faeces would mean human pathogens would be removed from public areas, limiting the opportunity for the transmission of some faecally transmitted diseases.272 Human and animal faeces could have been used to make dung cakes for fuel, and stored away for when the climate became colder, particularly in the winter months. The removal of waste would reduce the infestation of houses by rodents and insects which spread disease. On the other hand, pigs consume human waste, and in parts of Asia, there are incidents of excreta disposed of into pig-pens. A palaeo-biological study of waste found in animal enclosures suggests this practice occurred in the New Kingdom workmen’s village at Amarna.273 The presence and continuation of pigs within the Third Intermediate Period domestic settlements is indicated by the faunal remains from the western Delta at Kom Firin and Sais.274 Mobile scavengers such as dogs and poultry could look after themselves and, ranging freely, feed from open areas.275
Despite waste removal, there is evidence that, later in the Third Intermediate Period, large amounts of rubbish accumulated within walled enclosures, particularly at Matmar where refuse layers as much as 80 cm deep were used as foundations for new domestic housing inside the temple enclosure. A similar scenario occurs at Medinat Habu during the second housing phase. In the New Kingdom, there is evidence for refuse collections located immediately outside the residential enclosures of Deir el-Medina, the Amarna workmen’s village and Malqata,276 and in the Third Intermediate Period, the outer walls at Kom Firin show evidence of rubbish dumping up against the walls of the enclosure,277 indicating that the population was dumping refuse over the side of the temple’s mud-brick enclosure wall.
The evidence for refuse disposal during the Third Intermediate Period, albeit limited, suggests refuse was deposited in abandoned areas of the house, disused or structurally unsafe buildings, and unused tell zones. Refuse built up inside the temple enclosures at Medinat Habu and Matmar, with the previous late New Kingdom domestic phases and temple areas now being encroached by refuse mounds. These areas of refuse provided foundations for new organically developed domestic settlements to build up on top of them, while at the same time walled communities were dumping refuse over the tops of the temenos walls, creating refuse mounds against the outer temenos walls. This was an easy option and would have meant the inhabitants of a walled settlement did not have to go outside with their refuse.
Cemetery and Burial Locations
After the New Kingdom there were significant changes in both tomb architecture and the burial assemblages with which the population chose to be buried. A substantial number of studies of the period have been dedicated to these changes, but mainly focus on the analysis of material discovered from the Theban region owing to its good survival rates, while in the Delta and Middle Egypt little survives thanks to either ecological conditions, ancient looting, or poor early recording techniques. This Theban regional bias may have therefore created an unbalanced view of the changes in burial and funerary customs across the country. The evidence does, however, show that elite Thebans developed a new set of funerary values compared with the New Kingdom. The focus for the Theban elites was no longer a large decorated rock-cut tomb, but a space-efficient burial, which included the minimum essential burial goods for the rebirth of the individual.
The funerary landscape of the Third Intermediate Period is largely absent from the archaeological record. In all, thirty Third Intermediate Period cemeteries have so far been identified in Upper Egypt,278 while only a few isolated burial grounds and individual elite and royal tombs are known from the Delta, particularly at Tanis and Tell Muqdam; the picture for the Delta is, however, severely hampered by ancient looting and modern urbanism. Third Intermediate Period cemetery phases are difficult to classify into dynasties from the mid-Twenty-Second Dynasty onwards. Most cemeteries in both Upper Egypt and the Delta are those of the elite population and royalty. Non-elite funerary sites are mainly unknown or poorly recorded, and in Upper Egypt there are no cemeteries recorded for the Fifth, Seventh, Eleventh, and Fourteenth Upper Egyptian nomes, while in the Delta huge geographic zones particularly in the central and western Delta are so far lacking any Third Intermediate Period funerary material.
Several factors may explain this under-representation of cemeteries in the archaeological record. Firstly, owing to the poorly documented early excavations of cemetery sites in Egypt, Third Intermediate Period cemeteries may have been misclassified and/or misdated in the academic literature. Many earlier necropoli were re-used in this period and may have been misclassified as earlier burials. The paucity of burial items with the poorer population may have led to these burials being mixed with earlier burials with clearly datable tomb assemblages. Many cemetery sites are likely still to be discovered, or large areas of previously known cemeteries which have Third Intermediate Period interment zones have yet to be excavated. Large numbers of elite and royal burials of the Third Intermediate Period were interred within the temenos walls of the main temples, and many of these temple temenoi have not been discovered or still await full excavation. Later sacred landscape changes initiated by the Late Period kings also destroyed many of the monumental tombs of the period. Many of the non-elite populations may have interred their dead on the settlement mounds, and successive taphonomic changes will have obscured the burials under thick settlement phases or sediment. Finally, the dynamic nature of the hydrological system, particularly in the Delta, along with ancient/modern looting and urban encroachment, may have destroyed many cemetery areas.
The evidence from surviving cemetery sites does show a general chronological progression of Twenty-First to Twenty-Fifth Dynasty burials from the First to the Tenth Upper Egyptian Nome. From the Eleventh to the Fourteenth Upper Egyptian Nome there is no evidence, so far, of Twenty-Second to Twenty-Fifth Dynasty burial grounds, but only examples of Twenty-First Dynasty interments. From the Akoris to Atfih region (Heracleopolitan/Faiyum region) the data shows the absence of Twenty-First Dynasty burials, and the region is characterised by Twenty-Second to Twenty-Fifth Dynasty burial grounds.
The locations of the cemeteries within the wider settlements show that the New Kingdom temples influenced the position and place of burial grounds during the Third Intermediate Period.279 The rulers of Third Intermediate Period Egypt now constructed their tombs within the temple precincts, for example at Tanis, while other family members had tombs located near the cult temples at Tell el-Balamun, Memphis, Heracleopolis, and Hermopolis, or in the case of Harsiese A, in the temple of Ramesses III at Medinat Habu.280 The tombs of the Gods Wives of Amun from the late tenth century bce onwards are located behind the Ramesseum, or were in tomb chapels erected at Medinat Habu. The royal cousins Nesterwy and Djedptahefankh D were buried within or behind the temple of Ramesses III, while other members of Takeloth III’s family had tombs within the temple of Hatshepsut. The cult temple at Matmar was a focal point for some burials, while at Thebes, the old temples of Hatshepsut, Ramesses II, Tauseret, Amenhotep II, Seti I, and Ramesses III all had Third Intermediate Period burials. Temple blocks were also found with the deceased in a few graves at Gurob and Matmar.281 The non-elite populations appear to have chosen a more nucleated form of burial closer to the temples, instead of in the detached funerary and cultic zones of the New Kingdom, such as at Mendes, where crumbling enclosure walls of the temple were used for poor status burials.282
The Continuity and Transition of Third Intermediate Period Settlements
After the end of the New Kingdom, Egyptian settlements within different political and environmental regions developed differing patterns of settlement management. The political centres of Thebes, Memphis, Mendes, and Kom el-Hisn continued the nucleation of domestic buildings around the main temple enclosures, retaining the axial alignment of the earlier New Kingdom settlements in relation to the main cult temple. In the Delta, at Sais and Mendes, owing to the limitations of tell space, new domestic areas were built on earlier abandoned domestic and funerary zones, showing a reorganisation of domestic settlement into new areas. This was also the case for tomb construction, which utilised the earlier tombs and cemeteries, while at the same time making use of the earlier civic and religious buildings as secure zones of interment. In the late New Kingdom and early Twenty-First Dynasty, ephemeral settlements such as Kom Firin, Matmar, and Medinat Habu saw the development of domestic communities within the New Kingdom temple enclosures as a response to local civic insecurity, while attempts at domestic encroachment on religious and civic areas in the main political centres such as Thebes had to be combated through new wall constructions. The temenoi of almost every settlement show some form of degradation, so much so that domestic installations and poor and elite burials were placed in the collapsing exterior sides of the walls, while the interior areas remained secure. The walls were only modified and maintained during the Third Intermediate Period to suit the needs of the existing population, and renovations were dictated by the resources the region could provide. Local kings and chiefs focused their attention on the civic and religious buildings within the main temple enclosures, such as temples, palaces, tombs, storage areas, and military installations.
The degeneration of a national temple building policy was already happening long before the start of the Third Intermediate Period and was a result of economic pressures and a general breakdown in efficient governmental controls rather than a significant change in the expression of state religion through physical building projects. The local chiefs and rulers focused their temple building within their own settlements and associated hinterlands and zones of power. Access to stone and precious metals for temple construction was not available to many rulers thanks to the geo-political boundaries of their realms. This, in turn, led them to further recycle the monuments of the previous religious built environment that they saw around them, to placate the gods and their own subjects within their own economic limitations. The surviving temple buildings show a continuation of Ramesside styles and designs, apart from the invention of the freestanding temple sanctuary during the reign of Shoshenq I, reminiscent of the temple sanctuaries from the Ptolemaic Period onwards.283
A pragmatic re-use of New Kingdom palace buildings can be observed in relation to the temple which would have retained the religious topography of the New Kingdom temenoi zones. Settlement management of many New Kingdom civic and secular buildings outside the main temenoi suggests that they ceased to function and were taken over by domestic and industrial architecture. The population became self-sufficient and adapted the built environment around them to suit their needs, utilising what was available to continue their domestic lives, despite the changing political and, perhaps, economic circumstances. Many domestic houses continued to adhere to the New Kingdom Amarna style, while less regular architectural styles were developed as a response to space limitations, the personal adaptation and needs of the family unit, the economic and social hierarchy of the occupants of the house, the settlement type and its location, or as a result of a decentralised government not dictating architectural conformity as in earlier periods, leading to unique regional plans developing at Medinat Habu, Hermopolis, and Tell el-Retaba. Local populations were self-sufficient at the family level in the storage of grain and food commodities, while grain surplus was stored within larger houses and temple enclosures for redistribution to the wider community, indicating the self-sufficient nature of the political centres. This suggests that family units had access to fields and agricultural facilities, and so long as they could grow produce they had a certain amount of self-sufficiency.