1 Introduction
The Bronze Age witnessed transformative interactions between Egypt and the Levant. Their nature and degree fluctuated throughout the third and second millennia BCE. While such relations enabled access to innovative concepts and otherwise inaccessible resources, their maintenance remained susceptible to political, socio-cultural, and environmental stressors. By the second half of the second millennium BCE, a complex network of interregional contacts had flourished, allowing for the intense flows of entities across the vast regions.
This network did not emerge instantaneously. Recent analyses have identified its development in the earlier second millennium BCE, with certain aspects emerging already in the third millennium BCE. Egypt and the Levant focuses on these aspects. Section 1 introduces the topic, including evidence for Egyptian–Levantine encounters, and a brief overview of approaches to Egyptian–Levantine interregional relations. Section 2 offers an outline of such encounters, their shifting nature in association with broader political and societal developments, and possible motivations for developing networks of exchange and interaction. Section 3 summarises the means and impact of fostering and maintaining this network.
The Element is not an exhaustive synthesis of Egyptian–Levantine relations. Instead, it aims to present a snapshot of how we today understand connections between Egypt and the Levant in the Bronze Age. It specifically focuses on the third to mid-second millennium BCE, or the first two-thirds of the Bronze Age, for two main reasons. Firstly, interactions in the Late Bronze Age (LBA) and the evidence on them differ from previous centuries. Egyptian representations portray amplified political control over certain Levantine regions, whereas Levantine sites evince varying, debatable, evidence for such control. From King Thutmose III’s multiyear campaigns, Amarna Period diplomacies, and Ramesside witnesses of war and peace, to the complex and interrelated processes of transformation, the LBA demands exploration beyond the confines of this Element (for recent overviews, see Ahrens Reference Ahrens2020; Grandet Reference Grandet, Radner, Moeller and Potts2022). Secondly, studies have usually applied LBA power and exchange dynamics onto earlier Bronze Age interactions, obscuring changing continuities. This Element shifts focus from imperialistic and extractive relations that place Egypt as ‘core’, to current and potentially future research that conceptualises multifaceted and multidirectional connectivities.
1.1 Geography
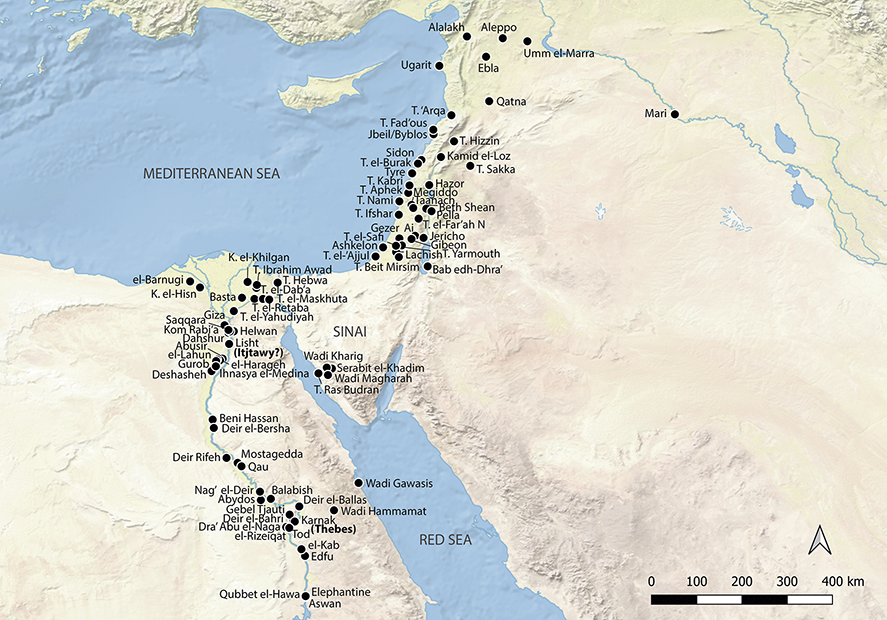
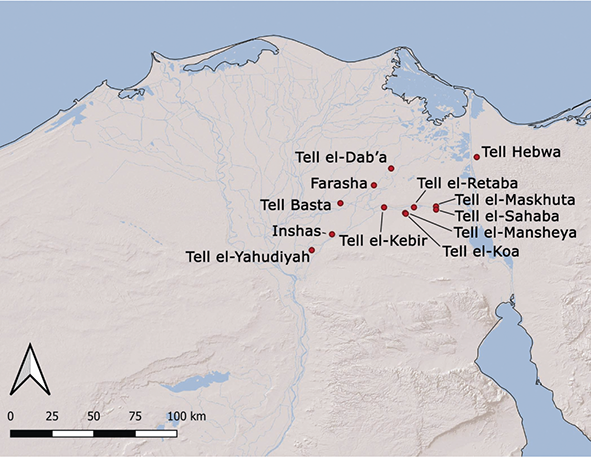
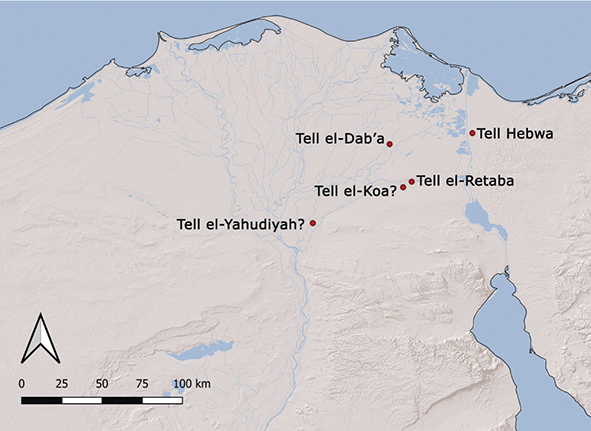
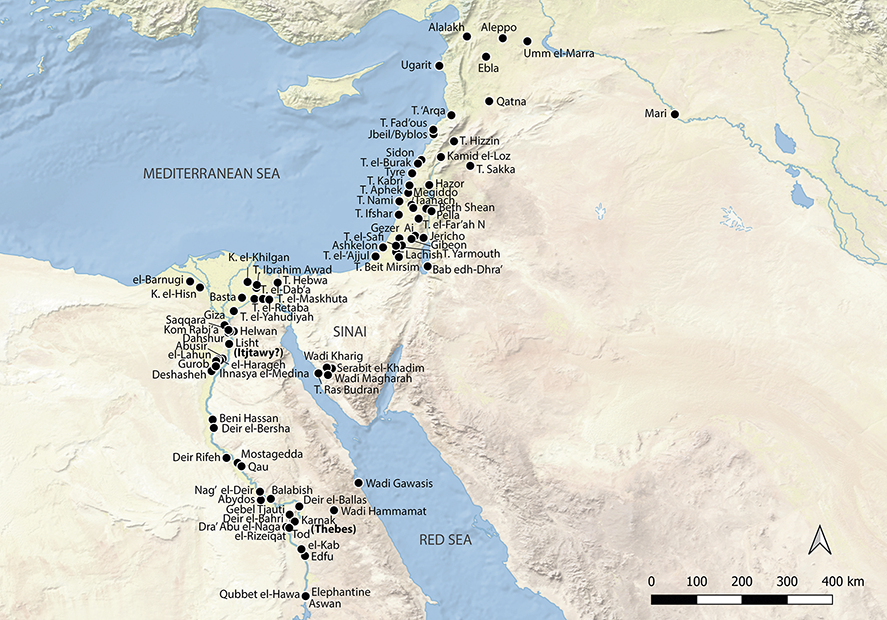
A network by its very concept does not include only two cities, two states, or two regions. Due to length limitations of this Element, the focus is narrowed to Egypt and the Levant (Figure 1), bearing in mind that the communities across these regions were linked to others that would have influenced their connectivities. Egypt is considered here as the area over which a unified Pharaonic state achieved rulership during the Old and Middle Kingdoms. This encompasses the lower Nile Valley, from the first cataract at Aswan to the Delta’s Mediterranean coast. To its northeast is the Sinai Peninsula, beyond which is a stretch of territory that has been referred to as ‘Syria-Palestine’, with ‘Syria’ for the north and ‘Palestine’ for the south; others have opted for ‘Phoenicia’ and ‘Canaan’ for these regions, their limits often uncertain. Here, the term ‘Levant’ is preferred, demarcating the area bounded by Wadi el-‘Arish at the south (along north Sinai), the Mediterranean coast on the west, and the ʻAmuq Plain, alongside parts of the Amanus and Taurus mountains, to the north. The eastern limits extend to the Euphrates River, the Syrian Desert, and the Transjordan deserts. Despite socio-cultural variability across the Levant, scholars divide it further into the Northern and Southern Levant at the modern border between Lebanon and Israel, the border reflecting more the current political situation (Genz Reference Genz and Potts2012: 607).
Egypt and the Levant, with sites mentioned in the text.
1.2 Chronology
Chronological correlations between Egypt and the Levant are imperative for considerations of cross-cultural encounters and developments. They have traditionally depended on relative dating methods involving analyses of the evidence for encounters, and their attribution to archaeological periodisations and/or the Egyptian historical chronology. Such methods allowed for the general and generally accepted correlation of the Levantine Early Bronze Age (EBA) with the Predynastic Period to the Old Kingdom; the Middle Bronze Age (MBA) with the Middle Kingdom and Second Intermediate Period; and the LBA with the New Kingdom.
More specific synchronisations of subdivisions or dynasties have proven to be challenging. This is due to the inherent problems in the reconstruction of Levantine and Egyptian chronologies, and in the determinations and correlations of transitions into and out of each respective period (Nigro Reference Nigro and Gallo2019). Within Levantine studies, different dating schemes have been proposed for the Northern and Southern Levant, their synchronisation continually being refined. Gaps also remain in our understanding of the Egyptian dynasties. The existence, order, and length of some rulers’ reigns remain uncertain, as are correlations in regionalised archaeological periodisations and historical chronologies of the First and Second Intermediate Periods (see Ryholt Reference Ryholt1997; Verner Reference Verner, Vymazalová and Bárta2008; Sowada Reference Sowada, Höflmayer and Eichmann2014; Forstner-Müller and Moeller Reference Forstner-Müller and Moeller2018; Jüngling and Höflmayer Reference Jüngling and Höflmayer2023).
Such challenges in chronological determinations have been further exacerbated by the incorporation of absolute dating techniques. Over the last two decades, two major research programmes have sought to update and revise chronological correlations by integrating absolute with relative dating methods. The first, the Associated Regional Chronologies of the Ancient Near East Project (ARCANE), focused on regional assemblages across Egypt and Western Asia in the third millennium BCE (Sallaberger and Schrakamp Reference Sallaberger and Schrakamp2013; Lebeau Reference Lebeau2014, Reference Lebeau2018). The second, the Synchronisation of Civilisations in the Eastern Mediterranean in the second millennium BCE (SCIEM) project, concentrated on synchronising the chronologies of Egypt, Western Asia, Anatolia, and the Aegean (Bietak 2001–2003; Bietak and Czerny Reference Bietak and Czerny2007). Despite their significant contributions to refining our understandings of chronological correlations in the third to second millennium BCE, scholarly consensus has not yet been reached, especially regarding absolute dating.
Radiocarbon analyses have been used to argue for earlier or ‘higher’ chronologies for Egypt (e.g. Bronk Ramsey et al. Reference Bronk Ramsey, Dee and Rowland2010; Shortland and Bronk Ramsey Reference Shortland and Bronk Ramsey2013; Quiles, Sowada and Kanawati Reference Quiles, Sowada and Kanawati2023) and the Levant (e.g. Bonani et al. Reference Bonani, Haas and Hawass2001; Regev et al. Reference Regev, de Miroschedji, Greenberg, Braun, Greenhut and Boaretto2012; Höflmayer Reference Höflmayer2017; Erdil et al. Reference Erdil, Webster and Kuitems2024). These consequently bring the end of the EB III from its conventional dating around 2300 BCE to around 2500 BCE, correlating this with Dynasty 4 or early Dynasty 5 (Höflmayer Reference Höflmayer, Höflmayer and Eichmann2014: 137). They would also infer higher dates for the MBA, its subdivisions, and its transition into the LBA, bringing its beginning to correspond with late Dynasty 11 or early Dynasty 12, and its end to Dynasty 15. The implications of the high chronology have been discussed (e.g. Höflmayer Reference Höflmayer, Höflmayer and Eichmann2014, Reference Höflmayer2019; Cohen Reference Cohen2017; Nigro Reference Nigro and Gallo2019: 10–11; D’Andrea Reference D’Andrea2023; Manning Reference Manning2024). Regarding relations between Egypt and the Southern Levant, scholars agree that the paucity of evidence for intense late Old Kingdom to early Middle Kingdom interactions cannot conclusively support or oppose either chronological scheme (Cohen Reference Cohen2017: 38; D’Andrea Reference D’Andrea2023: 91).
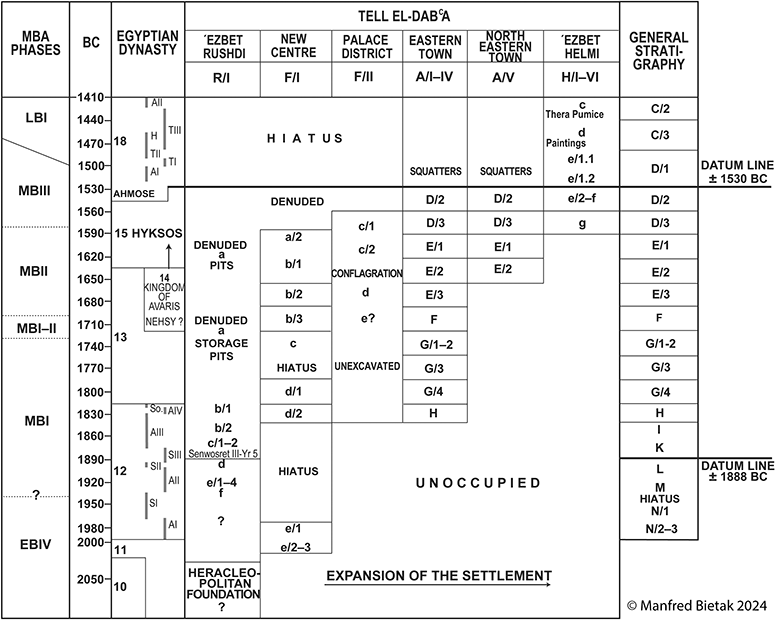
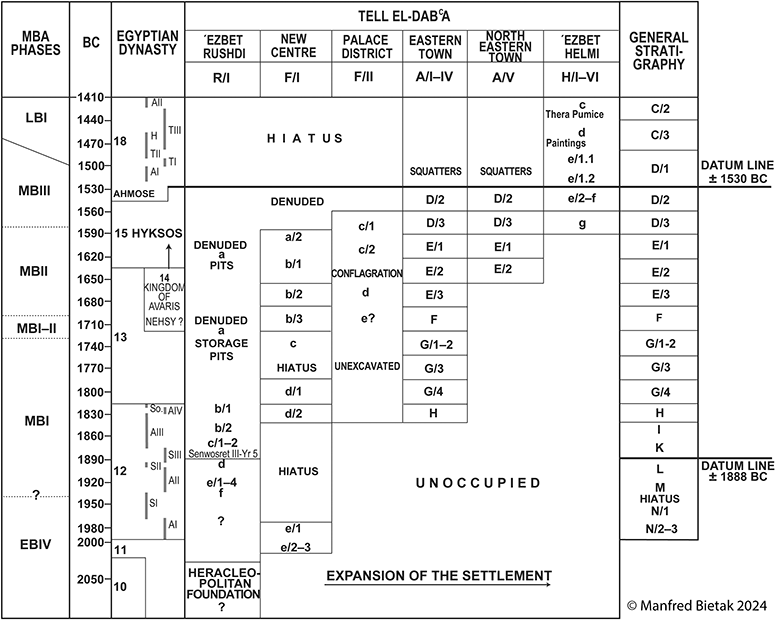
However, implications are considerable for the second half of the Middle Kingdom to the Second Intermediate Period, for which the evidence for Egyptian–Levantine relations is more abundant. Analyses of this evidence support the later ‘low’ chronology (Bietak Reference Bietak, Shortland and Ramsey2013, Reference Bietak2021a, Reference Bietak, Driessen and Fantuzzi2024; see, however, Forstner-Müller and Moeller Reference Forstner-Müller and Moeller2018). These are bolstered by the findings from the site of Tell el-Dabʻa in the northeastern Delta, where a consecutive stratigraphy from around the early Middle Kingdom to the New Kingdom has been excavated (Bietak Reference Bietak1991, Reference Bietak, Driessen and Fantuzzi2024; Figure 10). Each stratum has been carefully synchronised with the Levantine chronology according to its Levantine imports and correlations with material across such sites as Tell el-ʻAjjul, Ashkelon, Sidon, and Tell ʻArqa (e.g. Czerny Reference Czerny1999, Reference Czerny2015; Aston Reference Aston2004; Ben-Tor Reference Ben-Tor2007a; Kopetzky Reference Kopetzky2010; Aston and Bietak Reference Aston and Bietak2012; Stager and Voss Reference Stager, Voss, Stager, Schloen and Voss2018a). Accordingly, the combined evidence has been used to assign the beginning of the MBA to Dynasty 12, and its end to early Dynasty 18.
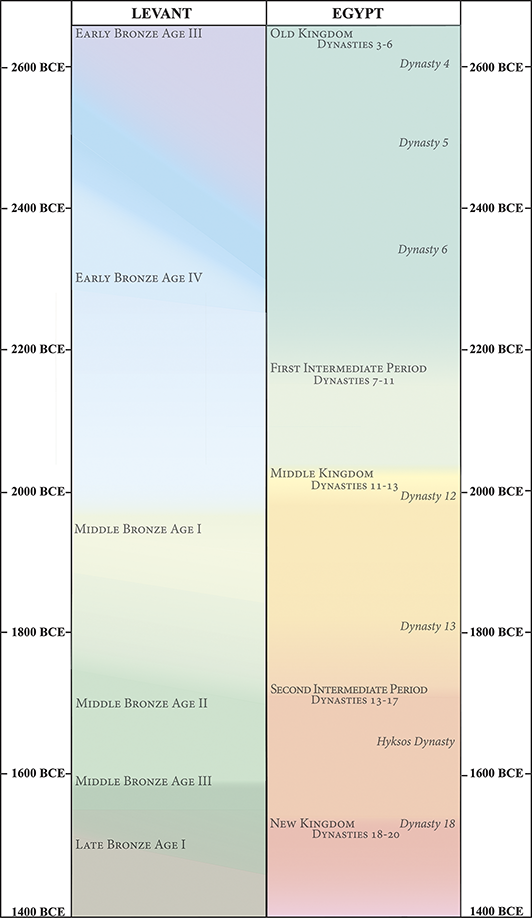
This Element relies on relative correlations as offered by such archaeological and historical material (Figure 2). The data for Egyptian–Levantine interactions are dated and approached contextually, in consideration of their immediate findspots (if known), and their nature, form, and function, for any insights these may shed on cultural encounters and transformations. Contexts and meanings are often barely considered in interpretations of representations that search for chronological synchronisations (e.g. Execration Texts, Section 2.3.2). This has contributed to completely different chronologies and historical reconstructions.
Chronological correlations between Egypt and the Levant. Colour changes indicate possible transitions between periods.
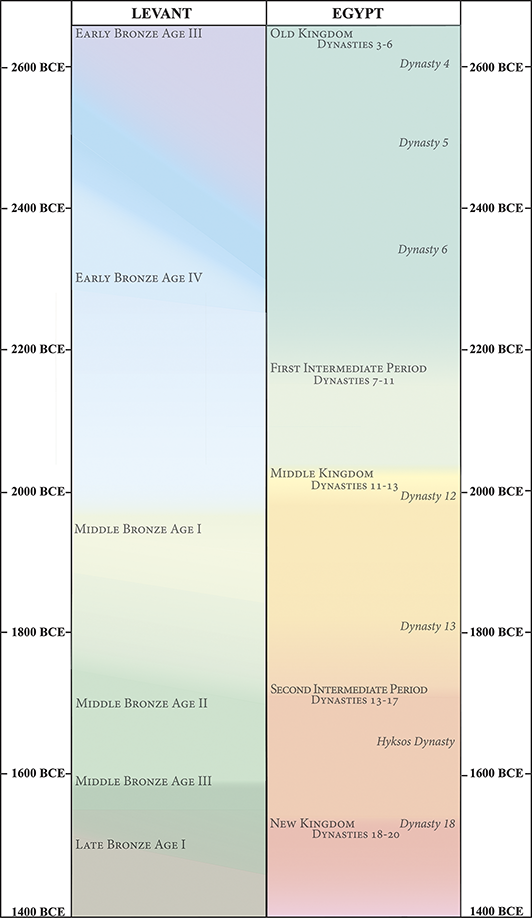
Figure 2 Long description
Levant: Early Bronze Age 3 is placed at about 2650 B C E, Early Bronze Age 4 at 2500 to 2300 B C E, Middle Bronze Age 1 at 1950 B C E, Middle Bronze Age 2 at 1700 B C E, Middle Bronze Age 3 at 1600 B C E, and Late Bronze Age 1 at 1500 B C E. Egypt: Old Kingdom is placed at about 2650 B C E, Dynasty 4 at 2600 B C E, Dynasty 5 at 2500 B C E, Dynasty 6 at 2350 B C E, First Intermediate Period (Dynasties 7 to 11) at 2180 B C E, Middle Kingdom (Dynasties 11 to 13) at 2030 B C E, Dynasty 12 at 2000 B C E, Dynasty 13 at 1800 B C E, Hykos Dynasty at 1650 B C E, and New Kingdom (Dynasties 18 to 20) starting with Dynasty 18 at about 1530 B C E.
1.3 Theoretical Frameworks
Egyptian–Levantine encounters undoubtedly shifted across the Bronze Age. Their motivations have often been interpreted from the Egyptian perspective, with relations generally ranging between the imperialistic or dominating, diplomatic or commercial, and minimal to non-existent. Since the mid-twentieth century, several theories have been applied to conceptualise such relations. Among the most common is the world-systems approach, which grew in popularity in the social sciences for its perspectives on interregional patterns of power and exchange. The approach considers three major systems in society: culture, politics, and the economy; the first operates within one system, and the other two extend to larger world-systems with varied labour divisions (Wallerstein Reference Wallerstein1974). Each world-system has competing polities that form two distinct zones: (1) the ‘core’, dominating and highly developed, manufacturing high-value items for consumption across the system; and (2) the ‘periphery’, its social development and political economy dependent on the core, which it provides with raw materials and people (Wallerstein Reference Wallerstein1974; Hopkins and Wallerstein Reference Hopkins and Wallerstein1982). A ‘semi-periphery’ could emerge with a higher degree of political control than the periphery, serving the interests of economic elites (Wallerstein Reference Wallerstein1974).
This approach was then adapted to interrogate macroscalar trends in history and archaeology, where the culture-historical approach contributed to understanding exchange as between two bounded cultures. Accordingly, the fixed core would dominate the periphery in a hierarchical and asymmetric exchange system, ‘spreading’ ideas, innovations, and triggers of social change to the periphery (McGuire Reference McGuire and Ellis2000: 132–3). This aligns with the concept of cultural diffusionism, leading to such processes as cultural borrowing or appropriation, and culture change (Davis Reference Davis1983; Trigger Reference Trigger2006). Critiques have highlighted the approach’s mainly unidirectional flow of influences, and the diminished importance of local agency and dynamics (e.g. Stein Reference Stein2002). Considering such aspects, the framework was revised to emphasise the importance of interaction for change, limiting the prerequisite of core dominance and the unequal division of labour to reflect different degrees of social complexity (Chase-Dunn and Hall Reference Chase-Dunn and Hall1993).
The world-systems approach, with modifications, has been applied to studies on Egyptian–Levantine interactions. Typically, Egypt is placed as core, with the periphery including the Levant, its socio-cultural developments dependent on Egypt’s interests and structures. For instance, according to Cohen (Reference Cohen2016), EBA relations between Egypt and the Southern Levant were hierarchical, with Egyptian presence strongly influencing EB I Southern Levantine settlements, its withdrawal leading to settlement restructure and regression at the end of the EB I and early EB II. Afterwards, the near-absence of Egyptian interest in the early MBA Southern Levant allowed for developments in stable settlements, leading to strong urban systems (Cohen Reference Cohen2016). A heterarchical, asymmetrical, world-system is favoured by Flammini (Reference Flammini, Wilkinson, Sherratt and Bennet2020), wherein Egyptian practices and cultural features were adopted by Gublite/Byblite rulers for local needs, the reverse not identifiable.
Such insights reflect the advantages of applying the world-systems approach. Nonetheless, its applications remain dependent on one key factor: the dominance of the Egyptian state. This overshadows local agency, internal developments, as well as supra-regional complexities that involve multidirectional movements and influences of various entities within, across, and beyond Egypt and the Levant. This is not to mean that power imbalances did not exist or impact exchanges; rather, in some ways, the imbalance in power between Egypt and the Levant that is furthered by the world-systems approach echoes imperialistic, capitalist, or extractive concepts of interregional exchange. Power dynamics are generalised, and the influence of economic exchanges on socio-cultural developments are amplified. Egyptian elements are ‘borrowed’ by reactive Levantines, leading to ‘Egyptianisation’. To a certain extent, the placement of the Egyptian as the dominant culture is further reflected in analyses of culture change that approach the Egyptian culture as donor or producer, affecting the acculturation of northeastern groups or individuals in, for instance, Middle Kingdom and Second Intermediate Period Egypt (e.g. Schneider Reference Schneider and Wendrich2010). This domination is not always questioned, especially in periods when the Egyptian state had fragmented.
To incorporate agency and the dynamic, complex, nature of culture and identity, multiscalar approaches are now being applied (see Mills et al. Reference Mills, Peeples and Randall Haas2015; Feinman Reference Feinman and Hodos2017; Mourad Reference Mourad2021: 25–44). These analyse macroscalar trends (e.g. settlement patterns; object distributions; the longue durée) alongside meso- and microscalar dynamics (e.g. communities of practice; agency; local and regional ties and transformations) by shifting temporal, spatial, and social group perspectives to discern the complexities of human interactions. They aim to push disciplines into new ways of thinking of long-distance connectivities in relation to networks that affect and effect local, regional, and supra-regional change. Multiscalar approaches consider the emergence, maintenance, and implications of such networks. Generally, they agree on three essential and interrelated elements of long-distance exchange: (1) entities of exchange; (2) the physical and abstract spaces of connectivity; and (3) facilitative links and media. Entities of exchange include objects, concepts, words, and images, as well as people, animals, plants, and other biological elements. In a broad sense, all manifest knowledge via their encounter, which can then be transferred across geographic and socio-cultural borders, potentially changing along paths of transmission (Ulf Reference Ulf, Rollinger and Schnegg2014).
Agents of exchange are of diverse social identities. They include those who travel between regions whether temporarily, such as merchants, specialised workers, and diplomatic personnel, or more permanently, such as migrants (Howard Reference Howard2012). They also include those who facilitate interactions and negotiations. Such agents could represent state and/or non-state initiatives, with differing or converging motivations. They can define multiscalar borders of a space. They can also delineate, promote, and rely on activities and infrastructure that enable and foster encounters, including those of religious, cultic, administrative, political, commercial, and diplomatic nature.
As such, they are dependent on spaces of connectivity. These include physical spaces such as routes, harbours, garrisons, temples, administrative complexes, or palaces, as well as abstract spaces in which concepts and objects are conceived (Bhabha Reference Bhabha and Bammer1994; Fahlander Reference Fahlander, Cornell and Fahlander2007; Matić Reference Matić, Beck, Backes and Verbovsek2017). Such spaces contribute to complex knowledge transformations that manifest in varied cultural and social reproductions, from the formulation of new or reinterpreted objects to (re)negotiated identities. Various theories have been used to understand these processes and their outcomes. These include cultural entanglement, through which creativity results in new meanings for adopted objects, or new objects; and transculturalisation, which considers the continually dynamic transformation of entities. Examples that incorporate such theories in their assessment of third- and mid second-millennia-BCE Egyptian–Levantine relations include analyses on identities exhibiting entangled and transformed cultural elements at Tell el-Dabʻa (e.g. Bader Reference Bader2021); and those on transcultural technological and religious elements negotiated by Egyptian and Levantine communities (e.g. Schneider Reference Schneider2003b; Colonna Reference Colonna2018; Mourad Reference Mourad2021). Across all, agency is key, as individuals and groups could initiate, negotiate, or reject encounters, as well as adopt, adapt, accept, reject, or reverse transfers and their manifestations.
It is not only agents of exchange that may be influenced by connectivities; their networks surpass those that tied to one distant region. Individuals in their interlinked networks could also participate or be integrated into shared spaces. Specialised communities that facilitate connections could then emerge. These include trade or ethnic diasporas of dispersed, but collectively self-identified, groups, the communities in which they reside for a prolonged time, those at their points of origin, and their social networks (Vertovec Reference Vertovec2009). Such communities may exhibit markers of transnationalisation, or, for the ancient world, transregionalisation, which refers to the sustained social existence, relations, and formations of individuals and groups across distances (Vertovec Reference Vertovec2009). With increasing connectedness over distances, globalisation emerges (Vertovec Reference Vertovec2009). A product of modernity, many have debated globalisation’s existence in antiquity (Jennings Reference Jennings2011). Despite links today with neoliberal, ‘free-market’, economies and extractivism, its insights lie in the development of a network’s intense interactions and interdependencies that can trigger socio-cultural changes manifesting in shared cultural elements. These transformations are tied to processes like glocalisation, which refers to local responses, negotiations, and adaptations to global engagement (Roudometof Reference Roudometof2016; Hodos Reference Hodos and Hodos2017).
Encounters and long-distance connectivities cannot be separated from the context in which they occur. This includes their environmental, historical, social, political, commercial, economic, ideological, and intracultural situations and developments. Context determines power dynamics, which can significantly promote or hinder agent motivations, activities, and connectivities. Context is also mutable and multiple. As an example, the cultural context to which an agent belongs may include elements of one or more culture, whereas that to which an exchanged ‘transcultural’ entity belongs may shift according to its producer, transmitter, and recipient (Ulf Reference Ulf, Rollinger and Schnegg2014). Context could impact the degree, nature, and rate of encounters, alongside their catalysts, mechanisms, and outcomes. As such, it must be considered when assessing how encounters are manifested in the evidence.
1.4 The Evidence
The study of direct and indirect Egyptian–Levantine encounters is constrained by the fragmentary nature of the evidence, preserved to varying degrees. Some contexts, sites, and regions have also been favoured for archaeological exploration more than others. Methods of survey and excavation vary, whereas their publications diverge in quality and detail. Moreover, objects in museum collections could be of questionable or unknown provenance. Despite these limitations, several types of evidence may be examined. Each presents its own challenges. The evidence includes mobile objects, such as ceramics, timbers, stone vessels, and scarabs that are transported across distances. These may or may not be from secure contexts. Their specific origins are often difficult to pinpoint, as is the length of time from production to deposition. Some could be reused or repurposed, with multiple meanings ascribed to them that are not necessarily clarified by their findspots. This complicates our reconstruction of the mechanisms through which encounters took place. For instance, objects could be transported from places of origin either via state-sponsored expeditions, or via exchange between non-state-sponsored merchants.
Aspects of these mechanisms may be elucidated from pictorial and textual representations of cultural encounters discussed in Sections 2 and 3. These include representations of non-local entities, such as individuals, animals, plants, and objects or their aspects, as well as individuals and groups engaged in cross-cultural interactions or their organisation and administration. These representations may occur in royal palatial and funerary complexes; tombs, usually of high-status individuals; temples; dedicatory, biographical and expeditionary inscriptions; religious, royal, administrative and literary texts; 3D-sculptural forms such as figurines and statues; and decorated or inscribed jewellery, weaponry, seals, and scarabs. The representations are communicated via the cultural and social milieu of those involved in their production, according to socio-cultural ideals and norms, and for specific purposes. Pertinent to note is the imbalance in representations from Egypt in comparison to those from the Levant. The dependency on the former significantly impacts historical reconstructions, especially if the nature and purpose of Egyptian texts, most of which are from royal and elite contexts, are not considered. Understandings of Levantine agency and agent motivations are also significantly limited by this imbalance, and, to an extent, reliant on Egyptian representations.
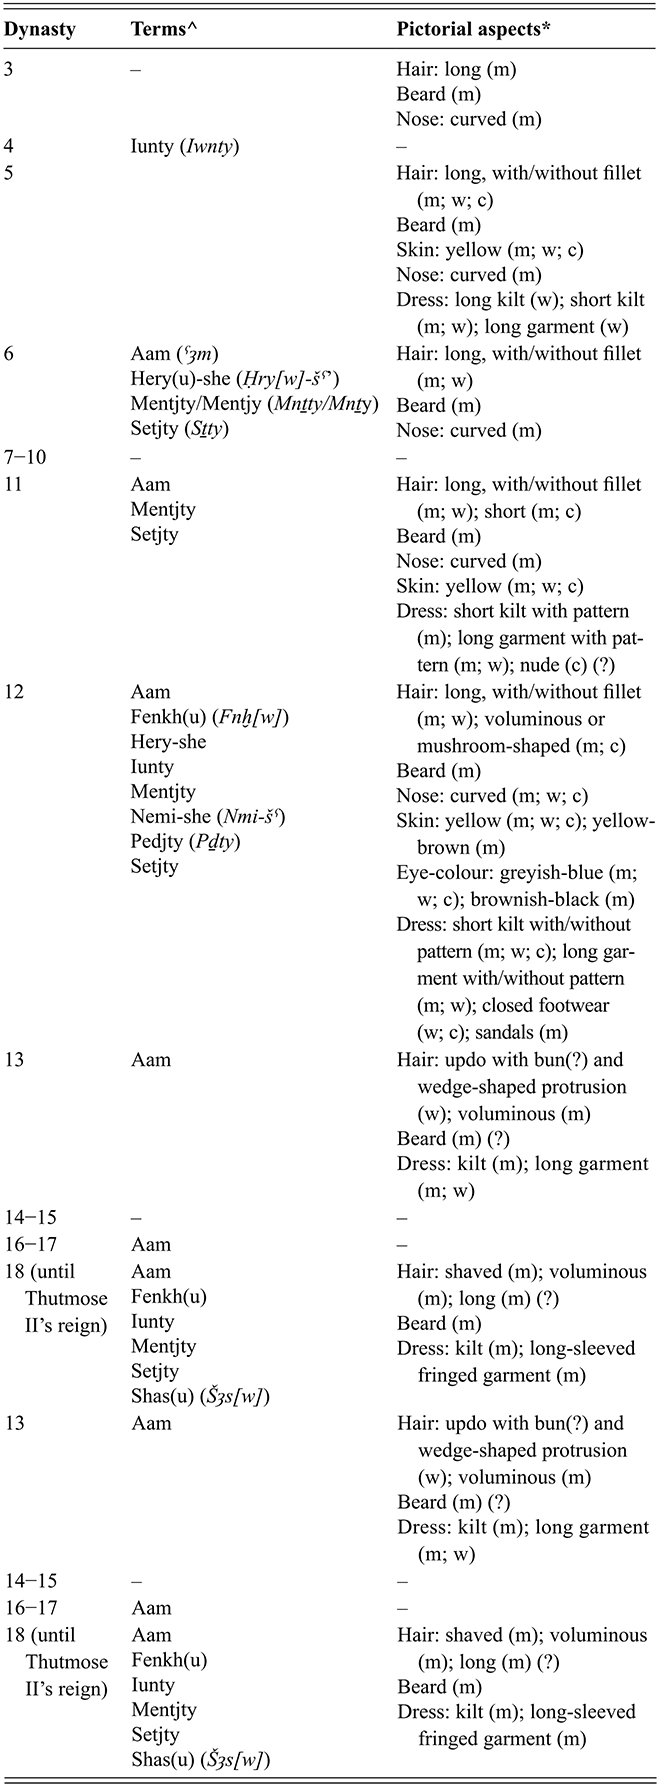
Egyptian representations of the examined period use the elements in Table 1 to identify individuals from the northeast of Egypt. Egyptologists label these individuals ‘Asiatics’ in reference to their origins in Western Asia. The applicability of this term is questionable for three main reasons: (1) its use in the nineteenth and twentieth centuries with pejorative and offensive implications; (2) its assumption that all individuals portrayed with ‘Asiatic’ features originate from Western Asia rather than other regions northeast of Egypt; and (3) its lack of differentiation between and distinction of the groups identified by Egyptians. As such, ‘northeasterner’ is here used to identify individuals more broadly with the elements listed in Table 1, emphasising the Egyptian perspective inherent in this body of evidence. More specifically, toponyms and group names are mentioned wherever preserved to highlight the various identifications of, and changing approaches to, distinct groups represented in Egyptian sources.
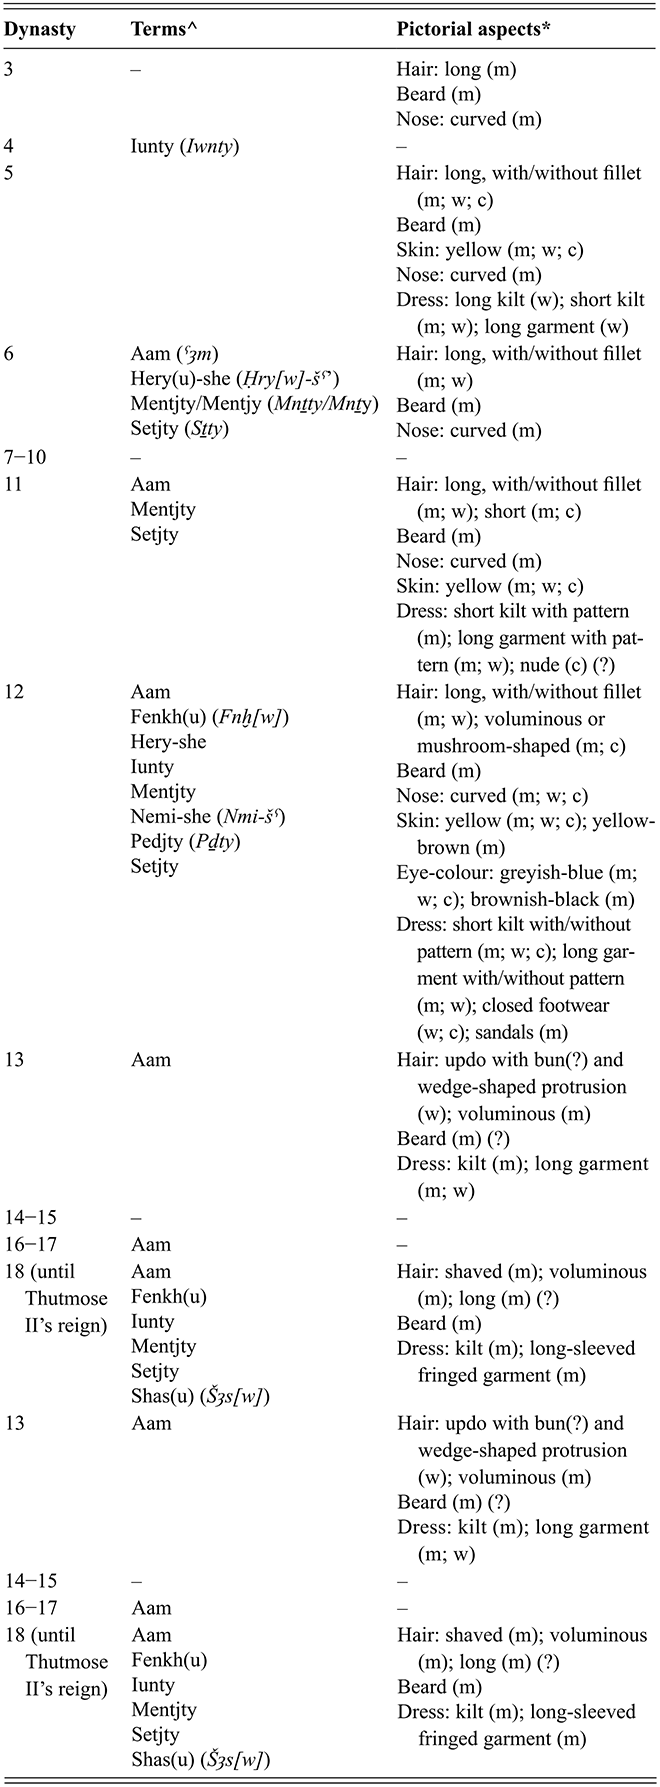
Table 1 Long description
The table has three columns. The first column lists Egyptian Dynasties 3 to 18 (up to Thutmose 2's reign). The second column lists ethnonyms relating to northeasterners per Dynasty. The third column lists pictorial aspects used to represent northeastern men, women, and children in Egyptian art per dynasty. These aspects include hairstyle, the presence or absence of beards for men, nose shape, skin tone, and dress style.
^ Terms are listed in masculine singular for simplicity.
* Abbreviations: (m) man; (w) woman; (c) child.
On the representations’ historical veracity, a consideration of purpose and context offers pertinent insights on their nature and role, shifting how ‘veracity’ is perceived. That is, how we today examine representations according to our conceptualisation of historical veracity may not be how their producers approached them. Consequently, as understandings of the purpose, context, nature, and role of representations alter and develop, so do their interpretations. Representations in Egyptian tombs of officials, for instance, are framed by socio-cultural ideals and were likely selected to showcase tomb owners’ achievements or involvement in particular events (Baines Reference Baines1990; O’Connor Reference O’Connor and Tait2003). The historicity of such representations has contributed to variant approaches that impact reconstructions of Egyptian–Levantine interactions. Also contributing to such variances are the difficulties in determining the origins, cultures, social groups, and subsistence patterns of represented individuals and groups, and in identifying toponyms with specific sites. In many cases, however, these identifications simply remain unverified. The dating of representations may also be difficult to determine.
The examination of organic remains has offered more concrete indications of movements between Egypt and the Levant. The results of scientific methods such as petrographic, residue, isotopic, aDNA, and dental non-metric analyses have pointed to previously unknown movements of peoples, plants, animals, objects, and/or biological affinities between individuals across regions (see Sections 2.1.3, 2.3.2). Interpretations of the latter must consider archaeological and historical contexts, as well as current theoretical perspectives that support the inherently dynamic and mutable nature of social and cultural identities, and the complexities of socio-cultural change. Consequently, biological affinities should not be conflated with cultural or ethnic origins without critical assessment.
Encounters with objects, animals, and peoples could also lead to the transmission of concepts and techniques. This transmission occurs in physical or abstract spaces, its outcomes influenced by individual choice as well as social, cultural, political, and environmental factors (see Section 1.3). Some outcomes manifest in the archaeological and textual record as locally made productions inspired by non-local styles, techniques, or languages. These can include objects such as pottery or weapons; architectural elements and plans such as those of temples or palaces; words and classifiers introduced into a lexicon, those with changing meanings, or morphological borrowings; and artistic details. It is often problematic to determine the cultural identity or origins of the individuals responsible for such productions and to detail the process(es) through which they were made.
2 Transforming Networks
2.1 The Second Half of the Third Millennium BCE
Encounters between Egypt and the Levant can be traced before the emergence of the Old Kingdom state. Diversified networks facilitated trade in ceramics and luxury products from the late fourth to early third millennium BCE, reaching funerary and domestic contexts in Egypt (Sowada Reference Sowada2009: 26–48) and Levantine sites like those of the Negev (de Miroschedji Reference de Miroschedji, van den Brink and Levy2002: 40–2; Atkins and Yekutieli Reference Atkins and Yekutieli2023) and Byblos (Prag Reference Prag1986). An increase in archaeological evidence for exchange is attested in the early third millennium BCE, indicating heightened trade likely associated with the growing power and demands of high-status individuals in Predynastic Egypt (Sowada Reference Sowada2009: 27). The concentration of Egyptian and Egyptian-inspired objects in EB IB Southern Levant suggests Egyptian presence that has been variably explained as the outcome of, for instance, trade, colonisation, administrative control, or immigration (e.g. Yadin Reference Yadin1955; Brandl Reference Brandl and van den Brink1992; de Miroschedji Reference de Miroschedji, van den Brink and Levy2002, Reference de Miroschedji2015: 1025–6). Evidence for these interactions declines in EB II Southern Levant (de Miroschedji Reference de Miroschedji, van den Brink and Levy2002: 44–6), pointing to shifts in interests or networks (Sowada Reference Sowada2009: 29–30). Changes in the types of exchanged products are attested, as, for example, with the occurrence of Egyptian stone vessels in the Levant (Sowada Reference Sowada2009: 50–3). An increase in sea-based trade has been proposed, particularly with the Northern Levant for its timber (Sowada Reference Sowada2009: 50, 53). This coincides with the establishment and consolidation of the Old Kingdom state. Thereafter, encounters between Egypt and the Levant are documented in Egyptian representations that were either state-commissioned or produced for tombs of officials, manifesting variably in the archaeological record.
2.1.1 Representations by the Egyptian State
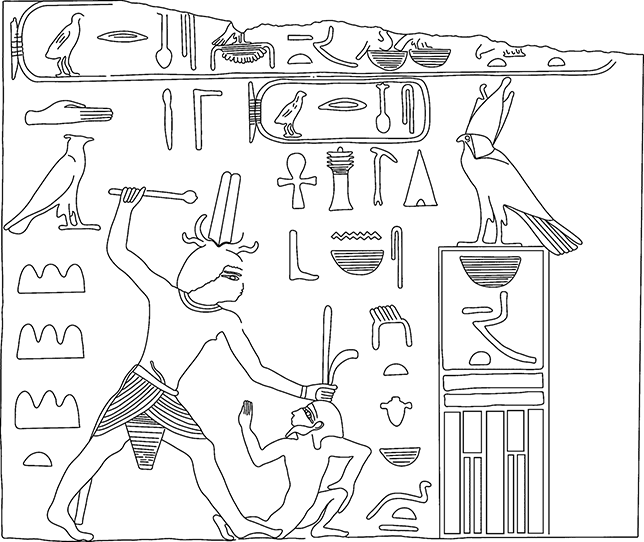
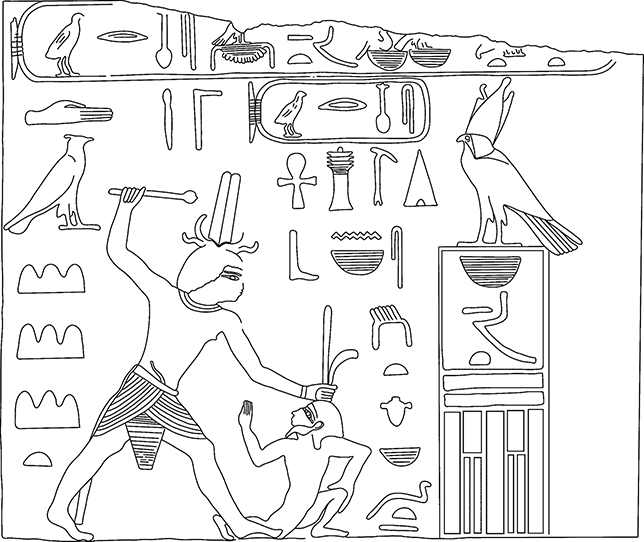
Egyptian–Levantine encounters represented in expeditionary texts, temples, and royal contexts project the ideology of pharaoh as protector of Egypt. These are exemplified in smiting scenes. Several occur at Wadi Magharah in the Sinai and portray Kings Djoser to Pepy I targeting northeasterners (Figure 3) or, in some cases, Mentjy-individuals with long hair and beards (Gardiner and Peet Reference Gardiner and Peet1917: pls. 5 [8], 6 [10], 8 [16]; Tallet Reference Tallet2018: 97–115). The Mentjy-people are often associated with the region of Setjet (Sṯt), possibly an ideological northeastern foreign entity. Such scenes were likely purposed to declare Egyptian control over the resources of Wadi Magharah, including copper and turquoise, while perhaps simultaneously and symbolically deterring Mentjy-attacks. The Egyptians travelled to the Sinai into the late Sixth Dynasty (Redford Reference Redford1986: 136–9; Tallet Reference Tallet2018: 114–5), reaching Wadi Kharig and Tell Ras Budran on the coast (Mumford Reference Mumford2006). Likely encountering groups residing in this region, their interactions with Levantines in these spaces remain uncertain.
Inscription Nr. 5 depicting Snefru in a smiting stance. Dynasty 4, Wadi Magharah.
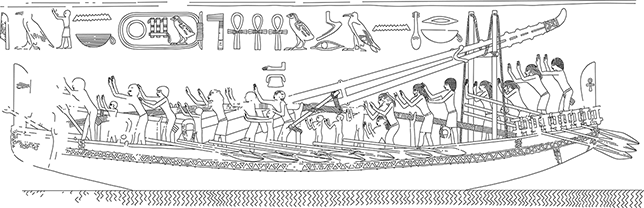
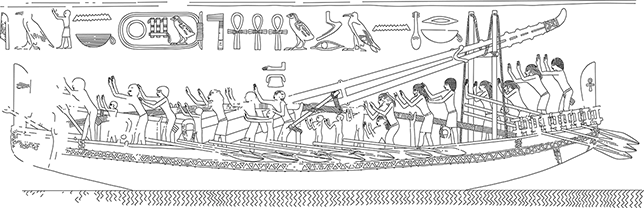
Exchanges are supported by other representations. The earliest documented campaign to the Levant occurs in the Palermo Stone Annals, dated to the Fifth Dynasty rule of Neferirkara or Niuserra (Redford Reference Redford1986: 134–5). For Snefru’s reign, the Annals record the construction of ships and palatial gates of coniferous-woods, and the transportation of such timber (Sethe Reference Sethe1933: 236–7 [lines 4–6]).Footnote 1 The woods refer to conifers like cedar and pine, prevalent in today’s Lebanon, Syria, Turkey, Cyprus, and the Atlas Mountains, with cedar wood indeed attested in Fourth Dynasty contexts (Helck Reference Helck1971: 25–8; Arbuckle Reference Arbuckle2024; Section 2.1.3). Further, King Sahura’s funerary temple at Abusir portrays bears and vessels likely from the Levant being brought to the pharaoh, and northeasterners arriving in ships with arms up in praise (Borchardt Reference Borchardt1910: pls. 3, 11–4; Figure 4). Similarly, a block from the causeway of Wenis’s funerary complex at Saqqara pictures two vessels transporting reverent northeasterners (Hassan Reference Hassan1955: 136–9, fig. 2).
Relief depicting the arrival of northeasterners and Egyptians by ship. Funerary Temple of Sahura, Dynasty 5, Abusir.
Scenes highlighting hostile representations surface in Fifth and Sixth Dynasty funerary complexes. Sahura’s causeway includes a representation of bounded captives shown with features of foreigners encountered northeast, south, and west of Egypt (Borchardt Reference Borchardt1910: pls. 5–7). Their binding ropes extend from deities’ hands, the northeasterners led by the deity Sopdu, signalling the highly symbolic character of the scene. A fragment from King Djedkara’s funerary temple mentions the ‘prostrating’ and ‘overthrowing’ of foreign lands, as well as gold and electrum taken from Batj (Bȝṯ), Senseh (Snsh), and Heset (Ḥst), which have been suggested to be in the Levant (Grimm Reference Grimm1985: pl. 1; Redford Reference Redford1986: table 1). Another fragment from King Wenis’s causeway portrays an Egyptian archer aiming at a falling northeasterner with fillet-bound hair, and an Egyptian and northeasterner, also with fillet-bound hair, in hand-to-hand combat (Hassan Reference Hassan1955: 519–20, pl. 95). To these can be added representations that emphasise the ruler’s duty to protect Egypt from foreign forces. These include scenes from Niuserra’s causeway showing subjugated northeasterners among other foreigners beneath lion’s paws (Borchardt Reference Borchardt1907: pls. 8–12); smiting scenes in King Pepy II’s funerary and possibly valley temples (Jéquier Reference Jéquier1940: pls. 36, 48); as well as statues of bound foreigners from the pyramid complexes of Neferefra, Dejdkara, Pepy I, and Pepy II (Prakash Reference Prakash2022). The cosmic significance to control these forces is echoed in Pyramid Text Utterance 650 from the burial chambers of Kings Merernra and Pepy II, wherein the god ‘shall hack up for him the fortresses of Setjet’ (Redford Reference Redford1986: table 1).
Due to these representations’ portrayal in sacred funerary spaces, it is difficult to determine their historicity (Sowada Reference Sowada2009: 7). Those that portray offerings of commodities and northeasterners on ships may reflect desired alliances or access to exotic entities. Others that depict intergroup conflict emphasise the foreigners’ ideological subordination. Such scenes reflect a strong awareness of the movement of northeasterners via various mechanisms, and resulting interactions that required state management.
2.1.2 Representations in Egyptian Tombs of Officials
Representations of northeastern entities are attested in tombs of officials dating across the Old Kingdom. Imports from Western Asia are represented in Third, Fifth, and Sixth Dynasty tombs, and include one- and two-handled vessels in offering lists and scenes, and wine-making scenes; and coniferous-wood oils in offering lists (Sowada Reference Sowada2009: 158–60, 199). Encounters with northeasterners are thus far only attested in tombs from the Fifth Dynasty onwards. Studies on Egyptian–Levantine relations commonly mention two siege scenes and three biographical texts.
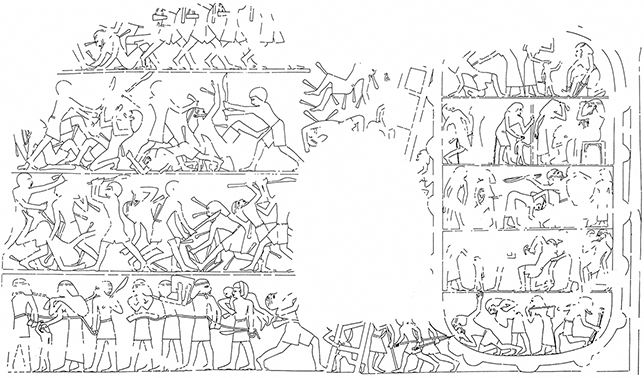
The siege scenes occur in the tombs of Kaemheset at Saqqara and Inti at Deshasheh (Mourad Reference Mourad2011). The former was likely completed between the reigns of Fifth Dynasty Niuserra and Djedkara (McFarlane Reference McFarlane2003: 19–23), and the latter in the reign of Djedkara (Kanawati and McFarlane Reference Kanawati and McFarlane1993: 17–19). Each depicts an attack against an enclosure with northeasterners. Their men have beards, long hair bound with fillets, and, in Kaemheset’s case, garments with patterned hems (Kanawati and McFarlane Reference Kanawati and McFarlane1993: pl. 27; McFarlane Reference McFarlane2003: pl. 48). Inti’s scene includes hand-to-hand combat outside its crenellated enclosure and captives (Figure 5). It also preserves a fragmentary inscription referencing an expedition to or against enclosures marked by crenellated ovals (Kanawati and McFarlane Reference Kanawati and McFarlane1993: pl. 2). One name, (N)edia ([N]diȝ) or Ida (Idȝ), is preserved, its Levantine identification uncertain (Albright Reference Albright1934: 9 n. 23; Schneider 1998: 20 n. 113; Begon Reference Begon2016). The crenellated enclosures have been associated with ‘wenet’-structures, suggested to be in the eastern Nile Delta, the Eastern Desert, the Sinai, the Negev, or at/near Tell el-Sakan (Begon Reference Begon2016; Gundacker Reference Gundacker and Höflmayer2017: 367). According to some, they were inhabited by local populations and/or northeasterners, acting as refuges that were protected by the Egyptian state (Gundacker Reference Gundacker and Höflmayer2017: 367) or as trading hubs (Helck Reference Helck1971: 16–17). Nevertheless, the uncertainties in the location and nature of these structures make it challenging to confirm whether the targets in the siege scenes are even in the Levant.
Siege scene of Inti. Dynasty 5, Deshasheh. Kanawati and McFarlane Reference Kanawati and McFarlane1993: pl. 27.
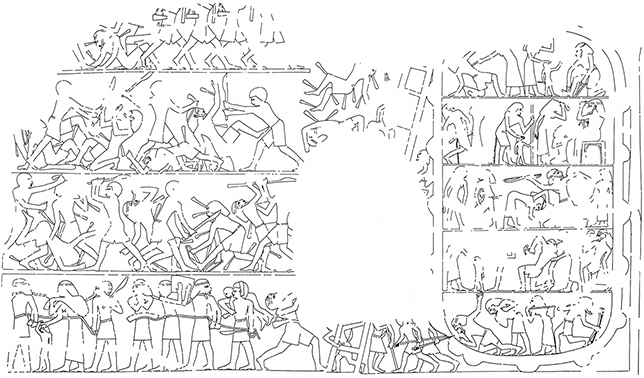
Figure 5 Long description
The three parts of the siege scene are highly detailed. The besieged structure is a crenellated oval, its interior divided into five registers, each portraying various activities of northeasterners. A few men are wounded, one breaks his bow in fear, another defecates, and the ruler, seated on a throne, pulls his hair out. Women attend to the wounded. The structure's wall is being attacked by Egyptians, two of whom poke its wall while others scale a now-damaged ladder. To the right, three registers show Egyptian soldiers overpowering northeasterners in various stances. All northeasterners are pierced with arrows and are in falling, submissive, or defensive postures. The register underneath shows two groups of captive men, women, and children, each led by an armed Egyptian soldier by rope. One northeasterner in each group carries a bag likely of belongings.
Wenet-structures are otherwise mentioned in the biography of Weni (Sethe Reference Sethe1933: 98–110; Hofmann Reference Hofmann2002; Richards Reference Richards2002). The text from his Abydos tomb documents campaigns against Aam-Heryu-she-individuals during King Pepy I’s reign. Weni leads a sizeable army, directing it to/across the Sinai. The army destroys the land of the Heryu-she-people, with its wenet-enclosures, figs, and vines, before returning to Egypt with captives. This campaign was repeated five times, with a sixth to subdue rebels at Sheret-tep-wendju (Šrt-tp-wnḏw ‘the Nose of Gazelle’s Head (?)’), of uncertain location (Gundacker Reference Gundacker and Höflmayer2017: 360–1). The identity and origins of the Aam-Heryu-she-people also remain unclear (e.g. Redford Reference Redford1986: 126; Rainey Reference Rainey1994: 81–2; Begon Reference Begon2016: 11–6; Gundacker Reference Gundacker and Höflmayer2017: 350–2). The term Aam (ˁȝm), as used in the Old to early New Kingdoms at least, refers to individuals, groups, or aspects from Egypt’s northeast; Heryu-she (ḥryw-šˁ) is literally translated to ‘those who are on/across the sand’. Thus, the Aam-Heryu-she seem to be individuals encountered in/across the desert regions northeast of Egypt, their exact origins unspecified. This is supported by the group’s mention in the biography of Pepynakht-Heqaib at Elephantine (Sethe Reference Sethe1933: 131–5). The inscription records how, in the reign of Pepy II, the official was sent to the land of the Aam-people to retrieve the body of Ankhnekhet. The latter was involved in constructing a Kebenty-(Kbnty) or Gublite/Byblite-type ship to travel to Punt, when he was murdered by Aam-Heryu-she-people. The event may have occurred along the Red Sea coast, from whence travel to Punt was launched and where Old Kingdom harbour activity is attested (Mumford Reference Mumford2006: 57; Bard and Fattovich Reference Bard and Fattovich2018).
The biography of Iny points to the diplomatic or commercial nature of interactions, recording the official’s participation in expeditions to the Levant (Marcolin and Espinel Reference Marcolin, Espinel, Bárta, Coppens and Krejãí2011). He was involved in six campaigns. Four were commissioned by King Pepy I to Amaaw (ˁmȝȝw), Khenty-she (Ḫnty-š) and Pawes[?] (Pȝws[?]), which returned with silver and other products. One was sent by Merenra to Keben (Kbn) or Jbeil/Byblos,Footnote 2 from which Kebenty-ships, lapis lazuli, and other products were accessed. The sixth was sent by Pepy II to Khenty-she, returning with a Kebenty-ship, cargo boats, silver, and Aam-men and -women. The range of products emphasises Egypt’s access to a vast network spanning Western Asia, and Jbeil/Byblos’s importance as a trading hub. The remaining toponyms in Iny’s biography are most likely northern regions connected to Jbeil/Byblos’s network. Indeed, tablets from Ebla mention commercial and diplomatic relations with a ‘Dugurasu’, a toponym identified with Egypt (Biga Reference Biga2016).
2.1.3 The Archaeological Evidence
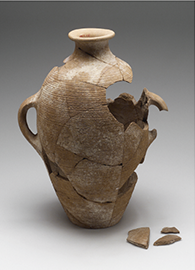
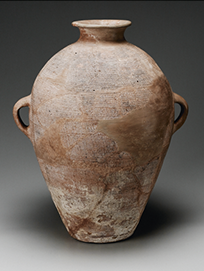
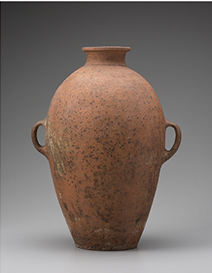
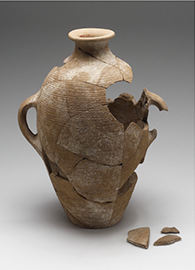
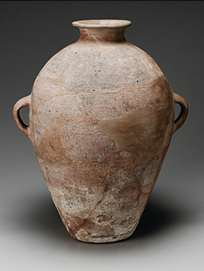
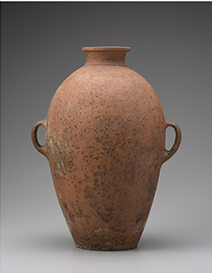
Archaeological evidence for Egyptian–Levantine encounters in the EB III to EB IV is limited. Most is of pottery, stone, and, to a lesser degree, wood. Scientific studies point to the movements of animals: isotopic analyses on teeth from one goat and several donkeys found at EB III Tell el-Safi indicate that they were raised in the Nile Valley, with four donkeys buried in ritual foundation deposits (Arnold et al. Reference Arnold, Greenfield and Hartman2018, Reference Arnold, Greenfield and Hartman2025). Egyptian material from the Southern Levant is otherwise attested at EB III sites, including Bab edh-Dhraʻ, ʻAi, and Tel Yarmouth, where objects like palettes, pottery, stone vessels, and beads of semi-precious stones were found (see Sowada Reference Sowada2009). None can be securely dated to after the early Fifth Dynasty (Höflmayer Reference Höflmayer, Höflmayer and Eichmann2014: 140). Further, Sowada’s study on imported ceramics in Egyptian contexts of the Early Dynastic Period to Dynasty 4 has identified a reduction in those from the Southern Levant by Dynasty 4, and an increase in Northern Levantine vessels (Sowada Reference Sowada2009: 250–1). It is also from Dynasty 4 onwards when coniferous woods such as Lebanese cedar are increasingly attested for a range of objects in Egypt, including architectural elements in King Snefru’s Bent Pyramid, funerary boats of Kings Khufu and Ranefref (Verner Reference Verner2006: 143), coffins of royal and non-royal individuals, and ship components (Sowada Reference Sowada2009: 75, 81, 86; Creasman Reference Creasman2013: 157–8; Arbuckle Reference Arbuckle2024). Resins and oils have been identified within imported pottery from the Levant in Egypt, including two-handled combed jars attested in Fourth to late Sixth Dynasty contexts (Figure 6) petrographically traced to the region between today’s Beirut and Tripoli (Sowada, Ownby, and Wodzińska Reference Sowada, Ownby and Wodzińska2020; Sowada et al. Reference Sowada, Wetterstrom, Jacobsen, Bertuch and Serpico2023).
Levantine combed ware jars from Giza.
MFA 37.2729, Tomb G 5020, Dynasty 4;
MFA 37.2724, Tomb G 2370 B of Senedjemib-Inty, Dynasty 5;
MFA 13.2930, Tomb G 2381 A of Impy, reign of Pepy II, Dynasty 6.
From this area, Byblos produced many Old Kingdom finds. Only a few stone vessels, copper axes and a flint tool can be clearly assigned to contemporaneous EBA levels (see Sowada Reference Sowada2009: 128–41). These include stone vessel fragments from the Temple of Baalat Jbeil inscribed with the names of Kings Wenis and Niuserra, and possibly of Menkaura and Pepy II. Fragments from the ‘Palace’ bear the names of Queen Hetepheres and Pepy (I or II) (Sowada Reference Sowada2009: table 6). Other Old Kingdom finds from the Northern Levant include a fragment of a stone vessel from EB III Tell Fadʻous-Kfarʻabida, a cylinder seal from EB IV Tyre, a flint tool from Sidon, and stone vessels from EB IV contexts at Ebla’s Palace G, including a fragment from the terminal EB level naming Pepy I (see Sowada Reference Sowada2009: 141–5; Genz and Ahrens Reference Genz and Ahrens2023).
While the concentration of archaeological evidence from the Northern Levant points to their deposition in the EB IV, a decrease in Levantine ceramics in late Fifth and Sixth Dynasty Egypt has been observed (Sowada Reference Sowada2009: 250–1). These imports were mainly recovered from funerary contexts at, for instance, Giza, Abusir, Saqqara, and Edfu, with a few from settlements at Giza and Elephantine (Sowada Reference Sowada2009: 86–9, table 4; Forstner-Müller and Raue Reference Forstner-Müller, Raue and Eichmann2014). The latest at Abusir and Giza date to the reign of Pepy II. Many of the late Old Kingdom are from non-elite contexts beyond the capital, suggesting a reduction in state-controlled trade (Sowada Reference Sowada2009: 251–3), and/or a more diversified network through which imported items were distributed.
The evidence overall points to multifaceted relations between the Old Kingdom and EB III to EB IV Levant. It does not support Egypt’s imperial control over any Levantine region. While some propose Egyptian military activity against the Southern Levant (e.g. de Miroschedji Reference de Miroschedji, van den Brink and Levy2002: 47; Begon Reference Begon2016), this cannot yet be conclusively verified, relying heavily on unclear Egyptian representations. The lack of evidence for continued Southern Levantine and Egyptian connections does not necessarily point to a cessation of contacts, but rather the lack of securely identified evidence for Dynasties 5 and 6. Contacts with the Northern Levant appear to be mostly concerned with diplomatic and commercial initiatives, with stone vessels from the Egyptian royal court reaching, at least, the palaces at Jbeil/Byblos and Ebla. Representations on the Palermo Stone and in funerary contexts indicate that such initiatives were promoted by royal interests in acquiring resources like timber and its products, silver, and possibly skills associated with shipbuilding. These interests intersected with the growing funerary significance of coniferous woods, their resins, and their oils. Although direct evidence is lacking for the export of timber products from Jbeil/Byblos itself, the domination of combed jars among Levantine imports in Egypt, and the material from Byblos and its surrounds, strongly suggest that groups here were mediating, if not controlling, exchanges with the Egyptian state. Jbeil/Byblos was now a main hub that connected Egypt to the rest of Western Asia. Indeed, the Egyptian, and possibly Eblaite, textual material points to state officials’ access to a network that included the very northern parts of the Levant, if not further. The assumed domination of the Egyptian state in this network is not supported. Such domination is represented in specific spaces that furthered royal Egyptian ideologies. Otherwise, the diplomatic and commercial exchanges were between royal courts in Egypt and the Levant and, increasingly, individuals who were facilitating such exchanges.
The nature of Egyptian representations of interactions also develops in Dynasties 5 and 6. This coincides with the near-contemporaneous changing concentration of archaeological evidence for contacts. Reasons for these shifts may be associated with internal and/or external factors. Climatic and environmental changes have been put forward as drivers of change across the region, yet the extent of their impact on interregional interactions remains unclarified (see Moreno García Reference Moreno García, Meller, Arz, Jung and Risch2015). Egyptians were also experiencing shifting political alliances between sun cults and the central administration; threats against the rulership of Teti and Pepy I; and the growth in power of provincial officials (Kanawati and Swinton Reference Kanawati and Swinton2018). Weni’s biography and the siege scenes of Inti and Kaemheset add violent interactions between Egyptians and northeasterners, with similar attacks hinted by fragments from the royal funerary complexes of Kings Djedkara and Wenis. The biography of the official Weni suggests another concern with rebellions in the northeast, and the threat posed by the Heryu-she-people (Sowada Reference Sowada2009: 14). Like Inti’s siege scene, it implies an interest in one outcome of violent campaigns: the forced, controlled, movement of peoples (Redford Reference Redford1992: 53–5). The attempts to enforce authority over these peoples and/or their territories signify an intensified need to (re)assert access to resources via new or frequented routes to the northeast. The representation of such events in officials’ tombs supports their growth in power. Perhaps they occurred before the late Fifth Dynasty, but officials could not record them, or perhaps they commissioned them because of their increasing monopoly over cross-border activities.
2.2 The Late Third to the Early Second Millennium BCE
Interactions towards the end of the third millennium BCE are difficult to ascertain. The limited evidence has been interpreted as a termination of Egyptian–Levantine contacts caused by the collapse of the Egyptian state, and the socio-political shifts in the Levant that saw the destruction, abandonment, or reduction in size of settlements (e.g. de Miroschedji Reference de Miroschedji, van den Brink and Levy2002: 47–8). It is more likely that the nature and degree of interactions altered as the agents, interests, and means of exchange transformed across Egypt and Western Asia (Ward Reference Ward1971; Moreno García Reference Moreno García, Meller, Arz, Jung and Risch2015). The concentration of Old Kingdom evidence in royal contexts or tombs of state officials signals that similar material of the First Intermediate Period would be restricted.
Knowledge of northeastern entities was certainly transmitted and communicated across this period. Biographical texts and other tomb inscriptions continue to mention coniferous-woods and oils (Ward Reference Ward1971: 49–52). A fragmentary offering list for the god Min also records silver, lapis-lazuli, incense, and myrrh (Goedicke Reference Goedicke1994: 71–84). One source for myrrh is listed in a fragmentary biography from a tomb at Qubbet el-Hawa (QH 110), wherein an official supplied the Heracleopolitan House of King Khety with a variety of commodities from other African lands and Western Asia, including ‘myrrh from Jbeil/Byblos’ (Edel, Seyfried, and Vieler Reference Edel, Seyfried and Vieler2008: 1743–4, pls. 81–2). The text suggests that the Heracleopolitan administration was not directly sponsoring trade, but accessing imports via other mediators (Ward Reference Ward1971: 56).
The archaeological evidence does not add much clarification. Egyptian coffins of coniferous woods have been identified (Ward Reference Ward1971: 51), though their dating cannot be narrowed further than the First Intermediate Period to early Middle Kingdom. A dating within this range has also been offered for Levantine-type weapons from Kom el-Hisn, as well as lapis lazuli and silver objects from this site and el-Barnugi in the Western Delta (Moreno García Reference Moreno García2017: 113). Of more secure First Intermediate Period date is a non-royal coffin with a cedar veneer from Naga el-Deir (Brovarski Reference Brovarski2018: 315–9, n. 450), a Levantine-type anchor axe from a non-royal tomb at Helwan (Ward Reference Ward1971: 53–6), and a fragment of Levantine fabric, possibly of an amphora, from near a tomb at Heracleopolis/Ihnasya el-Medina (Bader Reference Bader2011: 56 [Nr. 55]).
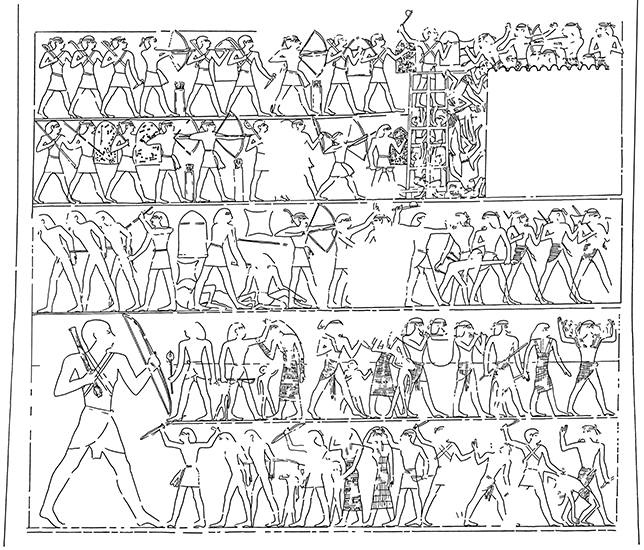
It is also at Ihnasya el-Medina that a false door stela of the official Ankhef identifies him as ‘overseer of the expedition of Aam-people’ (Van Dijk Reference Van Dijk, Andrews and van Dijk2006).Footnote 3 This marks an important development in the representation of northeasterners, aligning with siege scenes in the tombs of nomarchs Baqet III and Khety at Beni Hassan. The latter are of likely late Eleventh Dynasty date and depict northeastern warriors alongside Egyptians and Nubians attacking a settlement defended by Egyptians (Kanawati and Evans Reference Kanawati and Evans2019: pls. 76–8; Reference Kanawati and Evans2020: pls. 102–3). The scenes are countered by another found in the Asasif tomb of Intef, a general who served King Montuhotep II. Intef’s scene depicts an attack on a fortress defended by northeasterners (Jaroš-Deckert Reference Jaroš-Deckert1984: pls. 1–2, 6, 14, 17; Figure 7). Indeed, an attack against Aam-individuals of Djaty is recorded in the biography of official Tjehemau at Abisko, possibly of Montuhotep II’s reign (Roeder Reference Roeder1911: pls. 106–8; Darnell Reference Darnell2003). It mentions a king travelling south with his army when the attack occurred. The location of this event, like that of Intef’s target, remains unconfirmed, with suggestions placing them in the Levant or Egypt (Redford Reference Redford1992: 69–70; Brovarski Reference Brovarski, Woods, McFarlane and Binder2010: 59–60, 68). Together with the scenes from Beni Hassan and the Levantine-type weaponry from Helwan and Kom el-Hisn, it is tempting to interpret the representations as suggestive of northeasterners living in Egypt. However, the evidence remains too difficult to date to a specific period, and to correlate to interconnected events or settlements.
Siege scene of Intef (TT 386). Dynasty 11, Thebes. Redrawn after Jaroš-Deckert Reference Jaroš-Deckert1984: pl. 17, originally created by Dieter Arnold and Jürgen Settgast.
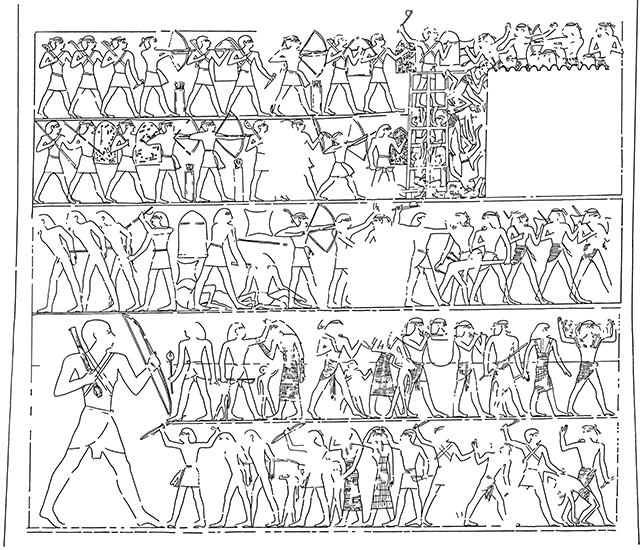
Figure 7 Long description
The siege scene is divided into five registers. The upper two have a walled fortress at the right, defended by northeasterners, some of whom are shown falling over the wall. To its right, a scaling structure is being used by Egyptians to access the top of the fortress. The remaining parts of these registers are occupied by Egyptian soldiers armed with bows and arrows, axes, poles or spears, and shields. The third register shows five Egyptians engaged either in leading away northeastern captive men, smiting fallen northeasterns, or attacking them. The two registers below are flanked at the left by a large-scale figure, presumably the tomb owner, who oversees captive northeastern men, women, and children being led away.
Instead, Intef’s siege scene corresponds with the reunification of Egypt by King Montuhotep II. This period witnessed a return to ideological representations of foreigners, particularly in Thebes, and a growing state priority to (re)instate control over cross-border interactions. Accordingly, a stone block from Gebelein shows the king clubbing a northeasterner, among others (Habachi Reference Habachi1963: figs. 15–7). His funerary temple at Deir el-Bahri yielded fragments of a possible siege against northeasterners, with an inscription preserving such words as ‘overthrowing the Aam-people’ (Naville Reference Naville1907: 40, 68, pls. 14–5). Attacks on Aam-individuals are otherwise noted in the late Eleventh to early Twelfth Dynasty biography of the official Khety, though in association with the resumption of quarrying activity in the Sinai (Gardiner Reference Gardiner1917: 37–8, pl. 9). To access Levantine resources, Montuhotep II sent the official Henenu possibly to Khetyu-ash (Ḫtyw-ˁš) for coniferous-wood, as mentioned in his Deir el-Bahri tomb (TT 313) (Hayes Reference Hayes1949). Henu’s inscription at Wadi Hammamat then suggests that King Montuhotep III’s officials had access to such timber for the Kebenty-ships headed to Punt (Couyat and Montet Reference Couyat and Montet1912–1913: 81–4, pl. 31). Uses of this timber for coffins are highly feasible (Arbuckle Reference Arbuckle2024).
Overall, the period from the late third millennium BCE to very early second millennium BCE did not likely experience a cessation of Egyptian–Levantine connections. While the evidence from the Levant remains meagre, that from Egypt suggests that shifting socio-political and economic dynamics contributed to the emergence of different agents and means of connectivities. Arguably, this process had already begun in the late Old Kingdom, with more officials showcasing their Northern Levantine connections. In the First Intermediate Period, officials with such connections supplied desired commodities for the Heracleopolitan court, and possibly for wider cultic and funerary uses. Between the First Intermediate Period and the early Middle Kingdom, Middle Egyptians portrayed northeasterners as allied warriors. Although Montuhotep II and his administration seem to have attempted to (re)assert control over Egyptian–Levantine encounters, these representations continued into the second millennium BCE.
2.3 The First Half of the Second Millennium BCE
2.3.1 EB IV to MB I and the First Half of Dynasty 12
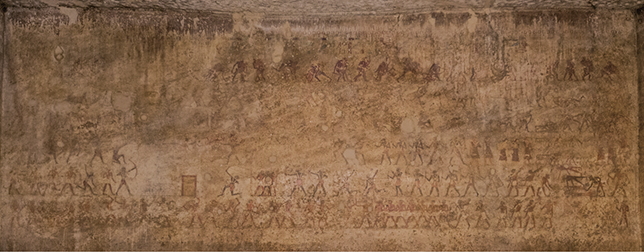
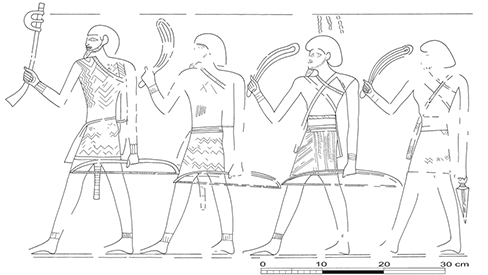
Egyptian–Levantine exchanges in this period involved both royal and non-royal agents. Responsibilities represented under the umbrella of the earlier Old Kingdom administration were now shared with selected individuals beyond the newly established capital at Itjtawy. At Beni Hassan, siege scenes continued to portray northeasterners allied with the local army. These occur in the tombs of officials Khnumhotep I and Amenemhat that respectively date to the reigns of Amenemhat I and Senwosret I (Kanawati and Evans Reference Kanawati and Evans2016; Lashien and Mourad Reference Lashien and Mourad2019). The scenes differ slightly in detail. The northeasterners in Khnumhotep I’s tomb are likely portrayed with different divisions, one of which includes their possible leader wearing the earliest known one-shouldered garment in Egyptian art (Figure 8). The biography of Khnumhotep I additionally implies that the nomarch’s diverse army helped secure Amenemhat I’s rule (Mourad Reference Mourad2015: 84; Mourad Reference Mourad2020). Together with the siege scene, it supports the representation of northeasterners as warriors in Egypt and the role of provincial leaders in mediating alliances.
Siege scene of Khnumhotep I with inset detail of northeasterners. Dynasty 12, Beni Hassan.
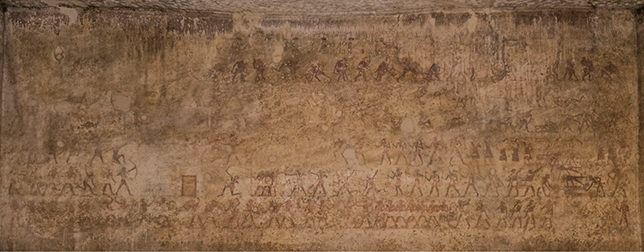
Figure 8a Long description
The wall painting is in good condition, with some parts faded. It shows groups of individuals divided into six registers. The upper three are dominated by wrestling men shown in pairs and in various positions. Registers 4 and 5 have a siege scene extending from the left to the centre. The besieged structure is defended by possible Egyptians. It is flanked by soldiers portrayed as of Egyptian, southern and northeastern origin. To the right of Register 4 is a group of western men, women and children with a herd of goats. The right of Register 5 has a pile of dead bodies being attended by soldiers. The bottom Register 6 has groups of soldiers walking or engaged in one-on-one combat. At the very right of this register are the four northeasterners shown in the inset detail.
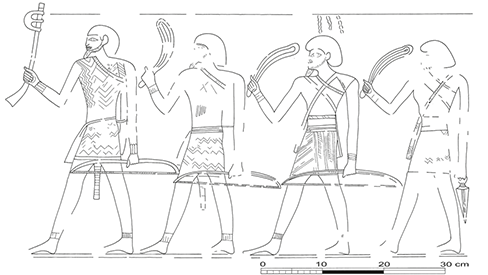
Figure 8b Long description
The first armed northeasterner in the group wears a patterned one-shouldered garment and carries a fenestrated axe and bow. The other three behind him wear patterned kilts and are armed with throwing sticks, bows, and, for the last man, a dagger.
Not all relations with northeasterners were cooperative during the early Twelfth Dynasty. The Abydos stela of Nesumontu records the official’s participation in attacks on fortresses of Iunty, Mentjy- and Heryu-she-groups during Amenemhat I’s reign (Simpson Reference Simpson1974: pl. 14 [6.2]). Other early Twelfth Dynasty texts, such as an inscription at Tod’s Temple of Montu (Redford Reference Redford1987: figs. 1–2) or the official Montuhotep’s stela at Abydos (CG 20539, Lange and Schäfer Reference Lange and Schäfer1902: 150–8, pl. 41), represent the ideological subjugation of Aam- and Setjty-people. To these can be added three texts that mention northeasterners in Egypt: the Prophecies of Neferty, referring to Aam- and Setjty-individuals; the Admonitions of Ipuwer, to Pedjty- and Setjty-people; and the Instructions for Merikara, to Pedjty-individuals as Aam-people threatening the Delta (Helck Reference Helck1970; Gardiner Reference Gardiner1909; Golénischeff Reference Golénischeff1913). The texts have been used to support a Levantine incursion into Egypt, especially the Delta, during the First Intermediate Period (e.g. Ward Reference Ward1971: 20–41; Redford Reference Redford1992: 66–9). However, they must be approached cautiously. The Prophecies and the Admonitions likely date to the Twelfth Dynasty, if not later (Posener Reference Posener1969: 21–60; Cohen Reference Cohen2002: 36–8), and all three appear commissioned by the royal court. They emphasise the ideological representation of belligerent foreigners, and the foreign scapegoat for problems in Egypt. Further, the Instructions and Prophecies may reflect royal interests in controlling the Delta and securing its access to the northeast. The Instructions note how the king strengthened the east by establishing towns up to the Ways of Horus. This initiative mirrors that of King Amenemhat I, who reportedly constructed the Walls of the Ruler to manage cross-border movements. More specifically, as recorded in the Tale of Sinuhe, the Walls were intended to repel the Setjty- and Nemiu-she-people (Nmiw-šˁ ‘those who traverse the sand’).
The Tale of Sinuhe provides other insights on Egyptian conceptualisations of Egyptian–Levantine encounters. Known from at least the second half of Dynasty 12 (Koch Reference Koch1990; Parkinson Reference Parkinson2002: 296–7), the fictional text recounts how the Egyptian official Sinuhe escapes Egypt after the attempted assassination of King Amenemhat I. He flees northeast past the Walls of the Ruler, where he is rescued by a Setjty-group. He then travels through several lands, reaching Qedem (Qdm) where the ruler of Upper Retjenu (Rṯnw), Amusanenshi, summons him. Knowing the situation in Egypt, now ruled by Senwosret I, Amusanenshi offers Sinuhe refuge, his daughter in marriage, and the fertile land of Iaa (Iʒʒ). Sinuhe spends several years here, becoming a strong commander in Amusanenshi’s army. At the behest of Senwosret I, he then returns to Egypt as a respected figure who is afforded a tomb according to Egyptian customs.
The Tale emphasises Egyptian awareness of Levantine geography, society, and culture. This is framed by Egyptian ideals and Sinuhe’s character development (Baines Reference Baines1982; O’Connor Reference O’Connor and Tait2003). It depicts Egyptian elements and characters as stronger and more desired than the other. Levantines are represented with a clear social hierarchy: Amusanenshi is ruler of Upper Retjenu, and Sinuhe, his subordinate, is ruler of a portion of Amusanenshi’s land, his possessions and duties passed on to his eldest son. Rulers in the vicinity engaged in armed combat with one another, or forged alliances via marriage or coalitions like that of the heqau khasut (ḥqȝw ḫȝswt) ‘rulers of foreign lands’. Representatives of the Egyptian state interacted with the rulers via trade, gift-exchange, and letter-correspondence (Mourad Reference Mourad2015: 121–2). Alongside debate on its implications for Egyptian–Levantine chronology, the text remains vague on whether Upper Retjenu is populated by semi-nomadic or settled people (Cohen Reference Cohen2002: 18–9, 132). The locations of Qedem and Iaa are also uncertain, although the Beqaa Valley appears most probable (Mourad Reference Mourad2013). The text’s earliest copy (Papyrus Berlin 3022B) also preserves the first clear mention of the toponym Retjenu.Footnote 4 The tale, alongside other Middle Kingdom texts, suggests that this region likely comprised parts of the Northern Levant, extending to an area named Sekmem (Skmm), perhaps Shechem (Mourad Reference Mourad2015: 199; Section 2.3.2).
Exchanges with Retjenu are supported by the Daybook of King Amenemhat II (Altenmüller Reference Altenmüller2015). Its fragment was discovered at Mit Rahina and possibly originated from the Memphite Temple of Ptah, and records expeditions, donations for temples and festivals, and visits from foreign dignitaries. The latter include the children of Setjet’s rulers who brought silver, cattle, lead, and 1002 Aam-individuals. Three expeditions were sent northeast. One maritime expedition was commissioned to Khenty-she, returning with a cargo of sixty-five Aam-people and a variety of products, including coniferous-wood (Marcus Reference Marcus2007: 150–4, tables 2–3). The second was sent to the Sinai Turquoise Terraces for turquoise, fauna, minerals, and aromatics from the Sinai and, perhaps, the Arabian Peninsula (Cohen Reference Cohen2002: 42; Marcus Reference Marcus2007: 157, table 3). The third involved an attack on Iwa (Iwʒ) and possibly Iasy (Iʒsy) sent by ship to return evidently by land with a cargo of 1554 Aam-individuals, weaponry, and other objects, perhaps loot. Different locations for Iwa and Iasy have been proposed, though they could be between the Sinai Peninsula and Khenty-she (Marcus Reference Marcus2007: 146–8; Mourad Reference Mourad2015: 79).
The Daybook further records the destination of exchanged entities. Imports were distributed to the royal court, the elite, and other officials. It is plausibly via such means that the imported silver and lapis lazuli items of the so-called Tod Treasure reached its Temple of Montu (Lilyquist Reference Lilyquist1993: 35–6; Marcus Reference Marcus2007: 158–60). The Daybook also attests to the movements of thousands of Aam-individuals into Egypt within a short timeframe. These include dignitaries and elite individuals visiting the Royal Residence, and Aam-captives(?) from Iwa and Iasy who were assigned to the district Sekhem-Amenemhat. Other Twelfth Dynasty representations hint that individuals with northeastern features, or associated with the appellative Aam,Footnote 5 were living in Egypt. These include the controller of a phyle, Sa-Ip, who was born of a Aam-woman as inscribed on a fragment at Dahshur, and possible northeasterners in the tombs of officials Amenemhat and Khnumhotep II at Beni Hassan, and Wekhhotep (B2) and Wekhhotep (B4) at Meir, where ‘cattle of Aam-individuals’ are attested (Mourad Reference Mourad2015: 62, 94–5).
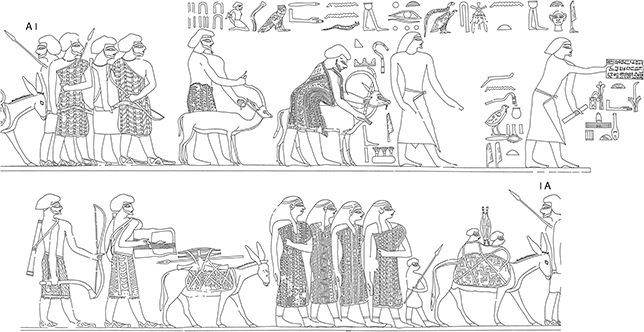
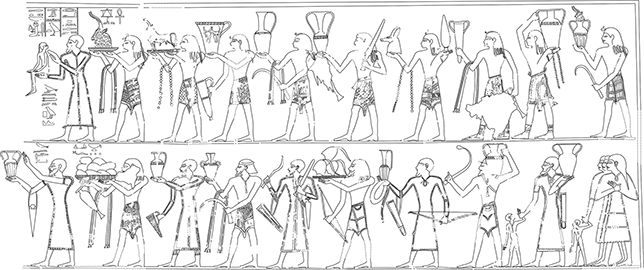
Movements of Aam-individuals are famously represented in the tomb of mayor Khnumhotep II at Beni Hassan (Figure 9). Continuing the role of his grandfather, Khnumhotep I, in negotiating cross-border relations, Khnumhotep II decided to picture a procession of Aam-individuals on the north wall of his chapel, its details identifying the group, their origin, and the purpose of their visit (Kamrin Reference Kamrin2009; Kanawati and Evans Reference Kanawati and Evans2014: pls. 42–8, 124, 128–9; Mourad Reference Mourad2015, 86–8; Cohen Reference Cohen2015). The scribe Neferhotep presents the group alongside a document reporting that the ‘son of the count’ Khnumhotep brought thirty-seven Aam-individuals of Shu (Šw) to Khnumhotep II in Year 6 of Senwosret II’s reign. The procession depicts fifteen Aam-individuals: eight men, four women, and three children. The first is a high-status man, as exemplified by his elaborate one-shouldered garment and a caption identifying him as heqa khaset (ḥqȝ ḫȝst) ‘ruler of a foreign land’ Ibsha, the name of possible Semitic derivation (Albright Reference Albright1934: 8; Schneider Reference Schneider1998: 47). The remaining adults are depicted with multicoloured patterned clothing and yellowish skin. A row of hieroglyphs above them signifies that they are ‘coming on account of the bringing of mesdjemet (msḏmt)’, a mineral/product that may be sourced from the Eastern Desert and Sinai (Forbes Reference Forbes1974: 209–33). The procession has contributed to much discussion on the visit, the group’s identity and mode of subsistence, and implications for chronological correlations (Cohen Reference Cohen2015). However, the location of Shu in the Eastern Desert or the Northern/Southern Levant cannot be verified. The details suggest that the group were not (semi)-nomads or Bedouins, but at least partially related to a sedentary lifestyle (Mourad Reference Mourad2015: 89). Further, mesdjemet is not clearly portrayed in the procession, yet neither are thirty-seven individuals. Given the inclusion of children, the group was likely travelling for a lengthier stay, possibly related to mesdjemet’s procurement or processing. The scene’s context, in Khnumhotep II’s tomb, also expresses this official’s agency to highlight access to Aam-expertise and to mesdjemet, and his possible success in mediating ventures with a foreign ruler. It also points to the multigenerational involvement of the Khnumhotep family in cross-cultural interactions, contributing to their district’s continuous interactions with northeasterners (see Mourad Reference Mourad2015: 84–5, Reference Mourad2021: 92, 193–4, 331; Section 3.1).
The procession of Aam-individuals in the tomb of Khnumhotep II. Dynasty 12, Beni Hassan.
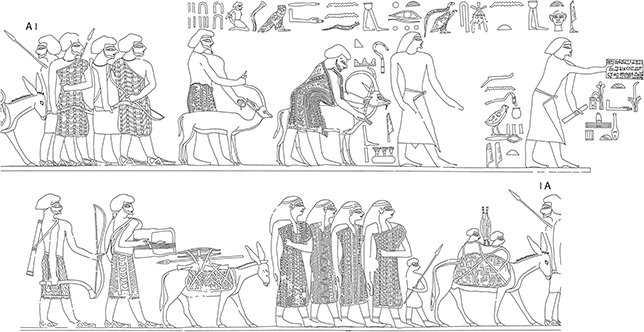
Figure 9 Long description
The drawing presents the procession of 15 Aam-individuals on the north wall of the tomb of Khnumhotep 2. Two Egyptians head the group, one presenting a document with hieroglyphic writing to the tomb owner. A caption is above the group, labelling them asAam-individuals. They are headed by their leader, who wears an elaborate one-shouldered garment. He and the man behind him lead an ibex and an oryx. Behind them are three main groups: (1) four men in sandals, (2) four women in boots and three children, two of whom are on a donkey, and (3) two men in sandals, one carrying a lyre, the other a duck-bill axe, with a donkey in front of them.
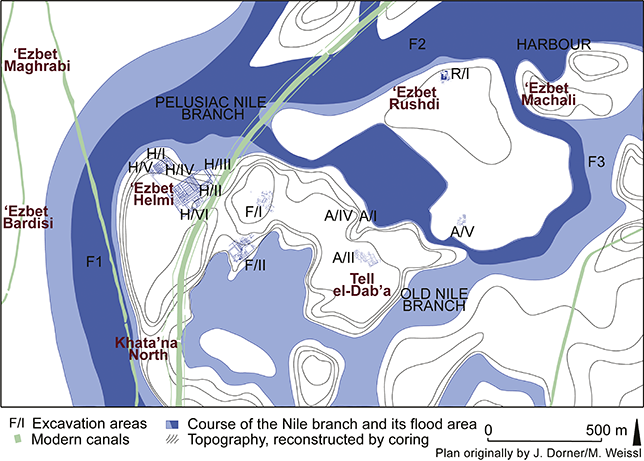
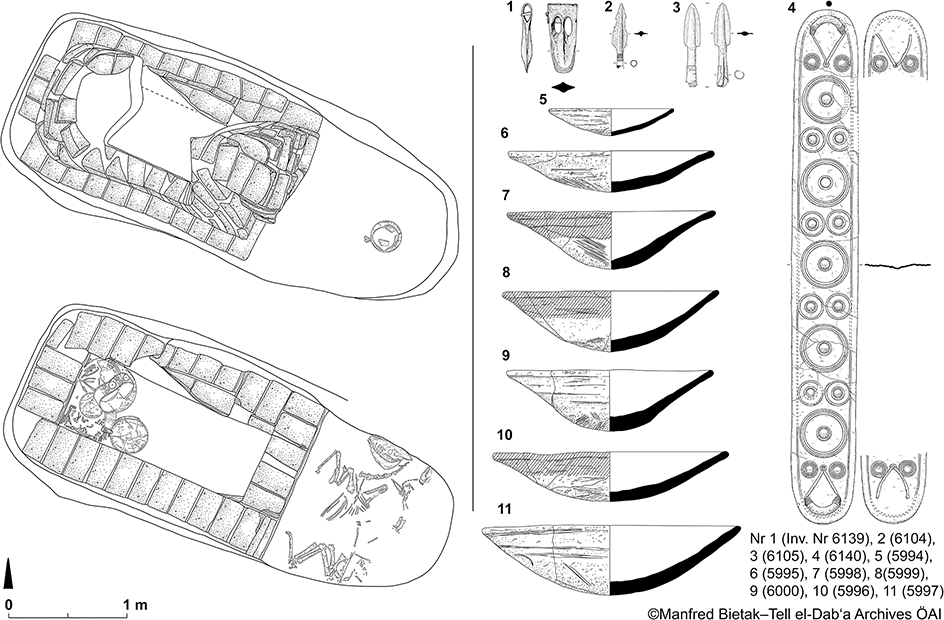
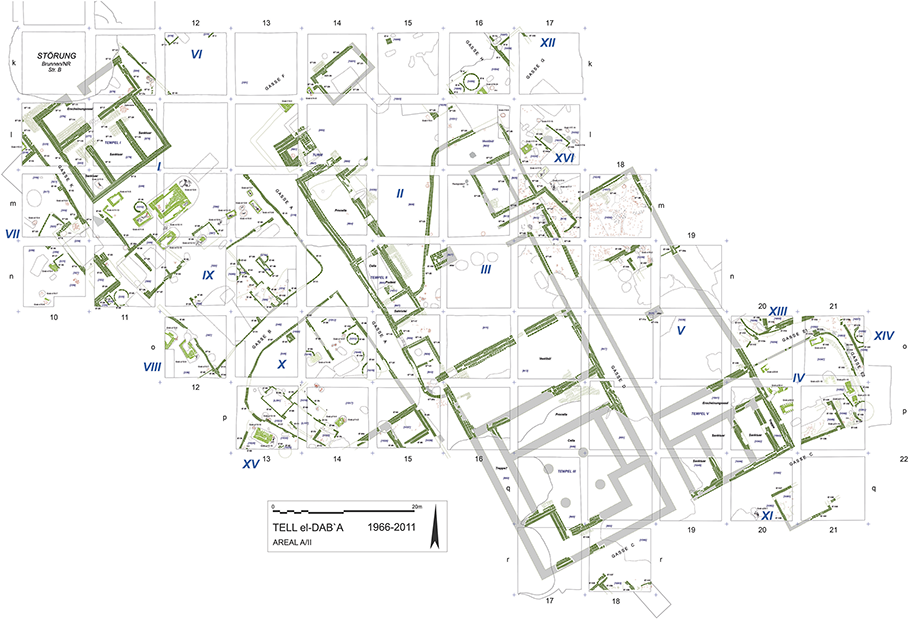
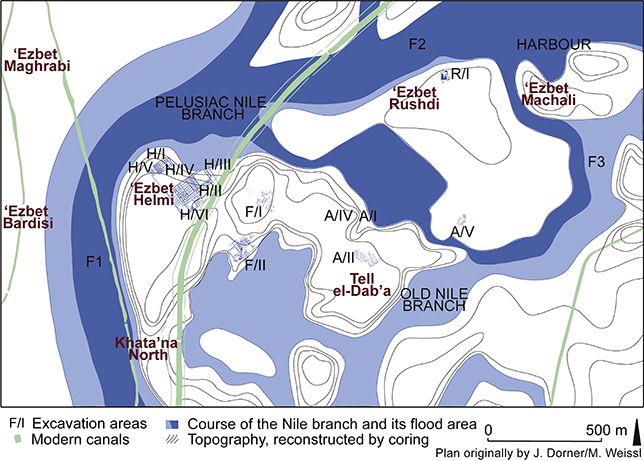
Such interactions are supported by the archaeological evidence. A planned settlement was established in the northeast Delta at Tell el-Dabʻa around the late Eleventh or early Twelfth Dynasty (Figure 10). A short hiatus was followed by the construction of a large compound and temple at nearby ʻEzbet Rushdi (Figure 11) in the first half of Dynasty 12 (Bietak Reference Bietak1991: 31; Czerny Reference Czerny1999). Its ceramic repertoire included Levantine Painted Ware vessels, and amphorae with Northern and Southern Levantine parallels and petrographic groups (Cohen Weinberger and Goren Reference Cohen-Weinberger and Goren2004: table 1a; Bagh Reference Bagh2013: 43–5; Czerny Reference Czerny2015: 359–61). Such data suggests that the newly established administration invested in the settlement at least partly for its strategic proximity to the Levant and Mediterranean Sea. Access to Levantine commodities is otherwise confirmed across Egypt, with Levantine Painted pottery attested at Kom el-Hisn, el-Lisht and Elephantine (Bagh Reference Bagh2013: 61–2, 65). Levantine-type vessels may have also been represented in Twelfth Dynasty tombs at el-Lisht and Beni Hassan (see Mourad Reference Mourad2015: 73, 85, figs. 4.40, 4.51).
The stratigraphy of Tell el-Dabʻa.
Map of Tell el-Dabˁa.
The sparse evidence from the Levant supports exchanges with Egypt. Four MB I sites produced Egyptian objects of the first half of the Twelfth Dynasty: Tell Ifshar, Megiddo, Sidon and Byblos. Twelfth Dynasty pottery, including store-jars, dating no earlier than Amenemhat II’s reign were found in administrative complexes at Tell Ifshar (Phases A and B; Marcus, Porath, and Paley Reference Marcus, Porath and Paley2008: 207). Scarabs likely made in Egypt were collected from funerary contexts at Megiddo (Stratum XIV; Tufnell Reference Tufnell1973: 71) and Sidon, from where an Egyptian globular jar was also found (Level 1; Doumet-Serhal Reference Doumet-Serhal2004: 94, Reference Doumet-Serhal2006: 39; Loffet Reference Loffet2011/12: 109–12). At Byblos, cultic contexts yielded Egyptian-type objects. For instance, the Temple of Baalat Jbeil produced the so-called ‘Montet Jar’ containing small items of various origin, including Old to early Middle Kingdom Egypt, that were likely deposited in the MB I (Montet Reference Montet1928: 127–39; Tufnell and Ward Reference Tufnell and Ward1966). Altogether, the Egyptian objects are restricted to mostly small objects in funerary and cultic contexts, and vessels in administrative contexts. All are from sites predominantly along maritime routes.
2.3.2 MB I to MB II and the Second Half of Dynasty 12 to Mid-Dynasty 13
The reigns of Senwosret III and Amenemhat III are marked by internal and interregional developments. Some of these may have purposed to restructure the state’s networks to strengthen the capital as administrative and political hub. Two biographical texts reflect its growing interference in Levantine affairs. The first was found fragmented in an official’s tomb at Dahshur of a Khnumhotep, likely the ‘son of the count’ Khnumhotep II buried at Beni Hassan (Allen Reference Allen2008). It records the experiences of the overseer of the expedition of sailors as he embarked on a maritime voyage to Jbeil/Byblos and Watji (Wȝṯi) for coniferous-wood during Senwosret III’s reign. The text hints at the Egyptians’ contributions in circumventing unstable relations between the two coastal cities. These involved negotiations with the ruler of Jbeil/Byblos, Maki (possibly Semitic Malki for ‘ruler’; Allen 2008), letter correspondence with the Egyptian king, and the possible militaristic intervention of the pharaoh. These facilitated the apparent continuation of maritime contact with Jbeil/Byblos. The second biographical text specifies Senwosret III’s interference in Retjenu, sending the last known military expedition to the Levant until early Dynasty 18.Footnote 6 Inscribed on a stela from Abydos (Simpson Reference Simpson1974: pl. 31), the text records Khusobek’s involvement in an expedition to Setjet to overthrow Mentjy-people. Because of his bravery in defeating a Aam-individual, Khusobek was rewarded with a staff, a bow, and a dagger. The foray reportedly led to the ‘fall’ of Retjenu and the region of Sekmem, possibly Shechem (Redford Reference Redford1992: 76; Goedicke Reference Goedicke1998).
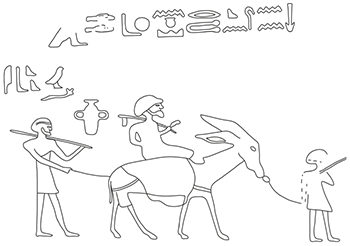
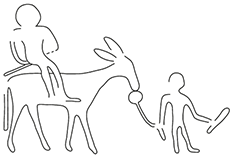
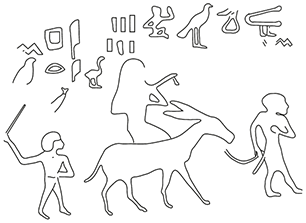
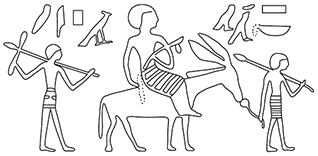
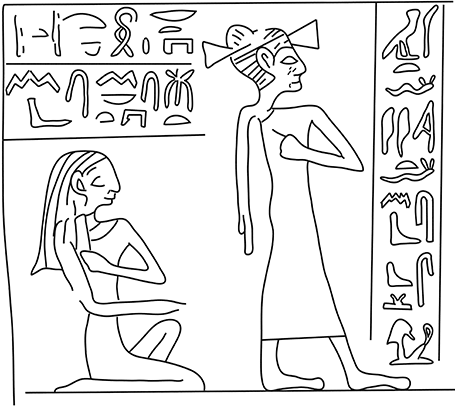
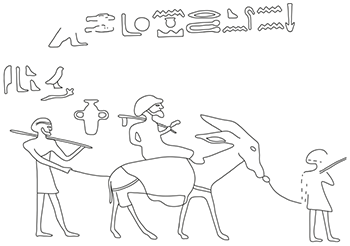
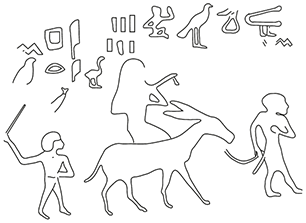
Amicable relations with northeasterners, especially those from Retjenu, became more pronounced from the reign of Senwosret III onwards. They are attested in inscriptions at the mines of Serabit el-Khadim, exploited for turquoise and copper, and its rock-cut temple for Hathor and Sopdu (Černý Reference Černý1955: 33–8). Many Egyptian inscriptions record the Aam-element, a Western Asian toponym, or a name of possible Semitic derivation (Schneider Reference Schneider2003a: 72–6; Mourad Reference Mourad2015: 135–42, 305–8, fig. B3; Tallet Reference Tallet2018: 37–42). They date between the reigns of Senwosret III and Amenemhat IV, most to the reign of Amenemhat III. Four name the ‘brother of the ruler of Retjenu, Khebded(em)’ (Inscription Nrs. 85, 87, 92 and 112), one of which depicts him with a voluminous hairstyle riding a donkey (Goldwasser Reference Goldwasser2012/Reference Goldwasser2013; Figure 12a). If a donkey-rider depicted in three other inscriptions (Figure 12b–d) is also identified as Khebded(em), then the dignitary would be attested in texts dating from at least Year 4 to 25 of Amenemhat III’s reign. Three other inscriptions, Nrs. 114–5 and 120, list men from Retjenu among the Egyptian expeditions; the latest, Inscription Nr. 120, dates to Year 6 of Amenemhat IV’s reign. Thus, these inscriptions suggest persistent diplomatic relations with Retjenu. Feasibly, Retjenu-individuals were involved in a collaborative venture with the Egyptians for Serabit el-Khadim’s resources. The possibility that they were residing in Egypt for at least twenty years to partake in this venture cannot be dismissed, with Bietak (Reference Bietak and Franzipane2023a) suggesting that they were at Tell el-Dabʻa. Proto-alphabetic texts found at Serabit el-Khadim, and of feasible MB I date, also support the presence of Semitic-speakers (Petrie Reference Petrie1906; Goldwasser Reference Goldwasser2006, Reference Goldwasser2012; Parker Reference Parker2022; Section 3.4). The texts indicate that they were using the same spaces as Egyptians, including the Hathor Temple. Alongside the mention of diverse groups joining the Egyptian expeditions, inclusive cross-cultural interactions may be deduced.
The donkey-rider and his entourage as detailed on
Inscription Nr. 112,
Inscription Nr. 103,
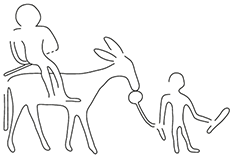
Inscription Nr. 405, and
Inscription Nr. 115. Dynasty 12, Serabit el-Khadim.
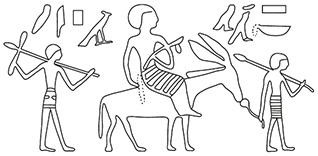
Rituals seem to have been carried out to secure the continuation of such interactions, manifesting in the ‘Execration Texts’. These hieratic texts are written on figurines or pottery and feature ritualistic rebellion formulae followed by lists of individuals and groups, mostly of foreign entities, surrounding Egypt. Two known sets of texts from Egypt represent northeasterners: the red broken ‘Berlin bowls’ that likely originate from a Theban grave; and the anthropomorphic clay ‘Brussel figurines’, recovered near King Teti’s pyramid at Saqqara (Sethe Reference Sethe1926; Posener Reference Posener1940; Ritner Reference Ritner1993: 111–80). Both are debatably of the second half of Dynasty 12 (Posener Reference Posener1940: 15–7, 31–5; Redford Reference Redford1992: 88; Cohen Reference Cohen2002: 16–7). The Berlin bowls name twenty-nine rulers of fourteen northeastern lands with five additional toponyms, and the Brussel figurines list fifty-eight rulers and sixty-nine northeastern lands. Toponyms have been identified to varying certainty with Levantine sites (Posener Reference Posener1940: 68–73; Aharoni Reference Aharoni1967). The presence and absence of names have led to interpretations that the bowls’ texts were composed at a time when Levantine society was tribal, whereas the figurines’ texts represent a sedentary society of later date (Redford Reference Redford1992: 91). Others have inferred that the differences reflect an increase in Egyptian–Levantine relations (Posener Reference Posener1940: 45; Weinstein Reference Weinstein1992: 12–3; Rainey Reference Rainey1994: 82–4). Several aspects caution against such interpretations, including the uncertain dating of the texts; the spatial constraints imposed by their media; available scribal resources and choice; and their function and use in rituals and in funerary contexts to protect spaces or activities from threatening, rebellious forces (Posener Reference Posener1940: 40–3; Ritner Reference Ritner1993: 136–53; Cohen Reference Cohen2002: 48; Mourad Reference Mourad2015: 80). Thus, the Execration texts cannot be critically used for indications of the socio-political structure of the Levant, its relations with Egypt, or chronological correlations. Instead, they reflect knowledge of the geography and ruling elite of the Levant, and rituals against potential threats (Posener Reference Posener1940: 45; Cohen Reference Cohen2002: 49).
Other Middle Kingdom texts of the second half of Dynasty 12 to Dynasty 13 suggest that Aam-individuals, and those with a Semitic-sounding name, were residing and/or working in Egypt. They are mentioned in papyri from el-Lahun and Draʻ Abu el-Nagaʻ, stelae from Abydos, Edfu and el-Rizeiqat, graffiti at Gebel Tjauti and Aswan, and unprovenanced objects (see Schneider Reference Schneider2003a; Mourad Reference Mourad2015). They include a count, household members, cooks, weavers, temple personnel, and labourers (Mourad Reference Mourad2015: fig. 7.11). Some have Egyptian names and, when depicted, are usually represented as Egyptians. One stela portrays the Aam-woman Senebheqa with an Egyptian name, but her atypical hairstyle and dress imply her northeastern origins (Figure 13). Like for other such individuals, it is not yet possible to pinpoint Senebheqa’s origins.
Detail of Stela Musée Joseph Déchelette, Roanne Nr. 163. Early Dynasty 13, unknown provenance.
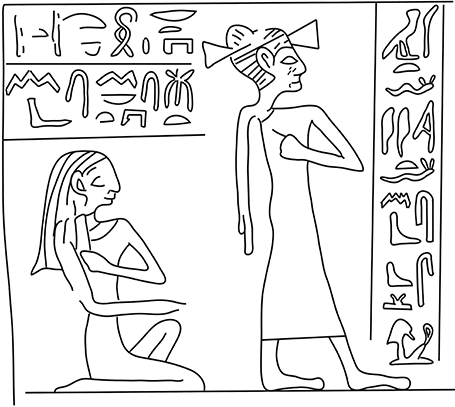
The archaeological material supports multifaceted interactions. At Tell el-Dabʻa, a settlement assigned to the late Twelfth Dynasty features two structures inspired by Levantine architecture (Phase H, Area F/I; Bietak Reference Bietak1991: 32; Figure 10), one of which was rebuilt into a large Egyptian-type administrative complex in the subsequent early Thirteenth Dynasty (Phase G/4; Bietak Reference Bietak1991: 33). The complex’s materials indicate that its high-status occupants were accessing Levantine elements (Bietak Reference Bietak1991: 33). The late Twelfth to Thirteenth Dynasty burials at the site also feature funerary customs found in Egypt and Western Asia (Bietak Reference Bietak1991: 196; Forstner-Müller Reference 89Müller2008; Schiestl Reference Schiestl2009; Figure 14). Those not attested elsewhere in Egypt include donkey burials before tombs, and the placement of toggle pins, diadems, metal belts, or MB I-type weaponry on interred bodies (Prell Reference Prell2021). One scarab possibly inscribed with the title ‘ruler of Retjenu’ signals at continued relations with this region (Martin Reference Martin1998). Studies on the ceramic repertoire have observed locally made MB I-type pottery, and an increasing number of MB I ceramics predominantly of Northern Levantine types and fabrics (Bietak Reference Bietak1991: 33–6; Cohen-Weinberger and Goren Reference Cohen-Weinberger and Goren2004: fig. 2, table 1; Kopetzky Reference Kopetzky2010: figs. 44, 52; Aston and Bietak Reference Aston and Bietak2012; Bagh Reference Bagh2013; Vilain Reference Vilain2023: fig. 3.5). Thus, the evidence supports the site’s growing cultural heterogeneity, with a high possibility for the presence of inhabitants with Egyptian and Levantine cultural affinities. Isotopic analyses support its role as a hub in the wider region, revealing that some individuals, mostly female, had migrated to Tell el-Dabʻa from beyond the Nile Valley (Stantis et al. Reference Stantis, Kharobi and Maaranen2020).
Plan of Tomb F/I-m/18-Nr. 3 and a selection of its grave goods. Stratum d/1 (Phase G/4), Area F/I, Tell el-Dabˁa.
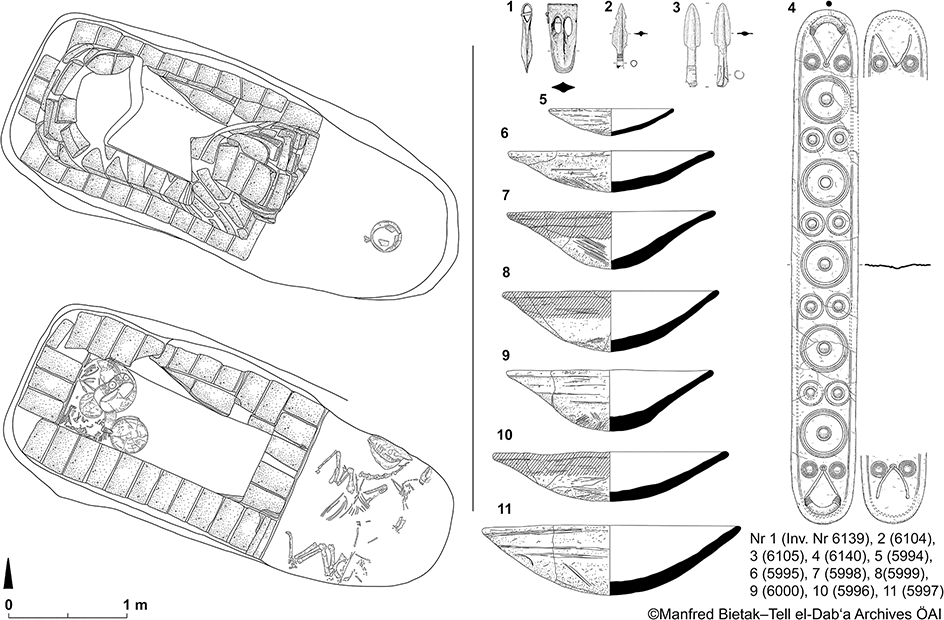
Conceivably, Tell el-Dabʻa functioned as an entrepôt managing the distribution of commodities from the Eastern Mediterranean to other Nile Valley communities. Levantine imports of the second half of Dynasty 12 to mid-Dynasty 13 are mostly found in the Memphite and Fayum region, with amphorae from Amenemhat III’s funerary complex at Dahshur (Arnold Reference Arnold1982), and the mid-Thirteenth Dynasty settlement at Kom-Rabiʻa (Bader Reference Bader2009: 383–7; Ownby Reference Ownby2010). Fragments from the latter were petrographically assessed to derive from the Levant, including coastal and inland Lebanon, and the northern coastal Southern Levant (Level VII; Ownby Reference Ownby2010). El-Lahun produced Levantine Painted Ware vessels, amphorae fragments, and botanical remains, all possibly of the first half of Dynasty 13 (Petrik Reference Petrik, Bechtold, Gulyás and Hasznos2011: 218; Bagh Reference Bagh2013: 63). Fragments of amphorae and juglets were also collected at el-Lisht but have been assigned generally to the Thirteenth Dynasty and early Second Intermediate Period (Arnold, Arnold, and Allen Reference Arnold, Arnold and Allen1995). Further south, late Twelfth to early Thirteenth Dynasty contexts at Edfu yielded Levantine Painted Ware (Bagh Reference Bagh2013: 64). Fragments of amphorae were also found at the Red Sea coast’s Wadi Gawasis (Bard and Fattovich Reference Bard and Fattovich2018: 103–6).
Egyptian imports are similarly attested at MB I Levantine sites, including Tell Ifshar, Ashkelon, Gezer, Megiddo, Sidon, and Byblos. A Twelfth Dynasty jar and bottle were collected from Tell Ifshar’s administrative complex (Phase C; Marcus, Porath, and Paley Reference Marcus, Porath and Paley2008: 210–3). The late MB I settlement gate at the coastal seaport of Ashkelon produced an Egyptian ringstand and store-jars, and seal impressions of late Middle Kingdom designs (Stager and Voss Reference Stager, Voss, Stager, Schloen and Voss2018b). The impressions would have been stamped on boxes, baskets, door locks, a silo opening, and ceramic vessels, including those of Levantine shape (Brandl Reference Brandl, Stager, Schloen and Voss2018). The latter, alongside the local clay of the impressions, suggests that they were made and used locally, likely by representatives of the Egyptian administration (Brandl Reference Brandl, Stager, Schloen and Voss2018: 390). Funerary contexts at Gezer and Megiddo yielded Egyptian stone vessels and design scarabs; burials at Sidon produced Egyptian-design scarabs and imported Upper and Lower Egyptian storage and transport vessels (Levels 2–3; Doumet-Serhal Reference Doumet-Serhal2004, Reference Doumet-Serhal2006; Forstner-Müller, Kopetzky, and Doumet-Serhal Reference Doumet-Serhal2006); and Royal Tombs I–II at Byblos also contained stone vessels and Egyptian-type scarabs and body adornments (Montet Reference Montet1928; Kopetzky Reference Kopetzky2018). These attestations indicate the continued distribution of Egyptian commodities to the Levant, with Egyptian material reaching areas along major trade routes. They include mostly vessels for transportation or storage associated with trade or administration and funerary practices, Egyptian-design scarabs from burials, and unique adornments in royal Gublite/Byblite tombs.
2.3.3 MB II to MB III and the Second Intermediate Period
The Second Intermediate Period is identified by the independence of Egyptian towns from Dynasty 13, centred at Itjtawy. As with the First Intermediate Period, the dissolution of the central administration removed the need to represent achievements in state-sponsored activities. Hence, most of our evidence for Egyptian–Levantine interactions at this time is archaeological in nature.
The remains at Tell el-Dabʻa signify the site’s independence, particularly in phases ascribed to the second half of Dynasty 13, or Dynasty 14 as reconstructed by Bietak (Phases F–E/3; Bietak Reference Bietak, Bietak, Czerny and Forstner-Müller2010a: 18; Figure 10). Now known as Avaris, its leaders initiated major construction programs, including a sacred precinct at Area A/II and a palatial complex at Area F/II (Bietak Reference Bietak, Bietak, Czerny and Forstner-Müller2010a: 18). The precinct features temples with architectural parallels from Egypt (e.g. Temples I and V) and Western Asia (e.g. Temples II and III) (Bietak Reference Bietak, Bietak and Prell2019, Reference Bietak, Bietak and Prell2021b; Figure 15). Funerary customs continued to reflect those of Egyptian and Levantine origin, the latter including the deposition of bronze weaponry and donkeys, and infant jar-burials (Bietak Reference Bietak1996: 39–40; Forstner-Müller Reference 89Müller2008; Prell Reference Prell2021). Levantine imports and MB-type pottery remain common, the examined imports reaching a peak in number in early Dynasty 14 (Kopetzky Reference Kopetzky2010: fig. 52; Vilain Reference Vilain2023: fig. 3.5). Those that were analysed petrographically were traced mostly to the Northern Levant; around 30 per cent are of Southern Levantine fabrics, most from the coastal Negev (Cohen-Weinberger and Goren Reference Cohen-Weinberger and Goren2004: 81, table 2).
Plan of the sacred precinct of Area A/II, Tell el-Dabʻa.
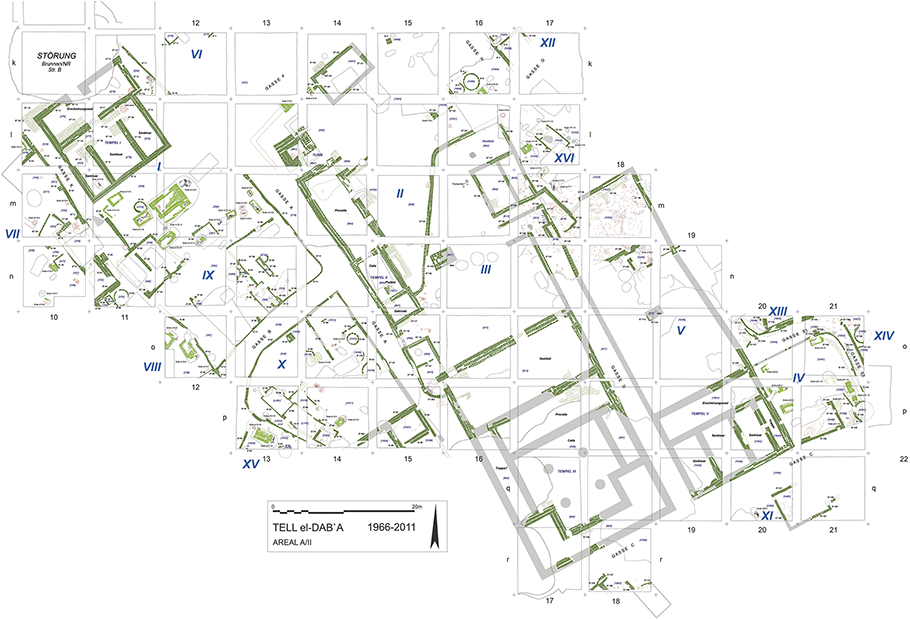
The end of Dynasty 14 at the site is marked by the destruction of its palatial complex by fire, with another rebuilt at the same location (Bietak et al. Reference Bietak, Math, Müller and Jurman2012/Reference Bietak, Math, Müller and Jurman2013). The destruction marks the beginning of the Hyksos Dynasty 15 (Phases E/2–D/2; Figure 10). According to Manetho’s history, as narrated by Josephus, the Hyksos invaded Egypt, massacred its people, and destroyed its temples and cities; they then installed one of their own as king who fortified Avaris as his capital (Josephus, Contra Apionem, I.14.73–92). This narrative is no longer considered historically accurate. The term ‘Hyksos’ derives from the Egyptian title heqa khasut (ḥqȝ ḫȝswt) ‘ruler of foreign lands’ (Section 3.3). Nineteenth- and twentieth-century scholars proposed that they were Hurrian, Indo-European, or Levantine (see Mourad Reference Mourad2015: 9–11). Cultural affiliations with Western Asia are supported by (1) their mostly Semitic names, and (2) Theban texts associating them with Aam-individuals and Retjenu (Schneider Reference Schneider1998). Thus far, no evidence for the sudden widespread invasion of Egypt has been found. Instead, it points to an increasing number of individuals originally from the northeast working and residing in Egypt. Through their sustained ties with the Levant, they were able to grow both in power and in wealth in communities like at Tell el-Dabʻa (Mourad Reference Mourad2015). The destruction of this city’s palatial complex at the start of Dynasty 15 signals at a political, and possibly violent, event that consolidated Hyksos authority. Whether they were from Tell el-Dabʻa itself or from one or more other communities is still being questioned, with Bietak (Reference Bietakforthcoming) suggesting that they could be from Itjtawy. Avaris was then established as their capital.
The city grew significantly in size and population in early Dynasty 15. Cultic and burial practices persisted though with more intramural and multiple burials, possibly due to a rise in population density (see, with references, Mourad Reference Mourad2021: 60–2). Burials with associated weapons and donkeys are no longer attested from mid-Dynasty 15 (Prell Reference Prell2021: 26–51). The number and range of studied Levantine imports also decrease; however, petrographic analysis supports a Northern Levantine origin for most analysed vessels, with around 20 per cent from Southern Levantine areas (Cohen-Weinberger and Goren Reference Cohen-Weinberger and Goren2004: 81). Local ceramics, including those of Levantine-type, continue to be produced, with new types attested, signalling at flourishing workshops (Kopetzky Reference Kopetzky2010: figs. 44, 52; Vilain Reference Vilain2023: fig. 3.5).
Across this Second Intermediate Period timeframe, Levantine(-type) objects were deposited in other parts of Egypt and Nubia, though in limited numbers. Levantine amphorae were collected from occupation levels at Kom Rabiʻa and el-Lisht, burials at Tell el-Maskhuta and possibly Tell el-Sahaba, and unpublished contexts at Kom el-Khilgan (see, with references, Mourad Reference Mourad2015: 130, Reference Mourad2021: 73–6). Levantine pottery and jugs were also found in both funerary and domestic contexts at Tell Hebwa (Abd el-Maksoud Reference Abd el-Maksoud1998). Of uncertain origin are Tell el-Yahudiyah vessels or parts thereof from el-Harageh, el-Lahun, el-Lisht, Deir Rifeh, Mostagedda, Abydos, and Karnak, and Levantine-design scarabs from Mostagedda and el-Lisht (Aston and Bietak Reference Aston and Bietak2012; Ilin-Tomich Reference Ilin-Tomich2023). Sites in the Eastern Delta, such as Tell Basta, Tell Hebwa, Tell el-Yahudiyah, and others along the Wadi Tumilat, exhibit similar material cultural elements to Tell el-Dabʻa’s Fifteenth Dynasty phases, including the use and deposition of Levantine-type pottery, design scarabs, bronzes and weaponry and, in some cases, equid burials (see, with references, Mourad Reference Mourad2015: 21, 43–61, Reference Mourad2021: 73–6). These support the consolidation of an integrated network in the Eastern Delta, plausibly facilitated by the Hyksos, in Dynasty 15 (Figure 16a). Levantine(-type) objects found further west and south were likely, but not exclusively, distributed via Tell el-Dabʻa.
Sites in the Eastern Delta with published evidence of
Fifteenth Dynasty activity and
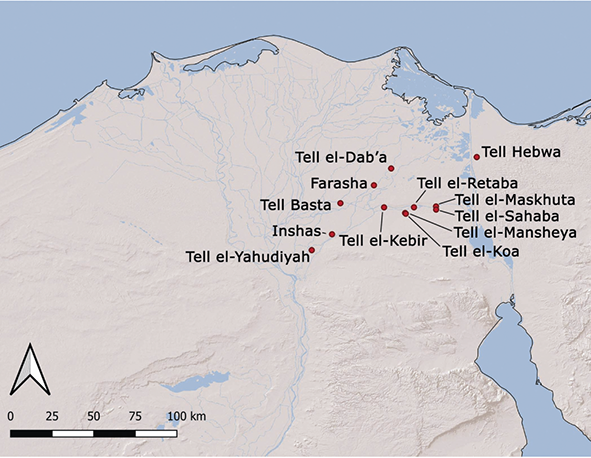
Eighteenth Dynasty activity.
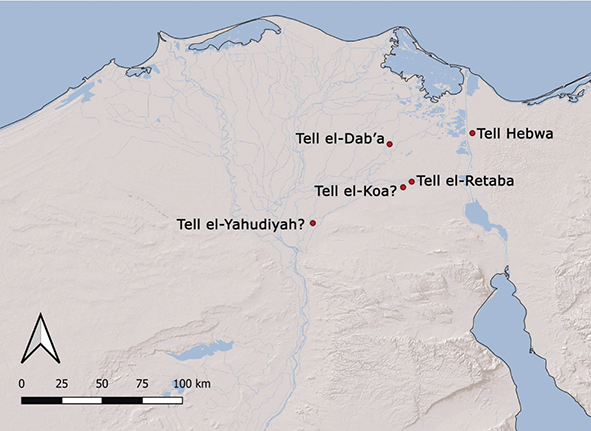
The Egyptian evidence stresses that its internal political developments did not lead to a termination of contacts with the Levant. Unlike the situation in the EB III and EB IV, some Southern and Northern Levantine settlements were flourishing across the MB II and MB III, with cities like Hazor, Gezer, Megiddo, Jbeil/Byblos, Yamkhad, Qatna, and Mari consolidating their power and control over commercial exchanges (see Genz Reference Genz and Potts2012; Harrison Reference Harrison and Potts2012). Egyptian- and Egyptian-influenced objects are more commonly attested across the regions. Objects of Second Intermediate Period date include pottery, seals, and stone vessels. Scarabs and seals inscribed with Egyptian motifs and names of Fourteenth and Fifteenth Dynasty rulers are predominantly from funerary contexts at, for instance, Tell el-ʻAjjul, Beth Shean, Tell el-Farʻah (N), Gezer, Hazor, Jericho, Tell Kabri, Lachish, Megiddo, Pella, Sidon, Tell Hizzin, and Ruweise (Ben-Tor Reference Ben-Tor2007a; Ahrens Reference Ahrens2020). Occupation levels at such sites as Tell Aphek, Tell Beit Mirsim, Tell Nami, Alalakh, Kamid el-Loz, and Ebla also produced Egyptian-type scarabs (Ben-Tor Reference Ben-Tor2007a; Ahrens Reference Ahrens2020). Stone vessels, typically cosmetic containers, were mostly found in burials with a few from domestic contexts, increasing in number from the MB I–II to MB III (Sparks Reference Sparks2007: 270–1). Examples come from burials at Megiddo, Beth Shean, Jericho, Byblos, and Ebla, and settlement contexts at Hazor (Sparks Reference Sparks2007; Mazar and Mullins Reference Mazar, Mullins, Mazar and Mullins2007: 15–6). Egyptian ceramic vessels, predominantly of Lower Egyptian fabrics, are attested in fewer secure MB II and MB III contexts. Several cooking pots, storage or transport vessels, bowls, and a Tell el-Yahudiyah fragment were found at Ashkelon, along a path connecting its MB II gate to a sanctuary, as well as the MB III rampart atop it (Stager and Voss Reference Stager, Voss, Stager, Schloen and Voss2018b). Additional imported Tell el-Yahudiyah vessels were found in burials at Ashkelon (Stager and Voss Reference Stager, Voss, Aston and Bietak2012: 570–2) and an MB II context at Beth Shean (Maeir and Mullins Reference Maeir, Mullins, Aston and Bietak2012: 585). Storage or transport vessels were collected from funerary and cultic contexts at Sidon and Byblos (Doumet-Serhal and Boschloos Reference Doumet-Serhal, Boschloos, Bietak and Prell2021), and occupation loci at Tell ʻArqa (Charaf Reference Charaf and Maila-Afeiche2009: 295–7). A few high-value items were found at Beth Shean and Byblos (Montet Reference Montet1928; Mazar and Mullins Reference Mazar, Mullins, Mazar and Mullins2007: 15–6; Kopetzky Reference Kopetzky2018).
The prestige finds, however, may not be exports of Second Intermediate Period Egypt. Several Egyptian objects in MB II and MB III contexts, and unsecure or later LBA contexts, exhibit earlier Middle Kingdom styles. These include Egyptian statues at Tell el-ʻAjjul, Gezer, Megiddo, Tell Hizzin, and Ras Shamra (Ahrens Reference Ahrens2020). The discrepancy between style and date of deposition suggests that the objects were exported to the Levant at an earlier point and deposited at a later date, perhaps as heirlooms, and/or exported in the MB II or later, possibly as looted objects, to be gifted or traded to Levantines (Ahrens and Kopetzky Reference Ahrens, Kopetzky, Bietak and Prell2021).
Further complicating attempts to trace contemporaneous exchanges between MB II and MB III Levant and Egypt are objects that showcase forms and motifs inspired by different cultural repertoires. Many stone vessels, scarabs, and seals are of uncertain origin. Such Egyptian objects were already exchanged across MB I to MB II Levant (Section 2.3.1–2), and were likely highly desired particularly for use in elite and funerary contexts. Their sustained demand was plausibly satisfied by Levantine workshops that were already making similar products in the MB I. Production flourished in the second half of the MBA. Some scarab designs are influenced or inspired by Egyptian motifs, and some represent Levantine styles (Ben-Tor Reference Ben-Tor2007a). Found in occupation deposits and predominantly from burials, Levantine-design scarabs likely had an amuletic and funerary function, becoming more common in Southern Levantine burials than Egyptian scarabs and seals (Ben-Tor Reference Ben-Tor2007a). Egyptian-style pottery of local fabrics are also attested in burials as at Tell Fadʻous-Kfarʻabida and Sidon (Doumet-Serhal and Boschloos Reference Doumet-Serhal, Boschloos, Bietak and Prell2021; Ahrens Reference Ahrens2020). Elsewhere in the Northern Levant, monumental complexes at Ebla, Tell Burak and Tell Sakka incorporated Egyptian-inspired motifs (Figure 26), with the local use of the hieroglyphic script also documented at Byblos (Section 3.4; Mourad Reference Mourad2015: 164–85).
Therefore, the evidence from the Levant, like that in Egypt, points to exchanges and their resulting influences on culture and society. Maritime trade persisted into the second half of the MBA or the Second Intermediate Period, including its Hyksos Dynasty. The wider distribution of Egyptian objects in the Levant correlates with the more intensive settlement of the Southern Levant, and more frequent use of routes connecting sites along the coast with those further inland and vice versa. The circulation of locally made Egyptian-type stone vessels and seals would have also facilitated wider Levantine encounters with originally Egyptian designs. Some have suggested that the quantity and distribution of Egyptian and Egyptian-influenced objects points to the Southern Levantine origins of the Hyksos (Weinstein Reference Weinstein1981; Ben-Tor Reference Ben-Tor2007a: 190–2). However, the material cultures between Tell el-Dabʻa and Southern Levantine sites differ. Encounters with Egyptian cultural elements in the Northern Levant were maintained, and are of a slightly different nature from those in the Southern Levant. Combined, the evidence suggests commercial and diplomatic relations, rather than Fourteenth or Fifteenth Dynasty domination over the Levant.
Tell el-Dabʻa’s role in Egyptian–Levantine relations was acknowledged by its competing dynasty in the south. Theban King Kamose records, in his Second Stela at the temple of Karnak, his attack against Avaris; he desired to ‘save Egypt and smite the Aam-people’ whose ruler Ipepi (i.e. Apophis) had taxed the Thebans (Second Stela of Kamose, lines 4–5). Little archaeological evidence for the attacks of Kamose and his successor, Ahmose, has thus far been found at Avaris. However, sites in the Eastern Delta, especially Tell el-Dabʻa, experienced a noticeable reduction in population density and occupation at the end of Dynasty 15 (Mourad Reference Mourad2021: 63–83; Figure 16b). Perhaps, their inhabitants were forcibly or willingly moved elsewhere.
2.4 LB I and Early Dynasty 18 up to Thutmose III’s Reign
The Theban takeover of the Hyksos Dynasty was related to militaristic and operational developments that became instrumental for Dynasty 18’s military strength. It contributed to an emerging royal and state ideology of Theban expansionism that shaped New Kingdom relations with the Levant. The Kamose Stela exemplifies this ideology, drawing on the representation of the northeasterner as ‘wicked’ of heart, ‘miserable’, and ‘weak’, the Aam-people in Egypt overrunning the land (Second Stela of Kamose, lines 4, 11, 16, 18). This continually develops into Dynasty 18. The smiting scene is once again utilised, the earliest attested on an axe from Queen Ahhotep’s burial (Morris Reference Morris, Miniaci and Lacovara2022). The axe also represents a griffin carved in Eastern Mediterranean style, incorporating motifs of power of diverse origin. Possibly depicting a battle against the Hyksos and their allies are fragments from Ahmose’s funerary temple at Abydos (Harvey Reference Harvey1998: figs. 76–7, 80). Northeasterners are shown with beards, shaved heads, and, in one case, a fringed long-sleeved garment, the first of its type recorded in Egyptian art. If reconstructed correctly, the scene is the first to depict the king’s active involvement as a warrior in battle, aiming his bow from a horse-drawn chariot (Section 3.4).
Multiyear campaigns against the Hyksos continue with multiyear campaigns against Levantine rulers. Two early Eighteenth Dynasty biographies recount officials’ involvement in battles, both from their tombs at el-Kab. The biography of Ahmose-si-Ibana follows the captain’s achievements serving Kings Ahmose, Amenhotep I, and Thutmose I (Sethe Reference Sethe1927: 3–9). He was rewarded the Gold of Honour (Section 3.4) for his role in slaying the Mentjy-group of Setjet during Ahmose’s attacks on Hyksos-allied regions and on Sharuhen (Šȝrȝḥȝn), postulated to be Tell el-ʻAjjul (see Bietak Reference Bietak1996: 60–3). He also joined Thutmose I on his campaign to Retjenu, reaching Naharin (Nhrynȝ). The biography of the chief commander of the infantry Ahmose-Pennekhbet narrates his duties in the armies of Ahmose to Thutmose III (Sethe Reference Sethe1927: 35–6). He joined Ahmose’s campaign to the Levantine Djahy (Ḏȝhy), Thutmose I’s to Naharin, and Thutmose II’s against Shasu-individuals (Šȝsw) of either the Sinai or the Levant. The biographies mirror Sixth and Twelfth Dynasty representations of attacks against northeastern entities. Regions were reached, attacked, and then looted, with or without mention of captives and rewards. Further interference via, for instance, the instalment of Egyptian garrisons is not mentioned.
The reasons for royal interest in the Levant are multifaceted. The textual evidence notes Ahmose unleashing his ‘war cries’ in the lands of the Fenkhu-people (Sethe Reference Sethe1927: 18). Thutmose I vented ‘his wrath’ throughout the foreign lands, attacking his enemies at Naharin (Sethe Reference Sethe1927: 9). Another fragmentary text from Queen Hatshepsut’s funerary temple evidently records Thutmose I partaking in an activity enjoyed by the Northern Levantine elite: elephant hunting (Sethe Reference Sethe1927: 104; Pfälzner Reference Pfälzner, Aruz, Graff and Rakic2013). Fragmentary early Eighteenth Dynasty texts mentioning Qedem and Mitanni (Mtiny) also signal interest in the Northern Levant (Helck Reference Helck1983: 110 [125]; Redford Reference Redford1979; Spalinger Reference Spalinger2005). Others record early Eighteenth Dynasty pharaohs commissioning temple furnishings of imported materials, including silver, lapis lazuli, Setjet-copper, and coniferous-wood from Tep-Khetyu (Tp-Ḫtyw) and/or Khenty-she, signalling at continued interests in commodities accessed via the Levant and for Egyptian cultic practices (Mourad Reference Mourad2021: 99–104). Such evidence suggests that early Eighteenth Dynasty relations with the Levant were partially geared towards exhibiting the new political leadership of Egypt, and to reciprocally gather information on the Levantine socio-political landscape.
This was likely transforming from the latter half of the MB III to LB I. In the northwest of the Northern Levant, hubs like Aleppo, Alalakh and Ebla were destroyed, possibly by Hittite rulers and Pizikarra of Nineveh, while the Mitannian Kingdom was consolidated (Bonacossi Reference Bonacossi, Steiner and Killebrew2013). This did not greatly impact the material culture, which continued to gradually transition into the LBA. In the south, some settlements were destroyed or abandoned, thereafter resettled with a few continuing in occupation (see Koch Reference Koch, Maeir, Shai and McKinny2019). Although the Egyptian campaigns were believed to have caused these settlement shifts in the Southern Levant, issues in chronological synchronisations and limited evidence hinder such conclusions (Höflmayer Reference Höflmayer, Eder and Pruzsinszky2015).
The archaeological evidence for Egyptian–Levantine connectivities prior to Thutmose III’s reign is scarce. Ahrens (Reference Ahrens2020: 283) lists four early Eighteenth Dynasty objects from the Northern Levant, namely a stone vessel and scarab from tombs at Qatna dating from the MB II to LB II, and a bowl from Alalakh of uncertain context. Koch (Reference Koch, Maeir, Shai and McKinny2019: 267) counts thirty-five imports from LB I contexts in the Southern Levant, thirty of which are from tombs at Tell el-ʻAjjul, four from Megiddo and one from Taanach. In Egypt, few sites in the Eastern Delta accessed the Eastern Mediterranean: Tell Hebwa, with apparently the densest occupation in the region, produced Cypriot vessels (Level 4a; Abd el-Maksoud Reference Abd el-Maksoud1998); and Tell el-Dabʻa’s ʻEzbet Helmi yielded a few Levantine and Cypriot imports, the former possibly residual from earlier phases (Fuscaldo Reference Fuscaldo2010: 31, 34, 83–6; Hein Reference Hein, Forstner-Müller and Moeller2018). Beyond the Delta, northeastern imports were found in mostly funerary contexts and a few in settlement levels. Examples include Red Lustrous Wheelmade Ware from Gurob and Kom Rabiʻa (Eriksson Reference Eriksson1993), and Black Lustrous Ware from Saqqara, Deir el-Bersha, el-Harageh, and Qau (Bourriau et al. Reference Bourriau, De Meyer, Op de Beeck and Vereecken2005; Hörburger Reference Hörburger and Hein2007; Kawai Reference Kawai, Kawai and Davies2022). Although these types of wares are respectively Anatolian and Cypriot in origin, analyses have suggested workshops across the Eastern Mediterranean (e.g. Yannai and Gorzalczany Reference Yannai, Gorzalczany and Hein2007; Kibaroğlu et al. Reference Kibaroğlu, Kozal, Klügel, Hartmann and Monien2019, Reference Kibaroğlu, Kozal and Crewe2025). Also of uncertain origin are glass objects, their earliest attestations occurring in late Second Intermediate Period to early Eighteenth Dynasty contexts, as at ʻEzbet Helmi, Draʻ Abu el-Nagaʻ, Saqqara, Qau and Ballas (Lilyquist Reference Lilyquist1993; Kawai Reference Kawai, Kawai and Davies2022). Most are small items, such as beads and jewellery inlays, deposited with other precious and non-Egyptian objects.
Thus, by Thutmose III’s reign, the Egyptians had consolidated power and stability, and strengthened their royal and state ideology of territorial expansionism. However, they had limited access to Levantine commodities. The Eastern Mediterranean socio-political landscape was shifting, with city-states similarly consolidating and exerting their power across various territories in the Levant. Accordingly, the Egyptian administration may have shifted its foreign policies either to take advantage of the political situation in the Levant (Ahrens Reference Ahrens2020), and/or to safeguard Egypt’s political, diplomatic, and commercial interests. In Thutmose III’s reign, it seems that a coalition of Levantine rulers had gathered at Megiddo, perhaps in opposition to the Egyptian forays; the pharaoh launched his campaign from Tjaru ‘to extend the boundaries of Egypt’, and solidify Egyptian presence and authority in the Levant (Sethe 1907: 647–8; Redford Reference Redford2003: 8, 13). The remains at Tjaru, identified with Tell Hebwa, support continued occupation across the Fifteenth to early Eighteenth Dynasties, with its settlement enlarged and fortified around the reign of Thutmose III (Abd el-Maksoud Reference Abd el-Maksoud1998: 36–8). Tell Hebwa and nearby tombs yielded Egyptian, Cypriot, Levantine-type, and Levantine ceramics in these phases (Levels 4a–3; Abd el-Maksoud Reference Abd el-Maksoud1998; Aston Reference Aston, Gruber, Aḥituv, Lehmann and Talshir2012). At ʻEzbet Helmi, a palatial precinct was constructed around the reign of Thutmose III, producing many Cypriot, and a few Levantine, pottery; the precinct is otherwise well-known for its wall painting fragments of Aegean, especially Minoan, style (see, most recently, Hein Reference Hein, Forstner-Müller and Moeller2018, Reference Hein, Driessen and Fantuzzi2024; Becker Reference Becker2024; Bietak Reference Bietak, Marinatos, Blakolmer and Platon2025). Settlements along the Wadi Tumilat also experienced reintensification, with at least Tell el-Retaba receiving Cypriot juglets and a Levantine amphora (Rzepka et al. Reference Rzepka, Hudec and Jarmużek2015: 166; Wodzińska Reference Wodzińska2012). The importance of these Deltaic communities for Eastern Mediterranean connectivities was thus likely recognised by the new administration, who may have revitalised settlements to facilitate interactions.
The multiyear campaigns of Thutmose III established Egyptian control over parts of the Southern Levant, and, at the least, interference in Northern Levantine political structures (Redford Reference Redford2003). Subsequently, the nature of interactions became more varied than previously attested, featuring the construction of fortresses and garrisons in the Levant, lengthy battles and sieges, and more intensive commercial and diplomatic contacts (see Helck Reference Helck1971: 119–56; Spalinger Reference Spalinger1978; Redford Reference Redford2003; Morris Reference Morris2005). Materials exchanged between Egypt and the Levant from contexts dating to Thutmose III’s reign onwards grew in number and range (Koch Reference Koch, Maeir, Shai and McKinny2019; Ahrens Reference Ahrens2020). This coincides with increasing representations of northeasterners and individuals with Semitic-sounding names in Egypt, either as visitors or perhaps as residents (see Schneider Reference Schneider1992; Anthony Reference Anthony2017; Figure 17). Egypt’s role in the supra-regional network had now shifted as its political interference extended to political control and annexation of Levantine territory. By mid-Dynasty 18, the intensified interactions reflect markers of globalisation (Section 1.3), the process nevertheless reliant on earlier networks and negotiations.
A scene showing the arrival of foreigners bearing gifts. West wall, Tomb of Menkheperraseneb (TT 86), Sheikh ˁabd el-Qurna, reign of Thutmose III to Amenhotep II, Dynasty 18. After N. de G. Davies 1933: pls. 4–5.
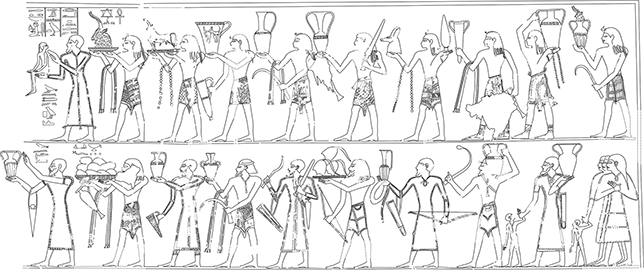
3 Sustaining Negotiations
This section summarises the means of connectivity between Egypt and the Levant. These include (1) spaces significant for cross-border activities; (2) technological means supporting long-distance connectivities; (3) social networks, involving specialised individuals and communities; and (4) communication, whether written or visual. The section evaluates how these components contributed to socio-cultural transformations, discussing religious and ideological shifts, identity negotiations, and cultural changes.
3.1 Spaces and Infrastructure
Different physical spaces facilitated connectivities across the examined period. These include palatial or administrative structures, cultic spaces, industry/activity-specific spaces, and domestic spaces. They are commonly situated at hubs that provided access to strategic routes, both land-based (e.g. Beni Hassan’s Oryx province, Tell el-ʻAjjul, or Ebla) and maritime-based (e.g. Tell el-Dabʻa, Ashkelon, or Jbeil/Byblos). They could also occur at resource-rich locales that attracted multiple groups, such as Serabit el-Khadim. The vectors connecting these hubs could additionally be considered as spaces of exchange, particularly when frequented continuously and consistently.
Palatial and administrative structures received dignitaries and agents engaged in cross-border activities, commodities, gifts, and possibly captives. They include almost every Egyptian royal court of the examined period (Section 2), such as the Old Kingdom residence at Memphis which would have received the goods represented in the funerary temple reliefs of Sahura and the biography of Iny; the Heracleopolitan residence of the House of Khety, which was supplied with imported commodities as per the Qubbet el-Hawa text; the Middle Kingdom residence at Itjtawy, as attested in the Daybook of Amenemhat II; the Second Intermediate Period palatial structures of Tell el-Dabʻa’s Area F/II; and the Eighteenth Dynasty palatial complex at ʻEzbet Helmi. Levantine royal courts also accessed Egyptian elements, though the evidence is more meagre compared with that on Egyptian palaces. It includes EB IV palatial contexts at Byblos and Ebla that yielded stone vessels or fragments with the names of Egyptian pharaohs, and an MB I Gublite/Byblite palace that received Khnumhotep III as attested in his biography. To these may be added palatial complexes bearing Egyptian-inspired elements in the Levant, such as the EB IIIB palace(?) at Tel Yarmuth that was possibly constructed with the use of the cubit (de Miroschedji Reference de Miroschedji and Wolff2001: 836), the late MB I to MB II palace at Tell Sakka with Egyptian-inspired elements in its wall paintings, and the MB palace at Ebla with its Egyptian-inspired seals and furniture inlays (Ahrens Reference Ahrens2020).
Agents of exchange also accessed administrative or mayoral complexes. At least one instance is known from the EBA Levant, with a stone vessel fragment retrieved from a possibly administrative structure at EB III Tell Fadʻous-Kfarʻabida (Genz and Ahrens Reference Genz and Ahrens2023). In the MBA, the administrative complexes at MB I Tell Ifshar produced Egyptian ceramics (Section 2.3.1–2). More examples are found from Egypt. For instance, Levantine dignitaries were travelling to at least the Oryx district, where the group of Aam-individuals depicted in Khnumhotep II’s tomb were possibly welcomed at its mayoral complex. Tell el-Dabʻa also hosted at least two administrative spaces with access to Levantine elements. The late Twelfth to early Thirteenth Dynasty complex at Area F/I produced, for instance, a possibly locally made cylinder seal that depicts a coastal Levantine storm god (Porada Reference Porada1984; Figure 18). Also likely locally made are sealings from a Fifteenth Dynasty complex at Area R/III that portray a nude female (Forstner-Müller et al. Reference Forstner-Müller, Hassler, Matić and Rose2015; Reali Reference Reali2017; Figure 19a–b). The motif may have been inspired by representations of the nude female on Near Eastern seals, with similar seals collected from Fifteenth and early Eighteenth Dynasty contexts in the Eastern Delta (Figure 19c–d); it also bears similarities with the feminine form of the so-called Bes image that occurs from the Middle Kingdom onwards (Mourad 2021: 183–97). Apart from the exchanged goods and gifts, or the reception of individuals involved in commerce or diplomacy, such spaces would have furthered means of diplomatic and commercial communication, and evidently the transmission of iconography (Section 3.4).
Depiction on cylinder seal TD 2995 from Area F/I. Early Dynasty 13, Tell el-Dabʻa.
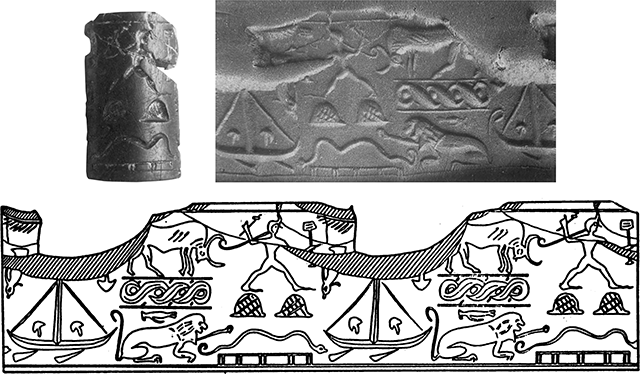
Depictions on seals from the Eastern Delta showing the nude female.
TD 9453J, Area R/III, Dynasty 15, Tell el-Dabˁa;
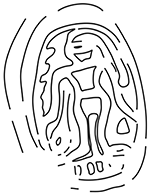
TD 9452H, Area R/III, Dynasty 15, Tell el-Dabˁa;
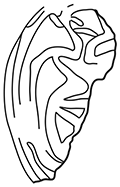
Nr. 676, Dynasty 15, Tell el-Retaba;
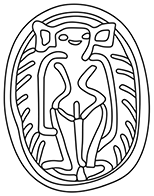
MAN_19, Dynasty 15, Tell el-Mansheya.
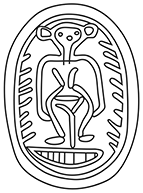
Spaces for ritualistic activities offered another suitable setting for the transmission of knowledge on religion, cult, and associated cultural elements. Cultural encounters at such spaces are inferred via their access to exchanged commodities, architectural elements, remains of ritualistic activities, and texts. Examples for the third millennium BCE include the EB III Sanctuary at ʻAi from where Early Dynastic and early Old Kingdom stone vessels were recovered, and the EBA Temple of Baalat Jbeil at Byblos, where stone vessel fragments were also collected (Sowada Reference Sowada2009: 111–6, table 6). Egyptian-type bifacial flint knives found across Byblos, especially at its Baalat Temple, the L-shaped Temple and the sacred precinct, suggest their use in ritual butchering (Badreshany et al. Reference Badreshany, Sowada and Ownby2022). Objects from unclear contexts of the Baalat Temple may also be of the Old Kingdom (Espinel Reference Espinel2002). The temple further yielded the Montet Jar of likely EB IV/MB I date, with contents bearing Egyptian, Mesopotamian and Levantine traits (Tufnell and Ward Reference Tufnell and Ward1966). In the early second millennium BCE, the site’s Temple of Obelisks was used for deposits with Egyptian and Egyptian-inspired objects, including seals, and figurines of humans, deities, and animals (Dunand Reference Dunand1954: pls. 90–141). The temple’s name reflects the twenty-six obelisks standing in its sanctuary (Figure 20), one of which is inscribed with a hieroglyphic inscription naming the ‘foremost’ (ḥȝty-ˁȝ) of Jbeil/Byblos, Ibshemu, beloved of Horshefra, and his sealbearer Kukun (Dunand Reference Dunand1954: pl. 32 [2]). Another relief fragment from the temple mentions a pharaoh, possibly Neferhotep, giving praise to the god Ra, alongside the ‘foremost’ of Jbeil/Byblos, Inten (Dunand Reference Dunand1937: pl. 30 [3065]). The two inscriptions not only point to the local use of the hieroglyphic script, but also the possibility that the Egyptian royal court was using this space for dedications to Ra, possibly associated with Horshefra. Elsewhere in the Levant, a cultic context at MB II Sidon produced a scarab inscribed in hieroglyphs with the name of Djdkaraa, lord of a Levantine locale named Iay (Iȝy), who was beloved of a deity represented with a Seth-animal (Level 6; Doumet-Serhal and Boschloos Reference Doumet-Serhal, Boschloos, Bietak and Prell2021: fig. 10; Figure 21). At MB II Ashkelon, the so-called Sanctuary of the Silver Calf and a path leading to it produced Egyptian ceramics (Stager and Voss Reference Stager, Voss, Stager, Schloen and Voss2018b). The Egyptian objects, as with those found in other cultic contexts in the Levant, may have been deposited by Levantine or Egyptian agents of exchange.
The MBA Temple of Obelisks, Byblos.
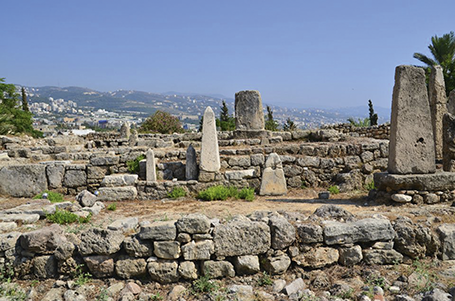
Scarab from Sidon, Level 6, MB II.
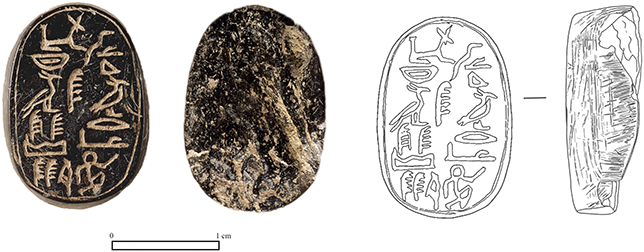
From Egypt, representations of the subjugation of northeasterners, among other foreigners, were typically commissioned by Egyptian rulers in sacred and liminal spaces. These include funerary complexes and temples like those for Hathor and Montu, as well as expeditionary inscriptions at, for instance, Wadi Maghareh and Serabit el-Khadim. They emphasise the Egyptian ruler’s duty to protect Egypt from such forces. Barring such ideological representations, evidence for encounters with Levantine elements at sacred spaces occur mostly from the Middle Kingdom onwards. An Old Kingdom temple at Tell Ibrahim Awad in the northeastern Delta has been suggested to bear Levantine architectural elements (Bietak Reference Bietak, Hawass, der Manuelian and Hussein2010b), though no other evidence for Levantine-Egyptian encounters in the area has thus far been found. In the Middle Kingdom, the Daybook of Amenemhat II mentions imported commodities donated to temples, whereas the Tod Treasure at the Temple of Montu features such commodities. Papyri from el-Lahun list Aam-singers and -dancers performing at festivals and involved in cultic activities, likely of the nearby funerary temple of Senwosret II (Mourad Reference Mourad2015: 70–1). Although difficult to confirm, representations of northeasterners in Egyptian tomb chapels, such as those at Beni Hassan, may have also been observed by visitors presenting offerings to tomb owners. In the Second Intermediate Period, the sacred precinct at Tell el-Dabʻa retains significant evidence for the construction of temples in both Egyptian- and Levantine-style, as well as ritualistic and funerary activities of diverse origin (see Bietak Reference Bietak, Bietak and Prell2019, Reference Bietak, Bietak and Prell2021b; Forstner-Müller Reference 89Müller2008; Figure 15). The combined evidence at the precinct and elsewhere strongly suggests that it was used for the worship of deities originally of Egyptian and Levantine origin, perhaps including one or more male deities like the storm god, and one or more female deities like Hathor (Bietak Reference Bietak, Bietak and Prell2019, Reference Bietak, Bietak and Prell2021b; Mourad Reference Mourad2021). From its conception to realisation and use, the sacred precinct would have necessitated knowledge in architectural, cultural, and ritualistic elements of Egyptian and Levantine origin. Other temples at the site likely featured similar ritualistic activities. Their continuation into the New Kingdom is confirmed by an offering pit of early Eighteenth Dynasty date at the site’s Area R/I temple (Müller Reference 89Müller2008: 279, n. 524).
The Egyptian and proto-alphabetic texts at Serabit el-Khadim’s Temple of Hathor further stress cross-cultural interactions at cultic spaces. They signify that individuals of diverse origins used its temple and mines for their activities (Section 3.3; Figure 22). Indeed, Inscription Nr. 345, a sphinx from the Hathor Temple, preserves a hieroglyphic dedication of the ‘beloved of Hathor, lady of the Turquoise Terraces’ and a proto-alphabetic text ‘for Baalat’ (Černý Reference Černý1955: 202; Goldwasser Reference Goldwasser2006: 135; Figure 25). Likely inscribed by the same bilingual person, the dedications suggest that Hathor was identified with the goddess Baalat (Mourad Reference Mourad2015: 140–1). Their inscription on a sphinx, as with other texts found at the site on Egyptian-style statuettes and a stela, point to Semitic-speaking individuals knowledgeable in Egyptian culture (Section 2.3.2).
Serabit el-Khadim.
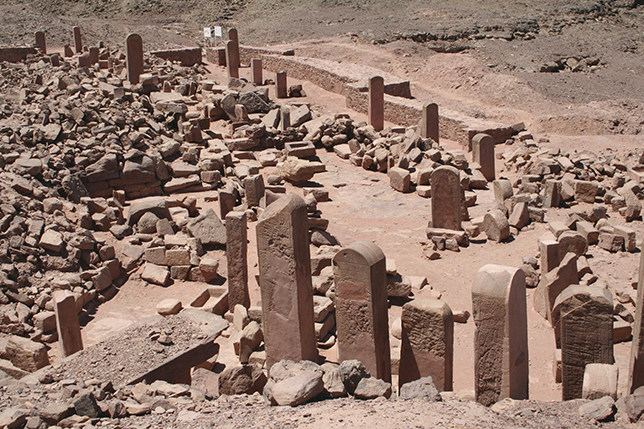
The evidence from sacred spaces covers both cultural encounters with entities of diverse origin and the manifestations of resulting transformations. These provide pertinent contextual information on transregional processes of religious transformation. Those of the EB III to EB IV suggest prestigious items of exchange being deposited at, for instance, Byblos and ʻAi. Those of the MBA suggest the continuation of such depositions, as well as the use of multiple scripts in dedications to deities, especially those linked to a storm god, and Baalat/Hathor. At Sidon, the Seth-animal classifier was used to identify the patron deity of a Levantine locale, whereas at Tell el-Dabʻa, motifs associated with the Levantine storm god are attested on seals (Mourad Reference Mourad2021: 115–74; Figure 18). At Serabit el-Khadim, both hieroglyphic and proto-alphabetic scripts are used for dedications to Hathor, identified as Baalat. This syncretisation of Hathor and Baalat is clearly attested from the early second millennium BCE, the process likely initiating earlier in the third millennium BCE with encounters at and beyond Byblos’s Baalat Temple (Espinel Reference Espinel2002; Colonna Reference Colonna2018: table 1). Indeed, Coffin Text Utterance 61, as found on two coffins from early Twelfth Dynasty Deir el-Bersha, is the earliest attestation of Hathor with the epithet of ‘lady of Jbeil/Byblos’, mentioning that she makes the steering-oar of the barque (De Buck Reference Buck de1935: I.262 [B4 C.55]), perhaps associating her either with its timber or navigation. The epithet is later used in several texts either in association with counts of Jbeil/Byblos, officials in favour of the goddess, or for individuals in Egypt with the name Nebet-Keben(y) (Nbt-Kbn[y] ‘lady of Jbeil/Byblos’) (Mourad Reference Mourad2021: 184–6). Two other male deities may have been worshipped by both Egyptians and Gublites/Byblites. The texts at the Temple of Obelisks, marked by solar symbols, honour Ra and Horshefra, perhaps a solar deity. The script was also used at the Temple of Baalat during or before the MBA on a locally made cylinder seal to represent a local deity’s name, Khai-taw, and Baalat, identified by the classifier for Hathor (Colonna Reference Colonna2018). Khai-taw is otherwise mentioned in the Pyramid Texts of Kings Wenis, Teti, and Pepy I in three instances. Two are in the so-called ‘Serpent Spells’ (Section 3.4) and the third, Pyramid Text Utterance 322, is written amid spells for ascending to Nut, specifying that Khai-taw dwells in Negaw (Ngȝw) (Sethe Reference Sethe1908: 322 [518]). The toponym is next attested in Dynasty 12, in association with coniferous-wood used for the door of Khnumhotep II’s tomb (Kanawati and Evans Reference Kanawati and Evans2014: pl. 13b [114]), signalling a likely Northern Levantine location. The contexts of both the seal and the Pyramid Texts point to their cultic function, with the latter also associated with funerary beliefs. Such transformations are clearly the result of consistent and sustained cultural encounters and interactions from the EBA to the MBA. While interactions at sacred spaces are not the only processes that contributed to these developments, they feasibly facilitated the transmission of knowledge on deities of different social groups. They would have promoted their shared worship and shared ritualistic activities, the identification of commonalities between them, the dedication of offerings in bilingual texts and perhaps oral prayers, and eventually the transculturalisation or syncretisation of deities.
The Serabit el-Khadim inscriptions point to another physical space that furthered exchanges, with its mines bringing together individuals with a shared goal. Such industry-specific spaces allow individuals of different groups and status to work together, often using divergent or similar methods that, over time, could converge or lead to adaptations, innovations, or inspirations, and the formation of transregional communities of practice (Section 1.3). Activities at Serabit el-Khadim, for instance, were sponsored by the Egyptian state, and possibly the rulers of Retjenu, to ensure the extraction of resources. These contributed to multiyear negotiations between Egyptian officials and expedition members, and Retjenu-individuals (Section 2.3.2). Other industry-specific spaces are workshops. For instance, the Twelfth to Thirteenth Dynasty complex at Area F/I, Tell el-Dabʻa, likely featured a metalworking workshop wherein limestone moulds for Egyptian- and Levantine-type metal objects were found (Philip Reference Philip2006: 171–84, 204). These indicate that one or more metalworkers were familiar with producing bronzeworks of diverse cultural origin and likely differing metalworking techniques, possibly contributing to the observed use of Levantine-type bronzes at the site and broader technological transformations in Egypt (Mourad Reference Mourad2021: 220–9). Other locally made objects bearing both Egyptian and Levantine aspects, such as pottery or scarabs, were likely produced in similar settings. The use of a shared space by craftspeople of Levantine origin in Egypt is more specifically delineated in Papyrus Brooklyn 35.1446 of the mid-Thirteenth Dynasty reign of Sobekhotep III (Hayes Reference Hayes1972). It preserves a list of individuals, the majority labelled as Aam or with a Semitic name. Several of the women are involved in textile-work, most likely in an Upper Egyptian, perhaps Theban, household.
Harbours and routes could also be approached as activity-specific spaces that catered groups involved in sea- or land-based travel. The provision of related infrastructure is usually supported by community or expedition leaders. The Sixth Dynasty biography of Iny suggests that Ra-hat may have had a harbour, possibly in the Nile Delta, for maritime travel to Jbeil/Byblos (Marcolin and Espinel Reference Marcolin, Espinel, Bárta, Coppens and Krejãí2011: 602). In the Twelfth Dynasty, a stela from Area R/I at Tell el-Dabʻa offers a name for its settlement as the Hewet-Amenemhat-maa-net-ra-waty (Ḥwt-Imn-m-ḥȝt-mȝˁ-nt-rȝ-wȝty) ‘District-of-Amenemhat-justified-of-the-beginning-of-the-two-roads’ (Czerny Reference Czerny2015: fig. 11B [c]). By the Thirteenth Dynasty, Tell el-Dabʻa was known as Hewet-wart (Ḥwt-wˁrt) ‘Administrative-centre-of-the-district’, later garbled to the Greek Avaris (Czerny Reference Czerny2015: 385 [Nr. 8929]). The first name highlights the site’s strategic access to routes, and the second its heightened administrative significance. Tell el-Dabʻa likely featured at least one harbour, almost in the centre of the town, providing access to the Eastern Mediterranean by Dynasty 13 (Bietak Reference Bietak, Erskine, Hollander and Papaconstantinou2023b; Forstner-Müller et al. Reference Forstner-Müller, Hassler, Matić and Rose2015; Figure 11). Additional mooring places were located across its landscape (Herbich and Forstner-Müller Reference Herbich and Forstner-Müller2013). Its central harbour continued to be used in the Ramesside Period, with several arguing for the site’s identification with the Eighteenth Dynasty harbour-town of Perunefer (see Bietak Reference Bietak, Erskine, Hollander and Papaconstantinou2023b).
The northeastern Delta further featured land-based departure/entry points to the Sinai and the Levant, including Wadi Tumilat and Tjaru/Tell Hebwa. The latter was likely part of the Ways of Horus route and fortification system mentioned from Dynasty 5 onwards (Morris Reference Morris2005: 46–50). The Walls of the Ruler enclosure(s) are noted in Dynasty 12, most notably in the Tale of Sinuhe. Accordingly, the Ways and Walls controlled the movements of people and goods across land-based routes linking Africa with Asia. Further south, a route linking Thebes with Hou, Abydos and the Western Desert oases may have been frequented by individuals of Egyptian and Levantine origin, with Wadi el-Hol producing late Middle Kingdom Egyptian and proto-alphabetic texts (Darnell et al. Reference Darnell, Dobbs-Allsopp, Lundberg, McCarter, Zuckerman and Manassa2005). Sites along the Levantine coast with possible harbours encountered Egyptian elements, especially Ashkelon, Tell Ifshar, Sidon, and Jbeil/Byblos. The latter’s harbour is mentioned in the biography of Khnumhotep III, with Egyptian officials receiving permission to dock from Maki, the Gublite/Byblite king. These harbours have been associated with the so-called ‘Byblos-run’, allowing ships to dock as they travelled along the Levantine coast.
3.2 Traversing Long Distances
Successful travel over long distances necessitated knowledge of routes, and logistical and technological demands. For travel over the Eastern Desert and Sinai, knowledge of water resources and landmarks would have been needed and were best accessed via mobile groups and (semi)-nomadic populations that regularly traversed the region. The domestication of donkeys by the fifth millennium BCE facilitated such travel, allowing for the movement of larger numbers of people and greater loads of goods. The importance of donkeys in long-distance travel is evident in Egypt from the Early Dynastic Period (Vandenbeusch Reference Vandenbeusch2020: 39–40). Its use is confirmed by the donkeys raised in the Nile Valley but buried at EB III Tell el-Safi (Section 2.1.3). Studies on Old to Middle Kingdom representations of donkeys show an increase in attestations from around early Dynasty 5, suggesting the animal’s greater importance for elite tomb owners (Lashien Reference Lashien2020). This has been interpreted to partially align with the introduction of desert way-stations for donkey caravans, and an increased use of the animal for long-distance transport (Burn Reference Burn2021: 90). Egyptians are rarely represented directly on donkeys (Köpp-Junk Reference Köpp-Junk2015: 109–11, 165). Contrarily, elite, royal, and divine individuals in Western Asia are portrayed on the animal (Way Reference Way2011). The custom is mirrored in the depictions of Aam-children in Khnumhotep II’s tomb and the Retjenu donkey-rider at Serabit el-Khadim (Figures 9, 12). It contributed to the donkey’s importance for the elites and their rituals, and perhaps to the horse’s value. The latter, known in Western Asia from the fourth millennium BCE, required more resources to breed, train and harness, and was thus a highly valued animal, but not the most effective for long-haul travel in the EBA and MBA (Moorey Reference Moorey1986). Its prestigious value was recognised in Egypt, with the first securely identified published horse found at Fifteenth Dynasty Tell el-Dabʻa, the almost complete skeleton buried at Area F/II’s palatial complex (Bietak et al. Reference Bietak, Math, Müller and Jurman2012/Reference Bietak, Math, Müller and Jurman2013). The horse’s attachment to the chariot, also a prestige vehicle, was mostly used ‘over restricted distances in suitable terrain’ in MBA Western Asia, but it is not clearly attested in Egyptian material culture until Dynasty 18 (Moorey Reference Moorey1986: 205; Section 3.4).
The Mediterranean Sea was navigated by at least the late fifth millennium BCE, ensuring quicker travel between the Levantine coast and Egypt. This required seafaring ships, the expertise to construct and sail them, and navigation capabilities. The Palermo Stone records the earliest reference to seagoing ships and their construction from coniferous woods for Snefru whereas the use of such woods is supported by the Lebanese cedar of Old and Middle Kingdom ship parts (Sections 2.1.1, 2.1.3). One term that the Egyptians used for these ships is Kebenty (Kbnty) or Gublite/Byblite-ship. This may refer to their initial construction at the city, the Byblos-run, or the source of their timber(s) (Sowada Reference Sowada2009: 8–9). The term could also indicate their initial encounter at Jbeil/Byblos or via its intermediaries. Northeasterners are otherwise portrayed arriving on seagoing ships in the funerary temples of Kings Sahura and Wenis (Figure 4; Section 2.1.1), while the seal from Tell el-Dabʻa portrays sailors protected by a storm god (Figure 18). The association with seafaring was adapted as part of the Egyptian storm god’s role by early Dynasty 18 (Mourad Reference Mourad2021: 146–8).
The use of imported woods for Egypt’s seagoing ships necessitated strategic alliances between various groups. These included loggers, shipmakers, sailors, intermediaries, diplomats, and elite investors, usually the rulers of coastal cities and Egyptian dynasties. Khnumhotep III’s biography attests to the often-tenuous political dealings that negotiations entailed. Although Jbeil/Byblos is assumed to be the main source for Egypt’s coniferous woods, other areas provided Egypt with timbers (e.g. Khenty-she and Tep-Khetyu). As such, Jbeil/Byblos’s leaders likely monopolised the trade to become the favoured partner for timbers and their products in certain dynasties. Restricted access to the city and other sources of coniferous woods in periods of regionalisation increased the Egyptians’ reliance either on their Eastern Mediterranean trading partners or competing powers within Egypt. This may be one reason for the mention of the seagoing ships docked at the harbour of Avaris in Kamose’s Second Stela (Helck Reference Helck1983: 82–97). Avaris’s ties to the Levant and its access to seagoing capabilities would have been desired by the Thebans. To reach the Levant and secure connectivity, early Eighteenth Dynasty pharaohs necessitated (re)negotiations with merchants, harbour communities, like those of Avaris and perhaps Jbeil/Byblos, or other maritime groups traversing the Eastern Mediterranean.
3.3 Agents of Exchange
Physical spaces of exchange promote and generate abstract spaces of encounters where knowledge transformation may occur. Palatial and administrative complexes hosted royal and elite individuals, dignitaries, officials, and their entourages. Priests and officiants, among others, frequented sacred spaces. Industry-specific spaces, on the other hand, were used by individuals with specific skillsets, administrative representatives, and perhaps members of associated households. These individuals were of diverse social and cultural identities, the management of their interactions also administered by specific persons. The Egyptian textual record mentions administrative positions that targeted long-distance connectivities and cross-cultural encounters. These include ranked titles for expedition/military personnel, sailors, fortification officials, desert traversers, and administrators, as well as interpreters. Epithets were ascribed to people who brought foreign commodities or information (‘secrets’) into Egypt, or who managed ‘doors’, ‘entries’, or routes to foreign lands (Espinel Reference Espinel2015–2016). Others attained roles in mediating affairs with foreigners, like the scribes of the Aam-individuals or overseers of the expedition of Aam-individuals (Mourad Reference Mourad2015: 126). Administrative divisions were also set up to manage imported commodities, such as the Sixth Dynasty ‘house of coniferous-wood’ and the Heracleopolitan ‘department of myrrh’ (Willems Reference Willems2007: 95). Some perhaps also managed foreigners, such as the Middle Kingdom wenet-enclosure mentioned at/near el-Lahun (Luft Reference Luft2006: 43–8).
The diversity of these agents is demonstrated in second-millennium-BCE examples from Beni Hassan, Serabit el-Khadim, Tell el-Dabʻa, and Byblos (Section 2.3). At Beni Hassan, encounters are represented in tombs of counts with ties to regional and local administrations (Kanawati and Evans Reference Kanawati and Evans2014, Reference Kanawati and Evans2016, Reference Kanawati and Evans2019, Reference Kanawati and Evans2020). Tombs with siege scenes, or those of Khety, Baqet III, Amenemhat and Khnumhotep I (Figure 8), depict an allied army of Egyptian, Nubian and northeastern warriors. Khety and Amenemhat were overseers of the army/expedition, their duties well-represented by the organised siege activities in their tombs. Amenemhat and Khnumhotep II depicted other individuals involved in cross-border activities, including overseers of the army/expedition, of the deserts, and of hunters. Khnumhotep II’s son, who brought the Aam-individuals to his father, is further titled as ‘keeper of the gateway of the foreign lands’, his role in mediating encounters continuing with the expedition to Jbeil/Byblos recorded in his Dahshur tomb biography. As community leaders, these individuals had a network of officials whom they tasked to partake in cross-border activities as agents of exchange. Their representation in tombs dating from the Eleventh to mid-Twelfth Dynasty evinces consistent encounters between local Egyptians, northeastern warriors, skilled travellers, and foreign cultural elements like weaponry and textiles. The involvement of three generations of Khnumhoteps in managing these encounters infers the transmission of associated knowledge and skills via kinship relations across time and, for Khnumhotep III at Dahshur, also space, signifying this as one means of sustaining connectivities.
The textual repertoire from Serabit el-Khadim supports the persistence of long-term alliances. Those that note northeasterners list individuals like treasurers, overseers of Lower Egypt, scribes, interpreters, craftsmen, transporters, and personal attendants (Tallet Reference Tallet2018). Northeasterners of varying rank are indicated by such expressions as the ‘brother of the ruler of Retjenu’ and ‘his retainer’, or depictions of the dignitary riding a donkey joined by guards (Figure 12). Individuals labelled in association with the Aam-element are ascribed low- to middle-ranking titles such as ‘hall-keeper’ (Inscription Nr. 85), and possibly high-ranking titles such as ‘sealer of the king of Lower Egypt’ (Inscription Nrs. 54, 108–9, 414), indicating their roles within the Egyptian administration (Mourad Reference Mourad2015: 135, fig. B3). Other non-local groups include Aam-individuals from Hami (Ḥȝmi), and Imenu-individuals (Imnw) (Inscriptions Nrs. 85, 110 and 114; Mourad Reference Mourad2015: fig. B3). Such groups could have offered regional expertise (Černý Reference Černý1935), labour (Shaw Reference Shaw, Knapp, Pigott and Herbert1998: 246), or, for the Imenu-persons, skills in mining, metal processing, or stone transportation (Tallet Reference Tallet2018: 43–5). As members of Egyptian expeditions, their activities at Serabit el-Khadim feasibly supported knowledge transmission between the groups. For certain individuals, like the donkey-rider, their continued involvement over at least twenty years signals at binding alliances with expedition members.
Tell el-Dabʻa’s community similarly negotiated ties between local, regional, and Levantine groups. Individuals of different professions may have been involved, such as religious personnel, ritual officiants, administrative officials, craftspeople, merchants, and, in the Second Intermediate Period and Eighteenth Dynasty, the ruling elite. Mediators of relations with Levantines included the community’s leaders and their entourage who would have used the administrative and palatial complexes (Section 3.1). Those buried in the courtyard of the Twelfth to Thirteenth Dynasty administrative complex of Area F/I included in their funerary assemblages a variety of local and non-local items (Schiestl Reference Schiestl2009: 363–97; Section 2.3.2). Seals name one as a ‘sealer of the king of Lower Egypt’ (Schiestl Reference Schiestl2009: 393) and, if read correctly, another as a ‘ruler of Retjenu’ (Martin Reference Martin1998). The burials also produced fragments of a statue of a seated man; it preserves features associated with high-status Egyptian officials and northeasterners in Egyptian art, especially with its mushroom-like hairdo and multicoloured patterned garment (Schiestl Reference Schiestl2009: 77–89; Figure 23). The garment does not appear to be one-shouldered, but is close in design to cloaks worn by the Middle Kingdom elite (Moreno García Reference Moreno García2017: 119). The statue thus represents an individual, who, together with the statue’s sculptor(s), was negotiating elements of diverse origin in its creation and portrayed identity. The surrounding burials and complex similarly reflect such negotiations. This strongly suggests that a specialised group(s) active in Egyptian–Levantine relations had emerged at the site. A marker of transregionalisation (Section 1.3), the group would have facilitated continuous connectivities across borders. As the statue was likely originally situated in a tomb chapel, this identity would have been recognised by the people viewing and offering to it. They too would have been exposed to the Egyptian and Levantine elements found across the site, and may have identified with diverse cultures.
Reconstructed limestone statue from fragments from Area F/I’s cemetery. Late Dynasty 12–13, Tell el-Dabʻa.
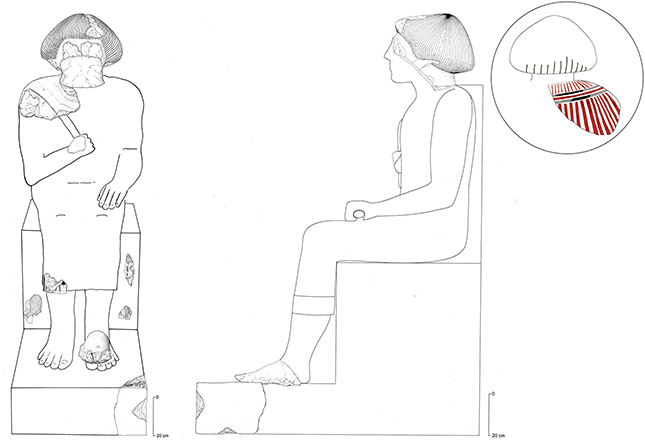
Negotiations continued into the Second Intermediate Period. The continuation of interactions with specific Levantine groups is confirmed by a Levantine-style seal impression of the ‘ruler of Retjenu’ that was found in the Fourteenth Dynasty palatial complex at Area F/II, Tell el-Dabʻa (Kopetzky and Bietak Reference Kopetzky and Bietak2016; Figure 24). The complex’s leaders likely commissioned the construction of the sacred precinct at this time, which would have been used by local and non-local groups. By Dynasty 15, new leaders controlled Avaris; seals at the Area F/II palatial complex and R/III settlement indicate that some used the title heqa-khasut ‘ruler of foreign lands’ (Bietak et al. Reference Bietak, Math, Müller and Jurman2012/Reference Bietak, Math, Müller and Jurman2013; Forstner-Müller et al. Reference Forstner-Müller, Hassler, Matić and Rose2015; Section 2.3.3). The title was previously used by high-ranking individuals who represented rulers of several lands or peoples (e.g. Tale of Sinuhe; Section 2.3.1). By choosing this title for themselves (Candelora Reference Candelora2017), the rulers may have been highlighting their distinction from their forebears, and their expanded roles as leaders of a diverse population with close ties to various territories and peoples (Mourad Reference Mourad2015: 201). Their participation in cross-border activities manifested in finds from Area F/II’s palatial complex, including a fragment of a cuneiform tablet (Section 3.4.1), and several imported vessels from surrounding regions (Aston and Bader Reference Bader2009; Bietak et al. Reference Bietak, Math, Müller and Jurman2012/Reference Bietak, Math, Müller and Jurman2013).
Seal impression TD 9402H, with reconstruction.
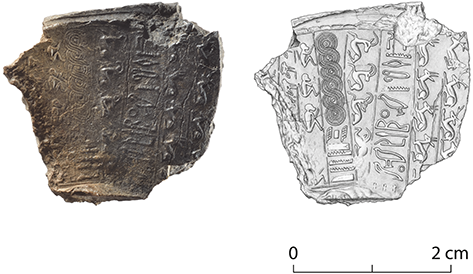
Encounters and negotiations between the diverse groups at Tell el-Dabʻa and those from the Levant contributed to various transformations. The town was established by the central administration and controlled by centrally appointed officials who eventually grew in power and wealth partially because of their management of Egyptian–Levantine interactions, and feasibly because of their oversight over the now-administrative hub in the region. Their identity negotiations extended to other members of the community, who benefitted from the site’s independence and utilised the new spaces sponsored by its leaders in the first half of the Second Intermediate Period. These leaders were able to sustain connections with specific Levantine groups, the encounters continuing to spur negotiations in cultural reproductions. The settlement attracted migrants who, together with its local populace, contributed to its expansion and population growth under the Hyksos. These persistent cross-cultural encounters among and between all these agents of exchange feasibly led to multicultural landscapes and multi-ethnic identities (Schneider Reference Schneider2003a, Reference Schneider2003b; Mourad Reference Mourad2015; Bader Reference Bader2021). Perhaps these included trade diasporas who could promote knowledge transfer and the maintenance of connectivities with members of the same community at and beyond Tell el-Dabʻa, or with specific interregional allies like the Retjenu elite (Stein Reference Stein2002; Section 1.3). For Avaris, and more broadly Egypt from the reign of Senwosret III onwards, ties with Retjenu are continuously attested. Bietak (Reference Bietakforthcoming) proposes that the late Twelfth to Fourteenth Dynasty complexes at Tell el-Dabʻa served Retjenu’s rulers, and suggests that they originated from Jbeil/Byblos.
The harbour city of Jbeil/Byblos offers another pertinent example for agents of exchange. Not much is known on the identity of its EB III to EB IV agents, though those utilising its undiscovered harbour and the site’s temples and palatial structure encountered and facilitated interactions with Egyptian entities. The MBA hieroglyphic texts at Byblos offer further details, naming the ‘foremost’ of Jbeil/Byblos Ibshemu and his son Ipshemu-ib, Ipashemu-ib, and Inten, while a sealing from Alalakh mentions the ‘foremost’ Nehsiankh and unprovenanced scarabs offer the additional names of Rynty and Kain (Martin Reference Martin1971: 14 [105], 25–6 [261–3], 66–7 [810], 129 [1689]; Flammini Reference Flammini2010). Ibshemu is also described as a ‘king’ (nsw) in the title of his seal-bearer, Kukun (Dunand Reference Dunand1954: pl. 32 [2]). The use of an Egyptian script and titles has sparked much discussion on Egyptian-Gublite/Byblite relations. Some suggest that the titles were bestowed by the Egyptian king, thereby reflecting administrative or political dominance over the Levantine city (e.g. Albright Reference Albright1964; Helck Reference Helck1971: 64; Redford Reference Redford1992: 97; Ben-Tor Reference Ben-Tor, Bickel, Schroer, Schurte and Uehlinger2007b: 179). Such dominance, however, is not observed in the material culture and unlikely if the term ‘king’ was used for Ibshemu in Egyptian (Flammini Reference Flammini2010: 156). Another suggestion is that they, together with other Egyptian-inspired objects, reflect elite emulation and a patron-client relationship (Flammini Reference Flammini2010). To allow for the prestigious allure of the strong pharaohs, such a relationship would be dependent on the now-questionable chronological synchronisation of Dynasty 12 with some of the counts (Kopetzky Reference Kopetzky2018). As the supra-regional power dynamics of this period are uncertain, the titles could otherwise be viewed unsubordinated to the Egyptian administration, and as direct translations of those used in the Gublite/Byblite administration; thus, they would have been bestowed by the local officials themselves. These local elite, their scribes and officials, and local craftspeople were highly knowledgeable in Egyptian culture. Thereby, their adaptation of Egyptian elements more likely represents their negotiations of social group identity, with some facilitating means of communication with commercial and diplomatic allies. The transformations could consequently be regarded as strategies to further connectivities with, rather than as expressions of subordination to, the Egyptians.
3.4 Forms of Communication
Negotiations between agents of exchange require effective means of communication. These may eventuate in new, adopted, or adapted cultural expressions that facilitate or strengthen ties, or express status and roles. The (trans)formation of shared cultural reproductions across supra-regional networks could be identified as markers of transculturalisation and globalisation (Autiero and Cobb Reference Autiero, Cobb, Auterio and Cobb2022: 3–4; Section 1.3). Their processes can be traced from at least the late third millennium BCE in the following means of communication.
3.4.1 Languages and Scripts
One of many factors that contribute to language transformations are contacts with individuals of diverse identities who utilise different languages or scripts. These could manifest in lexical borrowings, like the use of loanwords from another language; structural borrowings, such as literal translations of phrases; morphological borrowings, such as the transference of grammatical morphemes; and new or changing meanings of words and classifiers (Schneider Reference Schneider2023). Such contact-induced language change is uncontested for the LBA onwards, but further research is needed on the EBA to MBA (Mourad Reference Mourad2021: 83–91; Schneider Reference Schneider2023). Identified examples include lexemes in the Egyptian language and scripts that emerged by the early Eighteenth Dynasty to distinguish adopted entities, like the horse (ssm) and chariot (wrryt). The epithet ‘lady of Jbeil/Byblos’ is also a feasible case for an early structural borrowing (Zernecke Reference Zernecke2013: 227–30). Another potential example of contact-induced change is with the Seth-animal classifier, as its semantic association with weather phenomena, an aspect of the Levantine storm god, becomes more pronounced across the second millennium BCE (Allon Reference Allon2007).
Language changes may have been furthered by bilingual individuals, and those knowledgeable in different scripts (Section 3.1). Such knowledge is, for instance, inferred in the Serpent Spells of Old Kingdom Pyramid Texts, some of which are suggested to be a hieroglyphic transcription from a Semitic spell offering protection against snakes (PT 232–8, 281–7; Steiner Reference Steiner2011). The Egyptian spells mention Gublites/Byblites slithering away, suggesting one potential source for these spells (Steiner Reference Steiner2011). Bilingual individuals are additionally inferred by the visitors and interpreters who joined cross-border activities, like the Twelfth Dynasty Serabit el-Khadim expeditions (Figure 25), who may have included translators of foreign speech, such as those noted in Retjenu in the Tale of Sinuhe (Section 2.3.1) (Schneider Reference Schneider2023: 72–85). Interpreters were plausibly needed at Tell el-Dabʻa’s Fifteenth Dynasty palatial complex to read the Akkadian cuneiform tablet found there, its fragment preserving the first-person pronoun typical of a letter (Bietak et al. Reference Bietak, Math, Müller and Jurman2012/Reference Bietak, Math, Müller and Jurman2013). This may relate to the wider use of Old Babylonian in MBA Western Asia for diplomacy. Letter correspondence between Egyptian and Northern Levantine diplomats is otherwise noted in Khnumhotep III’s biography and the Tale of Sinuhe. Their script of choice is not attested; yet, based on the inscriptions uncovered on several objects from, for instance, Byblos, the hieroglyphic, and perhaps hieratic, scripts may have been used from the third to early second millennium BCE. Indeed, the Egyptian script and language was used at least in the Northern Levant for temple dedications, and was adopted by elite individuals for inscriptions on prestigious and personal objects (Section 3.3). Scribal and grammatical idiosyncrasies on some of these suggest they were written by local scribes.
Sphinx EA 41748 with Inscription Nr. 345 of proto-alphabetic and hieroglyphic texts. Hathor Temple, Serabit el-Khadim.
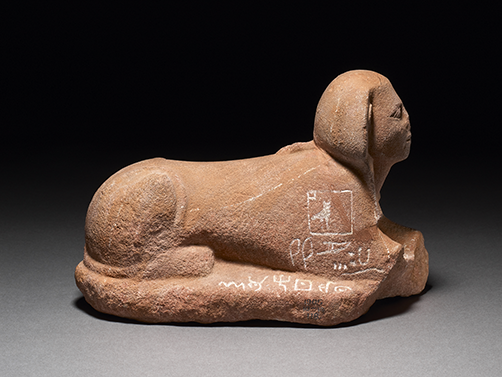
Such knowledge in at least two scripts and languages feasibly contributed to the emergence of the proto-alphabetic script. The texts at Serabit el-Khadim led to the hypothesis that the alphabet was invented at the site, perhaps by illiterate miners who encountered and imitated Egyptian texts (Goldwasser Reference Goldwasser2006, Reference Goldwasser2012). However, the script is attested elsewhere and perhaps much earlier, with four clay cylinders from EBA Umm el-Marra interpreted as early alphabetic (Schwartz Reference Schwartz2021). Other proto-alphabetic texts include two recorded at Wadi el-Hol, perhaps dating to the reign of Amenemhat III (Darnell et al. Reference Darnell, Dobbs-Allsopp, Lundberg, McCarter, Zuckerman and Manassa2005), and one found on a heddle-jack at el-Lahun, possibly of the Middle Kingdom (see Mourad Reference Mourad2015: 70). Consequently, some have suggested that the Serabit el-Khadim texts were composed by Levantine elite who had close ties with the Egyptian administration (Rollston Reference Rollston2011) or Levantine individuals in/allied with the Egyptian army (Darnell et al. Reference Darnell, Dobbs-Allsopp, Lundberg, McCarter, Zuckerman and Manassa2005). Until further examples are found, the dating and origins of the script remain open. Still, it was likely a result of encounters with the Egyptian script(s), and was used by bilingual and transregional individuals.
3.4.2 Metrological Systems
Although the correct identification of weights and standards in the archaeological record hinders the analyses of metrological systems, reappraisals and new discoveries have supported their convergence in the second millennium BCE. A study of the weight, shape, and material of Middle Kingdom weights led Cour-Marty (Reference Cour-Marty1990) to suggest that the Egyptian weight system was already changing in the Middle Kingdom, possibly due to Levantine influences. A weighing scene in the tomb of Amenemhat at Beni Hassan supports this earlier development, with a balance holding what appear to be rectangular, conical, spherical, and sphendonoid or barrel-shaped weights (Kanawati and Evans Reference Kanawati and Evans2016: pls. 24b, 91). The sphendonoid shape is typical of weights, usually of hematite, used in Western Asia in the late third and second millennia BCE. Thus far, the earliest archaeological attestation for sphendonoid hematite weights in Egypt dates to at least early Dynasty 13 and occurs at Tell el-Dabʻa; they are also found in later Fourteenth to Fifteenth Dynasty funerary and settlement contexts at the site, and at ʻEzbet Helmi’s early Eighteenth Dynasty precinct (Prell, Rahmstorf, and Ialongo Reference Prell, Rahmstorf, Ialongo, Bietak and Prell2021). The weights are compatible with the so-called Mesopotamian (around 8.3g) and Levantine (around 9.4g) units (Prell and Rahmstorf Reference Prell, Rahmstorf, Kilian and Zöller-Engelhardt2021). This supports their use in Levantine exchanges, and hints at broader processes wherein intensified commercial interactions contributed to the increased use of various units of measurement across the supra-regional network. Furthered by such interactions at hubs like the Oryx district and Tell el-Dabʻa, these converged by the New Kingdom into a shared or correlated system of weights in Egypt based on the new qedet (qdt) unit of 9.1g.
3.4.3 Visual and Performative Expressions
Heightened encounters could contribute to the need for more effective communication of membership to or status in social groups to facilitate shared interests and activities. Not all agents of exchange may have used the same language or script. Two- and three-dimensional motifs (e.g. smiting god, guilloche), attire and bodily adornments (e.g. certain textiles, seals, weapon types), and bodily ‘extensions’ (e.g. furniture, chariots) could then be visually interpreted by wielders and recipients of the same, connected, or opposing social groups. These expressions may transform into shared or recognisable markers that are recontextualised to suit specific spaces or agents of exchange. One example is the aforementioned statue from Tell el-Dabʻa that exhibits artistic traits identifying the figure as part of a specific group (Figure 23; Section 3.1). Others include the Egyptian-inspired elements at the MBA complexes at Tell Sakka, Tell el-Burak (Figure 26) and Ebla, and the Minoan-inspired paintings at ʻEzbet Helmi. Two other examples are here discussed with additional details on processes of transformation: the horse-drawn chariot and the curved sword.
Drawing of wall paintings, Room 10 of complex, Tell el-Burak, MB I.
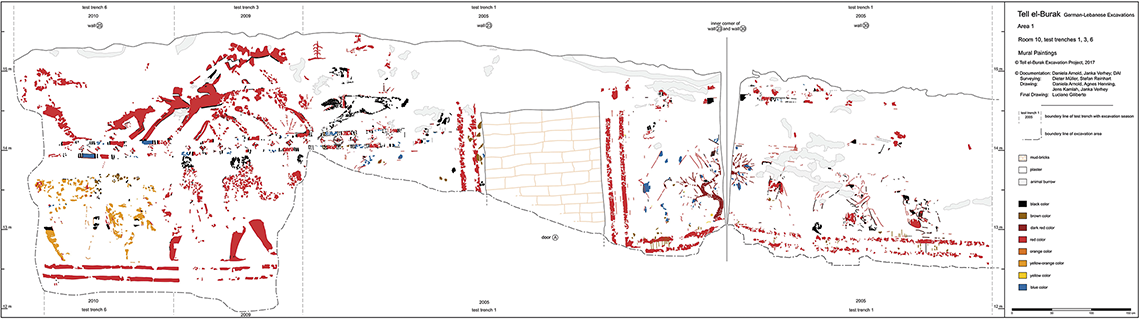
The image of a ruling figure on a horse-drawn chariot wielding a weapon is attested across Egypt and the Levant by the LBA. The chariot’s expression of prestige and authority feasibly promoted its adoption by elite and royal individuals. Alongside the highly valued horse, the chariot’s use in MBA warfare in Anatolia and Western Asia seems to be limited, with most representations associating it with elite, royal, and perhaps divine figures who used it for diplomatic ventures, hunting, trampling enemies, and perhaps racing (Littauer and Crouwel Reference Littauer and Crouwel1979; Moorey Reference Moorey1986; Figure 27). In some cases, they hold the composite bow, a weapon of prestige, or the curved sword, a weapon of power. These elements and their meanings are eventually also attested in New Kingdom Egypt; yet, it would be incorrect to assume that they were transmitted simultaneously and via only one group, as by the Hyksos. Multidirectional negotiations triggered these transmissions and adaptations, with these entities’ expressions of power, status, and identity furthering such processes. For instance, while the earliest secure archaeological attestations of the horse are from Fifteenth Dynasty Tell el-Dabʻa, those for the chariot are from the Eighteenth Dynasty tomb of Amenhotep II (KV 35; Veldmeijer and Ikram Reference Veldmeijer and Ikram2018: 14). Both, however, may have been represented in the late Second Intermediate Period. Kamose’s narrative mentions ‘yoked quadrupeds’ (ḥtr) fleeing a town during the ruler’s attack, the animals interpreted as horses (Carnarvon Tablet, line 16). It also describes that which belongs to the ‘twin span’ (ḥtri) among the wooden items looted from Avaris, which has also been translated as chariotry (Second Stela of Kamose, line 13). Such terms may reflect early attempts to incorporate these entities into the Egyptian lexeme (Goldwasser Reference Goldwasser, Pommerening and Bisang2017: 47–52). Otherwise, the terms ssm and wrryt, with their respective classifiers of a horse and chariot, more clearly identify these objects in the early Eighteenth Dynasty biography of Ahmose si-Ibana (Sethe Reference Sethe1927: 3). In this text, king Ahmose is described to be riding his chariot before and during the attack on Avaris, with soldiers on foot. This mirrors the use of the horse-drawn chariot in the MBA Northern Levant (Figure 27c). The chariot’s benefits on the battlefield are not mentioned by Ahmose-si-Ibana; the Delta’s terrain may not have been suitable for its effective use in war (Shaw Reference Shaw2012). Conversely, the earliest artistic representation of the horse-drawn chariot in Egypt occurs in Ahmose’s funerary temple. The image is clearer on a scarab assigned to the reign of Thutmose I, the ruler roped by the waist to a horse-drawn chariot (Figure 28). The position echoes that of a charioteer aiming at animals on a MB I–II seal (Figure 27b). The king is portrayed as a warrior charioteer, a representation that became common in scenes of hunting, warfare, and royal and divine processions (Sabbahy Reference Sabbahy, Veldmeijer and Ikram2018). The motif is innovatively incorporated into the Egyptian artistic repertoire, adapting Western Asian iconography while continuing earlier Old and Middle Kingdom representations of the pharaoh trampling enemies as a composite creature, or hunting desert animals as a skilled archer.
Seal impressions showing the horse drawn chariot.
Old Babylonian Period, unknown provenance;
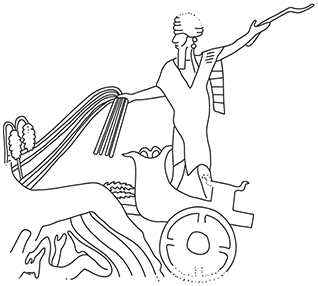
MB I–II, purchased in Beirut;
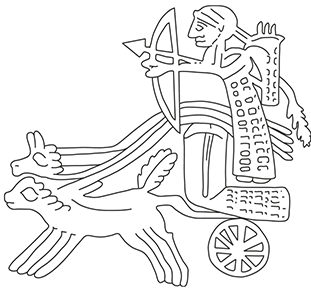
MB I–II, purchased in Aleppo.
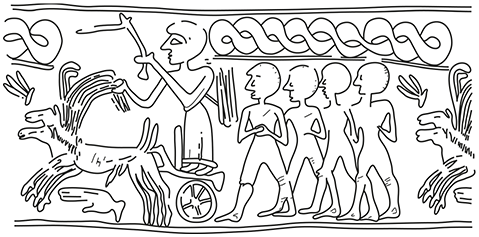
Scarab Seal EA 17774 of Thutmose I, early Dynasty 18, unknown provenance.
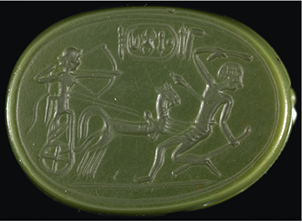
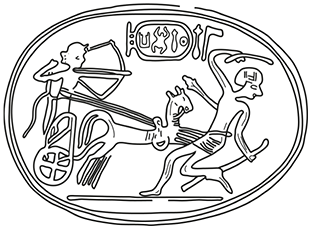
This recontextualisation of the horse-drawn chariot into the repertoire of royal Egyptian iconography was triggered by a multitude of factors. These include the prestigious value of both the horse and the chariot in Western Asia, their symbolic representation of high status and authority, and this transmitted importance, at least of the horse, to the Hyksos, who offer one potential source through which the Thebans encountered the animal and perhaps the chariot (Mourad Reference Mourad2021: 229–42). It is in this period of inter-dynastic conflict that the Theban king is first attested using the horse-drawn chariot. This visual and performative expression of his authority could be interrelated with the need or desire to communicate it in a new context of heightened significance to the king’s allies and enemies. As the Egyptian king then led forays into the Levant in early Dynasty 18 (Section 2.4), this display was likely recognised by Levantines, who were also transitioning to chariot warfare (Trimm Reference Trimm2017: 219–25). Consequently, the increase in Egyptian–Levantine encounters in the LBA feasibly contributed to the incorporation of the chariot, horse, and linked armaments, into the Egyptian cultural repertoire. Part of this ‘package’ were the required skills and expertise to keep horses, and the infrastructure and technology to make and repair chariots and associated protective measures. Their incorporation accelerated other linked textual, artistic, administrative, technological, and ideological transformations including, for instance, the worship of the originally Levantine deities, Astarte and Reshef, and the curved sword (Mourad Reference Mourad2021: 352).
This weapon offers the second example of a shared visual marker communicating status and identity. Different types were made in EBA and MBA Western Asia, with bronze swords from the MBA Levant collected from royal and ritual contexts (Vogel Reference Vogel, O’Brien and Boatright2013). Royal Tombs I–III at Byblos each produced a curved sword of a new type, with the newly attested dark raised metal alloy along the centre of the blade and hilt (Montet Reference Montet1928: 173–80). That of Royal Tomb I was found at the right side of its interred owner, and that of Royal Tomb II in the right hand. The latter includes a hieroglyphic text naming the ‘foremost’ of Jbeil/Byblos, Ipshemu-ib (Figure 29). Likely made locally, the swords and their contexts support MBA representations pointing to the curved sword’s association with royal power. In Egypt, Middle Kingdom attestations of curved swords are uncertain (Mourad Reference Mourad2021: 244–6). The earliest known curved sword from a secure context was found at the arms of a high-status male buried in a Fourteenth Dynasty tomb at Tell el-Dabʻa’s sacred precinct (Forstner-Müller Reference 89Müller2008: 177–84). The sword is then clearly represented from Thutmose III’s reign onwards in association with the pharaoh, either handed to him by a deity, or carried by him in the smiting stance or as part of his attire (Vogel Reference Vogel, O’Brien and Boatright2013). It is also represented in association with the military, Levantine dignitaries, or, from Amenhotep II’s reign onwards, royal workshops (Mourad Reference Mourad2021: 246–7). Egyptians identified the curved sword as khepesh (ḫpš), a term that was used already to represent ‘strong arm’, ‘strength’, or ‘foreleg’, mirroring the ox foreleg that is used as its classifier (Galán Reference Galán1995: 69–73). Thus, the shape and symbolism of khepesh corresponds with that of the khepesh-sword, the similarities likely facilitating the weapon’s incorporation in Egyptian religious and political ideology. The reasons for its adoption are varied, and could include its expression of divine strength and victory in Western Asia, offering the Egyptians a means to communicate their heroic power as they campaigned in the Levant. It could also relate to developments in Egypt, with the prenomen of the Fifteenth Dynasty Apophis, Neb-khepesh-Ra (Nb-ḫpš-Rˁw ‘Ra-is-the-lord-of-khepesh’), harkening to the strength imbued by the Hyksos, as bestowed by Ra (Montet Reference Montet1928: 180). Perhaps, this further inspired the Thebans to relate the weapon with a term symbolising their own divine right to rule (Mourad Reference Mourad2021: 249). In either case, the curved sword offers an additional example of how this symbolic weapon was recontextualised from the Levant, at sites like Byblos with its royal associations, to Egypt, where it became integrated with the concept of khepesh to communicate divine power.
Curved swords from Royal Tombs I–III (left to right), Byblos (not to scale).
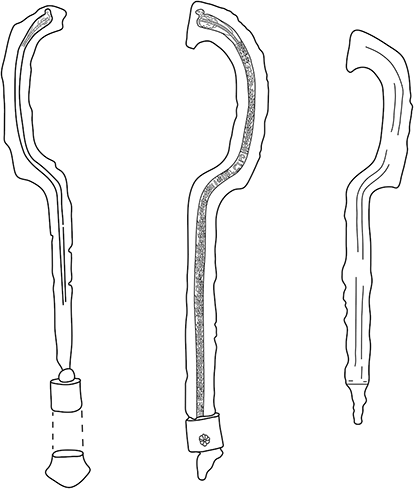
To an extent, individuals carrying and using these weapons or the horse-drawn chariot, also performatively communicated their symbolic meanings. This extended to ritualistic practices like feasting, slaughtering, offering, or burying objects and animals, or even elite practices, like hunting elephants, which could promote communication of social identity and relations via their highly symbolic social acts (Dietler Reference Dietler and Insoll2011). Although difficult to trace in the archaeological record, musical performances, like those represented by the Aam-lyrist in the tomb of Khnumhotep II or the Aam-singers and dancers of the el-Lahun papyri, may have also enhanced social cohesion in spaces of exchange (Mourad Reference Mourad2021: 324–6). Sacred and palatial spaces for exchange have yielded evidence for such rituals. Examples include the Old Kingdom Egyptian ritual knives collected from Byblos’s temples (Badreshany et al. Reference Badreshany, Sowada and Ownby2022), and offering pits associated with temples and administrative and palatial complexes of the Thirteenth to Eighteenth Dynasties at Tell el-Dabʻa (Müller Reference 89Müller2008). Some of the latter include equid remains, highlighting the cultic importance of donkeys and, perhaps, their relation to foundation ceremonies (Prell Reference Prell2021: 21–52). The ritualistic deposition of equids is not found beyond the Delta at this time, but is attested in the Northern and Southern Levant (Prell Reference Prell2021: 21–52). Examples include the donkeys raised along the Nile Valley and slaughtered for ritual foundation deposits at EB III Tell el-Safi, and MBA texts referring to their slaughter for treaty ratification or in honour of deities like Addu, Ishtar and Baal (Bietak Reference Bietak1996: 40; Way Reference Way2011: 41–8, 75–82; Mourad Reference Mourad2021: 139–40; Arnold et al. Reference Arnold, Greenfield and Hartman2025). Some offering pits in the precinct and palace at Tell el-Dabʻa also yielded remains that mirror those of ritual banqueting in EBA and MBA Levantine contexts (Müller Reference 89Müller2008; Bietak et al. Reference Bietak, Math, Müller and Jurman2012/Reference Bietak, Math, Müller and Jurman2013: 32–8). Such rituals may have involved or promoted exchanges between agents of exchange, thus performatively communicating social roles and status.
4 Conclusion
From the third to the mid-second millennium BCE, the inhabitants of Egypt and the Levant undoubtedly encountered concepts, people, objects, and animals from beyond their cultural and geographical borders. Our understandings of such encounters have been shaped by diverse, and often conflicting, interpretations of the available data. Old Kingdom evidence implies limited Egyptian-Southern Levantine relations, perhaps featuring the exchange of mostly Levantine ceramics and Egyptian stone items until around the early Fifth Dynasty, and the movement of animals (e.g. donkeys at Tell el-Safi; Section 2.1.3). Ties with the Northern Levant, particularly Jbeil/Byblos, intensified across the EB III to EB IV, with its elite likely monopolising trade in certain commodities highly desired by Egyptians, like coniferous woods and oils (Section 3.2). They also mediated the movements of other entities, including silver, lapis lazuli, and bears (Section 2.1). These exchanges were plausibly commissioned by royal courts, who could supply the resources and infrastructure required for travelling long-distances with larger loads of goods. The Egyptian administration was also interested in controlling the movements of northeasterners, especially in Dynasties 5 and 6, from those arriving peacefully by ship to those moved forcefully in campaigns (Section 2.1.1–2). Facilitating ties were knowledge exchanges on ritual, religion, and perhaps architecture and scripts (e.g. Pyramid Texts; material at Byblos’s Baalat Temple; Section 3.4).
Socio-cultural and political developments from the late Fifth to early Twelfth Dynasties, and the EB IV to MB I Levant, possibly restructured networks and revitalised connectivities. These were no longer represented solely as state- sponsored initiatives, as northeasterners entered new roles in Egyptian communities (e.g. warriors at Beni Hassan). Pictured allied with the Egyptians, diplomatic and commercial ties persisted between specific groups as agents of exchange sustained their roles into Dynasties 12 and 13 (e.g. Khnumhotep family; Retjenu elite; Tell el-Dabʻa community; Section 2.3). New infrastructure and hubs were established in Egypt, as at Tell el-Dabʻa, to control transregional movements and exchanges that initially witnessed Egyptian commodities reaching hubs along the Levantine coast. Multigenerational ties were interrelated with an intensification of encounters. Their management and control added to the power, wealth, and independence of Tell el-Dabʻa’s community as it adapted through a politically tumultuous period and continued to attract a growing population to eventually become a capital of the Hyksos. Consistent connectivities with the Levant contributed to various socio-cultural transformations with, for example, flourishing industries across the network that produced seals and vessels inspired by multiple traditions, and that catered to local and regional communities.
To maintain these connectivities, individuals, local, and transregional groups negotiated different forms of communication that furthered exchanges, and visually and performatively communicated status and identity (Section 3.4). Approaching these as transcultural processes provides an interpretation that is not dependent on the socio-political dominance inherent in concepts like Egyptianisation, especially in periods of uncertain or shifting power dynamics (Section 1.3). Importantly, the evidence thus far does not support the imperial dominance of any Third to early Eighteenth Dynasties, including that of the Hyksos, over the Northern and Southern Levant. However, the fall of the Hyksos likely strengthened the new Eighteenth Dynasty’s ideology of territorial expansionism (Section 2.4). As another tumultuous period impacted hubs across the network, knowledge of its structure, ties, and means of connectivities likely persisted among specific groups and spaces of exchange. This offered early Eighteenth Dynasty rulers and officials the tools to express their newly consolidated power, and to pursue direct political dominance over parts of the Levant into a period of intensifying, if not globalising, interactions. This Element has shown how these interactions were founded on earlier processes that date to at least the late third millennium BCE. They established and promoted long-distance connectivities and negotiations across Egypt and the Levant, resulting in the LBA network.
Gianluca Miniaci
University of Pisa
Gianluca Miniaci is Associate Professor in Egyptology at the University of Pisa, Honorary Researcher at the Institute of Archaeology, UCL – London, and Chercheur associé at the École Pratique des Hautes Études, Paris. He is currently co-director of the archaeological mission at Zawyet Sultan (Menya, Egypt). His main research interest focuses on the social history and the dynamics of material culture in the Middle Bronze Age Egypt and its interconnections between the Levant, Aegean, and Nubia.
Juan Carlos Moreno García
CNRS, Paris
Juan Carlos Moreno García (PhD in Egyptology, 1995) is a CNRS senior researcher at Sorbonne University, as well as lecturer on social and economic history of ancient Egypt at the École des Hautes Études en Sciences Sociales (EHESS) in Paris. He has published extensively on the administration, socio-economic history, and landscape organization of ancient Egypt, usually in a comparative perspective with other civilizations of the ancient world, and has organized several conferences on these topics.
Anna Stevens
University of Cambridge and Monash University
Anna Stevens is a research archaeologist with a particular interest in how material culture and urban space can shed light on the lives of the non-elite in ancient Egypt. She is Senior Research Associate at the McDonald Institute for Archaeological Research and Assistant Director of the Amarna Project (both University of Cambridge).
About the Series
The aim of this Elements series is to offer authoritative but accessible overviews of foundational and emerging topics in the study of ancient Egypt, along with comparative analyses, translated into a language comprehensible to non-specialists. Its authors will take a step back and connect ancient Egypt to the world around, bringing ancient Egypt to the attention of the broader humanities community and leading Egyptology in new directions.