

Appendix 2.2 Capability Conversation Guide
Capability-Oriented Integration Support
Introduction and Justification
This capability conversation guide supports professionals and supervisors in having structured conversations with employees or clients about sustainable work integration. The foundation of this method lies in supporting the individual’s autonomy and agency. In this approach, the worker is seen not as an object of policy but as a subject and an agent in control of their professional future and recovery if necessary.
This approach combines the CA [Reference Sen2, Reference Sen4] with the theory of planned behaviour (TPB; [Reference Fishbein and Ajzen40]). The CA emphasises well-being as the freedom to be and do what one has reason to value. It provides a strong normative framework: work should not only be available but also meaningful and enabling. The TPB complements this by addressing behavioural change – specifically, how attitudes, perceived norms, and perceived behavioural control influence actual behaviour. Where the CA provides a moral compass, the TPB provides a behavioural steering wheel.
Using both perspectives enables a method that is ethically grounded and behaviourally effective. The professional and organisational contexts are not neutral observers; they are active co-creators of the worker’s real opportunities to pursue a valuable work life. Therefore, it is essential to engage professionals, supervisors, and systemic conditions (e.g., team dynamics, policy constraints) in supporting autonomy and work values.
The practical implementation of the conversation structure follows.
As additional tools that support autonomy enhancement consultations, we include three rationales and the circle model. The three rationales are applicable in different situations. They concern Erickson’s ‘free rein’ metaphor, the scale metaphor (balance metaphor), and ‘the human function curve’. The ‘circle model’ serves as a practical tool for conversation. It helps visualise various value domains at work (e.g., knowledge use, social relationships, personal growth) and helps employees identify which values are and are not being realised.
Conversation Structure with Example Questions
Preparation for the conversation: the employee/client completes the CSWQ (Appendix 2.1).
1. Opening (tool: rationales)
Objective: Establish contact and clarify purpose.
Key elements:
Short introduction
Shared agenda setting
Clarify mutual expectations
Example questions:
“The purpose of this conversation is to review the results of the questionnaire (CSWQ) jointly. Is that also how you see it?”
“Are there any specific topics you’d like to address today?”
“How was it for you to answer these kinds of questions about your work?”
“What stands out to you in the list you filled in?”
“Are there important work values for you that are not on the list?”
To help discover personal values:
“What’s important to you in a given situation at work?”
“What gets you out of bed in the morning?”
“What matters most to you at work?”
“What do you pay attention to when things go well – or when they don’t?”
2. What is already there (tool: circle model, inner circle)
Objective: explore what already works and what is valued.
Example questions:
“Let’s look at what’s already going well. What aspects of your work are currently aligned with your values?”
“Can you recall a recent moment when you felt things were going well – what made that possible?”
“What is important to you in those moments?”
“What makes that situation work for you?”
“Are there elements from that situation that we can use elsewhere?”
3. What could develop further (tool: circle model, middle circle)
Objective: Exploring aspirations, weighing potential changes, and prioritising.
Example questions:
“Which values do you wish were more present in your work (which values are most important to you)?”
“What would make your work more meaningful for you?”
“If you could choose, what would you want to do more (or less) of?”
“What would your ideal work situation look like?”
“Which steps could bring you closer to that?”
“What choices do you face at the moment?”
4. What is needed (identifying personal and contextual conversion factors)?
Objectives: Discuss what supports or hinders the desired development.
Example questions:
“What personal strengths can you draw on to realise these values?”
“Which factors in your team or organisation support or hinder this?”
“Are there things in your work environment or private life that could change to help you further?”
“Are there people who can support you with this?”
“What kind of support would you find helpful?”
5. What can be done (later; individual and context; tool: circle model, outer circle)
Objective: identify concrete actions and move towards them.
Example questions:
“What small steps could you take to bring your work more in line with your values?”
“How could your manager or colleagues support you in this?”
“Would it help to make some concrete agreements about this?”
“What would be helpful to try out?”
“What can you influence yourself, and what needs to be done by others?”
6. Closing
Objective: Summarise, agree on actions, and confirm the next steps.
Example questions:
“Let’s summarise what we’ve talked about – what stood out most to you?”
“Which agreements have we made?”
“What will be your next step?”
“Shall we plan a follow-up, or does this give you enough to work with for now?”
Conclusion
This guide aims to operationalise the CA in a practical and respectful way, supporting individuals through tailored, autonomy-enhancing conversations. The integration with the theory of planned behaviour ensures that normative ideals become behaviourally actionable, with a shared responsibility among worker, professional, and workplace contexts.
Practical Tools
Providing a Rationale
A rationale must first offer an acceptable explanation for the client’s current condition and, second, provide a concrete perspective for improvement. The second criterion is especially important for a positive effect. Explanations that do not meet this (such as ‘a difficult childhood’) have little potential to support improvement. A well-chosen rationale appeals not only to the cognitive level but also to the emotional level, thus contributing to acceptance.
Next, we provide three examples of rationales, each of which highlights an important aspect of someone’s situation and the guidance provided.
First, a rationale that emphasises the autonomy-enhancing aspect of the guidance. For this purpose, we use the wonderful metaphor that Milton Erickson shared with trainee directive therapists [Reference Rosen41].
Metaphor of the Horse and the Loose Rein
Erickson described how, when he was approximately thirteen years old, a horse wandered onto his family’s farm. The horse had no halter, ear tag, or anything else by which it could be identified. The farmhands repeatedly tried to drive it away, as a strange horse on your property was considered a problem. Horse theft could even be punishable by death. However, the horse kept returning. Eventually, Erickson offered to return it to its owner. His father and the farmhands laughed at him; how could a boy succeed where experienced hands had failed? Milton persisted, and his father gave permission. Milton mounted the horse, led it to the road, and then gave it a loose rein. He only intervened when the horse left the road or stopped grazing. After a journey of many miles, the horse finally arrives at a remote farm and walks in. The farmer asked Erickson: “How did you know the horse was mine and came from here? It had no halter or identification.” Milton replied, “I didn’t know – but the horse did. I just kept it on the road.”
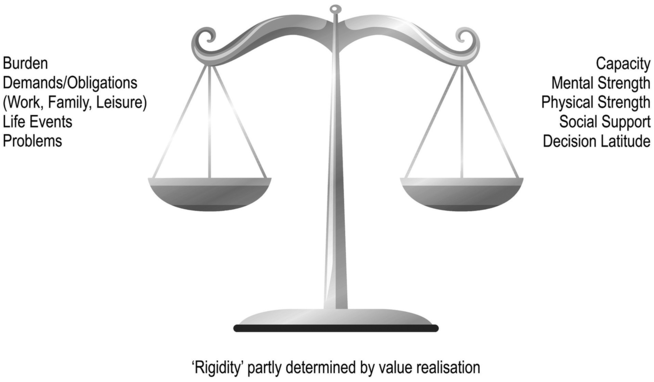
An example of a metaphor that focuses on balancing load and capacity is the balance metaphor.
The Balance Metaphor
The balance metaphor (see Figure 2.2) vividly illustrates that there must be a balance between burden and resilience through capacity. If this balance is disturbed, the solution can be derived from the metaphor: the burden must be – temporarily – reduced (less work, fewer obligations, solving problems, etc.) or the resilience (one’s capacity) must be increased (e.g., mobilising social support, improving time management, scheduling relaxation, improving physical condition) – or, usually, both.
The balance metaphor.
The professional can use the metaphor in guidance to discuss actions with the client that might restore the balance between demand and capacity:
You might see it as a balance that has become unsettled: the balance between what you can handle and what is being asked of you. That balance has been disrupted to the point that it is no longer manageable. Because you’re currently out of work, the scale on the ‘demand’ side has been lightened practically, but emotionally, the burden may have increased, and your resilience may have decreased. Therefore, the current state of balance is not representative. However, that is temporary; in the long term, you will need to find a more structural and sustainable solution by working on both sides of the scale.
Another example is the ‘human function curve’ metaphor, which clarifies the continuum of stress and performance.
The Demands Performance Curve
The demands performance curve (see Figure 2.3) shows that the balance between burden and resilience lies on a continuum ranging from underload (annoyance and ‘bore-out’), healthy load, to overload (exhaustion and burnout). Too little challenge results in underload; then comes the area of healthy load (of ease), but if you exceed that, imbalance occurs again – this time in the form of overload. Mild complaints occur at the start of imbalance; more complaints arise with greater imbalance. An important lesson from this metaphor is that the area of ease (often denoted as the comfort zone) – the area where one functions optimally – is before the peak.
The demands performance curve.

The professional can use this metaphor to discuss the continuum of underload, healthy load, and overload with the client:
This metaphor assumes that an organism responds like a muscle fibre – for example, a heart muscle fibre. When you start to stimulate it (ask it to ‘work’), it performs more. Most of us recognise this on an organism level in the way that busy people often take on even more. Underload isn’t good; a muscle then turns to fat, and people often do as well. In the curve, we see that there is a zone of healthy load. Our ‘area of ease’ – where we function optimally and sustainably – lies in that zone. Importantly, this zone lies before the peak. If you then ask more of a muscle – or a person – it will perform more, so the output increases. However, it is not sustainable because fatigue begins to set in. The zone between the area of ease and the peak of the curve for emergencies is crucial. In the past, the proverbial bear might literally appear on your path; today, that’s figuratively when we want to give a final push to achieve something. That’s fine if it’s occasional and followed by rest and recovery (note that being annoyed is an effective way of recovery). However, there are two pitfalls. First, we live in a society that demands more and more from us, often calling on us to give ‘just a bit extra’. That’s true at work but also in our personal lives. Second, we gain experience that going the extra mile works: we get more done. That experience may lead us to use it more often, suppressing fatigue and not recovering. Then, we can go over the top: fatigue turns into exhaustion, overload into burnout, and our functioning collapses. Part of the guidance process is learning how to remain mostly within the area of ease.
Practical Tools
The Circle Model
The circle model (see Figure 2.4) distinguishes between what is already present, what needs improvement or development, and what may need attention in the longer term. With this model, the client can see that many things of importance are already present and that there is a distinction between issues that are relevant now and those that may become relevant in the future.
The circle model.

Example questions (in addition to those in the conversation guide):
In the innermost circle, you can place the work values that you feel you are already able to realise.
○ What makes these important to you?
○ How did you manage to achieve that? What approach did you take?
○ What was important for you in that process?
In the middle circle, you can place the work values you would like to pay more attention to in the short term.
○ What makes these so important to you?
In the outer circle, you can place the work values that you want to focus on only in the longer term.
○ What makes these important to you?
○ What makes you think these will only become relevant later on?
The professional can prepare for using the model by drawing or printing three circles in advance and creating cards (or having them made) listing the seven work values. The client can then physically move and organise the values. Visualising in this way supports the conversation in a playful manner. Alternatively, sheets of paper with printed text can also be used.
This method can also be applied to more ‘minor’, concrete goals. For example, to map out what someone would like to achieve in the coming month.

 Open access