

The long shadow of the serpent kingdom falls across Maya history in ways that are now impossible to ignore. No other political entity impressed itself so firmly into the inscriptional record of the Classic-period southern lowlands nor came so close to mastery over it. Its rivals, allies, and clients all had reason to record its affairs, and collectively, they offer us an unusually rich, near-contemporary narrative of events. This is important because, even though its famed capital at Calakmul possesses more monuments than any other Classic Maya site, it has been—and remains—one of the most difficult places to conduct epigraphic research (Morley Reference Morley1933; Ruppert and Denison Reference Ruppert and Denison1943). Centuries of exposure have taken a devastating toll on its porous and brittle limestone, stripping the great majority of well over one hundred stelae clean of legible text. Classic Maya kingdoms are typically understood from the inside out, with a home corpus shedding light on a much smaller body of foreign references. But losses at Calakmul mean that one must often do the reverse and work from the outside in, using information assembled from a variety of sites and sources—reflected in the contributions to this special section—to make sense of the sparse local data.
Yet the obstacles to comprehending the serpent kingdom go beyond that posed by the patchy survival of data alone. Its history turns out to be one of unusual complexity, whose teasing-out has produced several surprises and left turns while leaving a good number of uncertainties. In the process, we have gained important insights into the practice of politics during the Classic era and the malleability of the Maya concept of polity in the face of contingent events.
In 1993, the Proyecto Arqueológico de Calakmul of the Instituto Nacional de Antropología e Historia (INAH), under the direction of Ramón Carrasco Vargas, began work at the site, with a wide-ranging mandate to investigate, analyze, and conserve its remains. The opportunity to conduct deep excavations for over two decades has brought many benefits—not least, the discovery of inscriptions that have been protected under fallen debris, reused within construction fill, or deliberately conserved in caches. I have been fortunate to contribute the epigraphic component of the project since 1994 (e.g., Martin Reference Martin1996a, Reference Martin and Carrasco1996b, Reference Martin2000a, Reference Martin2005, Reference Martin2008, 2012).
In this study, I will first discuss the finds at Calakmul that are most relevant to the identity of both polity and place, followed by what they and others tell us about the momentous shift of the kingdom's royal seat from Dzibanche to Calakmul in the seventh century. This involves an examination of dynastic history both before and after, linking two eras of greatness and political power for the serpent kings. Here, we seek to understand the fuller context of the transfer and to identify the agents behind it. At root lies a simple question: was this a strategic relocation of the royal line, or instead a dynastic rupture that gave rise to an entirely new lineage that co-opted its prestigious identity?
Identities of polity and place
Two items of glyphic evidence, titles and toponyms, are central to defining the identity of the serpent kingdom. Within his foundational publication on Classic Maya emblem glyphs, Heinrich Berlin (Reference Berlin1958) describes Copan Stela A and its list of examples representing Tikal, Palenque, Copan, and another site of which he could only say “un lugar desconocido para mi” (“a place unknown to me”). The main sign of that compound was first recognized as the head of a serpent by Thomas Barthel (Reference Barthel1968a:183, Reference Barthel1968b:144), who read it as chan “snake.” For Barthel, those four kingdoms on Stela A formed a quadripartite model of political organization that was symbolically aligned to the cardinal directions. Joyce Marcus (Reference Marcus1973, Reference Marcus1976) took up the challenge of understanding how all other emblem glyph–bearing centers fit within this four-way scheme, proposing three tiers of dependent centers subject to these capitals. In the process, she was the first to suggest that the snake-head emblem glyph should be assigned to Calakmul (1973:913)—reasoning that as the largest site without a known emblem, this was its likeliest home. She later pointed to several emblem candidates on standing Calakmul stelae (Reference Marcus1987:173–176, Figure 65), although their eroded state prevented any positive identifications.
Jeffrey Miller (Reference Miller and Robertson1974) accepted the Calakmul proposal and attributed an unprovenanced stela in the Cleveland Museum of Art to the site, having recognized a reference to the Snake king we know today as Yuknoom Yich'aak K'ahk’ II in its text. Peter Mathews (Reference Mathews1979) collected data on all the monuments that feature snake-head emblems, including a good number on looted pieces carved in a style thought to be typical of the Usumacinta region (Coe Reference Coe1973:28–31). The growing suspicion that the serpent capital was a still-undiscovered center led Mathews to devise a neutral term—“Site Q”—for it. Even so, he provided the first firm epigraphic link to Calakmul by matching the Calendar Round of Yuknoom Yich'aak K'ahk's birth on a looted panel with a corresponding Long Count on Calakmul Stela 9. However, after Ian Graham (Reference Graham1988) uncovered the discarded carcass of the Cleveland monument at El Peru, it was that center that took on the mantle of leading contender (Schele Reference Schele and Boone1984:24). An additional link to Calakmul subsequently came when Yuknoom Yich'aak K'ahk II's name was identified on a doorjamb excavated by the Universidad de Campeche project at the site directed by William Folan (Marcus and Folan Reference Marcus and Folan1994).
Yet by then, the discovery of toponyms in Classic Maya inscriptions had all but confirmed the Calakmul attribution (Stuart and Houston Reference Stuart and Houston1994:28–29). This work identified two place-names, today read as uxte'tuun (“Three Stones”) and chiiknahb (“? Pool”), that were intimately associated with Snake kings (see below). For example, the former features in a key title carried by the great king Yuknoom Ch'een II, whereas the latter was where his successor Yuknoom Yich'aak K'ahk’ II was inaugurated. Both toponyms were recognized on Calakmul monuments, appearing on Stela 89 and Stela 51, respectively. Not long after, the problem of the many still-unassigned Site Q monuments was solved. Unexpectedly, most of those cataloged by Mathews were traced to the rather modest center of La Corona, which proved to be a dependency of Calakmul (Barrientos et al. Reference Barrientos, Canuto and Suart2024; Stuart in Schuster Reference Schuster1997). One substantial set of La Corona's monuments mention Snake affairs without any reference to its own, provoking a suspicion that these particular blocks may have been produced there and intended as exports to the core Calakmul polity that went undelivered.
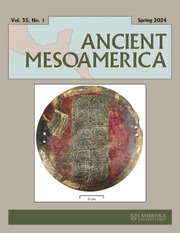
The initial season of the INAH project uncovered the first legible instance of the serpent emblem glyph within the fill of Calakmul Structure IV, although a better-preserved example subsequently emerged on a block uncovered between Structure XIII and its western annex (Martin Reference Martin and Carrasco1996b, Reference Martin2008) (Figure 1a). Likely a stairway riser, this shows a kneeling male wearing a large feather headdress and the garb of a ballplayer—specifically, the thick belt and kneepad used as protection in the game. Its three surviving glyphs have the rounded, pillow-like forms associated with the “ornate” phase of Proskouriakoff's (Reference Proskouriakoff1950:124–138) stylistic chronology, suggesting a carving date in the mid-eighth century. The first two compounds are damaged, but the third supplies the emblem of the depicted king, a fine example of K'UH-ka-KAAN-(la)-AJAW or k'uhul kaanul ajaw (“Holy Snake[-Place] Lord”) (Figure 1b). Today, a total of 13 such titles have been uncovered or otherwise recognized at Calakmul.
Emblem glyphs of the Snake and Bat kingdoms: (a) Calakmul Element 39; (b) Calakmul Element 39 (pA3); (c) Dzibanche Monument 13 (B3); (d) Resbalon Block BX25; and (e) Calakmul Stela 114 (C5). Photograph and drawings by the author.
The ubiquitous ka- prefix on the snake-head logogram here serves to signal a reading of kaan in place of chan, its regular value in the inscriptions. Proto-Mayan *kaan (Kaufman Reference Kaufman2003:636–637) is reflected in most branches of the Mayan language tree except that for Ch'olan-Tzeltalan. Those languages underwent a k(’) > ch(’) shift and a shortening of vowel-length while the script was in active use, although the changes took place progressively and irregularly on a word-by-word basis (Law et al. Reference Law, Robertson, Houston, Zender and Stuart2014). There are a few other places where kaan (“snake”) appears in the texts, all of them in personal names (which are spelled not only ka-KAAN but with occasional disharmonic suffixes as KAAN-nu or ka-KAAN-nu). All of these, including that of Snake emblem, can be explained as enduring proto-Mayan forms, where a strong conservatism in proper nouns might be expected.
Today we understand that all the main signs or “referents” in emblem glyphs originate as toponyms, with each a title describing the “(holy) lord of such-and-such place” (Bíró Reference Bíró2012:59; Martin Reference Martin2020:326–334; Tokovinine Reference Tokovinine2013:85–86). Another reason to believe that the snake head is a place-name is those spellings where it is appended by a –la sign. This produces a nominal suffix specifying a locale, although its vowel (V) is never expressed glyphically and is properly rendered -Vl. It may be relevant that –il endings in Ch'ol (Warkentin and Scott Reference Warkentin and Scott1978:118–119) and Itzaj (Hofling and Tesucún 1997:23) convert common nouns into toponyms with the sense of “x-place.” An alternative suggestion is that the –la ending generates an –iil or –u'ul suffix that signifies “where x abounds” (Lacadena and Wichmann Reference Lacadena and Wichmann2019:191–195), making kaanu'ul “the place where snakes abound.” Until this matter is settled, I will keep to the long-standing but not necessarily accurate spelling of kaanul.
Momentarily, the Snake kingdom sat within our expectations of an important but otherwise conventional Classic Maya polity. But the story soon took a revelatory turn. In 1993, Enrique Nalda (Reference Nalda2004a, Reference Nalda and Nalda2004b) began excavations at Dzibanche, 126 km to the northeast of Calakmul, and his team soon encountered parts of a monumental stairway carved in a particularly early style. Each of 15 blocks featured a bound captive and a short inscription, several of which named the presiding victor as one Yuknoom Ch'een—a namesake to the Late Classic ruler—accompanied by an early version of the snake-head emblem glyph (Figure 1c). The same emblem appeared on a second set of stairway blocks at Dzibanche—as well as others on stucco, bone, and ceramic—all of which supported the idea that this was a major serpent capital (Nalda Reference Nalda, Monod Becquelin, Breton and Ruz2010; Velásquez Reference Velásquez García and Nalda2004, Reference Velásquez García2005, Reference Velásquez García2008; Velásquez García and Balanzario Granados Reference Velásquez García and Balanzario Granados2016, Reference Velásquez García and Balanzario Granados2024). This was bolstered by the cluster of similarly early snake-head emblems seen in this same northerly region, at Resbalon, Pol Box, and Yo'okop (Carrasco Vargas and Boucher Reference Carrasco Vargas and Boucher1987:5; Esparza and Pérez Reference Esparza and Pérez2009:9; Martin Reference Martin1997:861) (Figure 1d).
Was this evidence for two separate Snake dynasties or for one that ruled in two separate locations? A single kingdom initially based at Dzibanche would have the major advantage of filling a yawning temporal gap at Calakmul (Martin Reference Martin2005:6–7). Only a handful of pre-600 a.d. inscriptions have been recovered there despite decades of excavation and, although they include mentions of both uxte'tuun and chiiknahb, none of them features a recognizable snake-head emblem. Equally, unlike Calakmul, Dzibanche shows no evidence of maintaining its role as a major serpent capital into the Late Classic Period. Indeed, the old seat of power now fades from the record and, even though a few finds of emblem glyphs suggest that it maintained a portion of kaanul dynasty, we know very little about its history after the transfer (Velásquez García and Balanzario Granados Reference Velásquez García and Balanzario Granados2024).
Calakmul was already an ancient city active from at least 400 b.c. onward, with both its largest temple pyramids, Structures I and II, Preclassic in origin (Carrasco Vargas Reference Carrasco Vargas, Fields and Reents-Budet2005; Carrasco and Colón Gonzáles 2005; Folan et al. Reference Folan, Marcus, Pincemin, del Rosario Carrasco, Fletcher and López1995). Such a long history posed another question: if the serpent kings were ensconced at Dzibanche in the Early Classic, who ruled Calakmul at that time? Critical light on this, and another step in recognizing the transfer, would be shed by the earliest and—at 87 surviving glyph-blocks—the longest Calakmul inscription. Stela 114 was discovered by the Universidad de Campeche project in a niche set within a late phase of Structure II (Pincemin et al. Reference Pincemin, Marcus, Folan, Folan, Carrasco and López1998). It celebrates the 9.0.0.0.0 period ending of a.d. 435, but damage and some obscure paleography make it a difficult text to read in full. The protagonist pictured on its face bears glyphic motifs in his headdress that allow us to identify him in the rear text. There, he carries an emblem glyph, but not one based on the head of a snake but rather on the head of a bat (Martin Reference Martin2005:9–10) (Figure 1e). Bat-head emblems are seen on monuments at Uxul, Naachtun, and Oxpemul during the Late Classic (Grube Reference Grube2005:95–98), and this was clearly a political entity that once had widespread influence. From this, we can surmise that the serpent kings were not native to Calakmul but arrivistes who had displaced an existing lineage (Martin Reference Martin2005, Reference Martin2020:138–141).
A transfer from Dzibanche to Calakmul would conform to a wider pattern among the Classic Maya, in which political dynamics provoked certain lineages to leave their original home, sometimes splitting into two or more parts. When this occurred, the correspondence between referents and toponyms broke down, with the former converted into dynastic names that moved across the landscape. Today, this understanding allows us to distinguish dynasties that claim a local foundation from those that have migrated from elsewhere.
Was kaanul the ancient name of Dzibanche? The first sign that it was came from Fragment 1 at this site, with its partial phrase ta-na-*CH'EEN-na ka-KAAN tahn ch'een kaan(ul) (“in the domain/settlement of the Snake[-Place]”) (Martin and Velásquez García Reference Martin and García2016:29, Figure 9; Velásquez García and Balanzario Granados, Reference Velásquez García and Balanzario Granados2024). Although a single instance cannot be definitive, it is highly suggestive, given the very small sample of Dzibanche texts and the known context. That uxte'tuun chiiknahb directly succeeded kaanul as the Snake capital was confirmed with the discovery of the extraordinary Xunantunich Panel 4 in 2016 (Helmke and Awe Reference Helmke and Awe2016a) (Figure 2). Here, a transfer that I had proposed from scattered clues was spelled out in explicit terms: ma-cha-ja K'AWIIL-li TAHN-na-CH'EEN ka-KAAN-la PAT-li K'AWIIL 3-TE’-TUUN-ni machaj k'awiilil tahn ch'een kaanul pataal k'awiil(il) uxte'tuun (“Power is negated in the midst of Snake-Place, power is formed at Uxte'tuun”) (Chiiknahb followed on an adjoining block). This inscription, together with portions of the same one found at Naranjo and Ucanal, was once part of a hieroglyphic stairway that stood at Caracol (Martin Reference Martin, Colas, Delvendahl, Kuhnert and Schubart2000b:57–58, Reference Martin2017a)—one largely dedicated to explaining the historical context of the Snake shift (Helmke and Vepretskii Reference Helmke and Vepretskii2024).
Recording the transfer from kaanul (Dzibanche) to uxte'tuun (Calakmul) on Xunantunich Panel 4, lower roundel. Drawing by the author.

La Corona Element 33 supplies another phrase of interest, with a mention of kaanul as the subject of a term for political establishment, a kaj “(re)settling” in a.d. 635 (Beliaev and Davletshin Reference Beliaev and Davletshin2014; Stuart Reference Stuart2004, Reference Stuart2012). Regrettably, subsequent signs are damaged, and explanatory information has been lost. This date sits well with the point at which Calakmul became the new serpent capital, with the kaanul reference perhaps serving as a broad reference to the kingdom in this case. But the difficulty with this is that almost all phrases of this type refer to specific sites, suggesting instead that this is the city of Dzibanche and part of the political machinations of this era.
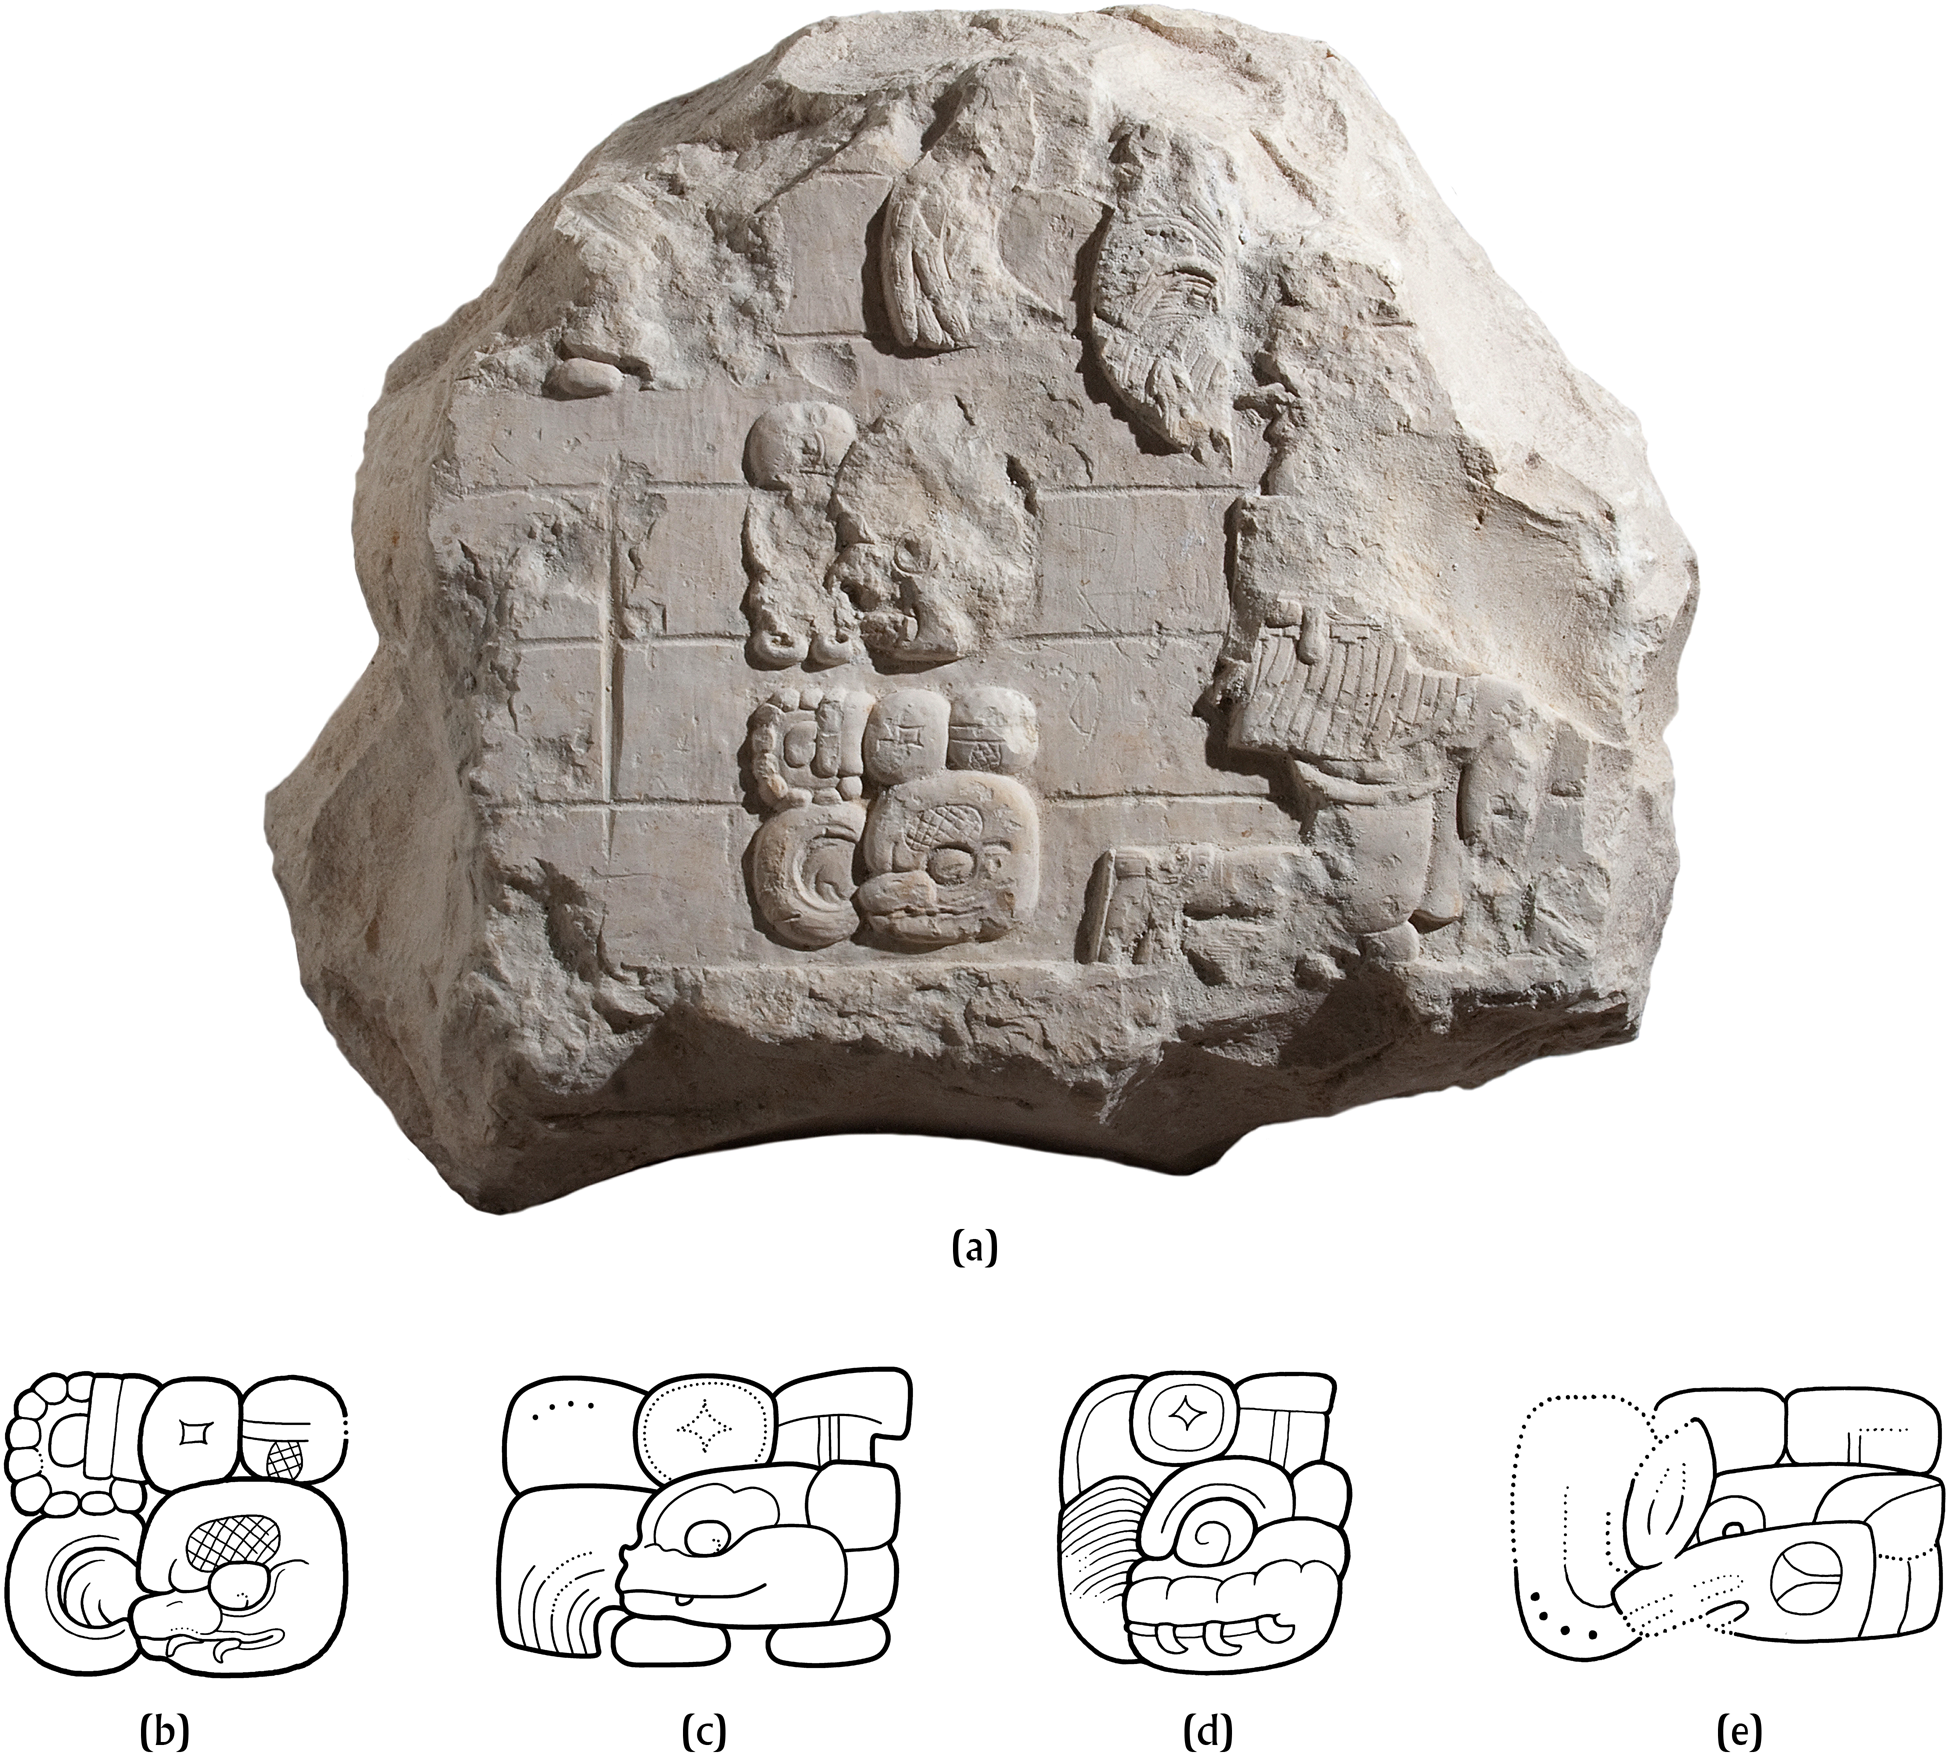
The precise geographic ambits of uxte'tuun and chiiknahb remain hard to discern (Martin and Velásquez García Reference Martin and García2016). They usually appear individually, but when paired, they always fall in that order (Figure 3a). There are some distinctions between them. Thus far, only uxte'tuun is described as a ch'een, the metaphorical term referring to settlements and/or domains (Figure 3b), whereas chiiknahb is favored when we have an associative title such as aj chiiknahb (“Chiiknahb Person”) (Figure 3c). They are also distinguished when used within royal titles, the elevated uxte'tuun kaloomte’ contrasting with the more modest chiiknahb ajaw (Figure 3e–f). The idea that they were nested locales, one set within the other, is appealing. A strong hint that uxte'tuun was the larger comes from the late use of uxte'tuun kaloomte’ at Oxpemul (Grube Reference Grube and Sprajc2008:203–211). This postdates the decline of Calakmul and appears to be a claim to have superseded it in regional preeminence. Equally, a suspicion that chiiknahb refers to the central portion of the site is encouraged by a Calakmul mural self-referentially labeled chiiknahb kot, or “Chiiknahb Wall” (Martin Reference Martin2008). The abundant aquatic imagery of the painted scene may allude to a supernatural location from which that toponym was derived. The INAH project has produced a total of six new examples of uxte'tuun and three of chiiknahb.
Toponyms at Calakmul: (a) Uxte'tuun chiiknahb on La Corona Ballplayer Panel 1; (b) ta ch'een uxte'tuun on Calakmul Stela 54 (A15); (c) Aj chiiknahb on a lip-to-lip cache plate; (d) Uxte'tuun kaloomte’ on Calakmul Stela 89 (D5-C6a); (e) Chiiknahb ajaw on Calakmul Element 30 (pA2) Drawings and photograph by the author.
Serpent rising
A defining feature of Classic Maya political culture was the pivotal role of bloodline in determining legitimacy, with each king in a dynasty claiming descent from a close relative and, beyond them, an ancestral founder who may have lived centuries in the past. Only a few polities set down king lists in any consistent way, with the best sequences known from Copan, Palenque, and Yaxchilan. The serpent kingdom should now be counted among them, even if its version is by far the most problematic.
INAH excavations within Calakmul's largest court complex, the West (or Great) Acropolis, produced 766 sherds of codex-style ceramics (Delvendahl Reference Delvendahl2010; García Barrios Reference García Barrios2011). Rendered in their distinctive black/brown line on a cream background framed by red bands, these vessels get their name from their presumed resemblance to Classic-era bark-paper books—making them a prized, if tenuous, link to that great lost tradition (Robicsek and Hales Reference Robicsek and Hales1981).
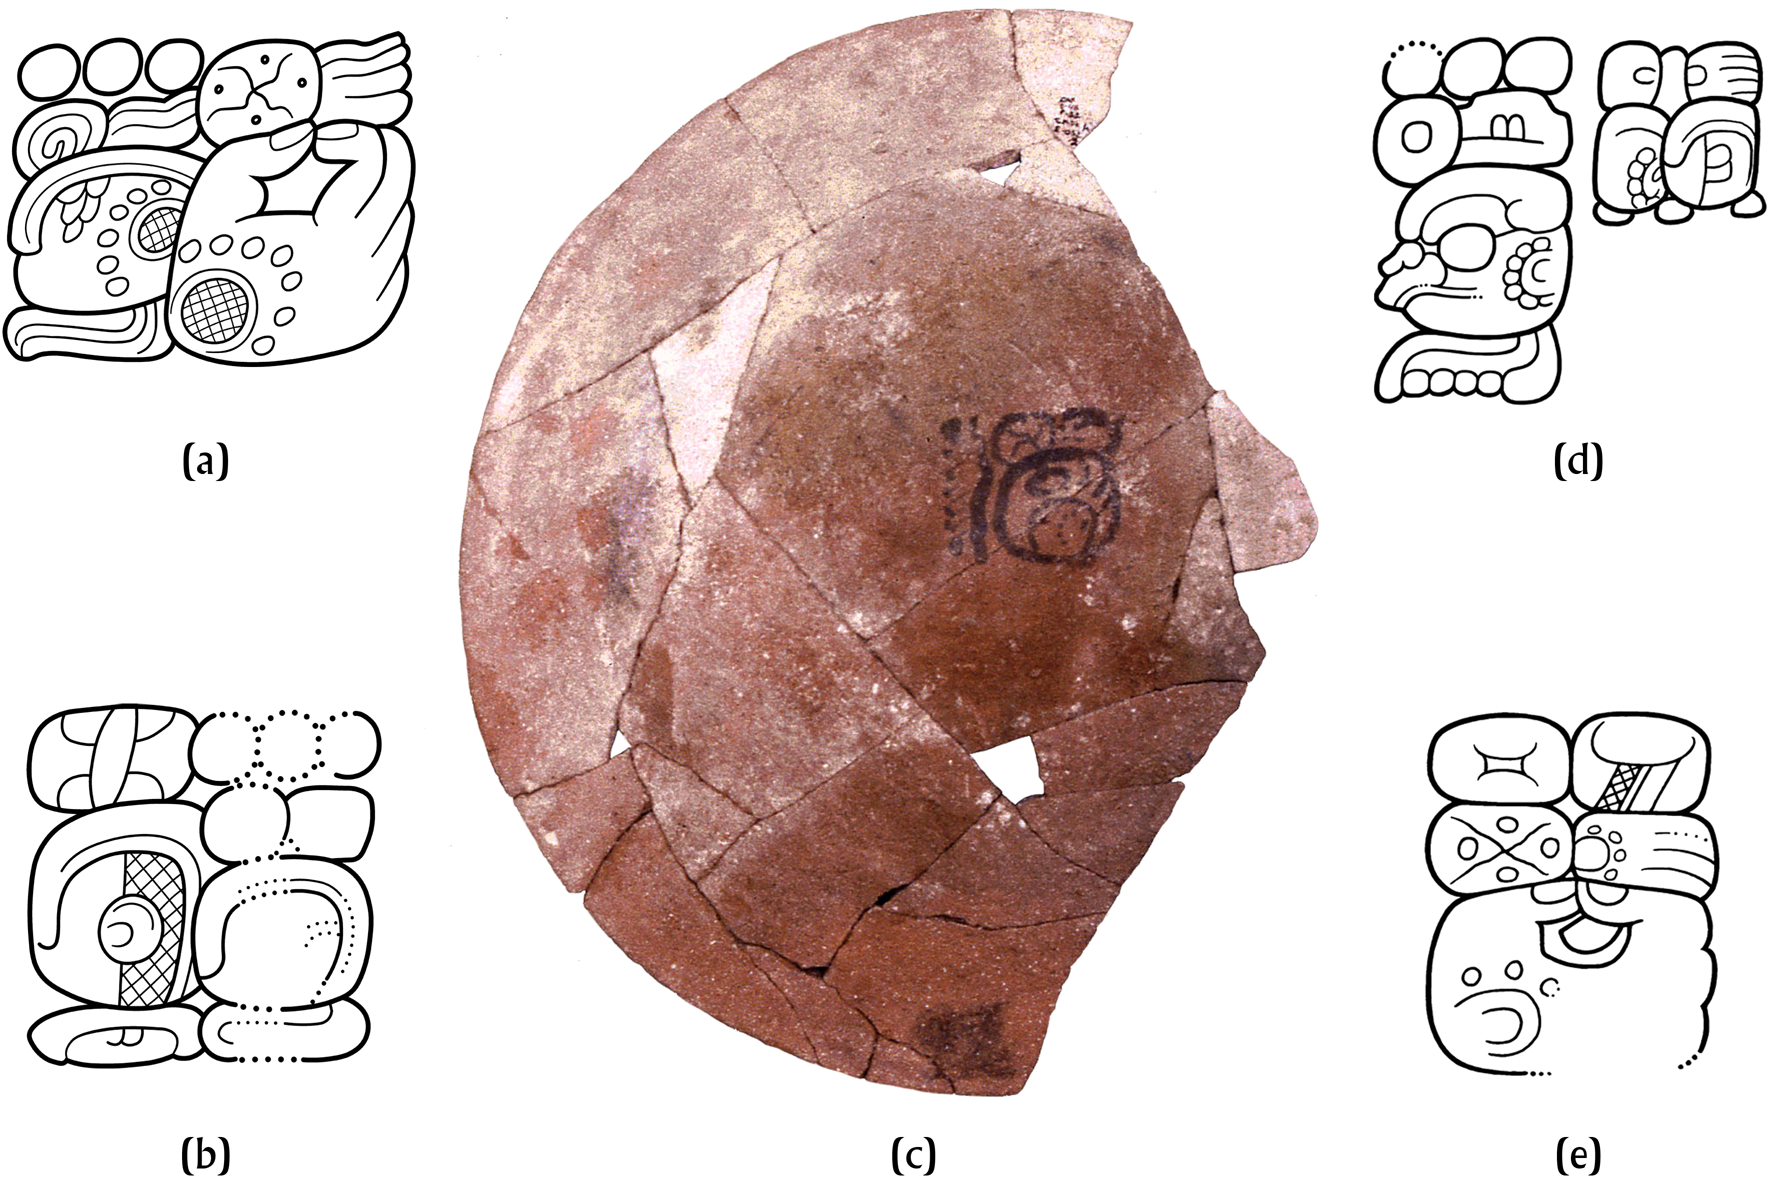
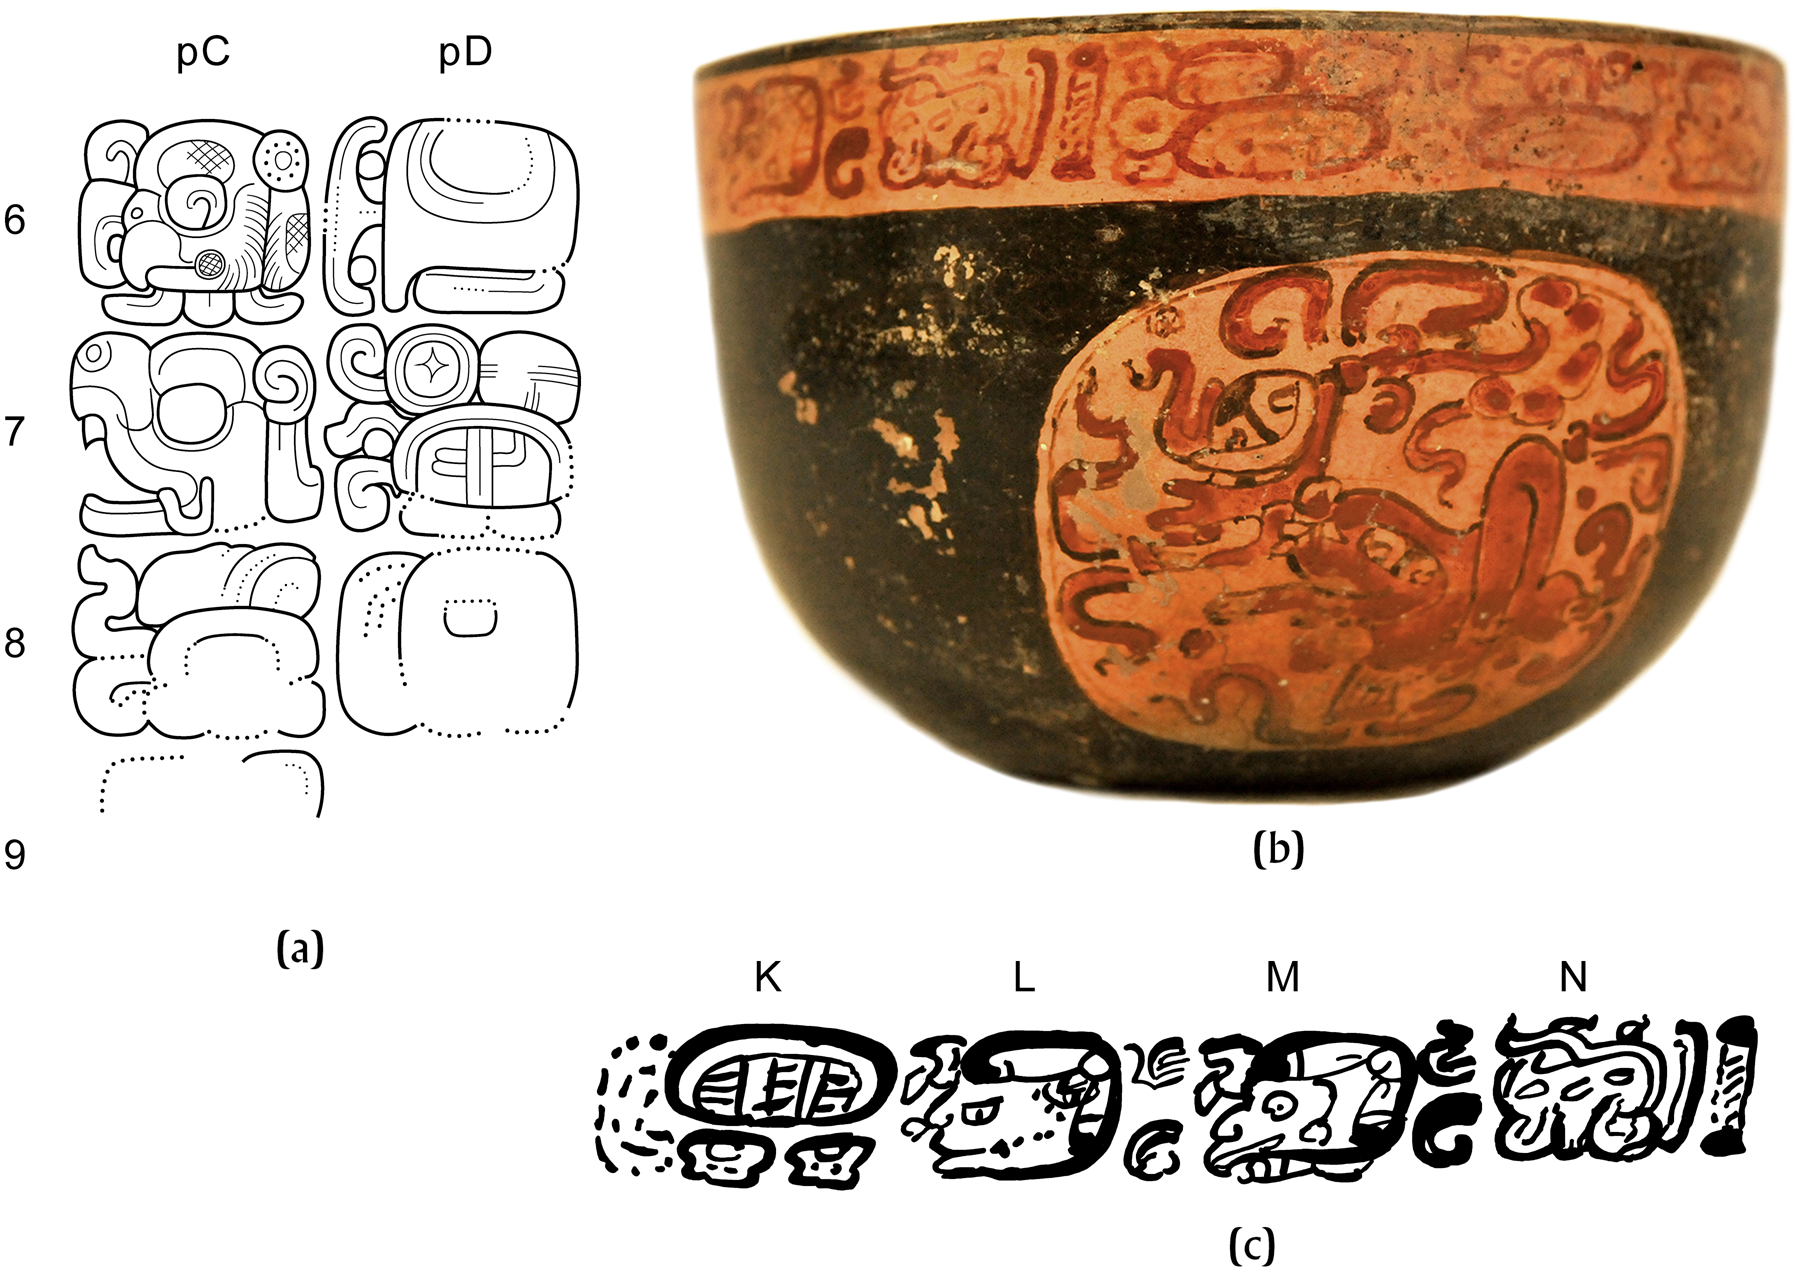
For our purposes, the key finds are three sherds from what is most likely to have been a single pot (Figure 4a–c). This is one of a subset of codex-style vessels dubbed “Dynastic Vases,” of which 12 whole examples are known from public and private collections (Martin Reference Martin1997; Robicsek and Hales Reference Robicsek and Hales1981:157–159). The Calakmul fragments are important in being the first to have been recovered archaeologically. Each vase presents the same sequence of kaanul kings, with the number featured dependent on its size; the largest, K6751, includes Rulers 1 through 19 (Figure 4d–e). A standard textual formula, with occasional omissions, provides a date, verb, name, and title. The verb in all cases is k'am/ch'am (“to grasp, take”) either as the antipassive ch'amaw k'awiil (“k'awiil is taken”) or—in one case—the transitive uch'amaw k'awiil (“he takes k'awiil”). This expression is usually used for inauguration ceremonies, although it can refer to other assumptions of authority and power as well. Despite their small size, the two larger Calakmul sherds can be identified as parts of the passages referring to Rulers 2 and 8 (Martin Reference Martin2008) (Figure 4a–b).
King list on the Dynastic Vases: (a–c) Sherds from Structure XX, Calakmul (photographs by Jorge Pérez de Lara); (d) K6751 Photograph (© Museum Associates/LACMA Conservation by Yosi Pozeilov); (e) K6751 Roll-out (after a photograph by Justin Kerr).
The Dynastic Vases would appear to present a trove of information, but a closer look quickly reveals severe obstacles in using them as a historical source (Martin Reference Martin1997). Not only are Calendar Round dates given without an anchor in the Long Count, but the coefficients of those dates are inconsistent, varying from one vase to another and including several impossible combinations. Some of these discrepancies can be attributed to illicit restoration work, but others were introduced by the original painters—including one who gave different coefficients for the same date on different vessels. Additionally, even though several of the kings’ names on the vases are familiar from the monumental record, their dates do not match those carved in stone. Even more problematic is that the names of the painted kings do not always fall in the sequence seen on monuments, and more than one ruler we would expect to see is absent. Given all these problems, it seemed very likely that the list referred to some distant portion of Preclassic history, or even to a completely legendary time.
Yet, despite its many flaws and interpretive problems, there is now some reason to think that the painted king list does, after all, have a historical basis (Martin Reference Martin2017b). Three suppositions are either helpful or required: first, that some of the kings on the vases are earlier namesakes of those we know from monuments; second, that the missing kings could be present but are masked behind alternate names; and third, that the overall chronology of the list is badly warped by miscopying and a general lack of interest in accuracy or consistency on the part of the scribes. The latter is less troubling if we take the primary function of the texts to be decorative and status imbuing rather than record keeping in the proper sense. One more factor to consider is that true codex-style vessels were not produced at Calakmul but farther to the south at the subject polity of Chatahn.
The first clue to the list's historicity comes from the concluding portion of the K6751 text. There, a Distance Number of 5.4.4.16, covering 104 years, counts forward from the accession of its last king, Ruler 19, to another date that apparently marks the death of the vessel's owner—suggesting that it was a purpose-made grave good or memorial (M2-N6). The Calendar Round in question, 4 Akbal 11 Uo, falls within the production span of codex-style vessels in the late seventh and early eighth centuries only if it is placed to the Long Count 9.13.4.1.3 in a.d. 696. But any backward count of a century or so from the era of codex-style painting has the effect of setting the whole list within the Early Classic period. Significantly, Ruler 19 (L6) shares his name with Scroll Serpent, who is known to have been the last Early Classic king of the Snake polity (see Figure 5i–j) (Table 1). There is also a Yuknoom Ch'een name at a point in the text that could credibly be the protagonist of the Dzibanche captive stairway (H5).
Comparisons of kaanul rulers’ names on the Dynastic Vases and monuments: (a) Tajoom Uk'ab K'ahk’, K6751 (J5b-I6); (b) Tuun K'ab Hix, Naranjo Stela 25 (B9); (c) K'ahk’ Ti’ Ch'ich’, K6751 (K1b); (d) K'ahk’ Ti’ Ch'ich’, El Peru Stela 44 (E8); (e) Sky Witness, K6751 (K2b); (f) Sky Witness, Caracol Stela 3 (A13); (g) Yuknoom Ti’ Chan on K6751 (K4); (h) Yax Yopaat, Dzibanche Monument 16 (pA2); (i) Scroll Serpent, K6751 (L6); (j) Scroll Serpent, Palenque Temple of the Inscriptions, East Panel (N10). Drawings by the author.
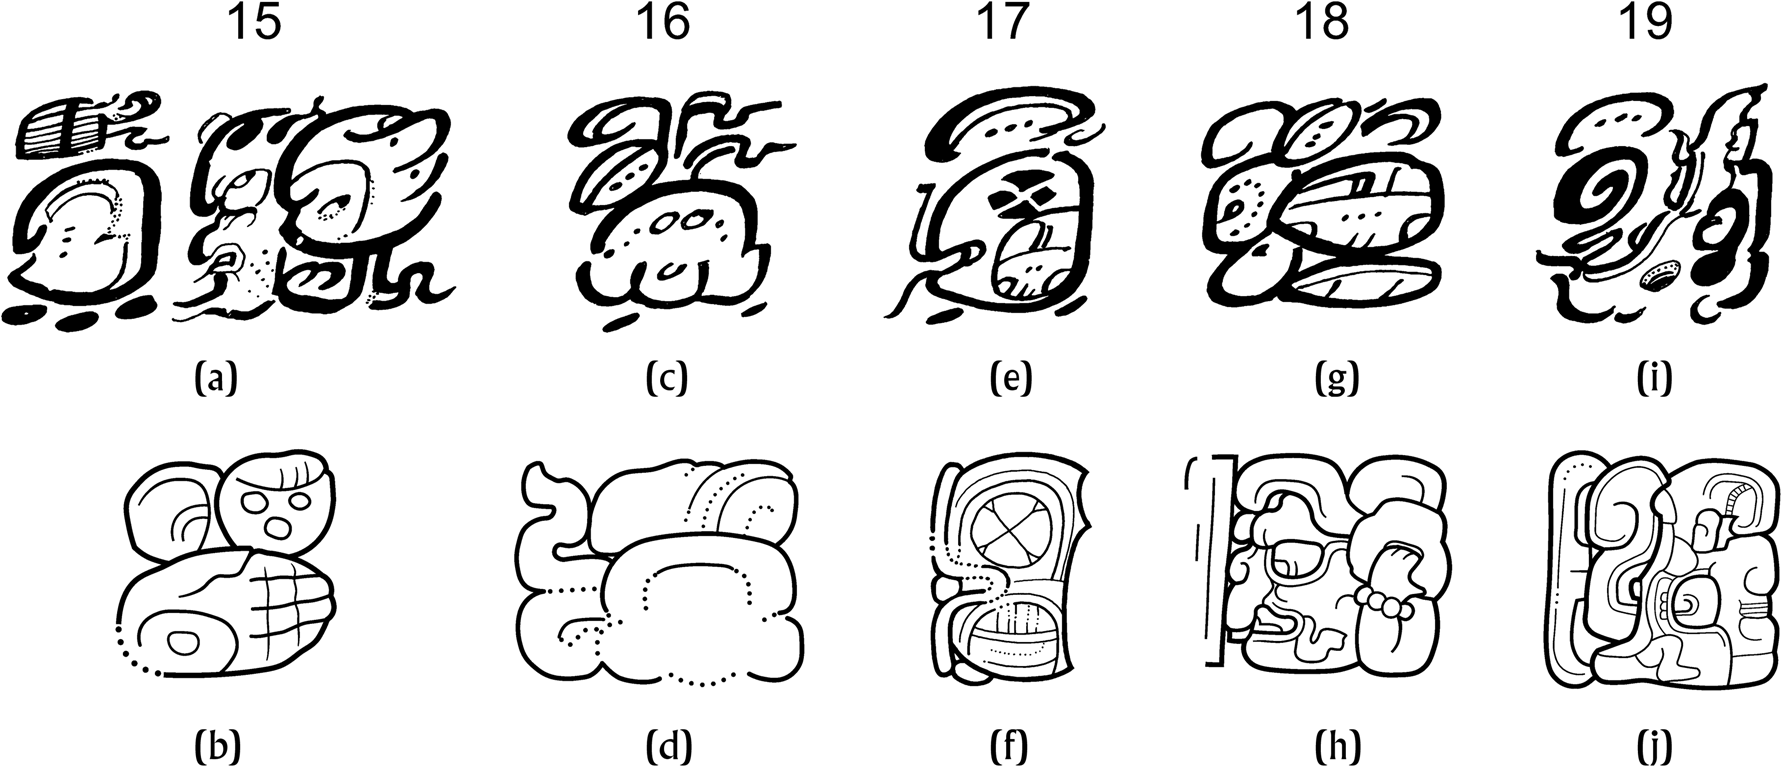
A correlation between references to five Early Classic kaanul rulers from three different sources.

As an aside, the spelling of the month Uo in that last passage is distinctly idiosyncratic. It is rendered at M4 as Yukatekan wo-hi wooh, instead of the conventional Ch'olan version IHK’[AT]-Ø ihk'at seen at J6b (Martin Reference Martin1997:854). It was once speculated that the kaan term was derived from Yukatek—a language that resisted the k(’) > ch(’) innovation—a solution that is no longer required (see above). Yet it is nonetheless interesting that Dzibanche lies within the modern range of that language. Although unlikely to be native Yukatek speakers themselves, the painters of the Dynastic Vases may have been signaling the northerly homeland, even language, of these early kings.
Could other kings on the vessels be matched with those on monuments? The trail to another begins with the discovery of El Peru Stela 44 by the Proyecto Arqueológico de El Perú-Waka’ (see Navarro-Farr et al. Reference Navarro-Farr, Kate Kelly and Freidel2024). Commissioned in a.d. 564, a partly preserved text refers to a certain K'AHK’-TI’-CH'ICH’ k'ahk’ ti’ ch'ich’ (at pC8), who is said to be the overlord of an El Peru king who came to power in a.d. 556 (Stanley Guenter, personal communication 2013) (Figure 6a). Unfortunately, although the block occupied by the opening k'uhul “holy” part of his emblem glyph is visible (at pD8), nothing more survives. K'ahk’ Ti’ Ch'ich’ is a rare name, but it is used by Ruler 16 on K6751 (K1b) (Martin Reference Martin1997:861) (Figure 5c–d).
The hegemony of K'ahk’ Ti’ Ch'ich: (a) El Peru Stela 44 (drawing by the author after Mary Kate Kelly); (b) Polychrome bowl from Burial 23, Uaxactun (photograph by Dmitri Beliaev); (c) Detail of text describing a Tikal king as vassal to K'ahk’ Ti’ Ch'ich' (K–N) (drawing by the author).
By good fortune, one of the few inscriptions we have from Dzibanche dates to exactly this era. Commissioned to celebrate the 9.6.0.0.0 period ending of a.d. 554, it was carved over three lintels inside one of the largest temple pyramids at the site (Velásquez García and Balanzario Granados Reference Velásquez García and Balanzario Granados2024). The last of them references two earlier dates, which are best calculated to 9.5.18.13.2 in 552 and 9.5.16.0.8 in 550. The event attached to the former is now lost, but from its context, it very likely referred to the dedication of the temple itself. The latter is attached to the accession of a king—expressed as chumlaj ti kaloomte'il (“seating into kaloomte’-ship”)—although his name was on a preceding but now destroyed lintel. The significance of this 550 date is that it falls on the Calendar Round 7 Lamat 6 Uo, which is precisely the one given for the “k'awiil-taking” of Ruler 16 on K6751. The chance that any two such positions match by happenstance is 18,980:1, which compels us to conclude that on this occasion, the K6751 record is accurate and that Ruler 16 and K'ahk’ Ti’ Ch'ich’ were one and the same person.
But difficulties are introduced by another text we must consider at this point: Naranjo Stela 47, discovered by Vilma Fialko and her team in 2015 (Martin et al. Reference Martin, Fialko, Tokovinine and Ramirez2016; Tokovinine et al. Reference Tokovinine, Francisco and Vilma2024) (Figure 7). It gives a sequence of four Snake overlords of Naranjo—Tuun K'ab Hix, Aj Saakil, Sky Witness, and Scroll Serpent—who are called the 4-TZ'AK-bu K'UH-ka-KAAN[AJAW] chan tz'akbu’ k'uhul kaan(ul) ajaw (“four placed in order holy Snake lords”) (B5). This is clearly at odds with what we see on K6751. Tuun K'ab Hix is mentioned on monuments at Yaxchilan in a.d. 537 and Naranjo in 546, whereas a daughter is referenced on La Corona Panel 5 as early as 520 (Barrientos et al. Reference Barrientos, Canuto and Suart2024; Martin Reference Martin2008:8) (Figure 5b). His name is nowhere to be seen on K6751, where his place as Ruler 15 is filled by someone called Tajoom Uk'ab K'ahk’ (J5-I6) (Figure 5a). The next name on Stela 47, a previously unseen Aj Saakil (A4), is equally problematic because it appears precisely where we would expect to find K'ahk’ Ti’ Ch'ich’. In this case, clarity comes from another find at Calakmul.
A sequence of four Dzibanche overlords on Naranjo Stela 47 (A3–A6). Drawing by the author after a photograph by Alexandre Tokovinine.

Although most royal records are carved on stelae that are meters high, valuable information can also emerge from far smaller and more intimate artifacts. Among the burials within Calakmul Structure II-B was Tomb 6, which contained the bodies of a woman and a child (García-Moreno and Granados Reference García-Moreno and Granados2000:30–31). Their grave goods included three needle-like bones, one of which was inscribed with 11 hieroglyphs (Figure 8). Although implements of this size and shape were often weaving picks used by high-ranking women, others were awls used in bloodletting rituals. Given that the Tomb 6 bones were found together with a collection of razor-sharp obsidian blades, the latter is more likely here.
Bone from Tomb 6, Calakmul Structure II. Drawing by the author after a photograph by Rogelio Valencia.

The tiny text, each of its signs barely 5 mm high, opens by identifying its owner as a woman, although her single name-glyph is now too damaged to read (Glyphs #1–3). The next term, which connects her to her father, is a familiar one spelled in an unfamiliar way (#4–5). The “capped ajaw” sign read as mijiin in MIJIIN-na-li is here introduced by u-K'AHK’. Until now, the flames surmounting the capped ajaw sign have been taken to be an optional elaboration of the MIJIIN logogram, but this is evidence that k'ahk’(al) (“fiery”) was instead a regular modifier, making the whole form uk'ahk’al mijiinil—as noted by Dmitri Beliaev with Rogelio Valencia (personal communications 2016). The same separation can be recognized on a painted vase found in a looter's trench at La Corona. In that case “fiery” appears as 2k'a, in which a diacritic serves to double the k'a value (Beliaev in Looper and Polyukhovych Reference Looper and Polyukhovych2016:2). A variant of this appears on Itzimte(-Bolonchen) Stela 7, where the same diacritic is attached to the logogram 2K'AHK' (see Von Euw Reference Von Euw1977:19), this time as an allusion to phonetic repetition. In a parentage statement, it likely alludes to the “heat” of male progenitors, not unlike constructions seen in Tzeltal and other Mayan languages (Marc Zender, personal communication 2016).
The remaining text is devoted to the names and titles of the father and offers a solution for the contrast between K6751 and Stela 47. Examination of close-up photographs allowed Dmitri Beliaev to recognize the K'ahk’ Ti’ Ch'ich’ Aj Saak(il) names in sequence (#6–7), demonstrating that they refer to the same individual (Martin and Beliaev Reference Martin and Beliaev2017:4). Scribes were evidently at liberty to select either nominal to identify him—an alternate naming practice that would occur again in Late Classic–period Calakmul, giving the eighth-century king nicknamed today Yuknoom Took’ K'awiil an entirely different name that was used in foreign contexts. This is significant because it demonstrates one way in which conflicts between named kings in our lists might be explained, conceivably even including the mismatch between Ruler 15/Tajoom Uk'ab K'ahk’ and Tuun K'ab Hix—although there may be some quite different solution that is currently unknown to us in this case.
Another feature of the bone text should draw our attention. At #9, we find a kaloomte’ title for K'ahk’ Ti’ Ch'ich’ Aj Saakil—the same high status into which this Dzibanche king acceded on the lintel. At #8, this is specified with EL-K'IN elk'in (“east”), styling him as a great lord of the eastern Maya realm. Given that Calakmul kings sometimes describe themselves as ochk'in kaloomte’, or great lords of the “west,” here we have one of the ways in which the Dzibanche and Calakmul kingships were distinguished (Martin Reference Martin2020:413 n23). Another instance of this eastern distinction appears on a vessel found at Uaxactun, which refers to the deep past of the Snake kingdom (Carter Reference Carter2015:10–11). It is not inconceivable that the bone text concludes with two compounds, #10–11, that together spell the serpent emblem in the form K'UH-ka? KAAN?[*AJAW], but their cursive quality and poor condition precludes any certainty.
The kaloomte’ epithet establishes K'ahk’ Ti’ Ch'ich's hegemonic power, of which his overlordship at El Peru was just one part. Another emerges from a polychrome bowl retrieved from Uaxactun Burial 23 (Smith Reference Smith1955:Figure 80d) (Figure 6b). This greatly resembles another bowl, K6813, that carries the name and titles of the Naranjo king Aj Numsaaj Chan K'inich and that was produced at that site in the second half of the sixth century. The stated owner of the Uaxactun bowl is not the king of Naranjo but one of Tikal (using an uncommon but recognized variant of its emblem glyph). However, his long nominal phrase does not match any of those known from the great city itself, and he cannot be fitted into its count of kings. The salient point comes at the close of the phrase, where we are told that he was the yajaw or “vassal” of K'ahk’ Ti’ Ch'ich’ (note the concluding AJ sign that begins an Aj Saakil name truncated for lack of space) (Martin and Beliaev Reference Martin and Beliaev2017; also Martin Reference Martin2005:4, n8) (Figure 6c).
The explanation for their relationship doubtless lies in a drastic upending of Tikal's political fortunes. In 562, the twenty-first Tikal king, Wak Chan K'awiil, suffered a “star war” defeat that had long-lasting ramifications—no monuments can be found at the city for the next 130 years. This clash is described on Caracol Altar 21 amid a longer series of interactions linking Tikal with both Caracol and the Snake polity (Houston Reference Houston1987:93, Reference Houston, Robertson and Fields1991; Martin Reference Martin2001). The name and title of the victor are mostly effaced, but their remaining outlines cannot be those of the current Caracol king. Instead, those outlines are consistent with those of a kaanul king, an idea that is clearly attractive given that Dzibanche was the main beneficiary of Tikal's eclipse. Sergei Vepretskii (personal communication 2017) has made a good case that K'ahk’ Ti’ Ch'ich’ appears in a later section of the Altar 21 text, and that it was he who defeated Tikal in 562. This would make good sense of their vassal–overlord relationship on the bowl, manufactured at another vassal center. Most likely, the Tikal client was a compliant puppet disavowed by later generations of Tikal dynasts (Martin and Beliaev Reference Martin and Beliaev2017:4). Finally, a text recently uncovered at Chochkitam names K'ahk’ Ti’ Ch'ich’ as the overlord of the local king (Estrada-Belli and Tokovinine Reference Estrada-Belli and Tokovinine2022). Probably dated to 568, this would extend his reign still further, with implications that we will come to shortly.
Does the presence of the inscribed bone at Calakmul demonstrate familial continuity with Dzibanche? Archaeologically, the proximity of Tomb 6 to Tomb 4 within Structure II-B—which is almost certain to be that of Yich'aak K'ahk’—suggests that they were laid down at much the same time, at the very end of the seventh century (Carrasco Vargas et al. Reference Carrasco Vargas, Boucher, Gonzaléz, Blos, Vierna, Moreno and Negrete1999; García-Moreno and Granados Reference García-Moreno and Granados2000). We know that the occupant of Tomb 6 was a relatively young woman, and this undermines the otherwise attractive idea that the incised bone identifies her. Deposited a century or more after the lifetime of K'ahk’ Ti’ Ch'ich’, this is more likely to be an heirloom—one suggestive of close family ties between the old and new capitals but not evidence for a direct link.
The king who follows K'ahk’ Ti’ Ch'ich’ Aj Saakil on both Stela 47 and K6751 is Sky Witness (K2b), whose name is only partially deciphered (Figure 5e–f). He supervised the elevation of a Los Alacranes king in 561 (Grube Reference Grube and Sprajc2008:195), a date that made him the initial suspect as conqueror of Tikal (Martin Reference Martin2005:3–5). As things currently stand, the reigns of these two Snake rulers overlap, raising the prospect of a dual kingship system. We already know that the rhetorical emphasis on paramount rulers could mask the presence of apprentice kings, who were also “holy lords” bearing emblem glyphs. Indeed, Yuknoom Yich'aak K'ahk’ II carries the full kaanul emblem glyph as a fourteen-year-old adolescent in 662, still two decades away from succeeding Yuknoom Ch'een II. There could have been separate junior and senior positions entailing successive inaugurations, the second into kaloomte’ status (Martin Reference Martin2017b, Reference Martin2020:73, 107, 322). All remains conjecture at this stage, but it could provide a solution for some, though not all, chronological conflicts on K6751. It might also be a way to explain the otherwise perplexing credit given to Sky Witness for an attack on Palenque in 599—a placement that conflicts with no less than two other reigns. There is one more textual reference to Sky Witness, probably commissioned in 593, some 138 km north of Dzibanche at Yo'okop; a useful insight into the northern reach of the kaanul kingdom.
Returning to K6751, the next character in the sequence—Ruler 18, or Yuknoom Ti’ Chan (K4)—represents another divergence (Figure 5g). We might expect his reign to coincide with the 9.7.0.0.0 period ending of 573, which is recorded on part of another monumental stairway, Dzibanche Monument 2. A matching block from that program, Monument 16, mentions a ruler's name that resembles that of Yax Yopaat, a character known from an unprovenanced slate mirror-back (Velásquez García and Balanzario Granados Reference Velásquez García and Balanzario Granados2024) (Figure 5h). Yuknoom Ti’ Chan and Yax Yopaat could be alternate names, but evidence for this is currently lacking. Neither moniker appears on Naranjo Stela 47, although with a tenure that lasted only a few years, he might not have achieved sufficient status to merit mention as an overlord.
We next come to Ruler 19, the aforementioned Scroll Serpent, whose moniker was probably read u-?K'AY-KAAN for uk'ay kaan—literally, “Song of the Snake” (Figure 5i–j). Information on his reign appears on Calakmul Stela 33, one of the better-preserved monuments at the site, erected in front of Structure V in 657 (Figure 9). Its rear face tracks back in time to describe his accession on 9.7.5.14.17 in 579, linking that to the period endings of 9.7.10.0.0 and 9.8.0.0.0, which fell in 583 and 593. In the process, it gives considerable prominence to a woman—most likely his queen consort—who shares her name with two later royal females from Calakmul (one of them Lady K'abel at El Peru-Waka’; see Navarro-Farr et al. Reference Navarro-Farr, Kate Kelly and Freidel2024). Both Scroll Serpent and the period ending of 9.8.0.0.0 are back-referenced again on Calakmul Stela 8 from 721 (Martin Reference Martin2005:Figure 3). This adds the information that the king died a 4-K'atun Ajaw, meaning that he reached 59 to 79 years of age. Additionally, Stela 8 specifies the location where the K'atun-ending ceremony took place. Sadly, this is all but illegible today, although we can say with assurance that its outlines fit neither uxte'tuun nor chiiknahb.
Calakmul Stela 33, back face. Drawing by the author.

Scroll Serpent was a significant political actor whose name is found at several major centers. He was, as already noted, the overlord of the local king on Naranjo Stela 47, and a record of his accession on La Milpa Stela 12 clearly implies his dominion there (Helmke Reference Helmke2020:15, Figure 13a). On Caracol Altar 21, he again celebrates the 9.8.0.0.0 period ending (Sergei Vepretskii, personal communication 2017), and on Caracol Stela 4, he directs some lost action performed by the ruler of that center, which is evidence for his patronage there as well. At Palenque, he appears on the East Panel of the Temple of Inscriptions, where he is the protagonist of a ch'ahkaj attack against its capital of lakamha’ in 611 (Martin Reference Martin1997:862, Reference Martin and Trejo2000c:109; also Looper and Schele Reference Looper and Schele1991). The second of Dzibanche's assaults on this locale, at a distance of 382 km, these are the two longest military expeditions known in Maya history. The severe disruption visited on the Palenque dynasty, which now saw the accession of a short-lived ruler not counted in its king list—as well as a complete absence of any known monuments before 647—raises the likelihood that kaanul was able to impose its will there, much as it had at Tikal.
Beyond Scroll Serpent and the sequence on K6751 come two kings—Yuknoom Ti’ Chan II and Tajoom Uk'ab K'ahk’ II—whom we know only from Caracol monuments. The former is referenced as another overking, installing a Caracol ruler in 619, whereas the latter is a protagonist on the Caracol Hieroglyphic Stairway and Stela 22, where he features in events occurring between 622 and 630 (Helmke and Vepretskii Reference Helmke and Vepretskii2024; Martin and Grube Reference Martin and Grube2000:106).
The great reconstitution
By the first decades of the seventh century, the serpent kings had spread their influence across the southern lowlands, acquiring a series of major client kingdoms and doubtless a larger number of minor ones for which evidence is lacking. In the process, they had militarily neutered and apparently subordinated two leading rivals, Tikal and Palenque, at least for a time. Yet, seemingly at the height of its powers, the royal seat at Dzibanche was exchanged for one at Calakmul. Why might this have happened, and who brought it about?
The three Dynastic Vase sherds prove that such vessels were present at Calakmul, establishing the local elite's interest in the kingdom's antiquity and implying their sense of membership and continuity. But the kings of Calakmul also wanted to stress that they were the beginning of something new. That ambition is signaled by a numbered count, one that played no small part in recognizing the dynastic switch from Dzibanche to Calakmul (Martin Reference Martin2005:7–8).
On both Calakmul Stela 52 and Stela 89, the name and titles of their commissioning king, Yuknoom Took’ K'awiil, are followed by the statement ux tz'akbuil k'awiil (“third placed in order of K'awiil”) (I4–5) (Figure 10a). A similar reckoning appears on the jamb recovered by the Universidad de Campeche team cited earlier. There, his predecessor, Yuknoom Yich'aak K'ahk’ II, is specified as u ka tz'akbuil k'awiil (“second placed in order of K'awiil”) (A2–3) (Figure 10b). Necessarily, this makes K'awiil synonymous with his predecessor, Yuknoom Ch'een II. Clear support for this comes from the jamb text, where the next compound is the title ho’ winikhaab ajaw, or “5-K'atun Lord” (A4). Yuknoom Ch'een reached five K'atuns in age (79 years old) in the year 680, and he carries the title on a panel originally from Zapote Bobal (pD1–pB2), now on the national register in Guatemala (Martin and Reents-Budet Reference Martin and Reents-Budet2010:4) (Figure 11). In these two counts, K'awiil evidently serves as an honorific name for the deceased king, suggesting a concept of afterlife union with this patron of royal authority and power, which has parallels elsewhere.
The Short Dynastic Count at Calakmul: (a) Calakmul Stela 89 (I1–I5); (b) Calakmul Door Jamb (A1–A4). Drawings by the author.

Yuknoom Ch'een II as a 5-K'atun Ajaw, unprovenanced panel, originally from Zapote Bobal or its environs (pA1–pD2). Drawing by the author.

This “short dynastic count” of just three rulers establishes Yuknoom Ch'een II as the founder of a reconstituted kaanul kingdom, making him the primary figure in the shift in capital (Martin Reference Martin2005:11) (Figure 12). Importantly, just 58 days before his accession in 636, there was a battle that marked a decisive moment in a kaanul civil war (Helmke and Awe Reference Helmke and Awe2016a:10–12). Appearing on the hieroglyphic stairway at Caracol, it tells of a nonruling kaanul lord we know only as Yuknoom Head, who defeated the reigning Dzibanche monarch Waxaklajuun Ubaah Kaan. This very short span between the battle and the inauguration clearly suggests a causal connection. Either Yuknoom Ch'een and Yuknoom Head were close collaborators, or they were simply the same person bearing variant, or distinct pre- and postaccession names (Martin Reference Martin2005:11, n9, Reference Martin2017a).
Portrait of Yuknoom Ch'een II on a molded-carved lidded vessel now in the Schaffhausen Museum, Schaffhausen, Switzerland. Drawing by the author.

We know frustratingly little about this highly consequential conflict, but it evidently began sometime after the demise of Tajoom Uk'ab K'ahk’ II in 630 and concluded with Waxaklajuun Ubaah Kaan's death in 640. The term employed for the latter suggests that he met his end in an execution or ritual killing (Helmke and Awe Reference Helmke and Awe2016a:10). The conflict had also embroiled Naranjo, which Yuknoom Head seized in 631. Thanks to a new reading by Christophe Helmke and Sergei Vepretskii (Reference Helmke and Vepretskii2024), we can appreciate that allied fighters from Calakmul participated in that attack, marking the earliest occasion on which the uxte'tuun chiiknahb names are associated with a Snake lord.
Other switches in polity capitals did not restart dynastic counts, so it is necessary to ask why it did so here. Indeed, does the “re-zeroed” short count point to Yuknoom Ch'een II as a usurper—perhaps even one from the former Bat royal line at Calakmul? No direct reference to Yuknoom Ch'een's parentage survives, but if his claim to the serpent throne was legitimate, he would need to be a direct descendent of Dzibanche's ruling house.
Calakmul Stela 33 might provide that connection. The last legible glyphs on the rear face offer a distance number of 7.2.17, which counts forward from the 9.8.0.0.0 period ending to 9.8.7.2.17 in 600 (Figure 9). This is significant because this is precisely the date that can be calculated by joining partial information on Calakmul Stela 75 and El Peru Stela 20, both of which record the birth of Yuknoom Ch'een II (Martin Reference Martin1998). Given that Stela 33 was one of his commissions, the inclusion of such a reference is unsurprising. But following directly after the lavish discussion afforded to Scroll Serpent and his queen, we might well infer that Yuknoom Ch'een was their son—making him a royal princeling with at least some viable claim to the throne.
Under Yuknoom Ch'een II and his immediate successors, Calakmul was transformed to suit the polity's macropolitical ambitions. Although the two great early pyramids were enlarged, the great mass of the construction effort went into an expansion of the court-style buildings in its central core, whose concentrated design, areal expanse, and number of individual structures exceed that at any other Maya site—including Tikal (Martin Reference Martin, Inomata and Houston2001b). To appreciate the scale and ambition of this project, one need only compare it with the elegantly compact royal palace of Palenque, which would fit within the combined court complexes at Calakmul somewhere in the region of 30 times. The mapping and excavation conducted thus far—the latter admittedly limited in scope—reveals audience spaces and residences arranged around courtyards in familiar configurations. The organization and means necessary to build these complexes, mostly in the time of Yuknoom Ch'een II it seems, are impressive and serve to illustrate the resources at his command. Court architecture at Dzibanche is smaller but of a similar concentrated design, and it offers a suitable prototype (Nalda and Balanzario Reference Nalda and Balanzario2014:Figure 2).
Why were such outsized facilities required at Calakmul? Whatever their purpose, they seem inescapably a material signature of its political activities. Capable of accommodating many hundreds of people, we can suppose that—in addition to housing the royal family and high nobles—they were the business space for a range of different tasks, ranging from the administration of tribute and other economic activities to high-status craft production, elite schooling, and accommodation for visiting dignitaries. But “guests” might also have been housed on a more permanent basis, if some slim epigraphic clues and compelling cross-cultural comparisons are as relevant as they seem. The capitals of hegemonic powers worldwide typically host clients or their offspring to both inculcate loyalty and provide a valuable collection of hostages. This would be in keeping with a known Mesoamerican practice, and it reflects a strategy that made the control of distant vassal kingdoms viable (Martin Reference Martin, Inomata and Houston2001b, Reference Martin2020:348–351).
The political network that Calakmul operated across the Maya Lowlands retained many of the clients previously held by Dzibanche, restoring any desertions that had been incurred during the civil war and likely reaching into new areas (Figure 13). In first assaulting and then supporting a breakaway from the Tikal dynasty at Dos Pilas, we see competition with Tikal pursued using more than one means. By installing kings at Cancuen and Moral-Reforma—which sat astride key river highways to the south and west, respectively—Yuknoom Ch'een II looked to create clients that controlled important trade and communication routes. His conquest of Tikal in 657 checked the resurgence of his greatest rival, and it is only after this signal triumph that we see evidence for his overking status at a range of other sites, including Piedras Negras, Uxul, Zapote Bobal, La Corona, and El Peru. Calakmul evidently focused on its western connections, suggesting that the relocated capital may have been strategic in making those places closer to hand.
Diagram of the political interactions of the kaanul polity throughout the southern Maya Lowlands. Drawing by the author.

All this information comes from the outside in, given that Yuknoom Ch'een's name was long absent from Calakmul itself. Even though surviving dates and groupings indicate that he erected as many as 23 stelae there, the lamentable state of those monuments means that not a single stone bears a legible name. The only hope of clear examples were the subsurface excavations undertaken by the INAH project. The discovery in 1997 of Structure II-b Tomb 4, the previously noted interment linked to Yuknoom Yich'aak K'ahk’ II (Carrasco et al. 1999), finally produced those examples.
One came in the rim text of a codex-style ceramic, an heirloom piece, where we find a version of his name, yu[ku]-CH'EEN, together with a kaloomte’ title (Figure 14a). This pot is useful in placing the origins of this style to his reign. A much more fragile context, the stucco surround of a jade mosaic mask, provided another version, yu[ku]-no-CH'EEN-na (Figure 14b). Found lying on the interred body's left shoulder, both mask and surround were highly fragmentary, and the red cinnabar-inscribed text could only be recovered in part. The passage we have is introduced by u-BAAH ubaah—“it is his image(?)”—and it gives every reason to suppose that the mask was a portrait of Yuknoom Ch'een. After ubaah, we find the name of the Waterlily Serpent deity, which may be the particular persona that the mask invokes (Stephen Houston, personal communication 2022). We know that images of ancestral kings were used in ritual performances, sometimes as masks fixed to belts topped by their hieroglyphic names. Related cases appear in the scenes on painted vessels that show dances involving humanoid masks in cutaway style (for example, on K2795). Yuknoom Yich'aak K'ahk’ might have worn this visage of his predecessor and probable father in special impersonation rites.
The name of Yuknoom Ch'een II at Calakmul: (a) Codex-style vase, Tomb 4, Calakmul Structure II (photograph by Dorie Reents-Budet); (b) Fragments of a stucco text attached to a jade mask in Tomb 4, Calakmul Structure II (drawing by the author).

Aside from Tomb 4, a third instance of the name subsequently appeared on an incised potsherd (Boucher Le Landais Reference Boucher Le Landais2012: Figure 2) (Figure 15). It came from a vessel used to hold ich (“chile”) (Stuart Reference Stuart2016) and includes a fuller-than-normal spelling of yu-ku-no-ma CH'EEN-na within a statement of ownership. Finally, the damaged second glyph on the Element 39 stairway riser might offer a fourth example, albeit in a retrospective reference (Figure 1a). There, a yu[*ku]-no-*CH'EEN combination is likely, even though the bird head is too damaged to positively identify as CH'EEN.
The name of Yuknoom Ch'een II on a sherd from a vessel for chile found at Calakmul. Drawing by the author.

Yuknoom Ch'een II's 50-year reign came to an end when he was deep into old age, in either 685 or 686. By that point, he had presided over the most successful era in the kaanul dynasty's later history, emulating or exceeding the achievements of renowned predecessors such as K'ahk’ Ti’ Ch'ich’ and Scroll Serpent. We now have good reason to think that he was a direct descendant of their line, and that the reconstitution he enacted at Calakmul was a strategic one following a civil conflict—one that offered fresh opportunities for the kingdom.
Concluding thoughts
Our ability to reach back in time and access events that occurred and people who lived centuries ago is always severely constrained. Even when textual sources can be married with material remains in illuminating ways, we are looking at merest fragments of the whole, with inference and interpolation our constant companions. Yet, one thing working in our favor is that there is a strong tendency for formal monuments to record the most salient—rather than the incidental—events of their day. Political actions that altered the balance of power across whole regions would fall into that category, and the transfer from Dzibanche to Calakmul was sufficiently significant in its own time for it to be recorded with an eye toward posterity.
Rising like a phoenix from the ashes of a bitter internecine struggle, Yuknoom Ch'een II remade the kaanul kingdom at Calakmul and successfully emulated the strategies that had taken Dzibanche to its own period of dominance. His successors maintained the basic structure of the Snake “imperium” for several decades more, but defeats at the hands of Tikal coincided with a weakening grasp on its allies and clients, with the result that its political network progressively wasted away. Trouble reached the capital by 751, the period ending 9.16.0.0.0, when we see a revival of the Bat emblem amid other signs of political crisis (Martin Reference Martin2020:141).
The kaanul dynasty might later have reestablished itself at Calakmul, but given that none of the ninth-century monuments at the site are well preserved and show even the outlines of a snake-head title, this remains hypothetical. Strictly on the evidence we currently have, the sojourn of the serpent kings at uxte'tuun chiiknahb endured for little more than 115 years—a veritable flash in the pan within Calakmul's history of more than a millennium. As I have said elsewhere, there have already been many twists and turns on the trail of the serpent kings, and we will doubtless learn more in the years to come.
Acknowledgments
I must give my special appreciation to Ramón Carrasco Vargas, director of the Proyecto Arqueológico de Calakmul, who has been a hospitable and generous host during my time contributing to his project. My thanks also go to Sandra Balanzario, Francisco Estrada-Belli, and Erik Velásquez for their invitation to contribute to this special section. I appreciate the help of Adriana Velásquez Morlet, director of Centro INAH Campeche, in archival research. Finally, I am grateful for the financial assistance provided by my home institution, the University of Pennsylvania's Penn Museum, for my fieldwork at Calakmul since 2003.


 Open access