
Introduction
The Roman army in the eastern Roman Empire has been discussed extensively, including its military organization, camps, interaction with the local civilian population and policing and security actions.Footnote 1 Historical sources and epigraphical and archaeological finds attest to the presence of the Roman army in the Land of Israel, in Provincia Syria-Palaestina,Footnote 2 including the Roman legionary base of the Tenth Legion in Jerusalem.Footnote 3 With regard to the Roman military presence and the establishment of the Roman base at Legio-Kefar ‘Othnay, Isaac and Roll argued that the soldiers of Legio II Traiana, who also built roads in the area between the legionary base and Akko-Ptolemais,Footnote 4 arrived first, and those of Legio VI Ferrata replaced them slightly thereafter.Footnote 5 Inscriptions found in Israel reveal that soldiers of both legions built the aqueducts to Caesarea.Footnote 6 The archaeological finds also show the presence of units of the Sixth Legion elsewhere throughout the country, and their bases in or near poleis such as Bet Guvrin-Eleutheropolis,Footnote 7 Samaria-SebasteFootnote 8 and Tel Shalem near Bet She‘an-Scythopolis (Fig. 16.1)Footnote 9 and other sites in Israel where the permanent presence of military units has been proven.Footnote 10
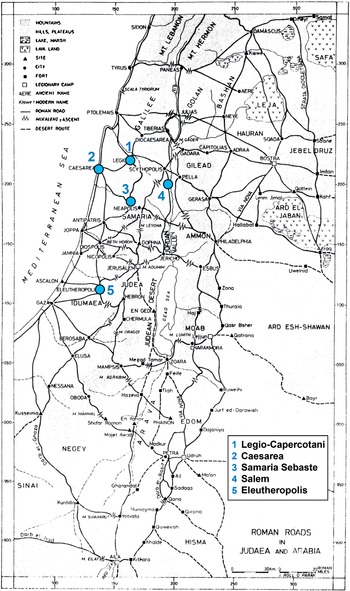
Figure 16.1 Map: Legio-Kefar ‘Othnay and the sites in Palestine that mention Roman military presence, Roman roads and the activities of the soldiers of Legio II Traiana and Legio VI Ferrata (according to Roman Road map, Reference RollRoll 1994).
This evidence has given rise to various theories about the size of the Roman legionary base and the period of time it was occupied by the soldiers of the Sixth Legion until its abandonment.Footnote 11 An archaeological survey in the Legio area proposed that the Roman legionary base at Legio-Kefar ‘Othnay was situated on the northwestern part of the El Manakh hill.Footnote 12 A geophysical survey (2010–11)Footnote 13 and four excavation seasons (2013, 2015, 2017, 2019)Footnote 14 took place on the hill over the past decade, during which architectural remains were uncovered. These support the identification of the legionary base at the site and enable us to relate archaeologically to the history of Roman military presence there in the second–third centuries CE. The findings also allow us to assess the area of the Roman legionary base, whose size resembles Roman legionary bases from the same period known in other parts of the empire.Footnote 15
In this chapter we will survey the historical background of the Roman legionary base at Legio-Kefar ‘Othnay and the small finds such as roof tiles/bricks with Roman military stamps and coins with countermarks as well as Roman weapons.Footnote 16 We will also discuss their contribution to understanding the Roman military presence at Legio-Kefar ‘Othnay.
To begin with, we note that the Latin term castra may be the most suitable term to describe the legionary base. The term translates into English as “camp,” “fort” or “fortress” depending on the usage in various periods. Webster proposed that the term “camp” was used to designate a temporary locale; “fort” was a more permanent station for a single unit, while “fortress” signified a permanent legionary base.Footnote 17 Nevertheless, this chapter will apply the term “legionary base” rather than “fortress” to the Roman legionary base at Legio, because this term attributes administrative characteristics to the site as well as those more typical of a permanent settlement than those associated with a fortified complex. We thank Professor Benjamin Isaac for his assistance in clarifying this issue.
Historical Background
The historical sources about Legio-Kefar ‘Othnay, which were collected by Tsafrir, Di Segni and Green,Footnote 18 reveal evidence of three settlements at the site in the Roman period: a Jewish village (Kefar ‘Othnay), a Roman army base (Legio-Capercotani) and a Roman–Byzantine city (Maximianopolis). In other sources, postdating the Byzantine period, the settlement is mentioned by the Arabic name El Lajjun and in Crusader sources is called La Leyun. These names preserve the name Legio, which in turn stems from the site’s association with the Roman legionary base; it is the name by which the site is still known today.
Flavius Josephus describes Lower Galilee as encompassing the mountainous region only; his description did not include the “Great Plain” (the Jezreel Valley) to the south. The southern boundary of Galilee was marked at Exaloth (Iksal); no Jewish or other settlement is mentioned in the area between Exaloth in the north and Ginae (Jenin) in the south, on the northern border of Samaria.Footnote 19 The Mishnah also indicates that the valley was not included in Jewish Galilee.Footnote 20 By contrast, according to clear Talmudic tradition,Footnote 21 Kefar ‘Othnay marks the southern halachic boundary of Galilee.
The name Kefar ‘Othnay is not known in the Bible, and according to Elitsur, this form originated in onomastica of the Second Temple period.Footnote 22 Talmudic sources mention a locale by the name Kefar ‘Othnay as early as the first generation after the destruction of the Second Temple, at the end of the first century CE.Footnote 23 This is the first mention of Kefar ‘Othnay and the presence of Jews there; later on, Rabban Gamaliel, who was the Patriarch (Nasi) in the second generation after the destruction of the Temple (c. 85–115 CE), visited Kefar ‘Othnay at the end of the first or early second century CE to confirm the divorce of a woman whose two required witnesses were kutim (Samaritans).Footnote 24 Further evidence about the site is found in the testimony of Gamaliel’s son Simon, of the ‘Usha generation’ in the middle of the second century, who presented Kefar ‘Othnay as an example of the produce of Samaritans.Footnote 25
From the sources presented here, we may conclude that a settlement by the name of Kefar ‘Othnay existed as early as the second half of the first century CE and in the second century CE; however, it is unclear from these sources whether Jews continued to live there in the third century and thereafter. The information here indicates that expansion of Jewish settlement in Galilee toward the Jezreel Valley, on the border of Samaritan country, accelerated after the first Jewish revolt (66–73 CE) and necessitated the updating of the halachic “map.”
It is against this backdrop that we should examine the founding and growth of a Jewish village by the name of Kefar ‘Othnay at this historical-geographical juncture and on the seam between the Jewish sphere in Galilee and the Samarian sphere in Samaria.Footnote 26 The mention of this settlement on the border of Galilee on the road from Galilee to Judea, with the same wording used to describe the location of Antipatris – on the border of Judaea and on the road from Judea to GalileeFootnote 27 – bolsters this assumption. Moreover, Rabban Gamaliel’s journeys to Galilee and the mention of his visit to Kefar ‘Othnay are consistent with the description of Kefar ‘Othnay as a point on the southern boundary of Galilee for purposes of the laws governing divorce and as a settlement situated on the main road from Galilee to Judea. Not for nothing did Oppenheimer point out the similarity between the journeys of Rabban Gamaliel of Yavneh and those of Roman rulers of important cities.Footnote 28 It seems that this is another aspect attesting to the location and centrality of settlements on main roads in the Land of Israel in general and the centrality of the settlement at that spot in particular.
The name Kefar ‘Othnay appears in its Latin form, Caporcotani, as a way station on the Peutinger Map (Fig. 16.2). The final version of that map is dated to the fourth century CE, although scholars agree that its sources concerning the Land of Israel date from the second century CE. The map places Capercotani midway between Caesarea and Scythopolis,Footnote 29 further evidence of its importance in the Roman imperial road network. The settlement is also mentioned as one of the cities of Galilee in the second-century Geographia by Claudius Ptolemy (καπαρκοτνεῖ).Footnote 30 The appearance of the name on the Peutinger Map and in Geographia shows that the Jewish-Samaritan village (Kefar ‘Othnay) had given its name to the legionary base – Caporcotani/ Caparcotani.Footnote 31 Other than a lone reference in Josephus’ writings to a commander of Legio VI Fretensis who was killed in the Battle of the Bet Ḥoron Ascent during Cestius Gallus’ failed campaign in Judea in 66 CE,Footnote 32 we have no additional evidence, prior to the second century, of the presence in Judea of soldiers of the Sixth Legion, its commanders or headquarters.

Figure 16.2 Peutinger Map – Caporcotani (Legio) along the Roman road between Caesarea and Bet She‘an-Scythopolis (according to Reference WeberWeber 1976, Seg. X.).
The similarity between the name of the Roman legionary base and the name of the mixed Jewish and Samaritan village also emerges from burial inscriptions of soldiers of the Sixth Legion in their place of origin in Asia Minor. The name of the village in Latin appears on the Peutinger Map and in Ptolemy’s Geographia. “Caparcotna” is also attested on inscriptions from Asia Minor.Footnote 33 One of the officers buried in Antioch of Pisidia is Gaius Novius Rusticus, son of Gaius Novius Prescus, who was consul from 165 to 168 CE. Thus, it seems that Gaius Novius served in Kefar ‘Othnay sometime around the mid second century CE,Footnote 34 providing epigraphic confirmation of the historical information.
Furthermore, ancient milestones and inscriptions attest to the location of a legionary base on El Manakh hill at Legio,Footnote 35 showing that the Roman army did indeed reach Legio in the early second century CE.Footnote 36 According to a description by Cassius Dio, dating to the early third century CE, it appears that the Sixth Legion was still encamped in Judea at that time, in addition to the Tenth Legion,Footnote 37 and scholars concur that the Sixth Legion was indeed stationed at Kefar ‘Othnay in Galilee (see next).Footnote 38 The Greek word cast[ron] ([áπó κáστ]ρων), engraved on a milestone found at the third mile from Legio, on the Legio-Scythopolis road, reconstructed by Isaac and Roll as “fortress” or “camp.” According to Isaac and Roll, in the inscription on another milestone along the Roman road from Legio to Diocaesarea (Sepphoris, see next), the word “legion” ([áπó λ]εγεωνος) appears. Both inscriptions probably refer to the legionary base.
Thus, another Roman legion, in addition to the Tenth, was stationed in Provincia Judaea at the second decade of the second century CE. Isaac and Roll suggested that this legion was Legio II Traiana.Footnote 39 The promotion of a provincial governor from the rank of procurator to consul meant that the region received an additional legion. Indeed, an inscription dated to 120 CE was found at Caesarea, honoring Lucius Cossonius Gallus, the twenty-eighth governor of provincial Judaea and consul (approx. 117–18 CE, after the execution of Lusius Quietus). The inscription from Caesarea proves that Lucius Cossonius Gallus was already consul during Trajan’s reign (117 CE).Footnote 40 With regard to Isaac and Roll’s arguments (see aforementioned), it should be noted that Lucius Cossonius Gallus had served only shortly before as the commander of Legio II Traiana.Footnote 41
Thus, it would seem that the name Legio became entrenched as the name of the legionary base during the time the Roman legion was there; eventually this name replaced the name Caporcotani/Caparcotani, apparently at the beginning of the third century CE.Footnote 42 The site was also called Legio (λεγεών) by Eusebius in his Onomasticon at the end of the third century CE, where he notes it as a point from which distances to settlements in Galilee were measured (Fig. 16.3).Footnote 43 Because Eusebius’ writings are evidence of the presence of military units in a number of settlements,Footnote 44 including Aila (ʻAqaba) as the base of Legio X Fretensis,Footnote 45 it seems that his failure to mention the name of the unit that was based or present at Legio might indicate that in his time the legionary headquarters was no longer there. As to when the headquarters left Legio, a construction inscription of the Sixth Legion found in Udrukh, ArabiaFootnote 46 apparently attests that at the end of the third century the legion (or at least part of it) had moved eastward.Footnote 47 The absence of the name of the Sixth Legion from the legions posted in Palestine at the beginning of the fifth century CEFootnote 48 underscores the assumption that at that time the headquarters was no longer at Legio-Kefar ‘Othnay. Ritterling claimed that the legion had already left by the time of Alexander Severus (222–35 CE),Footnote 49 and other assessments have been voiced for a later date for the departure of the Sixth Legion from Legio.Footnote 50
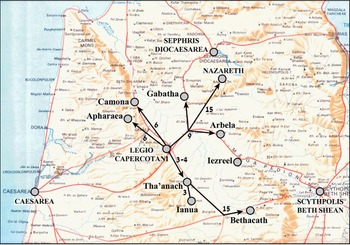
Figure 16.3 Map of sites in the Jezreel Valley and its environs showing connections to Legio, according to Eusebius (according to Roman Road Map, TIR 1994; Reference RollRoll 1994; Eusebius, Onomasticon).
Shatzman recently suggested that the small size of the bases in Udrukh and Al Lajjun (in Transjordan)Footnote 51 supports the evidence of the presence of soldiers of Legio VI Ferrata in EgyptFootnote 52 and attests that the legion was split when it was moved from the base in Judea and sent to two provinces, part to Arabia and part to Egypt.Footnote 53 Either way it is likely that by approximately the year 300 the legionary headquarters was no longer stationed at Kefar ‘Othnay.
Hieronymus (342–420 CE), in his Latin translation of Eusebius’ Onomasticon, calls Legio oppido Legionis,Footnote 54 which hints that a key civilian settlement developed at the site after the legion’s departure from Legio or during the last stages of its presence there. The term oppidum indicates a regional administrative settlement center, not necessarily fortified, which under Roman influence gradually became an urban center of the type known in central and Western Europe.Footnote 55 In any case, during the Late Roman period, the name of the place was changed to Maximianopolis. Hence, even if until that time Legio had only the status of a regional settlement center, and assuming that it did not have the status of polis before then, the name change to Maximianopolis indicates that this status was granted to the settlement at that site. Abel suggested that the city was named after the Emperor Maximian Heraclius (286–304 CE).Footnote 56 Other scholars suggested that the name honored the Emperor Maximian Galerius (305 CE) at the latest.Footnote 57 Discussion of the regional urban center that developed at Legio in the Late Roman–early Byzantine period exceeds the boundaries of the matter at hand.
Lajjun, Kefar ‘Othnay and the Legionary Base at Legio
The name Lajjun appears on the Schumacher map (1908) alongside a bridge over Naḥal Qeni (Fig. 16.4).Footnote 58 On Mandate maps,Footnote 59 the name Lajjun is given to the three central villages that existed in the area until the first half of the twentieth century. At the very beginning of scholarly research, the accepted opinion was that the Arabic name preserved the Latin word legio and thus preserved centuries-old traditions going back to the time the Roman legion built its base here.Footnote 60 This toponymic association was known to Eusebius (262–340 CE), author of the Onomasticon,Footnote 61 who notes distances from Legio (Legeon) to a number of settlements in Galilee (Fig. 16.3). As mentioned earlier, based on the distances between known milestones in the area around Legio, Isaac and Roll proposed identifying the location of the camp on El Manakh hill, north of Naḥal Qeni, northwest of the Megiddo Junction and southeast of Kibbutz Megiddo. The hill is mentioned by this name in both the Schumacher map (1908) and the Mandatory map,Footnote 62 and El Manakh according to Sharoni means “place of encampment” or “place of camel encampment” (Reference SharoniSharoni 1987: 1266). This may indicate an area that had previously been used as an encampment and perhaps that the memory of the legionary camp was preserved in the Arabic name of the hill, the way the name Legio-Lajjun (above)Footnote 63 was preserved.
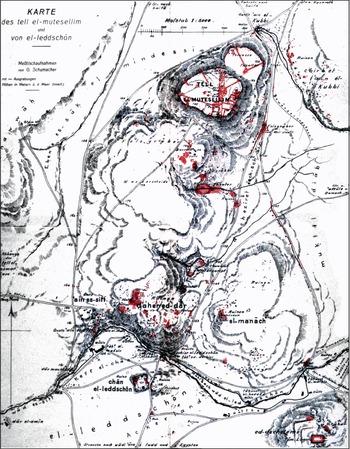
Figure 16.4 Schumacher map (1908), probes and archaeological excavations at Legio.
As noted earlier, in historical sources dated to the mid second century CE, the legionary base was called Caporcotani, after the name of the village (Kefar ‘Othnay) next to which it was established. We identify the rural site excavated within the Megiddo prison compound, south of Naḥal Qeni, as Kefar ‘Othnay. In that excavation we uncovered remains of the rural village and evidence that the population was mixed – Jews, Samaritans and the families of Roman legionaries, some of whom were Christian.Footnote 64 According to the milestones, a Roman legionary base, although established earlier (and called Caporcotani, see previous discussion), was called Legio (“legion”) only after the beginning of the third century, and that was its name until the Roman legion left the site and the Byzantine polis was founded.
Roman military bases and fortifications, as well as Roman roads between main cities (poleis), are known as obvious elements of Roman state-sponsored construction in the Land of Israel.Footnote 65 The connection between the military camp and the nearby road network also manifests itself in the way standard Roman military bases were built. These legionary bases were usually built around an orthogonal network of streets, with the main street running the length of the base, the “headquarters road” or via praetoria, intersected in the center by the main road running its width, the “commanders’ road” or via principalis. At the end of these main streets, in the middle of the base’s walls, four gates were built to provide convenient access to roads leading to and from the base. According to Isaac, the Roman military legionary base in the Land of Israel served as the starting points of roads leading to the imperial road system, and only from the Severan period and onward did six main cities (poleis) in the province serve as starting points for Roman imperial roads.Footnote 66 According to Roll, this network reached its greatest extent during the third century CE.Footnote 67 At that time the legionary base was already situated at Kefar ‘Othnay, but served no more as caput viae.
From previous surveys conducted at the site and as-yet unpublished archaeological excavations,Footnote 68 we may suggest that this was a full-fledged legionary base of the type known in the Western Roman Empire, which we believe covered an area of at most 201.25 dunams (20.125 hectares). No Roman military base of this size from the second to third centuries CE has yet been documented in the eastern Roman Empire.
Roman Military Finds from Legio-Kefar ‘Othnay
Research on the material culture of the Roman army as reflected in archaeological findings in the Land of Israel shows that, in addition to legionary-stamped pottery objects (such as roof tiles, bricks and pipes) and Roman weapons, bread stamps, tableware and amphoras, stone masks, gems and jewelry, architecture, cultic objects and burials all enable us to identify Roman military presence in general.Footnote 69 The findings, of three main types – tiles and bricks with military-legionary stamps, counterstruck coins and weapons identified with the Roman army – will be discussed later. They will assist us in examining Roman military presence at the site.
Stamped Tiles and Bricks
In Jerusalem, where the Tenth Legion was stationed, military stamps, bricks and pipes were uncovered, as was a Roman military workshop, although opinions are divided as to the precise location of the military camp.Footnote 70 This contrasts with the paucity of finds documented so far of military stamps of the legions stationed at Legio. Recently published comparative research, however,Footnote 71 shows major differences in the quantity of military stamps among legionary sites throughout the empire. While in some cases legionary camps have produced a great many finds, excavations of other camps have unearthed no tiles or bricks with military stamps at all. At this stage of the research, therefore, it seems that no great significance should be attached to comparisons of the two sites in this regard.
Nevertheless, a number of tiles and bricks bearing Roman military stamps, or those of Legio VI Ferrata, have been documented from Legio. Reference SchumacherSchumacher (1908: 175) was the first to publish a tile with a Sixth Legion Ferrata stamp (LEG VI FER), which was found east of the theater at Legio. Other stamped tiles were discovered in Schumacher’s excavations of the amphitheater south of the tell and in his excavations at e-Daher Hill.Footnote 72 Sixth Legion-stamped tiles were also found at Tel Ta‘anach, south of Legio,Footnote 73 and an additional tile was found in the hiding complex at Har Hazon.Footnote 74 Adan-Bayewitz reported tiles bearing the Sixth Legion stamp from the excavations at Kefar Ḥananya, on the border of the Upper Galilee, where pottery kilns were also found.Footnote 75 A Sixth Legion-stamped tile was also found in the excavations of the Roman procurator’s palace at Caesarea.Footnote 76 Tiles bearing military stamps have also been documented in private collections and in the possession of communities in the area.Footnote 77 Recently a number of military-stamped tiles were found in a number of archaeological excavations in the Legio area, among them on the edges of the legionary base hill,Footnote 78 in the Megiddo Prison compoundFootnote 79 and in the JVRP excavations of the legionary base.Footnote 80 The findings include stamps of two legions, as well as numerous private stamps and stamps of other units. The latter will not be described here.
Roman Military Stamps of Legio II Traiana
Two stamps were found in excavations at the edges of El Manakh hill, identified as military stamps not of Legio VI Ferrata. In a preliminary report, it was proposed that they be identified as belonging to Legio II Traiana.Footnote 81 On one of the tiles, the following stamped inscription survived: LEGII[], which we propose reconstructing as LEGII[T].
The preliminary assumption, that these were tiles of the Second Legion (Traiana), relies on the fact that this legion is mentioned on the milestone dated to the year 120 CE found along the Roman road from Legio to Sepphoris/Acco.Footnote 82 The stamps on the tile found in the excavations at the edges of the hill are not intact, and we may propose reconstructing them as LEGIII[] or LEGII[]. This would mean the stamps could have belonged either to the Third Legion or the Second Legion (see discussion in the historical overview, n. 39). A new find of tiles of this type in the JVRP excavation of the legionary base,Footnote 83 of more intact stamps of Legio II Traiana, supports this proposal (Fig. 16.5).
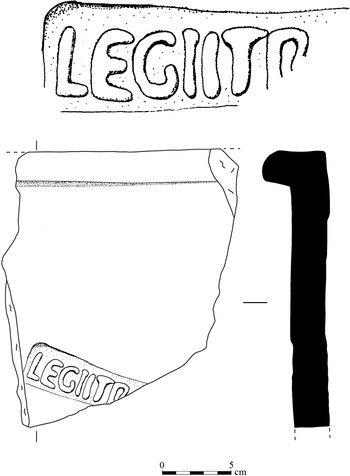
Figure 16.5 Tile bearing the stamp of Legio II Traiana, from Legio-Kefar ‘Othnay (JVRP Excavation).
Roman Military Stamps of Legio VI Ferrata
These stamps are divided into six main types. They are categorized typologically, and at this phase of the research it may be assumed that they were stamped at the site during the second to third centuries CE.
1. Well-executed, framed stamp. Top line: LEGVI (with a line above the number VI); bottom line: FERR (Fig. 16.6:1).
2. LEGVIF[ER], in a square frame.
3. LEGVIFE[R], in an elliptical frame.
4. LEGVIFE[R], with a line about the number VI.
5. LEGVIFER, carelessly executed, mostly mirror-stamped (negative; Fig. 16.6.2).
6. Tile with ligature (of the letters ERR) of the word Ferrata (Fig. 16.6.3).
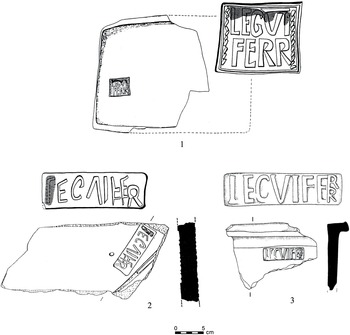
Figure 16.6 Stamps of Legio VI Ferrata stamps from Legio-Kefar ‘Othnay (Tepper 2003).
Although a Roman military pottery kiln has not yet been found in the Legio area, the petrographic tests we conducted on a number of tiles bearing stamps of the two abovementioned legions revealed that they were all made from local clay typical of Naḥal Qeni and the Megiddo area.Footnote 84 This is reasonable testimony to the presence of a workshop at the site, which would have operated to meet the construction needs in and near the legionary base, as shown by similar findings in JerusalemFootnote 85 and elsewhere in the empire.Footnote 86
The issue of whether this workshop operated parallel to a workshop not owned by the Roman army cannot be resolved at this time.Footnote 87 However, we note that the survey of the Legio area and in the excavations of Kefar ‘Othnay revealed clay stands, which are typical of pottery workshop assemblages during the Roman period.Footnote 88 This demonstrates the existence of a local workshop here during the Roman period that would have also produced pottery objects. Another conclusion is that the production of materials for the Roman army at Legio, including bricks and tiles,Footnote 89 should be dated to the first phase of the establishment of the camp at the site, in the second decade of the second century CE.
Countermarked Coins
Countermarked coins with legionary numbers or symbols were minted by the military authorities.Footnote 90 Thus, findings of this type can contribute to the identification of Roman presence at the site, as was also proposed with regard to the Tenth Legion Fretensis in Jerusalem.Footnote 91 Howgego mentioned eleven coins with countermarks of the Sixth Legion (LVIF). The seals in question were overstruck on coins originally minted from 5 BCE to 117 CE. Overstrikes were also found on coins minted in the time of Claudius (41–54 CE), Nero (54–68 CE) and Domitian (81–96 CE), as well as on one coin from the time of Agrippa II (48–95 CE)Footnote 92 from the same series, and Howgego posited that these coins were probably countermarked in Legio after the legion arrived there from Arabia.Footnote 93 In the Legio region survey, more than forty countermarked coins of the Sixth Legion were examined,Footnote 94 most of which were struck over worn coins. Of these, six coins could be identified as having been minted in Antioch, three from the time of Claudius, Domitian and Vespasian (69–79 CE), and two from the Iudaea Capta series, one of the latter from the time of Vespasian.
Our research confirms Howgego’s conclusion that the VI Ferrata countermarks date no later than the second decade of the second century CE. We have found that the Sixth Legion stamps on the coins were divided into three groups: (1) stamps of the LVIF type; (2) stamps similar to the previous group, but with a line above the number VI (see Fig. 16.7); and (3) stamps of the FVI type. Their chronology is a subject for further study.
The letters on all the coins are very finely incised and clear. The average measurements are W: 0.5 mm; H: 2.0–2.5 mm. Of the additional dated countermarked coins, we note one from the time of Domitian and another from the time of Claudius. Interestingly, some of the coins revealed another, rectangular countermark, of a head facing right (see Fig. 16.7), measuring on average 3.5–5.0 mm. Among this type are additional coins that do not feature the legion number; these will be discussed in a separate study. Furthermore, additional coins have recently been found bearing countermarks of the Sixth Legion in the excavations at Kefar ‘Othnay and of the legionary base (not yet published).Footnote 95 Those that can be dated will contribute greatly to the discussion of the characteristics of Roman military minting activities at the legionary base at Legio.

Figure 16.7 Legio, Coin with two countermarks, the first of Legio VI Ferrata, the second of a head facing right (Reference TepperTepper 2014a).
In recent years, coins have been found with the countermark of Legio VI Ferrata at SepphorisFootnote 96 and at Kh. Hammam in eastern Galilee,Footnote 97 two sites that have been identified as Jewish. Although it has been suggested that the coins from Kh. Hammam are part of emergency hoards from the Bar Kokhba Revolt, it is possible that the coins from both sites are evidence of commerce between the legionaries from the base at Legio, or Roman troops throughout Galilee, and civilian settlements in the area of their operations.Footnote 98 The coins from Kh. Hammam might represent a life of peaceful commercial interaction before the violent events. As we know, countermarks of different types, including those of the Sixth Legion, show extensive economic-monetary activity, which included the minting of worn coins with countermarks so as to put them back into circulation. It is reasonable to assume that this activity was carried out by a central authority, apparently in the context of the Sixth Legion at Legio. Furthermore, coins bearing the countermark of the Tenth Legion Fretensis, which were also found at Legio-Kefar ‘Othnay,Footnote 99 enable us to deduce the existence of commerce among legionaries and/or the movement of merchandise between the two legions in the province.
Weapons
In the Legio area survey and the excavations at El Manakh hill, a number of metal and stone objects were found that were identified as weapons and legionaries’ equipment (Fig. 16.8).Footnote 100 Next, we will discuss a small collection of the metal finds only.
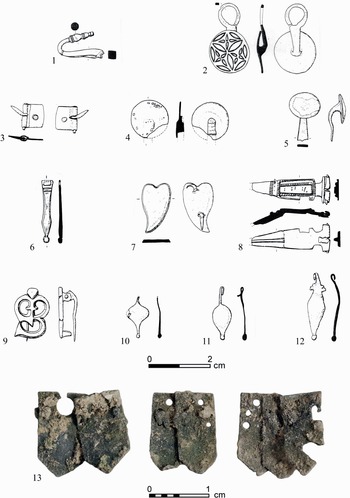
Figure 16.8 Legio, Roman military equipment: 1. Helmet carrying handle; 2–3. Object to be suspended from a sword frog; 4. Belt decoration; 5. Object from a segmented cuirass; 6. Strap terminals; 7. Belt mount; 8–9. Fibula; 10–12. Pendants; 13. Scale armor (Tepper 2003; no. 13 from JVRP excavation).
Helmet carrying handle (Fig. 16.8:1): Such handles were attached at the center of the neck guard. Examples of such handles are known from Masada as well as from Western Europe.Footnote 101 They were also used at the time of the Republic.Footnote 102 Handles of this type also served as mirrors and medicine boxes in Roman times.
Items for suspension on a sword frog (Fig. 16.8:2–3): The Roman sword frog hung from leather strips from a soldier’s belt. The strips were connected to a round, suspended element that was inserted in a slit in the belt. Two items that could not be dated are known from the Legio area. The first (Fig. 16.8:2) is decorated with a typical Eastern-style rosette, which is not previously known on a western weapon. The second (Fig. 16.8:3) was coated with gold, remnants of which can be seen on the round element.
Belt decoration (cingulum, balteus), resembling a tack, with a flat, silver-coated head (Fig. 16.8:4): This item apparently adorned the leather bands that hung from a Roman legionary’s belt.Footnote 103 Parallels are known from many sites in Western Europe (e.g., Vindonissa, Switzerland).Footnote 104
Belt buckle from a segmented cuirass (lorica segmentata: Fig. 16.8:5), used to attach chest and back bands of legionary armor,Footnote 105 dated according to parallels from Britain to the first and second centuries CE.Footnote 106
Strap terminals (Fig. 16.8:6): Droplike, elongated objects attached to the fringes at the end of a Roman legionnaire’s leather belt. Some have associated this item with a horse’s reins.Footnote 107 Many parallels dated to the second and third centuries CE have been found in Romania, Germany, Spain and Britain.Footnote 108
Belt mount (Fig. 16.8:7): Heart-shaped object apparently used as decoration on a legionary’s belt or horse’s bridle. Parallels from the fourth century CE are known from SpainFootnote 109 and Romania.Footnote 110
Fibula (Fig. 16.8:8): Type of strip-bow brooch, dated to the first century CE. Parallels are known from Roman military assemblages in the West (e.g., from Germany).Footnote 111
Fibula in trumpet design (Fig. 16.8:9). The fibula is dated by parallels from Morocco and Germany to the third and fourth centuries CE.Footnote 112 Earlier parallels are dated to the first and early second centuries CE, also documented in Britain.Footnote 113
Pendant (Fig. 16.8:10–12), including a teardrop pendant, which decorated horses’ bridles. Similar pendants, known from Gamla in the Kingdom of Agrippa II as well as from Britain and Romania, are dated to the first and second centuries CE.Footnote 114
Also worthy of joining this assemblage of metal weapons are sixteen pieces of scale armor (lorica squamata) found on the eastern slope of Tel Megiddo.Footnote 115 The form of these scales is typical of scales from the Roman period that are dated to the second and third centuries CE.Footnote 116 Another group of similar scales (Fig. 16.8:13) were found in the JVRP excavations in 2013 in the northern part of the camp.Footnote 117
The variety of weapons and Roman military equipment described here dates from the first to the fourth centuries CE and includes objects that were part of the Roman legionary’s equipment as well as from horses’ bridles, which may also attest to the presence of a cavalry unit at or near the legionary base at Legio. The parallels to these items come also from sites in the eastern empire, but mainly from its western provinces, which is possible evidence of both the source of the manpower and the equipment of the legionaries stationed at the base at Legio-Kefar ‘Othnay.
Summary
The evidence of Roman military presence in the area of Legio-Kefar ‘Othnay found in roof tiles, coins and weapons augments the growing architectural-archaeological testimony from the excavation project of the legionary base at Legio-Kefar ‘Othnay. Although we have not extended discussion to the detailed results of the excavations at the base, we can already propose that this was a legionary base whose plan and dimensions show that it was built in full Roman legionary style as it is known in the western Roman Empire.
The abovementioned military stamps on roof tiles and bricks reinforce the assessment that, during the lifetime of the base, two legions were stationed there, Legio II Traiana and Legio VI Ferrata, and they support Roll and Isaac’s theory that Legio II Traiana was first to arrive there, followed by Legio VI Ferrata. We concur with their proposal that Legio II Traiana was there for only a short time, and that the Sixth Legion, which settled there only after the Second abandoned it, remained there until it was sent to Arabia at the end of the third century CE or the beginning of the fourth century CE, at the latest.
The weapons described here show the presence of Roman legionaries at the site from the end of the first century CE at the earliest and apparently more so only from the early second century until the end of the third century or the early fourth century at the latest. The dating of the evidence revealed by the weapons indicates a Roman military presence at the earliest before the permanent base at Legio was established and at the latest after the departure of most of the Roman forces from the site. This presence may have been in the form of relatively small units, stationed here because of the importance of the location both before and after the permanent base was built or abandoned.
The discovery of counterstruck coins in the Legio survey, the excavations of the base and the adjacent dwelling complex (see subsequent discussion) show commercial ties among the area’s inhabitants, including between the population of Kefar ‘Othnay and the Roman legionaries stationed in the base. The finding of these coins in other archaeological complexes in Galilee that are identified as Jewish settlements underscores this theory and expands the understanding of the legionary sphere of economic influence to additional areas of Galilee.
Additional evidence that reveals Roman military presence at the site emerged from a mosaic floor unearthed in the Megiddo Prison compound in salvage excavations by the Israel Antiquities Authority (2003–8; Fig. 16.9).Footnote 118 A wealthy dwelling uncovered at the edge of Kefar ‘Othnay revealed three inscriptions in Greek, one of which was dedicated to “the God Jesus Christ.” Another inscription notes that a Roman centurion generously donated the floor. His name, Gaianus, indicates a Semitic (Arab) origin. Additional names documented on two bread stamps found in the structure are of Roman centurions; one of these names was apparently of Nabatean origin. We may reasonably posit that these individuals served in Legio VI Ferrata, thus revealing another source of that legion’s manpower. The wealthy structure, whose inhabitants were Christian families of centurions in the Roman army, was built at the beginning of the third century CE and abandoned at the end of that century. We associate its abandonment with the departure of the legion from Legio-Kefar ‘Othnay,Footnote 119 as was also clearly shown from the results of the archaeological excavation in the legionary base (n. 14).
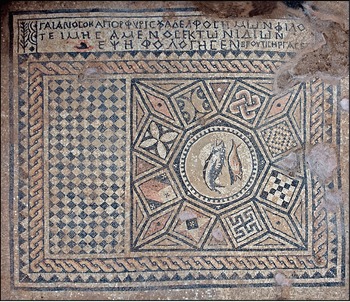
Figure 16.9 Kefar ‘Othnay – the northern panel of the mosaic in the Christian Prayer Hall. The floor was donated by Gaianus, a centurion (Reference Tepper and Di SegniTepper and Di Segni 2006).
The research presented in this chapter will be expanded in the future to include additional, still-unpublished findings from the excavation of the Christian structure in the Megiddo Prison compound and from the excavation of the legionary base (discussed earlier). These additional findings can shed new light on the complex relationship between legionaries and civilians in the eastern provinces in general and in the land of Israel in particular. Thus the current project enables a better understanding of the region of Legio-Kefar ‘Othnay, where a Roman legionary camp coexisted with a civilian settlement, and Roman legionaries and civilians, including pagans, Jews, Samaritans and Christians, lived in close proximity to each other.
It is a great privilege to dedicate a chapter in honour of Prof. Benjamin Isaac, whose contribution to the studies of the Roman Army and Aelia Capitolina are well known. In recent years, as a result of archeological excavations in Jerusalem in which I was involved, and research discussing the main streets of Aelia Capitolina (under the supervision of Professor Yoram Tsafrir), I met and had long conversations and correspondence with Professor Benjamin Isaac. I would like to thank Professor Isaac for sharing his wide knowledge with me and answering my questions with detailed explanations. His opinion regarding several issues raised in our meetings contributed a lot to my views concerning the development of the Roman colony of Aelia Capitolina, near the camp of legio X Fretensis.
In his ‘Roman Colonies in Judaea: The Foundation of Aelia Capitolina’, Isaac asks: ‘As regards Aelia, it seems quite certain that the legionary base was part of the city, but we have no evidence at all about the division of authority … and we know nothing of the territorial situation. What was the military territory and what belonged to the colony? Was there a division between the two or not?’Footnote 1 Mapping the archaeological remains of the Roman period that are known today in Jerusalem (and will be presented in short later) allows suggesting, with due caution, a possible solution to the territorial question raised by Isaac.
It is only natural to begin the present discussion with a quote from Isaac’s The Limits of Empire: ‘In 70 CE, the headquarters of the legion X Fretensis were established in Jerusalem to guard the former center of the revolt. This, is stated explicitly by Josephus on three occasions (Josephus, BJ 7.1–2, 5, 17; Vita 422); it follows from the text of a diploma of 93 CE (ILS 9059: “qui militaverunt Hierosolymnis in legione X Fretense”); and it is also clear from inscriptions found in the town’.Footnote 2
In addition to the historical sources and the epigraphic finds – the bulk of military small finds, that were revealed in several sites around the Old City, indicate the presence of the X Fretensis in Jerusalem: Coins of Aelia Capitolina, bearing symbols of the Tenth Legion; bread stamps of a military bakery, carrying the symbol of the centuria together with the names of the centurion and the baker-soldier, in Latin; and a wealth of construction materials, including clay pipes, roof tiles and bricks, bearing the stamps of the X Fretensis, are among these finds.Footnote 3 The kilns of the legion were recently exposed in Binyanei- ha’Ummah, adding important information.Footnote 4
Legio X Fretensis retained its base in town until it was transferred to Aela on the Red Sea sometime in the second half of the third century, perhaps under Diocletian. Still later, in the late fourth century, the Notitia mentions a unit of equites Mauri Illyriciani as based in Aelia (Notitia Dignitatum Orientis xxxiv 21).Footnote 5
Surprisingly, despite the long duration of military presence in Jerusalem, and although the ancient literatures insist on the fact that the Roman army never spent a single night without laying out a fortified camp (Josephus, BJ 3.76–84),Footnote 6 no archaeological remains were attributed with certainty to the military camp, and the site of the camp has not yet been identified.
Nevertheless, most researchers, relying on the testimony of Flavius Josephus and the topography of Jerusalem, propose identifying the legionary base in the area of the south-western hill – that is, the Upper City of the Second Temple period, and Herod’s palace in its north-west corner.Footnote 7 The size of the camp is still a matter of disagreement. Tsafrir, and others, suggested it lay in the south-west quarter of the Old City – the current location of the Citadel and the Armenian Quarter; Wilson suggested it occupied the area of the Armenian and Jewish quarters in the south of the Old City, and Geva, recently followed by the author, suggested it stretched all over the summit of the upper city of the Second Temple period, including the areas of the Armenian and Jewish Quarters within the Old City, as well as Mount Zion outside the Ottoman walls. Vincent suggested the camp was larger in the beginning, occupying the areas of the Jewish and Armenian Quarters, and later reduced in size.
Since no architectural remains of the military camp were recognized with certainty in the south-western hill, other suggestions were offered in recent years. E. Mazar and Stiebel offered to identify the camp in the Temple Mount and its south-west footsteps.Footnote 8 Their proposal relied on findings that were exposed in B. Mazar’s excavations, especially a Roman bathhouse, Roman latrines, and a group of ovens, identified as military facilities.Footnote 9 These structures were all located west of the Temple Mount, and in my opinion they constituted an integral part of Aelia Capitolina, with no boundary separating them from the eastern cardo and the decumanus – the main streets of the Roman city that delineate this area in the north and in the west.Footnote 10 Mazar, and Stiebel relied on, among other things, the fact that the floor of the hypocaust was built of bricks carrying the stamps of the Legio X Fretensis, and the ovens were made of broken pieces of bricks and fragments of roof tiles, some of which bear the stamp impressions of the Tenth Legion. However, building materials carrying the stamp of the Tenth Legion are not a rare find in Jerusalem. They are widespread in Roman sites throughout Jerusalem, and their wide distribution was explained as being produced by the military and sold to all in the markets of Aelia Capitolina.Footnote 11 The Legio X Fretensis stamped building materials should be taken as a chronological indicator of an occupation of the second through fourth centuries, more than an indication of a military possession. Abramovich suggested that the camp extended over the whole southern part of the Old City,Footnote 12 between the current western city wall, and the eastern Wall of the Temple Mount, including the area of the Ophel, to the south of the Temple Mount. He relied on findings that were exposed in recent excavations along the eastern cardo and the Great Causeway in the area of the Western Wall Plaza.Footnote 13 However, we suggested identifying the main remains as belonging to Aelia Capitolina, and not to the military camp. Alternatively, Bear suggested identifying the camp in the area of the Muristan and the Church of the Holy Sepulchre, but this is a hypothetical proposition. It is not based on historical evidence, and it is not substantiated by any archaeological findings. The area is identified by all as the central forum of Aelia Capitolina due to its central location near the intersection of the western cardo and the decumanus of Aelia Capitolina, and the substantial remains of the Roman period, including a public square, a decorative arch and monumental remains of public buildings.Footnote 14 Isaac reviewed the sources, noting that: ‘After the first Jewish revolt the headquarters of the legion X Fretensis were established in the western part of the city, perhaps near the towers of Herod’s palace, that one of them still stands’. Alternatively, he suggested, the military base might have been at the Temple Mount, or in the northern part of the city, where no excavations were yet carried out. At Palmyra and Luxor, he added, the Roman army established a military headquarters in a former sanctuary.Footnote 15
As mentioned earlier, I support the traditional identification of the south-western hill as the site of the Tenth Legion camp. In addition to the historical testimony of Josephus, it is important to note the advantageous topography of the south-western hill, which probably affected the choice of the army. The south-western hill’s summit (heights) extends over an area of about 20 to 25 hectares. It is the highest hill of Jerusalem, and it has a more or less leveled and well drained surface, with the elevated podium of Herod’s palace in the north-west (the Citadel, David’s tower, and Armenian Garden today). Water supply was provided by the high-level and low-level aqueducts of the Second Temple period that were reconstructed and maintained throughout the Roman period. Thirty-one Latin inscriptions that were engraved on the conduits of the high-level aqueduct to Jerusalem – carrying a curvilinear sign, symbol of centurio or centuria, followed by the name of the centurion in command – provide the Roman dating and the military identity of the aqueduct’s repair.Footnote 16
These qualities of the south-western hill assured good sanitation and health to the soldiers and made it a site well suited to the needs of the army.
Without the archaeological evidence, however, it is not possible to certainly verify the location of the camp. And in this regard, I would like to add some notes.
In recent years, several archaeological remains of the Roman period, all dated between the late first and the fourth centuries, were exposed throughout the Old City of Jerusalem and in the Ophel. The new finds included segments of thoroughfares, a bridge that carried a street towards the Temple Mount, public buildings and private residences, all belonging to the civil colony of Aelia Capitolina, its extramural neighbourhoods, or the military entourage. Mapping down the remains that are now known allows a better understanding of the topography and chronology of the Roman city.
I would like to suggest identifying the site of the camp, not necessarily on the basis of its architectural remains (that are quite meager), but more on the basis of the clear differences between the layout of the remains in the suggested site of the camp, on one hand, and the remains within the limits of Aelia Capitolina on the other. The summit of the south-western hill was indeed settled in the Roman period, but it is almost bare of architectural remains and has no urban characteristics whatsoever, while the area lying in the northern and south-eastern parts of the Old City, within the limits of Aelia Capitolina, is indicative of its orthogonal, well-developed urban layout.
Laying out the remains (of the late first to late fourth centuries) allows us to reconstruct the development of the military camp and Aelia Capitolina in four subsequent phases (Figs. 17.1–17.4):
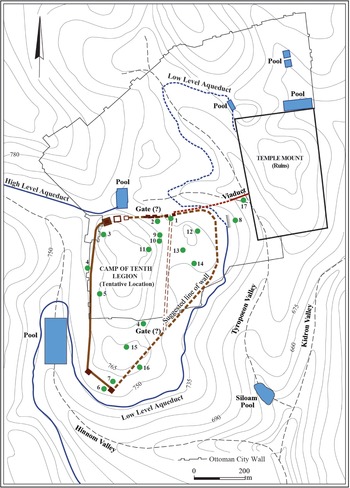
Figure 17.1 The camp of the X Fretensis, the Temple Mount, and the bridge connecting them in the early second century CE. The author’s proposal. Drawing: Natalya Zak.
1. In 70 CE the military camp was founded in the area of the former, Herodian, ‘Upper City’ (Fig. 17.1). A civilian settlement (canabae legionis) was probably established outside the walls of the fortress,Footnote 17 but its archaeological remains are unknown.
2. Around 120/130 the Roman city of Aelia Capitolina was founded next to the camp, in the northern and south-eastern areas of the Old City. The huge Temenos of the Temple Mount was included within the Roman city (Fig. 17.2).
3. Following the departure of the legio X Fretensis and the abandonment of the military camp, and especially following the Christianization of Jerusalem in the early fourth century in the Constantinian Age, the south-eastern extramural hill was inhabited, and several private courtyard houses were built.Footnote 18 The abandoned camp, in the south-western hill, remained walled and empty for several years (Fig. 17.3).
4. The abandoned camp in the south-western hill, now called ‘Zion’, was finally inhabited in the second half of the fourth century (Fig. 17.4). Several streets, churches and monasteries were built around the south-western hill, especially in the fifth and sixth centuries.Footnote 19 The ‘emptiness’ of Zion, due to its military past, made the Christian penetration easier, especially if compared to the rest of the city. Finally, around 400–50 CE, a city wall depicted in the Madaba map was built, encompassing the areas of the civil colony of Aelia Capitolina, the south-western hill of Zion, and the south-eastern hill. Scholars disagree on the date of the wall’s construction, but do agree that the wide contour of the wall, as seen in the Madaba map, is Byzantine in date (that is, between Constantine and Justinian). The construction of the wall ‘ended’ the physical growth of the city’s territory.
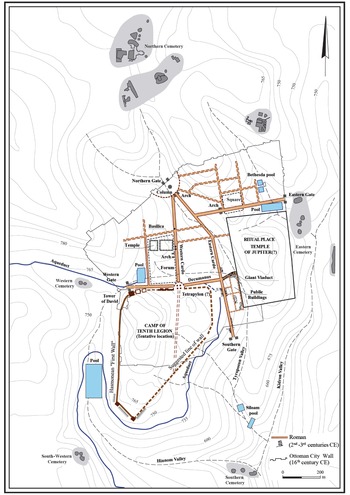
Figure 17.2 The city of Aelia Capitolina and the military camp in the second and third centuries CE. The author’s proposal. Drawing: Natalya Zak. Based on data from Reference Tsafrir, Tsafrir and SafraiTsafrir 1999a, plan; Reference Geva and SternGeva 1993, plan; Reference Gordon and MazarGordon 2007, fig. 1; Reference Weksler-Bdolah, Stiebel, Peleg-Barkat, Ben-Ami and GadotWeksler-Bdolah 2014c, fig. 1.

Figure 17.3 Jerusalem/Aelia in the mid fourth century. The author’s proposal. Drawing: Natalya Zak. The south-eastern hill being settled with courtyard houses; the abandoned camp in the south-western hill is still walled.
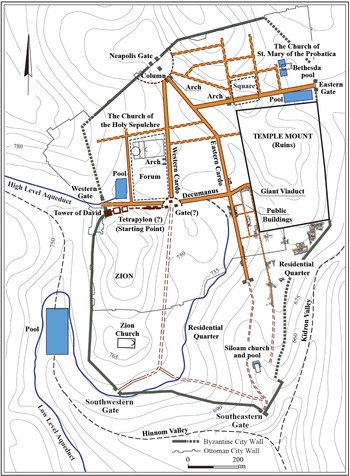
Figure 17.4 Jerusalem/Aelia around 450 CE. The author’s proposal. Drawing: Natalya Zak. A wide circumference wall surrounds the city, encompassing the area of Aelia Capitolina, the south-western hill of Zion, and the south-eastern hill. The Martyrium and Anastasis (the Church of the Holy Sepulchre), the Church of Holy Zion, the Church of St. Mary of the Probatica and the Siloam Church were built.
Following is a short description of the archaeological remains that allow such a reconstruction. Emphasis is given to the findings related to the camp and the Roman city. Remains that were described and discussed in research literature in the past are described in short.Footnote 20 New findings are portrayed in greater detail.
1 70 CE to Late Third Century: Legio X Fretensis Camp’s Site (Fig. 17.1)
Permanent camps of the Roman army were preferably established in sites having topographic and strategic advantages, good water supply and good drainage, providing better health over time for the soldiers staying there. Indeed, the south-western hill of Jerusalem fits these requirements. The testimony of Josephus (BJ 7.1–2) further supports the western location, indicating that sections of the old fortifications in the western side of the city were left intact for the defense of the army.
The Camp’s Fortifications and Related Structures
Identification of the camp’s fortifications is a difficult challenge to the researchers of Jerusalem, and until now, no remains were attributed with certainty to these defenses. However, a re-examination of sections of walls, towers, a moat, steep natural cliffs and even the structure of a gate, described in the past along the route that I think delimited the camp, allows offering carefully that these remains are indeed contemporaneous and were incorporated into the line of defenses that surrounded the military camp. It is difficult to prove this assumption, though, as most of the remains were documented in the late nineteenth to early twentieth centuries, and there is no secure dating for them. Recent excavations in some nearby locations shed light on this issue.
The camp’s fortifications in the north and west consisted of sections of earlier fortifications, the ‘First Wall’ of the Second Temple period, that were repaired and incorporated into a continuous line surrounding the camp area. Yet the northern line of the First Wall was abandoned several years before 70 CE, and the state of its remains in 70 CE is unknown.
A probable gate structure that was exposed in the past might be suggested as part of the Camp’s northern gate. This is an arched entrance (3.2 m wide, 4.5 m high) that was exposed on the eastern side of Chabad Street, opposite its intersection with St. Mark Street (Fig. 17.1:1).Footnote 21 The opening is incorporated in a wall that continues from north to south and was interpreted as an indirect entrance gate, incorporated in a wall running from east to west. Warren identified it as the Second Temple period Gennath Gate, mentioned by Flavius Josephus (BJ 5.146), but most researchers believe that the gate was later than the Second Temple period, and the estimated time of its construction was Roman or Byzantine. Wilson suggested that it is not earlier than the fifth or sixth century CE, while Vincent assumed that it is a tower gate in the wall of the camp of X Fretensis when the camp extended over the whole summit of the south-western hill, 70–130 CE. Tsafrir suggested that the gate was an Early Islamic construction.Footnote 22 The gate is sometimes referred as the Gennath Gate or the café Bashoura Gate.
Cafe Bashourah is a square café hall (8 × 8 m) located in the center of the Old City, near the intersection of David–es-Silsilah with Chabad–Jewish Street. At the center of the café there are four monolithic columns arranged in a square (4.5 × 4.5 m, Fig. 17.5) and it had been proposed that they preserved a monument, presumably a tetrapylon, adorning the intersection of the main streets of the Roman city. Footnote 23 A few meters to the south-south-west of the café hall, on the east side of Chabad Street, the gate structure discussed previously is located. Vincent rightly (in my view) identified it as a northern gate of the X Fretensis military camp and considered the structure of the gate, and the café as belonging to one compound (25 × 15 m), named in short ‘The gate of Bashoura’.Footnote 24 Wilson too, in his suggested plan of the camp of the Tenth Legion at Jerusalem, placed the northern gate of the camp exactly in this spot.Footnote 25
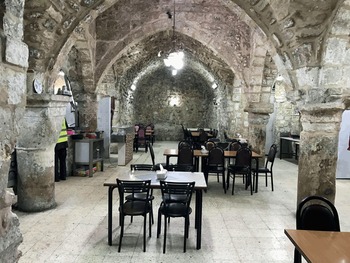
Figure 17.5 Café Bashourah: Four monolithic columns arranged in a square.
The columns in the center of café Bashourah preserve, in my opinion, a monument, possibly, as suggested before, a tetrapylon. However, I believe that this monument was actually marking the ‘starting point’ of the ways and roads that led out from the Camp’s gate to the north, east and west. Some of these roads were paved immediately after 70 CE (i.e., the road leading north, the road leading east; see the following), and their starting point was obviously connected to the camp of the X Fretensis. The monument under discussion (tetrapylon?) possibly stood in the center of a small square outside the camp’s gate. At first (after 70 CE), it was standing just outside the northern gate of the military camp. Then (following the foundation of the Roman City), it stood in the intersection, between the military camp and the civil city, and finally, after the soldiers abandoned the camp grounds, and the area of the camp was attached to the civilian city, this spot was located at the center of the city, at the intersection of the main streets – the cardo and the decumanus (Fig. 17.2).
About 40 m west of the ‘Bashoura Gate’, in the Lutheran hostel, along the northern side of St. Mark Street, two towers and a 30 m long wall section between them were recorded in the late nineteenth century.Footnote 26 It was believed that this section of wall and towers belongs to the Camp’s northern wall (Fig. 17.1:2).
Further to the west, near the north-western corner of the First Wall, stands the Tower of David, now combined in the wall of the Citadel. The Tower of David is usually recognized as either the Phazael or the Hippicus Tower, two of the three towers built by King Herod north of his palace, along the ‘First Wall’ (Josephus, BJ 5.161–9 176). The tower might have been incorporated in the defense of the north-western corner of the camp. South of the Tower of David, some sections of the ‘First Wall’ were revealed, with square towers protruding to the west. The curved contour of the NW corner is typical of Roman military camps. A thickening of the ‘First Wall’ that has been identified in the Citadel might represent the Roman restoration of the First Wall, after 70 CE (Fig. 17.1:3).Footnote 27
Other sections of the First Wall were discovered south of the Citadel, along the western side of the Ottoman city wall (Fig. 17.1:4),Footnote 28 and further south. In mount Zion, approximately 200 m south of the south-west corner of the old city wall, Maudsley documented a hewn cliff continuing from north to south, then turning south-east and continuing another 150 m along a straight axis, ending in a prominent tower in the south-east corner, (Fig. 17.1:6).Footnote 29 Hewn towers are protruding off the cliff’s face, and fallen ashlars were documented along its foothills. The cliff and the towers were considered as belonging to a section of the ‘First Wall’ that was destroyed in 70 CE. A massive, towerlike structure (8 × 4 m), located a few meters away from the edge of the southern cliff of Mount Zion, slightly north of the southernmost tower (Bliss and Dickie’s Tower AB), was recently re-excavated (Fig. 17.1:7).Footnote 30 This tower might be part of the fortifications of the camp. The structure was documented in the late nineteenth century by Conder, and again by Abel. The external southern wall (8 m long) and the western wall (4 m long) are built of large ashlars, some of which are reused Herodian stones, with drafted margins along their faces. The structure appears to be later than Herodian, and earlier than the Byzantine period, thus a Roman date may be suggested. The strategic advantage of its prominent location is clear.
Figure 17.6 Eastern Cardo in the Western Wall Plaza, looking northeast. January 2009. In lower part – flagstones of the cardo. In lower left – remains of a seventh century BCE (Iron Age) building, sealed beneath the Roman street’s pavement.
Figure 17.7 Eastern Cardo in the Western Wall Plaza, looking south-west. A rock-hewn cliff runs along the west side of the street. Hewn cells (probably shops) are carved at the bottom of the cliff, and structures of the Jewish Quarter are built atop it. In the lower-right corner – remains of a seventh century BCE (Iron Age) building, sealed under the Roman street’s pavement. Left – flagstones and portico of the Roman cardo.
From tower AB in the south-east, a hewn mote that was partly documented in the past is running north-east, around the summit of Mount Zion, disconnecting it from the lower slopes of the hill.Footnote 31 Bliss and Dickie, followed by others, suggested that the mote was of medieval age, but ditches and motes were used as defenses in many Roman camps, and there is a possibility that the mote is part of the camp’s fortifications. The steep slopes of the south-western hill were recently revealed further north in an excavation conducted in the north-west of the Western Wall Plaza (Fig. 17.1:8).Footnote 32 It became evident that the natural steep slopes of the western hill were accentuated in quarrying operations during the First and the Second Temple periods. It would be reasonable to assume that the Roman Legion took advantage of this physical structure and settled over the hill, protected by the steep slopes. It seems that, as in the southern part, some kind of fortification was built in the head of the rock cliff, or slightly away from it, but the remains of such a wall were not revealed
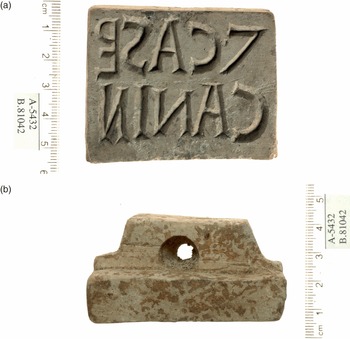
Figure 17.8 Bread stamp from the Roman dump: (Centuria) Caspe(rii), (Opus) Canin(ii). (Century) of Casperius. (Work) of Caninius (photos by Clara Amit; reading by Leah Di Segni): (a) stamp’s sealing surface; (b) stamp’s long side.
In conclusion, the remains that might constitute the defenses of the camp include a possible gate tower in the center of the northern side, sections of walls, and towers, including the Tower of David in the north-west, a hewn cliff, and protruding towers in the south and steep cliffs along the eastern side. This line of fortifications enclosed the camp, and separated it from the city. The walls were not designed to defend the camp from enemies and were therefore not massive. Such a separation wall between camp and city is known from other sites in the eastern part of the Roman Empire, such as Dura Europos, Palmyra, and Bostra, sites in which the army was based near existing cities, or inside them.Footnote 33 The reasonable suggestion to identify the ‘Wall of Sion’ (murum Sion), in the itinerary of the Bordeaux Pilgrim (dated to 333 CE), with the Walls of the legionary campFootnote 34 indicates that long sections of the walls of the camp were still standing long after the camp was abandoned in the late third century.
The outline of the south-western hill apparently dictated the irregular polygonal shape of the Tenth Legion camp. Following Wilson, most researchers prefer to restore the camp as a rectangle, relying on the usual outline of camps.Footnote 35 However, there are examples of polygon-shaped camps, which were established in accordance with the site’s topography (e.g. Camp F of the Masada siege, and others)Footnote 36 – allowing such a reconstruction.
A difficulty arising from the reconstruction of the camp as extending around the whole summit of the south-western hill, including Mount Zion, relates to the view identifying Mount Zion as the holy center of the Jewish and Christian communities living outside Aelia Capitolina in the Roman period. Footnote 37 No church or synagogue could have been built here – had the area been included within the Legionary fortress.
However, recent excavations in the burial chamber of David’s Tomb (below) showed the structure was not built prior to the late fourth century, excluding its identification with a synagogue mentioned in the early fourth-century sources.
Structures, Roads and Installations inside the Camp
The camp site was presumably crossed by two roads, leading from the café Bashoura Gate in the north to south and from east to west (usually identified as the via principalis and the via praetoria). Wilson suggested reconstructing the longitude road, which he named via principalis along the route of the later Byzantine Cardo.Footnote 38 The remains of the military road are unknown today, but it is likely in my opinion that the southern section of the western cardo indeed followed the military route.
Poor remains of buildings and installations of the Roman period that were exposed in the areas of the south-western hill provide evidence that the hill was inhabited during the period in question. The finds were summarized in detail previously.Footnote 39 They include remains of a structure and clay pipes, bearing the stamp of the X Fretensis, in the courtyard of the Citadel (Fig. 17.1:3), and hundreds of broken pieces of roof tiles, pipes, and bricks bearing the legion’s stamp in all excavated areas in the south-western hill, in the Armenian Garden (Fig. 17.1:5), and in the Jewish Quarter, indicating the existence of structures that were not preserved. Footnote 40
A few remains that have been exposed in recent years add to our knowledge:
Short sections of two water canals that were dated to the Roman period (post 70 CE) were exposed in the Kishle Compound, immediately south of the Citadel, inside Jaffa Gate, near the remains of Herod’s palace. According to the excavator, these canals might be part of the infrastructure of the Roman camp.Footnote 41
The Assyrian Church of St. Mark
In the courtyard of the Assyrian Church of St. Mark, in the Armenian Quarter (Fig. 17.1:10, approximately 200 m east of the Citadel, 40 m west of the western cardo), two walls were partly exposed, apparently creating the north-western corner of a structure, or a room in a larger structure.Footnote 42 The walls (2–2.5 m in length, width unknown) were exposed along their inner faces only. They are built of roughly hewn fieldstones, arranged in homogenous courses, and were preserved to a height of more than a meter well above their foundations. The walls were sealed by a thick white gravel-like layer, containing potsherds of the fourth century. Below this layer, between the walls, there was a stratified earthen fill, containing fragments of pottery vessels from the Roman period, and at the bottom of the excavation, there was a fill, mixed with ash, containing fragments of the Early Roman, Second Temple period. The finds seem to date the walls to the Roman period (second to fourth centuries). The limited size of the excavation does not allow drawing a full plan of the building. However, the western wall of the corner exposed now is located about 25 m to the south of a similar wall, 25 m long from north to south, that was exposed in Area R of Avigad’s excavations (Fig. 17.1:9).Footnote 43 Might these walls be part of the camp’s barracks?
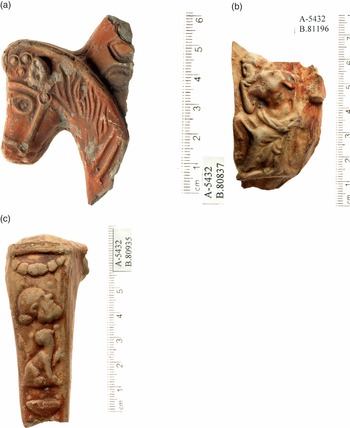
Figure 17.9 Finds from the Roman dump along the Eastern Cardo (photos by Clara Amit): (a) fragment of Broneer Type XXI lamp, with left-harnessed horse-head volute preserved; (b) wall fragment of drinking vessel, showing seated male figure in a pensive mood, identified as Saturn; (c) fragment of mold-made jug handle, decorated with Dionysiac motifs: the head of an old satyr, a panther and a bowl of fruit.
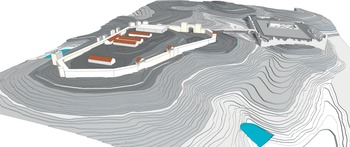
Figure 17.10 Author’s proposed reconstruction of the military camp, the ruins of the Temple Mount and the bridge connecting them in the early second century CE. The outline of the bridge is generally based on the findings of the excavations. The restoration of the camp and the Temple Mount are for illustration purposes only. Drafting: Yaakov Shmidov.
Approximately 80 m south-west of the Assyrian Church of St. Mark, an excavation inside a building on the southern side of Or HaHayim Street, near Arrarat Street, revealed a Roman stratum consisting of short segments of walls (along an east–west axis) and fragmented floor sections (Fig. 17.1:11). Earthen fills containing a multitude of potsherds dating from the Roman period (second to third centuries CE) and roof tiles bearing the stamp of the Legion X Fretensis were also recovered.Footnote 44 The architectural remains were severely damaged during later periods. Nevertheless, they indicate a Roman presence here in the second to fourth centuries.
Figure 17.11 Flagstones of the Western Cardo along Khan ez-Zeit street, looking south (Source: Archives of the Israel Antiquities Authority, the British Mandate files, 1947. Jerusalem, Muslim quarter A2, Volume 101, photograph 38812).
The Jewish Quarter
Another finding that highlights the presence of Romans, probably soldiers, on the south-western hill in the late first/early second century is a group of more than ten complete, or nearly complete pottery vessels that were discovered in a cistern of the Second Temple period, in Area F of the Jewish Quarter Excavations directed by Avigad (Fig. 17.1:14). Some of the vessels, including bowls and oil lamps, were published by Avigad as belonging to the Second Temple period. A re-examination of the vessels by R. Rosenthal-Heginbottom revealed that some of them were made in the kilns of the Tenth Legion in Binyanei-ha’Ummah, and others were similar to those found at the Roman dump that was exposed below the pavement of the Eastern Cardo (below). The date of the assemblage of vessels is between 70 and 130 CE.Footnote 45
In area N in Avigad’s excavations, east of the Hurva synagogue, about 50 m east of the western cardo, the corner of a large building whose nature is unknown was discovered (Fig. 17.1:13). The walls are 9.5 m long, and 1.7–2 m wide, with no internal division. Between the walls there was an earthen fill containing fragments of pottery vessels dating to the Roman period (second to fourth centuries). It may be assumed that the discussed corner is a foundation of a large building of the Roman period that was not preserved.Footnote 46
In Omer St., in the Jewish Quarter, approximately 100 m east of the axis of the western cardo, a part of a plastered, large installation, presumably a pool, with a bench built along its side, was exposed (Fig. 17.1:12).Footnote 47 The excavators suggested it was possibly part of a bathhouse. A ceramic pipe covered with tiles bearing the stamp of the Tenth Legion was part of the construction of the pool, dating its construction to the period of Aelia Capitolina, second to fourth centuries CE.
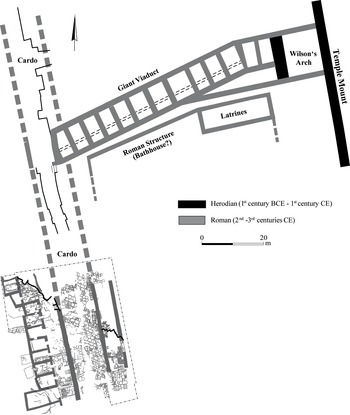
Figure 17.12 Great Causeway – Eastern Cardo – plan based on the excavation findings. Drafting: Vadim Essman, Natalya Zak.
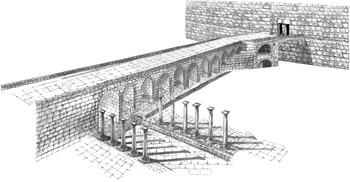
Figure 17.13 Great Causeway, carrying the decumanus, and the Eastern Cardo, reconstruction based on the excavation findings. Drafting: Yaakov Shmidov.
Roman Refuse Dump on the Slopes of the South-Western Hill
An indirect evidence regarding the presence of Roman soldiers west of the Temple Mount, possibly at the south-western hill, was recently revealed in the excavations along the eastern cardo, in the north-west part of the Western Wall Plaza (Fig. 17.6). The cardo’s course here was hewn across the slopes of the south-western hill, along a north–south direction (Fig. 17.7). The excavations exposed an accumulation of refuse dump in a deep abandoned quarry pit (extending over an area of approximately 9 × 5 meters, 3.5 m deep) that was located along the route of the street and had to be filled up and leveled prior to the paving itself. The filling material (i.e. the dump) was presumably brought from a nearby military dump, containing organic material that was burned on the site itself. The dump was rich in artifacts that possibly originated in the military camp. The main findings were three military bread-stamps, two complete and one broken (Fig. 17.8), and a very rich and varied assemblage of broken pottery vessels (Fig. 17.9:1–3). Many vessels were produced in the kilns of the X Fretensis in Binyanei-ha’Ummah, and along with them there were vessels made in the local traditions prevalent in Jerusalem before the destruction of the Second Temple, as well as imported vessels, including amphorae, lamps and fine tableware. Of the faunal remains, pigs constitute the most common species, constituting over 60 per cent of the finds, and the bones were assigned to domesticated piglets – a hallmark of Roman military diet. The dump, dated to 70–130 CE, obviously belonged to Roman soldiers, indicating their presence in the vicinity of the find spot. The importance of the finding stems from the fact that this was the first time that a sealed assemblage of finds clearly attributed to the Roman army, and dated to 70–130 CE, was unearthed in Jerusalem.Footnote 48
Aside from the Roman findings, the dump contained also findings that derived from private houses (e.g. fragments of stone vessels and fragments of frescoes), typical of the Herodian houses of the Upper City. It can therefore be assumed that the findings derived from the clearing of collapsed buildings of the Second Temple period, along with refuse of soldiers and officers who stayed on the summit of the south-western hill.
The dump was probably brought to the abandoned quarry from a nearby dump site of the military camp, possibly located on the slopes of the south-western hill. If this is so, it sheds light on the probable location of the camp itself up the hill.
Mount Zion: David’s Tomb (Fig. 17.1:15)
Limited excavations were undertaken recently by the Israel Antiquities Authority in the burial chamber of ‘David’s Tomb’ in Mount Zion. A coin of the late fourth century in the core of the external wall of the building, as well as potsherds of a similar date, that were exposed under the lower floor that abutted the wall, allow establishing a late fourth century terminus post quem for the construction of the building. In the opinion of the excavator, the building was probably related to the Church of Hagia Sion in the Byzantine period, but some architectural elements (fragments of columns and a Corinthian capital) that were exposed in the excavation in a secondary use might originate in a Roman structure that stood nearby and was not preserved.Footnote 49
Other remains of the Roman period (second to fourth centuries), including small segments of a floor of rectangular stone slabs and a set of drainage channels, were recently discovered approximately 60–70 m south-east of the tomb of David, in the Mount Zion lower parking lot (Fig. 17.1:16).Footnote 50 The remains were dated to the Roman period, but it was not possible to determine whether they were part of a private residence, or anything public.
A Roman Bridge Connecting the Slopes of the South-Western Hill and the Temple Mount
The Great Causeway, whose remains were investigated recently, is a long, arched Roman bridge, lying under es-Silsilah Street, west of the Temple Mount.Footnote 51 The findings that were revealed may suggest that as early as the late first century, or the early second century, and even before the founding of Aelia Capitolina during Hadrian’s reign, a narrow, long, arched bridge (the northern row of arches in the structure of the Great Causeway) was constructed west of the Temple Mount.Footnote 52 The entire structure of the Great Causeway includes the monumental Wilson’s Arch that is integrated in the Western Wall of the Temple Mount, and two rows of arches that were built west of Wilson’s Arch: the northern row was built first, and the southern row later, abutting it. Both rows are founded on a 14 m-wide dam wall that was built across the Tyropoeon valley in the Second Temple period. The northern bridge (some 80 m long, about 6 m wide) ran across the Tyropoeon Valley and was presumably incorporated into a narrow road that connected the slopes of the south-western hill, with the ruins of the Temple Mount (Figs. 17.1:17, 17.10). The construction of the bridge was dated between 70 and 130 CE, indicating that immediately after 70 CE, soldiers started cleaning and leveling the surface of the wide dam wall in order to construct the bridge upon it. Fallen stones, broken stone vessels, and potsherds of the Second Temple period, the remains of the destruction of 70 CE, were removed into plastered installations of the Second Temple period (one of which was identified as a ritual bath) that were hewn into the surface of the dam wall, probably during the Great Revolt of the Jews against the Romans. Two Roman furnaces, perhaps used for smelting metal, that were constructed on top of the dam wall, after its surfaces were cleared and leveled, are testimony to the type of activity carried out on the spot.
It seems that at this stage, when the Tenth Legion established its camp on the south-western hill, soldiers began clearing the area around the camp and installing access roads to and from the camp. One road that the bridge in question was incorporated into ran across the Tyropoeon Valley leading east to the Temple Mount. Another road was presumably paved at the same stage, as indicated by the two Flavian milestones, carrying the names of Vespasian and Titus, that were discovered, in secondary use, near Robinson’s Arch.Footnote 53
The construction of the bridge indicates the importance of the Temple Mount in the eyes of the Roman soldiers despite the fact that the Jewish Temple was destroyed, and parts of the Temenos walls dismantled. Possible reasons for that could be the following:
1. Obviously, the Temple Mount was still rising high and noticeable above its surroundings. From the heights of the complex, and certainly from the south-east corner there was a good strategic control of the environment, especially towards the East. It is likely that the soldiers were patrolling the Temple Mount regularly, perhaps even establishing a military outpost for observation somewhere on the mountain.
2. In addition, it is unlikely that the Romans ignored the ruins of the Jewish Temple that were still standing in the center of the compound and attracted visitors (Jews and others). Under these conditions, it is conceivable that the Romans sought to demonstrate their presence in the Temple Mount, if only to highlight their victory and supremacy.
3. Another option with due caution is that the Roman presence on the Temple Mount was also associated with the recognition of the site as holy, if only because of tradition identifying it as such for over a thousand years. In this context it is possible to suggest that the decision of Hadrian, a few years later, to build a temple to Jupiter on the Temple Mount (Cassius Dio, Roman History, 69, 12), was due to the same reasons. In Carthage, too, the Roman Capitolium was constructed on the ruins of the Punic Temple.Footnote 54
All in all – the findings that are known around the south-western hill allows the conclusion that the south-western hill was indeed inhabited, and fortified soon after the destruction of the Upper City of Herodian Jerusalem, in 70 CE. Interestingly, no structures in good state of preservation were preserved on the summit of the hill and the whole appearance of the area seems quite poor, standing in contrast to the orthogonal, well preserved state of the Roman city (below).
2 Aelia Capitolina (Second to Third/Early Fourth Century)
By the time that Aelia Capitolina was founded, the south-western hill was already occupied by the military camp, and the Roman city was built north and east of the camp, in relatively moderate areas (Fig. 17.2). As noted earlier, it is likely that the military camp was surrounded by a wall, while the limits of the city were marked with freestanding city gates, set along the roads that led out from the military camp.Footnote 55 The starting point of these roads was probably located immediately outside the northern gate of the camp and marked by a tetrapylon (described previously in the café Bashoura area). That monument was now set in the center of Aelia Capitolina (below).
The orthogonal layout of Aelia Capitolina was shaped with a grid network of streets that were parallel and perpendicular to each other. The main, central streets were somewhat wider than the rest and had porticos along their sides. The orthogonal layout of the Roman city is reflected in the Madaba mosaic map of the sixth century,Footnote 56 and is actually preserved in the urban topography of the old city of Jerusalem to our own days.
Two colonnaded thoroughfares, identified as the eastern and western cardines of the Roman city, run across the city in a north–south axis. Both streets start in an oval square that is partly known today inside and under the Ottoman Damascus Gate. The eastern cardo (its flagstones were revealed in many places along el-Wad, ha’Gai Street) runs along the Tyropoeon valley, in a north-west–south-east direction, and approximately opposite the corner of the Temple Mount, it turns south and continues in a straight line, parallel to the western wall of the Temple enclosure, towards a presumed gate in the area of the current Dung Gate. The western cardo, whose remains were documented 400 m along Khan ez-Zeit Street (Fig. 17.11), runs from the oval square inside the Damascus Gate directly south, towards the presumed northern gate of the military camp, in the area of the Café Bashoura, located today in the center of the Old City.Footnote 57 The decumanus runs from the western city gate, in the area of Jaffa Gate, eastward. It runs along David street (towards Café Bashoura), and from there, along el-Silsila street, towards the Temple Mount. North of the Temple Mount, remains of another street were exposed in the route of the Via Dolorosa. Some identify it as the northern decumanus, running from the Eastern gate, in the site of the Lion’s Gate, towards the eastern cardo in the west.
Along the main streets, remains of urban squares, monumental arches decorating the squares, and a variety of buildings typical of a Roman city are known (Fig. 17.2 and subsequent discussion).Footnote 58 The monumental appearance of the Roman city, and the good state of its preservation, are exhibited in the findings of the eastern Cardo that was exposed along the north-western side of the Western Wall Plaza; and the Great Causeway – the bridge that carried the decumanus, from the west, eastwards towards the Temple Mount, and was recently investigated along the northern side of the same Plaza (Fig. 17.12).Footnote 59
A 50 m-long segment of the eastern cardo was exposed in the Western Wall Plaza (Figs. 17.6, 17.7). The colonnaded street consisted of a carriageway (8 m wide), lined on both sides with an elevated sidewalk (1.5 m wide), and a further elevated portico (6.5 m wide). The carriageway was paved with large flagstones of the local Mizzi Hilu limestone, laid diagonally across the street’s route. The sidewalks were paved with similar flagstones, laid parallel along the street. The appearance of the 24 m-wide street is monumental. The latest coin from beneath the pavement of the street was Hadrianic, indicating that the street was not paved prior to the Hadrianic reign. Along the western side of the street, there was a row of shops, and along its eastern side, remains of two streets heading east. A monumental gateway (propylaea) between these two streets is probably part of a public building that was not exposed.
In the section that was exposed now, the cardo’s route ran across the slope of the south-western hill, paralleling the Western Wall of the Temple Mount. Its surface sloped gently from north to south. The route of the cardo was hewn and lowered to adjust the street’s level, creating a vertical cliff, 11 m high, along the western side of the street. This cliff separated the hill, where the military supposedly camped, from the civilian sphere of the colonnaded street. In the northern section of the street exposed now, the flagstones were laid on top of remains of older buildings (i.e. an Iron Age building), as well as on top of the Roman dump that was brought to the site in order to fill the pit of an abandoned quarry (described previously).
North of the Western Wall Plaza, the investigation of the Great Causeway revealed that during the Hadrianic reign, or slightly later, the narrow bridge that was constructed between the slopes of the south-western hill and the Temple Mount in 70–130 CE was widened with another row of arches. The later, southern row of arches abutted the northern row, and on top of both rows, flagstones of a street were laid. The street, recognized as the decumanus, a main street in the new Roman City, ran across the Tyropoeon valley and above the eastern cardo, leading towards the Temple Mount (Figs. 17.12, 17.13).
Recent excavations enabled a glimpse into the buildings that adorned the Roman city. Remains of a well-built, large complex of public buildings of the Roman period were exposed south of the Great Causeway, extending all the way between the Temple Mount and the eastern cardo. The walls of the Roman buildings are standing at present 10 m high. The eastern section of the building contained a public latrine of the Roman period, which might have been part of a larger Roman bathhouse (Fig. 17.12).Footnote 60
The western section of the Roman building (Fig. 17.12) was partly excavated recently. One of the stones of its northern wall (facing north) carries an inscription of the X Fretensis. Bahat thought that the stone was in a secondary use,Footnote 61 while Eck suggested it was in situ (CIIP, 1, 2, 725). The inner parts of this section are constructed of hewn ashlars with a monumental appearance. The date of this building is not known yet, though a Roman date might be postulated (the excavations reached a secondary, Early Islamic stratum inside this building, and did not proceed further).Footnote 62
In the northern part of the Old City, about 20 m north of Via Dolorosa St. and 50 m east of the eastern cardo’s route (el-Wad street), within the current compound of the ‘Austrian Hospice’, the upper part of walls and arches that supported a flat roof – belonging, presumably, to a square courtyard of a building, surrounded by rooms – were exposed.Footnote 63 The small finds within the fills that sealed the building were dated to the fourth century, implying that the building, possibly a private building in Aelia Capitolina, was built not later than the fourth century.
Summing up, the examination and mapping of all known remains of the Roman period in the area of the Old City show that the Roman city was designed according to the Roman orthogonal tradition. However, prominent remains of the Herodian city, such as the Temple Mount, were integrated in the urban plan.
Discussion
A re-examination of the remains of the Roman period that are known around the Old City of Jerusalem at present shows chronological differences that allow us to recover several stages in the development of Aelia Capitolina after 70 CE.
Earlier, we concentrated on remains in the south-western hill of Jerusalem that are related to the military camp of the Tenth Legion, and remains in the northern and south-eastern parts of the Old City that are related to Aelia Capitolina. The marked difference between these areas require a further discussion. Presented here are a few matters that arose from this study:
1. All of the remains of the Roman period (that are dated between the late first and the late third/early fourth century) are located more or less in the area of the Old City, supporting the view that the Old City, in general, preserves the remains of Aelia Capitolina, including the camp of Legio X Fretensis. The summit of Mount Zion, lying today outside the Ottoman Walls, might have been included within the limits of the camp, although this cannot be verified at present.
2. The Herodian Temenos of the Temple Mount was obviously included within the limits of Aelia Capitolina.Footnote 64 The Great Causeway carried the eastern section of the decumanus toward the main western gate of the enclosure.
3. The bridge, connecting the Temple Mount with the south-western hill at first, and with Aelia Capitolina, later, indicates the importance of the Temple Mount to the Romans. It was offered, with due caution, that its significance was not only due to strategic reasons, but also a result of the tradition identifying the Temple Mount as a holy site.
4. Mapping the remains of the Roman period in Jerusalem shows marked differences between the orthogonal layout of the remains in the northern and south-eastern parts of the Old City that seem to represent the Roman colony of Aelia Capitolina, and the ‘quite empty’ area of the south-western hill, which probably represents the military camp. The streets and the monumental buildings of Aelia Capitolina are well preserved in many places throughout the Old City of Jerusalem. Paving stones of Roman streets were exposed below the routes of several main streets of the Old City,Footnote 65 and the original drainage channels that run below their level have been used continually until the twentieth century. Monumental buildings of Aelia Capitolina, such as the arch of the ‘Ecce Homo’, are still standing high above the surface, decorating the cityscape of the Old City, and other structures are preserved to significant heights below ground level (such as the northern Roman city gate below the Damascus gate, or the latrine building near the Great Causeway). All in all, it is possible to suggest that the colony of Aelia Capitolina is indeed preserved in the Old City of Jerusalem, streets and structures alike.
5. The meager nature of the remains in the south-western hill requires discussion. Most scholars believe that the Roman military camp in Jerusalem was similar in shape to other military camps throughout the Empire. Lack of remains of the camp and the least amount of building inscriptions is surprising, and different explanations have been proposed.Footnote 66 In my opinion, the absence of the remains might be related to the mode of the camp’s evacuation and the fate of the abandoned camp thereafter. Polybius (Histories, VI, 40, 1–3); and Josephus (BJ 3, 89–92) indicated that the evacuation of a military camp during the battle is done according to a proper procedure.Footnote 67 It is likely that the evacuation of a permanent camp also followed an established procedure, although no descriptions are preserved in the historical sources. In this scenario, most of the buildings were probably dismantled, building materials collected in piles, and lightweight materials that could be utilized to build the next camp (wooden beams, furniture, perhaps even intact roof tiles) loaded on wagons and taken with the soldiers. It is likely that the heavy building materials, ashlars, for example, that were left in piles in the area of the camp, were later ‘robbed’ and utilized for construction of buildings around the city. Indeed, stones carrying fragments of Latin inscriptions, including inscriptions of the Legio X Fretensis, were reused as building stones in later buildings throughout the city, and their origin might have been the dismantled buildings of the camp.Footnote 68
The camp, therefore, remained mostly empty. However, large structures, such as the Tower of David, were not dismantled but probably used by the units of the army that continued to be present in the city long after the Legion was transferred to Aelia (above, Notitia Dignitatum Orientis xxxiv 21).
6. The historical sources and the archaeological finds indicate that the abandoned campsite that became known as Zion in the Byzantine period remained walled and mostly empty of structures long after the departure of the Legion (above). The south-western hill did not enjoy urban development like other parts of the city, and especially in relation to the extramural, south-eastern hill, where large private courtyard houses were built from the early fourth century onward.Footnote 69 It follows that the abandoned campsite remained a military zone for several decades after the legion was transferred to Aela. It was eventually inhabited, mainly by churches and monasteries, several decades later. A similar phenomenon, of campsites staying uninhabited for several decades after their abandonment, was observed in Legio and Rapidum, too.Footnote 70
Summary: The X Fretensis Camp and the Roman City of Aelia Capitolina
The historical evidence and the archaeological remains enable the following reconstruction: After the destruction of Jerusalem in 70 CE, the Legio X Fretensis camped on the south-western hill. The defenses of the camp included sections of the First Wall in the north and the west, the Herodian Tower of David in the NW corner, a hewn cliff, and protruding towers in the south and steep cliffs along the eastern side. The camp extended over an area of approximately 20–25 hectares and housed, apparently, the Legion headquarters and some of the units (Fig. 17.1).
Inside the camp there were presumably different structures, including the headquarters (principia) and barracks. Epigraphic finds indicate the existence of stables, too. Outside the camp, on the eastern slopes of the camp’s hill, artifacts originating from the camp’s refuse dump were recently discovered, and the remains of a long bridge that connected the camp with the Temple Mount were revealed.
Fifty to sixty years later, Hadrian built a new city on the ruins of Jerusalem, naming it Aelia Capitolina. The Roman city was built north and east of the camp’s hill, ‘wrapping’ the camp and maintaining a prominent border between the territory of the camp and the city. The city’s orthogonal plan abutted the camp, so that its main streets were leading to the north gate of the camp (Fig. 17.2). This intersection of the camp and the city became the starting point of the roads that led from the city in all directions.
Following the departure of the Tenth Legion to Aela, and the abandonment of the camp, and even more so after the Christianization of Jerusalem in the early fourth century, the abandoned campsite remained a close military zone, empty and fortified, while the rest of the city, and especially the extramural area of the south-eastern hill, was developed and settled densely (Fig. 17.3). Finally, between the late fourth and the mid fifth centuries, the camp’s hill that was now called Zion was inhabited and settled, and a wide-circumference city wall, encompassing the area of Aelia Capitolina together with the south-western hill and the south-eastern hill, was built (Fig. 17.4). As noted earlier, the relative emptiness of the south-western hill until comparatively late – a result of its being the former site of the Roman legionary camp – might have been among the factors that enabled the extensive construction of churches and monasteries across the hill in the Byzantine period, when the hill was named Zion.


 Open access