
Introduction
Dunyvaig (Dùn Naomhaig) Castle (site number NR44NW 24, National Grid Reference NR 40593 45487) occupies the tip of the promontory on the east side of Lagavulin Bay, Isle of Islay (Figure 1). The castle survives in the form of a tower building, an inner and outer courtyard—the latter with at least five internal buildings (buildings A–E)—and a ‘sea gate’ (Figure 2). While the origins of the castle are very likely earlier, the current visible works are thought to date from the sixteenth century with later additions and repairs (Royal Commission on the Ancient and Historical Monuments of Scotland 1984).
Dunyvaig Castle, Lagavulin Bay, Islay (map by Darko Maričević, photograph by Steven Mithen).

Royal Commission on the Ancient and Historical Monuments of Scotland (1984) plan of Dunyvaig Castle, showing trenches 1 and 2 (figure from RCAHMS, with annotations by Darko Maričević).

The castle was one of the major strongholds of the MacDonalds of Dunyvaig and the Glens. The MacDonald Lordship of the Isles flourished throughout the fourteenth and fifteenth centuries AD, with its centre at Finlaggan on Islay (the island also containing the castle of Loch Gorm). The MacDonalds continued to hold Dunyvaig Castle until 1494 when, following several rebellions, it and their Islay lands were forfeited to the crown. Caldwell (Reference Caldwell2008) provides a detailed account of this history and the events referred to below.
Relations between the MacDonalds and another powerful west coast family, the Campbells, were complex, but prior to the forfeiture their relationship can perhaps best be described as that of cautious neighbours. After the forfeiture, the crown relied on successive earls of Argyll to exercise royal authority in the west. This increasingly resulted in Campbell encroachment on lands traditionally part of the MacDonald patrimony. In 1519, for example, the Earl of Argyll deputed his brother John Campbell of Calder as keeper of Dunyvaig, although the castle was regranted to the MacDonalds in 1545. By the early seventeenth century, riven by infighting and mounting debts, the MacDonalds of Dunyvaig had also lost their ancestral base of Islay, their chief (Angus) surrendering Dunyvaig Castle to the crown in 1605, before renouncing ownership of the whole island in favour of Sir John Campbell of Cawdor in 1615 (Cowan Reference Cowan1979). This resulted in increased animosity towards the Campbells by the remaining members of the Dunyvaig family.
Excavations at Dunyvaig
In August 2018, Islay Heritage—a charity devoted to promoting the archaeology of Islay (SCO 46938)—and the University of Reading opened two excavation trenches within the castle to evaluate the archaeological remains. Trench 2 investigated the sea gate that had been partially blocked by a turf structure, and the remains of a burnt building (Figure 3). Trench 1 identified that the partially ruined stone and mortar walls of the outer courtyard had also been refortified by turf walling. Trench 1 also exposed the north end of building B, a large rectangular building measuring 11.5 × 4.5m internally with substantial clay bonded walls. This building, like that in trench 2, had been burnt prior to its collapse, possibly indicating a widespread conflagration within the castle courtyard. The seal matrix was discovered on a clay floor that lay beneath the wall collapse of building B (Figure 4).
Trench 2, excavation at the sea gate (figure by Darko Maričević).

Trench 1, excavation of building B showing location of the seal matrix (figure by Darko Maričević).

The seal matrix
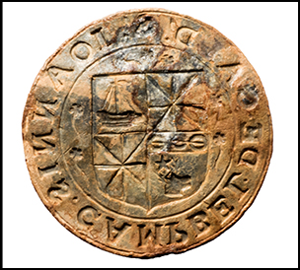
Seal matrices were used to make impressions on wax seals as a means of authenticating documents or keeping them closed. Armorial seal matrices were commonly used by the Scottish nobility, but only a small number have survived and even fewer have been recovered from archaeological contexts. The seal matrix discovered at Dunyvaig was made from a lead and tin alloy, with traces of antimony and silver (Rowena Banerjea pers. comm.). It measures 36mm in diameter and is cast in the form of a flower, a uniquely sixteenth- and seventeenth-century Scottish phenomenon (Caldwell Reference Caldwell1993) (Figure 5). The front of the seal matrix has a broad-pointed shield bearing the arms of the Campbells of Calder (or Cawdor) whose quartered arms derive from both the Campbell family and the Thanes of Cawdor, the families being united in marriage in 1511. The Campbell elements include the gyronny (a gyron being a heraldic term for a triangular shape, which is expressed as a figure of eight triangles in the Campbell arms) and a lymphad, or galley (representing the galley of Lorne), while the stag's head, star and buckle elements derive from the Cawdor family arms (Figure 6). The armorial shield is encircled by a Latin inscription in Roman capitals, reading S’. IOANNIS. CAMPBEL. DE. CALD’. The area between the shield and inscription has a simple floral decoration.
Seal Matrix of Sir John Campbell of Cawdor (figure by Sarah Lambert-Gates and Darko Maričević).

Detail showing: A) the maker's mark DM; B) the stag's head; C) the galley (figure by Sarah Lambert-Gates and Darko Maričević).

On the reverse side, encircling the ribbed handle (or stalk) is a floral decoration of eight petals. An engraved X marks the top of the seal while the sides have a date (1593) and a maker's mark, the conjoined initials DM.
The seal matrix is very similar to one of James Hamilton, now in the collection of the National Museum of Scotland, which also has the same initials DM and bearing a date of 1601 (Caldwell Reference Caldwell1993: illustration 6). Caldwell suggested that the initials are those of David Mylne, an Edinburgh goldsmith who was admitted to the guild in 1573 (Jackson Reference Jackson1905: 470). The similarity in design and the type of punches used in the decoration suggest that the two matrices were probably produced in the same workshop. The date 1593 was an inauspicious one for the Calder family, as in the previous year, Sir John Campbell, the laird (landowner) of Calder, was assassinated by other members of his clan (Caldwell Reference Caldwell2008). His heir and son, another John, was a minor on his father's death, but this did not seem to prevent a new seal matrix being made, presumably to ensure that official family business could continue in the young heir's name. We do not know whether the 1593 seal differed from any previous Calder seals used by Sir John Campbell senior.
The seal matrix and the siege of 1615
The history of Dunyvaig castle in the seventeenth century is complex; documents suggest that the castle was attacked at least four times by MacDonald clansmen who were successful in taking the castle from Campbell (and government) control in 1614, 1615 and 1647. Each time, the castle was retaken from the MacDonalds following a siege.
It is likely that the seal matrix was deposited within building B during one of these sieges, and at present the most likely scenario is that it was lost or hidden during the events of 1614 and 1615. In 1614, following its loss to MacDonald forces, the castle was besieged by government troops led by Sir John Campbell and Sir Oliver Lambert, when its walls were partially destroyed by a bombardment in early 1615.
It is possible that building B, along with the other buildings within the courtyard, was constructed after the siege when the castle was occupied by the Campbells and became their administrative centre on Islay. Building B may then have had an official function, possibly occupied by the constable or Campbell officials, thereby requiring the use of the seal matrix.
In the summer of 1615 the castle was attacked and retaken by Sir James MacDonald after his escape from crown custody; during this attack, the constable of the castle, Alexander MacDougall, was killed. It is possible that the loss of the seal matrix was associated with these events. The castle was not retaken by Campbell or government forces until October 1615, and prior to this Sir James MacDonald may have constructed the bulk of the earthen ramparts over the ruined walls of the castle, as he also constructed earthworks at Loch Gorm castle in this period.
Summary
The Campbell seal matrix is a well-preserved artefact that unusually provides a manufacture date and identifies its owner. The historical and archaeological evidence from Dunyvaig Castle provide a testament to the prolonged and violent struggle for control of Islay in the seventeenth century. The conflict between the MacDonalds and the Campbells encompassed wider political, economic and religious change that affected Scotland and beyond from the sixteenth century. As such, the seal matrix is a highly symbolic artefact deposited at a specific time and place during this conflict, which continued into the eighteenth century, and the legacy of which still reverberates in the present day.
Acknowledgements
We are grateful to Lagavulin Distillery for permission to excavate at Dunyvaig; Historic Environment Scotland for providing Scheduled Monument Consent (30002682C); Islay Heritage and the University of Reading for funding and for the support of our colleagues and the Islay community.


 Open access