





1. Introduction
Many natural cellular materials possess outstanding properties such as light weight, high stiffness and improved heat control (e.g. Al-Ketan, Rowshan & Al-Rub Reference Al-Ketan, Rowshan and Al-Rub2018), and are therefore inspiring the creation of new engineering materials with similar advantageous traits (e.g. Femmer, Kuehne & Wessling Reference Femmer, Kuehne and Wessling2015; Pouya et al. Reference Pouya, Overvelde, Kolle, Aizenberg, Bertoldi, Weaver and Vukusic2016). When translating this to engineering applications, a key question arises: How can we mimic natural cells and replicate the structures observed in nature? Earlier simple geometries in two dimensions such as, triangles or hexagons (Gibson Reference Gibson2003), as well as three-dimensional (3-D) polyhedral cells including hollow octahedron truss and octet lattice (e.g. Han, Lee & Kang Reference Han, Lee and Kang2015; Zheng et al. Reference Zheng2016) had the drawback of sharp edges and corners, leading to stress concentration in structural applications. Moreover, such designs are not conducive to cell migration and attachment, particularly in tissue engineering applications. To overcome these limitations, triply periodic minimal surfaces (TPMS)-based media (a class of metamaterial) have garnered serious attention over the past decade. Triply periodic minimal surfaces comprise minimal surface areas where the mean curvature is zero at every point (e.g. Do Carmo Reference Do Carmo2016), resulting in smooth surfaces, lacking sharp edges or corners that can be repeated without intersecting in three dimensions, and examples include Schoen gyroid, Schwarz primitive, and Schwarz diamond (e.g. Al-Ketan & Abu Al-Rub Reference Al-Ketan and Abu Al-Rub2019). Some of the TPMS geometries that we will focus in this paper are shown in figure 1 (details of which will be presented later).
The TPMS porous media used in this study with solid phase shown in the shading. Panels (a), (b) and (c) represent one unit cell in 12 mm $\times$
12 mm
$\times$
12 mm $\times$
12 mm of gyroid, primitive and BCC, respectively. The pair (
$\times$
12 mm of gyroid, primitive and BCC, respectively. The pair ( $d_{\!p1}, d_{\!p2}$
) in mm for
$d_{\!p1}, d_{\!p2}$
) in mm for $\phi =$
0.85, 0.7 and 0.55 are, respectively, the following: gyroid, (2.34, 5.35), (1.72, 4.72) and (1.07, 4.07); primitive, (4.9, 10.5), (3.78, 9.74), (2.38, 9.02); BCC, (8.0, 11.4), (6.88, 9.78), (5.82, 8.28). Panels (d), (e) and ( f) show
$\phi =$
0.85, 0.7 and 0.55 are, respectively, the following: gyroid, (2.34, 5.35), (1.72, 4.72) and (1.07, 4.07); primitive, (4.9, 10.5), (3.78, 9.74), (2.38, 9.02); BCC, (8.0, 11.4), (6.88, 9.78), (5.82, 8.28). Panels (d), (e) and ( f) show $4\times 4$
unit cells of gyroid, primitive and BCC, respectively.
$4\times 4$
unit cells of gyroid, primitive and BCC, respectively.

With the advancement of additive manufacturing technology (e.g. 3-D printing), these complex geometries can be manufactured with high precision (Velasco-Hogan, Xu & Meyers Reference Velasco-Hogan, Xu and Meyers2018) that prompted numerous studies on the mechanical properties of various TPMS porous media demonstrating the superiority of TPMS over traditional lattice structures (e.g. Jung & Buehler Reference Jung and Buehler2018; Yang et al. Reference Yang, Mertens, Ferrucci, Yan, Shi and Yang2019). Consequently, the primary focus on TPMS porous media has been their mechanical properties, with relatively less attention devoted to the fluid flow aspects (or thermal properties, e.g. Samson, Tran & Marzocca (Reference Samson, Tran and Marzocca2023)) within TPMS porous media, which provides the motivation of this study to focus on the fluid dynamics perspective. Most available research emphasises biomedical and heat-transfer applications with a need for pressure drop evaluation to estimate permeability. Here we will present a comprehensive set of TPMS pressure drop measurements for varying parameters overcoming some of the existing experimental limitations. A salient feature of this paper is the introduction of a more accurate permeability estimation methodology compared with the usually accepted procedure, which also allows one to place different porous media (and not merely TPMS) on a single plot for comparison with drag coefficient as a function of Reynolds number. As such, we will present the estimation methodology of an ‘equivalent hydraulic diameter’ (called $d_{{H\hbox{-}\textit{equ}}}$
), not from the geometry of the porous media, but rather by an inverse method directly from the experimental pressure drop data.
$d_{{H\hbox{-}\textit{equ}}}$
), not from the geometry of the porous media, but rather by an inverse method directly from the experimental pressure drop data.
1.1. Permeability estimates in TPMS porous media
Classically, average pressure change $\Delta\! P$
over a distance
$\Delta\! P$
over a distance $\Delta x$
is given by the Darcy–Forchheimer relation (e.g. Bear Reference Bear1988; Regulski et al. Reference Regulski2015),
$\Delta x$
is given by the Darcy–Forchheimer relation (e.g. Bear Reference Bear1988; Regulski et al. Reference Regulski2015),
 \begin{equation} \frac {-\Delta\! P}{\Delta x}=\frac {\mu }{K_{\!Q1}}u_s+\frac {\rho }{K_{\!Q2}}u_s^2, \end{equation}
where, $u_s$
is the ‘superficial velocity’ defined as the volumetric flow rate divided by the cross-sectional area that includes multiple pore (or units cells), whereas the ‘intrinsic velocity’ (at the pore level)
$u_s$
is the ‘superficial velocity’ defined as the volumetric flow rate divided by the cross-sectional area that includes multiple pore (or units cells), whereas the ‘intrinsic velocity’ (at the pore level) $u_i = u_s/\phi$
, where porosity
$u_i = u_s/\phi$
, where porosity $\phi =V_\textit{fluid}/V_\textit{total}$
is the ratio of fluid to total volume;
$\phi =V_\textit{fluid}/V_\textit{total}$
is the ratio of fluid to total volume; $\mu$
and
$\mu$
and $\rho$
are, respectively, the dynamic viscosity and density of the fluid, and the two-dimensional coefficients
$\rho$
are, respectively, the dynamic viscosity and density of the fluid, and the two-dimensional coefficients $K_{\!Q1}$
(
$K_{\!Q1}$
( $\textrm {m}^2$
) and
$\textrm {m}^2$
) and $K_{\!Q2}$
(
$K_{\!Q2}$
( $\textrm {m}$
) are the, quadratically fitted (hence, the subscript
$\textrm {m}$
) are the, quadratically fitted (hence, the subscript $Q$
), viscous (Darcy) and inertial (Forchheimer) permeabilities, respectively. Without the quadratic term in (1.1), we obtain Darcy’s formula that is valid within the laminar (low velocity) regime with dominant viscous forces. As fluid velocity increases, pressure drop is no longer linear and deviates from Darcy’s law, requiring the
$Q$
), viscous (Darcy) and inertial (Forchheimer) permeabilities, respectively. Without the quadratic term in (1.1), we obtain Darcy’s formula that is valid within the laminar (low velocity) regime with dominant viscous forces. As fluid velocity increases, pressure drop is no longer linear and deviates from Darcy’s law, requiring the $u_s^2$
term to account for the turbulent flow regime, i.e. the Forchheimer addition. Although not explicit in (1.1), it is clear that
$u_s^2$
term to account for the turbulent flow regime, i.e. the Forchheimer addition. Although not explicit in (1.1), it is clear that $K_{\!Q1}$
and
$K_{\!Q1}$
and $K_{\!Q2}$
are functions of
$K_{\!Q2}$
are functions of $\phi$
as well as the pore geometry.
$\phi$
as well as the pore geometry.
Most permeability estimations (e.g. Bobbert et al. Reference Bobbert, Lietaert, Eftekhari, Pouran, Ahmadi, Weinans and Zadpoor2017; Castro et al. Reference Castro, Pires, Santos, Gouveia and Fernandes2019; Montazerian et al. Reference Montazerian, Mohamed, Montazeri, Kheiri, Milani, Kim and Hoorfar2019; Ma et al. Reference Ma2020; Santos et al. Reference Santos, Pires, Gouveia, Castro and Fernandes2020; Pires et al. Reference Pires, Santos, Ruben, Gouveia, Castro and Fernandes2021) measure only $K_{\!Q1}$
, where
$K_{\!Q1}$
, where ${-\Delta\! P}/{\Delta x}$
is fitted with a straight line to
${-\Delta\! P}/{\Delta x}$
is fitted with a straight line to $u_s$
. There are several issues. Most importantly, it is rarely ascertained that the flow is within the laminar regime (i.e. only
$u_s$
. There are several issues. Most importantly, it is rarely ascertained that the flow is within the laminar regime (i.e. only $K_{\!Q1}$
is sufficient); the
$K_{\!Q1}$
is sufficient); the $\Delta x$
over which the
$\Delta x$
over which the $\Delta\! P$
is estimated in quite short (few centimetres), with questions on fully developed conditions; and the geometrical parameters tested are of limited extent. More recently, using numerical simulations Rathore et al. (Reference Rathore, Mehta, Kumar and Asfer2023) have estimated both
$\Delta\! P$
is estimated in quite short (few centimetres), with questions on fully developed conditions; and the geometrical parameters tested are of limited extent. More recently, using numerical simulations Rathore et al. (Reference Rathore, Mehta, Kumar and Asfer2023) have estimated both $K_{\!Q1}$
and
$K_{\!Q1}$
and $K_{\!Q2}$
and Ahmed & Bottaro (Reference Ahmed and Bottaro2023) have calculated an ‘effective’ permeability (that reduces to the ‘pure’ Darcy permeability at zero Reynolds number) for a set of TPMS geometries. These investigations suggest the need for a systematic and broader parametric experimental study where both
$K_{\!Q2}$
and Ahmed & Bottaro (Reference Ahmed and Bottaro2023) have calculated an ‘effective’ permeability (that reduces to the ‘pure’ Darcy permeability at zero Reynolds number) for a set of TPMS geometries. These investigations suggest the need for a systematic and broader parametric experimental study where both $\phi$
and flow rate (or Reynolds number) are changed with a clear indication of laminar and turbulent regimes. In fact, there is hardly any experimental data at higher flow rates leading to fully turbulent scenarios. An exception is the recent experiments by Hawken et al. (Reference Hawken, Reid, Clarke, Watson, Fee and Holland2023), who measured pressure drop for a specific TPMS geometry – diamond (which will be discussed later). In this paper, we plan to fill some of the gap by carrying out an experimental study by reporting
$\phi$
and flow rate (or Reynolds number) are changed with a clear indication of laminar and turbulent regimes. In fact, there is hardly any experimental data at higher flow rates leading to fully turbulent scenarios. An exception is the recent experiments by Hawken et al. (Reference Hawken, Reid, Clarke, Watson, Fee and Holland2023), who measured pressure drop for a specific TPMS geometry – diamond (which will be discussed later). In this paper, we plan to fill some of the gap by carrying out an experimental study by reporting $K_{\!Q1}$
and
$K_{\!Q1}$
and $K_{\!Q2}$
(where possible), and covering laminar to turbulent regimes for different TPMS geometries,
$K_{\!Q2}$
(where possible), and covering laminar to turbulent regimes for different TPMS geometries, $\phi$
and flow rates. Furthermore, we will also vary cell sizes for a fixed
$\phi$
and flow rates. Furthermore, we will also vary cell sizes for a fixed $\phi$
, and in a particular case, keeping all bulk parameters fixed, we report changes owing to surface roughness (from the 3-D printing technology).
$\phi$
, and in a particular case, keeping all bulk parameters fixed, we report changes owing to surface roughness (from the 3-D printing technology).
Although values of $K_{\!Q1}$
and
$K_{\!Q1}$
and $K_{\!Q2}$
are valuable (for cases that can be fitted by the quadratic form (1.1)) for characterising and designing specific applications, the fact that they are dimensional quantities implies that they vary with each dimensional variable of TPMS (and that also holds for any porous media, and not just TPMS). This is fundamentally unsatisfying, and makes it difficult to compare different geometries as dimensional variables change. Non-dimensional parameters are required to place pressure drop on a firmer footing.
$K_{\!Q2}$
are valuable (for cases that can be fitted by the quadratic form (1.1)) for characterising and designing specific applications, the fact that they are dimensional quantities implies that they vary with each dimensional variable of TPMS (and that also holds for any porous media, and not just TPMS). This is fundamentally unsatisfying, and makes it difficult to compare different geometries as dimensional variables change. Non-dimensional parameters are required to place pressure drop on a firmer footing.
1.2. Non-dimensional pressure drop
If we fix a type of TPMS geometry (e.g. gyroid, primitive, etc.), the governing variables are the length of the (square) unit cell $l$
or equivalently the ‘pore diameter’
$l$
or equivalently the ‘pore diameter’ $d$
, or the hydraulic diameter,
$d$
, or the hydraulic diameter, $d_{\!{H}} \equiv 4 V_\textit{fluid}/(\rm wetted\,area)$
, and the porosity
$d_{\!{H}} \equiv 4 V_\textit{fluid}/(\rm wetted\,area)$
, and the porosity $\phi$
. Along with the fluid and flow variables, these dimensional variables will result in two non-dimensional input parameters:
$\phi$
. Along with the fluid and flow variables, these dimensional variables will result in two non-dimensional input parameters: $\phi$
and Reynolds number,
$\phi$
and Reynolds number, $ l u_i/\nu$
or
$ l u_i/\nu$
or $d u_i/\nu$
or
$d u_i/\nu$
or $d_{\!{H}}\,u_i/\nu$
, where
$d_{\!{H}}\,u_i/\nu$
, where $\nu =\mu /\rho$
is the kinematic viscosity and the output non-dimensional pressure gradient is
$\nu =\mu /\rho$
is the kinematic viscosity and the output non-dimensional pressure gradient is $(-\Delta\! P/\Delta x)/(\rho u_i^2/d_{\!{H}})$
.
$(-\Delta\! P/\Delta x)/(\rho u_i^2/d_{\!{H}})$
.
Further progress on TPMS geometries is possible, if we borrow from the vast amount of existing research in particle porous media (e.g. Bear Reference Bear1988; Richardson Reference Richardson2002). For particles (such as, sand, pebbles, etc.) of some mean diameter, the use of $d_{\!H}$
(and the intrinsic velocity
$d_{\!H}$
(and the intrinsic velocity $u_i$
) remarkably reduces the two inputs (
$u_i$
) remarkably reduces the two inputs ( $\phi$
and
$\phi$
and $d_{\!{H}}$
) to just one, because
$d_{\!{H}}$
) to just one, because $\phi$
and
$\phi$
and $d_{\!{H}}$
can be related via
$d_{\!{H}}$
can be related via $d_{\!{H}} \equiv 4V_\textit{fluid}/({\rm wetted\,area}) = 4(\phi \,V_\textit{total})/[S\,(1-\phi )V_\textit{total}] = 4\phi /(S\,(1-\phi ))$
, where
$d_{\!{H}} \equiv 4V_\textit{fluid}/({\rm wetted\,area}) = 4(\phi \,V_\textit{total})/[S\,(1-\phi )V_\textit{total}] = 4\phi /(S\,(1-\phi ))$
, where $S = { ( \rm particle\,wetted\,area)}/V_{\textit{ solid particle}}$
that for a spherical particle of diameter
$S = { ( \rm particle\,wetted\,area)}/V_{\textit{ solid particle}}$
that for a spherical particle of diameter $d$
reduces to
$d$
reduces to $S=6/d$
. Following the argument in (1.1), the non-dimensional pressure drop is inversely proportional to the Reynolds number in laminar and should be a constant in fully turbulent regimes, i.e.
$S=6/d$
. Following the argument in (1.1), the non-dimensional pressure drop is inversely proportional to the Reynolds number in laminar and should be a constant in fully turbulent regimes, i.e.
 \begin{equation} \frac {-\Delta\! P/\Delta x}{\rho u_i^2/d_{\!{H}}} = \frac {C_1}{u_i d_{\!{H}}/\nu } + C_2, \end{equation}
where $C_1$
and
$C_1$
and $C_2$
are constants to be determined from experiments. Substitution of
$C_2$
are constants to be determined from experiments. Substitution of $u_i=u_s/\phi$
and
$u_i=u_s/\phi$
and $d_{\!{H}}=(2/3) d\,\phi /(1-\phi )$
into (1.2) results in
$d_{\!{H}}=(2/3) d\,\phi /(1-\phi )$
into (1.2) results in
 \begin{align} &\frac {-\Delta\! P/\Delta x}{\rho u_s^2/d}\frac {\phi ^3}{(1-\phi )} = \left (\frac {9C_1}{4} \right )\frac {(1-\phi )}{u_s d/\nu } + \frac {3 C_2}{2}, \quad {\rm and\,with} \nonumber \\ & f \equiv \frac {-\Delta\! P/\Delta x}{\rho u_s^2/d}\frac {\phi ^3}{(1-\phi )}, \end{align}
 \begin{align} & f = 150\frac {(1-\phi )}{\textit{Re}_d} + 1.75, \\[9pt] \nonumber \end{align}
which is the (Carman–Kozeny)–Ergun equation (e.g. Ergun Reference Ergun1952; Wood, He & Apte Reference Wood, He and Apte2020), where $\textit{Re}_d=u_s d/\nu$
and the constants (
$\textit{Re}_d=u_s d/\nu$
and the constants ( $C_1$
and
$C_1$
and $C_2$
) are determined from a multitude of packed sphere or particle experiments. The non-dimensional form of (1.4) has a significant advantage over the dimensional equation (1.1). Nevertheless, for TPMS, (1.1) provides an easy method to characterise the geometry, and is the most common method used. The difficulty in using (1.4) in the context of TPMS geometries is the requirement of a pore diameter, which unfortunately cannot be defined uniquely, although the hydraulic diameter
$C_2$
) are determined from a multitude of packed sphere or particle experiments. The non-dimensional form of (1.4) has a significant advantage over the dimensional equation (1.1). Nevertheless, for TPMS, (1.1) provides an easy method to characterise the geometry, and is the most common method used. The difficulty in using (1.4) in the context of TPMS geometries is the requirement of a pore diameter, which unfortunately cannot be defined uniquely, although the hydraulic diameter $d_{\!H}$
provides an option. However, it is still unclear if an equation similar to (1.4) can be obtained for TPMS. Even with
$d_{\!H}$
provides an option. However, it is still unclear if an equation similar to (1.4) can be obtained for TPMS. Even with $d_{\!H}$
, as we will show, different TPMS geometries show different
$d_{\!H}$
, as we will show, different TPMS geometries show different $f(\textit{Re})$
relationships, making it difficult to compare different geometries. Furthermore, it is relatively unknown how surface roughness, which is inherent when different manufacturing techniques or materials are used, will affect the
$f(\textit{Re})$
relationships, making it difficult to compare different geometries. Furthermore, it is relatively unknown how surface roughness, which is inherent when different manufacturing techniques or materials are used, will affect the $f(\textit{Re})$
relationship.
$f(\textit{Re})$
relationship.
As such, the objective of this paper is two-fold: first, we will present a comprehensive set of pressure drop experiments that are carried out in a relatively long test section (satisfying the fully developed condition) with varying TPMS geometries, $\phi$
and
$\phi$
and $l$
. Apart from presenting the two permeability coefficients (cf. (1.1)), we will show the functional relationships
$l$
. Apart from presenting the two permeability coefficients (cf. (1.1)), we will show the functional relationships $f(\textit{Re})$
for them. Second, to compare different porous media geometries, we will define an ‘equivalent hydraulic diameter’ for TPMS geometries (based on a laminar drag similarity of packed spheres and TPMS) that will allow us to directly compare TPMS with packed particle-bed porous media, and also with each other. This comparison framework will show that some TPMS geometries have lower drag than others within the turbulent regime. We will also show that (1.1) or (1.4), both of which postulate a laminar drag and a fully turbulent drag, is not sufficient to capture some of the TPMS porous media; in fact, some geometries show characteristics of a ‘transitional’ flow similar to flow through rough-walled pipes, suggesting a more nuanced
$f(\textit{Re})$
for them. Second, to compare different porous media geometries, we will define an ‘equivalent hydraulic diameter’ for TPMS geometries (based on a laminar drag similarity of packed spheres and TPMS) that will allow us to directly compare TPMS with packed particle-bed porous media, and also with each other. This comparison framework will show that some TPMS geometries have lower drag than others within the turbulent regime. We will also show that (1.1) or (1.4), both of which postulate a laminar drag and a fully turbulent drag, is not sufficient to capture some of the TPMS porous media; in fact, some geometries show characteristics of a ‘transitional’ flow similar to flow through rough-walled pipes, suggesting a more nuanced $f(\textit{Re})$
relationship than the usually expected one from (1.4). We note that the equivalent hydraulic diameter concept can be used for other porous media geometries, allowing a broader application beyond the present TPMS geometries. The rest of the paper is arranged as follows: in the next § 2 we present the experimental methods including the design and manufacturing of the TPMS geometry as well as the pressure measurement set-up. The pressure drop results and standard permeability estimates are discussed in § 3. Next, in § 4 we will show the non-dimensional drag and Reynolds number results, and introduce the concept of ‘the equivalent hydraulic diameter’
$f(\textit{Re})$
relationship than the usually expected one from (1.4). We note that the equivalent hydraulic diameter concept can be used for other porous media geometries, allowing a broader application beyond the present TPMS geometries. The rest of the paper is arranged as follows: in the next § 2 we present the experimental methods including the design and manufacturing of the TPMS geometry as well as the pressure measurement set-up. The pressure drop results and standard permeability estimates are discussed in § 3. Next, in § 4 we will show the non-dimensional drag and Reynolds number results, and introduce the concept of ‘the equivalent hydraulic diameter’ $d_{{H\hbox{-}\textit{equ}}}$
as well as a better estimate of Darcy permeability
$d_{{H\hbox{-}\textit{equ}}}$
as well as a better estimate of Darcy permeability $K_{\!Q1}$
, denoted by
$K_{\!Q1}$
, denoted by $K_1$
; this also allows us to compare different TPMS geometries with a common basis. The essential idea is to use the inverse Reynolds number regime that exists in the laminar part of friction factor distribution (the
$K_1$
; this also allows us to compare different TPMS geometries with a common basis. The essential idea is to use the inverse Reynolds number regime that exists in the laminar part of friction factor distribution (the $f \sim Re^{-1}$
regime) to determine an effective value for the equivalent hydraulic diameter
$f \sim Re^{-1}$
regime) to determine an effective value for the equivalent hydraulic diameter $d_{{H\hbox{-}\textit{equ}}}$
. A discussion follows in § 5, where we compare
$d_{{H\hbox{-}\textit{equ}}}$
. A discussion follows in § 5, where we compare $d_{\!{H}}$
and
$d_{\!{H}}$
and $d_{{H\hbox{-}\textit{equ}}}$
, as well as
$d_{{H\hbox{-}\textit{equ}}}$
, as well as $K_{\!Q1}$
and
$K_{\!Q1}$
and $K_1$
before suggesting an approximate drag model for cases where the quadratic law (1.1) is applicable, and hence, leading to a different estimate for
$K_1$
before suggesting an approximate drag model for cases where the quadratic law (1.1) is applicable, and hence, leading to a different estimate for $K_{\!Q2}$
, called
$K_{\!Q2}$
, called $K_2$
, which seems to be more reasonable than a direct fitting of data by (1.1). Finally, conclusions are drawn in § 6.
$K_2$
, which seems to be more reasonable than a direct fitting of data by (1.1). Finally, conclusions are drawn in § 6.
2. Experimental methods
This section is divided into two parts. In the first part, we present details of the TPMS porous media we have chosen, including their design and manufacturing. The focus of the second part is on the pressure drop measurement set-up that will incorporate the manufactured TPMS structures, and towards the end we will present validation of experimental set-up with an empty pipe $-\Delta\! P/\Delta x$
with laminar analytical solution.
$-\Delta\! P/\Delta x$
with laminar analytical solution.
2.1. Triply periodic minimal surface porous media
Among various TPMS porous media (e.g. Lord & Mackay Reference Lord and Mackay2003; Al-Ketan & Abu Al-Rub Reference Al-Ketan and Abu Al-Rub2019), we choose three common geometries: (i) gyroid – represents a complex internal architecture typical of TPMS porous media; (ii) ‘primitive’ – has a distinctive converging–diverging geometric shape; (iii) TPMS-based body-centred cubic (BCC) – owing to its open cell structure. Note that primitive is somewhere between gyroid and BCC in terms of complexity and open cell type.
2.1.1. The TPMS design
There are various ways to design TPMS topologies, and we adopt nodal surface approximation (e.g. Zhao et al. Reference Zhao, Liu, Fu, Zhang, Zhang and Zhou2018; Al-Ketan & Abu Al-Rub Reference Al-Ketan and Abu Al-Rub2019) because of the available mathematical expression, which enables us to produce customised topologies using MATLAB. In this method, either a solid or a sheet type topology is designed by choosing a level-set constant $c$
, which allows us to control the porosity
$c$
, which allows us to control the porosity $\phi$
by controlling the sheet thickness with different values of
$\phi$
by controlling the sheet thickness with different values of $\pm c$
. The following equations, respectively, for gyroid, primitive and BCC, which use the implicit method to create zero-valued surfaces solving nodal equations, are the most commonly used mathematical expressions to create TPMS porous media:
$\pm c$
. The following equations, respectively, for gyroid, primitive and BCC, which use the implicit method to create zero-valued surfaces solving nodal equations, are the most commonly used mathematical expressions to create TPMS porous media:
 \begin{align} \cos (k_xx)\sin (k_yy)+\cos (k_yy)\sin (k_zz)+\cos (k_zz)\sin (k_xx)-c=0, &{\,\rm \quad[gyroid]} \end{align}
 \begin{align} \cos (k_xx)+\cos (k_yy)+\cos (k_zz)-c=0, &{\,\rm \quad[primitive]} \end{align}
 \begin{align} \begin{split} \cos (2k_xx)+\cos (2k_yy)+\cos (2k_zz)-2[\cos (k_xx)\cos (k_yy)&\\ +\cos (k_yy)\cos (k_zz)+\cos (k_zz)\cos (k_xx)]-c=0. &{\,\rm \quad[BCC]} \end{split} \end{align}
Here $x$
,
$x$
, $y$
and
$y$
and $z$
are spatial coordinates in the 3-D Cartesian system, with
$z$
are spatial coordinates in the 3-D Cartesian system, with $k_x$
,
$k_x$
, $k_y$
and
$k_y$
and $k_z$
defined by
$k_z$
defined by $k_i =2\pi {n_i}/{L_i}$
(
$k_i =2\pi {n_i}/{L_i}$
( $i=x,y,z$
) where
$i=x,y,z$
) where $n_i$
is the number of unit cells and
$n_i$
is the number of unit cells and $L_i$
is the total lattice length in the
$L_i$
is the total lattice length in the $i$
direction. Hence, the length of each unit cell is
$i$
direction. Hence, the length of each unit cell is $l_i = L_i/n_i$
, where we keep the cell size the same in all directions,
$l_i = L_i/n_i$
, where we keep the cell size the same in all directions, $l=l_i$
(e.g. Peng & Tran Reference Peng and Tran2020). In practice, (2.1a
), (2.1b
) and (2.1c
) are solved using MATLAB, and its built-in functions of isosurface and isocaps are used to generate desired surfaces of TPMS porous media satisfying the above relationship. Figure 1(a), 1(b) and 1(c) show the unit cell geometry of gyroid, primitive and BCC, respectively, whereas the corresponding figure 1(d), 1(e) and 1( f) show a
$l=l_i$
(e.g. Peng & Tran Reference Peng and Tran2020). In practice, (2.1a
), (2.1b
) and (2.1c
) are solved using MATLAB, and its built-in functions of isosurface and isocaps are used to generate desired surfaces of TPMS porous media satisfying the above relationship. Figure 1(a), 1(b) and 1(c) show the unit cell geometry of gyroid, primitive and BCC, respectively, whereas the corresponding figure 1(d), 1(e) and 1( f) show a $4\times 4$
cell structure.
$4\times 4$
cell structure.
2.1.2. Pore diameter of TPMS porous media
‘Pore diameter’ is usually used to compare different TPMS geometries and for non-dimensionalisation. There are, however, no exact methods to define pore sizes in TPMS porous media. In practice, pore regions (or voids) are identified first, and then a diameter of a sphere fitting the pore region is used to represent a pore diameter. For example, gyroid and primitive in figure 1(a) and 1(b), respectively, have two distinct pore regions; one is formed by surrounding surfaces in the 3-D and the other one is void space. The former pore region can be fit with the diameter ( $d_{\!p1}$
) of sphere (Rati et al. Reference Rati, Singh, Rai and Kumta2019) and the later region with
$d_{\!p1}$
) of sphere (Rati et al. Reference Rati, Singh, Rai and Kumta2019) and the later region with $d_{\!p2}$
(Ali & Sen Reference Ali and Sen2018; Asbai-Ghoudan, de Galarreta & Rodriguez-Florez Reference Asbai-Ghoudan, de Galarreta and Rodriguez-Florez2021). So far, none of the literature has defined a pore size for BCC. Thus, we define
$d_{\!p2}$
(Ali & Sen Reference Ali and Sen2018; Asbai-Ghoudan, de Galarreta & Rodriguez-Florez Reference Asbai-Ghoudan, de Galarreta and Rodriguez-Florez2021). So far, none of the literature has defined a pore size for BCC. Thus, we define $d_{\!p1}$
and
$d_{\!p1}$
and $d_{\!p2}$
by applying the definition of gyroid and primitive. In figure 1(b), the subpanel in yellow colour shows the cut view of primitive in half to visualise
$d_{\!p2}$
by applying the definition of gyroid and primitive. In figure 1(b), the subpanel in yellow colour shows the cut view of primitive in half to visualise $d_{\!p2}$
inside. The pore diameters are depicted by red lines in figure 1, and values of (
$d_{\!p2}$
inside. The pore diameters are depicted by red lines in figure 1, and values of ( $d_{\!p1}, d_{\!p2}$
) are presented in the caption of figure 1. Although there are no unique ways to define pore diameters, the two selected diameters provide a rough guide to the pore size.
$d_{\!p1}, d_{\!p2}$
) are presented in the caption of figure 1. Although there are no unique ways to define pore diameters, the two selected diameters provide a rough guide to the pore size.
2.1.3. Manufacturing of TPMS porous media for experiments
Three different 3-D printing manufacturing processes are used to obtain TPMS geometries of the different $\phi$
and
$\phi$
and $l$
as described in table 1. We divide the experiments into two sets: Set 1 and Set 2. Set 1 has
$l$
as described in table 1. We divide the experiments into two sets: Set 1 and Set 2. Set 1 has $l=12$
mm, and is manufactured using a specialised 3-D printer, Stratasys Object 260 Connex3. Using this 3-D printer, the minimum unit cell size that can be obtained without being damaged from harvesting and removal of supporting material is approximately 12 mm. With this optimised length, a unit cell of each TPMS porous media, 12 mm
$l=12$
mm, and is manufactured using a specialised 3-D printer, Stratasys Object 260 Connex3. Using this 3-D printer, the minimum unit cell size that can be obtained without being damaged from harvesting and removal of supporting material is approximately 12 mm. With this optimised length, a unit cell of each TPMS porous media, 12 mm $\times$
12 mm
$\times$
12 mm $\times$
12 mm is designed, and based on this unit cell size, the values of
$\times$
12 mm is designed, and based on this unit cell size, the values of $c$
are optimised for each porous media to create targeted porosity namely,
$c$
are optimised for each porous media to create targeted porosity namely, $\phi$
= 0.85, 0.70 and 0.55.
$\phi$
= 0.85, 0.70 and 0.55.
Details of the TPMS porous media used in this study. Note that the design of G4 and Metal-G4 are the same; however, the former is manufactured using SLA and the latter by SLM as shown in figure 14(b) and 14(c). The permeabilities $K_{\!Q1}$
and
$K_{\!Q1}$
and $K_{\!Q2}$
(cf. (1.1)) are discussed in § 3.2. The top Set 1 has
$K_{\!Q2}$
(cf. (1.1)) are discussed in § 3.2. The top Set 1 has $l=12$
mm fixed, whereas the bottom Set 2 has
$l=12$
mm fixed, whereas the bottom Set 2 has $\phi \approx 0.85$
and varying
$\phi \approx 0.85$
and varying $l$
. Note that the first and last row are the same.
$l$
. Note that the first and last row are the same.

Set 2 cases in table 1 have a nominally fixed $\phi \approx 0.85$
and varying
$\phi \approx 0.85$
and varying $l$
, and are denoted G1 to G4. Stereolithography (SLA), a fine-resolution technology, is used to obtain
$l$
, and are denoted G1 to G4. Stereolithography (SLA), a fine-resolution technology, is used to obtain $l=$
$l=$ $4$
,
$4$
, $6$
and
$6$
and $9$
mm with
$9$
mm with $\phi \approx 0.85$
. Computational drawings of the three TPMS geometries are shown in figure 2, and photographs of each sample for both sets (cf. table 1) are presented in figure 3. The geometry ‘Metal-G4’ (with
$\phi \approx 0.85$
. Computational drawings of the three TPMS geometries are shown in figure 2, and photographs of each sample for both sets (cf. table 1) are presented in figure 3. The geometry ‘Metal-G4’ (with $l=9$
mm) is an aluminium TPMS that is 3-D printed with selective laser melting (SLM), and has the same bulk parameters as G4 that is printed in plastic with SLA. The geometry of Metal-G4 has a slightly rougher surface finish than G4 owing to the different 3-D printing process, which becomes apparent when pressure drop is measured. The roughness is estimated to be approximately 50
$l=9$
mm) is an aluminium TPMS that is 3-D printed with selective laser melting (SLM), and has the same bulk parameters as G4 that is printed in plastic with SLA. The geometry of Metal-G4 has a slightly rougher surface finish than G4 owing to the different 3-D printing process, which becomes apparent when pressure drop is measured. The roughness is estimated to be approximately 50 $\mu \textrm {m}$
. Case G5 in Set 2 is with
$\mu \textrm {m}$
. Case G5 in Set 2 is with $l=12$
mm, and is the same as the top row in Set 1.
$l=12$
mm, and is the same as the top row in Set 1.
All dimensions are in millimetres. The TPMS porous media in the cylinder shape with a diameter of 20.54 mm and a length of 120 mm. Panels (a), (b) and (c) are gyroid, primitive and BCC, respectively, in isometric, side and front views. This corresponds to Set 1 (see table 1) where the unit cell size $l=12$
mm, and the TPMS are placed inside a pipe of inner diameter 20.6 mm, i.e. little less than two unit cells within the pipe cross-section. Note that for Set 2 (not shown here), the smallest
$l=12$
mm, and the TPMS are placed inside a pipe of inner diameter 20.6 mm, i.e. little less than two unit cells within the pipe cross-section. Note that for Set 2 (not shown here), the smallest $l=4$
mm, i.e. over five periodic cells within the pipe cross-section.
$l=4$
mm, i.e. over five periodic cells within the pipe cross-section.

Photographs of one of each 3-D-printed TPMS porous media (of a diameter of 20.54 mm and a length of 120 mm) with different porosities. See table 1 for details of G1, G2, etc.

Schematic diagram of the experimental set-up for the pressure drop measurement. Numbers represent corresponding parts. Here $\unicode{x2460}$
Constant head tank,
$\unicode{x2460}$
Constant head tank, $\unicode{x2461}$
Flow conditioner,
$\unicode{x2461}$
Flow conditioner, $\unicode{x2462}$
Entrance length,
$\unicode{x2462}$
Entrance length, $\unicode{x2463}$
and
$\unicode{x2463}$
and $\unicode{x2464}$
TPMS porous media are inserted in the entire measurement section. Pressures are measured at three locations as indicated
$\unicode{x2464}$
TPMS porous media are inserted in the entire measurement section. Pressures are measured at three locations as indicated $P_1$
,
$P_1$
, $P_2$
, and
$P_2$
, and $P_3$
in the inset.
$P_3$
in the inset. $\unicode{x2465}$
Needle valve at the outlet,
$\unicode{x2465}$
Needle valve at the outlet, $\unicode{x2466}$
Load cell.
$\unicode{x2466}$
Load cell.

To characterise fluid flow through the TPMS porous media, the porous media is inserted in an acrylic pipe of inner diameter 20.6 mm with thickness 1.98 mm. (We will describe the full set-up in § 2.2.) To fill the length of 1.56 m acrylic pipe for Set 1 (and a shorter pipe for Set 2, as described later), a cylinder-shaped porous media is required. This full 1.56 m length of the porous media is manufactured by dividing into 13 smaller pieces of length 120 mm due to the limited size of a built plate in Stratasys Object 260 Connex3 (cf. figures 2 and 3). During the design process, we particularly pay attention to maintaining the complete unit cell as multiple 120 mm pieces are inserted into the acrylic pipe. These 13 pieces are aligned in the pipe to make the 1.56 m of a single porous medium. To cover the first set, nine separate acrylic pipes are used for three different TPMS porous media with three different porosities. For the second set of experiments G1 to G5 with $l$
=
$l$
= $4$
,
$4$
, $6$
and
$6$
and $9$
mm (cf. table 1), which is conducted after finishing first set of experiments, a shorter pipe of 36 cm is used. The results in different length pipes make hardly any difference (discussed in § 4.3), and the shorter pipe is allowed for a more comprehensive parametric study of the gyroid geometry.
$9$
mm (cf. table 1), which is conducted after finishing first set of experiments, a shorter pipe of 36 cm is used. The results in different length pipes make hardly any difference (discussed in § 4.3), and the shorter pipe is allowed for a more comprehensive parametric study of the gyroid geometry.
2.2. Experimental set-up
A schematic diagram of the experimental set-up for the pressure drop measurements is shown in figure 4. The set-up consists of three main sections: the inlet, the measurement section and the outlet. The inlet has a constant pressure head gravity driven system allowing water to be fed to a nozzle which includes honeycomb as flow straighteners. The fluid travels 1.3 m of empty acrylic pipe with an inner diameter of 20.6 mm before entering the pipe with the porous media inserted (for a pipe length of 1.56 m in Set 1 and 36 cm for Set 2). The entrance length of 1.3 m is such that an approximately fully developed laminar flow enters the porous media section, except for the highest flow rates that we encounter. We note that it is more important to achieve a fully developed flow in the porous section beyond the inlet pipe, which will be confirmed later in the paper.
For each porous media section of the pipe, the first pressure tap is located 2 cm from the start of the porous media section, the second and the third taps are 75 and 150 cm from the first tap. To accurately measure pressure changes at specific locations, five holes – each with a diameter of 4 mm – are made around the upper-half of the circumference to connect pressure taps, allowing for the measurement of the averaged pressure at that location. When the porous media are inserted into the acrylic pipe, extra care is taken to avoid the inserted porous media obstructing the holes. To ensure that the holes are not blocked, the silicone tubes connected to the taps are inspected and confirmed to be completely filled with water.
A manometer fabricated in-house (cf. figure 4) is carefully designed to minimise the effect of surface tension (with a relatively large manometer diameter of 35 mm), and height measurements are carried out with submillimetre resolution using a digital camera with a ruler for calibration. At the outlet, a calibrated load-cell is used to record the change of water mass with time. To detect any abnormality of the load-cell during experiments, a beaker with known weight and volume is used to collect the outlet water with a timer and later compared with the load-cell output.
For Set 2, we have considered a shorter 36 cm pipe. Tests with gyroid $l=12$
mm and
$l=12$
mm and $\phi =0.85$
show that the results are almost identical for the longer and 36 cm pipe. For each of the five pipes used in the Set 2 measurements, the first pressure tap is located 3 cm from the start of the gyroid, the second tap is 15 cm from the first and the last one 15 cm from the second tap. Thus, the last tap is 3 cm from the end of the porous medium, as shown in Appendix B (figure 14), where we also describe further details of the experimental set-up for Set 2. This includes special connectors for pressure tapping required for the metal gyroid – case Metal-G4 in table 1.
$\phi =0.85$
show that the results are almost identical for the longer and 36 cm pipe. For each of the five pipes used in the Set 2 measurements, the first pressure tap is located 3 cm from the start of the gyroid, the second tap is 15 cm from the first and the last one 15 cm from the second tap. Thus, the last tap is 3 cm from the end of the porous medium, as shown in Appendix B (figure 14), where we also describe further details of the experimental set-up for Set 2. This includes special connectors for pressure tapping required for the metal gyroid – case Metal-G4 in table 1.
Pressure drop within the measurement section in figure 4 without porous media. Three different symbols are three repeat experiments. (a) Pressure drops over $L=1.5\rm \,m$
at various superficial velocities (
$L=1.5\rm \,m$
at various superficial velocities ( $u_s$
). The dashed line is the linear fitting. (b) Normalised pressure drop versus
$u_s$
). The dashed line is the linear fitting. (b) Normalised pressure drop versus $\textit{Re}_{\textit{pipe}}$
on log–log axes and its comparison with analytical
$\textit{Re}_{\textit{pipe}}$
on log–log axes and its comparison with analytical $64/\textit{Re}_{ { pipe}}$
.
$64/\textit{Re}_{ { pipe}}$
.

2.3. Testing of pressure measurement system
Before conducting experiments on pressure drop in our porous media, we first measure the pressure drop in the acrylic pipe without the porous media. This measurement can then be compared with the analytical solution for laminar pressure drop in smooth pipe flows. By controlling the needle valve at the outlet, shown in figure 4, a range of flow rates is obtained, and the pressure drop at each flow rate is measured. The measurement is repeated three times and all the results are plotted together. Figure 5(a) shows pressure drop per unit length versus superficial velocity (which is the same as bulk velocity in this empty pipe). As the flow rates increase, the pressure drop also increases as shown in figure 5(a), and this increasing trend satisfies the expected linear relationship. Figure 5(b) shows the same data, but plotted on a log–log axes with $ C_f = (-\Delta\! P/\Delta x)\,{d_{\textit{pipe}}}/(( {1}/{2})\rho u_s^2)$
against
$ C_f = (-\Delta\! P/\Delta x)\,{d_{\textit{pipe}}}/(( {1}/{2})\rho u_s^2)$
against $\textit{Re}_{\textit{pipe}} = u_s d_{\textit{pipe}}/\nu$
, where
$\textit{Re}_{\textit{pipe}} = u_s d_{\textit{pipe}}/\nu$
, where $d_{\textit{pipe}}$
is the empty pipe diameter. The data follows the laminar solution of
$d_{\textit{pipe}}$
is the empty pipe diameter. The data follows the laminar solution of $64/\textit{Re}_{\textit{pipe}}$
reasonably well, providing confidence in our measurement system. Note that the pressure difference across
$64/\textit{Re}_{\textit{pipe}}$
reasonably well, providing confidence in our measurement system. Note that the pressure difference across $L=1.5$
m is less than
$L=1.5$
m is less than $5$
Pa m−1, whereas the pressure gradient in our porous media is at least an order of magnitude higher, which further supports the adequacy of the present system.
$5$
Pa m−1, whereas the pressure gradient in our porous media is at least an order of magnitude higher, which further supports the adequacy of the present system.
Pressure drops of TPMS porous media with three different porosities – Set 1 in table 1. (a) All pressure drop results. The fitting to extract $K_{\!Q1}$
and
$K_{\!Q1}$
and $K_{\!Q2}$
from (1.1) are shown separately: (b) gyroid; (c) primitive; (d) BCC. Red dashed lines (
$K_{\!Q2}$
from (1.1) are shown separately: (b) gyroid; (c) primitive; (d) BCC. Red dashed lines ( ) are the least square fitted (1.1) to data.

3. Pressure drop and permeability
We first consider pressure drop measurements for the three TPMS geometries with $l=12$
mm (Set 1 in table 1), and then for gyroid with varying
$l=12$
mm (Set 1 in table 1), and then for gyroid with varying $l$
but keeping
$l$
but keeping $\phi \approx 0.85$
constant (Set 2 in table 1). Subsequently, permeabilities as defined by (1.1) will be estimated for both sets.
$\phi \approx 0.85$
constant (Set 2 in table 1). Subsequently, permeabilities as defined by (1.1) will be estimated for both sets.
3.1. Results of pressure drop measurement
Figure 6(a) presents the experimental results of the net pressure drop ( $-\Delta\! P/\Delta x$
) for the three TPMS geometries of Set 1 (gyroid, primitive and BCC, cf. table 1), which have a fixed unit cell size
$-\Delta\! P/\Delta x$
) for the three TPMS geometries of Set 1 (gyroid, primitive and BCC, cf. table 1), which have a fixed unit cell size $l=12$
mm, and three different porosities of
$l=12$
mm, and three different porosities of $\phi =0.85$
, 0.70 and 0.55. The colour of symbols in the figure fades as the
$\phi =0.85$
, 0.70 and 0.55. The colour of symbols in the figure fades as the $\phi$
decreases. The measurement is repeated five times for each porous media, and the results are plotted together to show the reliability of the results and the repeatability of the measurements. Note that in the repeat experiments we do not try to keep
$\phi$
decreases. The measurement is repeated five times for each porous media, and the results are plotted together to show the reliability of the results and the repeatability of the measurements. Note that in the repeat experiments we do not try to keep $u_s$
constant. The pressure drop within each TPMS porous medium increases as
$u_s$
constant. The pressure drop within each TPMS porous medium increases as $\phi$
decreases. This is because a reduction in porosity implies a reduction in the void space for fluid to flow, which increases the viscous and pressure drag for a given
$\phi$
decreases. This is because a reduction in porosity implies a reduction in the void space for fluid to flow, which increases the viscous and pressure drag for a given $u_s$
and, in turn, increases flow resistance. As such, the largest pressure drops are observed at
$u_s$
and, in turn, increases flow resistance. As such, the largest pressure drops are observed at $\phi =0.55$
. In general, pressure drops in BCC are lower than those of gyroid and primitive. Compared with primitive at
$\phi =0.55$
. In general, pressure drops in BCC are lower than those of gyroid and primitive. Compared with primitive at $\phi =$
0.85 and 0.70 in figure 6(a), gyroid shows a larger pressure drop. However, at
$\phi =$
0.85 and 0.70 in figure 6(a), gyroid shows a larger pressure drop. However, at $\phi =0.55$
, both gyroid and primitive (
$\phi =0.55$
, both gyroid and primitive ( and
and  ) have almost identical pressure drops at lower $u_s$
, and then primitive has a slightly larger pressure drop as the superficial velocity increases beyond
$u_s$
, and then primitive has a slightly larger pressure drop as the superficial velocity increases beyond $u_s\approx 0.01$
m s−1.
$u_s\approx 0.01$
m s−1.


Furthermore, comparing the results of each porous medium at, say $\phi =0.85$
(in figure 6
a), a gradual linear increase in pressure drop is observed until
$\phi =0.85$
(in figure 6
a), a gradual linear increase in pressure drop is observed until $u_s\approx 0.01$
m s−1 (or less) for gyroid and primitive, and
$u_s\approx 0.01$
m s−1 (or less) for gyroid and primitive, and $u_s\approx 0.04$
m s−1 for BCC. As flow rate increases further, pressure drop increases faster than linear, reflecting the expected change from a viscous to a pressure drag dominated regime as suggested by (1.1). A similar trend is found in other open-cell type porous media, such as metal foams (e.g. Dukhan Reference Dukhan2006; Oun & Kennedy Reference Oun and Kennedy2014) and pack beds of spherical particles (e.g. Ergun Reference Ergun1952; Lovreglio et al. Reference Lovreglio, Das, Buist, Peters, Pel and Kuipers2018).
$u_s\approx 0.04$
m s−1 for BCC. As flow rate increases further, pressure drop increases faster than linear, reflecting the expected change from a viscous to a pressure drag dominated regime as suggested by (1.1). A similar trend is found in other open-cell type porous media, such as metal foams (e.g. Dukhan Reference Dukhan2006; Oun & Kennedy Reference Oun and Kennedy2014) and pack beds of spherical particles (e.g. Ergun Reference Ergun1952; Lovreglio et al. Reference Lovreglio, Das, Buist, Peters, Pel and Kuipers2018).
Another way to interpret figure 6(a) is to hold a constant $-\Delta\! P/\Delta x$
, say 400 Pa m−1, and move horizontally as
$-\Delta\! P/\Delta x$
, say 400 Pa m−1, and move horizontally as $u_s$
increases. We notice that for the same pressure drop, gyroid and primitive with
$u_s$
increases. We notice that for the same pressure drop, gyroid and primitive with $\phi =0.55$
(and ) have the smallest bulk velocities, and then gyroid and primitive at
$\phi =0.55$
(and ) have the smallest bulk velocities, and then gyroid and primitive at $\phi =0.70$
(
$\phi =0.70$
( and
and  ) and subsequently at $\phi =0.85$
(
$\phi =0.85$
( and
and  ), which represents increasing bulk velocity with increasing porosity. The BCC structures allow the highest flow rates among the three geometries, with $\phi =0.85$
(
$\phi =0.85$
( ) resulting in the highest in the BCC category.
The pressure drop results for Set 2, where $\phi \approx 0.85$
and the unit cell size
$\phi \approx 0.85$
and the unit cell size $l$
vary, are presented in figure 7(a). Not surprisingly, increasing
$l$
vary, are presented in figure 7(a). Not surprisingly, increasing $l=$
4, 6, 9, 12 mm corresponding to G1, G2, G3 (or G4) and G5 results in a reduction of
$l=$
4, 6, 9, 12 mm corresponding to G1, G2, G3 (or G4) and G5 results in a reduction of $-\Delta\! P/\Delta x$
. Note that the abscissa of figure 7(a) is larger compared with that in figure 6(a) to accommodate the increased pressure resulting from smaller
$-\Delta\! P/\Delta x$
. Note that the abscissa of figure 7(a) is larger compared with that in figure 6(a) to accommodate the increased pressure resulting from smaller $l$
. Interestingly, comparing the pressure drop results of porous media manufactured using SLA technique with plastic (G4) with SLM in metal (Metal-G4) with the same porosity and unit cell size, the pressure drop in Metal-G4 (SLM) is much larger than G4 (SLA). When
$l$
. Interestingly, comparing the pressure drop results of porous media manufactured using SLA technique with plastic (G4) with SLM in metal (Metal-G4) with the same porosity and unit cell size, the pressure drop in Metal-G4 (SLM) is much larger than G4 (SLA). When $u_s \lessapprox 0.02$
m s−1, the trend of pressure drop is similar. However, as velocity increases, the pressure drop in the SLM sample increases dramatically. It is known that metal 3-D printing with SLM cannot produce surfaces that are as smooth as in SLA using plastic, and this increased surface roughness is likely the cause of the elevated pressure drop even though the bulk characteristics of both Metal-G4 and G4 are the same. In figure 7(a), in a manner similar to figure 6(a), the linear trend at smaller
$u_s \lessapprox 0.02$
m s−1, the trend of pressure drop is similar. However, as velocity increases, the pressure drop in the SLM sample increases dramatically. It is known that metal 3-D printing with SLM cannot produce surfaces that are as smooth as in SLA using plastic, and this increased surface roughness is likely the cause of the elevated pressure drop even though the bulk characteristics of both Metal-G4 and G4 are the same. In figure 7(a), in a manner similar to figure 6(a), the linear trend at smaller $u_s$
gives way to a quadratic-like dependence at higher
$u_s$
gives way to a quadratic-like dependence at higher $u_s$
. This linear and quadratic variation in net pressure drop is quantified next following (1.1) in terms of
$u_s$
. This linear and quadratic variation in net pressure drop is quantified next following (1.1) in terms of $K_{\!Q1}$
and
$K_{\!Q1}$
and $K_{\!Q2}$
.
$K_{\!Q2}$
.


3.2. Permeability of TPMS porous media
Two permeability coefficients in (1.1) are usually obtained by fitting the experimental results with a second-order polynomial equation in $u_s$
. In the fitted equation, the coefficients of linear and quadratic terms correspond, respectively, to
$u_s$
. In the fitted equation, the coefficients of linear and quadratic terms correspond, respectively, to $\mu /K_{\!Q1}$
and
$\mu /K_{\!Q1}$
and $\rho /K_{\!Q2}$
. Since dynamic viscosity and density of the working liquid are known,
$\rho /K_{\!Q2}$
. Since dynamic viscosity and density of the working liquid are known, $K_{\!Q1}$
and
$K_{\!Q1}$
and $K_{\!Q2}$
can be calculated. The least-square fitted equations to the pressure drop data of gyroid are shown in red dashed lines () in figure 6(b) for Set 1 and in figure 7(b) for Set 2, and all the data had an
$K_{\!Q2}$
can be calculated. The least-square fitted equations to the pressure drop data of gyroid are shown in red dashed lines () in figure 6(b) for Set 1 and in figure 7(b) for Set 2, and all the data had an $R^2\gt 0.99$
. The two determined coefficients
$R^2\gt 0.99$
. The two determined coefficients $K_{\!Q1}$
and
$K_{\!Q1}$
and $K_{\!Q2}$
for gyroid are tabulated in table 1, with the common trend that the values of
$K_{\!Q2}$
for gyroid are tabulated in table 1, with the common trend that the values of $K_{\!Q2}$
decrease as porosity decreases. In other words, ‘form drag’ coefficient
$K_{\!Q2}$
decrease as porosity decreases. In other words, ‘form drag’ coefficient $C_Q\equiv 1/K_{\!Q2}$
in table 1 increases significantly as the internal structure of the gyroid acts as a blockage or resistance against the fluid flow. The results from Set 2, which consists only of gyroid with varying
$C_Q\equiv 1/K_{\!Q2}$
in table 1 increases significantly as the internal structure of the gyroid acts as a blockage or resistance against the fluid flow. The results from Set 2, which consists only of gyroid with varying $l$
and similar
$l$
and similar $\phi$
, are presented in figure 7(b) and table 1. The table shows that with increasing
$\phi$
, are presented in figure 7(b) and table 1. The table shows that with increasing $l$
(i.e. larger void regions) Darcy permeability
$l$
(i.e. larger void regions) Darcy permeability $K_{\!Q1}$
increases, whereas
$K_{\!Q1}$
increases, whereas $C_Q$
reduces. The case with Metal 3-D printing (Metal-G4) exhibits a higher
$C_Q$
reduces. The case with Metal 3-D printing (Metal-G4) exhibits a higher $C_Q$
(i.e. ‘drag’) compared with the case G4 that has the same bulk properties but better surface finish. This again reinforces the comments made earlier about the increased drag owing to enhanced surface roughness in metal 3-D printed porous media.
$C_Q$
(i.e. ‘drag’) compared with the case G4 that has the same bulk properties but better surface finish. This again reinforces the comments made earlier about the increased drag owing to enhanced surface roughness in metal 3-D printed porous media.
Friction factor $f$
(see (4.1)) distributions based on the hydraulic diameter
$f$
(see (4.1)) distributions based on the hydraulic diameter $d_{\!{H}}$
in (a), and with
$d_{\!{H}}$
in (a), and with $d_{\!{H}}$
replaced with
$d_{\!{H}}$
replaced with $d_{{H\hbox{-}\textit{equ}}}$
in (b). The black solid line represents the Ergun equation (4.2) written in
$d_{{H\hbox{-}\textit{equ}}}$
in (b). The black solid line represents the Ergun equation (4.2) written in $d_{\!{H}}$
, whereas the blue dashed line is the linear part (i.e. only first term on the right-hand side) of (4.2).
$d_{\!{H}}$
, whereas the blue dashed line is the linear part (i.e. only first term on the right-hand side) of (4.2).

Interestingly, and rather surprisingly, an attempt to fit (1.1) to the data of primitive and BCC in the least-square sense results in an erratic and sometimes a negative coefficient for $u_s$
(i.e. a negative
$u_s$
(i.e. a negative $K_{\!Q1}$
) that is non-physical. An attempt at forcing a least-square fit with a non-negative coefficient for
$K_{\!Q1}$
) that is non-physical. An attempt at forcing a least-square fit with a non-negative coefficient for $u_s$
results in a value of zero for
$u_s$
results in a value of zero for $K_{\!Q1}$
, again non-physical. This mathematical anomaly points to a physical difference between the form of pressure drop data for gyroid and the other two geometries (i.e. primitive and BCC). A careful observation of some of the primitive and BCC data in figure 6(a) or 6(c) and 6(d) shows that the pressure drop functions ‘bend outwards’ for higher velocities, making a linear plus a quadratic fit less viable. This becomes clear later (cf. figures 8 or 9) where the friction factor versus
$K_{\!Q1}$
, again non-physical. This mathematical anomaly points to a physical difference between the form of pressure drop data for gyroid and the other two geometries (i.e. primitive and BCC). A careful observation of some of the primitive and BCC data in figure 6(a) or 6(c) and 6(d) shows that the pressure drop functions ‘bend outwards’ for higher velocities, making a linear plus a quadratic fit less viable. This becomes clear later (cf. figures 8 or 9) where the friction factor versus $Re/\phi$
trend for primitive and BCC differs considerably from gyroid. As will be discussed later, primitive and BCC have a behaviour that has similarities to a pipe flow (i.e. connected voids), which has a substantial ‘transitions’ region apart from the laminar to turbulent region. An additional issue encountered when fitting (1.1) to all cases is related to the number of data points used in fitting. As shown in Appendix A, for gyroid (
$Re/\phi$
trend for primitive and BCC differs considerably from gyroid. As will be discussed later, primitive and BCC have a behaviour that has similarities to a pipe flow (i.e. connected voids), which has a substantial ‘transitions’ region apart from the laminar to turbulent region. An additional issue encountered when fitting (1.1) to all cases is related to the number of data points used in fitting. As shown in Appendix A, for gyroid ( $\phi =0.85$
), changing the number of data points does not change
$\phi =0.85$
), changing the number of data points does not change $K_{\!Q1}$
and
$K_{\!Q1}$
and $K_{\!Q2}$
beyond 10 %–20 %, whereas for primitive (and BCC), one could obtain a positive
$K_{\!Q2}$
beyond 10 %–20 %, whereas for primitive (and BCC), one could obtain a positive $K_{\!Q1}$
for a reduced and a negative
$K_{\!Q1}$
for a reduced and a negative $K_{\!Q1}$
for an increased number of data points. Appendix A further attempts to highlight these variations using one example from each gyroid and primitive by successively increasing the number of data points in fitting (1.1), starting from
$K_{\!Q1}$
for an increased number of data points. Appendix A further attempts to highlight these variations using one example from each gyroid and primitive by successively increasing the number of data points in fitting (1.1), starting from $u_s=0$
. In fact, the role of these large connected void regions presented in primitive and BBC remains to be fully investigated and it seems that this is a potential reason for the negative values of
$u_s=0$
. In fact, the role of these large connected void regions presented in primitive and BBC remains to be fully investigated and it seems that this is a potential reason for the negative values of $K_{\!Q2}$
.
$K_{\!Q2}$
.
Although empirically determined $K_{\!Q1}$
and
$K_{\!Q1}$
and $K_{\!Q2}$
using (1.1) are widely used in the study of metal foams (and other porous media) to provide valuable information for modelling a specific geometry or configuration, it has several limitations. (i) For cases where a fitting (1.1), such as for gyroid in our experiments or multitude of other porous media like metal form or packed bed of spheres, dimensional
$K_{\!Q2}$
using (1.1) are widely used in the study of metal foams (and other porous media) to provide valuable information for modelling a specific geometry or configuration, it has several limitations. (i) For cases where a fitting (1.1), such as for gyroid in our experiments or multitude of other porous media like metal form or packed bed of spheres, dimensional $K_{\!Q1}$
and
$K_{\!Q1}$
and $K_{\!Q2}$
are less satisfactory, which also limits comparison between different geometries. (ii) There are other geometries, such as primitive and BCC in our case, where (1.1) cannot fit the data, owing to a different physical mechanism at play. (iii) Furthermore, a naive fitting of (1.1) produces different results for varying data count, especially for the ‘non-canonical’ porous media like primitive and BCC, and to a lesser extent in gyroid.
$K_{\!Q2}$
are less satisfactory, which also limits comparison between different geometries. (ii) There are other geometries, such as primitive and BCC in our case, where (1.1) cannot fit the data, owing to a different physical mechanism at play. (iii) Furthermore, a naive fitting of (1.1) produces different results for varying data count, especially for the ‘non-canonical’ porous media like primitive and BCC, and to a lesser extent in gyroid.
Some of these issues will be resolved in the next section, and in doing so, we will also demonstrate a procedure that will allow a unified comparison of all porous media. The non-dimensional pressure drop ( $f$
) versus Reynolds number is the starting point. The difficulty, however, is the definition of a length scale required for non-dimensionalisation. We will begin with the ‘pore diameters’ defined in § 2.1.2 as the length scale, before moving to the hydraulic diameter (
$f$
) versus Reynolds number is the starting point. The difficulty, however, is the definition of a length scale required for non-dimensionalisation. We will begin with the ‘pore diameters’ defined in § 2.1.2 as the length scale, before moving to the hydraulic diameter ( $d_{\!{H}}$
). As we shall see,
$d_{\!{H}}$
). As we shall see, $f$
versus
$f$
versus $Re$
based on
$Re$
based on $d_{\!{H}}$
by itself is also not completely satisfactory, which will lead us to define an ‘equivalent hydraulic diameter’ (
$d_{\!{H}}$
by itself is also not completely satisfactory, which will lead us to define an ‘equivalent hydraulic diameter’ ( $d_{{H\hbox{-}\textit{equ}}}$
) to characterise and compare various porous media. We will commence with the data collected for Set 1 (for fixed
$d_{{H\hbox{-}\textit{equ}}}$
) to characterise and compare various porous media. We will commence with the data collected for Set 1 (for fixed $l=12$
mm, and varying
$l=12$
mm, and varying $\phi$
and geometry), and towards the end show results from Set 2 (fixed
$\phi$
and geometry), and towards the end show results from Set 2 (fixed $\phi \approx 0.85$
and varying
$\phi \approx 0.85$
and varying $l$
).
$l$
).
4. Non-dimensional pressure drop versus Reynolds number correlations
The pressure drop is non-dimensionalised, and represented by $f$
as defined in (1.3). For the pore or sphere diameter
$f$
as defined in (1.3). For the pore or sphere diameter $d$
that appears in (1.3), we use the two pore diameters,
$d$
that appears in (1.3), we use the two pore diameters, $d_{\!p1}$
and
$d_{\!p1}$
and $d_{\!p2}$
discussed in § 2.1.2. Our experimental results of Set 1, with
$d_{\!p2}$
discussed in § 2.1.2. Our experimental results of Set 1, with $\textit{Re}_{\!p1} \equiv d_{\!p1} u_s/\nu$
and similarly for
$\textit{Re}_{\!p1} \equiv d_{\!p1} u_s/\nu$
and similarly for $\textit{Re}_{\!p2}$
, are compared with the Ergun equation (1.4), and plotted in figure 8(a) and 8(b), respectively, for
$\textit{Re}_{\!p2}$
, are compared with the Ergun equation (1.4), and plotted in figure 8(a) and 8(b), respectively, for $d_{\!p1}$
and
$d_{\!p1}$
and $d_{\!p2}$
. The most set of data show the expected
$d_{\!p2}$
. The most set of data show the expected $f\sim 1/Re$
behaviour at lower
$f\sim 1/Re$
behaviour at lower $Re$
, and
$Re$
, and $f$
tending towards a constant value at increasing
$f$
tending towards a constant value at increasing $Re$
. Nevertheless, figure 8 demonstrates how the experimental results might seem to vary depending on the definition of the ‘pore diameter’. This could cause significant confusion in applications when TPMS porous media are used, because no universally accepted definition of pore size exists, and more significantly, the existing definitions are not related to fluid flows, rather defined by convenient geometric arguments. The uniqueness issue of the pore diameter could be solved by using the hydraulic diameter, which is now considered. Nevertheless, we note that in most geometries, an experimental estimation of the hydraulic diameter is practically unattainable; in what follows, we will present an ‘equivalent hydraulic diameter’ that overcomes these issues and is physically meaningful.
$Re$
. Nevertheless, figure 8 demonstrates how the experimental results might seem to vary depending on the definition of the ‘pore diameter’. This could cause significant confusion in applications when TPMS porous media are used, because no universally accepted definition of pore size exists, and more significantly, the existing definitions are not related to fluid flows, rather defined by convenient geometric arguments. The uniqueness issue of the pore diameter could be solved by using the hydraulic diameter, which is now considered. Nevertheless, we note that in most geometries, an experimental estimation of the hydraulic diameter is practically unattainable; in what follows, we will present an ‘equivalent hydraulic diameter’ that overcomes these issues and is physically meaningful.
4.1. Hydraulic diameter and resulting $f$
versus
$Re$
distribution
$f$
versus
$Re$
distribution


The concept of hydraulic diameter usually works well for similar geometries in diverse fluid flow situations. As discussed in § 1 hydraulic diameter $d_{\!{H}} \equiv 4V_\textit{fluid}/({\rm wetted\,area})$
, an estimation of
$d_{\!{H}} \equiv 4V_\textit{fluid}/({\rm wetted\,area})$
, an estimation of $d_{\!{H}}$
requires void volume available for flow (
$d_{\!{H}}$
requires void volume available for flow ( $V_\textit{fluid}$
) that is related to porosity, the wetted surface area that includes the total surface area of TPMS porous media, and the surface area of the acrylic pipe that does not contact TPMS porous media.
$V_\textit{fluid}$
) that is related to porosity, the wetted surface area that includes the total surface area of TPMS porous media, and the surface area of the acrylic pipe that does not contact TPMS porous media.
Appendix C provides details of extracting $d_{\!{H}}$
. Briefly, Autodesk Netfabb computer software is used to estimate
$d_{\!{H}}$
. Briefly, Autodesk Netfabb computer software is used to estimate $V_\textit{fluid}$
and the wetted surface area. The values of
$V_\textit{fluid}$
and the wetted surface area. The values of $V_\textit{fluid}$
are experimentally estimated by immersing samples in water and calculating the increased volume. The difference between computer-estimated and experimental values is
$V_\textit{fluid}$
are experimentally estimated by immersing samples in water and calculating the increased volume. The difference between computer-estimated and experimental values is $\lessapprox 1.5\,\%$
. The final computed
$\lessapprox 1.5\,\%$
. The final computed $d_{\!{H}}$
values for all samples are reported in table 2. Consistent with our expectation that smaller
$d_{\!{H}}$
values for all samples are reported in table 2. Consistent with our expectation that smaller $\phi$
should result in a higher pressure drop and hence equivalent to a packed bed of smaller spheres, Set 1 data shows that reduction in
$\phi$
should result in a higher pressure drop and hence equivalent to a packed bed of smaller spheres, Set 1 data shows that reduction in $\phi$
results in a reduced
$\phi$
results in a reduced $d_{\!{H}}$
. Likewise, in Set 2, with a fixed
$d_{\!{H}}$
. Likewise, in Set 2, with a fixed $\phi \approx 0.85$
, an increase in unit cell size
$\phi \approx 0.85$
, an increase in unit cell size $l$
shows an increased
$l$
shows an increased $d_{\!{H}}$
.
$d_{\!{H}}$
.


To plot $f$
versus Reynolds number, the Ergun equation (1.4) is modified in-terms of the hydraulic diameter
$f$
versus Reynolds number, the Ergun equation (1.4) is modified in-terms of the hydraulic diameter $d_{\!{H}}$
by using,
$d_{\!{H}}$
by using, $d=(3/2) d_{\!{H}}\,(1-\phi )/\phi$
, and with
$d=(3/2) d_{\!{H}}\,(1-\phi )/\phi$
, and with
 \begin{align} &f \equiv \frac {-\Delta\! P/\Delta x}{\rho u_s^2/d}\frac {\phi ^3}{(1-\phi )} = \frac {-\Delta\! P/\Delta x}{\rho u_s^2/d_{\textrm { H}}}\phi ^2 \left (\frac {3}{2} \right )\!, \end{align}
 \begin{align} & f = 150\left (\frac {2}{3}\right )\frac {\phi }{\textit{Re}_{d_{\!{H}}}} + 1.75, \end{align}
where, $\textit{Re}_{d_{\!{H}}} = u_s\,d_{\!{H}}/\nu$
. Note that the derivation of the Ergun equation begins with
$\textit{Re}_{d_{\!{H}}} = u_s\,d_{\!{H}}/\nu$
. Note that the derivation of the Ergun equation begins with $d_{\!{H}}$
(rather than
$d_{\!{H}}$
(rather than $d$
); so, in that sense (4.2) is more broadly applicable than (1.4). Recall that the constants 150 and 1.75 in both (4.2) and (1.4) are for random packed spheres.
$d$
); so, in that sense (4.2) is more broadly applicable than (1.4). Recall that the constants 150 and 1.75 in both (4.2) and (1.4) are for random packed spheres.
Using $d_{\!{H}}$
from table 2 and
$d_{\!{H}}$
from table 2 and $f$
evaluated as in (4.1), figure 9(a) shows Set 1 data on a log–log
$f$
evaluated as in (4.1), figure 9(a) shows Set 1 data on a log–log $f$
versus
$f$
versus $\textit{Re}_{d_{\!{H}}}$
plot using appropriate symbols for each case. The Ergun equation (4.2) is presented with a black solid line. The net pressure drop, composed of viscous and pressure drag, dominates, respectively, at lower and higher
$\textit{Re}_{d_{\!{H}}}$
plot using appropriate symbols for each case. The Ergun equation (4.2) is presented with a black solid line. The net pressure drop, composed of viscous and pressure drag, dominates, respectively, at lower and higher $\textit{Re}_{d_{\!{H}}}$
. Data from TPMS porous media start at different ordinate positions, but most porous media show a linear relationship that is suggested by the Ergun equation for low
$\textit{Re}_{d_{\!{H}}}$
. Data from TPMS porous media start at different ordinate positions, but most porous media show a linear relationship that is suggested by the Ergun equation for low $\textit{Re}_{d_{\!{H}}}/\phi$
values;
$\textit{Re}_{d_{\!{H}}}/\phi$
values; $\textit{Re}_{d_{\!{H}}}/\phi \lessapprox 10$
for gyroids;
$\textit{Re}_{d_{\!{H}}}/\phi \lessapprox 10$
for gyroids; $\lessapprox 50$
for
$\lessapprox 50$
for $\phi =0.55$
primitive and
$\phi =0.55$
primitive and $\lessapprox 100$
for other primitives;
$\lessapprox 100$
for other primitives; $\lessapprox 200$
for BCC. This can be qualitatively explained by noticing that gyroid has the most ‘contorted’ path of all the three geometries (cf. figure 2), whereas primitive and BCC have an increasingly ‘easier’ flow path. An approximate analogy can be drawn between these cases and rough-walled pipe flows, where a reduction in the wall-roughness (i.e. a reduced flow contortion) increases the linear dependence region. Enhanced flow contortions result from flow separations around roughness or strongly curved pore regions (with a subsequent adverse pressure gradient), and hence, a dominance of the pressure drag over the viscous drag.
$\lessapprox 200$
for BCC. This can be qualitatively explained by noticing that gyroid has the most ‘contorted’ path of all the three geometries (cf. figure 2), whereas primitive and BCC have an increasingly ‘easier’ flow path. An approximate analogy can be drawn between these cases and rough-walled pipe flows, where a reduction in the wall-roughness (i.e. a reduced flow contortion) increases the linear dependence region. Enhanced flow contortions result from flow separations around roughness or strongly curved pore regions (with a subsequent adverse pressure gradient), and hence, a dominance of the pressure drag over the viscous drag.
It is clear that the majority of the data in figure 9(a) do not follow the Ergun equation, and this is expected because the constants in the Ergun equation are tuned only for pressure drop through packed spheres. Nevertheless, $f$
versus
$f$
versus $\textit{Re}_{d_{\!{H}}}$
is not uncommon to be plotted for a variety of porous media, such as metal forms (Richardson, Peng & Remue Reference Richardson, Peng and Remue2000; Dietrich et al. Reference Dietrich, Schabel, Kind and Martin2009), or packed rods, cylinder, plates, etc. (Richardson Reference Richardson2002), or more recently even for a TPMS ‘diamond’ geometry (Hawken et al. Reference Hawken, Reid, Clarke, Watson, Fee and Holland2023), and the aim then is to characterise the constants
$\textit{Re}_{d_{\!{H}}}$
is not uncommon to be plotted for a variety of porous media, such as metal forms (Richardson, Peng & Remue Reference Richardson, Peng and Remue2000; Dietrich et al. Reference Dietrich, Schabel, Kind and Martin2009), or packed rods, cylinder, plates, etc. (Richardson Reference Richardson2002), or more recently even for a TPMS ‘diamond’ geometry (Hawken et al. Reference Hawken, Reid, Clarke, Watson, Fee and Holland2023), and the aim then is to characterise the constants $K_{\!Q1}$
and
$K_{\!Q1}$
and $K_{\!Q2}$
, or their equivalent numerical values, such as 150 and 1.75 in (4.2) as a function of different parameters such
$K_{\!Q2}$
, or their equivalent numerical values, such as 150 and 1.75 in (4.2) as a function of different parameters such $\phi$
,
$\phi$
, $l$
and type of geometry. As alluded in the Introduction § 1, there are two essential deficiencies: first, different functional fitted curves for each specific case make comparison of different cases difficult. Furthermore, in many cases, an estimation of
$l$
and type of geometry. As alluded in the Introduction § 1, there are two essential deficiencies: first, different functional fitted curves for each specific case make comparison of different cases difficult. Furthermore, in many cases, an estimation of $d_{\!{H}}$
is not even possible, and an arbitrary ‘pore diameter’ is chosen to plot
$d_{\!{H}}$
is not even possible, and an arbitrary ‘pore diameter’ is chosen to plot $f$
versus
$f$
versus $Re$
, making comparison of different cases even more difficult. Second, a closer examination of the data in figure 9(a) shows that at higher
$Re$
, making comparison of different cases even more difficult. Second, a closer examination of the data in figure 9(a) shows that at higher $\textit{Re}_{d_{\!{H}}}/\phi$
, especially for primitive and BCC,
$\textit{Re}_{d_{\!{H}}}/\phi$
, especially for primitive and BCC, $f(d_{\!{H}})$
increases before becoming a constant. This ‘dip’ in the
$f(d_{\!{H}})$
increases before becoming a constant. This ‘dip’ in the $f$
versus
$f$
versus $\textit{Re}_{d_{\!{H}}}$
implies that the two-constant quadratic model (1.1) or the Ergun equation (4.2) cannot completely capture the flow physics associated with variation of
$\textit{Re}_{d_{\!{H}}}$
implies that the two-constant quadratic model (1.1) or the Ergun equation (4.2) cannot completely capture the flow physics associated with variation of $f$
as the flow ‘transitions’ from the laminar regime to a fully turbulent regime.
$f$
as the flow ‘transitions’ from the laminar regime to a fully turbulent regime.
Towards a resolution to the first deficiency, where no single existing ‘diameter’ can be uniquely related to a case with specific $\phi$
,
$\phi$
, $l$
and geometry, we will define an ‘equivalent hydraulic diameter’
$l$
and geometry, we will define an ‘equivalent hydraulic diameter’ $d_{{H\hbox{-}\textit{equ}}}$
, that is possible for all porous media (and not just TPMS which is the focus here) and is unique to each porous medium.
$d_{{H\hbox{-}\textit{equ}}}$
, that is possible for all porous media (and not just TPMS which is the focus here) and is unique to each porous medium.
4.2. Equivalent hydraulic diameter, and non-dimensional pressure drop
The essential idea is to find the equivalent hydraulic diameter that moves the laminar drag law region of each geometry to that given by the laminar region in the Ergun equation (for packed spheres). Thus, for each geometry, we are trying to find the equivalent hydraulic diameter that gives the same laminar viscous drag as packed spheres. Said differently, we plan to identify the ‘linear’ or laminar region for each geometry in figure 9(a) and move it towards the Ergun equation (black line in figure 9
a) by varying the hydraulic diameter as a free parameter. The diameter that best matches (4.2) in the linear regime is $d_{{H\hbox{-}\textit{equ}}}$
. As an aside, we note that this is similar to defining an ‘equivalent sand-grain roughness’ in rough wall-flows in the fully turbulent regime, whereas here we focus on the laminar regime. Below, we will present two methods to estimate
$d_{{H\hbox{-}\textit{equ}}}$
. As an aside, we note that this is similar to defining an ‘equivalent sand-grain roughness’ in rough wall-flows in the fully turbulent regime, whereas here we focus on the laminar regime. Below, we will present two methods to estimate $d_{{H\hbox{-}\textit{equ}}}$
that should provide the same
$d_{{H\hbox{-}\textit{equ}}}$
that should provide the same $d_{{H\hbox{-}\textit{equ}}}$
within numerical and experiential data errors. With such a
$d_{{H\hbox{-}\textit{equ}}}$
within numerical and experiential data errors. With such a $d_{{H\hbox{-}\textit{equ}}}$
, that is listed in table 2 for different cases,
$d_{{H\hbox{-}\textit{equ}}}$
, that is listed in table 2 for different cases, $f$
versus
$f$
versus $\textit{Re}_{d_{{H\hbox{-}\textit{equ}}}}$
can be obtained and is plotted in figure 9(b) for Set 1. As required, the ‘laminar’ region of the data follows the linear part of the Ergun equation:
$\textit{Re}_{d_{{H\hbox{-}\textit{equ}}}}$
can be obtained and is plotted in figure 9(b) for Set 1. As required, the ‘laminar’ region of the data follows the linear part of the Ergun equation: $f = 150 ({2}/{3} ){\phi }/{\textit{Re}_{d_{{H\hbox{-}\textit{equ}}}}}$
shown in the blue dashed line. Before discussing figure 9(b) or features of
$f = 150 ({2}/{3} ){\phi }/{\textit{Re}_{d_{{H\hbox{-}\textit{equ}}}}}$
shown in the blue dashed line. Before discussing figure 9(b) or features of $d_{{H\hbox{-}\textit{equ}}}$
, we discuss the two methods for estimating
$d_{{H\hbox{-}\textit{equ}}}$
, we discuss the two methods for estimating $d_{{H\hbox{-}\textit{equ}}}$
.
$d_{{H\hbox{-}\textit{equ}}}$
.
Method 1 (this is a two-step process). In Step 1, the ‘laminar’ region or the range of $\textit{Re}_{d_{\!{H}}}/\phi$
where
$\textit{Re}_{d_{\!{H}}}/\phi$
where $f_H$
varies linearly with
$f_H$
varies linearly with $\textit{Re}_{d_{\!{H}}}/\phi$
(in figure 9
a) is determined. Step 1 starts by fitting a linear line with slope –1 (on log–log axes) to the experimental data points in an increment of one data point at each time, and stops where the error is minimum. In Step 2, we vary the value of
$\textit{Re}_{d_{\!{H}}}/\phi$
(in figure 9
a) is determined. Step 1 starts by fitting a linear line with slope –1 (on log–log axes) to the experimental data points in an increment of one data point at each time, and stops where the error is minimum. In Step 2, we vary the value of $d_{\!{H}}$
such that the linear region in the data matches the linear part of the Ergun equation (
$d_{\!{H}}$
such that the linear region in the data matches the linear part of the Ergun equation ( $f = 150 ({2}/{3} ){\phi }/{\textit{Re}_{d_{{H\hbox{-}\textit{equ}}}}}$
). The details of this two-step process is illustrated in Appendix D.1 using figure 15 by taking the gyroid at
$f = 150 ({2}/{3} ){\phi }/{\textit{Re}_{d_{{H\hbox{-}\textit{equ}}}}}$
). The details of this two-step process is illustrated in Appendix D.1 using figure 15 by taking the gyroid at $\phi =0.85$
as an example. Note that although we start the process from a known
$\phi =0.85$
as an example. Note that although we start the process from a known $d_{\!{H}}$
, one could start from any reasonable but arbitrary diameter value, and the procedure will converge to the same
$d_{\!{H}}$
, one could start from any reasonable but arbitrary diameter value, and the procedure will converge to the same $d_{{H\hbox{-}\textit{equ}}}$
. This is further evidenced by the second method for estimating
$d_{{H\hbox{-}\textit{equ}}}$
. This is further evidenced by the second method for estimating $d_{{H\hbox{-}\textit{equ}}}$
described below, which does not rely on the knowledge of
$d_{{H\hbox{-}\textit{equ}}}$
described below, which does not rely on the knowledge of $d_{\!{H}}$
.
$d_{\!{H}}$
.
Method 2 (this is a one-step process). Similarly to Method 1, we again determine the linear drag region, but here in the $(-\Delta\! P/\Delta x)$
versus
$(-\Delta\! P/\Delta x)$
versus $u_s$
distribution, as those presented in figures 6 and 7. We start fitting a straight line passing through the origin, with slope (
$u_s$
distribution, as those presented in figures 6 and 7. We start fitting a straight line passing through the origin, with slope ( $m$
) as a free parameter, starting at
$m$
) as a free parameter, starting at $u_s=0$
, one data point at a time, until the error becomes a minimum. Using the dynamic viscosity
$u_s=0$
, one data point at a time, until the error becomes a minimum. Using the dynamic viscosity $\mu$
, the fitted line becomes
$\mu$
, the fitted line becomes
 \begin{equation} \frac {-\Delta\! P}{\Delta x}=\frac {1}{K_1}\mu u_s, \end{equation}
where, the permeability strictly within the linear region: $K_1 \equiv \mu /m$
. Now, the Ergun equation (4.2) can be rearranged to retain only
$K_1 \equiv \mu /m$
. Now, the Ergun equation (4.2) can be rearranged to retain only $(-\Delta\! P/\Delta x)$
on the left-hand side,
$(-\Delta\! P/\Delta x)$
on the left-hand side,
 \begin{equation} \frac {-\Delta\! P}{\Delta x}=\left [\left (\frac {2}{3}\right )^2 \frac {150}{d_{\!{H}}^2 \phi } \right ]\mu u_s + \left [ \frac {1.75}{d_{\!{H}} \phi ^2 (2/3)} \right ]\rho u_s^2. \end{equation}
Comparison of the linear part of (4.4) and (4.3) allows us to estimate $d_{{ H\hbox{-}\textit{equ}}}$
, such that
$d_{{ H\hbox{-}\textit{equ}}}$
, such that
 \begin{equation} d_{{H\hbox{-}\textit{equ}}} = \left (\frac {2}{3}\right ) \left [ \frac {150\,K_1}{\phi } \right ]^{1/2} \!. \end{equation}
Further details of Method 2 by considering gyroid with $\phi =0.85$
data are presented in Appendix D.2 using figure 16 (where, a different symbol,
$\phi =0.85$
data are presented in Appendix D.2 using figure 16 (where, a different symbol, $\tilde {d}_{{H\hbox{-}\textit{equ}}}$
is used to represent values obtained from (4.5) to distinguish it from those estimated by Method 1).
$\tilde {d}_{{H\hbox{-}\textit{equ}}}$
is used to represent values obtained from (4.5) to distinguish it from those estimated by Method 1).
Although theoretically one would expect the same $d_{{H\hbox{-}\textit{equ}}}$
by both Methods 1 and 2, practically, we obtain the same values within
$d_{{H\hbox{-}\textit{equ}}}$
by both Methods 1 and 2, practically, we obtain the same values within $\pm 0.05$
mm. As such, we present only
$\pm 0.05$
mm. As such, we present only $d_{{H\hbox{-}\textit{equ}}}$
values obtained from Method 1 in table 2. The slight difference is owing to the different fitting procedures carried out on an experimental data set with inherent measurement errors. Once
$d_{{H\hbox{-}\textit{equ}}}$
values obtained from Method 1 in table 2. The slight difference is owing to the different fitting procedures carried out on an experimental data set with inherent measurement errors. Once $d_{{H\hbox{-}\textit{equ}}}$
is found, we can also define an equivalent sphere diameter
$d_{{H\hbox{-}\textit{equ}}}$
is found, we can also define an equivalent sphere diameter $d_{{equ}} \equiv (3/2)d_{{H\hbox{-}\textit{equ}}}(1-\phi )/\phi$
, that is also presented in table 2. So, physically an arbitrary porous media with
$d_{{equ}} \equiv (3/2)d_{{H\hbox{-}\textit{equ}}}(1-\phi )/\phi$
, that is also presented in table 2. So, physically an arbitrary porous media with $d_{{equ}}$
will produce the same drag as packed spheres of diameter
$d_{{equ}}$
will produce the same drag as packed spheres of diameter $d_{{equ}}$
in the laminar region. We note that our direct estimation of
$d_{{equ}}$
in the laminar region. We note that our direct estimation of $K_1$
(leading to
$K_1$
(leading to $d_{{H\hbox{-}\textit{equ}}}$
by Method 2) or
$d_{{H\hbox{-}\textit{equ}}}$
by Method 2) or $d_{{H\hbox{-}\textit{equ}}}$
(leading to
$d_{{H\hbox{-}\textit{equ}}}$
(leading to $K_1$
as in Method 1) is empirically estimated from the available data within linear region around at the smallest Reynolds number. In the limit of
$K_1$
as in Method 1) is empirically estimated from the available data within linear region around at the smallest Reynolds number. In the limit of $Re=0$
(that can never be achieved in an experiment, unlike in a numerical simulation of Stokes flow), the
$Re=0$
(that can never be achieved in an experiment, unlike in a numerical simulation of Stokes flow), the $K_1$
will correspond to the true viscous laminar permeability; this draws attention to the distinction between the viscous–inertial laminar and purely viscous laminar regimes (e.g. Lasseux et al. Reference Lasseux, Abbasian, Ali and Ahmadi2011; Ahmed & Bottaro Reference Ahmed and Bottaro2023). At this point, it is also worth comparing the present experimentally obtained data with the numerical simulations of Ahmed & Bottaro (Reference Ahmed and Bottaro2023) for gyroid and primitive. Towards this, in table 2 we present
$K_1$
will correspond to the true viscous laminar permeability; this draws attention to the distinction between the viscous–inertial laminar and purely viscous laminar regimes (e.g. Lasseux et al. Reference Lasseux, Abbasian, Ali and Ahmadi2011; Ahmed & Bottaro Reference Ahmed and Bottaro2023). At this point, it is also worth comparing the present experimentally obtained data with the numerical simulations of Ahmed & Bottaro (Reference Ahmed and Bottaro2023) for gyroid and primitive. Towards this, in table 2 we present $K_1$
normalised with the unit cell length, i.e.
$K_1$
normalised with the unit cell length, i.e. $K_1/l^2$
, which for gyroid and primitive range between
$K_1/l^2$
, which for gyroid and primitive range between $0.1\times 10^{-3}$
and
$0.1\times 10^{-3}$
and $2\times 10^{-3}$
that is reasonably close to the range of values presented by Ahmed & Bottaro (Reference Ahmed and Bottaro2023) (in their figure 4). Furthermore, we note the differing trend of gyroid and primitive as
$2\times 10^{-3}$
that is reasonably close to the range of values presented by Ahmed & Bottaro (Reference Ahmed and Bottaro2023) (in their figure 4). Furthermore, we note the differing trend of gyroid and primitive as $\phi$
changes; for
$\phi$
changes; for $\phi =0.85$
, the
$\phi =0.85$
, the $K_1/l^2$
value is higher for primitive compared with gyroid, whereas gyroid exhibits a higher value of
$K_1/l^2$
value is higher for primitive compared with gyroid, whereas gyroid exhibits a higher value of $K_1/l^2$
compared with primitive for
$K_1/l^2$
compared with primitive for $\phi =0.55$
, and these trends are again consistent with the simulations of Ahmed & Bottaro (Reference Ahmed and Bottaro2023). We, however, note that a closer comparison shows that our values of
$\phi =0.55$
, and these trends are again consistent with the simulations of Ahmed & Bottaro (Reference Ahmed and Bottaro2023). We, however, note that a closer comparison shows that our values of $K_1$
are smaller than
$K_1$
are smaller than $Re=0$
, Stokes limit, presented by the numerical simulations of Ahmed & Bottaro (Reference Ahmed and Bottaro2023). Leaving aside the inherent measurement uncertainties and differences that can arise by a comparison between uncoordinated experiments and numerical simulations, this lower
$Re=0$
, Stokes limit, presented by the numerical simulations of Ahmed & Bottaro (Reference Ahmed and Bottaro2023). Leaving aside the inherent measurement uncertainties and differences that can arise by a comparison between uncoordinated experiments and numerical simulations, this lower $K_1$
may point to the finite inertial effect and indicates that we are likely not at the Stokes limit, especially for the larger
$K_1$
may point to the finite inertial effect and indicates that we are likely not at the Stokes limit, especially for the larger $l$
. The Reynolds number used by them is
$l$
. The Reynolds number used by them is $ \rho M l^3/\mu ^2 \approx 1880 M$
for
$ \rho M l^3/\mu ^2 \approx 1880 M$
for $l=12$
mm and
$l=12$
mm and $ 70 M$
for
$ 70 M$
for $l=4$
mm with our experimental
$l=4$
mm with our experimental $\rho$
and
$\rho$
and $\mu$
values, where
$\mu$
values, where $M=-\Delta\! P/\Delta x$
in Pascals per metre. For this Reynolds number to be ‘small’ (say, less than
$M=-\Delta\! P/\Delta x$
in Pascals per metre. For this Reynolds number to be ‘small’ (say, less than $\approx$
5000 from their figure 4), we should have
$\approx$
5000 from their figure 4), we should have $-\Delta\! P/\Delta x$
below a few Pascals per metre and 71 Pa m−1 for
$-\Delta\! P/\Delta x$
below a few Pascals per metre and 71 Pa m−1 for $l=12$
and 4 mm, respectively. Within our linear fitting regime, the majority of cases lie above this limit, and we therefore anticipate a finite inertial contribution to the estimates of
$l=12$
and 4 mm, respectively. Within our linear fitting regime, the majority of cases lie above this limit, and we therefore anticipate a finite inertial contribution to the estimates of $K_1$
. Another observation, now from Set 2 (G1 to G5) where
$K_1$
. Another observation, now from Set 2 (G1 to G5) where $\phi \approx 0.85$
and
$\phi \approx 0.85$
and $l$
is changing, is that the values of
$l$
is changing, is that the values of $K_1/l^2$
are relatively similar (at least lesser variations compared with Set 1). This shows that although the larger length scale of the flow set-up, i.e. the pipe diameter and the total length of the porous media or the number of unit cells affect the estimated
$K_1/l^2$
are relatively similar (at least lesser variations compared with Set 1). This shows that although the larger length scale of the flow set-up, i.e. the pipe diameter and the total length of the porous media or the number of unit cells affect the estimated $K_1$
, the effect is likely minor.
$K_1$
, the effect is likely minor.
Once $d_{{H\hbox{-}\textit{equ}}}$
is estimated, it is now possible to compare different configurations as the Reynolds number increases. Figure 9(b) shows the pressure drop results in terms of
$d_{{H\hbox{-}\textit{equ}}}$
is estimated, it is now possible to compare different configurations as the Reynolds number increases. Figure 9(b) shows the pressure drop results in terms of $d_{{H\hbox{-}\textit{equ}}}$
. The functional forms of
$d_{{H\hbox{-}\textit{equ}}}$
. The functional forms of $f$
for gyroid at the three different porosities are reasonably close to the Ergun equation, unlike those of primitive and BCC. Figure 10(a) shows the same data as in figure 9(b) but only for gyroid removing the clutter. The closeness of gyroid data to the Ergun equation suggests the ‘equivalence’ of flow dynamics within the gyroid geometry and randomly packed spheres because of the intricate geometric structure of gyroid. It is evident that
$f$
for gyroid at the three different porosities are reasonably close to the Ergun equation, unlike those of primitive and BCC. Figure 10(a) shows the same data as in figure 9(b) but only for gyroid removing the clutter. The closeness of gyroid data to the Ergun equation suggests the ‘equivalence’ of flow dynamics within the gyroid geometry and randomly packed spheres because of the intricate geometric structure of gyroid. It is evident that $\phi =0.85$
resembles packed spheres closest, and decreasing
$\phi =0.85$
resembles packed spheres closest, and decreasing $\phi$
results in an increased drag compared with random spheres. For example, gyroid with
$\phi$
results in an increased drag compared with random spheres. For example, gyroid with $\phi =0.55$
will result in a higher turbulent drag than packed spheres of an equivalent diameter, whereas
$\phi =0.55$
will result in a higher turbulent drag than packed spheres of an equivalent diameter, whereas $\phi =0.85$
shows a slightly lower drag (compared with spheres) in the fully turbulent regime.
$\phi =0.85$
shows a slightly lower drag (compared with spheres) in the fully turbulent regime.
Friction factors with the equivalent hydraulic diameters for (a) gyroid; (b) primitive; (c) BCC. Black solid and blue dashed lines are the same as in figure 9. The dashed lines are models based on $K_1$
and
$K_1$
and $K_2$
, whereas the dotted lines are based on
$K_2$
, whereas the dotted lines are based on $K_{\!Q1}$
and
$K_{\!Q1}$
and $K_{\!Q2}$
obtained by a least square fitting to (1.1), which are discussed in § 5.
$K_{\!Q2}$
obtained by a least square fitting to (1.1), which are discussed in § 5.

Figure 10(b) and 10(c) show corresponding data for primitive and BCC. Beyond the linear region, primitive and BCC show different relationships compared with the Ergun equation, but have a similar pattern for the different porosities as the flow rates increase. The converging–diverging shape of the primitive geometry (see figures 1
b and 1
e and 2
b) and the open structure with the node and strut in the middle of the BCC cases (see figures 1
c, 1
f and 2
c) deviates from random spheres, and highlights the large-scale inhomogeneities in these porous media. In primitive (cf. figure 10
b), $\phi =0.85$
seems to show a slightly reduced drag in the fully turbulent region (corresponding to highest
$\phi =0.85$
seems to show a slightly reduced drag in the fully turbulent region (corresponding to highest $\textit{Re}_{d_{{H\hbox{-}\textit{equ}}}}/\phi$
), whereas smaller porosities appear to reach a slightly higher asymptotic drag compared with packed spheres. In BCC, on the other hand, it shows a reduced turbulent drag at all
$\textit{Re}_{d_{{H\hbox{-}\textit{equ}}}}/\phi$
), whereas smaller porosities appear to reach a slightly higher asymptotic drag compared with packed spheres. In BCC, on the other hand, it shows a reduced turbulent drag at all $\phi$
, and this low-drag behaviour is hardly affected by changing
$\phi$
, and this low-drag behaviour is hardly affected by changing $\phi$
. It is important to highlight that the comparison of drag between different parameters of the porous media in fully turbulent regime is only possible after the definition of
$\phi$
. It is important to highlight that the comparison of drag between different parameters of the porous media in fully turbulent regime is only possible after the definition of $d_{{H\hbox{-}\textit{equ}}}$
. Specific to the TPMS geometries considered here, we observe a lower turbulent drag for
$d_{{H\hbox{-}\textit{equ}}}$
. Specific to the TPMS geometries considered here, we observe a lower turbulent drag for $\phi =0.85$
in all three geometries, and for all
$\phi =0.85$
in all three geometries, and for all $\phi$
values for BCC. It is quite likely that TPMS with almost zero mean curvature seems favourable to drag reduction when compared with packed spheres that have a fixed and finite curvature. One can speculate that it is likely that lower pressure drag, which is usually related to flow separation, is somewhat curtailed in these lower curvature geometries.
$\phi$
values for BCC. It is quite likely that TPMS with almost zero mean curvature seems favourable to drag reduction when compared with packed spheres that have a fixed and finite curvature. One can speculate that it is likely that lower pressure drag, which is usually related to flow separation, is somewhat curtailed in these lower curvature geometries.
Also, note that the insets in figure 10(b) and 10(c) highlight the start of the transitional region where inertial effects begin to manifest on a larger scale in the primitive and BCC cases, and there is a ‘dip’ behaviour in $f$
distribution as
$f$
distribution as $Re$
increases. That is, after the laminar region (where
$Re$
increases. That is, after the laminar region (where $f \sim (\textit{Re}_{d_{{H\hbox{-}\textit{equ}}}}/\phi )^{-1}$
),
$f \sim (\textit{Re}_{d_{{H\hbox{-}\textit{equ}}}}/\phi )^{-1}$
), $f$
increases before levelling towards an approximately constant fully turbulent region. This increase in
$f$
increases before levelling towards an approximately constant fully turbulent region. This increase in $f$
with
$f$
with $Re$
cannot be expressed as the usual linear–quadratic drag law (cf. (1.1) or the Ergun equation (1.4)) with a sum of laminar and fully turbulent flow drag contained in the existing formulations of porous media.
$Re$
cannot be expressed as the usual linear–quadratic drag law (cf. (1.1) or the Ergun equation (1.4)) with a sum of laminar and fully turbulent flow drag contained in the existing formulations of porous media.
This complex behaviour of $f$
is, however, reminiscent of flow through rough pipes presented on a ‘Moody’ diagram whereas the flow transitions from laminar to turbulent, an increase in
$f$
is, however, reminiscent of flow through rough pipes presented on a ‘Moody’ diagram whereas the flow transitions from laminar to turbulent, an increase in $f$
with
$f$
with $Re$
is quite common. In pipes, as the flow transitions from a laminar regime caused by the roughness-induced instabilities, the increased momentum transport owing to almost exponentially growing instabilities (e.g. Philip & Cohen (Reference Philip and Cohen2010), with sufficient space to grow in an empty pipe, i.e. possibility of long-range correlations) results in a rapid increase in
$Re$
is quite common. In pipes, as the flow transitions from a laminar regime caused by the roughness-induced instabilities, the increased momentum transport owing to almost exponentially growing instabilities (e.g. Philip & Cohen (Reference Philip and Cohen2010), with sufficient space to grow in an empty pipe, i.e. possibility of long-range correlations) results in a rapid increase in $f$
. As
$f$
. As $Re$
is further increased, the nonlinear transfer of energy (e.g. Cohen, Philip & Ben-Dov Reference Cohen, Philip and Ben-Dov2009) arrests this growth of
$Re$
is further increased, the nonlinear transfer of energy (e.g. Cohen, Philip & Ben-Dov Reference Cohen, Philip and Ben-Dov2009) arrests this growth of $f$
and brings to a constant value that is a fixed fraction of the total dynamic pressure in the pipe. We suspect a similar phenomenon happening in primitive and BCC geometries with their straight pipe-like structure (see figure 2
bii and 2
cii), and roughness that is inherent at the edges. The period structure with large empty streamwise expansive regions in primitive and BCC allows the possibility of larger scale ‘transitional’ structures (with possible long-range correlations) to exist within these geometries. This is in contrast to a ‘random porous media’ (such as a packed bed of spheres) where such structures are not allowed owing to the non-periodic nature of the geometry. Note that although gyroid has a periodic structure, the periodicity is hampered in the streamwise direction of the flow (see figure 2
a ii), resulting in gyroid to behave more closely to a random medium. In fact, the effect of large connected void regions forming direct pathways along the streamwise direction in primitive and BCC is reflected in the much larger
$f$
and brings to a constant value that is a fixed fraction of the total dynamic pressure in the pipe. We suspect a similar phenomenon happening in primitive and BCC geometries with their straight pipe-like structure (see figure 2
bii and 2
cii), and roughness that is inherent at the edges. The period structure with large empty streamwise expansive regions in primitive and BCC allows the possibility of larger scale ‘transitional’ structures (with possible long-range correlations) to exist within these geometries. This is in contrast to a ‘random porous media’ (such as a packed bed of spheres) where such structures are not allowed owing to the non-periodic nature of the geometry. Note that although gyroid has a periodic structure, the periodicity is hampered in the streamwise direction of the flow (see figure 2
a ii), resulting in gyroid to behave more closely to a random medium. In fact, the effect of large connected void regions forming direct pathways along the streamwise direction in primitive and BCC is reflected in the much larger $K_1$
in table 2, unlike gyroid which has a smaller
$K_1$
in table 2, unlike gyroid which has a smaller $K_1$
. Overall, this suggests that a more complex model, unlike the quadratic Ergun equation, is required to model flows in the primitive and BCC geometries that possess period geometries with extended streamwise regions.
$K_1$
. Overall, this suggests that a more complex model, unlike the quadratic Ergun equation, is required to model flows in the primitive and BCC geometries that possess period geometries with extended streamwise regions.
The geometric similarity of the gyroid (compared with other geometries considered here) and randomly packed beds is clearly observed in figure 10(a). We now focus on our attention to Set 2 (cf. table 1) for gyroid where $\phi \approx 0.85$
and the unit cell size
$\phi \approx 0.85$
and the unit cell size $l$
is varied.
$l$
is varied.
4.3. Effect of the number of unit cells
Here $f$
versus Reynolds number based on (a)
$f$
versus Reynolds number based on (a) $d_{\!{H}}$
, and (b)
$d_{\!{H}}$
, and (b) $d_{{H\hbox{-}\textit{equ}}}$
for data for Set 2 (cf. table 1) where
$d_{{H\hbox{-}\textit{equ}}}$
for data for Set 2 (cf. table 1) where $\phi \approx 0.85$
for
$\phi \approx 0.85$
for $l=$
4 mm G1 (
$l=$
4 mm G1 ( ), 6 mm G2 (
 ), 9 mm G3 and G4 (
 and
and  ), 12 mm G5 (
 ) and metal sample $l=$
9 mm Metal-G4 (
$l=$
9 mm Metal-G4 ( ).The black solid line represents the Ergun equation (4.2) written in $d_{\!{H}}$
, whereas the blue dashed line is the linear part of (4.2). For comparison purposes, the pressure drop measurement with the gyroid at
$d_{\!{H}}$
, whereas the blue dashed line is the linear part of (4.2). For comparison purposes, the pressure drop measurement with the gyroid at $l=$
12 mm and
$l=$
12 mm and $\phi =0.85$
(case G5) in table 1 is conducted in the Set 2 measurement section (36 cm), and several points are included in (a) with yellow symbols. Insets show zoomed-in view. The dashed green lines in (b) are models based on
$\phi =0.85$
(case G5) in table 1 is conducted in the Set 2 measurement section (36 cm), and several points are included in (a) with yellow symbols. Insets show zoomed-in view. The dashed green lines in (b) are models based on $K_1$
and
$K_1$
and $K_2$
as discussed in § 5.
$K_2$
as discussed in § 5.

Figure 11(a) and its inset show non-dimensionalised pressure drop in terms of the hydraulic diameter $d_{\!{H}}$
for Set 2, where
$d_{\!{H}}$
for Set 2, where $l=$
4, 6, 9 and 12 mm. For the same
$l=$
4, 6, 9 and 12 mm. For the same $\textit{Re}_{{d_{\!H}}}/\phi$
, a reduction in cell-size results in a corresponding increased dimensionless drag
$\textit{Re}_{{d_{\!H}}}/\phi$
, a reduction in cell-size results in a corresponding increased dimensionless drag $f$
(see (4.1) where
$f$
(see (4.1) where $d_{\!{H}}$
is replaced with
$d_{\!{H}}$
is replaced with $d_{{H\hbox{-}\textit{equ}}}$
) and not just the dimensional drag. The variation in dimensionless drag (similar to figure 9
a) suggests the unsuitability of
$d_{{H\hbox{-}\textit{equ}}}$
) and not just the dimensional drag. The variation in dimensionless drag (similar to figure 9
a) suggests the unsuitability of $d_{\!{H}}$
in furnishing a self-similar profile. Like most practical applications, we recall that our porous media is contained within a casing, i.e. a cylindrical pipe. Therefore, the pipe diameter will also feature as another parameter that can affect the results. Although
$d_{\!{H}}$
in furnishing a self-similar profile. Like most practical applications, we recall that our porous media is contained within a casing, i.e. a cylindrical pipe. Therefore, the pipe diameter will also feature as another parameter that can affect the results. Although $d_{\!{H}}$
accounts for the fluid coming in contact with the outer pipe, the collapse of the data for different
$d_{\!{H}}$
accounts for the fluid coming in contact with the outer pipe, the collapse of the data for different $l$
is not satisfactory. We suspect that as the pipe diameter becomes increasingly large compared with
$l$
is not satisfactory. We suspect that as the pipe diameter becomes increasingly large compared with $l$
, the effect of outer geometry will become less significant. Nevertheless, as presented in figure 11(b), the use of
$l$
, the effect of outer geometry will become less significant. Nevertheless, as presented in figure 11(b), the use of $d_{{H\hbox{-}\textit{equ}}}$
collapses all the different cases within the laminar region, and shows the expected variations as the flow becomes turbulent. Within the turbulent region (highlighted in the inset of figure 11
b) the data separate into two groups:
$d_{{H\hbox{-}\textit{equ}}}$
collapses all the different cases within the laminar region, and shows the expected variations as the flow becomes turbulent. Within the turbulent region (highlighted in the inset of figure 11
b) the data separate into two groups: $l=4$
and 6 mm cases group together, whereas the
$l=4$
and 6 mm cases group together, whereas the $l=9$
and 12 mm cases fall on top of each other. Interestingly, the metal
$l=9$
and 12 mm cases fall on top of each other. Interestingly, the metal $l=9$
mm cases, which we know has a rougher surface finish than the other plastic surfaces, merges with the smaller
$l=9$
mm cases, which we know has a rougher surface finish than the other plastic surfaces, merges with the smaller $l$
value cases. This indicates that surface roughness within the turbulent region acts dynamically as smaller cell sizes. Consistently,
$l$
value cases. This indicates that surface roughness within the turbulent region acts dynamically as smaller cell sizes. Consistently, $d_{{H\hbox{-}\textit{equ}}}$
for Metal-G4 and G4 are 2.9 and 3.0 mm, respectively (cf. table 2), although both have the same bulk geometric characteristics. Note that the different
$d_{{H\hbox{-}\textit{equ}}}$
for Metal-G4 and G4 are 2.9 and 3.0 mm, respectively (cf. table 2), although both have the same bulk geometric characteristics. Note that the different $\phi$
data presented in figure 10 separate in the turbulent region, because as
$\phi$
data presented in figure 10 separate in the turbulent region, because as $\phi$
decreases
$\phi$
decreases $d_{{H\hbox{-}\textit{equ}}}$
decreases (see table 2), indicating larger ‘roughness’ effect with decreasing
$d_{{H\hbox{-}\textit{equ}}}$
decreases (see table 2), indicating larger ‘roughness’ effect with decreasing $\phi$
. Similarly, decreasing
$\phi$
. Similarly, decreasing $l$
in figure 11(b) evidently results in a reduced value of
$l$
in figure 11(b) evidently results in a reduced value of $d_{{H\hbox{-}\textit{equ}}}$
leading to a ‘rougher’ turbulent flow. Note that there is no expectation that the data would collapse within the turbulent region, as the interaction of multiple turbulent length scales with the porous media is less likely to be represented by
$d_{{H\hbox{-}\textit{equ}}}$
leading to a ‘rougher’ turbulent flow. Note that there is no expectation that the data would collapse within the turbulent region, as the interaction of multiple turbulent length scales with the porous media is less likely to be represented by $d_{{H\hbox{-}\textit{equ}}}$
defined for the laminar region. However, for approximate engineering calculations, where if we ignore the variation of data in figure 11(b) within the turbulent region, the Ergun equation (1.4) with
$d_{{H\hbox{-}\textit{equ}}}$
defined for the laminar region. However, for approximate engineering calculations, where if we ignore the variation of data in figure 11(b) within the turbulent region, the Ergun equation (1.4) with $d_{{H\hbox{-}\textit{equ}}}$
seems sufficient to estimate the complete drag distribution for the gyroid geometry.
$d_{{H\hbox{-}\textit{equ}}}$
seems sufficient to estimate the complete drag distribution for the gyroid geometry.
5. Discussion
We have observed that $d_{ {H\hbox{-}\textit{equ}}}$
has been successful in placing non-dimensional drag and Reynolds number on a single plot (that can accommodate different unit cell size (
$d_{ {H\hbox{-}\textit{equ}}}$
has been successful in placing non-dimensional drag and Reynolds number on a single plot (that can accommodate different unit cell size ( $l$
), porosity (
$l$
), porosity ( $\phi$
) as well as geometry), and resulting in a comparison of drag in various geometries to be accomplished. This has become possible because
$\phi$
) as well as geometry), and resulting in a comparison of drag in various geometries to be accomplished. This has become possible because $d_{{H\hbox{-}\textit{equ}}}$
is a property of the flow and the geometry, whereas
$d_{{H\hbox{-}\textit{equ}}}$
is a property of the flow and the geometry, whereas $d_{\!{H}}$
is only a geometric property of the porous media. Hence, it is not surprising that the evaluation of
$d_{\!{H}}$
is only a geometric property of the porous media. Hence, it is not surprising that the evaluation of $d_{{H\hbox{-}\textit{equ}}}$
does not require knowledge of
$d_{{H\hbox{-}\textit{equ}}}$
does not require knowledge of $d_{\!{H}}$
. In fact, in almost all experimental study of any geometrically complex porous media (other than packed spheres), the determination of
$d_{\!{H}}$
. In fact, in almost all experimental study of any geometrically complex porous media (other than packed spheres), the determination of $d_{\!{H}}$
would be nearly impossible. Note that in our case, although porosity could be measured experimentally, the surface area estimation owes its credit to the computational model available to us, which is not possible in many cases. Hence, without the computer geometry we would not be able to estimate
$d_{\!{H}}$
would be nearly impossible. Note that in our case, although porosity could be measured experimentally, the surface area estimation owes its credit to the computational model available to us, which is not possible in many cases. Hence, without the computer geometry we would not be able to estimate $d_{\!{H}}$
, although
$d_{\!{H}}$
, although $d_{{H\hbox{-}\textit{equ}}}$
estimation is still possible with appropriate experiments.
$d_{{H\hbox{-}\textit{equ}}}$
estimation is still possible with appropriate experiments.
(a) Plot of $d_{\!{H}}$
versus
$d_{\!{H}}$
versus $d_{{H\hbox{-}\textit{equ}}}$
on linear–linear axes, (b)
$d_{{H\hbox{-}\textit{equ}}}$
on linear–linear axes, (b) $K_{\!Q1}$
versus
$K_{\!Q1}$
versus $K_1$
on log–log axes and (c)
$K_1$
on log–log axes and (c) $K_{\!Q2}$
versus
$K_{\!Q2}$
versus $K_2$
on log–log axes, for all cases. Gyroid (, , , , , ,
$K_2$
on log–log axes, for all cases. Gyroid (, , , , , ,  ,
,  ); primitive (, ,
  ); BCC (,
  ,
,  ). For further details of symbols and data, see tables 1 and 2. The dashed lines are at $45^\circ$
.
$45^\circ$
.

It is therefore of interest to see the relation between $d_{\!{H}}$
and
$d_{\!{H}}$
and $d_{{H\hbox{-}\textit{equ}}}$
, and the data are presented for all our cases in figure 12(a). For gyroid and primitive, the data fall below the dashed line at
$d_{{H\hbox{-}\textit{equ}}}$
, and the data are presented for all our cases in figure 12(a). For gyroid and primitive, the data fall below the dashed line at $45^\circ$
, i.e.
$45^\circ$
, i.e. $d_{\!{H}} \gt d_{{H\hbox{-}\textit{equ}}}$
, whereas the converse is true for BCC for which the data are above the line. This behaviour is reflective of the higher drag coefficient based on
$d_{\!{H}} \gt d_{{H\hbox{-}\textit{equ}}}$
, whereas the converse is true for BCC for which the data are above the line. This behaviour is reflective of the higher drag coefficient based on $d_{\!{H}}$
(i.e.
$d_{\!{H}}$
(i.e. $f(d_{\!{H}})$
) in the laminar regime for gyroid and primitive compared with packed spheres (i.e. the Ergun equation (1.4)), as discussed in figure 9(a), and lower
$f(d_{\!{H}})$
) in the laminar regime for gyroid and primitive compared with packed spheres (i.e. the Ergun equation (1.4)), as discussed in figure 9(a), and lower $f(d_{\!{H}})$
in BCC. Furthermore, we observe an approximately linear data trend between
$f(d_{\!{H}})$
in BCC. Furthermore, we observe an approximately linear data trend between $d_{\!{H}}$
and
$d_{\!{H}}$
and $d_{{H\hbox{-}\textit{equ}}}$
for all the three geometries, suggesting a self-similarity in flow dynamics for geometrically scaled porous media. Note, however, that the linear trend (of increasing
$d_{{H\hbox{-}\textit{equ}}}$
for all the three geometries, suggesting a self-similarity in flow dynamics for geometrically scaled porous media. Note, however, that the linear trend (of increasing $d_{{H\hbox{-}\textit{equ}}}$
with larger
$d_{{H\hbox{-}\textit{equ}}}$
with larger $d_{\!{H}}$
) is different for each individual geometry, which points to the expected variability stemming from different geometric structure, although gyroid and BCC with their compact geometrical features are more similar to each other.
$d_{\!{H}}$
) is different for each individual geometry, which points to the expected variability stemming from different geometric structure, although gyroid and BCC with their compact geometrical features are more similar to each other.
As discussed in § 4.2 (in relation to Method 2) and expressed in (4.5), $d_{{H\hbox{-}\textit{equ}}}$
is directly related to
$d_{{H\hbox{-}\textit{equ}}}$
is directly related to $K_1$
. In fact, once the ‘true’ Darcy permeability
$K_1$
. In fact, once the ‘true’ Darcy permeability $K_1$
is determined from the linear portion of
$K_1$
is determined from the linear portion of $-\Delta\! P/\Delta x$
versus
$-\Delta\! P/\Delta x$
versus $u_s$
curve,
$u_s$
curve, $d_{{H\hbox{-}\textit{equ}}}$
is obtained readily. This suggests that the usual method of estimating
$d_{{H\hbox{-}\textit{equ}}}$
is obtained readily. This suggests that the usual method of estimating $K_{\!Q1}$
by simply fitting a second-order curve (cf. (1.1)) to the raw data is not only uninformative, but potentially incorrect from a physical standpoint. Figure 12(b) presents a comparison of
$K_{\!Q1}$
by simply fitting a second-order curve (cf. (1.1)) to the raw data is not only uninformative, but potentially incorrect from a physical standpoint. Figure 12(b) presents a comparison of $K_{\!Q1}$
with
$K_{\!Q1}$
with $K_1$
on log–log axes, and shows that
$K_1$
on log–log axes, and shows that $K_{\!Q1}$
coincides with
$K_{\!Q1}$
coincides with $K_1$
only for a few cases, with no systematic trend. In several cases,
$K_1$
only for a few cases, with no systematic trend. In several cases, $K_{\!Q1}$
is greater than
$K_{\!Q1}$
is greater than $K_1$
, suggesting that if
$K_1$
, suggesting that if $K_{\!Q1}$
is used for practical purposes, a porous media in laminar flow will produce more drag in reality than suggested by
$K_{\!Q1}$
is used for practical purposes, a porous media in laminar flow will produce more drag in reality than suggested by $K_{\!Q1}$
. The values of
$K_{\!Q1}$
. The values of $K_1$
are included in table 2 for reference. Note that the primitive and BCC data are not shown in figure 12(b) because although data for
$K_1$
are included in table 2 for reference. Note that the primitive and BCC data are not shown in figure 12(b) because although data for $K_1$
is available, as discussed before,
$K_1$
is available, as discussed before, $K_{\!Q1}$
cannot be estimated reliably for these ‘non-canonical’ geometries.
$K_{\!Q1}$
cannot be estimated reliably for these ‘non-canonical’ geometries.
Although $K_1$
quantifies the laminar region of the porous media well, a similar characterisation of the turbulent region is difficult. As discussed in relation to figure 10(b) and 10(c), the transitional and turbulent regimes can show complicated behaviours in primitive and BCC, and modelling this region with merely a quadratic law could be challenging. The difficulty is further exacerbated by the fact that the Ergun equation requires an asymptotic
$K_1$
quantifies the laminar region of the porous media well, a similar characterisation of the turbulent region is difficult. As discussed in relation to figure 10(b) and 10(c), the transitional and turbulent regimes can show complicated behaviours in primitive and BCC, and modelling this region with merely a quadratic law could be challenging. The difficulty is further exacerbated by the fact that the Ergun equation requires an asymptotic $Re$
constant for fully turbulent regime (i.e. constant
$Re$
constant for fully turbulent regime (i.e. constant $C_3 \equiv (3/2)C_2= 1.75$
in (1.4)), whereas most experiments stop at finite
$C_3 \equiv (3/2)C_2= 1.75$
in (1.4)), whereas most experiments stop at finite $Re$
. Nevertheless, if we proceed to model
$Re$
. Nevertheless, if we proceed to model $f$
versus
$f$
versus $\textit{Re}_{d_{{H\hbox{-}\textit{equ}}}}/\phi$
using an Ergun-like equation, apart from
$\textit{Re}_{d_{{H\hbox{-}\textit{equ}}}}/\phi$
using an Ergun-like equation, apart from $K_1$
, we need a
$K_1$
, we need a $K_2$
. Note that by comparing (4.4) and (1.1),
$K_2$
. Note that by comparing (4.4) and (1.1), $K_2 \equiv (d_{{H\hbox{-}\textit{equ}}}\phi ^2(2/3))/(C_3)$
. Considering the above-mentioned different characters of primitive and BCC, we proceed to estimate
$K_2 \equiv (d_{{H\hbox{-}\textit{equ}}}\phi ^2(2/3))/(C_3)$
. Considering the above-mentioned different characters of primitive and BCC, we proceed to estimate $K_2$
only for the gyroid cases. Towards this we simply try different values of
$K_2$
only for the gyroid cases. Towards this we simply try different values of $C_3$
, and the one that allows the model to approximately pass through the last few points in our data set is taken and
$C_3$
, and the one that allows the model to approximately pass through the last few points in our data set is taken and $K_2$
is evaluated. The resulting Ergun-like equation is plotted for different datasets in figure 10(a) (and in figure 11
b) using dash–dotted lines. In the same figure, we have also plotted the Ergun-like equation resulting from
$K_2$
is evaluated. The resulting Ergun-like equation is plotted for different datasets in figure 10(a) (and in figure 11
b) using dash–dotted lines. In the same figure, we have also plotted the Ergun-like equation resulting from $K_{\!Q1}$
and
$K_{\!Q1}$
and $K_{\!Q2}$
obtained by fitting the quadratic equation to the raw data (shown in table 1) in dotted (greenish) lines. It is clear that
$K_{\!Q2}$
obtained by fitting the quadratic equation to the raw data (shown in table 1) in dotted (greenish) lines. It is clear that $K_{\!Q1}$
and
$K_{\!Q1}$
and $K_{\!Q2}$
combination mostly underpredicts the drag, especially in the turbulent regime. A plot of
$K_{\!Q2}$
combination mostly underpredicts the drag, especially in the turbulent regime. A plot of $K_{\!Q2}$
versus
$K_{\!Q2}$
versus $K_2$
in figure 12(c) on log–log axes further highlights that
$K_2$
in figure 12(c) on log–log axes further highlights that $K_{\!Q2}$
is always higher than
$K_{\!Q2}$
is always higher than $K_2$
, implying a lower drag estimate by the standard quadratic fitting. The approximate value of
$K_2$
, implying a lower drag estimate by the standard quadratic fitting. The approximate value of $K_2$
as well as
$K_2$
as well as $C \equiv 1/K_2$
(proportional to drag) are also presented in table 2, and a comparison of
$C \equiv 1/K_2$
(proportional to drag) are also presented in table 2, and a comparison of $C_Q$
in table 1 shows that
$C_Q$
in table 1 shows that $C_Q \lt C$
, again, implying a lower than actual drag estimate by quadratic fitting in the turbulent regime.
$C_Q \lt C$
, again, implying a lower than actual drag estimate by quadratic fitting in the turbulent regime.
6. Conclusion
The experimental pressure drop ( $-\Delta\! P/\Delta x$
) versus superficial velocity
$-\Delta\! P/\Delta x$
) versus superficial velocity $(u_s)$
shows that the gyroid geometry can be fitted quite well (based on
$(u_s)$
shows that the gyroid geometry can be fitted quite well (based on $R$
square) to a quadratic equation, which results in the usual estimation of Darcy and Forchheimer permeabilities (
$R$
square) to a quadratic equation, which results in the usual estimation of Darcy and Forchheimer permeabilities ( $K_{\!Q1}$
and
$K_{\!Q1}$
and $K_{\!Q2}$
, respectively). The data, when plotted on the non-dimensional friction factor (
$K_{\!Q2}$
, respectively). The data, when plotted on the non-dimensional friction factor ( $f$
) versus Reynolds number, shows that on occasions
$f$
) versus Reynolds number, shows that on occasions $K_{\!Q1}$
and
$K_{\!Q1}$
and $K_{\!Q2}$
underestimate the drag in laminar and turbulent regimes. On the other hand, for primitive and BCC, the traditional least-square fitted quadratic equation results in non-physical negative
$K_{\!Q2}$
underestimate the drag in laminar and turbulent regimes. On the other hand, for primitive and BCC, the traditional least-square fitted quadratic equation results in non-physical negative $K_{\!Q1}$
, owing to the ‘transitional’ behaviour exhibited by these geometries. The correct laminar Darcy permeability
$K_{\!Q1}$
, owing to the ‘transitional’ behaviour exhibited by these geometries. The correct laminar Darcy permeability $K_1$
can, however, be obtained for all three geometries by considering only the linear part of the
$K_1$
can, however, be obtained for all three geometries by considering only the linear part of the $-\Delta\! P/\Delta x$
versus
$-\Delta\! P/\Delta x$
versus $u_s$
plot (Method 2), or by an iterative shifting of
$u_s$
plot (Method 2), or by an iterative shifting of $f$
to obtain an equivalent hydraulic diameter (
$f$
to obtain an equivalent hydraulic diameter ( $d_{{H\hbox{-}\textit{equ}}}$
, which is the same as obtaining
$d_{{H\hbox{-}\textit{equ}}}$
, which is the same as obtaining $K_1$
) that fits the linear part of the Ergun equation (Method 1). The estimation of
$K_1$
) that fits the linear part of the Ergun equation (Method 1). The estimation of $d_{{H\hbox{-}\textit{equ}}}$
or
$d_{{H\hbox{-}\textit{equ}}}$
or $K_1$
solves two issues: (i) it provides the correct Darcy permeability in the laminar regime, and (ii) allows one to plot
$K_1$
solves two issues: (i) it provides the correct Darcy permeability in the laminar regime, and (ii) allows one to plot $f$
versus
$f$
versus $\textit{Re}_{d_{{H\hbox{-}\textit{equ}}}}/\phi$
for all data that collapse in the laminar regime, which can then be used to compare one configuration with others and the packed sphere case (quantified by the Ergun equation).
$\textit{Re}_{d_{{H\hbox{-}\textit{equ}}}}/\phi$
for all data that collapse in the laminar regime, which can then be used to compare one configuration with others and the packed sphere case (quantified by the Ergun equation).
We find a reduced drag in TPMS geometries compared with packed spheres in some primitive and all BCC geometries in the turbulent regime. This can be useful for practical applications of TPMS. A straight tube-like structure of the primitive and BCC geometries is a possible reason for this reduced drag. The tube-like geometry also shows that flows within primitive and BCC exhibit a behaviour of increasing $f$
with
$f$
with $Re$
towards the end of the laminar region, which is in contrast to gyroid or other random porous media. This behaviour has similarities to flow through pipes (especially as the flow transitions from laminar to turbulent). Although further work is required, the pipe flow comparison suggests that the periodic nature of primitive and BCC coupled with the existence of extended open streamwise regions allowing large streamwise structures could be a possible explanation for this unique trend in
$Re$
towards the end of the laminar region, which is in contrast to gyroid or other random porous media. This behaviour has similarities to flow through pipes (especially as the flow transitions from laminar to turbulent). Although further work is required, the pipe flow comparison suggests that the periodic nature of primitive and BCC coupled with the existence of extended open streamwise regions allowing large streamwise structures could be a possible explanation for this unique trend in $f$
versus
$f$
versus $Re$
curves. As such, the gyroid cases, which more closely resemble random porous media, can be modelled using a quadratic model, and we have estimated a more reasonable Forchheimer permeability
$Re$
curves. As such, the gyroid cases, which more closely resemble random porous media, can be modelled using a quadratic model, and we have estimated a more reasonable Forchheimer permeability $K_2$
, whereas the traditional
$K_2$
, whereas the traditional $K_{\!Q2}$
underpredicts drag in the turbulent regime. A fuller investigation of the flow structures as well as evidence of turbulence at higher
$K_{\!Q2}$
underpredicts drag in the turbulent regime. A fuller investigation of the flow structures as well as evidence of turbulence at higher $Re$
requires flow measurements inside the TPMS porous media. A preliminary investigation of Kim et al. (Reference Kim, Peng, Tran and Philip2022) is a step towards this goal.
$Re$
requires flow measurements inside the TPMS porous media. A preliminary investigation of Kim et al. (Reference Kim, Peng, Tran and Philip2022) is a step towards this goal.
Declaration of interests
The authors report no conflict of interest.
Appendix A. Issues with fitting (1.1) to data
To highlight the issue with fitting data to primitive and BCC that is not present in the gyroid geometry, we have selected two typical cases: gyroid and primitive at $\phi = 0.85$
. When the full data is least-square fitted to (1.1) as
$\phi = 0.85$
. When the full data is least-square fitted to (1.1) as $-\Delta\! P/\Delta x = a u_s^2 + b u_s$
, the coefficient
$-\Delta\! P/\Delta x = a u_s^2 + b u_s$
, the coefficient $b$
for gyroid is positive (as expected), but for primitive
$b$
for gyroid is positive (as expected), but for primitive $b$
can become negative that implies a negative
$b$
can become negative that implies a negative $K_{\!Q1}$
, which is not physical. These are shown in figure 13(a) and 13(b), respectively, for gyroid and primitive, as
$K_{\!Q1}$
, which is not physical. These are shown in figure 13(a) and 13(b), respectively, for gyroid and primitive, as $A$
profiles, with data in symbols and fitting in dashed lines. In fact, the fitted
$A$
profiles, with data in symbols and fitting in dashed lines. In fact, the fitted $A$
curve for primitive even shows a negative pressure drop value at smaller
$A$
curve for primitive even shows a negative pressure drop value at smaller $u_s$
. As we reduce the number of fitted data by excluding the higher end of
$u_s$
. As we reduce the number of fitted data by excluding the higher end of $u_s$
(shown as
$u_s$
(shown as $B$
and
$B$
and $C$
where use only the first
$C$
where use only the first $3/4$
and
$3/4$
and $1/2$
data points), the coefficients
$1/2$
data points), the coefficients $a$
and
$a$
and $b$
change (see the caption of figure 13). The changes in the gyroid coefficient are smaller; in contrast, primitive has large variations with
$b$
change (see the caption of figure 13). The changes in the gyroid coefficient are smaller; in contrast, primitive has large variations with $b$
changing from negative to positive when only
$b$
changing from negative to positive when only $1/2$
data is considered (the
$1/2$
data is considered (the $C$
curve). The extrapolated curves are shown in solid (green) lines, and as might be expected, a reduction in the fitted data can significantly affect the predictions outside the fitting range. To further clarify the dependence of
$C$
curve). The extrapolated curves are shown in solid (green) lines, and as might be expected, a reduction in the fitted data can significantly affect the predictions outside the fitting range. To further clarify the dependence of $K_{\!Q1}$
and
$K_{\!Q1}$
and $K_{\!Q2}$
on the number of data points, figure 13(c) and 13(d) are presented. Here, we clearly see that
$K_{\!Q2}$
on the number of data points, figure 13(c) and 13(d) are presented. Here, we clearly see that $K_{\!Q1}$
(figure 13
c) for gyroid is relatively constant, but for primitive
$K_{\!Q1}$
(figure 13
c) for gyroid is relatively constant, but for primitive $K_{\!Q1}$
varies dramatically, taking negative values as the number of data points increases. Interestingly,
$K_{\!Q1}$
varies dramatically, taking negative values as the number of data points increases. Interestingly, $K_{\!Q2}$
in figure 13(d) shows large variation for both gyroid and primitive, but settles down for larger data points, especially for the gyroid geometry. Hence, we observe that for higher values of the superficial velocity
$K_{\!Q2}$
in figure 13(d) shows large variation for both gyroid and primitive, but settles down for larger data points, especially for the gyroid geometry. Hence, we observe that for higher values of the superficial velocity $u_s$
, the Ergun equation becomes a better model for gyroid, whereas the applicability of the Ergun equation for primitive and BCC seems limited.
$u_s$
, the Ergun equation becomes a better model for gyroid, whereas the applicability of the Ergun equation for primitive and BCC seems limited.
(a) Gyroid at $\phi = 0.85$
. (b) Primitive at
$\phi = 0.85$
. (b) Primitive at $\phi = 0.85$
. Here
$\phi = 0.85$
. Here $A$
,
$A$
, $B$
and
$B$
and $C$
are, respectively, the least-square curves fitted to the full data,
$C$
are, respectively, the least-square curves fitted to the full data, $3/4$
and
$3/4$
and $1/2$
data from
$1/2$
data from $u_s=0$
, and they are shifted along the abscissa for clarity. Dashed lines are actual fitted curves shown up to the fitted data range, whereas (green) solid lines are extrapolations of the corresponding fitted curves. Fitted curves are of the form
$u_s=0$
, and they are shifted along the abscissa for clarity. Dashed lines are actual fitted curves shown up to the fitted data range, whereas (green) solid lines are extrapolations of the corresponding fitted curves. Fitted curves are of the form $-\Delta\! P/\Delta x = a\,u_s^2 + b\, u_s$
, where for gyroid
$-\Delta\! P/\Delta x = a\,u_s^2 + b\, u_s$
, where for gyroid $A$
,
$A$
, $B$
and
$B$
and $C$
,
$C$
, $a=3.64\times 10^5$
,
$a=3.64\times 10^5$
, $3.62\times 10^5$
and
$3.62\times 10^5$
and $3.96\times 10^5$
, and
$3.96\times 10^5$
, and $b=4.03\times 10^3$
,
$b=4.03\times 10^3$
, $4.05\times 10^3$
and
$4.05\times 10^3$
and $3.46\times 10^3$
, respectively. The same for primitive are
$3.46\times 10^3$
, respectively. The same for primitive are $a=3.57\times 10^5$
,
$a=3.57\times 10^5$
, $2.91\times 10^5$
and
$2.91\times 10^5$
and $1.95\times 10^5$
, and
$1.95\times 10^5$
, and $b=-3.55\times 10^3$
,
$b=-3.55\times 10^3$
, $-1.15\times 10^3$
and
$-1.15\times 10^3$
and $1.49\times 10^3$
. Note that the
$1.49\times 10^3$
. Note that the $R^2$
is greater than
$R^2$
is greater than $0.99$
for all fittings within their range. Here (c)
$0.99$
for all fittings within their range. Here (c) $K_{\!Q1}$
and (d)
$K_{\!Q1}$
and (d) $K_{\!Q2}$
obtained by fitting (1.1) using the MATLAB command fit, as a function of the number of data points starting at
$K_{\!Q2}$
obtained by fitting (1.1) using the MATLAB command fit, as a function of the number of data points starting at $u_s=0$
for gyroid and primitive
$u_s=0$
for gyroid and primitive $\phi = 0.85$
cases shown in (a) and (b). In (c) we also show
$\phi = 0.85$
cases shown in (a) and (b). In (c) we also show $K_1$
, by fitting to (4.3), as a function of increasing data points. Note that in the rest of the paper
$K_1$
, by fitting to (4.3), as a function of increasing data points. Note that in the rest of the paper $K_1$
is defined by (4.3) only within the linear region by ‘Method 2’ or equivalently by ‘Method 1’ described in § 4.2, which provides a unique value to
$K_1$
is defined by (4.3) only within the linear region by ‘Method 2’ or equivalently by ‘Method 1’ described in § 4.2, which provides a unique value to $K_1$
for each porous media. Note that some parts of the curves take unphysically large values that are approximately two orders of magnitude larger than the values shown in the plot. Hence, the full ordinate is not presented.
$K_1$
for each porous media. Note that some parts of the curves take unphysically large values that are approximately two orders of magnitude larger than the values shown in the plot. Hence, the full ordinate is not presented.

Appendix B. Details of laboratory set-up for Set 2 gyroid samples (cf. table 1)
Here we present further details of the experimental set-up for cases in Set 2 presented in table 1. Figure 14(a) and 14(b), respectively, show photographs of the measurement section for cases G1 to G4 manufactured using the SLA method (in plastic), and case Metal-G4 that is manufactured with SLM method using aluminium. The pressure tap connections for SLA (plastic) porous media is the same as for Set 1 as shown in figure 14(a), where we insert the TPMS structures into an transparent acrylic pipe.
For the metal gyroid, an outer thin shell is created to overcome the difficulty of inserting the gyroid into the acrylic pipe. Note that there is no outer shell for SLA gyroid sample, and the interior of the acrylic pipe acts as the ‘outer shell’. For the metal sample, a specially designed connector (connector 1) (see figure 14 c) is used to connect the metal TPMS to the rest of the acrylic pipe. For pressure measurements in the metal TPMS, at each of the three streamwise locations five pressure taps are created using another connector (connector 2) (see figure 14 c and 14 d), which aligns over the holes created in the metal shell and allows the pipe to be connected that is in-turn attached to the manometer.
Photograph of the measurement section shown in figure 4 for Set 2 (cf. table 1). (a) Gyroid manufactured by SLA (plastic) – cases G1 to G4, and (b) SLM (metal) sample – case Metal-G4. (c) Photographs of the connectors 1 and 2 that are, respectively, used to attached acrylic pipe to metal and for pressure taps. (d) Connector 2 attached to the metal TPMS structure.

Appendix C. Estimation of hydraulic diameter
$\boldsymbol{d_{\!{H}}}$

To accurately calculate void volumes, TPMS porous media solid volumes are obtained from Autodesk Netfabb computer software, and the volumes are also measured experimentally. As a reference, mass of the 13 TPMS porous media (each 12 cm long) inserted in the pressure drop measurement section is experimentally measured using a high precision balance. Measured mass of these 13 samples are almost the same; mean mass ( $M_{\textit{a}v\textit{g}}$
) as well as the standard deviation (
$M_{\textit{a}v\textit{g}}$
) as well as the standard deviation ( $\textit{STD}_m$
) are reported in table 3. The low standard deviation shows that the manufacturing process is highly consistent.
$\textit{STD}_m$
) are reported in table 3. The low standard deviation shows that the manufacturing process is highly consistent.
Measured average mass of 13 samples ( $M_{\textit{a}v\textit{g}}$
), standard deviation of measured mass (
$M_{\textit{a}v\textit{g}}$
), standard deviation of measured mass ( $\textit{STD}_m$
), theoretical solid volumes from Autodesk Netfabb (
$\textit{STD}_m$
), theoretical solid volumes from Autodesk Netfabb ( $V_{\textrm {S}-AN}$
), measured average volumes (
$V_{\textrm {S}-AN}$
), measured average volumes ( $V_{\textrm {S}-m}$
) and percentage error between
$V_{\textrm {S}-m}$
) and percentage error between $V_{\textrm {S}-AN}$
and
$V_{\textrm {S}-AN}$
and $V_{\textrm {S}-m}$
, respectively. Here
$V_{\textrm {S}-m}$
, respectively. Here $V_\textit{fluid}$
is void volume for fluid to flow through the porous media;
$V_\textit{fluid}$
is void volume for fluid to flow through the porous media; $\textit{WSA}_{AT}$
is the wetted surface area of acrylic pipe (non-contact area with the porous media); and
$\textit{WSA}_{AT}$
is the wetted surface area of acrylic pipe (non-contact area with the porous media); and $\textit{WSA}_\textit{TPMS}$
is the wetted surface area of the porous media.
$\textit{WSA}_\textit{TPMS}$
is the wetted surface area of the porous media.

To measure volumes, a measuring cylinder (250 ml) is used with water at 19 $^\circ$
C. Due to the translucent surface of the measuring cylinder, blue food colour is added to water to read the scale. Water is filled up to 200 ml for the TPMS porous media to be fully submerged. Photographs are taken with a Nikon camera before and after to capture the water height displacement. The photographs are imported into MATLAB to calculate the increased height in mm/pixel, and then we calculate the solid volume of each sample (12 cm long) using the known diameter of the measuring cylinder (
$^\circ$
C. Due to the translucent surface of the measuring cylinder, blue food colour is added to water to read the scale. Water is filled up to 200 ml for the TPMS porous media to be fully submerged. Photographs are taken with a Nikon camera before and after to capture the water height displacement. The photographs are imported into MATLAB to calculate the increased height in mm/pixel, and then we calculate the solid volume of each sample (12 cm long) using the known diameter of the measuring cylinder ( $V_{ {S}-m}$
). Percentage errors between measured solid volumes (
$V_{ {S}-m}$
). Percentage errors between measured solid volumes ( $V_{ {S}-m}$
) and volumes obtained from Autocad Netfabb (
$V_{ {S}-m}$
) and volumes obtained from Autocad Netfabb ( $V_{\! {S}-AN}$
) are also calculated based on the relationship
$V_{\! {S}-AN}$
) are also calculated based on the relationship
 \begin{equation}{\rm \%\,error} =\frac {|{\rm V}_{\!{S}-m} - {\rm V}_{\!{S}-AN}|}{{\rm V}_{\! {S}-AN}}\times 100. \end{equation}
These results are summarised in table 3. Measured volumes are slightly larger than volumes in the Netfabb, and we suspect that the actual surface areas of TPMS porous media are slightly larger than the values in Autodesk Netfabb. Since the difference is small, we use the values of volumes and surface areas of TPMS porous media calculated from the Netfabb. Note that an accurate measurement of surface area experimentally is almost an impossible task, especially for these complex geometries. The void volumes are calculated by subtracting solid volume of TPMS porous media from the volume of the empty pipe in the measurement section, i.e. $V_\textit{fluid} = 13 (12\,(\pi /4)\,d_{\textit{pipe}}^2 - V_{\! {S}-AN} )$
cm
$V_\textit{fluid} = 13 (12\,(\pi /4)\,d_{\textit{pipe}}^2 - V_{\! {S}-AN} )$
cm $^3$
, where
$^3$
, where $d_{\textit{pipe}}=2.06$
cm and each sample is 12 cm long with 13 such samples to make the total porous media section.
$d_{\textit{pipe}}=2.06$
cm and each sample is 12 cm long with 13 such samples to make the total porous media section.
Two wetted surface areas are considered. One is from the surface area of the acrylic pipe that does not touch TPMS porous media, i.e. where the pipe touches the working liquid ( $\textit{WSA}_\textit{pipe}$
), and the other is the surface area of TPMS porous media in contact with the working liquid (
$\textit{WSA}_\textit{pipe}$
), and the other is the surface area of TPMS porous media in contact with the working liquid ( $\textit{WSA}_\textit{TPMS}$
). Thus, the total wetted surface area is the sum of the two wetted surfaces, which is used in calculating
$\textit{WSA}_\textit{TPMS}$
). Thus, the total wetted surface area is the sum of the two wetted surfaces, which is used in calculating $d_{\!{H}} \equiv 4 V_\textit{fluid}/( {\rm wetted\,area}) = 4 V_\textit{fluid}/(\textit{WSA}_\textit{pipe}+\textit{WSA}_\textit{TPMS})$
. All calculated values for Set 1 are summarised in table 3. Relevant data for Set 2 are presented in table 4, where cases G1 to G4 porous media have a length of 36 cm (and hence smaller
$d_{\!{H}} \equiv 4 V_\textit{fluid}/( {\rm wetted\,area}) = 4 V_\textit{fluid}/(\textit{WSA}_\textit{pipe}+\textit{WSA}_\textit{TPMS})$
. All calculated values for Set 1 are summarised in table 3. Relevant data for Set 2 are presented in table 4, where cases G1 to G4 porous media have a length of 36 cm (and hence smaller $V_\textit{fluid}$
and wetted surface areas).
$V_\textit{fluid}$
and wetted surface areas).
Similar to table 3, but for Set 2. Note that from G1 to G4 the TPMS length is 36 cm, whereas for G5 it is 156 cm.

Method 1 of estimating $d_{{H\hbox{-}\textit{equ}}}$
. (a) Step 1, where the linear region of the data is located (shown by red outlined symbols). (b) Step 2, where a range of diameters is used to evaluate
$d_{{H\hbox{-}\textit{equ}}}$
. (a) Step 1, where the linear region of the data is located (shown by red outlined symbols). (b) Step 2, where a range of diameters is used to evaluate $f$
, and hence translate the data as to find the best fit with the linear Ergun equation (the blue dashed line). Empty symbols are plotted with the final
$f$
, and hence translate the data as to find the best fit with the linear Ergun equation (the blue dashed line). Empty symbols are plotted with the final $d_{{H\hbox{-}\textit{equ}}}$
. For information on insets, see text.
$d_{{H\hbox{-}\textit{equ}}}$
. For information on insets, see text.

Appendix D. Procedure to estimate
$\boldsymbol{d_{{H\hbox{-}\textit{equ}}}}$

D.1. Method 1 for estimating
$d_{{H\hbox{-}\textit{equ}}}$

Here we present a procedure to estimate $d_{{H\hbox{-}\textit{equ}}}$
using the case of gyroid
$d_{{H\hbox{-}\textit{equ}}}$
using the case of gyroid $\phi =0.85$
as the example. This is a two–step process. The inputs are
$\phi =0.85$
as the example. This is a two–step process. The inputs are $-\Delta\! P/\Delta x$
,
$-\Delta\! P/\Delta x$
, $\phi$
and
$\phi$
and $u_s$
, and the output is
$u_s$
, and the output is $d_{{H\hbox{-}\textit{equ}}}$
. In Step 1, we plot the data on
$d_{{H\hbox{-}\textit{equ}}}$
. In Step 1, we plot the data on $f$
versus
$f$
versus $\textit{Re}_{d_{\!{H}}}$
axes, where any diameter
$\textit{Re}_{d_{\!{H}}}$
axes, where any diameter $d_{\!{H}}$
can be used – although we use the hydraulic diameter already available to us. The data is presented in figure 15(a) using black symbols. The linear or purely laminar region of the data is estimated by starting with the first point (for lowest
$d_{\!{H}}$
can be used – although we use the hydraulic diameter already available to us. The data is presented in figure 15(a) using black symbols. The linear or purely laminar region of the data is estimated by starting with the first point (for lowest $u_s$
) in the dataset and fitting a linear equation with a constant slope
$u_s$
) in the dataset and fitting a linear equation with a constant slope $=-1$
by incrementing one data point at a time. The fitting is performed with MATLAB’s fitlm command. Simultaneously, the ‘standard error’ is plotted (see inset in figure 15
a) with increasing data points. The data points where the error becomes a minimum are located (which in this case are the first 18 points, and are also shown with a red outline around the symbols).
$=-1$
by incrementing one data point at a time. The fitting is performed with MATLAB’s fitlm command. Simultaneously, the ‘standard error’ is plotted (see inset in figure 15
a) with increasing data points. The data points where the error becomes a minimum are located (which in this case are the first 18 points, and are also shown with a red outline around the symbols).
In Step 2 (see figure 15
b), we consider a range of test diameters, and for each diameter $f$
is calculated (cf. (4.1)) for the first 18 points found in Step 1, as well as the root-mean-square-error (RMSE) between
$f$
is calculated (cf. (4.1)) for the first 18 points found in Step 1, as well as the root-mean-square-error (RMSE) between $f$
and the linear part of the Ergun equation (i.e. first right-hand side term in (4.2) and shown by the blue dashed line in figure 15). This RMSE is shown in the inset of figure 15(b), and reaches a minimum for a diameter of 3.9 mm, which is termed
$f$
and the linear part of the Ergun equation (i.e. first right-hand side term in (4.2) and shown by the blue dashed line in figure 15). This RMSE is shown in the inset of figure 15(b), and reaches a minimum for a diameter of 3.9 mm, which is termed $d_{{H\hbox{-}\textit{equ}}}$
. A final
$d_{{H\hbox{-}\textit{equ}}}$
. A final $f$
calculated with
$f$
calculated with $d_{{H\hbox{-}\textit{equ}}}$
is shown in figure 15(b) in empty symbols, which as expected, closely follows the linear blue dashed line in the linear regime. Note that
$d_{{H\hbox{-}\textit{equ}}}$
is shown in figure 15(b) in empty symbols, which as expected, closely follows the linear blue dashed line in the linear regime. Note that $K_1$
can be determined from
$K_1$
can be determined from ${d}_{{H\hbox{-}\textit{equ}}}$
using (4.5).
${d}_{{H\hbox{-}\textit{equ}}}$
using (4.5).
Method 2 of estimating $d_{{H\hbox{-}\textit{equ}}}$
. (a) Raw
$d_{{H\hbox{-}\textit{equ}}}$
. (a) Raw $-\Delta\! P/\Delta x$
versus
$-\Delta\! P/\Delta x$
versus $u_s$
plot. (b) Zoomed-in region of (a) shown in red shades. The white dashed line over data points outlined in red colour is the final linear fit, and the slope estimates
$u_s$
plot. (b) Zoomed-in region of (a) shown in red shades. The white dashed line over data points outlined in red colour is the final linear fit, and the slope estimates $K_1$
. Here (c)
$K_1$
. Here (c) $f$
versus
$f$
versus $\textit{Re}_{\tilde {d}_{{H\hbox{-}\textit{equ}}}}/\phi$
plot for all cases from the
$\textit{Re}_{\tilde {d}_{{H\hbox{-}\textit{equ}}}}/\phi$
plot for all cases from the $\tilde {d}_{{H\hbox{-}\textit{equ}}}$
estimated using Method 2.
$\tilde {d}_{{H\hbox{-}\textit{equ}}}$
estimated using Method 2.

D.2. Method 2 for estimating
$d_{{H\hbox{-}\textit{equ}}}$

Method 2 works directly with the distribution of $-\Delta\! P/\Delta x$
,
$-\Delta\! P/\Delta x$
, $\phi$
and
$\phi$
and $u_s$
. An example of the data for gyroid at
$u_s$
. An example of the data for gyroid at $\phi =0.85$
is shown in figure 16(a). A zoomed-in plot of the red shaded region in figure 16(a) is presented in figure 16(b). Starting with the first point where both
$\phi =0.85$
is shown in figure 16(a). A zoomed-in plot of the red shaded region in figure 16(a) is presented in figure 16(b). Starting with the first point where both $-\Delta\! P/\Delta x$
and
$-\Delta\! P/\Delta x$
and $u_s$
are zero, we start fitting a straight line passing through (0,0) with an unknown slope, say
$u_s$
are zero, we start fitting a straight line passing through (0,0) with an unknown slope, say $m$
(using the MATLAB command fit). As the number of points increase, we monitor the error in fitting a fixed slope from the confidence bounds confint. The error presented as a function of data points in the inset of figure 16(b) reduces until data point 18, and then increases. The data points that result in the lowest error is deemed to constitute the linear region. This fit of data is shown using a white dashed line in figure 16(b). As discussed in relation to (4.3) the slope
$m$
(using the MATLAB command fit). As the number of points increase, we monitor the error in fitting a fixed slope from the confidence bounds confint. The error presented as a function of data points in the inset of figure 16(b) reduces until data point 18, and then increases. The data points that result in the lowest error is deemed to constitute the linear region. This fit of data is shown using a white dashed line in figure 16(b). As discussed in relation to (4.3) the slope $m$
determines the ‘true’ Darcy permeability
$m$
determines the ‘true’ Darcy permeability $K_1$
, and from there using (4.5) one can determine
$K_1$
, and from there using (4.5) one can determine $\tilde {d}_{{H\hbox{-}\textit{equ}}}$
. Note that
$\tilde {d}_{{H\hbox{-}\textit{equ}}}$
. Note that $\tilde {d}_{{H\hbox{-}\textit{equ}}}$
(with a tilde) is used to differentiate from
$\tilde {d}_{{H\hbox{-}\textit{equ}}}$
(with a tilde) is used to differentiate from $d_{{H\hbox{-}\textit{equ}}}$
estimated from Method 1 in Appendix D.1. Although both methods should give the same values, the fitting procedures and experimental uncertainties imply that both are close but not always the same numerical value. A fit of
$d_{{H\hbox{-}\textit{equ}}}$
estimated from Method 1 in Appendix D.1. Although both methods should give the same values, the fitting procedures and experimental uncertainties imply that both are close but not always the same numerical value. A fit of $f(\tilde {d}_{{H\hbox{-}\textit{equ}}})$
versus
$f(\tilde {d}_{{H\hbox{-}\textit{equ}}})$
versus $\textit{Re}_{\tilde {d}_{{H\hbox{-}\textit{equ}}}}/\phi$
for all data is presented in figure 16(c), and is almost indistinguishable from figure 9(b) estimated from
$\textit{Re}_{\tilde {d}_{{H\hbox{-}\textit{equ}}}}/\phi$
for all data is presented in figure 16(c), and is almost indistinguishable from figure 9(b) estimated from $d_{{H\hbox{-}\textit{equ}}}$
.
$d_{{H\hbox{-}\textit{equ}}}$
.


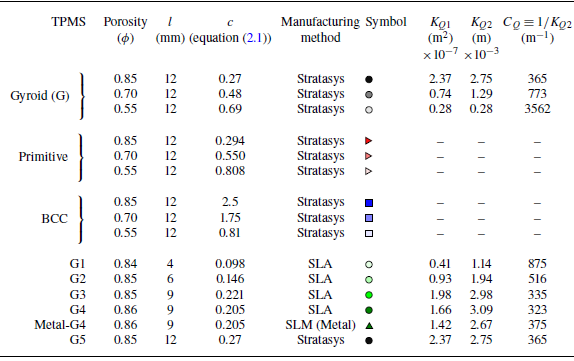


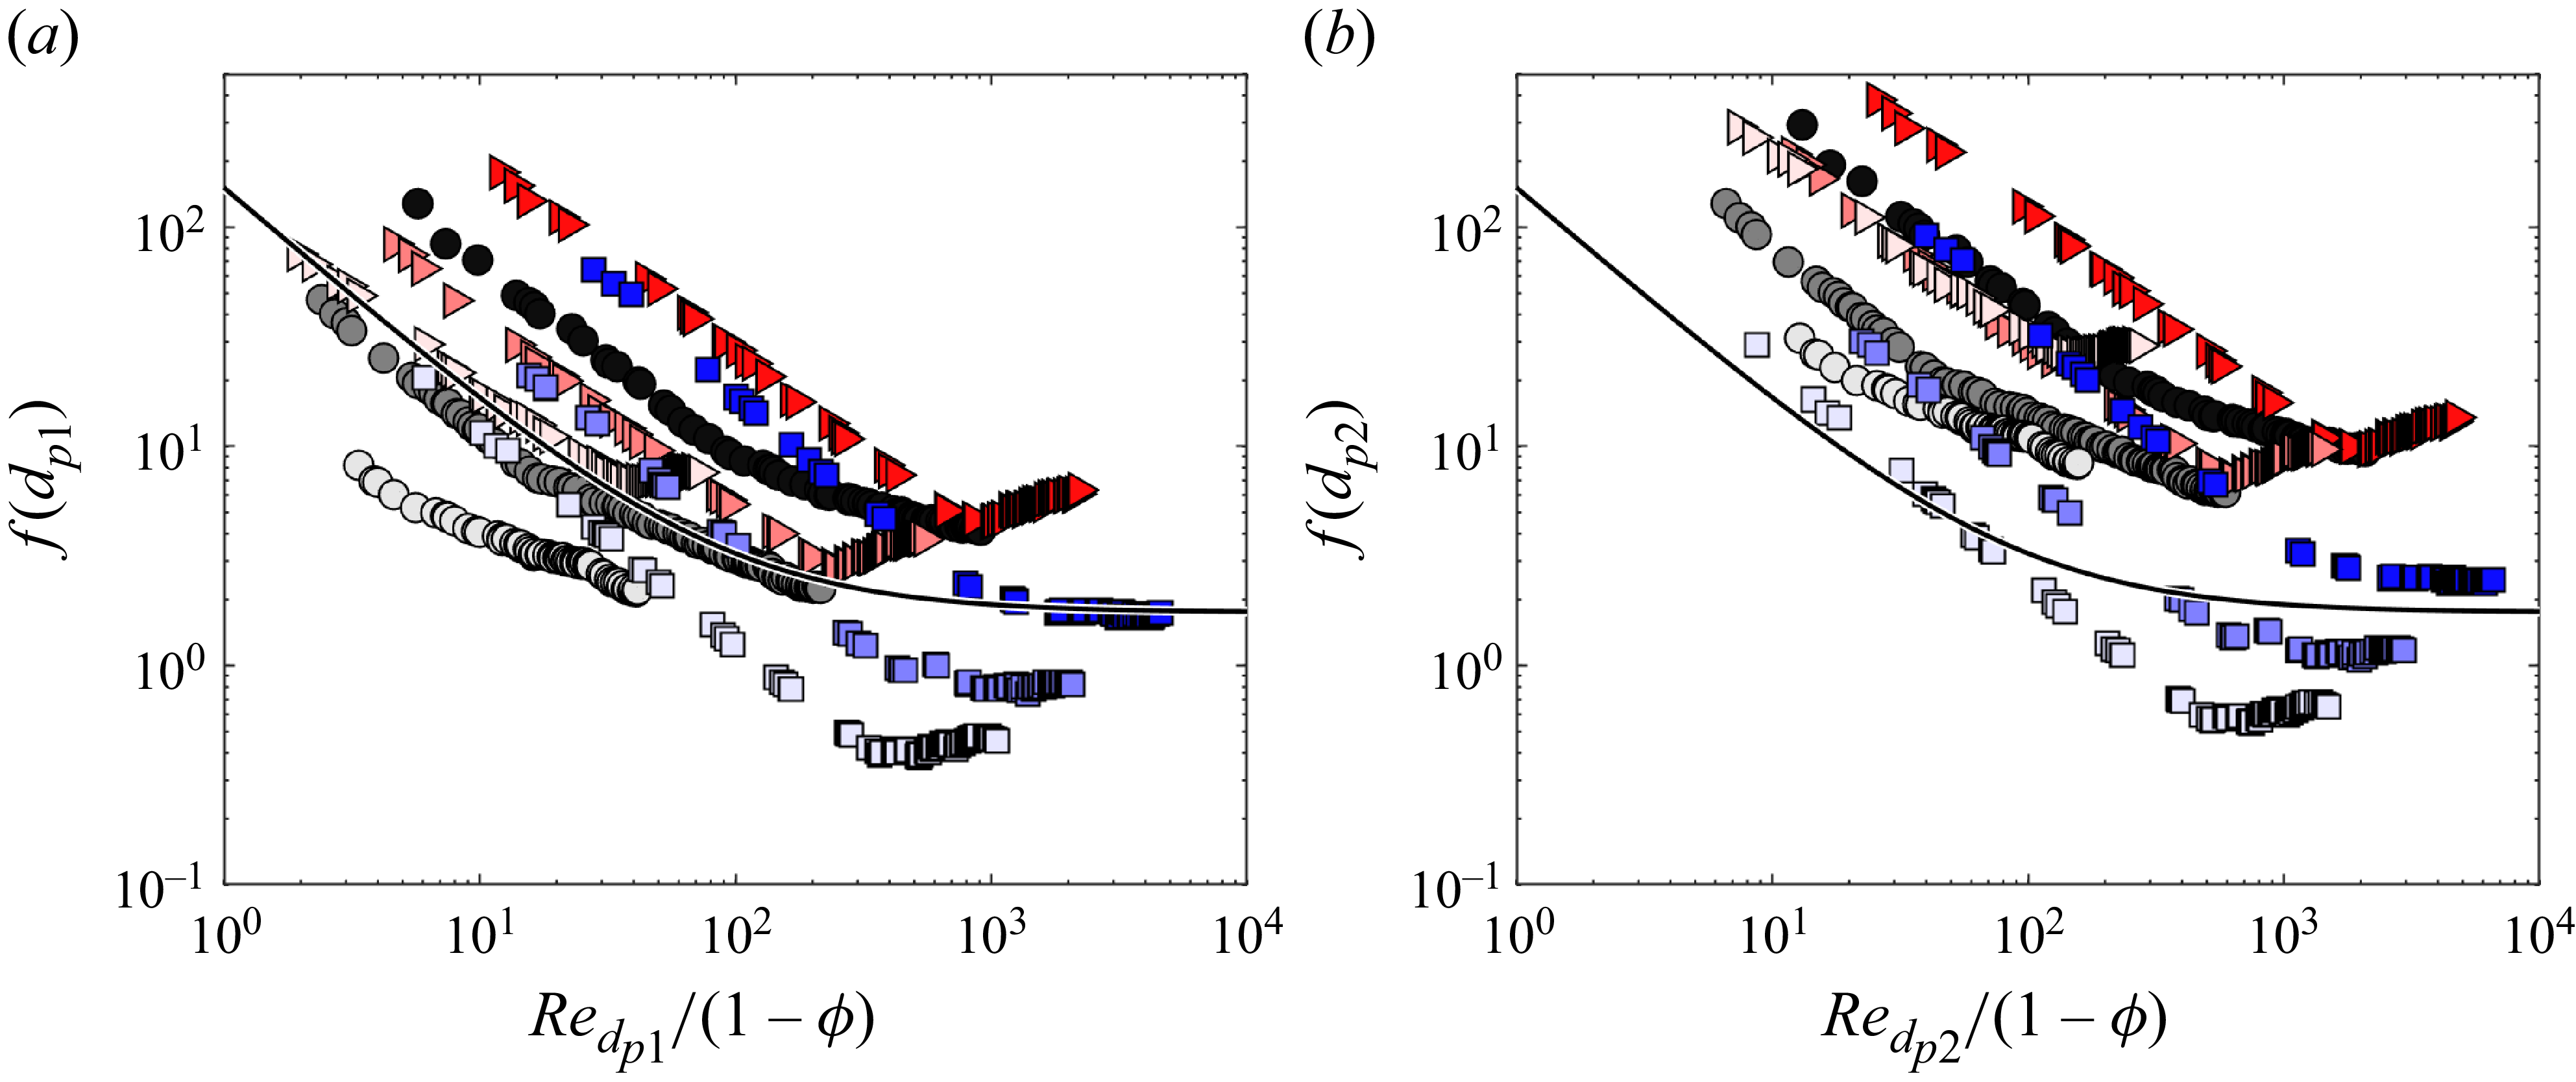


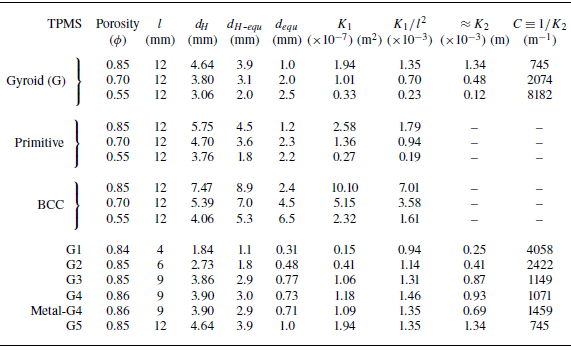


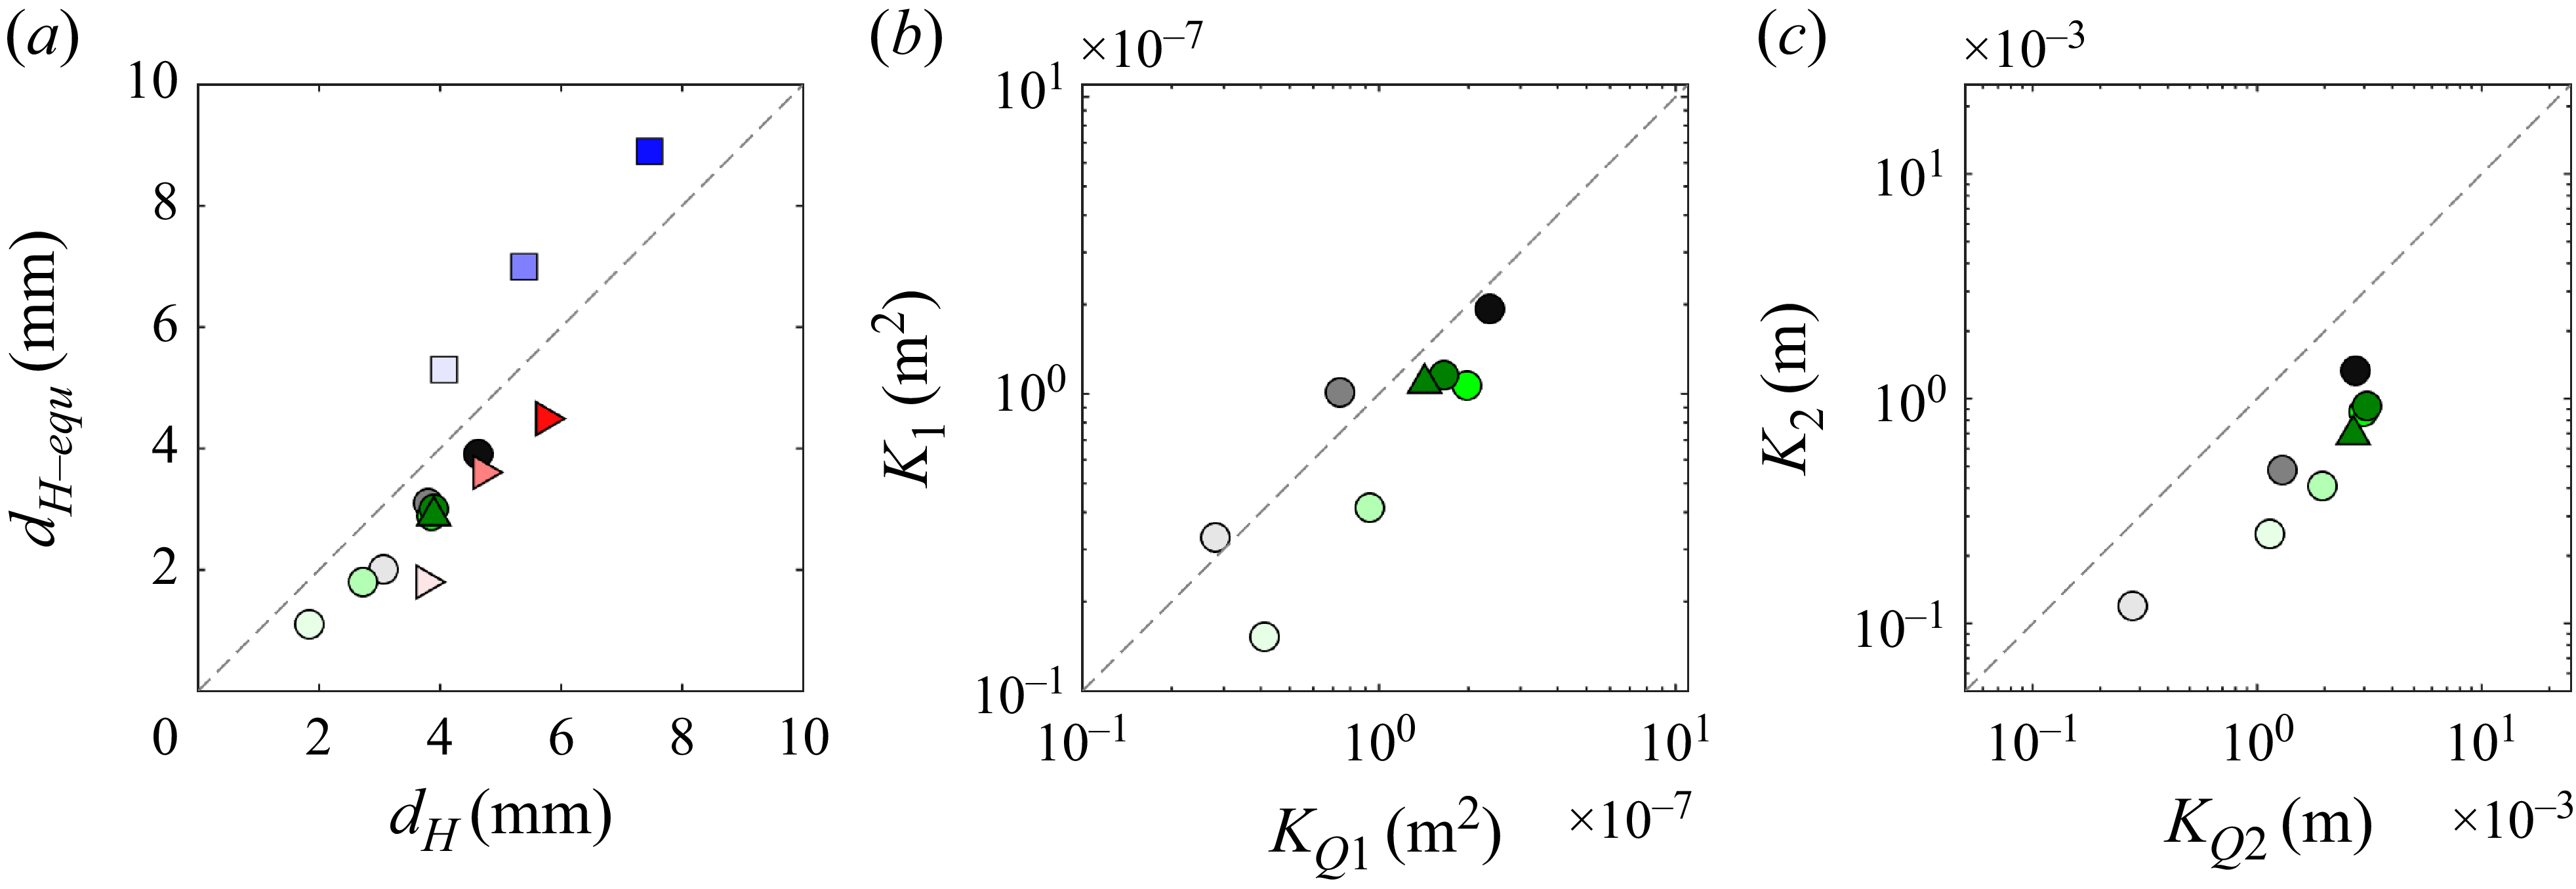


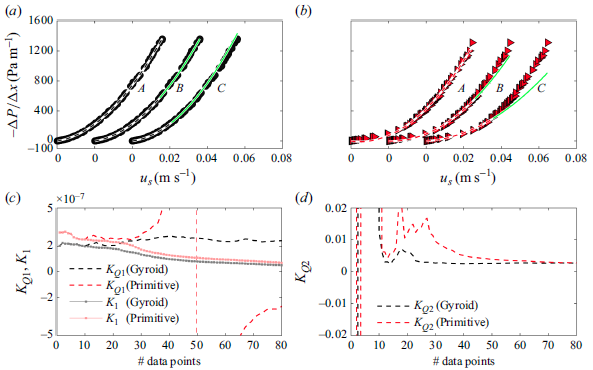


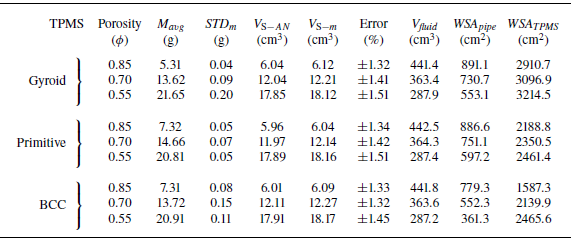


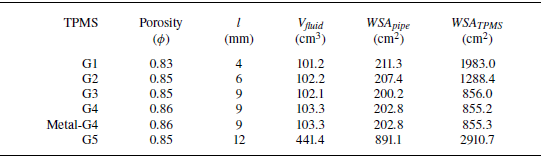
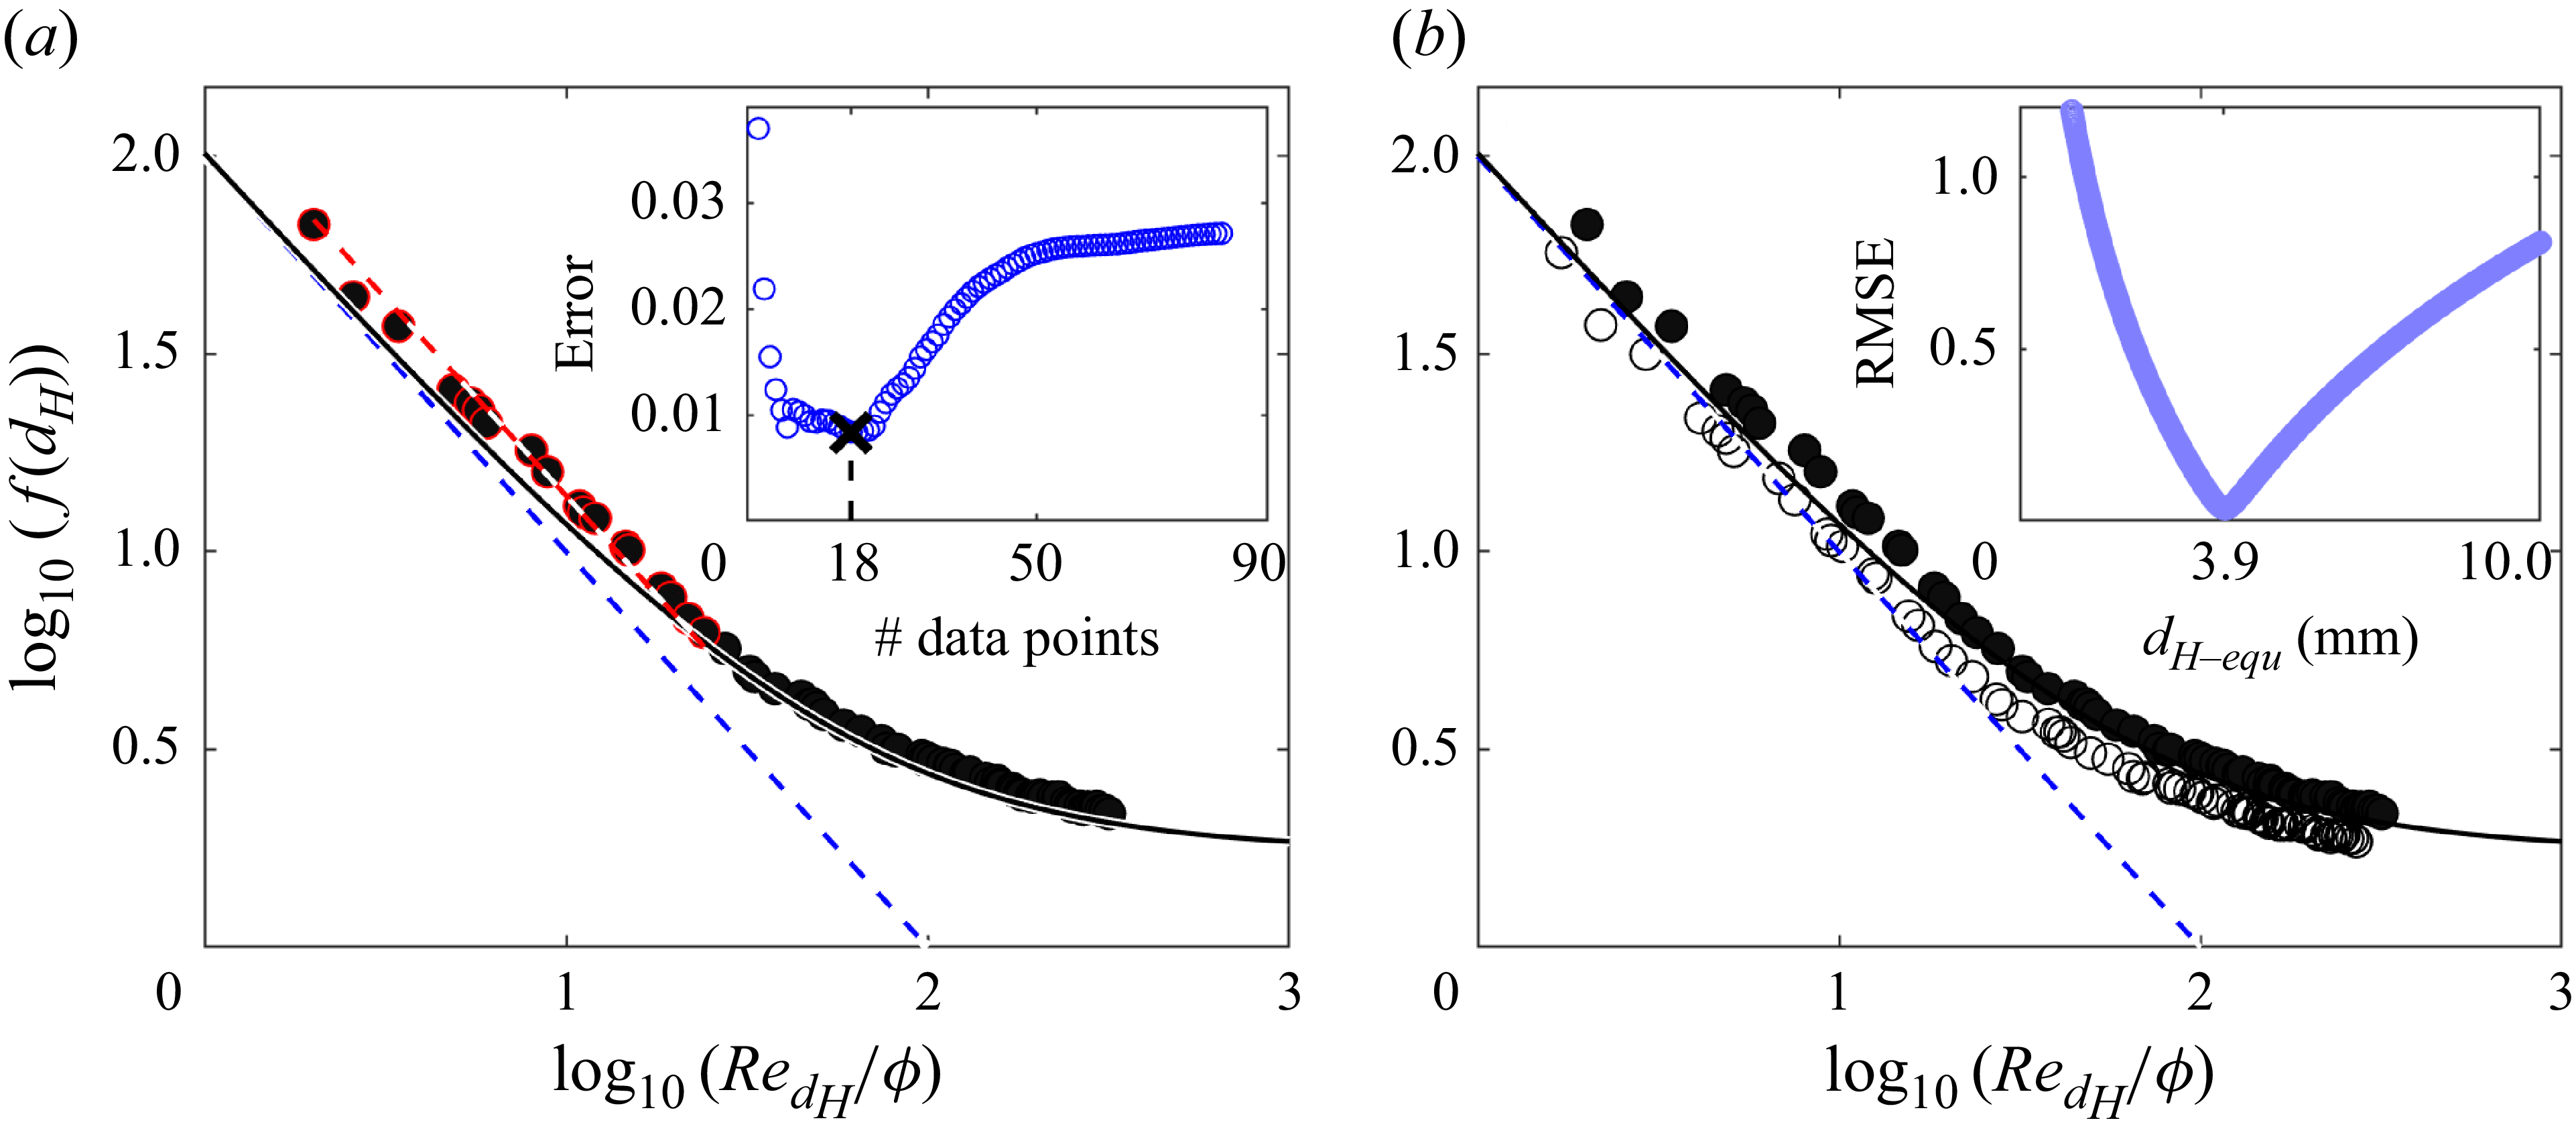


 Open access

