

Introduction
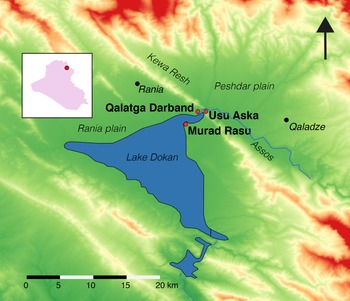
In Iraq 82, we gave a preliminary report on the first three seasons of the Darband-i Rania Archaeological Project, which took place in 2016 and 2017 (MacGinnis et al. Reference MacGinnis, Skuldbøl and Colantoni2020). These excavations were inaugurated within the framework of the British Museum’s ‘Iraq Scheme’ archaeological training programme, in order to provide a platform for field training of the participants.Footnote 1 The sites in question – Qalatga Darband, Usu Aska and Murad Rasu – are located at the Darband-i Rania, the pass located approximately 8 km east of modern Rania at the point where a gap between the Kewa Rash mountains to the northwest and the Assos mountains to the southeast allows the Lower Zab to flow from the Peshdar into the Rania Plain (Fig. 1). This location now corresponds to the northeast corner of Lake Dokan. Qalatga Darband dominates the western approaches to the pass on the northern side of the lake, with Usu Aska located in the pass itself, and Murad Rasu close by on the southern side of the lake. A major factor behind the choice of these sites was that they offered the opportunity to explore the first millennium B.C. occupation of a region hitherto little explored. But an important consideration was that the sites were subject to significant and ongoing degradation, both from the lake and from other factors, and all three remain critically endangered, with further damage virtually certain. In one aspect, therefore, these were rescue excavations, with an imperative to record and explore these sites while still possible, a factor which fit well with the Iraq Scheme objectives.
Map showing location of the Darband-i Rania (inset) and the three sites of the project at the northeast corner of Lake Dokan

Together, these sites present a unique opportunity for investigating the occupation and defense of this strategic pass through the first millennium B.C. Specifically, at Qalatga Darband, a large open site dated by preliminary survey to the Parthian period (mid-second century B.C. to early third century A.D.), the objectives were to map the ancient city, delineate the boundaries of the preserved archaeology for the purpose of site protection, conduct a controlled surface collection, carry out geo-physical survey, and conduct excavations in carefully targeted locations. At Usu Aska, a fortified site dating to the Neo-Assyrian period (mid-ninth to late seventh century B.C.), we aimed to recover evidence to illuminate the Assyrian occupation of the area, known from texts but barely documented in the archaeological record. At Murad Rasu, a mounded site with substantial multi-period stratigraphy, we hoped to reconstruct a sequence from the Assyrian to the Parthian period. In the event, the results far exceeded our expectations. The size of the city at Qalatga Darband was completely unexpected, as was the abundant evidence for multiple elements of Hellenistic material culture; while at Usu Aska, which at first was thought to be little more than a tower watch-post, we came to realise we were dealing with an Assyrian fort of very substantial proportions. At Murad Rasu, although we were not in fact able to reconstruct a continuous ceramic sequence for the first millennium B.C., the site proved of real interest in other ways that we had not predicted.
In this article we report on the three seasons undertaken in 2018, 2019 and 2021; no season was conducted in 2020 due to the world-wide shut-down triggered by the COVID epidemic. Once again, it is a pleasure to acknowledge the help and support of Jonathan Tubb, Director of the Iraq Scheme, and St. John Simpson, Assistant Director, and the many colleagues in the British Museum and beyond who contributed to the success of the programme. We are also deeply grateful to Kaify Mustafa Ali, General Director of Antiquities of Kurdistan; Kamal Rasheed Raheem, Head of the Directorate of Antiquities of Sulaimaniya; and Barzan Baiz Ismail, Head of the Directorate of Antiquities of Raparin, without whom this work could not have taken place and to all of whom we express our profound thanks. As in previous years, operations were carried out at all three of the sites authorised in the permit, Qalatga Darband, Usu Aska and Murad Rasu. The team over these seasons consisted of John MacGinnis, Barzan Baiz Ismail, Sami Jamil Hamarashid, Halkawt Omer, Mustafa Ahmad, Julie Bessenay, Ricardo Cabral, Claudia Da Lanca, Liam Devlin, Amanda Dusting, Maria Gajewska, Fatemah Ghaheri, Alberto Giannese, Marcus Hatch, Hatwan Ali, Guy Hazell, Awaz Jihad Heda, Floor Huisman, David Kertai, Ewout Koek, Ben Leigh, Tom Lyons, Timothy Matney, Andy Miller, Sophia Mills, Suzy Minette, Kate Morton, Sandra Mularczyk, Mathilde Mura, Virág Pabeschitz, Andrew Petersen, Steve Porter, Morgan Revels, Sarah Ritchie, Saleh Salimi, Alice Salvador, Mathilde Touillon-Ricci, Charlotte Vallance, Craig Williams, Twana Abubkir Mamand and Zozik Sabah Noori. Our Iraqi participant colleagues were: (Season 4) Diman Klury, Dhuha Dhiaa, Nadia Fadhel, Nadia Suhail, Sara Sulaiman, Estabraq Ghazi, Anas Abdalsattar and Adil Hamamin Sharif; (Season 5) Ahmed Smail Hamad Amin, Awder Nasraldin Hamasalim, Aymen Jasim Mohammed, Hayder Mohammed Ali and Ihsan Lafta Enad; and (Season 6) Hero Hassan Khidhr, Zhakaw Pirot Rasul, Halala Saleh Ahmed, Hiba Sabah Muter, Huda Nassir Abd Mosa, Noorah Ahmed Hantosh, Ranya Mohammed Abdul Wahid, Taisser Mahmud Hame and Tufoof Mohammed Dahham.
Qalatga Darband
Following on from the work of previous years,Footnote 2 the work of Seasons 4–6 at Qalatga Darband concentrated on completing the excavation of the Area E monumental building, undertaking a geophysical survey, and conducting a number of small, targeted operations.
The Area E Monumental Building
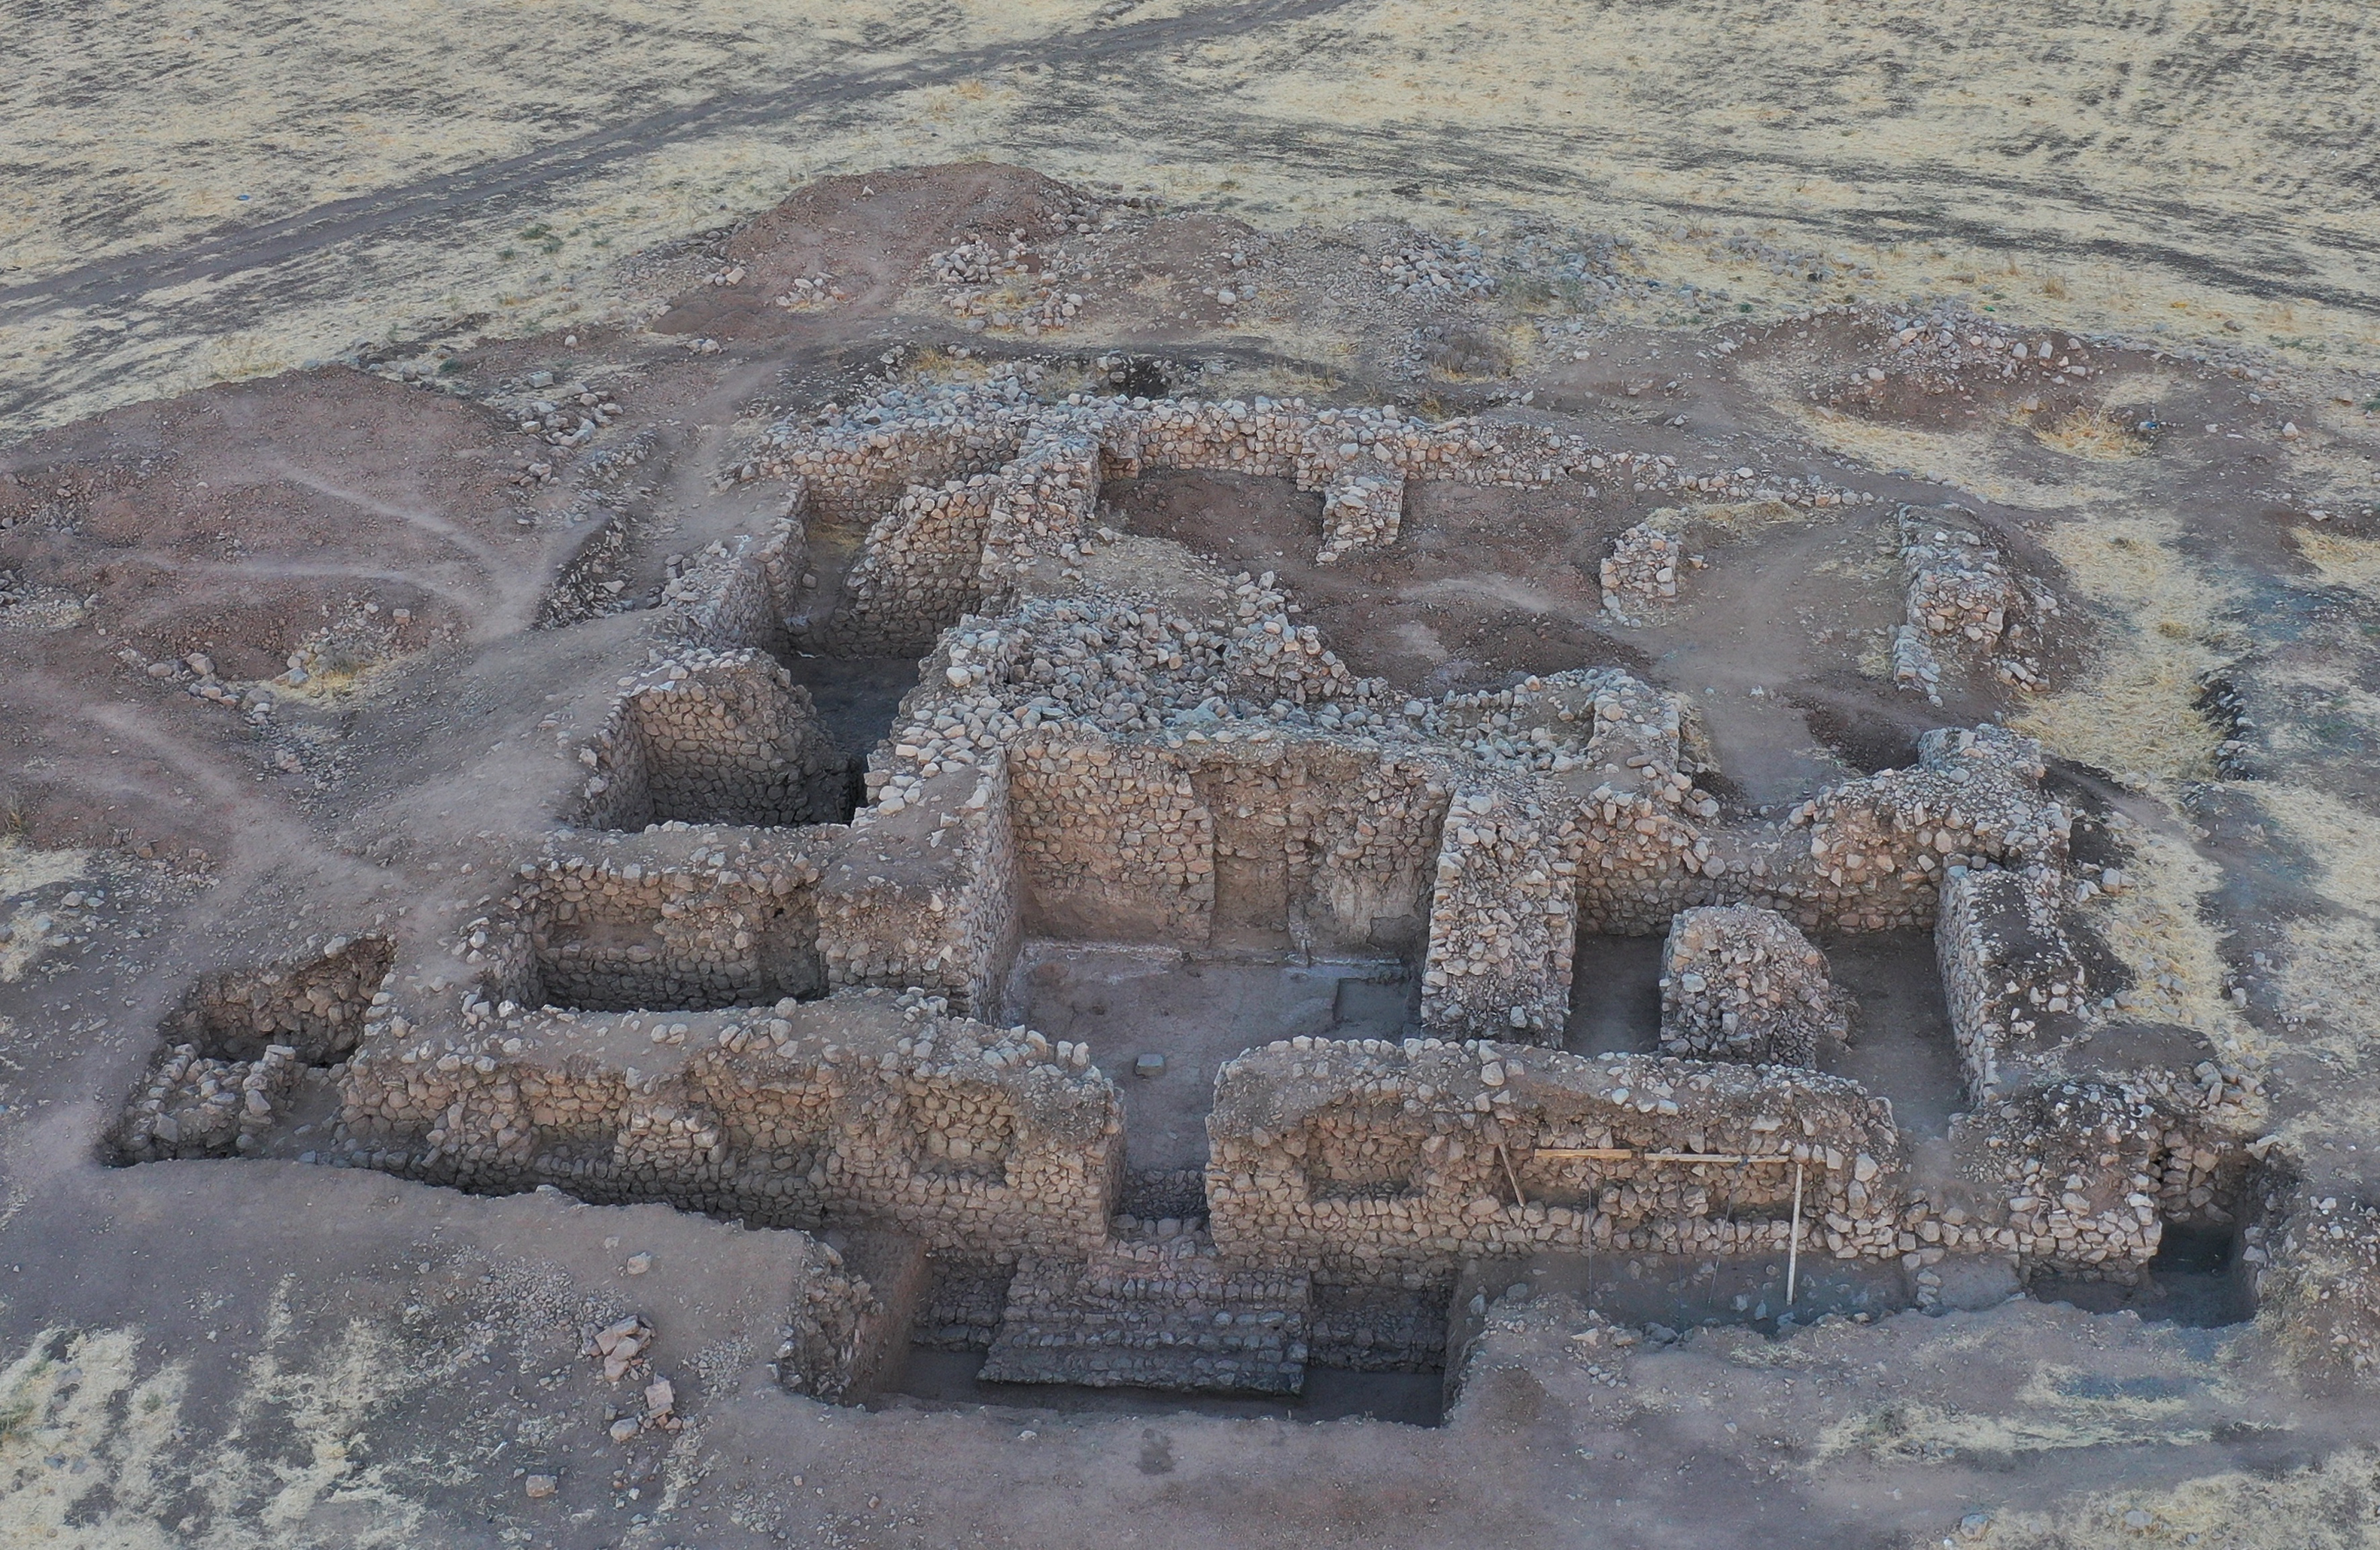
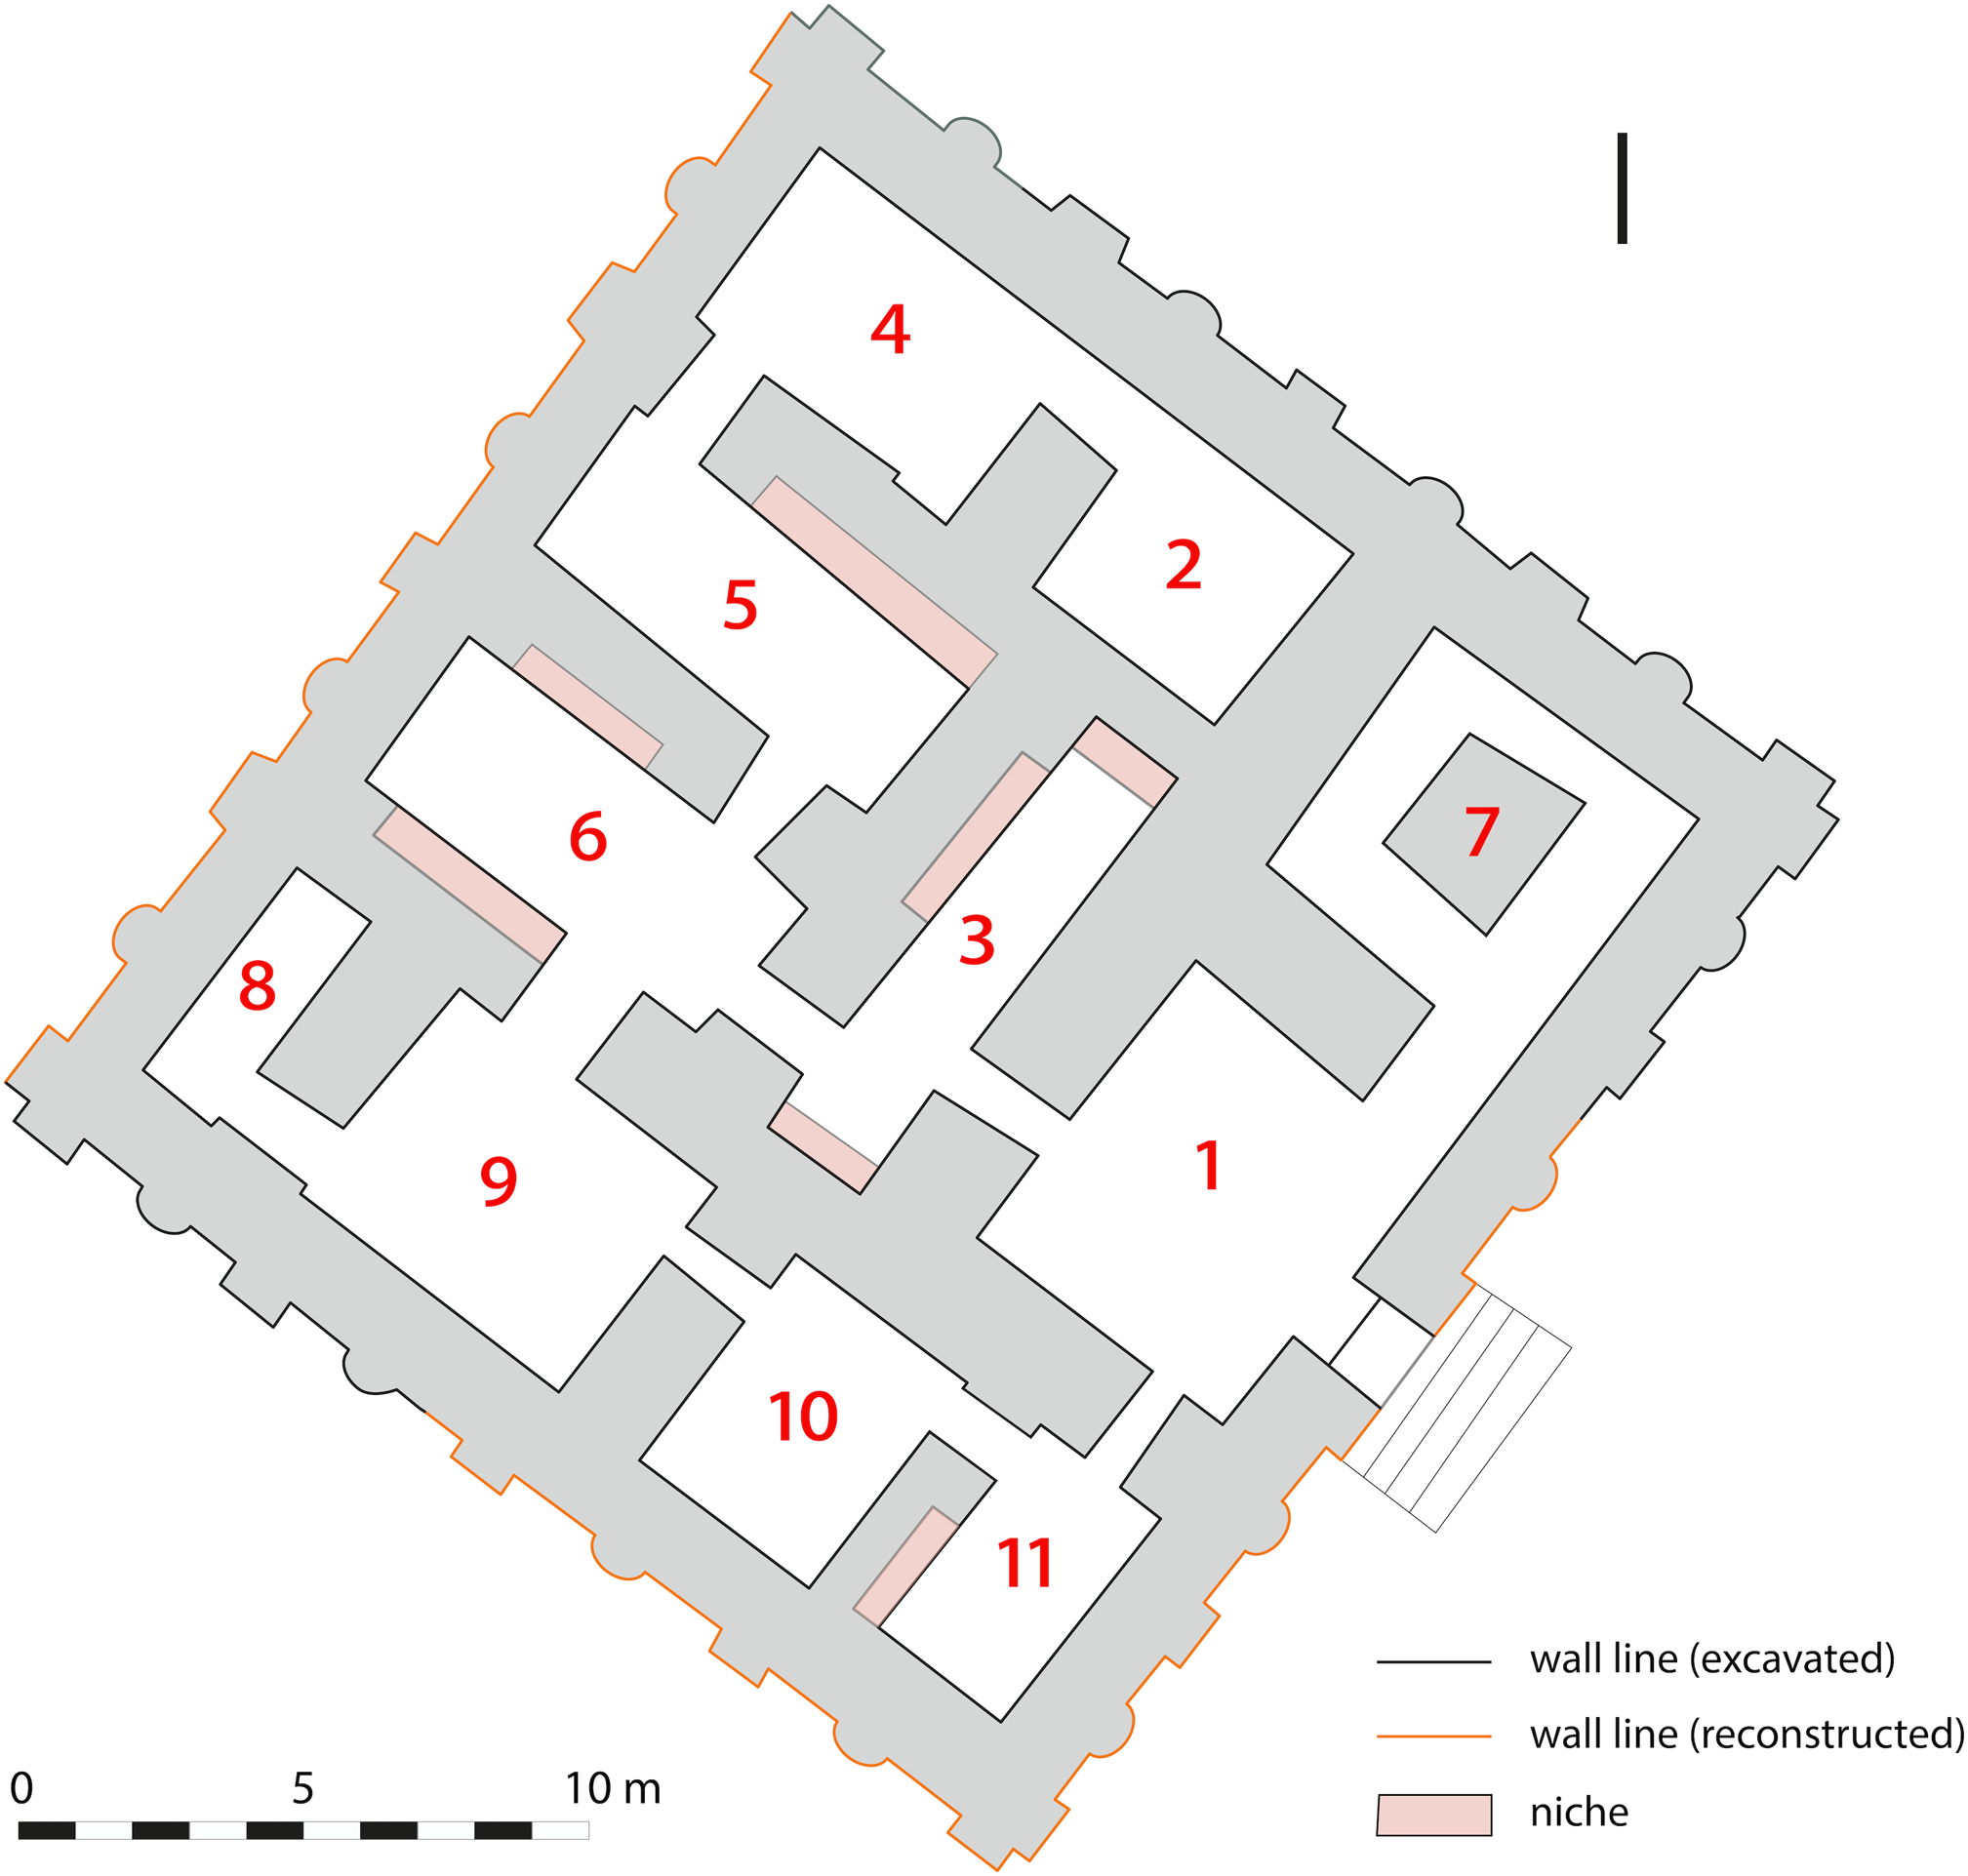
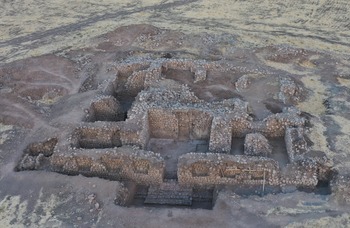
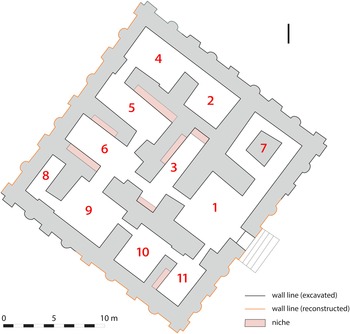
The Area E monumental building (Fig. 2), situated in the southern corner of Qalatga Darband, was the object of investigations in every season of fieldwork. It originally appeared as a mound of stone some 4 m high and 35 m in diameter, but excavation soon established that it constituted the remains of monumental architecture. By the end of Season 3, we had recovered approximately one third of the plan.Footnote 3 In the following three seasons, we were able to recover the entire plan (Fig. 3) and to excavate all eleven rooms down to at least the final surfaces, in the course of so doing significantly refining our understanding of the construction sequence.Footnote 4 The building is very impressive, measuring 23 x 23 m, with walls up to 1.9 m thick and standing up to 4 m high, dry-built with a slight battering. The faces of the walls are composed of carefully laid rows of stones, with the insides filled with small stones and rubble; the interior wall faces are plastered with a white lime plaster, painted in many places. The main use of the building came to an end in a fiery event, evidenced by layers of ash in all rooms. In fact, there were two burning horizons, evidently close together in time. The large storage jars containing lime plaster in Room 2, dishes containing yellow and pink pigments in Room 3, and incomplete replastering of floors in some rooms all suggest that the second burning took place while the building was in the process of being refurbished after the original burning. Following this, the building began to collapse. There was, nevertheless, some subsequent use of the area, at least in its western part, evidenced in the form of both a later surface in Room 8 and fragmentary remains of walls built above the collapse; an indication of the date of this phase is given by a coin of Pacorus II (78–105 A.D.). After that, the site fell out of use and was abandoned.
Area E monumental building at Qalatga Darband, aerial view from the southeast
Plan of Area E monumental building
In the very late Parthian and early Sasanian period, the dilapidated remains of the building were used for secondary burials of presumed Zoroastrian nature. In eight of the rooms (Rooms 1, 2, 3, 5, 6, 9, 10, and 11), the upper stone collapse contained large quantities of disarticulated human and animal bones, in addition to jewelry (rings, earrings, bracelets), beads, coins and sherds of pottery and glass vessels. The material from Room 11 also included equestrian tackle, evidently the equipment of a rider. The coins date to the late Parthian king Osroes II (190 A.D.), but otherwise to the early Sasanian period, from the reigns of Ardashir I (223–240 A.D.), Shapur I (240–270 A.D.), Ohrmazd I (270–271 A.D.), Bahram II (274–293 A.D.) and Shapur III (383–388 A.D.). The most plausible interpretation is that these materials are the remains of reburials of skeletons and accompanying grave goods that had been relocated from their original deposition contexts. These must be Zoroastrian secondary interments. Osteological analysis undertaken by Sophia Mills has established that these burials represent the remains of at least 28 individuals. In most cases, the sex cannot be assigned, although five could be identified as male and two as female. The age range encompasses infant (1), children (3), adolescents (6) and adults (18). In four instances, there are gnaw marks indicative of rodent activity. The animal bones were quite well preserved and show evidence of butchery: preliminary analysis establishes the presence of a broad range of species, including sheep, goat, cattle, horse, donkey, fallow deer, roe deer, dog, cat, birds and frog.Footnote 5 It is of interest to note that an exact parallel for these burials is found at the site of Shar-i Qumis (ancient Hecatompylos) in northern Iran, where also the disarticulated remains of burials of Sasanian date were found redeposited in the ruins of a Parthian monumental building.Footnote 6
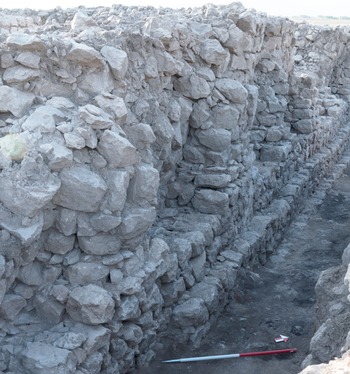
The building had a full built upper story. This is inferred from the thick layers of clayey material found in all rooms below the stone wall collapse – but above the ceiling collapse – which can only be the remains of fallen mudbrick masonry. The absence of large stones within these layers suggests that the internal walls of the upper floor were made primarily of wood, mudbrick and plaster. The sequence is therefore understood as the collapse of an upper story of the building constructed out of mudbrick.Footnote 7 Evidently some of the upper rooms, for example those above Room 2 and Room 6, had baked brick paving, most likely indicating that they were bathrooms or kitchens. The building was roofed with terracotta tiles, found in the collapse layers in every room.Footnote 8 Up to the top of the upper story, the walls must have stood around 7 m high; including the pitched tiled roof, the full height of the edifice must have been nearer 10 m. The external façade was decorated with a sequence of alternating semi-circular and rectangular buttresses separated by regularly spaced alcoves approximately 40 cm deep and 1.20 m wide (Fig. 4). This pattern of buttresses is reminiscent of Building Y1 at HatraFootnote 9 and the Gareus Temple at Uruk,Footnote 10 both Parthian in date, so it is perhaps justified in thinking of this as a specifically Parthian style. The building in its final phase was approached by an impressive staircase leading up to the entrance, 2.4 m wide with four steps rising a total height of 60 cm. The staircase was needed because this final phase of the main building was built on what was effectively a platform formed by the remains of the preceding phase; it seems likely, but is not proven, that this rebuilding took place following the original burning. No direct evidence survives for the lighting arrangements for the fallen upper story, but most probably this would have been by loop-hole slits in the mudbrick, as was the case, for example, in the Fort at Nush-i Jan.Footnote 11 The interior of the building was finished with white lime plaster 5–10 mm thick on to which were painted designs in blue, white, yellow, orange, red, pink and green paint. The beams of the ceiling were similarly colourfully painted. The surviving evidence does not allow us to determine the nature of the design, but there is nothing so far to indicate figurative rather than geometric patterns. In three places (Rooms 2, 3, 8) small pits under the floor containing plaster trays are believed to have been for foundation offerings.
Northeast façade of monumental building showing alternating round and square buttresses

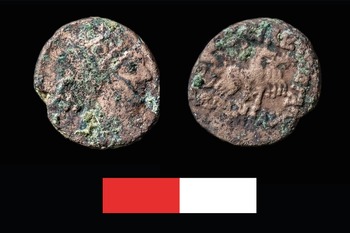
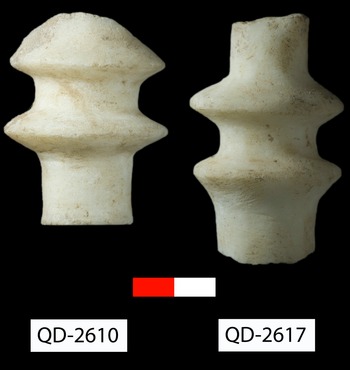
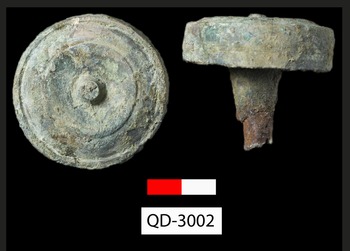
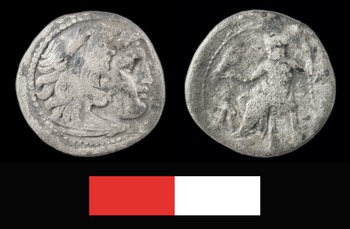
A striking feature in the inventory of material from the building is the large number of marble sculpture fragments. In all at least 57 pieces were recovered, derived from at least seven separate statues, all stylistically Hellenistic. While no statue is complete, and most pieces are indeed relatively small fragments, in two cases we have more substantial pieces, the quarter-size statue of a seated female and the half-size statue of a naked male.Footnote 12 The corpus, which fits with the well-known adoption of elements of Hellenistic culture by the Parthian elite, is currently being studied by Dr. Irene Romano of the University of Arizona. On the floor of Room 10 were two coins (QD-3298, QD-3299) dating to the reign of Orodes II (57–37 B.C.), in addition to a further coin which was not identifiable (QD-3292). A copper-bronze coin (QD-2815, Fig. 5), attributable to the ‘unknown king from Media Atropatene’ (probably second half of the first century B.C.), was found in the collapse in the corridor between Room 8 and Room 9. With regard to other finds, two turned marble pieces (Fig. 6) were probably finials belonging to furniture; a large number of strips, studs and pins of copper-bronze were also most likely from furniture decoration; eight bimetal roundels (Fig. 7) from Room 1, 3.5–5 cm in diameter and consisting of copper-bronze disks with simple concentric decoration on the front and the remains of a square iron shaft on the back, seem most likely to be door knobs. Other small finds include a copper-bronze needle, fragments of ivory inlay, and a fragment of a bone figurine.Footnote 13
Coin QD–2815 of ‘the unknown king from Media Atropatene’

Turned alabaster finials QD–2610 and QD–2617

Bimetal roundel QD–3002

Contrary to earlier statements,Footnote 14 the Area E monumental building was not built on a virgin site but overlies the remains of two earlier constructions, evidenced by segments of walls surviving below the main phase floor levels. These walls had been levelled to their foundations, i.e., to just one course high, with the result that few associated floor surfaces were preserved. While the orientation is the same as that of that of the main building, these walls are narrower (65 to 140 cm in width), and the plans do not correspond. The main building, therefore, while built over these remains, does not represent an exact rebuilding of a previously existing complex. It can be noted, though, that a coin of post-Alexander type (QD-2405, Fig. 8) hints at a preceding Hellenistic occupation of the site.Footnote 15
Coin of post-Alexander type QD–2405

With the recovery of the complete plan of the building, we are able to make some suggestions regarding room usage. It must, however, be stressed that this analysis is based primarily on the architectural configuration – a major issue is that we only have the plan of the ground floor, and we cannot reconstruct the plan of the upper storey with any certainty. Room 1 is the entrance chamber, with openings giving on to the Room 7 staircase to the northeast, to a sequence of storage rooms in the west of the building, and to a long sequence of rooms in the north. The first of these latter rooms is Room 3, an intermediate space serving as a transition to the inner rooms, perhaps used for storage for equipment relevant to the operation of the building. Rooms 5 and 6 are likely to be storerooms. The western side of the building was dedicated to food storage, with pithoi in Rooms 8 and 9 and smaller storage jars in Room 10. Room 11 may have been utilised for preparation of food. Room 2 appears to have been a space with a special status. This is evident from its position at the end of the long sequence of rooms leading from the entrance, the presence of key pieces of sculpture, and the fact that it was colourfully painted. Whatever the exact function of Room 2, Room 4 must have been an ante-chamber (which does not rule out a secondary use, for example as a storeroom). Overall, the building is best understood as a strongly built manor house belonging to a member of the local elite. A good parallel in terms of size, shape and internal organisation is the Fort at Nush-i Jan.Footnote 16
Dating
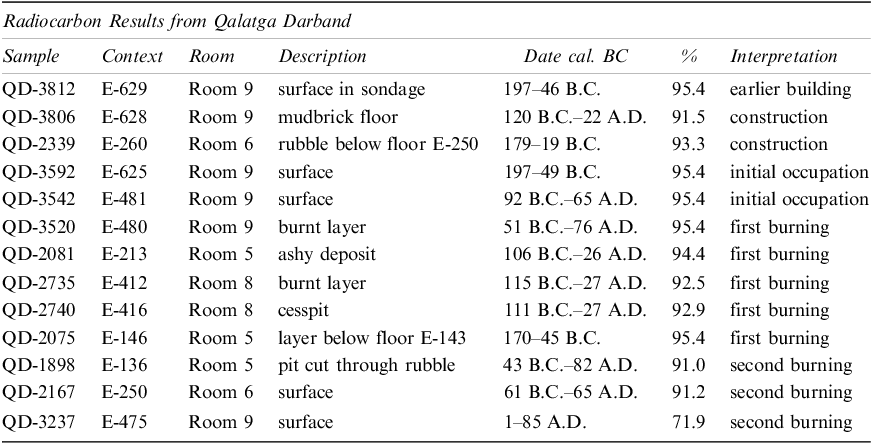
The initial dating of the Area E monumental building to the early Parthian period (late second and early first century B.C.), based on ceramic analysisFootnote 17 and supported by the dating of the Hellenistic sculpture to exactly this period, may now be refined with the results from radiocarbon testing. The samples, which were all of carbonised wood, were processed by the Scottish Universities Environmental Research Centre (SUERC) and calibrated using the IntCal20 atmospheric calibration curve;Footnote 18 we present the results here in Table 1:Footnote 19
Radiocarbon Results from the Area E building

Table 1: Long description
The table presents radiocarbon results from Qalatga Darband, detailing sample context, room, description, date calibrated B.C., percentage, and interpretation. It consists of 12 rows and 6 columns. The columns are labeled Sample, Context, Room, Description, Date cal. B.C., %, and Interpretation. Each row provides specific data for each sample. For example, Row 1: Sample QD-3812, Context E-629, Room 9, Description surface in sondage, Date cal. B.C. 197–46 B.C., % 95.4, Interpretation earlier building. Row 2: Sample QD-3806, Context E-628, Room 9, Description mudbrick floor, Date cal. B.C. 120 B.C.–22 A.D., % 91.5, Interpretation construction. Row 3: Sample QD-2339, Context E-260, Room 6, Description rubble below floor E-250, Date cal. B.C. 179–19 B.C., % 93.3, Interpretation construction. Row 4: Sample QD-3592, Context E-625, Room 9, Description surface, Date cal. B.C. 197–49 B.C., % 95.4, Interpretation initial occupation. Row 5: Sample QD-3542, Context E-481, Room 9, Description surface, Date cal. B.C. 92 B.C.–65 A.D., % 95.4, Interpretation initial occupation. Row 6: Sample QD-3520, Context E-480, Room 9, Description burnt layer, Date cal. B.C. 51 B.C.–76 A.D., % 95.4, Interpretation first burning. Row 7: Sample QD-2081, Context E-213, Room 5, Description ashy deposit, Date cal. B.C. 106 B.C.–26 A.D., % 94.4, Interpretation first burning. Row 8: Sample QD-2735, Context E-412, Room 8, Description burnt layer, Date cal. B.C. 115 B.C.–27 A.D., % 92.5, Interpretation first burning. Row 9: Sample QD-2740, Context E-416, Room 8, Description cesspit, Date cal. B.C. 111 B.C.–27 A.D., % 92.9, Interpretation first burning. Row 10: Sample QD-2075, Context E-146, Room 5, Description layer below floor E-143, Date cal. B.C. 170–45 B.C., % 95.4, Interpretation first burning. Row 11: Sample QD-1898, Context E-136, Room 5, Description pit cut through rubble, Date cal. B.C. 43 B.C.–82 A.D., % 91.0, Interpretation second burning. Row 12: Sample QD-2167, Context E-250, Room 6, Description surface, Date cal. B.C. 61 B.C.–65 A.D., % 91.2, Interpretation second burning. Row 13: Sample QD-3237, Context E-475, Room 9, Description surface, Date cal. B.C. 1–85 A.D., % 71.9, Interpretation second burning.
These results establish that the edifice that preceded the main monumental building was probably constructed in the second century or the first half of the first century B.C. As noted above, evidence was found for two phases of earlier construction; we do not, however, have separate dates for these two phases (each of which were only very partially revealed). With respect to the initial construction and occupation of the main monumental building, the samples from Room 6 (179–19 B.C.) and Room 9 (197–49 B.C., 120 B.C.–22 A.D., 92 B.C.–65 A.D.) combine to suggest that this is to be placed in the first half of the first century B.C. With respect to the initial burning of the building, the combination of the samples from Room 8 (115 B.C.–27 A.D., 111 B.C.–27 A.D.) and Room 5 (106 B.C.–26 A.D.), as well as the date from Room 9 (51 B.C.–76 A.D.), suggest a dating between the mid-first century B.C. and the first quarter of the first century A.D. An earlier date from Room 5 (170–45 B.C.) may perhaps be attributable to the wood itself stemming from a longer-growing specimen; an alternative, if all these dates are taken together, would be to imply a dating right in the middle of the first century B.C. This, however, we reject as we believe that the correct dating for the first burning in fact lies in the later part of the range. This is because the archaeological evidence suggests that the refurbishing and second burning of the building took place not long after the original burning. Dating of the first burning to the early first century A.D. would therefore correspond well with the suggestion that the second burning took place in the mid-first century A.D. With respect to the second burning, the dates from Room 5 (43 B.C.–82 A.D.), Room 6 (61 B.C.–65 A.D. and Room 9 (1–85 A.D.) together suggest a dating in the early or mid-first century A.D. As will be seen below, a dating in the middle of the first century A.D. could correspond well with events known from historical sources. In any case, a terminus ante quem non of 57 B.C. is provided by the coins of Orodes II (57–37 B.C.) in Room 10; the coin of the ‘unknown king from Media Atropatene’ from Room 8 probably dates to the second half of the first century B.C., perhaps even more specifically the third quarter of that century.Footnote 20 In addition, it should be noted that if the coin (QD-2729) from the floor of Room 8 is indeed of Pacorus II (78–105 A.D.), the second burning would have to be in the end zone of the range suggested by the radiocarbon dates, i.e., the last quarter of the first century A.D. Following the second burning, while the building as a whole was abandoned, a section of the western part was re-used; we do not have a radiocarbon sample for this occupation (no surfaces were preserved). It is possible that the comprehensive analysis of the ceramics recovered from the building (currently in progress) may offer further insights into the chronology outlined here.
Historical Reflections
In the site of Qalatga Darband we have a fortified settlement of the early Parthian period defending the western end of the Darband-i Rania. Why was this settlement created, why there, and when was it built? A first reflection is that a fortified point at this location makes sense in the context of the westward expansion of the Parthian empire, following from the occupation of Media Atropatene by Mithradates I in the mid 150s B.C.Footnote 21 – a development which must have brought the western edge of Parthian territory up to some point in the sequence of passes through the Zagros mountains. Perhaps we can be even more specific and suggest that Qalatga Darband was founded in the short period following the acquisition of Media Atropatene, but before northern Mesopotamia was brought under Parthian control (141 B.C. at the earliest, possibly somewhat later). By this model, the Darband-i Rania would have been, for a time, the western border of the Parthian empire. The question then is, what state lay to the west? The obvious answer is Adiabene, and we would therefore propose that at the Darband-i Rania we have the eastern border of Adiabene, at least at this time. In fact, even after Adiabene came within the orbit of Parthia, it was as a client kingdom, and the border may well still have been preserved at this location. It is entirely possible that the use and concept of the installation may have then been impacted by subsequent political and military developments. In this regard, the discovery of a grave at Usu Aska with a coin dating to Orodes II (57–37 B.C.) is extraordinarily suggestive. Orodes II is the king during whose reign the Parthian army massacred the Roman legions at the battle of Carrhae. Was the massive intensification of the defenses of the Darband-i Rania undertaken in the wake of Carrhae? Some support for this suggestion may come from the disposition of the remains at Qalatga Darband. Specifically, why is there a large square fort inside the already fortified zone of the site? A plausible answer could be that the square fort was the original Parthian installation guarding the western approach to the pass, which was subsequently expanded into the much more comprehensive defensive system represented by the complete circumvallation of the site; that is to say that the square fort dates to the mid second century B.C. (post–141 B.C.), and the expanded site to a century later (post–53 B.C.). By this analysis, the expanded fortification of the Darband-i Rania would have taken place in direct response to the rising threat from Rome.
Turning to the burnings of the monumental building, an intriguing possibility for the first burning, which the radiocarbon results suggest falls between the mid-first century B.C. and the first quarter of the first century A.D., is that this could be the result of Roman forays in the region. An obvious suggestion for the context of this burning is the operations which Mark Anthony conducted in Media Atropatene in 36 B.C. in the course of his campaign against Parthia;Footnote 22 another possibility might be the upheavals caused by the revolt of Tiridates against Phraates IV in 32–29 B.C.Footnote 23 For the context of the second burning, which the radiocarbon results put in the early or mid-first century A.D., there are a number of striking possibilities: the attack on Adiabene undertaken by the Parthian king Vologases I in c. 52 A.D.,Footnote 24 Tiridates of Armenia’s invasion of Media Atropatene in A.D. 60,Footnote 25 or the attack on Adiabene carried out by Tigranes VI, Tiridates’ replacement, in A.D. 61.Footnote 26
Unfortunately, we have no indication of to whom the building belonged, although the governor of the city (and perhaps also the surrounding region) would be an obvious candidate. The identification of the ancient name of the site is equally problematic. The excavations did not yield any epigraphic evidence (other than numismatic), nor do the Peutinger MapFootnote 27 or the Geography of PtolemyFootnote 28 offer any clues. One candidate would be the city of Natouniya (Natounisarkerta), known only from inscriptions on a limited number of coins.Footnote 29 While very little is known about Natouniya, there is an indication that it was located on the Lower Zab. This would be consistent with the location of Qalatga Darband and may yet prove to be correct, nevertheless it should be noted that there are other proposals for the location of Natouniya, for example at Altın Köprü, Rabana-Merquly (in the Piramagrun mountains), or Tell Mahuz (on the south bank of the Lower Zab approximately half way between Altın Köprü and the confluence with the Tigris).Footnote 30 Of these, Rabana-Merquly is, in the authors’ opinion, least likely as it did not lie on the Lower Zab. This question of identification in turn feeds into another question: to which political unit did the city belong? Was the fortified settlement at Qalatga Darband a creation of the Parthians, built as a bulwark on the western edge of the Empire, marking and defending the border with the kingdom of Adiabene? Or was it, conversely, built by a king of Adiabene, in an attempt to defend that kingdom and prevent further Parthian expansion, as would be implied by an identification with Natouniya? Was it actually part of Media Atropatene? Numismatics offer a hint to approaching this question, though not a decisive one. The dominance of Parthian coins could be taken to suggest an association with the Parthian state, while the absence of coins from the mint of Adiabene may be taken to argue against an affiliation with that kingdom; the coin from Media Atropatene perhaps leaves an ambiguity on this point. It should, in any case, be stressed that it would be hazardous to base an argument on such a small number of coins and also that it should be borne in mind that the site could have changed hands at one or more points in its history.
Geophysics
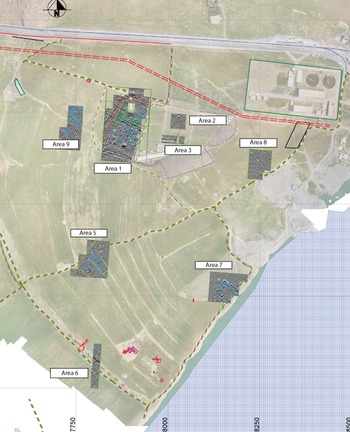
In Season 5, a programme of geophysical prospection using magnetic gradiometry was carried out under the direction of Timothy Matney, later supervised by Morgan Revels. The primary focus was on Qalatga Darband, where the overarching goal was to provide confirmation or refutation of current interpretations of the CORONA images and to add detail to the city plan; a limited amount of magnetometry was also carried out at Usu Aska (see below). Data was collected using a GeoScan FM-256 handheld magnetic field gradiometer. The survey was organised by 20 x 20 m squares in a grid aligned to magnetic north, with sample intervals of 0.125 m and transect intervals of 0.50 m. On a normal day this allowed 5 grid squares to be collected. The data were then processed using GeoPlot. Altogether, prospection was conducted in ten areas, eight of which were in Qalatga Darband (Fig. 9), encompassing 127 grid squares and a total area of 5.08 hectares.Footnote 31
Location of geophysical survey areas at Qalatga Darband

Fig. 9 Long description
A map showing the locations of geophysical survey areas at Qalatga Darband. The map highlights ten areas where geophysical prospection was conducted, with eight of these areas located within Qalatga Darband. The areas are labeled as Area 1, Area 2, Area 3, Area 5, Area 6, Area 7, Area 8, and Area 9. The map also shows roads, buildings, and other geographic features around the survey areas. The survey was organized in a grid aligned to magnetic north, with specific sample and transect intervals.
Areas 1, 2 and 3 (The Fort)
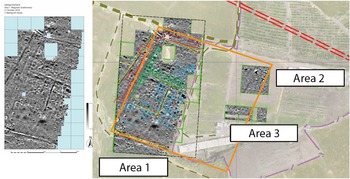
The interior of the fort was investigated in Areas 1, 2 and 3. This allowed us to map the whole of the western half of the complex and portions of the eastern half (the remaining parts could not be surveyed due to the presence of farm installations). The results were excellent. We show here a plan of the processed magnetic field gradiometry readings together with an overlaid interpretation (Fig. 10). The red lines represent the main outer wall, with three towers on the western side and one on the northern edge.Footnote 32 The lines of the wall follow those of the satellite image, although in the south the return of the wall does not show up in the magnetometry due to the interference of a modern pathway. The yellow lines represent an internal street system and an external road. The internal streets are long, straight features intersecting at right angles and strongly dividing the interior of the structure into blocks roughly 50 m square. As the road appears to run into the northernmost tower on the western wall, we believe that this is a gate. The green lines represent walls of a series of approximately 5 x 5 m rooms, built along both the inside of the main outer wall and the sides of the internal streets; these are likely to have been for barracks and/or storage.
Results of the magnetic field gradiometer mapping of the fort at Qalatga Darband, showing (left) the processed magnetic field gradiometry readings as a raster plot and (right) the same plot with an overlaid interpretation, together with (superimposed in orange) the footprint of the main outer wall as detected from CORONA imagery

Fig. 10 Long description
The image consists of two elements: a raster plot on the left and an interpretation diagram on the right. The raster plot shows the processed magnetic field gradiometry readings of the fort at Qalatga Darband. The interpretation diagram overlays an interpretation on the same plot, with the footprint of the main outer wall detected from CORONA imagery superimposed in orange. The diagram is divided into three areas labeled Area 1, Area 2, and Area 3, each showing different sections of the fort. The raster plot and the interpretation diagram together provide a comprehensive view of the magnetic field gradiometry readings and the structural layout of the fort.
Area 5 (Achaemenid Field)
This area was chosen as it was where an Achaemenid diorite bowl fragment was found on the surface in Season 1. At that time, a 3 x 3 m sounding (Trench F1) was conducted to establish whether any significant remains were present.Footnote 33 That trench did not reveal any architectural remains, so the prospection was carried out in Area 5 to see whether any such remains might be found in the wider area. In this the operation was successful, with the data evidencing the presence of an architectural complex measuring approximately 55 x 20 m.
Area 6 (City Wall)
Area 6 is a strip across the western fortification wall surveyed to investigate whether there was any evidence for an outer wall (proteichisma) or defensive ditch. In the event, no indications of any such features were detected, although structures built along the inside of the wall could be seen.
Area 7 (Southeastern Building)
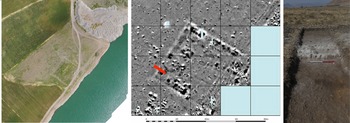
Work in Area 7 was undertaken in order to groundtruth a large rectangular feature on the eastern city wall visible in the drone survey undertaken in Season 2 (spring of 2017). The prospection clearly imaged a large structure oriented northwest-southeast with a preserved extent of approximately 42 x 50 m (Fig. 11); the interpretation was checked in a ground-truthing trench (Area J). The building appears to have comprised an open courtyard in the centre with entrances in the southern wall, and perhaps another smaller entrance in the northern wall near the northeast corner. Evidence for a series of rooms measuring approximately 5 x 5 m lining the interior of the northern and western walls is clear; once again, these are probably storage rooms and/or barracks. We interpret the building as also having two ranges of rooms on the north and west, although it is difficult to make out any details of their plan. The southwest corner of the building appears to have a round buttress or tower; an analogous projection is also visible, although less clear, on the northwestern corner. It is striking that this structure appears to have been architecturally isolated: there is no evidence of buildings to the north, west or south.
Southeastern Building at Qalatga Darband, showing (left) the image from the 2017 drone survey, (middle) results of the magnetometry mapping with the location of the ground-truthing trench (Area J) in red, and (right) the finished excavation

Area 8 (Quarry Anomaly)
Prospection was carried out at the eastern edge of the site near a modern quarry, to ground-truth another apparent rectangular feature that appeared as a crop mark at the edge of the quarry in the Season 2 drone survey. In this case, however, no evidence for architecture was detected, and the feature can be considered a false positive.
Area 9 (Architectural Stones)
Area 9, west of Area 1, was chosen for investigation as it is the location of the greatest concentration of shaped architectural stones (ashlar blocks, column parts, lever press bases and weights) recorded in the surface stone survey.Footnote 34 While it is clear that these pieces are not even approximately in situ and were moved to their present location in the process of field clearing, it remains the case that their original locations cannot have been too distant. The implication is that one or more major building complexes must have existed in the vicinity. The geophysical results did show evidence of rectilinear architecture in the northern section of the area, however these remains, checked by ground-truthing (the Area K trench), seem domestic in nature. Whether or not they could have been the location of oil-production facilities remains unclear.
Minor operations
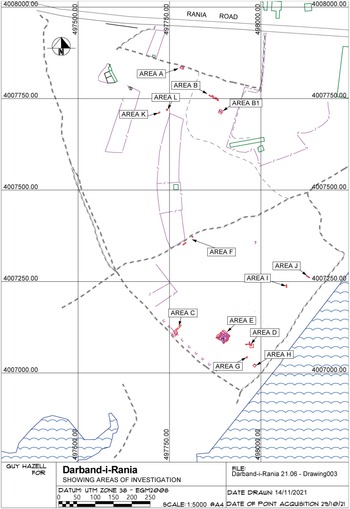
A number of small operations (Areas I–L) were carried out to investigate surface features and to ground-truth results of the geophysical survey (Fig. 12).
Location of excavation areas at Qalatga Darband

Fig. 12 Long description
A map showing areas of investigation at Qalatga Darband. The map includes various labeled areas such as Area A, Area B, Area K, Area L, Area B1, Area F, Area J, Area I, Area C, Area E, Area D, Area H, and Area G. These areas are marked with different symbols and are spread across the map. The map also shows Rania Road and a water body at the bottom. The legend indicates the scale and the date of the map drawing.
Area I
This trench was laid out across a modern field boundary in order to investigate whether or not this boundary was located above a pre-existing ancient wall. The excavation established that this was not the case, a valuable result for understanding the morphology of the site.
Area J
This trench was laid out to ground-truth the geophysical plot of the Southeastern Building.
Area K
This was the trench laid out to ground-truth the results of Area 9 of the geophysical survey.
Area L
Area L was an operation close to Area K in the northwestern part of the site, carried out in order to investigate a line of stones protruding through the surface. The excavation uncovered a section of stone wall footing that incorporated a re-used cylindrical column section (registered as SS-092 in the stone survey); the date when the wall was built out of these ancient components was not established.
Ceramics
The continuing analysis of ceramics from Qalatga Darband has resulted in refinement of the picture developed from data collected in the earlier seasons. Ceramics were recovered from multiple areas (B, E, F, I, J, K, L; our focus was on Areas B and E, and in particular on the substantial amount of ceramics from the floors of the rooms of the monumental building in Area E. A total of 24,927 sherds was catalogued over the 2018–2021 seasons, comprising 2,263 diagnostics and 22,664 non-diagnostics. This assemblage provides insights into both the repertoire of ceramic types and room functions. The excavations in Area B, on the other hand, have yielded materials post-dating the main occupational phase of Qalatga Darband, which have not been recovered from other areas, increasing our understanding of both the ceramic production and the history of the site. In Area B, Common Ware pottery was dominant (53%), followed by Storage Ware (40%), and the same was true with the Common Ware (78%) and Storage Ware (20%) in Area F; in Area E, by contrast, the proportions of the two wares were identical (each 45%). Other wares such as Glazed Ware, Cooking Ware and Coarse Handmade Ware were only present in very small quantities in all areas.
The pottery from Area E reflects the homogeneity of ceramic production across the site. This applies to both fabrics and types. Across the site, the ceramics are made of a sand-tempered fabric characterised by fine to small size minerals of different colours. Sub-fabrics are further distinguished by the types and quantities of inclusions, as well as by the texture of the paste: sandy, sandy with minerals (black, dark red, beige, white), sandy with chaff temper, and sandy with white lime. This sandy fabric was used for almost all common ware vessels, as well as some of the Fine Ware, Storage Ware and Cooking Ware vessels. We also find gritty fabrics used for storage vessels, extremely fine fabrics with tiny mineral inclusions for fine ware vessels, and fabrics with mineral tempers for cooking pots.Footnote 35
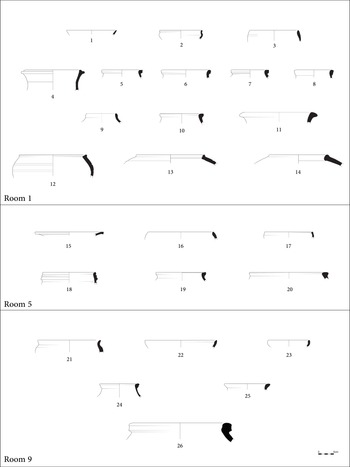
The remarkable homogeneity in terms of types of vessels from the floors of the Area E building (Figs. 13, 14: 1–7) also holds true for the forms and types of the ceramics found on the surfaces outside the building (Fig. 14: 8–20). Fish-plate forms with various lip profiles, primarily with triangular folded rims, occasionally with a single groove on the upper lip in the inner face, were present among open vessels (Fig. 13: 15; Fig. 14: 3). Bowl forms comprise a number of different types: flared rim bowls (Fig. 13: 1, 22; 14: 4, 9, 19); incurved rim bowls (Fig. 13: 3, 16, 17, 23); everted rim bowls with either round folded (Fig. 13: 2) or simple rounded lip profile (Fig. 13: 21); and carinated rim bowls (Fig. 14: 1, 2). Jar forms display a variety of types as well, but they all share variants of the folding lip. The principal rim type for jars is a round or square folded rim with a groove on the side and/or upper face of the lip (Fig. 13: 5–7; 14: 11–12). Other types are an everted rim with a projecting tenoned lip (Fig. 13: 4; 14: 7); a plain rounded either upright (Fig. 13: 9) or everted (Fig. 14: 13, 20) rim; a round folded rim with a tenon projecting from the fold, forming grooves on both sides (Fig. 13: 19, 24; 14: 10); and a very infrequently occurring grooved banded rim found on certain large jars and amphorae (Fig. 13: 18).
Pottery from Rooms 1, 5 and 9 in Area E

Pottery from Room 11 and outside surfaces in Area E

Fig. 14 Long description
Panel 1: A drawing of a small pottery vessel with a narrow neck and wide base. Panel 2: A drawing of a pottery vessel with a slightly wider neck and base. Panel 3: A drawing of a pottery vessel with a narrow neck and a wider base. Panel 4: A drawing of a pottery vessel with a wide base and a narrow neck. Panel 5: A drawing of a pottery vessel with a narrow neck and a slightly wider base. Panel 6: A drawing of a pottery vessel with a wide base and a narrow neck. Panel 7: A drawing of a pottery vessel with a narrow neck and a wider base. Panel 8: A drawing of a pottery vessel with a wide base and a narrow neck. Panel 9: A drawing of a pottery vessel with a narrow neck and a slightly wider base. Panel 10: A drawing of a pottery vessel with a wide base and a narrow neck. Panel 11: A drawing of a pottery vessel with a narrow neck and a wider base. Panel 12: A drawing of a pottery vessel with a wide base and a narrow neck. Panel 13: A drawing of a pottery vessel with a narrow neck and a slightly wider base. Panel 14: A drawing of a pottery vessel with a wide base and a narrow neck. Panel 15: A drawing of a pottery vessel with a narrow neck and a wider base. Panel 16: A drawing of a pottery vessel with a wide base and a narrow neck. Panel 17: A drawing of a pottery vessel with a narrow neck and a slightly wider base. Panel 18: A drawing of a pottery vessel with a wide base and a narrow neck. Panel 19: A drawing of a pottery vessel with a narrow neck and a wider base. Panel 20: A drawing of a pottery vessel with a wide base and a narrow neck. Panel 21: A drawing of a pottery vessel with a narrow neck and a slightly wider base. Panel 22: A drawing of a pottery vessel with a wide base and a narrow neck. Panel 23: A drawing of a pottery vessel with a narrow neck and a wider base. Panel 24: A drawing of a pottery vessel with a wide base and a narrow neck. Panel 25: A drawing of a pottery vessel with a narrow neck and a slightly wider base. Panel 26: A drawing of a pottery vessel with a wide base and a narrow neck.
Storage vessels exhibit less variety than common ware vessels. Two types of thick-walled jars were present on the floors of the building, characterised by either a triangular folded rim (Fig. 13: 11) or a round folded rim with a peaked lip and a groove on the inner face (Fig. 13: 9). Cooking pots, all rounded body forms with rounded bases, also showed diverse rim shapes: a round folded rim (Fig. 14: 6, 14); a round rim which is folded on both-sides (Fig. 13: 14); an incurved rim with a projecting tenoned lip (Fig. 13: 12, 13); and a triangular folded rim (Fig. 14: 15).
The uniformity of fabric and ware of the ceramics from Area E reflects the fact that the corpus all comes from a single time period, which can be dated to the end of the second and the first century B.C. – in historical terms, the early Parthian period; the corpus indeed constitutes a highly important assemblage for this period. In contrast to this homogeneity, the limited amount of pottery from the site from the later Parthian period, principally recovered in Area B, shows a greater variation in forms and types; an example of this is diamond-impressed decoration (not shown).
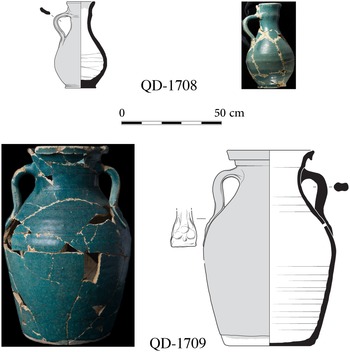
From the Sasanian level in Area E, two complete (but broken) vessels were recovered, both of green-blue glazed ware: a two-handled jar with everted beaked rim with a bifid-section handle and a flat base (QD-1709; Fig. 15: bottom); and a piriform, one-handled bottle with a slightly everted rounded rim and a disc base (QD-1708; Fig. 15: top). Both vessels are dated to the early Sasanian period (third–fourth century A.D.).
Vessels from the Sasanian secondary burials in Area E

Usu Aska
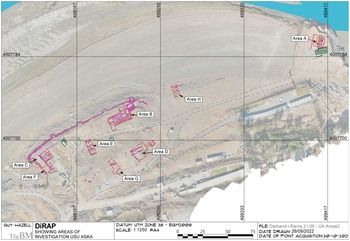
The investigation of the remains of the Assyrian fort at Usu Aska has been one of the great achievements of the project.Footnote 36 From an original understanding in Season 1 that the site consisted only of the fortified knoll/island at the northeastern end of the pass, the fieldwork went on to establish that this is in fact only one element of a much larger complex that covers most of the lower mountain slope between the knoll and the modern road bridge. The overall morphology is, however, clarified by a CORONA satellite image from January 1960,Footnote 37 which shows a rectangular feature measuring approximately 130 x 60 m at the western end of the site. As we now know, fortification walling connected this component – which we believe was the original fort – to the fortified knoll; the complete length of the site is accordingly around 320 m. In tandem with this growing understanding, we were able each year to devote a steadily growing part of our attention and resources to exploration of the site. Operations (Fig. 16) have now documented the outpost on the knoll (Area A), two areas of internal domestic architecture (Areas B and C), an interior area not yet classified (Area E), and the fortifications themselves in multiple locations (Areas C, D, F, G, H). While a general ascription to the Neo-Assyrian period is not in doubt, the exact date when the fort was first built has not yet been established; it would not, however, be surprising if it followed shortly in the wake of Ashurnasirpal II’s march through the Rania Plain in the opening phase of his first campaign in 882 B.C.Footnote 38
Location of excavation areas at Usu Aska

Area B
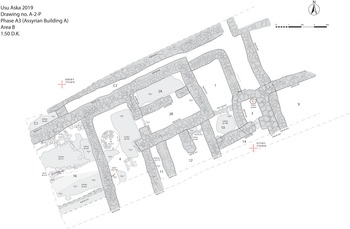
Area B is located at the northeastern end of the main rectangular component of the fort.Footnote 39 Later occupations include an Ottoman building and a Parthian grave, but the principal remains date to the Assyrian period. The excavation uncovered an area of utilitarian architecture built against the inner face of the fortification wall. This comprised two distinct phases. Building A (Fig. 17) was built above the levelled and cleared remains of Building B. Both buildings are aligned with the main fortification wall but are otherwise laid out differently. The method of construction was, however, the same, with small to medium width walls with rough stone footings defining a network of small rooms. The small finds recovered consist of military equipment (arrowheads, spearheads), general hardware (knife blades, needles, a whetstone, a sickle) and luxury items (a polished stone bowl, a cowrie shell) – an assemblage evidently accurately representative of the material culture of soldiers living in these quarters. Sondages carried out in Rooms 9 and 12 established that Building B was built on a levelling fill made up of the natural red clay with lime inclusions, with a depth of up to 3.25 m to the bedrock below; sloping tip lines were still visible. There was no major underlying architectural level, though limited evidence for human activity.
Plan of Building A, upper Assyrian phase in Area B at Usu Aska

Fig. 17 Long description
A plan of Building A in Area B at Usu Aska, showing the layout of the Assyrian period structure. The plan includes various labeled sections and surfaces, indicating different phases of construction and use. Key areas include C1, C2, 1, 2A, 2B, 3, 4, 9, 11, 12, 13, 14, and 16. The plan also shows the orientation and scale of the building, with coordinates provided for specific points. The layout includes walls, surfaces, and other architectural features, providing a detailed view of the utilitarian architecture built against the inner face of the fortification wall.
Area C
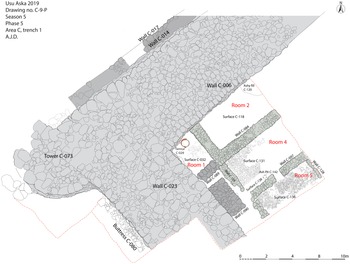
Area C is located at the western corner of Usu Aska at the point where the fortification wall turns towards the slopes of Mount Assos.Footnote 40 The upper levels were formed by important remains of the Parthian period, including a substantial wall and a large lime kiln; there was also limited evidence for a presence in the Hellenistic period. Below these levels were the well-preserved remains of an area of domestic architecture from the Assyrian occupation (Fig. 18), very similar in character to the remains exposed in Area B, including the fact that the sequence was divided into two separate building levels. The range of small finds was similar to that recovered in Area B, with the addition, however, that Area C also yielded tantalising evidence for administrative practices in the form of a clay sealing bearing the impression of a stamp seal engraved with the image of a scorpion (UA-1024)Footnote 41 and a fragment of an unbaked clay cuneiform tablet (UA-1069), unfortunately too small to yield meaningful data.
Plan of Area C (Phase 5) at Usu Aska

Area D
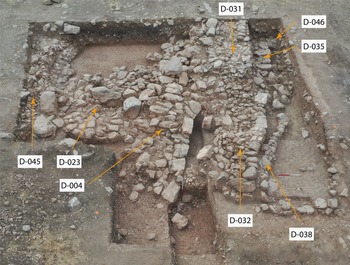
Area D is located near the southeast corner of the higher inland part of the site, i.e., towards the eastern side of the area corresponding to the rectangle visible in the CORONA image. The work here was directed towards investigating the fortification system in this location. The excavations exposed a mass of toppled masonry, evidencing four separate construction episodes of the defensive walls (as discussed below, the geophysics results suggest at least one further manifestation). The disposition of the masonry is most plausibly explained by the walls having been damaged by earthquakes and subsequently rebuilt on multiple occasions (Fig. 19).Footnote 42
Area D at Usu Aska, showing multiple constructions of the fortification wall

Fig. 19 Long description
A diagram of an archaeological excavation site showing multiple layers of fortification walls. The site is divided into several labeled sections: D-031, D-046, D-035, D-045, D-023, D-004, D-032, and D-038. The diagram illustrates the disposition of toppled masonry, indicating four separate construction episodes of the defensive walls. The masonry is scattered across the site, suggesting that the walls were damaged by earthquakes and subsequently rebuilt multiple times. The labels indicate specific areas of interest within the excavation site.
Area E
Area E is located in the mainland part of the site, at a point approximately 40 m inside the fortification wall and equidistant between Areas B and C. The original aim of the Area E excavation, which took place in the 2019 and 2021 seasons, was as a sounding to establish the depth of the stratigraphy, in order to inform the conduct of the operations in Areas B and C. The excavation started out as a 4 x 4 m square. However, as the architecture encountered proved to be of interest in its own right, the trench was progressively expanded over the two seasons of excavation to eventually cover an area of 12 x 6 m. The excavation yielded evidence for three periods of occupation: (1) traces of an Ottoman period presence; (2) a well-preserved Parthian level with an excellent assemblage of pottery; and (3) substantial remains from the Assyrian period. The Assyrian level had two well-built walls running parallel to each other, separated by a gap of 3.75 m. These are presumed to be part of a major building complex, the further investigation of which remains an important objective for future work.
Area F
The operation in Area F, just south of Area C, was located to investigate an apparent jog in the line of the fortification visible in the CORONA imagery,Footnote 43 interpreted to indicate the possible location of a gateway. The final trench measured 7 x 11 m. While we expected from the work in Area C to encounter a moderate layer of gravel and small cobbles at the surface, Area F proved to be the location of a massive deposit of cobbles, in places up to 1.8 m deep, which had been laid down recently, evidently in connection with the building of the original modern bridge nearby. Clearing this was a major operation, but once achieved, we exposed the main fortification wall, here 6.85 m wide and continuing from the section visible in Area C in a straight line for at least a further 7 m, with no turns. The outer face, excavated to a depth of 45 cm (the base was not reached), was protected by a revetment wall, 70 cm wide and 40 cm high, and probably also by a buttress, though time did not allow the latter to be fully investigated. A grave (F-033) was cut into the deposits overlying these remains. A number of small walls were built against the inside of the main wall, dividing the interior into a number of spaces. Small finds recovered from the associated deposits included a copper alloy fibula (UA-1528), fragments of a stone vessel (UA-1507) and a stone loom weight (UA-1504). With respect to our original interpretation of the CORONA imagery, we now believe that the erroneous identification of a possible turn (and gate) may be attributed to an Ottoman road crossing the site at this point.
Area G
Area G is a trench measuring 17 x 5 m laid out to explore remains of the fortification walling visible broaching the surface on the site’s southeastern (mountain) side. The operation exposed a section of the main wall – probably a continuation of the uppermost wall in Area D – including a semi-circular buttress 4.8 m in diameter, as well as some small walls built on the inside, together with their associated surfaces.
Area H
Area H is located in the lower eastern part of the site, in the zone which is regularly submerged by the waters of Lake Dokan. The aim of the operation, a 5 x 11 m trench, was to investigate a line of masonry that became visible during stone clearance at a time of low lake level. This masonry was evidently part of the section of the fortification wall connecting the main installation (the rectangular fort) with the tower at Area A. Although the outer face of the wall was clear, the inner face was more difficult to interpret: at least two inner faces were visible, presumably reflecting different phases of construction (which may in turn be related to earthquake activity, as demonstrated in Area D). There were also traces of occupations dating to the Ottoman (and possibly Parthian) periods.
Fortifications
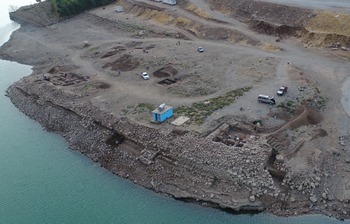
Work on clearing the fortifications started in Season 1 and continued in every season, succeeding in the end in exposing over 100 m of the main stretch of the wall between Areas C and B (Fig. 20)Footnote 44 . The masonry is constructed from large to very large (80–120 cm) unworked stone blocks that presumably came from the slopes of Mount Assos, immediately to the east. The wall is 6 m wide and stands in places up to 5.45 m (ten courses) high. A packing of small to medium stones was built up against the lower parts of the wall to protect against erosion from surface water running down the slope. The main stretch of the wall runs in an unbroken line parallel to the river for approximately 130 m, and more sporadically for a further 80 m towards the fortified knoll at Area A. It has not been demonstrated that the wall joins the remains at Area A; it does seem probable that this was originally the case, but this cannot be verified due to a stretch near Area A having been completely eroded by the waters of the lake. There are round towers at both the key corners of the main rectangular section (i.e., in Areas B and C), and between these were rectangular buttresses 4 m wide spaced at intervals of approximately 28–29 m along the length of the wall (in the normal Assyrian fashionFootnote 45 ). Bearing in mind that a large number of stones have clearly been eroded, and that the stone apron was almost certainly topped by a mudbrick superstructure, it is obvious that the fortification originally stood much higher than now preserved. We estimate that the original full elevation of the wall must have been approximately 10–15 m high.Footnote 46
Aerial view of Usu Aska from the west, showing clearance of the fortification walls, with Area C in the foreground

Geophysics at Usu Aska
As mentioned above, a magnetometry survey was carried out at Usu Aska in Season 4 in order to determine whether it was possible to map the sub-surface remains from the Assyrian period.Footnote 47 Prior to commencement, it was recognised that the irregular topography of the site, the presence of post-Assyrian archaeological levels (demonstrated for the Parthian and Ottoman periods), and the intensive use of the area as a picnic location in modern times were likely to inhibit the effectiveness of the results. Two areas were identified in the zone east of Areas B and D, where the ground was sufficiently level to allow data collection to take place: a block of four 20 x 20 m squares with one more 20 x 20 m block at its northeastern corner (Survey Area 4), and one further 20 x 20 m block to the west of this (Survey Area 11). The data collection protocol followed that used at Qalatga Darband (see above). As expected, the data generated (Fig. 21) are less clear than at Qalatga Darband; it is possible that anomalies in the northwestern quadrant of Area 4 may be interpreted as a structure measuring approximately 18 x 13 m, but otherwise the results are of limited usefulness.
Results of magnetometry survey at Usu Aska

Fig. 21 Long description
One map and two geophysical survey areas. The map shows the layout of the survey areas at Usu Aska, with specific regions labeled as Area B, Area D, Geophysics Area 11, and Geophysics Area 4. The map includes a scale bar indicating distances in meters and a north arrow for orientation. Geophysics Area 11 and Geophysics Area 4 are highlighted with distinct blocks overlaid on the map, indicating the zones where magnetometry data was collected. The survey areas are marked with specific boundaries and labels to denote the regions of interest. The purpose of combining these images is to illustrate the specific locations and extent of the magnetometry survey conducted at Usu Aska.
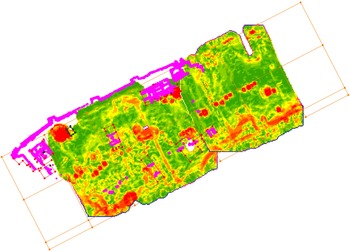
In a second attempt to map the configuration of the internal architecture of the fort, in 2021 a programme of prospection by conductivity was carried out at Usu Aska under the supervision of Marcus Hatch. The equipment used was a CMD Explorer multi-coil EM conductivity instrument, with receiver coils set to record depths of 2.3 m, 4.2 m and 6.7 m below ground level; a total of 13,650 m2 was covered. The results were moderately successful. In the plot shown here (Fig. 22), red represents areas of high conductivity and green areas of low conductivity, with yellow in between (purple represents stone architectural remains exposed in excavation or protruding through the surface). The long broad red feature stretching along the southeastern edge of the survey area must represent the fortification wall. While there was, unfortunately, insufficient time to ground-truth this feature, two important points may be made: (1) it is not the same as any of the separate constructions of the walls uncovered in Area D and therefore constitutes evidence that the fortification wall was built/rebuilt at least five times; and (2) it is the first direct evidence that the fortification wall extended from the main rectangular installation towards the island knoll (Area A) on the inner (mountain) side. The line of high conductivity extending roughly east-west across the site corresponds to the modern (and Ottoman period) road. Among the areas of moderate conductivity (yellow), it is possible to suggest a few rectilinear alignments which might correspond to ancient architecture, but the level of detail is insufficient to allow building plans to be drawn.
Plot of conductivity mapping of Usu Aska

In summary, while both the magnetometry and the conductivity surveys yielded some usable results, neither method succeeded in mapping the internal architectural configurations of the Assyrian phases at Usu Aska to any great degree. This does not exhaust the possibilities of the geophysical repertoire, however, and it is hoped in the future to experiment with other methods of prospection, particularly resistivity tomography and ground penetrating radar.
Studies in progress
Multiple post-excavation analyses are currently underway on material from Usu Aska, including ceramics by Awaz Jihad Heda,Footnote 48 zooarchaeological remains by Dr. Tina Greenfield, archaeobotanical remains by Dr. Lucas Proctor, and phytoliths by Fatemeh Ghaheri.
Murad Rasu
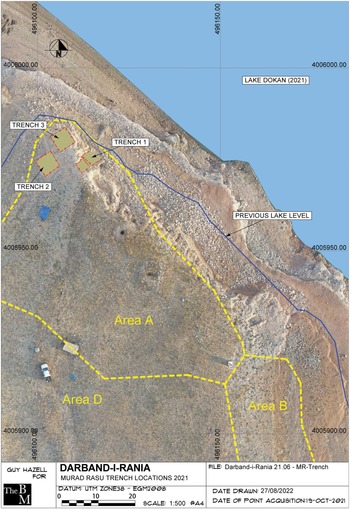
In our previous report, we summarised the results of the investigations at Murad Rasu, located southwest from Qalatga Darband across Lake Dokan.Footnote 49 This is a mounded site with a lower extension in the fields on its the southern side. Those investigations revealed: (1) an occupation visible in the section created by the erosion of the lake on the east, at that time tentatively dated to the third millennium B.C. (but now see below), as well as a level from the Uruk period; and (2) evidence from both surface survey and excavation for occupation in the Parthian, Sasanian and Ottoman periods. Following these earlier operations, a further programme of investigations was carried out at Murad Rasu in Season 6 (Fig. 23). There were two principal objectives: (1) resuming investigation of the lower occupational deposits, and (2) investigating the remains of a monumental mudbrick building preserved on the upper part of the mound.
Location of excavation trenches at Murad Rasu in Season 6

Fig. 23 Long description
A map showing the location of excavation trenches at Murad Rasu in Season 6. The map includes labels for Trench 1, Trench 2, and Trench 3, as well as areas labeled Area A, Area B, and Area D. The map also indicates the previous lake level and the current lake level of Lake Dokan. The trenches and areas are marked with distinct colors and shapes for easy identification. The map is oriented with north at the top.
Lower occupational deposits
Trench 1A was a continuation of the original 5 x 2.5 m area excavated in Season 1. In 2021, this area was extended by excavating a step-trench from the top of the mound down to the previously excavated area, as well as enlarging the size of the original trench. The upper part of the trench (an area of 4 x 1.4–2.5 m) was filled with a thick deposit of degraded mudbrick (A-106), the removal of which exposed an occupation deposit and surface (A-108) with an in situ pot (MR-022). In the lower part of the trench, below the large mudbrick wall A-007, the surface (A-015) in the room defined by walls A-006, A-014 and A-018, first exposed in Season 1, was identified and removed. This revealed a burnt deposit (A-117), which in turn overlay a lower surface (A-125) characterised by areas of river pebble paving, a baked half brick, ceramics lying flat and patches of burning. Below this was an extensive deposit of grey, white and orange compacted ashy material (A-131) that peeled off in layers, with a further burnt layer (A-138) below. Two radio-carbon dates now date this phase to the late third millennium B.C.Footnote 50
Monumental building
Trenches 2 and 3 were laid out in order to investigate the remains of a substantial mudbrick building heavily eroded by the waters of the lake. Trench 2, which measured 5 x 5 m, was on the upper part of the slope where these remains were exposed. In the western quadrant of the trench, a concentration of degraded mudbrick (A-107) laid on foundations of river cobbles (A-116) extended up the slope to the southeast, beyond the limit of excavation. On the southeastern side were the remains of a separate mudbrick wall (A-140) preserved up to five courses high; pebble surface A-142 was associated with this. Two extensive zones of burnt mudbrick (A-127, A-133) were found within the trench.
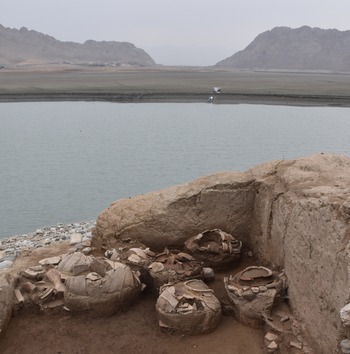
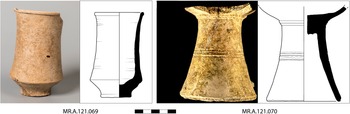
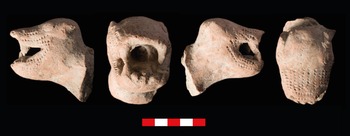
Trench 3, positioned 2 m to the north of Trench 2 and offset by 3 m to the east in order to avoid a burial located between the two, was laid out to investigate the space (designated Room 1) marked out by plaster lines visible on the surface defining three mudbrick walls: A-135 on the northwest, A-136 on the northeast, and A-137 on the southeast. The mudbrick of the wall was not preserved on the southwest side, having been destroyed by the laying of the later stone wall foundations A-102, but once these were removed the stone foundations of the southwest wall (A-134) were found at the level of surface A-121. While no doorway was identified, the fact that the other three sides of Room 1 preserve unbroken mudbrick indicates that the doorway must have been in the southwest wall. The western corner of the room had been removed by a robber pit (A-109). Eight large storage vessels lay in situ on the floor (A-121) (Fig. 24). The jars were surrounded by two fills. The upper fill (A-112) was a mid-orange clayey silt with frequent ceramics, slag and animal bone. Patches of plaster (A-110) fallen from the walls were found on top of this deposit, sloping down from wall A-137. The second fill (A-118), above the floor, contained white reed impressions and reed fragments, evidently from the ceiling/roof. Two small vessels, a fine beaker (MR.A.121.069) and a pedestal base (MR.A.121.070), were found resting in situ on the floor (Fig. 25). Preliminary analysis of the ceramics suggests a date in the Early or Middle Bronze Age (and so possibly contemporary with the palace of Kuwari at Shemshara).Footnote 51 The single charcoal sample judged adequate for radiocarbon analysis yielded a date of (95 %) 2457–2205 cal.B.C.Footnote 52 On the face of it, this would date the building to the third quarter of the third millennium B.C. We treat this conclusion with some caution, however, and are aware that it would at some future stage be highly desirable to carry out further fieldwork at the site, with aims including the recovery of more diagnostic ceramics and more charcoal samples suitable for radiocarbon analysis. A final find to mention is a lion head of baked clay (MR-236) recovered from the surface, the function of which is not yet clear (Fig. 26).
View of Room 1 in Trench 3 at Murad Rasu, looking northeast towards the pass

Beaker MR.A.121.069 and pedestal base MR.A.121.070

Terracotta lion head (MR-236) found during surface reconnaissance

Conclusions
In conclusion, the excavations in the Darband-i Rania have yielded fundamentally new data on the Assyrian and Parthian periods in the western Zagros of the Kurdistan Region of Iraq, a region which had hitherto been almost terra incognita in terms of archaeological research. As always, the results generate many new questions. At Qalatga, while the completion of the excavation of the Area E monumental building forms a natural stopping point, there is no shortage of work for future investigations. One important objective is refining our understanding of the plan and organisation of the city, both the overall layout and the location of specific features such as barracks, shops and workshops. The city must have had at least one temple – it is not unreasonable to think the various parts of columns recovered may have come from this – but its location is not known. Similarly, the many weights and bases of lever presses identified in the surface stone survey attest to the existence of a flourishing industry for olive oil production, but again the precise location of such facilities has not been established. The multiple strands of Hellenistic material culture raise important questions. The large rectilinear structure visible in the drone imagery of the southern part of the site looks strikingly similar to the plan of the building attached to the theatre in Babylon.Footnote 53 which Invernizzi has suggested may have been a gymnasium. Footnote 54 Could there similarly have been a gymnasium at Qalatga? If so, how deep did the Hellenisation at the city go? Could the settlement have actually been a polis? These questions can only be addressed by further fieldwork.
At Usu Aska, despite the huge advances of recent seasons, we still have no coherent picture of the internal organisation of the fort. It may be that geophysics still has a contribution to make here; neither the magnetometry nor the conductivity surveys succeeded in mapping the interior dispositions in any detail, but that still leaves resistivity and ground-penetrating radar as other methods to test, in addition to the picture which is slowly but steadily being built up from old-fashioned open area excavation. It would be interesting to identify the administrative centre, and there are also outstanding questions relating to the fortifications, not least the location of the gate.
At Murad Rasu, the overwhelming priority is to explore and document the tantalising remains of the monumental mud-brick building which dominates the brow of the mound, with an eye to recovering more of the plan (fragmented as this will be), materials that may help illuminate the function and political affiliation of the complex, and fresh samples for radiocarbon dating. There is plenty left to do!



 Open access

