

INTRODUCTION, by Sinclair Hood
This group of four or five tombs, ranging apparently from Middle Minoan (MM) to Late Minoan (LM) III in date, was discovered because of deep ploughing at a spot on the lower slopes of Ailias south of the Palace at Knossos (KS2, 55, no. 278; Figs 1–2).Footnote 1 In archaeological literature, the site is already known as KSP/60. Situated some 170 m on the east side of the Kairatos River and on the north side of the path leading to the Ayia Paraskevi chapel (c. 200 m to the east of it), and at an altitude of c. 110–120 m above sea level, the whole area of KSP/60 had formerly been planted with olive trees, of which many roots were churned up by ploughing. Subsequent levelling had exposed a concentration of MM pottery in one place (Area A) and clay larnax fragments in another (Area B) c. 20 m to the south-west of it.
Location of KSP/60 (Knossos Survey no. 278). © BSA and Google Earth/Maxar technologies.

General view of KSP/60, Areas A and B. © BSA.

Nikolaos Platon, then Director of Antiquities for Crete, invited the British School at Athens (BSA), which had been engaged since 1957 in excavations under the direction of Sinclair Hood on the Royal Road and elsewhere in the Knossos area, to investigate what had been exposed. This was done at the beginning of the BSA's excavation season at Knossos in 1960 in 16 working days between 29 June and 18 July. The BSA's foreman, Manolis Markoyiannakis, assisted with the work, and either three or four other men were employed, rising to five on occasion. These included the doyen of Knossian excavators, Spiros Vasilakis, together with Grigoris Kritsalakis, who normally worked as his shovel man. The excavations were filled in again when they were completed on 19 July. Since then, the whole area between the Kairatos stream on the west and the road some 150 m to the south leading up to the church of Ayia Paraskevi on the slopes above to the east has been replanted with olive trees interspersed with a few vines.
The work was supervised by Elizabeth (Lisa) French, to whose clear and full records, of what proved to be an unusually complicated site, we are much indebted. These were supplemented by occasional notes which Hood made as the work proceeded. The plans and main sections and several other drawings were executed by Beatrice Sheila Hoult, the project's architect. In the joint report which follows, the account of the excavations is mainly the work of Hood with significant updates by Yannis Galanakis. The study of most of the material, its description and parallels for it are due to Galanakis and Laura Preston. Notes on architecture, the general context and the final discussion are also by Galanakis, while the study of the skeletal remains was conducted by Argyro Nafplioti. Helen Hughes-Brock wrote the entries on jewellery (IV.9) and the stone figurine (B.5) and expanded and revised the entry on the blue pigment remains (IV.8).
AREA A, by Sinclair Hood and Yannis Galanakis
Area A, higher on the slope than Area B, was examined first. A pit here may have been the remains of a tomb in use early in the MM period, although this idea was not considered at the time of the excavation. The relatively small amount of pottery from it seemed to range from MM I to MM II with nothing later.
Two soundings were opened in Area A, where MM pottery had been exposed on the surface (for the original Excavation Levels/ELs and their correspondence to publication layers see Supplementary Appendices A–B). The first of these (A) measured 5–7 m north–south x 2.75–3.50 m west–east (Fig. 3:top) and covered an area of 17.4 m2. The second sounding (A1) beside (A) on the east, was 2.50–2.60 m north–south x 3–3.10 m west–east and covered an area of c. 8 m2. These two soundings revealed part of a large, roughly circular, pit which might have been the remains of a tomb comparable with the two circular MM rock-cut tombs (I and VI) found higher on the slopes of Ailias to the north.Footnote 2 The inward curving side of the pit at the north end was suggestive of the lower part of a tholos-like rock-cut vault. A ledge on the west side of the pit, about 0.25 m above the rock floor (Fig. 3:bottom, X), might have been a step down from the entrance into the chamber of a tomb. But the pit did not have a regular circular ground plan. The fill of it, however, was riddled with badger holes, and these had done much damage to the original rock floor, which was between 1.40 and 2.00 m below the modern surface. If this was indeed a tomb, it was one that had been largely destroyed by erosion that must have removed several metres of the soft white kouskouras rock into which it had been cut. It was clear, however, from Tombs II and III in Area B that erosion had indeed been severe here since the Bronze Age.
Top: Area A and A1. Bottom: Section A–B, looking west (ledge marked with an ‘X’ on west side). © BSA.

A bronze disc (A.34) was recovered from the rock floor at the north end of the pit exposed in sounding A. This was the only find from the pit apart from pottery. There was not a vast amount of pottery, not enough to fill one basket (ζεμπίλι), and half of this came from the disturbed surface levels (Excavation Level [EL] 1; on pottery quantities recovered during excavation see Supplementary Appendix C). Apart, however, from one or two fragments of LM and Turkish wares from the surface levels, all this pottery was MM of an early type, including perhaps some MM IA (e.g. A1) and wheelmade MM II (perhaps A.11). Dominantly, this pottery seems MM IA or IB in character (e.g. the footed goblets/egg-cups A.4–A.9, the angular or carinated cups A.15–A.16, the rounded cup A.18).Footnote 3 The single-handled cup (A.11) together with the fragments of the large shallow bowl A.20 and of the goblet A.7 were found in the deepest level of the pit in sounding A.
Pithoi were regularly used for burials in the earliest MM tombs in the Ailias cemetery (Hood Reference Hood and Krzyszkowska2010). No fragments of pithoi, however, were noted among the pottery from Area A. If, therefore, the pit represents the remains of a MM communal tomb, like those in the Ailias cemetery, it is just possible that it went out of use early in the period before the general adoption of pithoi for burial at Knossos, though even in MM times the use of pithoi or larnakes for burials was not universal at this site.Footnote 4
Pottery and other finds from Area A (Figs 4–6)
All measurements are in centimetres, where mentioned; all objects are in the BSA's Stratigraphical Museum at Knossos (SM); where known, excavation and/or storage numbers are provided.
Pottery from Area A (A.1–A.19). © BSA.

Pottery from Area A (A.3, A.11, A.15, A.17, A.21, A.23, A.25–A.27, A.29–A.31). © BSA.

Pottery from Area A (A.20–A.22, A.24–A.25, A.28, A.30, A.32–A.33) and bronze disc (A.34). © BSA.

A.1. Goblet rim (Fig. 4). Possibly handmade and MM IA in date. Outside with vertical paring below rim, cf. A.5. Orange clay; overall red-brown wash inside and out. A, EL 2.
A.2. Goblet rim (Fig. 4). Handmade. Inside plain; outside with overall wash, shades of red-brown. A, EL 3.
A.3. Goblet rim (Figs 4–5). Wheelmade; clear wheelmarks inside. Dusky orange clay. Overall brown wash inside and out. Outside with traces of white band set well below rim. A, Level 2 and A1, EL 1.
A.4. Goblet foot (Fig. 4). Base D. 4.6. H. 2.5. Neatly made, perhaps by hand and MM IA or IB in date. Orange clay; overall red-brown wash, except under foot. A, EL 2 (drawing no. 27). SM, Box 304.
A.5. Goblet foot (Fig. 4). Base D. c. 5. H. 5. Possibly handmade and MM IA or IB in date. Orange buff fine clay. Outside with vertical paring, cf. A.1, and light brown wash except on foot; inside, and underneath of foot, plain (part plain on inner base?). A, EL 2 (drawing no. 29). SM, Box 304.
A.6. Goblet (Fig. 4). Base D. 5. Rim D. 7.5. H. 8.4. MM IA or IB in date. Rim missing. Handmade and wheelmade; inside with aggressive wheelmarks. Pinched by hand near foot. Orange buff fine clay. Overall red-brown wash inside and out; liberal splashes of wash under foot. A1, EL 1 (drawing no. 21). SM, Box 302.
A.7. Goblet (Fig. 4). Base D. 5.2; H. 9–10 (when complete). MM IA or IB in date. Broken and rim missing. Possibly wheelmade. Orange-red buff fine clay; overall red-brown wash inside and out, except under foot. Perhaps with joining rim fragment. A, EL 3 (drawing no. 34). SM, Box 305.
A.8. Goblet foot (Fig. 4). Base D. 5.9. MM IA or IB in date. Possibly wheelmade. Orange-red, fine, soft clay; red-brown wash inside, and outside but not over whole of foot; only splashes of wash under foot. A1, EL 2 (drawing no. 25). SM, Box 303.
A.9. Goblet foot (Fig. 4). H. 3. MM IA or IB in date. Roughly made, probably on wheel. Pink-orange clay, hard fired. Red-brown wash inside except in bottom of bowl (very encrusted), and outside including about a third of underneath of foot. A, EL 2 (drawing no. 28). SM, Box 304.
A.10. Base, apparently of goblet (Fig. 4). Base D. 2.6. H. pres. 4.4. Neatly made, by hand (?). Pronounced hollow underneath. Orange buff fine clay; outside with thick creamy white slip, continuing under base. A1, EL 1 (drawing no. 22). SM, Box 302.
A.11. One-handled cup (Figs 4–5). Broken; half missing. H. 4.5. D. c. 8. Wheelmade. Orange clay with overall dark purple-brown to black wash. Outside with thick running spiral in white. MM IB–II or even MM III. Cf. MacGillivray Reference MacGillivray1998, 70 (no. 7), dated to MM IIB and IIIA; also cups from Kommos assigned to MM IIA, IIB and IIIA: Betancourt Reference Betancourt1990, fig. 18 (no. 225), fig. 19 (no. 239), fig. 21 (nos 355, 359), fig. 25 (no. 493). On light-on-dark, thick running, spiral decoration on MM IIIB pottery see also Girella Reference Girella, Macdonald and Knappett2013, 154, fig. 13:8; Girella and Caloi Reference Girella and Caloi2019, 258, 318, no. 1055, fig. II:4.7 (Kamilari Grigori Koryphi, similar but not identical; larger, handleless example). A, EL 3. KSP/60/P9 (drawing no. 7; Pottery Notebook, p. 2). SM, Box 301.
A.12. Rim and scrap of base of a cup (Fig. 4). Apparently wheelmade. Orange clay; overall black wash inside and out. Surface worn; but possible traces of decoration: irregularly placed spots in white inside and out. A1, EL 1.
A.13. Rim of a cup (?) with slight metallic ribbing on outside (Fig. 4). Apparently wheelmade. Orange clay; red to red-brown wash inside and out. A1, EL 2.
A.14. Profile of a cup (Fig. 4). H. pres. 6.8. Handmade and wheelmade? Orange buff fine clay; overall red wash inside and out, including under base. Outside with traces of decoration in white: apparently concentric loops hanging from rim on shoulder, with horizontal stripes below. A, EL 3 (drawing no. 35). SM, Box 305.
A.15. Fragments of rim, one with strap handle, from a carinated cup (Figs 4–5). Rim D. 14. H. 5.3 (with handle). Possibly MM IB in date. Body wheelmade(?). Strap handle handmade. Quite irregular. Orange-red clay. Solid black wash inside and out. Hard fired. Outside surface much worn, but with traces of possible decoration in white. A1, EL 1 (drawing no. 23). SM, Box 302.
A.16. Base of a cup of comparable fabric to A.15, and perhaps from same pot (Fig. 4). Possibly MM IB in date. A, EL 2.
A.17. Base and part of lower body of a small carinated cup (Figs 4–5). Base D. 4.5. H. 3.3. Cream buff hard fired clay. Wheelmade. Orange clay. Overall dark brown to black wash inside and out, and in base, worn. No sign of a handle on surviving fragment. External carination, near lower part of base. A, EL 2 (drawing no. 31). SM, Box 304.
A.18. Rim of a small cup or bowl, with stump of horizontal side handle (Fig. 4). Possibly MM IB in date. Wheelmade (?). Orange clay; overall dark red-brown wash inside and out. A1, EL 1.
A.19. Rim of a small bowl (Fig. 4). Wheelmade. Orange clay; overall dark red-brown wash inside and out; outside with possible traces of decoration in white. A, EL 3.
A.20. Fragments of a large bowl (Figs 5–6). H. 18. D. c. 38. Handmade. Gritty orange clay with paler slip. Decorated in red-brown; rim painted solid; lower part of body with solid circles and wave pattern of some kind. A, EL 3 (drawing no. 37). SM, Box 306.
A.21. Rim of a hole-mouth jar (Figs 5–6). Handmade. Fine orange clay; outside with overall black wash and decoration in white. A1, EL 1.
A.22. Rim of a hole-mouth jar (Fig. 6). Fine orange clay; overall black wash inside and out, worn. A1, EL 1.
A.23. Bridge-spout from a small jar (Fig. 5). Orange-pink clay with buff surface inside and out. Hard fired. Creamy pink slip inside with traces of dark wash on outside and inside spout. Dark wash on base. Possibly wheelmade. A, EL 3.
A.24. Jar rim (Fig. 6). Sharp carination below rim. Handmade. Orange clay with buff surface; diagonal stripes in dark red-brown on top of handle, worn. A, EL 2.
A.25. Handle, apparently from a jug (Figs 5–6). 7.2 × 5.2. Orange clay with paler surface; diagonal stripes in dark red-brown on top of handle, worn. A, EL 2 (drawing no. 42). SM, Box 307.
A.26. Side handle from a small jar (Fig. 5). Fine orange clay with paler surface; traces of dark brown paint on upper surface of handle. A1, EL 1.
A.27. As A.26 and possibly from same vessel (Fig. 5). Remains of black to dark-brown wash on outside and on handle. A, EL 2.
A.28. Small base, apparently of a closed vase, perhaps a jug (Fig. 6). Possibly handmade. Soft fabric; orange clay with fine grit; outside with dull black wash; inside, and underneath of base, plain. A1, EL 1.
A.29. Scrap of a cup (Fig. 5). Wheelmade (?). Soft fabric, worn; fine orange clay; overall dark brown to black wash inside and out. Outside with neat vertical ribs and traces of polychrome decoration in the spaces between them. A, EL 3.
A.30. Fragments of a fine bridge-spouted (?) jar (Figs 5–6). H. 2.6. Th. 0.2. Orange buff, very fine clay. Sharp carination below shoulder. Wide band of barbotine on shoulder above carination; rest of outside with overall red-brown to black wash with traces of polychrome decoration in red and white. A, EL 3 (drawing no. 33; Pottery Notebook, p. 2). SM, Box 305.
A.31. Fragment of large cup or bowl with barbotine decoration (Fig. 5). Fine orange clay; overall dark red-brown wash inside and out. Outside with rows of ‘prickle’ barbotine and possible traces of polychrome decoration. A1, EL 1.
A.32. Fragment of closed vessel (Fig. 6). 8.5 × 6. Handmade. Thin walled (0.2–0.35). Orange clay. Well fired. Interior untreated. Outside with overall black wash and decoration in white: palmette-like finial with spiral, each side rising from network. Import (?) A1, EL 2 (drawing no. 11). SM, Box 301 (no. 11).
A.33. Pithos fragment (Fig. 6). 6.2 × 6.5. Apparently from lower part of vase near base. Pink semi-coarse clay. Outside with horizontal ribs with diagonal slashes at intervals on them. Probably Venetian or Turkish. A, EL 1 (unnumbered drawing; Pottery Notebook, p. 2). SM, Box 302.
A.34. Rough disc of copper or bronze (Fig. 6). D. c. 3. Th. 0.1. A, EL 3, lying on rock under ledge at north end of cutting. SM, SF box (GNB, Area A, no. 5).
For other sherds from Area A–A1 see Supplementary Appendix D.
AREA B, by Sinclair Hood and Yannis Galanakis
Trials were opened in Area B, some 20 m down the slope to the south-west of Area A and on the south side of a patch of exposed rock and scrub (Figs 2, 7). These trials revealed what appears to have been a MM tomb (Tomb I), which had continued in use into LM I, and of which part was cleared to receive new burials in LM II. Three other tombs (II–IV) adjacent to it seemed to have been dug in LM II–III.
Clay larnax fragments had been brought to light by the deep ploughing in Area B, together with pottery which seemed dominantly LM I–II in character in contrast to that in Area A. Sounding B, together with B1 on the east side of it, was about 7 m long from north to south and 6 m wide from west to east.Footnote 5 These two soundings led to the discovery of Tombs I–III (Figs 7–8). Tomb IV was found in clearing the antechamber of Tomb I, into the edge of which it had been cut (for the original ELs in Area B see Supplementary Appendices A–B; for pottery and small finds as recorded in the GNB, see Supplementary Appendix E).
General plan of Area B and B1. Drawing by Beatrice Sheila Hoult. © BSA.

(a) Area B, Section A-A1, including Section A΄-A1 (chamber, stomion and dromos of Tomb IV), looking north. In Tomb I only the upper part of the blocking wall is shown here (level III). Drawn by Sinclair Hood and traced by William Taylour. (b) Area B, Section F-F1, including Section F2΄-F2 (plain dotted line, cutting through the antechamber of Tomb I), looking east. Drawing by Beatrice Sheila Hoult. © BSA.

A test was also made to the south of soundings B and B1 (Supplementary Appendix B, south trench). Two parallel north–south trenches, each 0.50 m wide, were dug in this test for about 9 m south of Tomb III, in the space between the southern continuation of the terrace wall, which ran across the dromos of Tomb IV, and a patch of rock and scrub above it on the east.
The pottery found included a fragment of black glaze, which may have been Hellenistic, but mainly consisted of Roman or Byzantine plain ware. This plain ware, together with tiles which were probably Byzantine, may be debris from an isolated farmhouse. A wall which may have belonged to the latter was exposed on the surface before excavation. It was 0.65 m wide and preserved with only one course 0.25 m high, running north–south for 5.10 m. On the east side of it, towards the south end, the stump of a cross wall was noted. These walls appear to have been built without the use of cement; a fragment of brick or thick tile, with cement adhering to both sides, may have come from some other nearby structure – e.g., a house, a tomb or a chapel – of Roman, Byzantine or an even later date. Part of a limestone saddle quern or grinder, broken at both ends, was recovered from this area (B.4).
Further trials in the immediate vicinity of our tombs failed to locate any others; but a structure examined in 1953, c. 50–60 m to the south-westFootnote 6 and tentatively identified as a LM shaft grave, may have belonged to the KSP/60 group of tombs. The Temple Tomb, and the chamber tombs around it (KS2, 58–9, nos 322–4), lie some 250 m away to the south-west of KSP/60 and are separated from them by the steep-sided stream bed of the Kairatos. Area B overlooks the palace and affords good views to the south, west and north, including the hills of Ambelokipi (Teke) and Hellenika, all the way to Katsambas (Fig. 9).
View from KSP/60, from north of Area B, looking north and north-west. © BSA.

The tombs, by Yannis Galanakis, Sinclair Hood and Argyro Nafplioti
Tomb I
This tomb may have been, in origin, of a type attested elsewhere at Knossos during the latter part of the MM period. Measuring c. 5 m maximum north–south and c. 4 m west–east (11.76 m2 due to its irregular plan),Footnote 7 and with a maximum estimated height of 2.65 m, Tomb I evidently consisted originally of three chambers: (i) the area accessed via a, possibly stepped, entrance, (ii) the ‘antechamber’ (a conventional name assigned to this space by the excavators) and (iii) a chamber to the east (Fig. 10). At the time of the excavation, it was thought that the antechamber in Tomb I might have been an open-air pit, but it seems more likely that it was hollowed out of the kouskouras rock like the chamber. No traces of burials and no offerings of any kind were recovered from it.Footnote 8
Plan of Tomb I in LM II–IIIA (inset showing Neopalatial plan of Tomb I and areas as mentioned in the text). Drawing by Beatrice Sheila Hoult. © BSA.

Several tombs comparable to Tomb I in shape are known from the cemeteries of Mavro Spilio and Ailias.Footnote 9 Tombs of this type seem to have replaced simple circular chambers, which may have been rock-cut versions of the circular built tombs found in the Mesara and elsewhere in Crete.Footnote 10 A closer parallel, perhaps, is afforded by the solitary MM Tomb XVIII in the Gypsades cemetery.Footnote 11
The original entrance to Tomb I is likely to have been on the downward slope to the west. Two (?) small ledges cut in the rock, each about 0.25 m in width, may be the remains of steps in the entrance leading into the antechamber from outside (GNB, opp. p. 7). A small stepped entrance like this is attested in the comparable Ailias Tomb VII and is common elsewhere in the Knossos valley (e.g. in the Poros tombs).Footnote 12 These, possibly entrance, steps would have led down into the southernmost of the three chambers, where the rock floor was about 0.50 m higher than it was in the larger chamber to the north of it. The floor in this northern chamber was in turn some 0.10–0.15 m lower than that in the eastern chamber of Tomb I used for the LM II–IIIA burials (Fig. 8b).
In contrast to the situation in Gypsades Tomb XVIII, however, the chamber used for burials in Tomb I is considerably smaller than the antechamber (Fig. 10), and some parts of the floor in the northern section of the latter are lower than the floor in the former (Figs 8, 10). There was no evidence to suggest that the burial chamber in Tomb I had been divided from the rest of the tomb (i.e. from the antechamber) by a blocking wall during an earlier period of use, i.e., before the time of Burial I in LM II–IIIA (Fig. 8a). The blocking wall found in this area, with at least three phases of construction/use, is associated with the burials found in the main, east, chamber of Tomb I and assigned here to LM II–IIIA (Figs 11–12).
Elevation (from inside the east chamber) and section of the successive blocking walls in Tomb I, looking west (BW = blocking wall). Drawing by Beatrice Sheila Hoult. © BSA.

(a) East (burial) chamber of Tomb I, looking north-east, with latest blocking wall (III) in place (60.B.38). (b) East (burial) chamber of Tomb I, with Tomb II on right, looking north-east. South end of blocking wall removed by makers of Tomb II. Blocking wall of Tomb II in bottom right foreground (60.B.39). (c) Tomb I, blocking wall (upper part after Burials II and III) looking north-east. Blocking wall of Tomb II in right foreground (60.B.42). (d) Tomb I and blocking wall in place (all three periods), looking north-east (60.B.46). (e) East (burial) chamber of Tomb I after removal of blocking wall, looking north-east (60.B.37). In (c)–(e) the person standing is Manolis Markoyiannakis. © BSA.

The whole area of the original tomb was excavated down to the rock floor. It was empty, or had been thoroughly cleared of any previous burials, before the first attested collapse of debris from the tomb's roof. This collapse only took place, it seems, after the earliest blocking wall was built in connection with Burial I (Fig. 11: BW I). No bones or other significant traces of earlier burials were noted anywhere, apart from a fragment of a pithos rim (I.4, marked as ‘Pithos Fragment’ in Fig. 10) that was recovered about 0.05 m above the rock floor of the northern part of the antechamber (Fig. 13).
Pithos rim (I.4) on floor of antechamber to Tomb I, with niche and brazier (IV.1), looking on south-east corner of Tomb IV behind. Taken from west (60.B.55). © BSA.

The original tomb may have been used for burials into LM I and even into LM IB. A certain amount of pottery was recovered from the lower part of the fill in the antechamber (Fig. 14: layer 9). We should not exclude, though, that this deposit as excavated may have included debris fallen from the roof of the tomb rather than material that might have been left above the rock floor from its earlier use. Some of the pottery from this deposit was MM, but it appeared to be dominantly late MM and, especially, LM I in character (e.g. B.17, bowl with a tortoise-shell ripple pattern).Footnote 13 It included fragments of several conical cups of the standard type which could be either LM IA or LM IB in date (B.28–B.30 and perhaps also B.31–B.32). One cup rim had an elegant floral design (I.18), possibly LM IB.Footnote 14 This sherd came from the lowest deposit in the antechamber which continued below the bottom of the earliest blocking wall (Fig. 14: layer 10). Though admittedly tentative, could this sherd have escaped clearance when the tomb was readied in LM II–IIIA, a relic of an earlier use? If this was the case, the tomb must have been very thoroughly cleared of remains of earlier burials after the end of LM I.
Section C-C1 through Tomb II and Antechamber to Tomb I, looking north. (1) Disturbed surface soil. (2) Hard light earth with many sherds. (3) Pure white kouskouras from final collapse of vaults of Tomb I and Antechamber with no sherds (cf. Fig. 15: layer 2). (4) Dark sandy kouskouras earth in Tomb I (cf. Fig. 15: layer 3). (5) Kouskouras with reddish and white lumps, deposited before wall A built. (6) Fine water-laid kouskouras earth, continuing below stones B. (7) Clean soft whitish kouskouras, against blocking wall III of tomb I. (8) Gritty soft kouskouras, reddish with white lumps, against blocking wall II of Tomb I. (9) White kouskouras, against blocking wall I of Tomb I (cf. Fig. 15: layer 6). (10) Gritty soft kouskouras, reddish with white lumps, continuing beneath blocking wall I of Tomb I. A = later terrace wall; B = stones, apparently fallen from blocking wall III. Drawn by Sinclair Hood and traced by William Taylour. © BSA.

There is, however, another point worth considering here. LM I sherds, still much in evidence in later layers of the fill in the antechamber, were found deposited against the blocking walls built after Burials II and III (Fig. 14: layers 5–8). The complete, but rather distorted conical cup I.6 came from high in the fill in the north-west corner of the chamber, just inside the blocking wall and 0.20 m below the top of it (Fig. 15: layer 3). This material may reflect the placing of pottery outside the tomb, perhaps as offerings for the dead (cf. Tomb III below); or it might have come from some other tomb higher on the slope to the east, from which it had washed down at a time before Tomb I got reused in LM II–IIIA. In either case, this ceramic material could have fallen into the antechamber through a hole formed by the collapse of part of the roof, most likely made in the late Neopalatial period.
Section B-B1 through Tomb I, looking south. (1) Disturbed surface soil. (2) Collapsed kouskouras rock of tomb vault, with no sherds (cf. Fig. 14: layer 3). (3) Sandy kouskouras earth, apparently water-laid deposit (cf. Fig. 14: layer 4). (4) Soft clean kouskouras earth with specks of charcoal. (5) Sandy kouskouras clay with pockets of fine gravel. (6) Dark brown earth with charcoal flecks. (7) Bands of sandy kouskouras clay, alternating with lenses of apparently water-laid fine gravel. Drawn by Sinclair Hood and traced by William Taylour. © BSA.

The pottery from the fills, which accumulated after the successive burials inside the chamber of Tomb I, tells a similar story (Fig. 15: layers 3–7). It is dominantly LM I in character and includes plain conical cups of LM I type. A complete conical cup (I.6) was recovered from high in the fill (Fig. 15: layer 3). But with this LM I material, there were also a few sherds of possible LM IB/II date (e.g. I.5, I.8, I.10). Notable among these was a fragment of a vase with the head of an octopus (I.5) from the fill between Burials II and III (Fig. 15: layer 5).Footnote 15
The east chamber in Tomb I, roughly circular during its LM II–IIIA use, measured c. 2.25 x 2 m (3.8 m2 due to its irregular plan) and had a maximum estimated height of c. 2.65 m (though during the Final Palatial period, and due to continuous episodes of roof collapse, its height got significantly reduced: Table 1). The east chamber of Tomb I had been used for at least three successive burials (Figs 16–17). These were separated by thick deposits of debris. The different levels of the burials were reflected in the successive stages of building visible in the blocking wall of the chamber and already noted above (Fig. 11). The earliest burial (I) (Figs 16a, 17a) was only a few centimetres above the rock floor of the chamber. About 0.75 m higher than this burial was the next one (II) (Figs 16b, 17b), with Burial III about 0.35 m higher than II (Figs 16c, 17b). Burial III, the study of which yielded evidence for the presence of at least two individuals, was covered by debris of kouskouras rock from a further fall from the chamber roof.
KSP/60 tomb dimensions. Table prepared by Y. Galanakis. © BSA.

(a) Tomb I, Burial II, with Burial III behind, taken from west (60.B.31). (b) Tomb I, Burial I, with Burial II behind and baulk left on right, taken from north-west (60.B.35). (c) Tomb I, Burial III, taken from west (60.B.30). © BSA.

(a) Plan of Tomb I with Burial I; ‘A’ marks brown earth on the rock floor perhaps indicating the remains of the wooden chest's floor; hatching indicates outline of wooden chest. (b) Plan of Tomb I with Burials II and III; ‘1’ marks a pair of bronze tweezers; ‘A’ and ‘Aˊ’ mark very dark brown earth patches, perhaps traces of the coffin floor; ‘B’ and ‘C’ mark traces of the pair of feet at the south end of the coffin; ‘D’ marks a kidney-shaped smudge on the surface of the rock below the remains of Burial II (perhaps traces of the coffin floor); hatching shows distribution of possible remains of the wooden coffin associated with Burial II © BSA.

In total, four individuals were buried in Tomb I (see Appendix below; Tables 3–4). For the first of these LM II–IIIA burials, the chamber seems to have been used just as it had been in earlier times, only slightly enlarged, and to some extent reshaped, for each of the succeeding burials. This enlargement and reshaping of the chamber might have been inspired by a desire to make it more regular in plan, and more like that of a standard chamber tomb of the LM II–III period.
Burial I (Individual I)
Burial I probably belonged to an adult male most likely between 18 and 25 years old. This individual had evidently been contained in a wooden chest or larnax as also recorded at the time of excavation (Fig. 17a; GNB, p. 10a; Notebook opp. p. 6 and p. 6; SH notes pp. 16–17). Bands of dark brown earth with a regular width of 0.07 m may have been relics of thick strips of wood supporting thinner panels which formed the floor of the chest. A system of thick strips framing thinner panels appears on the sides and ends of many LM III clay larnakes most likely in imitation of wooden models.Footnote 16 These bands were only noticed at the level of the skeleton; none were observed above it. They were very clear at the north end of the chest or larnax, which was evidently rectangular, with a width of perhaps as much as 0.77 m and a length of at least 1.30 m.Footnote 17
The body appeared, at the time of excavation, tightly contracted (especially the legs) and thought to have been set upright, inside the chest, in the sitting position with the knees raised (cf. the main burial in Tomb IV below).Footnote 18 This was suggested to the excavators by the way in which the vertebrae of the skeleton were lying, with the skull separate from them and upside down. The decomposition of the body and collapse of the wooden chest would explain further the position of the bones as found.Footnote 19
Based on the analysis of the excavation photos made by Nafplioti and on the representation of the major anatomical regions and the presence of one hand bone, Burial I had most likely been interred as a primary, articulated, burial with the upper limbs folded on the abdomen and the lower limbs particularly flexed, which, following skeletonisation of the body, was disturbed mainly due to natural processes (e.g. the rolling of the skull from its original position: Figs 16a, 17a).Footnote 20
The only object with Burial I was a bronze finger ring (I.1), which was found within the southern limits of the chest or larnax, under the feet of the skeleton. The rock floor of the chamber was about 0.05 m below the remains of the skeleton and of the wooden chest. An area of brown earth on the rock floor (Fig. 17a:A) might indicate the position of some wooden object, such as a bowl or platter, which had been placed there as suggested also for comparable smudges on the surface of the rock below the remains of burial II (Fig. 17b:D).
Burial II (Individual II)
The fill of the chamber above Burial I and below the surface associated with Burial II consisted of sandy kouskouras clay alternating and intermingled with lenses of fine gravel with a good many flecks of carbonised matter (charcoal) throughout (Fig. 15: layer 7 and Fig. 18). These deposits looked as if they had been laid by water action after the tomb with Burial I was closed. How the water penetrated this area is not clear, but it may have come through the blocking wall from the antechamber, although similar water-laid deposits were not observed there.
Tomb I, baulk left for section, showing levels of Burial II (above fill over Burial I) and Burial III, looking south with layers 4–7 indicated (60.B.36). © BSA.

In the north-east corner of the chamber, several large stones were noted in the fill immediately below the surface with Burial II. These may have come from the upper part of the Burial I blocking wall, which would have had to be removed to allow the second burial. This earliest blocking wall was c. 0.80 m thick and was preserved to a height of c. 0.90 m with four or five courses of unworked stones.
The scanty remains of Burial II (Figs 16b, 17b) belonged to another adult individual.Footnote 21 Poor preservation (less than 20 per cent), consisting of little more than a couple of long bones from the legs, and absence of reliable sex- and age-indicators did not allow for a more precise identification other than that this individual was younger than 45 years old at death. During excavation, Burial II was thought to represent an extended inhumation, probably lying on its back, like many of those in the Zafer Papoura cemetery and a pair which appear to have been contained in wooden coffins in Tomb Epsilon at Katsambas.Footnote 22 The body of this individual appears to have been contained in a long wooden chest or coffin placed north–south across the middle of the chamber.Footnote 23 Two skull fragments were found about 0.05 m above the south end of the coffin area, which was thought at the time of excavation to represent ‘accidental disturbance as skull presumably on N end’ (Notebook opp. p. 6; SH notes p. 9).
Based on the analysis of the excavation photos and available drawings by Nafplioti of the distribution of the skeletal elements as well as the representation of the main anatomical skeletal regions, Burial II appears disturbed. This disturbance was probably due to natural taphonomic processes (e.g. water seeping into the chamber at the level of Burial II as noted also during excavation). Despite skeletal incompleteness and the absence of small bones associated with this burial, and judging from the distribution of the bones, this individual had most probably been interred in the form of a complete cadaver, as originally suggested by the excavators, in a long wooden chest, or coffin.
Virtually no traces of the wooden coffin were left, but the position of the eastern outside edge of it was defined by a straight line with a fill of white kouskouras rock to the east of it; this fill had evidently fallen later from the chamber roof. To the west of this line, in the space originally occupied by the coffin, was a contrasting fill of soft, clean, darkish brown earth without any stones or lumps of kouskouras in it. Traces of where the west side of the coffin had been were less clear, but the area of soft brown earth was about 0.45 m wide at the north end and some 0.53 m at the south (Fig. 16b). When roof rockfall took place, the north side of the coffin may have survived upright for a time, while the south side collapsed outwards to the west.
At the time of the excavation, it was noted that when the soft brown earth was cleared away it seemed to leave an impression of a coffin narrowing from south to north after the manner of a modern or medieval one. Such a coffin shape would be difficult to parallel, however, in these early times, and any such receptacle is likely perhaps to have been rectangular. The width suggested by the traces of wooden feet at the south end was some 0.40–0.50 m, and the width at the north end was probably similar. This is compatible with the clay larnakes known from the Knossos area which range in width from 0.36–0.48 m, with most being between 0.40 and 0.42 m wide (e.g. Hood, Huxley and Sandars Reference Hood, Huxley and Sandars1958–9, 228–32, figs 24–5; Catania Reference Catania2018, 318).
At the north-east corner, the coffin traces in the shape of a dark brown smudge appeared to end in a straight line against the rock wall of the chamber. The coffin seems to have been approximately 2.00 m in length, which would have been enough to hold a fully extended burial.Footnote 24 It had evidently been provided with feet, like most of the LM III clay larnakes which are clearly replicas of wooden chests.Footnote 25 Traces of the pair of feet at the south end of the coffin were identified in a baulk left there for more careful examination later (Fig. 17b:B–C). Measuring from their outside edges these were 0.50 m apart from east to west and respectively 0.15 m and 0.18 m from the side of the chamber. Both the south and the east faces of the eastern foot seemed to be 0.08 m in width. The inside of this foot appeared to be rounded, as if it had been a quarter sawn from a section of a small tree trunk about 0.16 m in diameter. The shape of the western foot was less clear, but it could have been similar. One of the feet was traced descending below the level of the bottom of the coffin for some 0.08 m, but neither foot could be followed downwards as far as the surface on which they appeared to have been resting. A chest or coffin, similar in length to the one encountered here, might well have had an extra pair of feet in the middle of the sides.Footnote 26
A pair of bronze tweezers (I.2) was recovered at the other end of the burial (Fig. 17b:I). The tweezers were lying c. 0.05 m above the top of a patch of very dark brown earth, less than a centimetre thick, at the base of the coffin (Fig. 17b:A). One of the long bones preserved was resting at the time of excavation above a similar patch of very dark brown earth (Fig. 17b:Aˊ). These dark brown patches may be traces of the floor of the coffin which had contained the burial. Specks of carbonised wood noted here and there, on and just above this level to a depth of between 0.05 m and 0.10 m, might also be remains of the coffin.
Below the dark brown patches was a deposit a few centimetres thick of clean laminated kouskouras earth. This was only identified in the area occupied by the coffin traces. It looked as if it had been water-laid, and it must have formed before the coffin disintegrated. Since the coffin had feet, there could have been a gap of perhaps 0.10–0.20 m between the bottom of it and the surface on which it was standing.
A kidney-shaped smudge of dark brown about 0.40 m long from north to south and 0.20 m wide was noted on what appeared to be the floor of the chamber at the time the coffin was placed in it (Fig. 17b:D; SH notes p. 12). The surface with this smudge of dark brown was 0.10 m below the traces of the bottom of the coffin, which showed above it in the baulk temporarily left there for study. This smudge might conceivably reflect the presence of wooden objects, perhaps a pair of bowls or platters, which had been placed below the coffin.Footnote 27
Fragments of very coarse clay with what appeared to be a rough white plaster surface were recovered from the level of the coffin of Burial II (below and around it: B, EL 23). The object from which these came might have been an altar, or horns of consecration, but it was impossible to distinguish its shape. Six small lumps, apparently of similar material, but with soft ashy interiors, were found in the lowest level in the antechamber of Tomb I (B, EL 28).Footnote 28
The blocking wall, erected in the entrance to the chamber after Burial II, was built with large squarish stones, some of which, it was noted, were worked (Fig. 11, between second and third wall). This wall was a single row of stones thick, with only one or two courses preserved to a maximum height of c. 0.30 m. On the inner (east) side it slightly projected by c. 0.05 m beyond the line of the earlier blocking wall.
Burial III (Individuals III and IV)
It seems that on each of the two occasions when the chamber was used for a new burial the debris which had accumulated in it was levelled. On each occasion it also appears that the chamber was slightly enlarged at the north-west corner by the north end of the blocking wall. A ledge which was formed in this way corresponds in level to the surface with Burial II (Fig. 15). A second ledge beside it, on the west by the blocking wall, but some 0.30 m higher, similarly corresponds in level to the surface on which Burial III rested. These alterations are reflected in changes in the position of the successive blocking walls as seen on the elevation (Fig. 11).
Burial III, thought during excavation to represent a single interment, belongs to an adult female (25–35 years old) and a child (around 3 years old). Their remains had been deposited in an area c. 0.30 x 0.40 m against the back wall of the chamber on the east (Figs 16bc, 17b). These remains had been exceedingly contracted and resting on, what appeared to be, a fragment of kouskouras rock fallen from the roof.Footnote 29 When the bones, visible on the plan (Fig. 17b), were lifted, the rest of the skeletal material was found to be in a reasonably good state of preservation below them. The skull – most likely the one belonging to the adult female – was found much broken but seemed to be on its side facing east. A scrap of charcoal above the skeletal material, and other fragments of carbonised wood in the earth immediately below it, might have been remains of a small wooden chest or larnax into which the bodies had been squeezed.Footnote 30 Nafplioti, based on the analysis of the excavation information and on the distribution and representation of the major anatomical skeletal regions and the absence of small bones, attributes the arrangement of the remains of the two individuals comprising Burial III to a secondary treatment (see Appendix below; also, Duday Reference Duday, Cipriani and Pearce2009, Lecture 8).
Above the level of Burial III, the chamber was filled with a deposit of sandy kouskouras, which had evidently washed into it from the direction of the blocking wall to the west (Fig. 15: layer 3 – from this fill came a good deal of pottery, dominantly LM I in character, as noted already). Above this deposit was a clean fill of kouskouras from a subsequent collapse of the chamber roof (Fig. 15: layer 2).
No grave goods accompanied Burial III; but the remarkable twist of three bronze rods (I.3) was recovered from the fill towards the centre of the chamber some 0.20 m above the level of the burial and c. 1.50 m to the west of it. These rods must have been deliberately placed together in the chamber or thrown into it. Some ‘bronze cubes’ were also found at a high level in the same deposit, about a metre west of the twist of rods, just inside the south end of the blocking wall. Higher still, but also just inside the blocking wall, some possible bronze beads were noted.Footnote 31 These other bronze objects were not identified by us in the later study of the material, and whether any of them had a connection with the rods is uncertain.
The blocking wall erected after Burial III was largely built with small stones, two rows thick, with earth between them (Fig. 11). Larger stones had been used at the base of this third wall which was standing to a maximum height of c. 1.20 m with six or more courses at the time of excavation (the maximum width was c. 2.75–3.00 m). It had no regular face on either side.
The fill of the antechamber beyond the blocking walls differed somewhat in character from that in the burial chamber (Fig. 19). Most of the fill here appears to have consisted of successive falls of kouskouras rock from the roof. Section C-C1 (Figs 7, 14), located towards the southern end of the blocking wall, shows the sequence of layers in the antechamber, which correspond to the walls built after each of the three burials in the chamber. The foreman, Manolis Markoyiannakis, and the experienced excavator, Spiros Vasilakis, agreed that the deep layer of debris (Fig. 14: layer 9) against the earliest blocking wall, very loose and with large lumps of kouskouras rock and a few sherds, should be considered fall from the roof of the antechamber and could not represent the deliberate fill of a pit of any kind. The lowest deposit (Fig. 14: layer 10) in Section C-C1 was already in place before the first blocking wall was built after Burial I. Underneath this deposit, in parts of the antechamber, where the rock floor was at a deeper level, was a layer some 0.15–0.20 m thick of clean yellow sandy earth which appeared to be water-laid.
Antechamber of Tomb I and baulk left across it. Blocking wall on right. Looking north. Section C-C1, with layers 7–10 indicated (60.B.43). © BSA.

Evidence for the precise dating of the burials in the east chamber of Tomb I is slight. They were, however, the earliest in the KSP/60 group of tombs, going back to at least LM II, for reasons explained below in relation to the position and date of use of Tombs II–IV.
Pottery and other finds from Tomb I (Figs 20–26)
All measurements in centimetres, where mentioned; all objects are in the BSA's SM at Knossos; where known, excavation and/or storage numbers are provided.Footnote 32
Sketch of the bronze finger ring (I.1); drawings and photos of the bronze tweezers (I.2). © BSA.

(a) Associated with Burials I–III
I.1 Bronze finger ring (Fig. 20). D. c. 1.8; Th. 0.2. Fragmentary and much corroded. Not complete. Simple wire circle with hemispherical section. Plain and common. Similar rings have been recovered from other LM II–III assemblages at Knossos. Cf. the Kephala Tholos (Hutchinson Reference Hutchinson1956, 79, no. 10, pl. 12d; Preston Reference Preston2005) and Lower Gypsades tombs 4 and 7 (Hood, Huxley and Sandars Reference Hood, Huxley and Sandars1958–9, 246, no. IV.4, 249, no. VII.17, and fig. 33). Fig. 15: layer 7, near bottom of layer, by feet of Burial I. KSP/60/6 (GNB, Tomb I, no. 18).
I.2. Bronze tweezers (Fig. 20). L. 6.3; W. at ends 2.7. Corroded. Broken into four pieces but complete. Formed of a single strip of bronze with flattened, inward-turned ends. This was a common artefact type in LM II–III assemblages at Knossos. Cf. New Hospital Site Tomb I (Hood and de Jong Reference Hood and de Jong1952, 265, no. 1.12) and Mavro Spilio Tomb IV (Forsdyke Reference Forsdyke1927, 257, no. V.4 and fig. 38) (relatively common at Knossos accompanying burials both of men and women).Footnote 33 According to Branigan's typology, this example belongs to Type II – the ‘standard tweezer used in the Late Bronze Age’ (Branigan Reference Branigan1974, 31, pl. 15). Fig. 15: layer 5, immediately above coffin traces of Burial II at west end where feet of body may have been. KSP/60/5 (drawing no. 17). SM (‘T.IV’ on box; GNB, Tomb I, no. 17).
I.3. Three twisted bronze rods (Fig. 21). D. 0.5 (all three examples). L (1): 11.8; L (2): 11.2; L (3): 14.8. L (if straightened): c. 15–18. Slightly corroded, but otherwise intact and in good condition. The rods are of solid metal, circular in section, and all twisted. Two are sharply curved at both ends, and each of these has a shallow incised mark at one end. One mark is a cross or X, and the other a pair of short vertical lines.Footnote 34 Two of the rods (one of the incised and the non-incised) were found entangled. No parallels are known. Evely lists them as possible ingots (type IV) considering the incised marks as comparable, in terms of practice and not in terms of shape, to the signs that appear on some of the Ayia Triada ingots.Footnote 35 Fig. 15: layer 4, high in the fill c. 20 above Burial III and towards the centre of the chamber. KSP/60/4 (GNB, Tomb I, no. 16).
Drawings and photos of the three twisted bronze rods from Tomb I (I.3), including a close up of one of the bronze rods with X sign visible on the curved side (bottom right). © BSA.

(b) Miscellaneous from burial chamber of Tomb I (incl. east chamber)
I.4. Rim of pithos, gritty coarse clay fabric, with visible large grey grit, and with a rough band in pale red below rim on outside (B26), perhaps MM III (Fig. 10, marked as ‘Pithos Fragment’, shown also in Figs 13 and 22). About 0.05 above the rock floor of the northern part of the antechamber (same as level of Burial I inside the east chamber of Tomb I).
Drawings of pithos and larnax fragments from Tombs I and II: fragment B26 (possibly from Tomb I), fragment B7, and fragments N12–N13 and N15 (?) (II.2) from Tomb II. © BSA.

I.5. Fragment from an open (?) vessel (possibly a goblet) (Fig. 23). 4.5 x 4.6. Fine buff clay. Well fired. Outside burnished and decorated in brown-black with part of an octopus. Possibly LM II. Cf. P107 from MUM (Popham 1984, pl. 54ab, pl. 149:1,2). B, EL 21 (Fig. 15: approximately layers 3–4, fill separating Burial II from Burial III; drawing no. 73; Pottery Notebook, p. 9a). SM, unnumbered box.
Potsherds from Tomb I (I.5–I.8, I.11, I.13, I.15, I.16, I.18, I.20–I.21, I.24). © BSA.

I.6. Conical cup (Fig. 23). H. 3.8–4. Base D. 3.4. Rim D. 7.4–7.6 (but only 4 at narrowest point). Complete and unbroken, except for crack in rim. Hard fired. Dark brown buff clay, with very poor, thin, and dusky overall wash. Roughly finished, with uneven base, rim and sides. The rim has been pinched in on two sides prior to firing, producing an oval mouth and cracking the rim slightly on one side. MM III or LM I. Cf. a MM III parallel from the Acropolis houses (Catling, Catling and Smyth Reference Catling, Catling and Smyth1979, 39, no. 167 and fig. 23). Fig. 15: layer 3, the highest layer of the chamber fill, by north end of blocking wall and c. 20 below its top. KSP/60/P6 (drawing no. 61) (GNB, Tomb I, pot no. 1). SM, Box 311.
I.7. Cup/small bowl fragment (Fig. 23). 4 × 2.2. Fine buff clay, burnished and decorated in red-brown: inside solid, outside with net decoration. LM IB/II? B, EL 11 (Fig. 15: layers 3 or 4, in fill above level of Burial III; drawing no. 18; Pottery Notebook, p. 7). SM, Box 301 (N4).
I.8. Cup/goblet fragment (Fig. 23). 4.3 × 2.2. One small body sherd (preserved just below the rim). Buff clay, burnished and decorated in red: rim band on inside; outside with band of dots above one of quirks. LM IB/II. B, EL 23 (Fig. 15: layers 5 or 6, in fill around and below Burial II; drawing no. 16; Pottery Notebook, p. 10). SM, Box 301 (N7).
I.9. Rim of small cup. Fine fabric. Thin-walled, almost eggshell ware; orange clay with overall dark red-brown wash inside and out. Metallic grooves on outside. MM II (?). Fig. 15: layer 3 or 4, above level of Burial III. Cf. A.29.
I.10. Cup rim. Soft fabric. Clay greenish with surface smoothed inside and out. Decorated in dark red-brown: stripes on rim. LM II (?). Fig. 15: layer 3 or 4, above level of Burial III.
I.11. Fragment, apparently from lower part of a closed vase (Figs 23, 24). 3.6 x 3.3. Greenish clay. Outside surface well smoothed and decorated in dark brown: net pattern above stripes. LM II/IIIA? Cf. MUM, pl. 166, no. 73. B, EL 15 (drawing no. 67; Pottery Notebook, p. 8). SM, Box 312.
I.12. Fragment, perhaps from upper body/shoulder, of a closed vase, a piriform jar or a jug (Fig. 24). 6.1 x 5.2. Wheelmade. Orange clay with fine grit. Outside with a buff slip and decoration in dark red-brown: traces of decoration (floral?). LM I or II. Fig. 15: it approximately refers to layer 4. B, EL 15 (= EL 11, baulk within Tomb I).
Pottery from Tombs I–IV (I.11–I.16, I.19, I.22, I.23, I.26–I.28, II.6, II.7, III.1a, III.1b, III.4, IV.13). © BSA.

I.13. Scrap from side of a possible hemispherical cup (Figs 23, 24). 4.2 x 4.9. Fine orange clay with buff surface, well smoothed or burnished. Decoration in red-brown: spiral design on outside, inside solid. LM I (drawing no. 17). Fig. 15: layer 3 or 4, above level of Burial III. SM, Box 301 (N5).
I.14. Fragment, apparently from an open vessel (cup or bowl) (Fig. 24). Pale orange clay with buff surface, smoothed inside and out. Outside with decoration in dark red-brown (floral? and part of a band). LM I (?). Fig. 15: layer 3 or 4, above level of Burial III.
I.15. Fragment of an apparently open vase, cup or bowl (Figs 23–24). 4.2 x 4.4. Handmade (?). Fine orange to buff clay with a whitish slip with a green tinge inside and out, well smoothed or burnished in brown-black (floral motif?). Thin walled. Outside with decoration in red-brown. LM III? (see, e.g., Popham Reference Popham1984, pl. 181c, LM IIIB). Possibly intrusive and an import (?). B, EL 11 (east of blocking wall – within Tomb I) (drawing no. 60). SM, Box 311.
I.16. Jug neck (Figs 23–24). 4.2 × 4. Wheelmade. Orange clay with paler surface, smoothed on outside. Decoration in red-brown: row of spots below band. LM I. Probably from same vessel as I.17 (and perhaps also I.28 from the antechamber). B, EL 11 (Fig. 15: layer 3 or 4, above level of Burial III; drawing no. 62). SM, Box 311.
I.17. Jug shoulder and neck (Fig. 25). H. 10. Rib on shoulder D. 8.2. Metallic rib at base of neck. Wheelmade. Fine orange clay with paler surface. Decoration in red-brown. Probably from the same vase as I.16 and I.28? LM I. B, EL 10 (Fig. 14: layer 4 or 5, at high level in tomb chamber; drawing no. 56). From the burial chamber or the antechamber. SM, Box 311.
Jug shoulder and neck (I.17) and base of a closed vessel (same vessel?) (I.28). © BSA.

(c) From the antechamber
I.18. Rim of a small cup (Fig. 21). 3.2 × 2.5. Orange clay. Outside surface burnished and decorated in red-brown. S-shaped rim in profile. Band under rim with floral motif below (part of a band of such motifs, horizontal reed, or papyri?). Possibly LM IB. B, EL 28 (Fig. 14: layer 10, the lowest in the antechamber, continuing under the first blocking wall of the chamber; drawing no. 19; Pottery Handbook, p. 11). SM, Box 301 (N8).
I.19. Bowl rim (Fig. 24). Orange clay with buff surface, well smoothed or burnished. Decoration in red-brown: thick wavy band below wide band round inside of rim; outside with bands below rim. Stripes in added white on bands round rim inside and out. LM IA (?). Fig. 14: layer 8 or 9.
I.20. Small handleless cup (Fig. 23). H. 5.7; D. 9. Broken but complete except for chip from rim. Orange clay. MM IIIB or LM I. Fig. 14: layer 7, high in fill. KSP/60/P7 (drawing no. 4). SM, Box 301.
I.21. Conical cup (Fig. 23). H. 4.8; D. 8.8. Broken but complete except for chip from rim. Orange clay. Possibly LM I. Fig. 14: layer 7, high in fill. KSP/60/P8 (drawing no. 5). SM, Box 301.
I.22. Cup rim (Fig. 24). Orange clay with paler surface, smoothed or burnished. Decoration in red-brown: fine tortoise-shell ripple on outside, inside solid. On Knossian ripple decoration, see Hatzaki Reference Hatzaki, Macdonald and Knappett2013, 40–2. MM IIIB or LM IA. B, EL 20 (against outside of blocking wall, phase III, upper level; Pottery Notebook, p. 9a; another fragment was found in B, EL 26, i.e., from the same area of the upper fill of the antechamber: Pottery Notebook, p. 10a). Fig. 14: where ‘B’ is shown, part of layer 5? Cf. B.17 (Supplementary Appendix D), II.7 and IV.13.
I.23. Cup or bowl rim with knob on outside (Fig. 24). Pale orange clay. Band in red-brown, with stripe in added white, round outside of rim, with spiral below; inside solid brown. LM IA. Fig. 14: layer 5.
I.24. Fragment, from body/shoulder, of a closed vase, a jar or a jug (Fig. 23). c. 5.8 x 4.8. Wheelmade. Orange, creamy, clay. Burnished. Black paint outside, interior plain and untreated. Floral ornamentation. LM I or, more plausibly, LM II. Section: 0.35–0.45 wide. B, EL 18 (Fig. 14: layer 5; Pottery Notebook, p. 9; drawing no. 10). SM, Box 301 (N6).
I.25. Fragment from body of closed vessel (jug or jar?). Soft fabric; greenish clay. Outside with decoration in black: floral design? LM II (?). Fig. 14: layer 3, high in fill below wall A.
I.26. Cup rim (Fig. 24). Thin walled. Fine orange clay. Decoration in red-brown: spiral below band on outside of rim, inside solid. LM I. Fig. 15: layer 5, below level of floor of Tomb II.
I.27. Scrap from side of cup (Fig. 24). Orange clay. Decoration in red-brown: rough spiral on outside, inside solid. LM IA. B, EL 12 (Fig. 15: layer 5, below level of floor of Tomb II – may well belong to Tomb II rather than Tomb I).
I.28. Large jug or bowl base (Figs 24–25). Base D. 6.75–7. H. 2.5. Orange clay. Decoration in lustrous red-brown: spiral on underneath of base; stripes on outside, inside solid. Probably from the same vase as I.16–I.17? LM I. B, EL 12 (Fig. 15: layer 5, below level of floor of Tomb II; drawing no. 63). SM, Box 312.
I.29. Miniature vase, perhaps meant to represent a lamp (Fig. 26). H. 0.5; D. 2.5. Complete and unbroken. Handmade. Coarse gritty dark brown clay. Cf. B.24 (also from high in fill). Fig. 14: layer 7, high in fill. KSP/60/13.
Miniature clay vase (lamp?) and fragment of stone carver's waste (I.29, I.30). © BSA.

I.30. Fragment of stone carver's waste (Fig. 26). L. 3.5; W. 2.1; max. Th. 1. Fine white translucent marble. Fig. 14: layer 7, high in fill. KSP/60/15 (B, EL 17 mentioned alongside obsidian and bronze fragments from the small finds recovered during investigation of the Trial trenches B and B1, without any additional information in GNB, p. 4; obsidian and bronze fragments are mentioned, again with no further information, in relation to B, EL 18; also, Supplementary Appendices A–B).
Tomb II (Figs 7, 12c, 27, 28)
Tomb II was probably built at some point after a further fall of rock had covered the latest Burial III in Tomb I (Fig. 27a). It was cut into the kouskouras rock on the south side of Tomb I with its floor about 0.60 m above the level of Burial III. On the north side, it shaved the southern edge of Tomb I, where a strip of its floor was above the latest fill of fallen kouskouras rock there. The floor continued over the southern end of the latest blocking wall in Tomb I. A section of the upper part of the blocking wall of Tomb I had to be removed to allow for this. The western part of the floor of Tomb II was above fill in the antechamber of Tomb I (Fig. 28a–c).
(a) Plan of Tomb II. Drawing by Beatrice Sheila Hoult. (b) Section D-D1 through Tomb II, looking south. (1) Disturbed surface soil; (2) stones, apparently from blocking wall, with larnax fragments; (3) gritty reddish kouskouras earth with larnax fragments; (4) whitish kouskouras earth with larnax fragments; (5) soft kouskouras with red and white lumps and sherds in Antechamber of Tomb I; (6) as (5), but below the layer of surface B; (7) fill of lumps of kouskouras below surface at time blocking wall II in Tomb I was built (same as Fig. 14: layer 9); a = larnax foot on side; b = larnax fragment; A = layer when blocking wall II of Tomb I was built; B = layer when blocking wall III of Tomb I was built; C = Tomb I blocking walls I and II c. 0.60 m north of main section. Drawn by Sinclair Hood and traced by William Taylour. © BSA.

(a) Tomb II. Stones in fill, looking east (60.B.48). (b) West–east baulk for sections across Tomb I and measure on floor of Tomb II. Blocking wall of Tomb II in right foreground (60.B.51). (c) Tomb II after removal of stone fill, with baulk for section D-D1, looking east. Blocking wall of Tomb II in middle of baulk on right, exposed in section (60.B.50). © BSA.

Tomb II had been much destroyed by erosion, but the chamber appears to have measured 1.92 m across from north to south and rather less, 1.88 m, in depth from west to east (3.1 m2 due to its irregular shape and partial preservation). The maximum internal preserved height, from floor to ceiling, was c. 1.37 m (the original height, based on the curvature of the walls, would have been less than 1.80 m, probably closer to 1.60 m).Footnote 36 The blocking wall may have occupied the whole of the long west side of the chamber as in the case of Tomb III; but only the southern end of it survived, consisting of two large blocks of stone, which presented an even face on the inside on the east, together with some smaller stones beneath them and beyond them on the outside to the west (Fig. 12c). A scatter of loose stones, however, continuing the line of the surviving part of the blocking wall, may have been dislodged from a continuation of it northwards. Alternatively, Tomb II may have been a P-shaped chamber tomb with the entrance at one side like Tomb Gamma at Katsambas, Sellopoulo Tomb 3 and Mavro Spilio Tomb XIX.Footnote 37
Tomb II seems to have been thoroughly cleared of contents at some point and wrecked. In the excavation notebook, it was noted that the ‘whole tomb was robbed and filled with removed stones of blocking wall and broken larnax fragments’ (Notebook p. 4). Part of a pithos (B7), perhaps MM in date, was discovered in the layer immediately below the stone heap. No human remains were found. Their absence may be due to poor preservation (complete decay) and/or actual bone removal, excavation, and post-excavation loss.
Badgers have been active in the area and have caused some damage in adjacent Tomb III. But the upheaval in Tomb II, with fragments of larnax everywhere, seemed beyond what might be expected from badgers. The lower part of the fill in the chamber of Tomb II consisted of kouskouras earth with some stones from the blocking wall together with larnax fragments (Figs 7, 27b: layers 3 and 4). More larnax fragments were recovered from the fill of stones above, which also apparently came from the blocking wall (Fig. 28a). The fragments appeared to belong to a single larnax and its lid, made of coarse greenish clay with a green slip and with grooved decoration of some kind. A piece apparently from the gabled lid had a branch sign engraved on it (II.2). All four feet of the larnax were noted (Pottery Handbook, p. 13), and one was found standing upright on the floor of the tomb towards the north end and on top of the blocking wall of Tomb I (Fig. 7: Larnax Foot); but this was not necessarily its original position. Another foot was recorded by French as found upright but at a different angle elsewhere in the tomb.
The base of a jug or jar (II.1), found upside down by the inner face of the surviving section of the blocking wall, might have come from a vase, which belonged with the burial in the larnax, but could also be earlier. Some scraps of bronze (II.11–II.13), including part of a pin, were found close together under the loose stones, which might indicate a northward extension of the blocking wall. Another fragment of a bronze pin (II.10) was recovered below stones fallen from the blocking wall inside the chamber.
The pottery from the fill of the chamber seemed to be dominantly LM I in character. Some fragments, however, appeared to come from LM II–III vases. These were a good deal earlier than the likely date for Tomb II and the larnax burial in it. They may have come from offerings placed in, or more likely perhaps outside, tombs with somewhat older burials elsewhere in the area (Tomb I being a potential candidate). They included sherds from fine decorated bowls or cups assignable to LM II (II.3–II.4).
As noted above, no burial remains were found in Tomb II. If indeed there was a larnax burial in this tomb, it must have been later in date to the last burial (III) in Tomb I, since Tomb II was cut into the chamber of the latter and part of its floor rested on top of fill in the ‘antechamber’. This situation could suggest that the builders/users of Tomb II may have intentionally encroached the east chamber of Tomb I.
Pottery and other finds from Tomb II (Figs 22, 24, 29–32)
All measurements are in centimetres, where mentioned; all objects are in the BSA's SM at Knossos; where known, excavation and/or storage numbers are provided.
Base of a piriform jug or jar (II.1). © BSA.

(a) Associated with burial(s)
II.1. Piriform jug or jar, base (Fig. 29). Base D. 6.7. Pale cream, buff clay. Not hard fired. Fugitive traces of black paint on exterior. Numerous fragments of the lower part of the body preserved, all but one of which have been joined. Outside with decoration in black: five or six straight bands on lower part of body with wavy band above. LM II/III. Found upside down by the blocking wall of the tomb in Fig. 27b: A (GNB, Tomb II, pot no. 1). B, EL 7 (drawing no. 12). SM, Box number not recorded.
II.2. Chest-shaped larnax (Figs 22, 30).Footnote 38 Dimensions not ascertainable. Four typical feet noted, together with many body fragments, of which the six kept showed incised panels on sides and small vertical loop handles set just below the rim (Fig. 22). Three fragments appeared to come from the edge of a gabled lid, probably of the larnax (Fig. 22: N13). A flat fragment (c. 18 x 18.6), apparently from this lid, has a branch sign incised before firing on it (Fig. 30). From all layers in the burial chamber (drawing no. 79 for the incised fragment; Pottery Notebook, p. 13). SM, Box 316 (N12–N13 for larnax fragments; N14 for the incised fragment).
Fragment of a chest larnax with incised ‘branch’ sign (part of II.2). © BSA.

Katerina Mavriyannaki (Reference Mavriyannaki1985) has discussed signs, generally considered to be potter's marks, and cut before firing, on Cretan clay larnakes and their lids dating from MM and LM times. The signs on LM rectangular larnakes appear to be cut on the narrow ends and not on the long sides. In some cases, both the larnax and its lid have a sign cut on them. These signs do not seem to be common and have only been noted so far in the northern part of Crete and in association with chest-shaped larnakes. They are also attested in two larnakes from the Zafer Papoura cemetery.Footnote 39 The signs illustrated by Mavriyannaki are very simple (arrow-like, or plain, arcs); none are recognisable as branches.
There was a branch sign, but with two sprays each side of the stem instead of one as here, on a slab of stone used to cover a shaft grave north of the Palace.Footnote 40 There were no grave goods with the burial, but it was presumably of LM II–IIIA date. Branch signs are common as masons’ marks at Knossos, usually with two or three (or more) sprays, but in several cases with only one set as on our larnax fragment.Footnote 41 Branches regularly feature in Cretan cult scenes and in a funerary context, like this one, a religious significance may well be hypothesised.
(b) Miscellaneous from burial chamber
II.3. Bowl rim (Fig. 31). D. of rim 15–17. H. 6.3. Th. 0.4–0.7. Only a fragment of the rim and upper body is preserved, including the point where one of the horizontal handles joined the body. Fine buff clay. Surface unburnished, with decoration in black, very faded: the inside seems to have had a rim band, the outside a circumcurrent decoration of uncertain nature (but including spirals) below a rim band. Wavy band on body. LM II. Cf. no. P42 from MUM, with a wavy band linked with the rim band, and circumcurrent floral motifs with spirals.Footnote 42 LM II bowls are otherwise unknown, so far, from tombs at Knossos. B, EL 7 (drawing no. 9). Intrusive? SM, Box 301 (N1).
Potsherds (II.3–II.5, II.7), pin/awl fragment (II.11) and a bronze ‘disc’ (II.13) from Tomb II. © BSA.

II.4. Ephyraean goblet (?) rim (Fig. 31). D. c. 20. Fine buff clay. Surface burnished. Outside with decoration in black, difficult to distinguish, but consisting of rim band with a band of quirks below,Footnote 43 and top of a rosette. LM II. Although no traces of the handles remain, this is probably a goblet, rather than a bowl, because of the rosette decoration. The rosette also suggests that the goblet is of the Ephyraean type. Cf. Popham Reference Popham1984, pl. 55f (no. P 106, combined with a rosette) from MUM, and Betancourt Reference Betancourt1985, pl. 23ab, from the Temple Tomb and South West Angle of the Knossos palace. Most likely B, EL 7 (profile shown in Pottery Notebook, p. 5a) (Fig. 27b: layer 3, chamber fill; drawing no. 6). Intrusive? SM, Box 301 (N2).
II.5. Goblet rim (Fig. 31). 2.2 × 3.1. Fine orange clay. Surface unburnished. Outside with decoration in red, extremely worn, and impossible to decipher, apart from rim band. Solid interior. Probably LM II or LM IIIA. B, EL8 (Fig. 27b: layer 3, chamber fill; drawing no. 13; Pottery Notebook, p. 6). Intrusive? SM, Box 301 (N3).
II.6. Fragment of a large, closed vase (Fig. 24). Wheelmade. Orange clay with fine grit. Outside well smoothed or burnished, with decoration in red-brown: spiral above bands. LM I. Fig. 27b: layers 4 or 5, below the vase II.1 found upside down by the blocking wall of Tomb II.
II.7. Rim and fragment of a cup (Figs 24, 31). Rim D. c. 11.2. Orange clay. Outside surface buff, smoothed or burnished and decorated in red-brown: tortoise-shell ripple below band. Inside solid red-brown. Five fragments, four joined together. MM IIIB or LM IA. B, EL 4 (Fig. 27b: layer 4, above floor of Tomb II; drawing no. 53; Pottery Notebook, p. 4a). SM, Box 309. Cf. B.17 (Supplementary Appendix D), I.22 and IV.13.
II.8. Fragment of pithos with ‘naturalistic’ type of rope ornament, like that on pithoi from the Magazine of the Giant Pithoi in the palace at Knossos (Fig. 32). Coarse orange clay with large grit; surface a paler shade. Outside with traces of dark red-brown paint. MM II–III? Christakis Reference Christakis2005, 26, Group V (rope 18, most frequent in MM III). B, EL 4 (Fig. 27b: layer 4, above floor of Tomb II).
Fragment of pithos with ‘naturalistic’ type of rope ornament (II.8) and nozzle spout from large jar (II.9). © BSA.

II.9. Nozzle spout from large jar (Fig. 32). Gritty orange clay; grit reddish, including some large bits. Traces of decoration in red-brown on outside of round spout; splash of red paint inside. B, EL 4 (Fig. 27b: layer 4, above floor of Tomb II).
II.10. Bronze pin. L. preserved 1.5. D. 0.2. Highly corroded. Fig. 27b: layer 4, with II.11 and II.12 under stones from blocking wall (GNB, Tomb II, no. 13).
II.11. Bronze fragment, from a pin or awl? (Fig. 31). L. preserved 1.5. D. c. 0.5. Fig. 27b: layer 4, lower fill of chamber under stones from blocking wall (GNB, Tomb II, no. 12).
II.12. Bronze fragment. Max. D. 0.9; max. Th. 0.1. Misshapen, tiny pieces. Fig. 27b: layer 4, lower fill of chamber under stones from blocking wall (GNB, Tomb II, no. 11).
II.13. Bronze ‘disc’ (Fig. 31). D. preserved 1.1; Th. c. 0.2. Badly corroded. Has two holes, though these may be the result of corrosion. Fig. 27b: layer 3 (EL 14) fill of chamber (GNB, Tomb II, no. 14).
(c) From stone fill?
B7. Fragment of a pithos, perhaps ovoid or conical in shape. H. pres. 9.6. Th. 1.6–4.4. Gritty coarse clay fabric, with a wide black band below rim on the outside and white striped on each edge, perhaps MM II (Fig. 22). Christakis Reference Christakis2005, 19–21, forms 106–17 (conical: MM II to LM I, particularly forms 106 and 112, and 113 popular at Ailias and Archanes). B, EL 7 (below stone heap – soft earth – probably from stone fill trickle in the upper part of Tomb II; drawing no. 55; Pottery Notebook, p. 5a). SM, Box 309.
Tomb III (Figs 7–8, 33–35)
This tomb was located immediately to the south of Tomb II, with their blocking walls less than 0.50 m apart. Tomb III had a wide entrance occupying the whole of one of the long sides as found in some of the Zafer Papoura pit-caves.Footnote 44 No attempt was made to form any kind of a separate stomion.Footnote 45 As in the case of Tomb II, there is no surviving evidence for the existence of a dromos. The chamber of Tomb III was similar in size and cut to that of Tomb II.Footnote 46
The floor of the chamber was some 0.40 m higher than that of Tomb II and 2.50 m above the level of the original rock floor in Tomb I (Fig. 8b). It was only about a metre below the modern surface, and the upper part of the chamber had been entirely lost owing to erosion. The chamber measured about 2.00–2.10 m from north to south and c. 1.45–1.50 m from west to east within the blocking wall (3.15 m2 due to its irregular shape). This wall had a maximum width of c. 0.75 m, but only one or two courses of it were preserved to a height of between 0.25 m and 0.40 m. The stones used were large rough blocks of kouskouras rock; but one block exposed at the north end of the wall was larger than the rest and had been worked into a rectangular shape (Fig. 33). A channel with a V-shaped section, in what was the upper surface of the block as set in the blocking wall, ran from a rough hollow about 0.25 m across down to an abruptly sloping exit. This block was near the bottom of the original blocking wall and would have been concealed by the courses above it. It resembles a small drain-head, but its material (kouskouras) is not very suitable for such use.
Gypsum block with channel from blocking wall of Tomb III. Drawing by Beatrice Sheila Hoult. © BSA.

Hood, in an earlier draft of the KSP/60 manuscript, suggested that this block might have been used for libations in connection with the final rites which accompanied the burial(s), a feature otherwise unattested in any other tomb in the Knossos valley. The placement of the block, which would have presumably been covered by more stones of the blocking wall, makes this suggestion difficult to support. Could this be a reused block, perhaps detached from an original feature? This detachment and fragmentation, as well as its fixing in the blocking wall, fit better with the fragmentation practices observed in association with Tomb III (see discussion below).
The rock floor of the tomb was uneven and irregular. This may have been largely due to the activity of badgers, which had dug their way into it at the level of the floor and below it through two or more holes on the north side and had evidently caused much disturbance. No remains of a burial were recorded from this tomb, and badgers may have been partly responsible for the disappearance of all traces of one.Footnote 47 The other possibility is that the bones completely decayed or that the tomb was a ‘cenotaph’, a practice associated with bone removal episodes and attested both in Crete and mainland Greece.Footnote 48
Two clay vessels were found on the floor of the tomb (Figs 34, 35): a small Palace Style jar lying broken on its side (Fig. 35a:1; III.1) and an unbroken brazier (Fig. 35a:2; III.2). Parts of the Palace Style jar were missing, and a piece from its rim was resting above and within the brazier.Footnote 49 The decoration on this jar suggests that it must be assigned to LM IIIA1. In addition to these two vases, the fragments of a plain champagne cup (Fig. 35b:1; III.3) were recovered from the fill in the south-east corner of the tomb about 0.20 m above the level of the floor. This cup appears to date to LM IIIA2 or IIIB based on its shape. This and the position in which the cup was found make it unlikely that it was associated with the same burial as the other vases in the tomb. It may be intrusive, swept into the hollow left by the collapse of the tomb chamber, unless – which seems unlikely – it accompanied a second later burial of which no other trace was noted at the time of excavation.
Tomb III, with Palace Style piriform jar (III.1) and brazier (III.2), looking south. Blocking wall of Tomb III on right. Gypsum block visible in blocking wall, foreground, lower right. © BSA.

(a) Plan of Tomb III. Drawing by Beatrice Sheila Hoult. (b) Section E-E1 through Tomb III, looking north. (1) Disturbed surface soil; (2) gritty reddish kouskouras earth with lumps of kouskouras; (3) whitish kouskouras earth with small lumps of kouskouras; (4) burial layer with vases. Clean whitish kouskouras clay without lumps; (5) below level of vases, with stones; (6) continuation of (5) below blocking wall; A = stones, perhaps from blocking wall of Tomb II; B = gypsum block with channel (see Fig. 34); X = larnax fragment below edge of blocking wall; 1 = champagne cup (III.3); 2 = Palace Style jar (III.1); 3 = brazier (III.2). Drawn by Sinclair Hood and traced by William Taylour. © BSA.

Below the level of the floor with the vases, and between it and the rock, a layer of earth with small stones some 0.15 m or more in thickness extended over most of the area of the tomb except at the south end. A few potsherds were recovered from this deposit, which continued below the blocking wall of the tomb (Supplementary Appendix D, B.11–B.14; Fig. 35b). This placement suggests that the deposit preceded the tomb's final closure with the blocking wall. It may have been material brought into the tomb to level up the floor or remains of a clearing episode (from an earlier burial or burials). That might well be how a piece of obsidian, found in the area in front of III.1, but below the level of the pots on the chamber floor of Tomb III (south-west corner, GNB, no. 8 [B, Level 3], about 1 x 1.5 cm), may have come to be deposited there.
A rim fragment of a clay pithos or larnax was found in this deposit below the north end of the blocking wall (Fig. 35ab).Footnote 50 It is not clear if this fragment was intentionally placed there, as part of the building/closure of the building wall, or whether it was laid, along with soil, to level/even the area.Footnote 51
As noted above, no burial remains were found in Tomb III, though its original use was probably in LM IIIA1 (with the LM IIIA2–B champagne cup, III.3, considered intrusive or remnant of a later act).
Pottery from Tomb III (Figs 36–39)
All measurements are in centimetres, where mentioned; where known, excavation and/or storage numbers are provided.
Photos and drawings of Palace Style jar III.1. Drawing by Jeff Clarke. © BSA.

Jar neck (III.1a) and part of rim (III.1b), probably from III.1. © BSA.

Brazier from Tomb III (III.2). © BSA.

Champagne cup (III.3) and cup rim from Tomb III (III.4). © BSA.

(a) Associated with burial(s)?
III.1. Piriform jar (Fig. 36). H. 32.5. D. of rim 16, of base 12; max. D. 25. Only partly preserved, with a considerable part of one side missing. Fine red-yellow clay (red on inside, yellow on outside surface) with fine grits; hard-fired. Whitish buff slip or wash on outer surface. Decorated in black, but paint very faded. Inside of neck solid. Multiple zigzags on upper face of rim and outside of neck (Fig. 24). A floral scene of lily, papyrus, ivy and flowers (including trefoil) runs around the upper body, and two series of bands around the lower part (a group of eight bands, mostly equal in width, below the floral scene, and a further four above the foot) (Fig. 36). The handles have inverted Vs running up the upper face. LM IIIA1. The flora is rendered relatively naturalistically, for example in the details of the lily (five stamens with anthers, and the development of the volutes into spiral coils (cf. Furumark Reference Furumark1940–1, 257 and fig. 32). For the ivy with internal stamens, filled spirals and multiple stems, cf. Niemeier (Reference Niemeier1985, fig. 22:3 [no. 49]) and a LM IIIA1 bowl from the Theatral Area at Knossos (Popham Reference Popham1967, 345, n. 34, and pl. 84c).
The floral scene, and the specific motifs within it, are comparable with two Palace Style jars from the New Hospital Site tombs (Hood and de Jong Reference Hood and de Jong1952, figs 10 [no. I.6] and 11 [no. III.4]) and a jar at the Ashmolean Museum in Oxford (Popham Reference Popham1967, pl. 82b). However, these comparanda display a more naturalistic rendering of the floral motifs, consistent with their earlier, LM II, dating. B1, EL2 (Fig. 35a:1; layer 4, no. 2, at floor level, with the brazier III.2; part of the rim was found inside brazier III.2). Another fragment, together with some of the neck, came from a slightly lower level in the chamber fill (III.1a, III.1b). Drawing by Piet de Jong. KSP/60/P2 (GNB, Tomb III, pot no. 2). Herakleion Archaeological Museum.
III.1a. Jar neck and part of rim, most likely from III.1 (Fig. 37). Ridge D. 12–13. D. of rim 16. Fine red-yellow clay (red on inside, yellow on outside surface) with fine grits; hard-fired. Solid black paint on interior (neck). Exterior black paint on neck (pattern) and lip. Metallic ridge at end of neck. From under the level of the intact pots in Tomb III (‘floor level’), though no apparent earth change was observed. B1, EL 3 (drawing no. 48). SM, Box 308.
III.1b. Sherd with zig-zag decoration, most likely from III.1 (Fig. 37). 2.6 × 2.7. Fine red-yellow clay (red on inside, yellow on outside surface) with fine grits; hard-fired. From under the level of the intact pots in Tomb III (‘floor level’), though no apparent earth change was observed. B1, EL 3 (drawing no. 48). SM, Box 308.
III.2. Brazier (Fig. 38). Greatest H. 7.5; rim H. 4; rim D. 15.2; handle L. 10; base D. 5.5.; overall L. 20.5. Broken but almost complete. Sandy buff clay, soft fired. Completely covered in red wash though very worn. Relatively shallow bowl. Heavy roll, straight handle. Has a pronounced ‘candlestick’ centre.Footnote 52 Wheelmade. Presumably unused based on the extant archival information.Footnote 53 LM II or LM IIIA1. B1, EL 2 (Fig. 35a: no. 2; layer 4, no. 3, at floor level, with the piriform jar III.1, part of rim of which was found inside this brazier). KSP/60/P3 (GNB, Tomb III, pot no. 3). Herakleion Archaeological Museum.
(b) Miscellaneous
III.3. Champagne cup (Fig. 39). H. 6.8; rim D. 10.5; base D. 4.7. Handle broken off. Pieces of base and rim missing. Fine buff clay. Hard fired. Surface smooth but untreated. Undecorated. LM IIIA2 or IIIB, because of the low foot and unpronounced rim. Cf. Popham Reference Popham1969, 301–2, fig. 7. Parallels (both LM IIIB) for the straight rim have been found in the Little Palace (Popham Reference Popham1970, 111, fig. 17:9) and MUM (Popham 1984, pl. 180:5). Fig. 35a: (c); Fig. 35b: no. 1 at top of layer 4, c. 20 cm above floor level, in the south-east area of the chamber. Probably not part of the original assemblage (intrusive?), or possibly placed with a later burial of which no other traces found. KSP/60/P1 (GNB, Tomb III, pot no. 1; drawing no. 8). SM, Box 301.
III.4. Cup rim (Figs 24, 39). 3.5 × 3.1. Orange clay. Decoration in dark red-brown: outside with spiral design, inside solid. LM I. From surface. B1, EL 1 (Fig. 35b: layer 1; drawing no. 45). SM, Box 308.
Note: for the material found under the level of the pots and the tomb's blocking wall see Supplementary Appendix D, B.11–B.14. No ceramic material is recorded in association with the ‘ledge’ marked in Fig. 35b, and mentioned in GNB, p. 5–5a, no. 3, section B-B and the Pottery Notebook, p. 4 (Supplementary Appendix B, section C-C).
Tomb IV (Figs 2, 7–8, 40–42)
This was a chamber tomb of the more regular type than Tombs II and III, equipped with a narrow entrance and a dromos leading to it (Fig. 40). The dromos was somewhat irregular and had a distinct kink in it (i.e., set at an angle in relation to the axis of the chamber). It was traced for a length of about 3.90–4.00 m westwards from the face of the blocking wall in the entrance to the tomb, though it clearly continued originally further to the west. Τhe dromos sloped downwards towards the entrance at a 20° angle and varied in width from c. 0.94 m to 0.73 m at the west (outer) end. The sides of the dromos inclined inwards (key-hole shaped).
Plan and section of Tomb IV. Drawing by Beatrice Sheila Hoult. © BSA.

(a) Dromos of Tomb IV looking east with later terrace wall. Sheila Hoult (architect) over the roof of Tomb IV (60.B.54). (b) Tomb IV. Blocking wall, from dromos, looking east (60.B.56). © BSA.

(a) Tomb IV, looking down from south (60.B.60). (b) Plan of Tomb IV. (1) and (2) IV.1 and IV.2, braziers; (3)–(5) IV.3 to IV.5, blossom bowls; (6) pin (?); (7) IV.8, blue material; (8)** IV.2, glass beads; (9) IV.7, hair pin. Dotted line around the main burial marking = possible, original, extent of wooden coffin. Hatching shows distribution of remains (dark brown carbonised matter), possibly from the coffin drawing by Beatrice Sheila Hoult. © BSA.

The dromos had been filled with very hard, powdered kouskouras. Above this fill, at the west end of the dromos, was another fill of softish brown earth with hard earth above.Footnote 54 A later, north–south, terrace wall ran across the line of the dromos at a higher level (Figs 8, 41a). This had a massive boulder incorporated in its outer face with a fill of small stones behind it.Footnote 55 One small bag of sherds was recovered from the dromos, with very small fragments and almost nothing very diagnostic, apart from a few MM and LM I sherds,Footnote 56 probably material that entered the dromos fill from the general use of Area B.
The blocking wall of the chamber was found intact (Fig. 41b). It was rounded at the top to fit the entrance and stood to a height of 1.29 m with a maximum width of 0.75–0.85 m. The height of the stomion ranged from c. 1.20 m (outside, facing the dromos) to c. 1.35 m (inside, facing the chamber). The stomion's depth was only 0.30–0.35 m. The upper part of it was roughly built with large stones laid lengthwise through the entrance. At the bottom, however, the entrance was only 0.60 m wide and was occupied by a single rectangular block of gypsum (Notebook p. 8 and drawing in p. 9). A large slab, which had been placed in the dromos leaning against this and the part of the wall above it, overlapped the outer face of the entrance on either side. Further slabs had been laid against this large slab, outside the stomion and in the dromos, as shown in the section (Fig. 40).Footnote 57
The chamber was roughly square, with the corners rounded, and measured about 1.80–1.82 m (north–south) x 1.75–1.78 m (east–west), c. 3.16 m2 due to its irregular shape. Only part of the rock roof was preserved, and the estimated original internal height was c. 1.70–1.80 m, while the rest had sunk inside the chamber sealing the levels below. A low ledge had been left along the south side of the chamber (Figs 41b, 42ab). This ledge, 0.35–0.50 m in width, stood only 0.05–0.08 m above the rock floor of the rest of the chamber.Footnote 58
The north-east corner of the chamber had been cut into the fill of the antechamber of Tomb I. It was the clearing of this antechamber that led to the discovery of Tomb IV. The makers of Tomb IV left a niche in the fill of the antechamber at this point, with the native rock forming the bottom of the niche about 0.35 m above the surface of the ledge (ledge W. 0.35 m). A brazier (IV.1) was set in this niche (Figs 13, 42b: no. 1), the bowl of which was filled with a mass of carbonised matter identified as oak (quercus), a long-burning hard wood (Georgiou Reference Georgiou1977).
Main burial (Individual I)
At the time of excavation, it was thought that Tomb IV had been used for a single burial. The skeletal study, however, yielded evidence for two individuals: a young adult female, most probably 18–20 years old,Footnote 59 and a second individual who is represented only by two teeth, possibly remnants of an earlier burial made in this tomb and perhaps cleared to free space for the burial of the young woman just mentioned (see Appendix, below) (Tables 3–4).
The main burial lay on the north side of the chamber with head to the west (Figs 41b, 42ab). Episodes of roof collapse may have contributed to the destruction of the wooden coffin and/or resulted in its disintegration following natural decomposition. Coffin matter shifted where there was space – mainly to the south and to the east of the burial. While roof collapse and the coffin's disintegration may have disturbed the burial's original position somewhat, overall, this disturbance appears minimal as it did not affect much of the original placement of the body. Based on the observations made during excavation, on the representation of the major anatomical regions and the presence of small bones, this was a primary, articulated, burial with the upper limbs folded on the abdomen and the lower limbs very tightly flexed (GNB, p. 11a; SH notes pp. 25–6).
The body of the young woman appears to have been placed inside a wooden coffin or larnax. An area of darkish brown earth, about 1.50–1.60 m long from west to east and 0.60–0.90 m in width, surrounded the remains of the skeleton and might be traces of this coffin. At one spot to the south of the legs of the skeleton, these brown traces were about 0.02 m thick, with a gap of some 0.05 m below them to the rock floor of the chamber, at which level the bulk of the skeletal remains were found.Footnote 60 In addition, some traces of carbonised wood were noted at various points around the skeleton, notably below the skull, but in greatest abundance beneath the thighs. A fleck of blue colour, which was found in association with carbonised wood underneath the chest of the skeleton, might have been a relic of paint used to decorate such a wooden coffin (cf. IV.8).Footnote 61 The remains of the coffin did not give any precise indications of its shape or exact size. They suggested, however, that it might have been c. 1.10–1.20 m (L) x 0.50–0.60 m (W).Footnote 62
The skull was found in fragmentsFootnote 63 at a higher level than the rest of the skeleton, about 0.10 m above the rock floor of the chamber, with part of the lower jaw some 0.20 m away from it to the south-east (Fig. 42b).Footnote 64 The seemingly ‘raised’ position of the skull, in relation to the rest of the body, might have been due to its placement on a ‘cushion’ or earthen pillow.Footnote 65 Alternatively, and more plausibly given the distribution of carbonised wood noted above, the position of the skull and part of the upper body may have resulted from the progressive disintegration of the wooden coffin (collapsing originally in the latter area, and only afterwards in the former).Footnote 66 If the latter is correct, it would mean that the floor of the coffin was some 0.10 m above the chamber floor level (commonly the legs of clay larnakes range between 0.05 and 0.10 m).
The body had evidently been laid on its back, however, with the right arm crossed across the chest and the right hand resting on the left arm, which was stretched down so that it covered the stomach.Footnote 67 Leg bones were found tightly contracted, ‘doubled up as feet apparently beneath thighs’.Footnote 68 The body might have been partially wrapped in a shroud, even tied up with force, which could also explain the particularly contracted position of the lower part.Footnote 69
In the north-east corner of the tomb, beyond the legs of the skeleton, was an elegant brazier (IV.2),Footnote 70 standing upright although broken, about 0.25 m above the floor of the chamber (Fig. 42b: no. 3). Below, and on the side of, the brazier was a stone blossom bowl (IV.3) lying sideways (Fig. 42b: no. 2). The lower part and one side of this bowl were about level with the legs of the skeleton to the west of it. Immediately above the floor, to the west of the brazier and below the level of the skeleton, some lumps of bright blue colouring matter (IV.8) were recovered (Fig. 42b: no. 7). This matter might have been used for making paint to decorate the face or other parts of the body or paraphernalia associated with the burial. In addition to the above, French observed possible traces of a small wooden box, measuring about 0.10 x 0.10 m across, which could have contained this, but noted that these traces might have also come from part of the coffin.Footnote 71
To the west of this matter, by the leg bones of the skeleton and just below their level, a second stone blossom bowl was found (IV.4; Fig. 42b: no. 4). It was in a shattered condition lying on its side and nearly upside down. A third stone blossom bowl was found resting at an angle to the west of IV.4 and underneath the bones of the left foot of the skeleton (IV.5; Fig. 42b: no. 5). Beside the foot bones, lying on top of the blossom bowl IV.5, was a straight piece of material – apparently of bone or ivory – which was thought, at the time of excavation, to perhaps have belonged to a pin (IV.6; Fig. 42b: no. 6).
At an earlier draft of this manuscript, Hood had suggested that the blue matter (IV.8) along with the brazier (IV.2), the bowls (IV.3–IV.5) and the possible pin (IV.6) may have all been placed inside the coffin with the body. Given the position of some of these objects, however, above and below the burial level, it is also plausible to suggest that while some of these may have been inside the coffin (e.g. the pin and blue matter), others might have been placed below it (e.g. bowl IV.5) as well as on top and by its side (the brazier IV.2Footnote 72 and bowls IV.3, IV.5).
An ornament of glass (‘blacking at the time of excavation’), described by French in the excavation notebook as an ‘argonaut’ (Notebook opp. p. 8; GNB, p. 11), came from the earth beneath the brazier (IV.2). Half of a glass rosette probably also came from this area and was found during sieving. These types (i.e., ‘argonaut’ and ‘rosette’) are probably misidentifications (IV.9; Supplementary Appendix F). In our study, only two relief glass bead types were recognised (‘waz-lily’ and ‘wallet’).
The ‘argonaut’ had reached the dark grey stage of weathering, and neither of these ornaments has survived. These ornaments may well have been outliers of the glass beads found scattered over an area of c. 0.80 x 0.40 m from the region of the upper arms of the skeleton to just beyond the leg bones. Some of these ornaments were noted on either side of the skeleton and others below it (‘right [south] side of the body and underneath body and at left side – no apparent order’; GNB, opp. p. 8) (marked with an asterisk in Fig. 42b).
The scattered distribution of these glass ornaments suggested to the excavators, at first, that they might have been sewn onto a shroud or garment of some kind.Footnote 73 The scattering of our beads may also be due to the fact that the necklace, or head-band, composed of themFootnote 74 had been placed on top of a wooden coffin lid rather than on the body/head of the young woman, and dispersed perhaps by the impact of the partial roof collapse at a time after the strings holding them together had rotted (Supplementary Appendix F).
The only other object discovered was a small bone hairpin of standard type (IV.7; Fig. 42b: no. 9). It was found by the left arm of the skeleton.
The braziers and glass relief beads support a date for the main burial in Tomb IV in LM IIIA, i.e., sometime in the fourteenth century BC.
Further skeletal material (Individual II)
As noted above, two teeth identified during the study of the skeletal material from Tomb IV belong to an individual other than the one associated with the tomb's main, in situ, burial. They probably represent the only remains of an earlier burial, but their exact findspot in the grave is unknown (more on the possible ramifications stemming from the identification of the two teeth below).
Pottery and other finds from Tomb IV (Figs 43–45)
All measurements are in centimetres, where mentioned; all objects are in the BSA's SM at Knossos, unless otherwise stated; where known, excavation and/or storage numbers are provided.
The braziers (IV.1–IV.2) and stone blossom bowls from Tomb IV (IV.3–IV.5). © BSA.

Bone or ivory pin (IV.7), lumps of bright azure blue, apparently pigment (IV.8), and ‘waz-lily’ and ‘wallet’ relief beads (IV.9), all from Tomb IV. © BSA.

Pottery from Tomb IV (IV.10–IV.12). © BSA.

(a) Associated with the main burial
IV.1. Brazier (Fig. 43). Greatest H. 9.8; rim H. 7.5; base D. 5.5; rim D. 16; handle L. 10; overall L. 22. Broken but almost entirely reconstructed apart from a rim fragment. Coarse orange clay with green slip. LM IIIA. For the pronounced, torus, base cf. Hood, Huxley and Sandars Reference Hood, Huxley and Sandars1958–9, fig. 29, no. X.2, from the Upper Gypsades cemetery.Footnote 75 Wheelmade. Used and burnt on the inside. Charred matter from the bowl has been analysed by Georgiou,Footnote 76 and identified as oak (quercus). Fig. 42b: no. 1, standing in niche cut into fill of antechamber of Tomb I (Fig. 13). KSP/60/P4 (GNB, Tomb IV, pottery and stone vessels no. 1). Herakleion Archaeological Museum.
IV.2. Brazier (Fig. 43). H. 8.5–8.7; base D. 6.5; rim W. 12.7–13; handle L. 12.7; overall L. 20.5. Broken, almost completely restored. Pink clay, hard fired, no temper. Buff wash, matt surface. Unpainted. Wheelmade. Sandy orange clay. Torus base. Unused (no sign of burning) but with small flakes of carbonised matter in the hollow bowl.Footnote 77 LM IIIA. FIG. 42b: no. 3, east of legs of skeleton, but 0.20–0.25 m above the burial level, resting at the time of discovery on roof rockfall and carbonized matter. KSP/60/P5 (GNB, Tomb IV, pottery and stone vessels no. 2). Herakleion Archaeological Museum.
IV.3. Blossom bowl (Fig. 43). Serpentine, blue, grey and black with patches of buff, brown and greenish. Complete, but cracked. H. 10.7; max. D. 16.8, of rim 9.5, of base 7. Fig. 42b: no. 2, lying on side below brazier IV.2. KSP/60/10 (GNB, Tomb IV, pottery and stone vessels no. 3). Herakleion Archaeological Museum.
IV.4. Blossom bowl (Fig. 43). Serpentine, grey with green, brown and buff patches. Complete, but in crumbly state. H. 9.9; D. 13.9. FIG. 42b: no. 4, lying on side between legs of skeleton and north wall of burial chamber. KSP/60/11 (GNB, Tomb IV, pottery and stone vessels no. 4). Herakleion Archaeological Museum.
IV.5. Blossom bowl (Fig. 43). Serpentine, grey to black, with greenish, brown and buff patches. Complete but broken. H. 9; max. D. 14.25, of rim 7.6, of base 6.5. Fig. 42b: no. 5, by IV.4 and below left foot bones of skeleton, with the pin IV.6 above it. KSP/60/12 (GNB, Tomb IV, pottery and stone vessels no. 5). Herakleion Archaeological Museum
IV.6. Remains of a pin? Much destroyed. Apparently of bone or ivory. Dimensions not ascertainable. Fig. 42b: no. 6, by the left foot bones of the skeleton, and on top of the blossom bowl no. 5 (II.5). (GNB, Tomb IV, no. 19). Could this pin have made a pair originally with IV.7?
IV.7. Pin (Fig. 44). Bone or ivory. L. 4 (max). W. 1.5. Broken into four pieces. Tips at both ends missing. Surface very worn. It has a rhomboidal section and is curved at one end to form a U-shape. This was a common pin shape, found in several other tomb contexts at Knossos in different materials.Footnote 78 Possibly a hairpin given its placement near the head of the body. Fig. 42b: no. 9, by left shoulder of skeleton. KSP/60/9 (GNB, Tomb IV, no. 22).
IV.8. Several lumps of bright azure blue material (Fig. 44). Very fragmented and friable. The largest preserved piece with D. 2. Probably Egyptian blue frit (CaCuSi4O10), which was invented in Old Kingdom Egypt and later produced in Crete, as attested first in the Vat Room Deposit of the Palace. Made into beads and other small objects but its most important Minoan use was as a pigment. Used on plaster (e.g. frescoes, the Hagia Triada sarcophagus), on wood (e.g. larnakes), and also for backing rock crystal objects, where thanks to a recent discovery its presence can be detected on old objects even where no longer visible to the naked eye (Accorsi et al. Reference Accorsi, Verri, Bolognesi, Armaroli, Clementi, Milani and Romani2009; Panagiotaki Reference Panagiotaki2015). No parallels for cosmetic use for decorating the face or body are known from Crete, though Mavro Spilio Tombs VII and XX produced lumps of black ‘galena’ (lead sulphide) (Forsdyke Reference Forsdyke1927, 264, 283). Found with traces of what might have been a small rectangular wooden box which might have contained the material. If that is indeed the case, could that perhaps have been a pyxis for cosmetics, the blue for ‘makeup’ (see also discussion in main text above)? Fig. 42b: no. 7, near the legs of the skeleton with the brazier IV.2 (no. 2), just above the rock floor of the tomb chamber below the burial level. KSP/60/7 (GNB, Tomb IV, no. 20).
IV.9. Glass relief beads (Fig. 44). Some 20 fragments of various sizes, the largest c. 1 x 1 cm, the smallest mere scraps (which may subsequently have disintegrated to powder). Th. c. 0.2. All flat-backed, with relief decoration on front. The largest piece bears two spirals side by side and has one curved edge which appears to be original, thus probably a ‘waz-lily’; four smaller fragments preserving a spiral probably matched it. Three or four pieces are of ‘wallet’ shape with a raised band framing the edges: three nearly complete with string-hole (now broken through) along the top, a fourth retaining only the right-hand half of the object including part of its straight top and curved side, with three relief dots edging that side and a vertical line parallel with them.
The fragments are all in a very fragile condition. Fine and very crumbly in texture, in the typical process of weathering often seen in legally excavated glass relief-beads (whereas those in private collections and foreign museums, having been specially selected, are in better condition and often retain much of their original blue colour). The shiny blue surface has weathered to dull dark grey matt patches, has then progressed over much of the surface to a cream colour and has advanced further in other places to the terminal stage, yellow powder, which seems to be appearing in the interior of two of the scraps. Fig. 42b: no. 8, marked by asterisks. SM (no number). KSP/60/8 (GNB, Tomb IV, no. 21 and Supplementary Appendix C).
For further information about these beads, parallels for them, and the origin and meaning of the designs on them, see Supplementary Appendix F.
(b) Miscellaneous from fill of chamber
IV.10. Kylix rim (Fig. 45). D. 16–18. Fine, light orange-buff clay. Well fired. Plain, surface burnished. LM IIIA2/B? (drawing no. 14). SM, Box 301 (N9).
IV.11. Rim of kylix? (Fig. 45). D. c. 12–13. H. pres. 2.8. Th. 0.22–0.25. Fine orange buff clay. Overall red-orange wash inside and out. LM III (drawing no. 20). SM, Box 301 (N11).
IV.12. Bowl or cup fragment. 4 × 2.8. Fine pale greenish clay (Fig. 45). Surface burnished and decorated in red-brown: inside solid, outside with papyrus (?) design. LM II? B, EL 29 (drawing no. 15; Pottery Notebook, p. 11). SM, Box 301 (N10).
IV.13. Fragment of bowl with tortoise-shell ripple decoration inside and out (Fig. 24). Pale orange clay with buff surface, well smoothed or burnished inside and out. Decoration in dark red-brown. MM IIIB or LM IA. From area of brazier IV.1 on ledge in south-east corner of Tomb IV. Possibly intrusive from the antechamber of Tomb I (cf. B.17 [Supplementary Appendix D], I.22 and II.7).
Miscellaneous from Area B (Figs 46–47)
All measurements are in centimetres, where mentioned; all objects are stored in the BSA's SM at Knossos; where known, excavation and/or storage numbers are provided.
Rim of stone bowl (B.1) and a poppy-shaped lead object (B.3). © BSA.

Stone figurine from Area B (B.5). © BSA.

B.1. Rim of stone bowl (Fig. 46). D. c. 14. Serpentine, light greenish grey with fine grey to black veins. Surfaces well polished inside and out. Area B, surface. KSP/60/2 (GNB, Area B, no. 6).
B.2. Fragment of bronze pin (?). L. preserved 0.8. D. 0.3. Corroded. Area B, surface (GNB, Area B, no. 4).
B.3. Poppy-shaped lead object of unknown use (Fig. 46). Dimensions: 1.9 x 1.5. Presumably Venetian or Turkish? Surface in area of Tombs II and III. KSP/60/16 (GNB, Area B, no. 3).
B.4. Stone saddle quern. Broken at both ends. L. preserved 15; W. 12; max. Th. c. 6. From region of post-Minoan building exposed in trial south of Area B tombs.
B.5. Stone figurine (Fig. 47; Supplementary Appendix G), with string-hole added later, running from front to back through upper part of chest, perhaps to convert it into a pendant or amulet (or perhaps for a repair). Broken at the string-hole; head and right shoulder (with part of string-hole) missing. Lower part of back also broken away and missing. Surface rather scratched and battered. H. preserved 3.1; W. across shoulders 1.6. String-hole D. 0.25. Blue-grey steatite with dark olive-green patches. Groove down back; arms bent up at the elbows and held against the chest. The break at the back suggested at the time of excavation that the legs had extended here and that the figure was kneeling. The study by Hughes-Brock suggests that this is instead a standing male figure, for which there are many parallels (Supplementary Appendix G). From the pile of stones above the chamber of Tomb II (Fig. 27b: layer 2). Given by Grigoris Zidianakis. KSP/60/1 (GNB, Area B, no. 9).
For other sherds from Area B-B1, see Supplementary Appendix D.
DISCUSSION AND CONCLUSIONS, by Yannis Galanakis
Excavating KSP/60
Up until the 1950s, very few Late Bronze Age (LBA) chamber tombs in the Aegean had received the excavation attention that the KSP/60 tombs were to receive. With a few notable exceptions (e.g. the work of Alan Wace [Reference Wace1932] at Mycenae, of Carl Blegen [Reference Blegen1937] at Prosymna and of the Swedish teams at Asine and Dendra [Frödin and Persson Reference Frödin and Persson1938; Persson Reference Persson1942]), little attention was paid to the actual stratigraphy of LBA chamber tombs. Almost no section drawings were made, let alone published, and most of the tombs receiving extensive reports – and publicising by the Greek and International Press – were those with rich and diverse finds.Footnote 79
This publication, however, would not have been possible had it not been for the careful documentation of the excavation (photographs and drawings included), the use of experienced workers, and the interest in retrieving as much information about the tombs’ sequence of use as possible as well as of the burials. In particular, the attention of the excavators in producing several section drawings is unusual for the time in relation to the digging of chamber tombs, and for this reason all the more praiseworthy, as was their aim in obtaining a better understanding of site formation at a funerary site that posed challenges, not least because of several episodes of roof collapse and of other forms of disturbance as well as of the existence of overlapping rock-cut chambers at different height levels (Fig. 12). This interest aligned well with, and stemmed from, the BSA's aims at Knossos between 1957 and 1961 in examining the site's stratigraphy (Hood Reference Hood1961–2).
While sieving was not systematic, it did occur in several instances, especially in those areas where the bodies had been placed, mostly to retrieve small finds that would have otherwise been missed.
The funerary landscape
The KSP/60 tombs are situated at the south-east end of the mortuary landscape of the Knossos valley – from there one enjoys a very good view of the surrounding hills, all the way to the area of Katsambas and the sea to the north (Fig. 9). Easily visible, and accessible, from the Palace and the nearby areas (Fig. 48), this location on the east side of the River Kairatos may well have represented the southern end of the Ailias–Mavro Spilio cluster of tombs in this part of the valley.
Top: view of the palace at Knossos and surrounding area from the north-west, at some point in 1902, 1903 or 1904. Bottom: the burial landscape of Neopalatial Knossos. Crosses mark location of tombs in use during this period. White cross indicates use in LM I. Dotted line indicates river course. Area in grey highlights possible extent of Neopalatial town as reconstructed by Whitelaw Reference Whitelaw, D'Agata, Girella, Papadopoulou and Aquini2022; for Poros, the Neopalatial extent is based on Dimopoulou-Rethemiotaki Reference Dimopoulou-Rethemiotaki, Cadogan, Hatzaki and Vasilakis2004. Contours at 4 m. KSP/60 shown as ‘South of Palace’. © Photo: A.J. Evans Archive, Ashmolean Museum (Knossos photo album 03.83), University of Oxford. Map: adapted by Y. Galanakis from a map provided by T. Whitelaw. © Y. Galanakis.

In the Neopalatial period, emphasis was clearly placed around the Palace when it came to locating new tombs, especially in the south and west ends (e.g. Vlychia, Gypsades and the Temple Tomb on the west of the Kairatos; and KSP/60, Ailias, Lower Ailias, Mavro Spilio on its east side). The remains in Area A, as noted above, may relate to a MM I–II tomb, while Tomb I to the east was, in all likelihood, a multi-lobed Neopalatial chamber tomb built and used, originally, in MM III–LM I. Permanence, therefore, as a concept associated with tomb structure and use appealed to some, but probably did not include the whole of the Knossian population already in Proto- and Neopalatial times, when Knossos reached its greatest extent, some 80 ha.Footnote 80
Possibly six out of 11 known Neopalatial funerary locations (54.5 per cent, Poros, Mavro Spilio, Lower Ailias, South of the Palace [KSP/60], Temple Tomb area, and possibly Acropolis/Monastiriako Kephali) show use in the same area during the next phase, LM II, in the form of reuse/continuous use and/or the construction of new tombs. Over time, however, and especially during the fourteenth century BC, interest appears to have shifted away from the old mortuary areas, placing more emphasis now on the axes connecting the Palace to the north coast (e.g. via Ayios Ioannis, or over the Kephala and Isopata ridges leading to Katsambas near Poros, or even on the eastern side, perhaps via Zafer Papoura and Sellopoulo leading to Karteros).Footnote 81 In this respect, the size and relative simplicity of the graves, and the associated objects in these burials, may echo the interests of the tomb-using groups to associate themselves (or maintain an association at least) with a pre-existing burial location and ‘tradition’.
Framing the burial experience: the architecture of Tombs I–IV (Table 1)
Tomb I, in its Neopalatial form, is a typical, multi-lobed, rock-cut chamber tomb. With an area of 11.76 m2 and a height of c. 2.50–2.65 m, and approached by at least two steps, it would have been like other tombs in the valley (with Gypsades Tomb XVIII providing a good parallel). Overall, Tomb I is smaller than the average Ailias chamber tomb (20 m2) and significantly smaller than the largest (some 80 to 100 m2) chamber tombs at Poros.Footnote 82
In LM II–IIIA, the east chamber of Tomb I was (re?)used for burials. It is not clear how this tomb was accessed, but given the collapse of the roof in the antechamber, it is possible that a simple shaft, from the east, gave access to the tomb's west side that was to become the stomion. Could the use of earlier tombs, as in the case of the east chamber of Tomb I, have inspired people to develop the ‘pit-cave’, a popular burial type at Knossos (mostly of the fourteenth century BC)?Footnote 83 The other possibility is that the old, stepped, entrance may have been retained. However, over the course of the east chamber's use, the space became more and more restricted, with fewer cubic metres available for Burial II, with the floor higher than that of Burial I – and even higher for Burial III (Fig. 8; Table 1).
Either Tomb I was known to the builders of Tomb II, who may have intentionally, therefore, tried to encroach upon it (to the point that the latter's construction necessitated the demolition of part of the blocking wall of Tomb I, east chamber, to allow space for Tomb II), or they discovered it as they were trying to find appropriate soil for the construction of this burial structure. The former scenario seems probable, and the east chamber of Tomb I may well have inspired the appearance of Tomb II (cf. lack of any proper stomion, no dromos, small size, blocking wall covering entire east side).Footnote 84 Whatever burials were performed there appear to have also been described by a similar level of consistency in practice to those observed in Tomb I.
Given the architectural relationship between Tombs I and II, it is fair to say that the latter was built when Tomb I had gone out of use (or had its final use, with Burial III – a secondary deposition as suggested here of two individuals – placed close to the original ceiling of the east chamber in Tomb I). May we hypothesise that it was lack of space in Tomb I that necessitated the construction of Tomb II? Tomb III is very similar to the east chamber of Tomb I and indeed Tomb II (the only difference being that its ‘stomion’ is wider). Tombs II and III may have both been used in LM IIIA.
Tomb IV is a more canonical chamber tomb in the sense that it is equipped with a dromos, set at an angle in relation to the axis of the main chamber. This dromos, however, is of very small dimensions, while the chamber itself differs little in its dimensions from the other tombs (Table 1). This space would have allowed very few people to enter at any one time, and probably, also, in general: i.e., potentially a very different situation to the more spacious Poros and Ailias tombs, or the most elaborate Final Palatial examples. In Tombs II–IV, once inside, an adult could barely stand (1.60–1.80 m) and there was limited space for more than two individuals working at the same time.
Tomb IV was equipped with a rock-cut dromos (preserved at a length of c. 4 m at the time of excavation) that descended towards the stomion. The slope was gentle at the beginning (c. 6°) but became sharper closer to the chamber's entrance (reaching 20°). This ‘drop’, or change of slope, is attested in some tombs in the Knossos valley. It appears to represent an intentional action that helped to deepen the façade just in front of the tomb's entrance. It may have also had a practical function facilitating further access to the stomion and chamber (e.g. Ayios Ioannis, a tomb south of the Royal tomb, New Hospital Tomb I, Nea Alikarnassos, Sellopoulo Tombs 1–2, etc.). While the descending dromos – a popular feature of most LM II–III Knossian chamber tombs – might have provided a solution to building groups carving tombs around the valley, it also probably offered the desired effect: that of moving away the body, and those attending it, from the land of the living to the world of the dead by literally entering the earth.Footnote 85
Tomb IV also featured a low and narrow stomion. The body, most likely placed on a stretcher or already in the coffin for ease of controlling it, may have been inserted first into the chamber; or someone may have already crawled inside to receive it.Footnote 86 The body was then arranged accordingly.Footnote 87 An area of darkish brown earth about 1.50–1.60 m long from west to east and 0.60–0.90 m in width surrounded the remains of the skeleton and could be traces of the coffin. With estimated dimensions 1.10–1.20 m (L) x 0.50–0.60 m (W), the coffin might have just fitted through the narrow stomion. The body, if not already inside the coffin, could have been introduced in the container once the latter had been set in position inside the chamber.
If attendants were allowed to observe the body in its final resting place, they could have done so without entering the chamber, by kneeling in front of the stomion where, given its short length (0.30–0.35m), peering inside would have presented them with a full, up close, view.Footnote 88
This low approach (c. 1.20–1.29 m) would have afforded a significantly different experience from that encountered in funerals where the body was introduced into the tomb through a life- or over-life-size entrance (greater than 1.80 m).Footnote 89 However, tombs equipped with a tall entrance (over 1.80 m) in the Knossos valley represent only 11 per cent of the extant corpus (i.e., for which a plan has been published: 81 examples). Even in those examples, however, equipped with a tall entrance – ‘tall’ by the standards of the Knossos valley – the stomion was narrow (less than 0.90–1.00 m; most frequently c. 0.60 m) and short (less than 1.50 m), like in the vast majority of tombs in the area. In this respect, the burial experience (and viewers’ expectations) of Tomb IV appears compatible to what most chamber tomb groups may have experienced in fourteenth-century BC Knossos.
Ritual performance and/or beliefs probably required the presence of narrow, short and, often, low entrances for introducing and ultimately burying the body inside the tomb. There might, therefore, have been more continuity in practice between Neopalatial and Final Palatial tombs than previously hypothesised, with the former frequently equipped with low and narrow (e.g. Poros Tomb Reference Momigliano and Momigliano1967, H: 1.26–1.47 m) as well as stepped entrances (W: 0.9–1 m; steps are also attested in Final Palatial chamber tombs at Knossos) (Lembesi Reference Lembesi1967; Muhly Reference Muhly1992).
In terms of chamber area, only the east chamber of Tomb I (in use probably from LM II) is above the mean of known Knossian tombs, but still considerably under the median of Neopalatial chamber tombs in the valley. The chambers of the other three tombs (II–IV) are all below the mean and close to the 25 per cent quintile of the smaller tombs in the Knossos valley (Figs 49 and 50).
Top: LM II–IIIA2 chamber tombs at Knossos per chamber area (in m2). After Preston Reference Preston2000, vol. 2, fig. 5:5, modified by Y. Galanakis. Bottom: Percentages of ceramic shapes per period from KSP/60. MM I–II: 30 examples (from Area A); MM III–LM I: 25 examples (from Tomb I); LM II–IIIA: 18 examples (from Tombs I–IV). 73 examples in total (not listing material with uncertain provenance). Prepared by Y. Galanakis. © BSA.

Left: boxplot of chamber tombs at Knossos (75 examples) per m2. Minimum: 0.2 m2; first quartile (25%): 2.9575 m2; mean: 4 m2; median (50%): 6.032 m2; third quartile (75%): 5.925 m2; maximum: 43.1 m2. Prepared by Y. Galanakis. Right: boxplot of pit-caves at Knossos (17 examples) by chamber area in m2. Minimum: 0.7 m2; first quartile (25%): 1.05 m2; mean: 1.5 m2; median (50%): 1.52 m2; third quartile (75%): 1.8 m2; maximum: 2.6 m2. Prepared by Y. Galanakis. © BSA.

When compared to pit-caves, Tombs II–III are closer in terms of chamber area but are larger than the largest known pit-cave examples in the Knossos valley (Fig. 50). In addition, the ratio of length to breadth is greater in the KSP/60 tombs than in what is found in the Knossian pit-caves. The same is true for the overall height from floor to ceiling, which is higher in some of the KSP/60 examples than in the pit-caves. The former also lack the well-defined entrance system of the latter (i.e., either through a well-defined pit with the sides vertical or with one or more ledges to facilitate access to the burial chamber).
KSP/60 sequence of use
This side of the Kairatos, on the slopes of Ailias, may have started to be used for burials already in MM times, in Area A in MM IA (if the cut there is to be understood as a tomb)Footnote 90 and with the construction of the multi-chamber Tomb I in Area B, probably in MM III. The layout of Tomb I, with its three chambers and possible stepped entrance, the presence of MM pithoi, of types associated with burials, and of MM potsherds (perhaps even some of LM I, if indeed this material is associated with burials in this structure) add further weight to the possible funerary use of this structure before the Final Palatial period.
Roof collapse in the antechamber sealed material of LM I date underneath and possibly also made use of this part of the tomb difficult, if not prohibitive. Either at the end of LM I or early in LM II, the eastern chamber of Tomb I started to be used for burials – the first placed near the chamber's original floor. Although the tomb lacked a properly formed stomion or a dromos, it does appear to have been treated during this period as a rock-cut chamber tomb of the LM II–III type. Further episodes of roof collapse occurred in the east chamber and in the antechamber, this time creating a ledge in the latter which allowed water to seep in in the former. Another burial followed (also in a coffin like the first one), possibly in LM II, which seems to have been much disturbed by further water action.
A final episode of roof collapse filled up most of the east chamber, leading to the placement of Burial III (the commingled remains of an adult female and a child, placed perhaps inside a wooden container) on top of collapsed matter (Supplementary Appendix F).Footnote 91 The sealing of the dry-stone wall blocking the entrance ensued, with this action taking place after each burial mentioned above and as also documented in the phasing of the blocking wall's masonry.
After the use of this space for burials, the construction of Tomb II, at a higher level but adjacent to and over Tomb I, destroyed part of the latter (probably at the end of LM II or early in LM IIIA). The construction of Tomb IV, a more canonical chamber tomb, destroyed further one of the corners of the antechamber in Tomb I, an action that probably took place in the fourteenth century BC (LM IIIA). There seems to be very little activity around Tomb I after that point until the field's ploughing and the tomb's modern rediscovery (apart from a later terrace [?] wall, of unspecified date at a higher level over the antechamber of Tomb I: Fig. 14:A).
Tomb II was built after Tomb I. Disturbed and/or looted and ultimately wrecked, the remaining material does not allow for any clear reconstruction of this tomb's use other than to say that (1) it was possibly in use in LM II and IIIA (based on its relationship to Tomb I, ceramic evidence and the presence of clay larnax fragments, if indeed associated with this tomb's burial use); and (2) its encroachment on Tomb I may have been intentional rather than accidental. As already noted, Tombs II and III follow closely in form the re-used version of Tomb I, which may suggest that the builders of the former were aware of the latter's appearance and tried to emulate it. All three of these tombs (including Tomb I in its reused form) can here be considered unusual chamber tombs in the sense that they lack a clearly formed stomion and a dromos,Footnote 92 with their fourth side entirely occupied by blocking walls.
Tomb III appears to have been built after Tomb II, possibly also with clear knowledge of the latter's position as well as of that of Tomb I. No burial was found in this tomb, or any skeletal material for that matter, with badgers considered by the excavators as partly responsible for the disappearance of such traces. The other possibility is that the original burial(s) was removed elsewhere, a practice not uncommon in north-central Crete (e.g. Knossos and Archanes) and in mainland Greece in the late fifteenth to late fourteenth centuries BC.Footnote 93 The piriform jar and brazier support a date of use in LM IIIA1. A few potsherds found below the level of the floor, where the jar was placed, are of an earlier date, and included LM I (Fig. 35b: layers 5–6). The fact that this material continued also under the blocking wall of Tomb III (B.14) might imply that it was brought into the tomb to level up the floor or as part of any other specific action. Fragments of a plain champagne cup of LM IIIA2 or IIIB date, considered by the excavators intrusive, were found at a higher level that the jar on the chamber's floor (Fig. 35b: no. 1). These may well have come into the tomb or been deposited there intentionally as part of an act of final closure, following the collapse of the chamber roof and walls (with this episode probably happening sometime in the second half of the fourteenth century BC).Footnote 94
The last known Bronze Age tomb to have been built in Area B was Tomb IV, equipped with a more canonical looking stomion and a dromos. This tomb was placed at a lower level than the other three tombs, with its east corner abutting (and cutting into) the antechamber of Tomb I. It is not clear whether this action was intentional (though it seems possible). The location of Tomb I was probably roughly known to the builders of Tomb IV, which succeeded in avoiding it for the most part.
The skeletal study suggests that Tomb IV was probably used for more than one burial, though of the earlier burial only two teeth survived (see Appendix). Therefore, the action of removing earlier burials (for reburial elsewhere, or for some other treatment) may have been a practice performed by the tomb-using groups frequenting the KSP/60 area of Knossos.
The main burial in Tomb IV, based on the ceramic material and the glass relief beads, probably dates to the fourteenth century BC (LM IIIA, perhaps even LM IIIA2, the fourteenth century BC being clearly the period with the most visible, archaeologically speaking, funerary record in LBA Knossos).Footnote 95 The body of this young woman was also placed inside a wooden coffin following the ‘tradition’ (or at least, conventional practice) of the tomb-using groups associated with KSP/60. With the closure of Tomb IV following the burial, tomb use in the investigated area came to an end.Footnote 96
As with Tomb I, there is limited post-Bronze Age evidence for activity in the area above or around Tombs II and III, except for some potsherds and a few small finds of a potentially Byzantine/Venetian/Ottoman date. Wall remains, e.g., belonging to potential terraces with a north–south orientation (i.e., following the slope) found in the antechamber and in the dromos of Tomb IV, along with scant wall remains in trials south of the main excavation Area B (interpreted as representing remains of a Byzantine, or later, farmhouse)Footnote 97 suggest that this area attracted people also in later times (Fig. 51).
Glazed shallow bowl fragment. 6.5 × 2.6 cm. Yellow glaze visible in the incisions (marked in grey in the drawing), hard pinky clay, perhaps Late Byzantine/Venetian (fourteenth century AD?). Originally the whole interior surface would have been glazed, but this is no longer preserved (surface very worn). No level/layer recorded (drawing no. 38). SM, Box 307. © BSA.

Given that no post-LM IIIB material was found under the collection of stones over Tomb II and in parts of Tomb I (Fig. 28a), their placement there may have happened anytime between this period and the Late Byzantine/Ottoman times. Their placement, however, does look intentional especially in relation to covering the opening that partially existed over Tombs I and II, which was likely created by subsequent roof collapse episodes and was perhaps exacerbated further by animal activity in the area and exposure to the elements. The placement of stones in this large opening, therefore, sealed the area, making it both safer for people and animals and, with its levelling, more appropriate for future use(s).Footnote 98 It also sealed this context until its re-discovery and excavation in the summer of 1960.
Material culture (Table 2)
The objects that were discovered during the KSP/60 excavation have been presented above in detail. It suffices to say here that if one follows any ‘wealth index’ that scholars have used recently in their analyses of the Knossian burials (e.g. Preston Reference Preston2000; Evangelou Reference Evangelou2009), the KSP/60 tombs would score low in ‘value’, except for Tomb IV, the main burial of which, although not furnished with as many and diverse objects as some other burials at Knossos, nevertheless is closer to the average known ‘score’ in the valley during LM IIIA times.
Artefacts per KSP/60 tomb. Table prepared by Y. Galanakis. Not including ‘miscellaneous finds from Area B’. © BSA.

We believe, however, that a note of caution is long overdue on these ‘value’-based approaches (that became popular since the 1980s and 1990s). It is clear that material culture had many different uses to many different groups around Knossos and that changes were already underway in Neopalatial burial practices.Footnote 99 There is indeed a possibility that the late Neopalatial period may have witnessed, on the whole, fewer burials per tomb (i.e., in LM IA and IB), while the absence of recognisable LM IB burials might result from ‘the curtailing of grave goods observable throughout Crete in MM times’ (Hood Reference Hood and Krzyszkowska2010, 162), making their identification archaeologically difficult.Footnote 100 Alternatively, a different curation and post-funeral treatment of burials during this period may have resulted in their poor archaeological visibility.
Some burials, therefore, of the fifteenth century BC (covering the LM IB, II and IIIA1 styles) may still reflect a late Neopalatial attitude. While this is only a suggestion at present, it is important to seek alternative readings and not just those that suit power relation models of interpretations based on ‘wealth’ indices. If, for example, as we propose here, the very act of burial may have held special social and religious significance, then the use of objects becomes not necessarily an element of social capital and display, but a means for achieving religious and other related (eschatological) aims, and ultimately facilitating the funeral; the presentation of the body bringing closure to what is, and always has been, a difficult moment to deal with for any community.
Pottery forms the most abundant category of objects in the KSP/60 tombs followed by more ceramics, for example pithos and larnax fragments, as well as the wooden chests/coffins used for the burials of most of the – still preserved – individuals in Tombs I and IV. The burials of KSP/60 are described by consistency in practice, constraint in the use of material culture in association with the body, and an interest (as in Neopalatial times) with serving, drinking, and eating (bowls, jugs/jars, cups), all actions most likely associated either with funeral rites and/or with provisions for the deceased's journey ahead. Pottery is all local. The only import is probably a pre-LBA light-on-dark sherd from Area A (A.32).
The only exception is the burial of the young woman in Tomb IV, where more material and artefactual types are attested. The objects found there are associated with the preparation and presentation of the body (e.g. pins, relief beads, the blue matter) and other practical, symbolic actions and concerns (e.g. braziersFootnote 101 and blossom bowls, the latter perhaps referring to the ‘smell, flavour, and colour of saffron as well as the formal dress, jewellery, perfume, and diet of women’ as suggested by Bevan),Footnote 102 all elements, that is, compatible with other contemporary burials in the Knossian valley, the funeral ritual, and the representation of the deceased in death. Overall, the main burial in Tomb IV and its furnishings are consistent with the increased emphasis on adorning the body during the fourteenth century BC at this site (see e.g. Simandiraki-Grimshaw and Stevens Reference Simandiraki-Grimshaw, Stevens, Nosch and Laffineur2012).
Noticeable is the complete lack of painted pottery in association with the main burial in Tomb IV,Footnote 103 and of any clay vessels for that matter that could be used for food or drink, as well as the absence from the KSP/60 tombs of weapons, even more important if Burial I in Tomb I does indeed belong to a man, as suggested by the skeletal analysis. There is also a complete absence of gold and silver objects, semi-precious stones, seals, and signet rings.
Burial conventions: tomb reuse, post-depositional body treatment and object manipulation
The study of the skeletal remains is presented in detail by Nafplioti in the Appendix at the end of this article. Here we offer a summary of the burial practices associated with KSP/60.
The tombs under study had been used for several burials: at least four in the case of Tomb I and at least two in the case of Tomb IV. Based on strontium isotope ratio analyses, Nafplioti suggests that the individuals examined as part of the KSP/60 study had all been born and raised locally at Knossos. In addition, both men and women (young and old) were involved in physically demanding activities prior to their death (Tables 3–4; Appendix).
Summary of burial data, KSP/60. Table prepared by Y. Galanakis. © BSA.

KSP/60 burials: a concise inventory for skeletal completeness, sex, age and the principal pathological and non-pathological modifications recorded. Table prepared by A. Nafplioti. © A. Nafplioti.
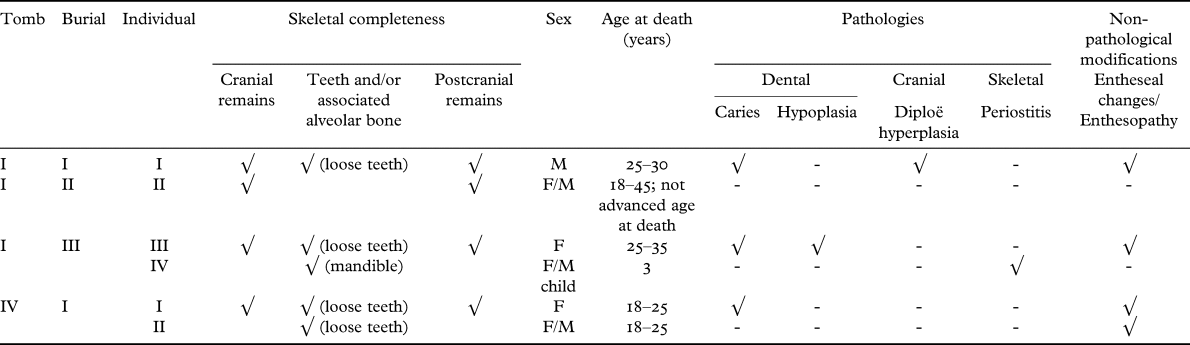
Key: √ = Present, M = Male, F = Female.
The number of burials per tomb is consistent with that observed in other tombs around Knossos in LM II–IIIA (Preston Reference Preston2000). Men, women and a child were buried in these tombs, some – at the time of excavation – still at a primary burial position (Tomb I, Burial I and possibly also Burial II; Tomb IV, main burial), while others are in a secondary state (Tomb I, Burial III). The latter clearly suggests engagement in post-depositional manipulation of the dead – a practice more commonly found in the LBA tombs at Knossos during the fourteenth and early thirteenth centuries BC (LM IIIA – especially IIIA2 – and LM IIIB). Post-depositional manipulation of the dead is manifested further through the practice of thorough bone removal of earlier burials from the tomb to another location outside, as suggested either by the complete absence of skeletal remains and/or by the presence of only very few skeletal/dental remains of other individuals.
Child burials are indeed extremely rare, at present, in the LM II and IIIA record of the Knossos valley. This issue may well relate to poor survival of the bones as well as the lack of systematic sieving which would have allowed even the smallest of fragments to be recovered. Nevertheless, even in those instances where archaeologists have conjectured a child burial, known cases remain extremely few (under 10) (e.g. Evangelou Reference Evangelou2009, 272–3). The burial of the infant (three years old) from Tomb I (Burial III, Individual IV) is the first studied and published burial of its kind from LM IIIA Knossos after more than 150 years of archaeological investigation. Clearly more work on that front is urgently needed to confirm, systematically that is, the presence/absence of the youngest members of society (under 12 years old) in the Knossian burial record.
There is evidence to suggest that earlier burials may have actually been cleared out of the tombs (and this point has been alluded to above): for example, (a) the tooth in the area of Burial I in Tomb I; (b) the two teeth in tomb IV belonging to a different individual from that represented in the tomb's main burial; and (c) the empty chambers of Tombs II and III, which had nevertheless been provided with some objects that are commonly found alongside burials in the Knossos valley. There is, so far, no instance in LM II–IIIA tombs at Knossos of piling up bones or pushing them to one side.Footnote 104 This situation is unlike the one we encounter on mainland Greece, where the piling up of bones (heaps) or pushing of the earlier remains to one side to make space for new interments on the chamber floor was common from early on during the LBA.Footnote 105 At Knossos one finds predominantly primary burials and rarely secondary burials within the same tomb, and there are also tombs that may have been cleared out completely of their original burials with no skeletal remains.Footnote 106
Could the above be suggestive of a hitherto little discussed important approach to burials in the Knossos valley? One that involved the handling and removal of earlier burials (when the time was appropriate to do so and/or certain conditions dictated their removal)? The ways bodies were meant to be handled at a funeral was perhaps conditioned also by age and gender and not just one's social role(s) or standing alone, influencing certain choices: from the containers used to hold the body to the furnishings that would accompany it and the final position of things on or around it and in the grave.
While scholars have acknowledged a shift from multiple burials in Knossian tombs (a practice that would have necessitated the manipulation of earlier remains) to single interments, or at least to very few burials, per grave in late Neopalatial to LM IIIA times,Footnote 107 post-depositional manipulation episodes of the dead, like those identified in KSP/60, should be carefully taken into account when considering this issue. This is so not least as what we see, as archaeologists, as a ‘final’ burial record may in reality – and without attention to site formation, taphonomy and the tomb's history of use – obscure the original number of actions performed therein.
Moreover, the shift to fewer burials cannot explain on its own how bodies were being handled. For example, in the case of individuals I and II in Tomb I, and the main burial in Tomb IV, we observe a desire for burial completeness (i.e., to keep the body whole and bounded, not just during the burial, but forever if possible); while in Tomb IV an earlier burial seems to have been cleared out, most likely for this tomb to receive the new (here called ‘main’) burial. This clearing out may have also been practised in the, otherwise devoid of skeletal remains, Tombs II and III, where very small bones from earlier burials might have been missed because of lack of systematic sieving as noted above, and also just before the LM II–IIIA use of Tomb I (where no signs of any Neopalatial burials were found, with the exception of one tooth, the context of which, however, is only given as ‘from the area of Tomb I’).
In one instance (Burial III in Tomb I), it was felt that the remains of a woman and a child should be buried together in the east chamber of Tomb I, at a level higher than Burials I and II and near the chamber's roof, suggesting perhaps an effort to link these two individuals to this burying group.Footnote 108 We have interpreted here the commingled remains of the woman and child as representing a secondary burial. Were these individuals originally buried in Tomb I and perhaps due to the ongoing roof collapse placed, after decomposition, in a wooden box for protection? Or should we understand the treatment that these two individuals received as presenting us with evidence for exhumation, from their original place of deposition (i.e., not in Tomb I), and re-burial in the uppermost layer of the east chamber of Tomb I?
While it is impossible to give a clear answer to this question, two important points emerge: firstly, exhuming burials, for possible re-burial, and clearing out tombs were practised at Knossos, revelatory of the body management concerns of the KSP/60 and of LM II–IIIA tomb-using groups more generally. If bones were indeed manipulated in such a way, as the one proposed here, this practice could account for the smaller number of burials we get per tomb (with the lack of systematic sieving, unfortunately, proving detrimental in confirming fully this hypothesis). Secondly, even when bodies are removed or re-buried, there is (to the extent possible) an interest in ‘completeness’ – by bodies left intact as at the time of the funeral (e.g. Burials I and II in Tomb I and the main burial in Tomb IV), or by removing them entirely (e.g. the clearing out of the Neopalatial burials and Tombs II–III), or by reburying them (Burial III, Tomb I, with the woman and child perhaps understood as forming ‘one body’, if they indeed had, as may well be the case, a familial relationship).
This interest in ‘completeness’ probably emerged in late Neopalatial times, as suggested by the use of wooden biers/stretchers and body presentation in some of the Poros tombs,Footnote 109 and became stronger, as a concept, with the use also of wooden chests/coffins from LM IIFootnote 110 to at least the earlier part of LM III, when they seem to have been superseded by their clay counterparts, the larnakes.Footnote 111 In our case, the evidence for the existence of sides and ends of rectangular wooden containers seemed to point to the existence of coffins, some of them at least with lids. We may, therefore, be dealing with the formation of a new, and wider, conceptualisation of the body in death, both in terms of its manipulation and treatment and its, progressively inalienable, relationship to material culture.
Are we to understand this transformation as suggesting eschatological changes during (late?) Neopalatial and Final Palatial times, with completeness associated somehow with new or renewed beliefs, for example about the afterlife? An answer to this question is not forthright – but to identify the practice of clearing out earlier burials, their exhumation and reburial, as well as the interest in ‘completeness’ in some LM II–IIIA burials in the Knossos valley has significant implications as to how these burials were approached and understood socially, and specifically, how bodies were treated in these contexts, perhaps also accounting for the low numbers of burials per tomb.Footnote 112
Why, then, were some burials left in place (e.g. Burials I and II in Tomb I), while others were removed? Could the answer to this question relate to a specific amount of time that was deemed necessary before such a practice could take place (e.g. following the complete decomposition/skeletonisation of one's body)? Or did it perhaps relate to the tomb-using group's presence in the area (i.e., for as long as they were there, able to visit or reuse the tomb, burials could be left intact)?Footnote 113 Any future study should adopt an integrated approach, one that includes aDNA analysis for a firmer detection of family relations between the people buried in this and other clusters of tombs in the Knossos valley,Footnote 114 not least to see the extent to which family relations played a role in the assignment of burials to graves and how these related burials then cluster, or not, in the mortuary landscape.Footnote 115
None of the bones examined from KSP/60 bears any trace of fire. The only fire remains (charcoal) are associated with the lighting of the tomb, for example the braziers in tomb IV, one of which (IV.2) was presumably unused and placed by the burial. The other brazier (IV.1), used and filled with charcoal, was placed in the corner of the tomb where it met the antechamber of Tomb I, making one wonder as to whether the use of this second brazier had more to do with the connection of the two chambers rather than – only or exclusively at least – with the main burial in Tomb IV (Figs 13, 42b).Footnote 116
The continuous use of wooden chests/coffins can be understood as representing a conventional practice for the groups using Tombs I and IV. The use of such body receptacles goes back to, at least, Neopalatial times (MM III) as suggested by the well-documented evidence in the Poros tombs, north of Knossos (Muhly Reference Muhly1992; Dimopoulou Reference Dimopoulou1999; Dimopoulou-Rethemiotaki Reference Dimopoulou-Rethemiotaki, Cadogan, Hatzaki and Vasilakis2004; Preston 2004b). One of the wooden chests/coffins from KSP/60, that embracing the female burial in Tomb IV, may have been painted blue reminding us of similar coffins from around the Knossos valley bearing this colour (cf. IV.8).Footnote 117
While clay larnakes are attested at KSP/60, they are all fragmentary and their exact relation to the tombs remains unclear, i.e., whether some of the burials in Tombs I–III were originally placed in a clay larnax, only later to be removed and with the clay larnakes broken and left behind, or whether these fragments represent fallen material from tombs/burials high up on the slope (see discussion on fragmentation below).Footnote 118
At least two of the primary burials (Tomb I, Burial I, and the main burial in Tomb IV) had the upper limbs folded and the lower limbs very tightly flexed, as recorded at the time of excavation, perhaps also in an effort for these bodies to fit within the associated wooden receptacle. Burial II in Tomb I was probably placed in a supine position within a wooden chest/coffin.Footnote 119
The partial (and, probably, over many episodes) roof collapse of Tomb I did not deter people from (re)using it for more burials with entries for Burials II and III in that tomb necessitating the removal of only part, each time, of the blocking wall.Footnote 120
The fragmentation of larnakes, and possibly also of the jugs/jars, in Tombs I–III may relate to acts leading to the final closure of these tombs. In Tomb III, a fragment of a clay larnax was found below the north end of the blocking wall. Although it may well have come to this area, along with soil, in an attempt to level it prior to the building of the blocking wall (as hypothesised at the time of excavation) (Notebook p. 1; SH notes p. 2), it is equally possible that it was intentionally placed there – a practice, of embedding fragments at stomia, which is attested in other tombs in the Knossos valley and beyond. Something similar appears to have happened in Tomb II, with these two tombs also sharing the use of piriform jars, both of which were found broken.Footnote 121
The fragmentation of jar III.1 inside Tomb III may well (also?) be due to the collapse of the roof and/or water seeping in (resulting in the placement of part of its rim above and within brazier III.2).Footnote 122 However, the fact that no earth change was observed between the ‘floor’ level of Tomb III and the fill below, where more ceramic fragments were found, could reinforce the idea that the position of objects was due to natural taphonomic processes as opposed to human agency. The placement of part of the jar's rim inside the brazier, the conical cup under the blocking wall (Supplementary Appendix D, B.14),Footnote 123 and the carved stone set at the stomion could all lend some weight to the idea that we may be dealing here with intentional fragmentation and curation marking the final closure of Tomb III (with the champagne cup also marking the end of Tomb III's use: III.3).Footnote 124
A LM I jug (I.16, I.17, I.28) was also found in fragments in the area above Burial III in the east chamber of Tomb I and outside of it, in the antechamber. Larnax fragments have also been noted around Tomb I (east chamber) and Tomb II. The situation here, however, is less clear to hypothesize the scenario envisaged for Tombs II and III, which share between them a lot more similarities (for example, both Tombs II and III were found empty of skeletal remains; they shared dimensions and overall plan, and yielded similar finds).
It is possible, therefore, to assume that people at the time associated the act of fragmentation with ‘ending’ – the latter, of any type, causing fragmentation in peoples’ relations and emotions. That these acts may be associated with the final closure of some fourteenth century BC or early thirteenth century BC tombs may have to do with how people dealt with certain anxieties, including the need to come to peace with those originally interred in the grave, which would therefore not have been visited past that point.Footnote 125
KSP/60 in context: ramifications and future directions
The implications stemming from this study can be summarised in the following way.
First, locating a grave was a very important decision for tomb-using groups around the Knossos valley, and especially in LM II–IIIA, where landscape associations may have mattered the most, as already noted above. Even more so in the case of KSP/60, where a direct connection was established with an earlier, Neopalatial, tomb. Reuse of earlier graves is often seen in Aegean scholarship as reflecting inability to mobilise labour to construct a new tomb, or an interest in maintaining links to existing burial places.Footnote 126 Although we cannot exclude the former, in the context of KSP/60, and in particular of Tomb I, we may be dealing with people who were interested in maintaining links to the (not-so-distant) past, while at the same time adapting, or developing, practices according to the needs of their time (e.g. the use of wooden coffins, the emphasis placed on ‘completeness’, and as a result of that the significance of ‘fragmentation’). This impression gains some further support from the construction next to Tomb I of two more chamber tombs which, as argued here, appear to emulate the architecture of the reused east chamber of Tomb I. The builders of Tomb II also clearly interacted with Tomb I by removing part of the latter's blocking wall.
Second, clearing out episodes involving the removal of earlier burials, as perhaps was the case in Neopalatial Tomb I, and Tombs II–III, and the earlier burial in Tomb IV, are important not only for providing us with more information regarding the practices performed, but also because they may impact on the tombs’ original number of burials. For example, the fact that we lack intact LM IB burials may also be due to the interaction of communities around the Knossos valley in LM II–IIIA with these, earlier, remains – an interaction that may have led, or at least contributed, to the disappearance of some of these Neopalatial burials from the archaeological record and the, seemingly low, number of burials per tomb in the fifteenth and fourteenth centuries BC.
Third, the identification of Burial I in Tomb I, as quite probably belonging to an adult male (18–25 years old) underlines that not all men were presented at death as ‘warriors’ – this is suspected for a number of cases in the Knossos valley,Footnote 127 and it has also been noted on mainland Greece;Footnote 128 but lack of skeletal studies and an emphasis on ‘warrior burials’ have side-lined this group of male burials to the detriment of how gender was constructed (and perceived) with, and without, the use of martial accoutrements in LM Knossos. This is clearly a topic that requires further investigation – one that has the potential to yield some excitingly new, and much needed, perspectives to the study of these contexts and of the individuals buried in themFootnote 129 – i.e., how their personas were structured through the presence/absence of material culture.
Fourth, stemming from the point just made above is the use of material culture in the tombs under study more generally. It is fair to say that by past (and current) standards, these tombs would have been perceived as ‘poorly furnished’. Indeed, following Evans’ approach, they would be deemed as belonging to ‘paupers’.Footnote 130 Although archaeological thinking since Evans’ days has clearly moved on, nevertheless this notion is still present in the literature of the period. Material culture, however, need not have played the same role for all burying groups, let alone for groups across different periods and/or regions.
The groups associated with Tombs I–IV were interested in (a) providing the dead with a specific sepulchre for deposition; (b) containing the body of the deceased in a wooden container; (c) clearing out, where possible, earlier remains (post-depositional treatment of the dead); and (d) providing these spaces and bodies with objects necessary for one's persona in death and for ritual action.
Particularly in the case of the young woman's burial in Tomb IV, the careful selection and use of objects furnished the deceased with ‘appropriate’ items, ‘appropriate’ perhaps because of her age and role(s) in life, but also for the image the living were trying to create for this individual at death: the relief beads,Footnote 131 the bone/ivory pin(s), the repurposed blossom bowls (the highest known number of such vessels associated with a single burial),Footnote 132 and perhaps the braziers were all deemed necessary for this young woman's send-off.Footnote 133 This is an image that recalls the so-called ‘young priestess’ painted on the West House at Akrotiri, who appears to be a few years younger than the young adult female in Tomb IV.Footnote 134
The association with pre-existing tombs, emphasis on the use of a specific location, and the providing of the deceased with a burial in a visible, durable (to the extent possible) grave were deemed socially important. A burial in itself in a defined space, a tomb of any kind, may have been reserved for a small group of the entire population, perhaps with the majority either receiving a simpler treatment, therefore more difficult to identify archaeologically thousands of years later, or buried in ways that would have resulted in these bodies eventually becoming invisible (see e.g. Hatzaki Reference Hatzaki, Relaki and Papadatos2018). For all the above, burials should not be viewed, exclusively or primarily, as providing us with glimpses onto the power relations of past societies,Footnote 135 or on the entire population for that matter. We may only be dealing with a fraction of it. For this reason, it is important to reconsider burials for what they actually were: part of funerals that is, of social experiences, and of wider relations.
Fifth, the excavation of KSP/60 provides us with an important case study on the use of wooden coffins and of body manipulation in a LBA chamber tomb context at Knossos.Footnote 136 By doing so, it adds to the ongoing discussions on the treatment of the human body in death at this site, and more broadly in Crete and the Aegean; and on practices of ‘completeness’ and ‘fragmentation’.
On the one hand, there is a clear interest in the KSP/60 tombs in containing bodies in wooden coffins, whether we are dealing with primary burials (e.g. Burial I and possibly Burial II in Tomb I, and the main burial in Tomb IV) or secondary ones (e.g. Burial III in Tomb I). On the other hand, there is also evidence for the interaction of people entering these graves with earlier burials (post-depositional treatment), which probably involved the manipulation of bones and their removal from the tomb – either for burial in another context (as might have been the case with Burial III in Tomb I); or for re-deposition/disposal in ways that may not leave, easily or necessarily, archaeological traces (e.g. at sea).
In those contexts where we find complete, in situ, burials, we also find ‘completeness’ in the material assemblage that accompanies them. But in those contexts where tombs seem to have been emptied of their original burials and associated objects, we encounter ‘fragmentation’. This pattern, while it may seem obvious, perhaps resulting in the latter case from post-funerary disturbances including pilfering, could reveal a hitherto little explored element of the burial experience at Knossos in the period under investigation: that in those instances where the removal of an earlier burial was required, ‘fragmentation’ might have constituted an essential part of the ensuing ritual – even more so if that ritual was an act of ‘closure’, leading to the end of a tomb's use,Footnote 137 an intentional act.
Moreover, and if the hypothesis presented above is correct, the tomb-using groups associated with these contexts had a particular interest in emptying the graves (already from late Neopalatial times, but certainly by LM II). Burial III in Tomb I, the secondary deposition of the woman and child, does seem to lend weight to the idea that moving remains from one location to another was indeed performed at Knossos in LM II–IIIA times.
The implication stemming from the identification of such a practice, if correctly recognised here, is that it adds further support to the idea that ‘cenotaphs’ were tombs where the primary burials, at some point, were removed and placed elsewhere (as attested in other tombs in the Knossos valley and beyond, including mainland Greece in the fifteenth and fourteenth centuries BC in particular).
The use of coffins, wooden and clay, may have therefore helped both with the funeral and the final presentation of the deceased individual, not least by also protecting the body from the elements and animal activity. More importantly, however, for our discussion here, this use may have also provided the body with a container within which skeletonisation could take place, facilitating in this way the easier and complete removal of bones, if that was indeed what was required, maintaining one's ‘completeness’ even after skeletonisation had taken place (Fig. 42a).
EPILOGUE
This publication makes available the record of an excavation that took place more than 60 years ago of a few individuals interred near Knossos some 35 centuries earlier. Reflecting on the time that has passed, we hope that this study becomes not only a source of additional archaeological information, but also a reason for the systematic re-examination of all those burial contexts which in the past have yielded skeletal remains but few or no finds.
Additionally, we hope that this study offers an opportunity to reflect on the funeral, as an experience, and to rethink how material culture was used in LBA burials in direct association with the individuals that were buried in these graves. These individuals, after all, were the main reason why people gathered in a particular location, decided to treat the deceased's bodies, performed rituals, and furnished them accordingly.Footnote 138 It is from them, and for them, that any mortuary investigation should begin.
APPENDIX: THE KSP/60 BURIALS. READING THE BONES, by Argyro Nafplioti
Introduction
The human skeletal remains from KSP/60 consist of bones and teeth from Tombs I and IV only. These bones were collected and stored for each tomb separately. Along with the determination of the minimum number of individuals represented by this material, and their biological sex and age at death, where possible, this study aims to shed light onto people's lifeways through evidence for their skeletal and dental health and activity-related (non-pathological) modifications of the skeleton, and also to give insights into the mortuary practices of the community that used this cemetery.
The human remains studied belong to inhumations in the interior of the tombs. Bone preservation and skeletal completeness is poor, largely due to taphonomic processes and bone degradation, and ranges from below 10 per cent to below 40 per cent. During excavation the soil was not sieved systematically, which resulted, most likely, in the further loss of small bones and bone fragments. Further loss occurred in the period that intervened between excavation and study of this material: for this reason, there is some discrepancy between the excavators’ sketches of the skeletons and the skeletal completeness forms presented here and which are based on the remains extant today (Figs 52 and 53).Footnote 139 All percentages provided below are based on the extant remains.
Skeletal inventory (bone preservation) of Individuals I–IV (anterior view), Tomb I. © Argyro Nafplioti/BSA.

Skeletal inventory (bone preservation) of Individual I (anterior view), Tomb IV. © Argyro Nafplioti/BSA.

Despite these shortcomings, however, the burials were most probably made in the tombs in the form of complete cadavers. To explore this topic with the aim to offer insights into the use of the tombs, the associated mortuary practices, and the post-depositional manipulation of the dead, we will use observations from the excavation photographs and report, as well as bioarchaeological data on bone distribution inside the tombs, on skeletal completeness and the presence of smaller bones in particular.
In addition, largely due to the dating of these burials in the period immediately following the widespread destructions on the island of Crete around the end of the LM IB period, and the proximity of the KSP/60 burials to the Palace of Knossos, these burials are relevant to the question of a so-called ‘Mycenaean’ (mainland) presence at Knossos (from LM IB/II onwards according to some scholars).Footnote 140 Concerning the earlier burials in KSP/60 Tomb I, in particular, the excavator of the site, Sinclair Hood (pers. comm., 2006 and in an earlier, unpublished, draft of the excavation report) noted that it would be interesting to know whether ‘these were newcomers from the mainland of Greece and their descendants or native Cretans, or a mixture of both’.Footnote 141 Here the author will summarize and discuss published strontium isotope results, which are relevant to the KSP/60 burials in order to explore the geographical provenance of these people.
Materials
As mentioned above, the preservation and completeness of the KSP/60 skeletal material studied are poor. Bone surface is normally severely weathered due to natural agents, mainly microbial attacks, soil properties, water activity, humidity and high temperature (Nielsen-Marsh and Hedges Reference Nielsen-Marsh and Hedges2000), to a degree that it is often very difficult to record the subperiosteal and ectocranial bone surfaces for probable pathological modifications. Trabecular bone is damaged, the epiphyses of long bones are missing, and the shafts are fragmented. The skeletons are mainly represented by long bone shaft fragments, a few cranial fragments (predominantly of the cranial vault) and in most cases by not more than two or three loose teeth. The Minimum Number of Individuals (MNI) represented by the studied skeletal remains was calculated as five adults and one child (Tables 3–5).
Age categories used in the KSP/60 study. Table prepared by A. Nafplioti. © A. Nafplioti.

Methods
Incompleteness of the skeletal material from these tombs has set certain limitations to the applicability of the widely used methods of analysis of human remains (Buikstra and Ubelaker Reference Buikstra and Ubelaker1994). In particular, estimation of the age at death for the individuals examined rarely used information on the epiphyseal fusion of the long bones (McKern and Stewart Reference McKern and Stewart1957; Krogman and İşcan Reference Krogman and İşcan1986; Buikstra and Ubelaker Reference Buikstra and Ubelaker1994), or the morphological changes on the pubic symphysis or the auricular surface of the os coxae (Brooks and Suchey Reference Brooks and Suchey1990), which are among the more reliable skeletal age indicators (White and Folkens 2000, 349).
In most cases, a relatively precise age-estimate was obtained by analysis of dental development and dental attrition / tooth wear (Tables 6–9). The presence of fully developed third molars was taken as evidence that the examined individual had reached adulthood by the time (s)he died (Ubelaker Reference Ubelaker1989). An even more precise age-estimate was obtained by dental wear data, an overall reliable method of age-determination for a variety of living and dead populations (Molnar Reference Molnar1971; Mays Reference Mays1998). Cranial suture closure was scored (following Meindl and Lovejoy Reference Meindl and Lovejoy1985), and was also used to age the individuals studied. Because the timing and degree of suture closure is population, and possibly also sex, specific (Perizonius Reference Perizonius1984; Key, Aiello and Molleson Reference Key, Aiello and Molleson1994), suture closure data were calibrated against age-estimates based on dental wear, where applicable, and were compared to similar data from other collections from Crete, which the author has studied. In cases where neither teeth nor evidence for cranial suture closure were available, adult individuals were assigned to two broad age-categories (18–45 and 45+) on the basis of the morphology of the bones and the absence or presence of age-related skeletal modifications, respectively.
Assessment of the morphology of the os coxae for the purposes of sex-determination was not possible for any of the tested individuals. Instead, biological sex was determined from certain aspects of the cranial and mandibular morphology. In cases where the skull was also absent, the recorded skeletal elements were tentatively assigned a probable sex on the basis of their overall size and robusticity, according to the widely accepted notion that males are bigger and more robust than females of the same population (White and Folkens 2000, 362). Where applicable, these specimens were compared to similar ones from more complete, hence more reliably sexed, individuals from the same skeletal collection, which were used as the population-specific standards for sex-determination. Data on the sex and age at death for poorly complete adult skeletons should be treated with extreme caution. Moreover, it was not possible to estimate living stature for any of the individuals in this assemblage, owing to the incompleteness of the long bones.
The presence and severity of pathological skeletal modifications were recorded as by Buikstra and Ubelaker (Reference Buikstra and Ubelaker1994). This study also recorded non-pathological skeletal modifications. It scored entheseal changes (Villotte and Knüsel Reference Villotte and Knüsel2013), i.e., hypertrophic development of sites of muscle/tendon/ligament attachment, mainly on long bones of the post-cranial skeleton. Nevertheless, all postcranial elements were scored for such changes. In the literature, entheseal changes/enthesopathies are normally attributed to excessive mechanical loading of the respective muscle and skeletal elements in the course of physical activities and are thus described as activity-related (Capasso, Kennedy and Wilczak Reference Capasso, Kennedy and Wilczak1999). In some cases, however, these lesions may be linked to disease (Rogers and Waldron Reference Roger and Waldron1995, 24). Severity of entheseal changes/enthesophytosis may have an age component too, as the result of many years of wear and tear of tendons and ligaments (Mann and Murphy Reference Mann and Murphy1990, 91). In the present study these modifications were scored on a three-grade scale (0–2), where 0 stands for complete absence or insignificant changes, while grades 1 and 2 describe minor and advanced modifications, respectively. This study records data on hypertrophic changes of muscle attachment sites on the skeleton largely as evidence for levels of (mechanical) stress linked to physical activities, rather than to infer specific activities. Moreover, surface weathering for all specimens studied was also scored on a three-grade scale as slight, moderate or severe.
As in the recent study of the Kalochorafitis LBA skeletal material by the author (Nafplioti Reference Nafplioti, Karetsou and Girella2015), the use of the KSP/60 tombs, the associated mortuary practices, and evidence for post-depositional manipulation of the dead will be investigated through observations made from the excavation photographs and the excavation reports as well as bioarchaeological data on the distribution of the skeletal remains inside the tombs, skeletal completeness, the representation of the main anatomical skeletal regions and the presence of smaller bones (e.g. hand/foot bones, vertebrae). As a general rule, in any burial context, the presence of some of the smaller bones of the skeleton (i.e., vertebrae, ribs, bones of the hand and foot in particular) hints to primary deposition sites/burial contexts: where the dead were originally placed to skeletonise. By contrast, a preponderance of skull and long bones is normally expected to reflect secondary contexts (Carr and Knüsel Reference Carr, Knüsel, Gwilt and Haselgrove1999; Baxter Reference Baxter1999, 6; Dowd Reference Dowd2008). For a concise inventory recording the skeletal completeness, sex, age and principal pathological and non-pathological modifications of the individuals from KSP/60, see Table 4.
Strontium isotope ratio (87Sr/86Sr) analysis of human tooth enamel was applied to four of the five adult burials examined in order to explore the geographical origin(s) of these people and distinguish between locals and non-locals at the site. The principles of 87Sr/86Sr analysis in research of this kind are well documented (Price, Burton and Bentley Reference Price, Burton and Bentley2002; Bentley Reference Bentley2006; Evans, Montgomery and Wildman Reference Evans, Montgomery and Wildman2009) and have also been extensively discussed in earlier relevant work by the author together with the geological context of strontium isotopic research in the Aegean (Nafplioti Reference Nafplioti2008; Reference Nafplioti2011; Reference Nafplioti, Kaizer, Burger and Schier2012). The analytical protocol for 87Sr/86Sr analysis, including procedures of sample extraction and sample preparation prior to analysis, have been described in earlier publications (Nafplioti Reference Nafplioti2008; Reference Nafplioti2009; Reference Nafplioti2011). Preparation and analysis of the samples were carried out at the National Oceanography Centre in Southampton, where the actual 87Sr/86Sr values were measured to the sixth decimal digit by a VG-Micromass Sector 54 Thermal Ionisation Mass Spectrometer.
Data and analysis
Tomb I
Individual I (Burial I), Tables 3, 4, 6
This individual is identified as probably an adult male. The postcranial skeleton is less than 35 per cent complete and poorly preserved (Fig. 52). Long bone shafts are fragmented, and the epiphyses are missing (Fig. 54a). The cranium is 50 per cent complete; it is represented by 39 identifiable fragments and an additional 24 small-sized, unidentified fragments.Footnote 142 One incomplete hand phalanx (the distal half of the proximal fourth phalanx) and 10 loose teeth are also present.
(a) Long bones of Individual I, Tomb I. (b) New bone formation on the palmar surface of a left hand phalanx of Individual I, Tomb I. (c) Caries on the upper left canine (on the cemento–enamel junction) of Individual III, Tomb I. (d) Hyperplasia/hypertrophy of the cranial diploë and concomitant thinning of the outer table of the cranial vault, Individual I. (e) New bone formation in the form of irregular bony outgrowths on the superior–anterior lateral end of the right clavicle of Individual III, Tomb I. (f) Right and left femora of Individual II, Tomb I. (g) Child mandible, Individual IV, Tomb I. (h) Canine caries, Individual III, Tomb I. © Argyro Nafplioti/BSA.

A probable male sex was tentatively assigned to this individual based on the morphology of the processus marginalis on the zygomatic bones of the cranium and on the robusticity of its post-cranial skeleton.Footnote 143 Analysis of dental wear suggests that at death this was a middle adult, aged between 25 and 30 years. The degree of fusion of small portions of the coronal, sagittal and lambdoid cranial sutures, which could be scored on the recovered cranial fragments, is in general agreement with this age-estimate.
According to the excavator, Individual I may have been originally placed upright inside a wooden chest/coffin, which later – upon decomposition and other disturbances – fell inside, resulting in the scattered arrangement of the bones.Footnote 144 Based on observations from the excavation photos made by the author, on the representation of the major anatomical regions and the presence of one hand bone, Individual I had been interred as a primary, articulated burial with the upper limbs folded on the abdomen and the lower limbs flexed, which, following skeletonisation of the body, was disturbed mainly due to natural processes (Figs 16:right and 17:top).
Dental, cranial and postcranial pathology
Individual I had suffered dental carious lesions in three out of the 10 teeth, which were collected with the remains of this burial (Table 6).Footnote 145 All three caries originated from the inter-proximal region (the surface of the tooth crown that is in contact with the preceding or succeeding tooth in the maxilla/mandible). The lesion on the maxillary right first premolar (URPM3) extended onto the occlusal (biting) surface and is small. The other two caries are on successive teeth on the left side maxilla: the maxillary left second premolar and first molar (ULPM4 and ULM1). Caries are located on the cemento–enamel junction of the two teeth, on their contact areas. In both cases, lesions are severe and have exposed the pulp cavity. This would have caused much inconvenience to the individual and probably resulted in infection of the supportive tissues, abscess, and necrosis of the tooth (Ortner Reference Ortner2003, 592). Although no associated alveolar bone was found with the teeth, the position of the caries on the cemento–enamel junction suggests resorption of the alveolar bone and exposure of the root to the causative agent of the caries (Aufderheide and Rodriguez-Martin Reference Aufderheide and Rodriguez-Martin2008, 404). Dental wear, which is commonly implicated in the aetiology of the resorption of the alveolar bone (Brothwell Reference Brothwell1981, 154), was not found to be severe enough for this individual to have introduced recession of the alveolar bone. Alveolar resorption may also be associated with periodontitis, that is the inflammatory response (usually bacterially induced) of the alveolar bone and adjacent tissues to one or more irritants. A common irritant is calculus and its precursor, bacterial plaque, which consists of protein, food particles, and living and dead micro-organisms (Ortner Reference Ortner2003, 593; Aufderheide and Rodriguez-Martin Reference Aufderheide and Rodriguez-Martin2008, 401). Although calculus was not present on any of the two carious teeth, it was recorded on the healthy maxillary right second molar (URM2) (Brothwell Reference Brothwell1981, 155). Slight calculus (Brothwell Reference Brothwell1981) on this tooth is deposited just above the cemento–enamel junction and it runs intermittently around the circumference of the tooth crown.
Dental chart: Tomb I, Individual I. Prepared by Argyro Nafplioti. © A. Nafplioti.

As observed from the six parietal bone fragments recorded, the cranial walls are thick (maximum thickness was measured as 10.3 mm), and there was hyperplasia of the diploë with some concomitant thinning of the outer table of the cranial vault (Fig. 54d). This is probably associated with diet-induced anaemia, i.e., megaloblastic anaemia due to B12 and B9 vitamin deficiency, or iron-deficiency anaemia (Walker et al. Reference Walker, Bathurst, Richman, Gjerdrum and Andrushko2009; Oxenham and Cavill Reference Oxenham and Cavill2010). Cribra orbitalia, i.e., pitting of the orbital roof, which had long been considered to share a common aetiology with the hypertrophy of the diploë (Stuart-Macadam Reference Stuart-Macadam, Iscan and Kennedy1989; Ortner Reference Ortner2003), was not present on the incomplete (less than 20 per cent) right orbital plate of this individual. This finding is in agreement with more recent work that showed the two to be inversely related (Wapler et al. Reference Wapler, Crubézy and Schultz2004; Aufderheide and Rodriguez-Martin Reference Aufderheide and Rodriguez-Martin2008, 350; Walker et al. Reference Walker, Bathurst, Richman, Gjerdrum and Andrushko2009; Rothschild et al. Reference Rothschild, Zdilla, Jellema and Lambert2021). Unfortunately, ectocranial bone weathering made recording of any probable ectocranial pathological modifications difficult.
Muscoloskeletal stress markers: observations
Νew bone formation (an outgrowth of lamellar bone) on the palmar surface of the left phalanx (Fig. 54b), on the mesial edge of the bone shaft, is most probably an activity-related modification. This is the attachment site for the flexor tendons. Entheseal changes / hypertrophic changes on this muscle attachment site are associated with excessive mechanical stress and flexion when holding an implement (e.g., tool, instrument) in a firm grasp (Capasso, Kennedy and Wilczak Reference Capasso, Kennedy and Wilczak1999, 94).
On both femora of this individual, shaft circumference at the sub-trochanteric region is less circular than usual resulting from the comparatively narrow anterior–posterior diameter of the femoral sub-trochanteric shaft. Thus, the two bones appear to be stronger in the mesio-lateral than the anterior–posterior shaft diameter. This condition is termed platymeria and its aetiology is rather complex (Buxton Reference Buxton1938; Schofield Reference Schofield1959; Gilbert and Gill Reference Gilbert, Gill, Gill and Rhine1990; Capasso, Kennedy and Wilczak et al. Reference Capasso, Kennedy and Wilczak1999). Specific subsistence strategies and types of physical stress are thought to be the most common factor accounting for platymeric femora (Ruff and Hayes Reference Ruff and Hayes1983). Platymeric femora have greater mesio-lateral strength than eurymeric femora, which allows them to sustain greater impact stress induced through the femoral head and greater abduction forces that peak with climbing and rapid walking (Ruff, Larsen and Hayes Reference Ruff, Larsen and Hayes1984; Capasso, Kennedy and Wilczak Reference Capasso, Kennedy and Wilczak1999, 102). Platymeric femora were also found in other, earlier Bronze Age assemblages at Knossos, also studied by the author. Increased muscular forces operating on lower limbs when walking over steep or uneven terrain are also consistent with the diaphyseal flattening of the tibia at the midshaft region (at the level of the nutrient foramen) (Capasso, Kennedy and Wilczak Reference Capasso, Kennedy and Wilczak1999, 113). This condition is known as platycnemia and was clearly observed on the left tibia of Individual I. Moreover, the portion of linea asperaFootnote 146 preserved on the posterior of the femur is thick and slightly pronounced (i.e., minor entheseal changes).Footnote 147 This one too is a non-pathological, activity-related skeletal modification that should be associated with high mechanical loading of the muscles attached directly to the linea aspera during the performance of physical activities involving the lower limbs (Capasso, Kennedy and Wilczak Reference Capasso, Kennedy and Wilczak1999, 103–4).
Individual II (Burial II), Tables 3–4
This skeleton belongs to an adult individual. It is the most severely weathered and most incomplete skeleton in the assemblage studied: less than 20 per cent of the skeleton is present (Fig. 52). The severe erosion of the ectocranial and subperiosteal bone surface has obliterated any probable evidence for pathological or non-pathological osseous surface modifications. The right and left femora are represented by nine fragments (Fig. 54f). There are also two fragments from the proximal shaft of a left side ulna and an incomplete left side radius. The skull is represented by two small-sized fragments of the frontal bone, and there were no teeth.
Based on observations of the author made from the excavation photos and the drawing regarding the distribution of skeletal elements in the tomb, as well as the representation of the main anatomical skeletal regions, this burial appears disturbed (Figs 16:middle and 17:bottom). Yet, and despite skeletal incompleteness and the absence of small bones associated with this burial, judging from the distribution of the bones, the individual had most probably been interred in the form of a complete cadaver, most likely contained in a long wooden chest, or coffin, placed north–south across the middle of the chamber.
Neither the sex nor the age at death of the individual could be reliably determined, due to severe skeletal incompleteness and the absence of reliable sex-and age-indicators. The absence of age-related osseous modifications from the linea aspera on both his/her right and left femora is compatible with a not advanced age at death for this individual (18–45 years old).
Individuals III and IV (Burial III), Tables 3–4, 7–8
At least two individuals are represented by the skeletal material collected by the excavators as ‘Burial III’: a probable adult female (Individual III) and a child (Individual IV). The adult skeleton is 50 per cent complete and is the most complete in the KSP/60 assemblage (Fig. 52). Severe weathering of the bone surface made recording of any probable subperiosteal or ectocranial pathological or non-pathological modifications difficult. Severe weathering had also impacted on the harder dental enamel surface, making impossible the scoring of hypoplastic lines on two of the three loose teeth that were collected.
Dental chart: Tomb I, Individual III. Prepared by Argyro Nafplioti. © A. Nafplioti.

A probable female sex was assigned to the adult individual based on the morphology of the occipital bone (i.e., rugosity of the nuchal ridge). This is corroborated by the gracile morphology of the post-cranial skeleton. Further, based on the wear of the maxillary right first molar (URM1) associated with this individual, she was assigned an age-at-death between 25 and 35 years.
The second individual represented by the skeletal material collected as Individual IV is a child, identified from an incomplete mandible, which comprises 75 per cent of the right side and less than 5 per cent of the left side of the bone, respectively (Fig. 52). Bone preservation is good and contrasts that of the adult bones, with which it was collected. Apart from this incomplete mandible, however, there is no other bone in the assemblage that can be associated with a child. Two deciduous right molars (dM1, dM2) are present on the mandible, while the crown of a permanent M1 had fully formed in the socket and can be observed inside the alveolar bone (Table 8). Based on dental development (Hillson Reference Hillson2002, 144–5), this individual was approximately three years old at the time of his/her death.
Dental chart: Tomb I, Individual IV (deciduous dentition and permanent LRM1). Prepared by Argyro Nafplioti. © A. Nafplioti.

The excavator had described burial III as ‘exceedingly contracted’.Footnote 148 From the photos and drawings, these bones were set in a very small area, c. 0.30 x 0.40 m. Based on the representation of the major anatomical skeletal regions by the material studied and the absence of small bones as well as the author's own observations from the excavation photos (Figs 16 and 17:bottom), it is best to attribute the arrangement of the remains of Individuals III and IV at the rear of the tomb chamber to a secondary treatment of burial III.
Dental and skeletal pathology
Two of the three maxillary teeth associated with Individual III had suffered carious lesions (Table 8). Two dental cavities were scored on the upper left canine (Fig. 54h): one of them, located on the occlusal (biting) surface, was severe and led to the exposure of the pulp cavity. This cavity would have been painful and the individual most probably avoided chewing food on this side of her mouth (see relevant comments for Individual I). The other one is located at the cemento–enamel junction, on the distal surface of the tooth crown. The second tooth affected by caries is the maxillary left second premolar (ULPM4). The position of the caries on the root of the tooth (Fig. 54c), inferior to the cemento–enamel junction, hints to considerable resorption of the alveolar bone. Although the latter is associated with periodontitis and calculus, which is a common irritant in the development of periodontitis (Ortner Reference Ortner2003, 592; Aufderheide and Rodriguez-Martin Reference Aufderheide and Rodriguez-Martin2008, 401; Waldron Reference Waldron2009, 238), no calculus was recorded on any of the teeth recovered with this individual.
Marked hypoplastic lines were recorded on the buccal (anterior) surface of the canine. Recording of hypoplastic lines on the other two teeth was impossible, due to enamel weathering. Tooth enamel hypoplastic lines reflect disturbances in enamel development. Amelogenesis (enamel formation) begins from the occlusal (biting) tooth crown surface and is directed towards the root of the tooth, to end up at the cemento–enamel junction of the crown. Dietary, disease and/or other forms of stress experienced by the individual during this process may temporarily disturb the amenoblastic activity. These disturbances are manifested on the tooth crown by enamel hypoplastic defects that can take various forms, i.e., lines, pits and grooves (Ortner Reference Ortner2003, 595). Hypoplastic lines on the maxillary canine of Individual III are located very close to the cemento–enamel junction, suggesting some stress experienced during her early childhood (approximately around the age of four years) (Hillson Reference Hillson2002, 165; Ortner Reference Ortner2003, 595; Reid and Dean Reference Reid and Dean2006).
New reactive bone was recorded on the anterior region of the mandible of the child (Individual IV), on its inferior margin. Deposition of new bone took the form of two small outgrowths of irregular bone, located one close to the other: one inferior to the canine and the other inferior to the second incisor (Fig. 54g). New bone formation (periostitis) represents an inflammatory response of the periosteum to an infection or trauma (White and Folkens 2000, 392; Ortner Reference Ortner2003, 206). Based on the position of these lesions, periostitis on the child's mandible may be associated with osteomyelitis, which most likely was unrelated to bacterial infection of dental origin (Aufderheide and Rodriguez-Martin Reference Aufderheide and Rodriguez-Martin2008, 409). The irregular texture of the new bone suggests that the infection was probably active at the time of death of the individual and could even be associated with it.
Musculoskeletal stress markers: observations
Despite bone surface weathering, new bone formation in the form of irregular bony outgrowths was recorded on the superior–anterior lateral end of the right clavicle of Individual III (Fig. 54e), which articulates with the scapula. This is the site where the deltoideus muscle attaches to the clavicle. This muscle is a major abductor of the arm (White and Folkens 2000, 184). Similar osseous hypertrophic changes were observed on the deltoid tuberosity of the right humerus of Individual III, which is the corresponding site, where the deltoideus muscle attaches, having run from the clavicle through the superior lateral margin of the acromion and the spine of the scapula (White and Folkens 2000, 184). Hypertrophic changes on the above sites are most likely linked to high mechanical loading of the deltoideus muscle of the right upper limb in the tasks she performed. The pronator ridge on the distal shaft of the left ulna is moderately pronounced. This is the site for the origin of the pronator quadratus muscle, and hypertrophic changes here are most probably associated with high stress levels on the muscles, which cause pronation of the wrist (White and Folkens 2000, 198).
The external shape of the cross-section of the proximal femoral shaft at the sub-trochanteric region of Individual III is similar to that of Individual I. Shaft circumference at the sub-trochanteric region appears to be less circular than usual, and the index for anterior–posterior to mesio-lateral diameter of the femoral sub-trochanteric shaft calculated from the left side femur is comparatively low (73.7). The aetiology of platymeric femora was discussed in relation to the remains of Individual I above. Thickening and moderate elevation of the linea aspera on the posterior femoral shaft surface was recorded for both femora of this individual. As was noted for Individual I, entheseal changes on this site of the femur probably reflect high mechanical loading of the muscles attached to the linea aspera (Capasso, Kennedy and Wilczak Reference Capasso, Kennedy and Wilczak1999, 103–4).
Level of burial I (EL 26)
An isolated tooth collected from this level (KSP/60 B.26) is a maxillary right first molar (URM1). Based on the degree of dental wear, the individual represented by this tooth was a middle adult. His/her age at death should tentatively be assigned to the 25–35 age category, and he/she was probably slightly older than Individual I recovered from the same level of Tomb I. There was no evidence for any pathology. Since there is no further information as to the context of this specimen, this tooth was not included into the Minimum Number of Individuals represented by the KSP/60 skeletal assemblage. Although it may probably represent the remains of an earlier burial that was cleared from Tomb I (see relevant discussion in the main text), one should not exclude the possibility that it originated from one of the more complete adult burials in the tomb.
Tomb IV
Individual I (Main Burial), Tables 3–4, 9
Individual I is probably a young adult female. The completeness of her post-cranial skeleton ranges between 40 and 50 per cent, i.e., comparatively high, and there are also 22 loose teeth and a few skull fragments (less than 10 per cent of the complete skull) present (Fig. 53). This is the only skeleton from the KSP/60 assemblage where more than one small bone was present. Individual I was probably the best preserved at the time of discovery (up to 70 per cent judging by the available excavation photos and drawing), but in the intervening period and until the study occurred a significant drop in the preservation of bones was noted (e.g., in the area of the jaw, spine, pelvis, arm and leg bones: cf. Figs 42 and 53).
The quality of bone preservation of Individual I is poor as with the skeletons from Tomb I. Severe weathering of the subperiosteal bone surface in the form of deep cracks and holes penetrating the cortical bone could have obliterated signs of pathological surface modification. Dental enamel is also severely eroded. All teeth were found loose. Two of them were recovered by the author during washing of the long bones. These were trapped in soil masses collected together with the long bones from the tomb.
Based on the morphology of the anterior region of the mandible, a probable female sex was assigned to this individual, which agrees with the overall gracile morphology of the post-cranial skeleton. Minimal or no dental wear on all 10 molars from the 22 loose teeth associated with this individual suggests a young age at death within the 18–25 category; most probably she was no more than 20. In agreement with a young adult age-at-death is the lack of signs of cranial suture closure, where this could be scored. Small portions of the right side lateral third of the coronal suture and the left side lateral third of the lambdoid suture had not fused. Furthermore, in line with the above, there were no age-related skeletal modifications on an incomplete thoracic vertebra associated with this individual.
Based on observations from the documentation of the excavation (Fig. 42), on the representation of the major anatomical regions and the presence of small bones, this was a primary, articulated burial with the upper limbs folded on the abdomen and the lower limbs tightly flexed with the feet tucked beneath the thighs (see also discussion in main text).
Dental pathology
A carious lesion was recorded on the occlusal surface of the mandibular left first molar (LLM1) (Table 9). This extends to both the mesiobuccal and mesiolingual cusps and has exposed the pulp cavity. As commented earlier for Individuals I and III from Tomb I, exposure of the pulp cavity would have caused much inconvenience to the individual and probably resulted in the necrosis of the tooth.
Dental chart: Tomb IV, Individual I. Prepared by Argyro Nafplioti. © A. Nafplioti.

Carabelli's cusp was scored on both the maxillary right and left first molars (URM1 and ULM1). This is an extra cusp on the mesiolingual molar tooth crown surface, which most frequently occurs on the maxillary first molar. It is a dental non-metric, morphological trait (Turner, Nichol and Scott Reference Turner, Nichol, Scott, Kelley and Larsen1991), and as such its presence/absence from the skeleton is not pathological. Rather, the frequency of non-metrics within a population has been shown to convey information about their genetic makeup (Tyrell and Chamberlain Reference Tyrell and Chamberlain1988). The frequency of the Carabelli's cusp, in particular, has been shown to differ between Bronze Age populations from Crete and the Mainland (Nafplioti Reference Nafplioti2007).
Musculoskeletal stress markers: observations
On four out of the five hand phalanges which were studied both the mesial and lateral edges of the bone shaft are relatively pronounced. These sites on the bone palmar surface mark the attachment of tendons. Entheseal/hypertrophic changes on these sites, which had also been recorded for Individual I from Tomb I, most probably reflect high stress levels during flexion of the fingers.
Individual II (Earlier Burial), Tables 3–4
Two of the 24 teeth recovered from Tomb IV were assigned to a second individual (Individual II). One of these teeth is an extra mandibular left second premolar (LLPM4) and the other is a maxillary right second molar (URM2). The colour of the dental enamel and the pattern of dental attrition on the URM2 are different from the other 22 loose teeth, which were assigned to the main burial, Individual I in Tomb IV. Based on the absence of advanced dental wear, this individual was identified as a young adult (18–25 years old). These teeth most probably represent the remains of an earlier burial made in the tomb, which had been cleared to free space for later interment(s), i.e., Individual I (for discussion see the main text).
Strontium isotope ratio (87Sr/86Sr) analysis
The strontium isotope ratio (87Sr/86Sr) results from four of the five adults from the KSP/60 chamber tombs have already been presented by Nafplioti (Reference Nafplioti2008; Reference Nafplioti, Kaizer, Burger and Schier2012), but are also displayed here (Tables 10–11). They are discussed in relation to the geographical origins of these people. The human tooth enamel 87Sr/86Sr signatures range between 0.70848 and 0.70904 (mean = 0.70885, sd = 0.00025). Variation in human tooth signatures, evidenced by the large standard deviation and range, is high and links to variation in the underlying lithologies and the corresponding strontium isotope signatures of Knossos and its periphery, to herding practices and to variation in feeding territories (Nafplioti Reference Nafplioti2011; Reference Nafplioti2021). It is higher than other Bronze Age human skeletal collections from Knossos, viz. Sellopoulo chamber tombs (sd = 0.00015), Ailias (sd = 0.00010), Gypsades (sd = 0.00003), or Sissi (sd = 0.00024), also on Crete, but lower compared with other sites in Greece, for example Manika on Euboea (sd = 0.00065) or the Chora of Naxos (sd = 0.00044) (Nafplioti Reference Nafplioti2007; Reference Nafplioti2008; Reference Nafplioti2009; Reference Nafplioti, Kaizer, Burger and Schier2012; Reference Nafplioti2021).
87Sr/86Sr values from tooth enamel samples from the KSP/60 individuals. Table prepared by A. Nafplioti. © A. Nafplioti.

All but one strontium isotope ratio signatures clearly fall within the confidence limit for characterizing the local population at Knossos (0.70852 to 0.70930), determined from archaeological animal tooth enamel values.Footnote 149 The fourth KSP/60 human strontium isotope signature measured from Individual I from Tomb IV as 0.70848 ± 0.000011 falls on the lower limit of this range. This value is also very close to a value of 0.70853 ± 0.00001 measured from a sheep/goat from Bronze Age Knossos (Nafplioti Reference Nafplioti2011, 1564, 1567), other 87Sr/86Sr data from the island of Crete more broadly (Nafplioti et al. Reference Nafplioti, Driessen, Schmitt and Crevecoeur2021), as well as further data currently under preparation for publication by the author. Therefore, based on the 87Sr/86Sr results, all four KSP/60 individuals tested can be identified as locals at Knossos.
Further evidence for the local origin of the KSP/60 individuals comes from the strontium signatures from an additional 11 individuals tested from the roughly contemporary chamber tombs at Sellopoulo (LM II–IIIA). The actual values from the Sellopoulo burials range between 0.70860 and 0.70913 (mean = 0.70896, sd = 0.00014) and are very similar to those from KSP/60. They are also very similar to the MM II–III Ailias and MM III–LM IA Gypsades tholos tomb burials, also at Knossos, which date to the period before the LM IB destructions and are assumed to represent the locally born Knossos population (Table 11). Moreover, testing the hypothesis that these people may have originated from the Argolid on the mainland, as some scholars have suggested in the past,Footnote 150 also yielded negative results based on the bioavailable 87Sr/86Sr from this region. The confidence limit for characterizing the local Argolid population was calculated from 13 archaeological animal enamel and modern snail shell samples from four sites in this region, i.e., Mycenae, Tiryns, Koilada and Kranidi, with a range between 0.70803 and 0.70847 (mean ratio ± 2 sd).Footnote 151 Values in this range are lower than any of the strontium isotope signatures from the Knossos individuals tested, lending weight to the idea that probably all four individuals tested from the KSP/60 assemblage had been born and raised locally.
87Sr/86Sr values from samples from Ailias, Gypsades, the Sellopoulo chamber tombs, the Sellopoulo shaft grave (SEL/58) and the tombs studied here (marked as ‘KSP’). Table prepared by A. Nafplioti. © A. Nafplioti.

Discussion and conclusions
The human skeletal material studied here represents burials from Tombs I and IV. No remains were recovered from Tombs II and III. Although the sample is too small for broader palaeodemographic and skeletal health analyses, data on skeletal completeness and the representation of anatomical skeletal regions, on the age at death, the biological sex and the skeletal health of the respective individuals offer informative insights into the lifeways and the mortuary practices of the community that used this cemetery. Moreover, this study using 87Sr/86Sr suggests a local origin, within the island of Crete and most likely Knossos itself, for the individuals examined from the KSP/60 assemblage.
Mortuary behaviour
The KSP/60 tombs had been used for more than one burial, for primary interments and for the secondary treatment of the remains of earlier burials. Secondary activities were performed following the original burial episode(s), and there is evidence for post-depositional manipulation of the dead from both Tombs I and IV in the form of relocation and arrangement of selected remains of skeletonised burials (Tomb I, Burial III) as well as clearing episodes to free up space for later burials (Tomb IV and probably also Tomb I).
Representation of age-groups and sexes
Determination of the sex and age-at-death for the individuals from this assemblage was often hindered by skeletal incompleteness and poor bone preservation. Out of the five adults from the KSP/60 tombs, two were identified as probable females, one as a probable male, while for the remainder their sex could not be confidently identified. As regards the distribution of age-groups, young (18–25) and middle (25–35) adults are represented by two burials each. The fifth adult could not be assigned to any specific age-category but was probably not of advanced age (18–45). There was an additional adult represented by a loose tooth collected as KSP/60 (EL 26, same level as Burial I in Tomb I), who was tentatively aged between 25 and 35 (not included in the calculated Minimum Number of Individuals due to the likelihood this may be linked with Individual I from the same tomb). Out of the two young adults, one was confidently identified as female. In the literature, a young age at death for the females is often associated with the higher health risks related to pregnancy and infant-rearing in past communities (e.g. McGeorge Reference McGeorge1989; Larsen Reference Larsen1997; Nafplioti Reference Nafplioti, Karetsou and Girella2015). One child, approximately three years old, is also present in the studied assemblage.
Skeletal health
Data on skeletal health are reviewed here as a reflection of past lifeways. As regards dental pathology, the incidence of dental caries in the KSP/60 assemblage was calculated as 16 per cent, and it is higher compared to other assemblages from Bronze Age Knossos or other sites from Crete more broadly, while the incidence of calculus (3 per cent) is comparatively lower: e.g., Archanes: 7% (caries), 26% (calculus) (Triantafyllou Reference Triantafyllou and Papadatos2005); Kalochorafitis: 4% (caries); 33% (calculus) (Nafplioti Reference Nafplioti, Karetsou and Girella2015); AiliasFootnote 152 at Knossos: 8% (caries), 34% (calculus);Footnote 153 Myrtos Pyrgos: 10.4% (caries) (Musgrave Reference Musgrave, Macdonald, Hatzaki and Andreou2015, no calculus mentioned).
The higher incidence of caries in the KSP/60 assemblage probably reflects a comparatively high contribution of carbohydrates including sugary (such as dried fruits) and starchy foods (Killen Reference Killen, Halstead and Barrett2004; Nitsch et al. Reference Nitsch, Jones, Sarpaki, Hald, Bogaard, Garcia, Orgeolet, Pomadère and Zurbach2019) into the diet of the KSP/60 individuals (cf. sites showing lower rates) (Ortner Reference Ortner2003, 591). In four out of the six carious teeth in the KSP/60 assemblage, decay was severe and involved exposure of the pulp cavity. Owing to the small size of the available sample, there can be no valid assessment of sex differences in terms of the frequency of carious lesions in order to explore probable differences in the diet of the two sexes. In two cases (Individuals I and III, Tomb I), the position of the carious lesion on the root of the tooth hints to resorption of the associated alveolar bone, probably linked to periodontitis (Ortner Reference Ortner2003, 593). The incidence of dental calculus in the KSP/60 assemblage, which is also linked to the consumption of carbohydrates and/or to poor dental hygiene (Lieverse Reference Lieverse1999; Lillie and Richards Reference Lillie and Richards2000; Hillson Reference Hillson2002; Hidaka and Oishi Reference Hidaka and Oishi2007), is comparatively low. Ante-mortem tooth loss could not be investigated due to skeletal incompleteness and the fact that all teeth were found loose (Waldron Reference Waldron2009, 238; Ortner Reference Ortner2003, 593; Hillson Reference Hillson2002, 280).
Reconstruction of the health status and the lifeways of these individuals through data on the prevalence of periostitis, degenerative joint disease, trauma, fractures, or other pathological and non-pathological (i.e., hypertrophic development of muscle attachment sites) modifications on the cranial and postcranial remains studied has been considerably compromised by skeletal incompleteness. In some cases, poor ectocranial or subperiosteal bone preservation and fragmentation have set further limitations upon the results of this study.
Hyperplasia/hypertrophy of the cranial diploë was scored as present in one of the individuals examined, where expansion of the diploë layer and/or enlargement of the diploë trabeculae were coupled with concomitant thinning of the outer cranial table. Despite the current understanding that hyperplasia of the cranial diploë in archaeological skeletal collections is most commonly linked to anaemia, there is no consensus over the particular conditions and type of anaemia responsible for the specific lesions. Different types of anaemia that are potentially involved include: iron-deficiency that is induced by a range of conditions, such as nutritional deficiencies, chronic blood loss, parasitic infections, and/or chronic diarrhoea (Stuart-Macadam and Susan Reference Ubelaker1992; Ubelaker Reference Ubelaker1992).
Although, more recently, Walker and colleagues (Walker et al. Reference Walker, Bathurst, Richman, Gjerdrum and Andrushko2009) argued against the existence of a causative relationship between iron deficiency and bone marrow hypertrophy on the grounds of a reduced capacity to sustain increased red blood cell production, such a relationship is still debatable. In fact, Oxenham and Cavill (Reference Oxenham and Cavill2010) challenged Walker and colleagues’ interpretation of the relevant clinical literature and restored iron deficiency anaemia as a plausible cause for (a) marrow hypertrophy and for the skeletal lesions under discussion; (b) nutritional megaloblastic anaemia that commonly develops due to B12 and B9 vitamins deficiency, often in association with gastrointestinal infections and related nutrient losses (Walker et al. Reference Walker, Bathurst, Richman, Gjerdrum and Andrushko2009, 114); and (c) hereditary hemolytic anaemias. Thalassemia, in particular, is relevant to the geographical context of this study. Angel (Reference Angel1964; Reference Angel1966), drawing from the high rates of alpha and beta thalassaemia in the modern Greek indigenous population (Rucknagel Reference Rucknagel1966), interpreted the presence of porotic hyperostotic lesions in prehistoric crania from Greece as evidence for thalassaemia in antiquity.
Although in the KSP/60 assemblage differential diagnosis of the cranial lesions under discussion is compromised by skeletal incompleteness, based on the available data on the severity and patterning of these lesions, they most likely reflect acquired, dietary-related anaemias. Whether linked to megaloblastic (B12 and B9 vitamin deficiency) or iron-deficiency anaemia, the observed changes to the cranial bones from Individual I from Tomb I probably reflect infancy/early childhood anaemia (Aufderheide and Rodriguez-Martin Reference Aufderheide and Rodriguez-Martin2008, 347; Stuart-Macadam and Susan Reference Stuart-Macadam and Kent1992) which persisted long enough to have induced these lesions.
Additional evidence for early childhood stress, possibly also linked to dietary factors, disease or other stress-related life events, include the presence of hypoplastic lines on a canine from Individual III also from Tomb I. Dental enamel weathering and post-mortem tooth loss do not allow a full appreciation of the prevalence of tooth enamel hypoplasia in the population sample examined.
Acknowledging the limitations imposed by the poor preservation of the material and skeletal incompleteness, the lack of evidence for degenerative joint disease and the paucity of data on periostitis or other pathological skeletal modifications from the KSP/60 assemblage does not necessarily equate to good health. Skeletal incompleteness and poor bone preservation, including fragmentation, damage on articular ends and weathering of the ectocranial and subperiosteal bone surfaces, may partly account for this picture. Periostitis on the incomplete child mandible from Tomb I (Individual IV) was attributed to a non-specific infection. This may be a case of osteomyelitis caused by bacterial infection of dental origin. Susceptibility to infections for children is known to increase during weaning, when children's stress levels increase as a result of the introduction of a new diet and associated higher infection risks. Individual IV was approximately three years old, which could be compatible with late weaning (Halcrow et al. Reference Halcrow, King, Millard, Snoddy, Scott, Elliot, Gröcke, Buckley, Standen, Arriaza, Tomori, Palmquist and Quinn2018).
Activity-related skeletal modifications involve mainly the lower limbs, in the form of platymeria and platychnemia, and the hypertrophy of the linea aspera on the femur (Individuals I and III from Tomb I). Similar (activity-induced) skeletal modifications of bones of the upper limb, including the clavicle and bones of the hand, which suggest high stress levels on the respective muscles, were recorded for Individuals I and III from Tomb I, and Individual I from Tomb IV. Despite the limitations to the results of this study described earlier in this section, overall, entheseal or hypertrophic changes on muscle attachment sites on the skeleton of the KSP/60 individuals are in overall agreement with their age at death. Although the recorded data are not consistent with extreme mechanical stress on the musculoskeletal system, there is evidence that some of these individuals performed strenuous physical activities.
Our skeleton is a unique record of our life history. Despite the low sample size and poor state of the KSP/60 skeletal assemblage, the study of these burials offers direct insights into the lifeways and mortuary practices of this community from the remains of the people themselves and contributes towards a more comprehensive reconstruction of life and death at LBA Knossos.
SUPPLEMENTARY MATERIAL
Supplementary Appendices A–G are published as online-only Supplementary Material at https://doi.org.10.1017/S0068245424000066.
ACKNOWLEDGEMENTS
It is a pleasure to record the active help and support of Professor Nikolaos Platon, then serving as Director of Antiquities for Crete, for these Knossos excavations of the BSA. We are also much indebted to Dr Elizabeth (Lisa) French, who oversaw the main excavation of the group of KSP/60 tombs south of the palace, for checking an earlier draft of our report and discussing it with us. To the architects, Beatrice Sheila Hoult, who drew the original plans for this excavation, and William Taylour, who helped with some of the plans and traced the archaeological sections, this project owes a lot. Jeff Clarke produced the drawing of the fine Palace Style amphora (III.1), and Rosemary Ostley kindly typed successive earlier versions of the text. Professor Peter Warren helped with the section on the stone vases (IV.3–IV.5) from Tomb IV. Dr Penelope Mountjoy and Professor Eleni Hatzaki gave us valuable advice on the LM pottery found. We extend, also, our heartfelt thanks to all the BSA Curators of the SM at Knossos for facilitating our work. We are also extremely grateful to the Directors of the BSA, the Archivist of the BSA, Amalia Kakissis, as well as to Dictynna and Martin Hood for helping us, in more ways than one, with the publication of this material. Finally, two anonymous reviewers helped us to avoid errors with their constructive feedback, while Professor Peter Liddel steered us steadily through the editorial process. We are also most grateful to Joshua Hey for his excellent editorial help. Any errors remain with the authors.


 Open access