


Introduction
In the study of iconoclastic destruction in past societies, distinguishing between intentional and unintentional damage can often be difficult (Suter Reference Suter and May2012; Sauer Reference Sauer, Kolrud and Prusac2014). As is the case with all types of objects, an image accumulates damage in all phases of its use and in its post-depositional context. Even with advancing analytical methods, iconoclastic damage can be hard to distinguish from the destruction wrought by natural forces and other anthropic processes (Connor Reference Connor2022: 59–73; Miniaci Reference Miniaci and Miniaci2023).
Following her death, the monuments of the pharaoh Hatshepsut (reigned c. 1473–1458 BC) were subject to a systematic programme of destruction, the most common manifestation of which was the erasure of her name and image from temple walls. This act was initiated by Thutmose III, her nephew and successor (sole reign c. 1458–1425 BC), but the motivation behind it remains contentious (Nims Reference Nims1966; Dorman Reference Dorman1988: 46–65; Laboury Reference Laboury1998: 483–512; Arnold Reference Arnold, Roehrig, Dreyfus and Keller2005; Roth Reference Roth, Roehrig, Dreyfus and Keller2005: 280–81; Bryan Reference Bryan and May2012: 365–69; Kapiec Reference Kapiec2021: 121–34).
The largest and most elaborate construction of Hatshepsut’s reign is her mortuary temple at Deir el-Bahri, located opposite the city of Luxor on the west bank of the Nile. This temple was placed in proximity to the temple of Mentuhotep II (reigned c. 2055–2004 BC), who was revered for reunifying Egypt after a period of decentralisation known as the First Intermediate Period (c. 2160–2055 BC; Arnold & Winlock Reference Arnold and Winlock1979). Later, Thutmose III would construct his temple between these two monuments (Lipińska Reference Lipińska1977). Today, Hatshepsut’s temple is the best preserved of the three (Figure 1).
Location of the quarry and the Hatshepsut Hole, in relation to the royal temples at Deir el-Bahri. Sheikh Abd el-Qurna is located out of the picture to the south; the Asasif is located to the east (drawing by Pamlyn Smith, adapted by author; used with permission of the Department of Egyptian Art, the Metropolitan Museum of Art).

Much of the current corpus of Hatshepsut’s statuary was excavated in the vicinity of her mortuary temple between 1922 and 1928. These excavations, led by Herbert Winlock of the Metropolitan Museum of Art in New York (MMA), uncovered thousands of statue fragments that had to be meticulously pieced together (Figure 2). Due to their fragmentary condition, Winlock surmised that Thutmose III must have ordered the thorough destruction of every image of Hatshepsut, identifying the pieces as “maddening relics of Thutmose’s spite” (Winlock Reference Winlock1923: 32; Reference Winlock1928: 44–46).
Reassembling the statue fragments of Hatshepsut (photograph by Harry Burton, 1929; © The Metropolitan Museum of Art, Department of Egyptian Art Archives (M10C 58)).

Similarly, Edgerton (Reference Edgerton1933: 26) characterised the destruction of the statues as “impulsive”, in contrast with the more calculated erasure of Hatshepsut’s image from temple walls. More recently, the destruction of the statuary has been interpreted as an act to neutralise their power and avert potential hostilities (Bryan Reference Bryan and May2012: 368–69; Bleiberg Reference Bleiberg, Bleiberg and Weissberg2019: 37). For Arnold (Reference Arnold, Roehrig, Dreyfus and Keller2005: 274), this treatment evinces the political power struggle between Hatshepsut and Thutmose III.
While the ‘shattered visage’ of Hatshepsut (Figure 3) has come to dominate the popular perception, such an image does not reflect the treatment of her statuary to its full extent. Many of her statues survive in relatively good condition, with their faces virtually intact (Figure 4). Their rate of recovery also varies; while some statues were found in near-complete condition, others are missing large parts or are represented by only a few small fragments. In addition, fragments from the same statue were often located in different parts of the necropolis, at times hundreds of metres apart (Winlock Reference Winlock1942: 158, 168).
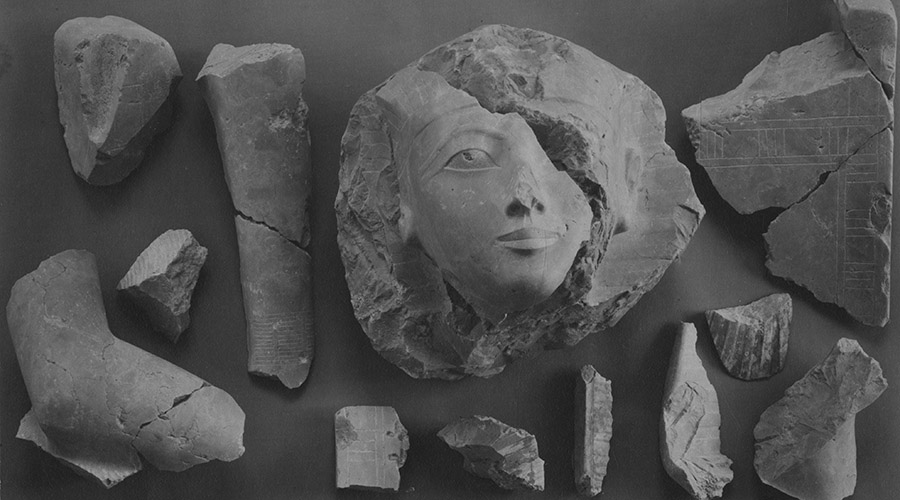
Fragments from an indurated limestone statue of Hatshepsut (approximately life size) (MMA 29.3.2) (photograph by Harry Burton, 1929; © The Metropolitan Museum of Art, Department of Egyptian Art Archives (M10C 71)).

A small kneeling statue of Hatshepsut (MMA 23.3.1) with its face fully intact: 616mm (h) × 325mm (w) × 515mm (d) (© The Metropolitan Museum of Art).

Excavation of the Hatshepsut Hole, showing body fragments from Cairo JE 47703 (left) and Berlin ÄM 22883 (right) in situ (photograph by Harry Burton, 1922–23; © The Metropolitan Museum of Art, Department of Egyptian Art Archives (M4C 101)).

This suggests that the statues were not buried immediately after their removal from the temple. As a result, they were exposed to various disturbance processes, the most significant of which must have been their reuse as raw material. The most cogent example of this is found in a stone house located to the north-east of the temple courtyard, where large sections were constructed using fragments of Hatshepsut’s statuary (Dorman Reference Dorman1991: 158–59; MMATE VII: 183–84). Other activities appear more ad hoc in nature, such as the opportunistic reuse of fragments as tools (MMATE VIII: 192, 254). Some fragments would remain exposed to human modifications for millennia; reuse activities persisted as late as the Graeco-Roman period (c. 332 BC–AD 95) and some fragments were encountered by nineteenth-century visitors to the Deir el-Bahri region, at times near the surface of the ground (Lepsius Reference Lepsius1849–59: vol. 3, pl. 25; Winlock Reference Winlock1942: 168–70). All these activities would have added to the damage sustained by Hatshepsut’s statuary. As a result, Thutmose III’s treatment of these statues cannot be properly understood without first disentangling these later processes.
Material
Archival material from Winlock’s excavations, currently housed in the Department of Egyptian Art Archives at the MMA, forms the focus for this study. These include unpublished field notes, drawings, photographs and correspondences. Much of these materials are also collated in the multi-volume compendia entitled Metropolitan Museum of Art Theban Excavations (abbreviated in this article as MMATE). In many instances, the findspots for statue fragments can be reconstructed from these materials, albeit with several caveats. In general, only the lateral position of the finds is available; this was often described using ambiguous terms and without a map for reference. Vertical stratigraphy is rarely specified, meaning it is often not possible to establish stratigraphic relationships. The thoroughness of Winlock’s documentation also varies. For instance, fragments from freestanding statues are recorded in much greater detail than those from sphinxes and architectural statues.
Another significant data source is a collection of unpublished material by Dorothea Arnold (Curator Emerita at the MMA). I was able to examine this material, which consists of notes, drawings and an unpublished manuscript, in 2023 during my tenure as a research fellow at the MMA. Arnold’s research is meticulous, and I have often relied on her analysis to correct my understanding of Winlock’s documentation. Many of the interpretations presented in this article, including those that are not necessarily shared by her, would scarcely have been possible without her initial analysis and generosity.
Locations of finds
Most of the statuary in the MMA collection was recovered from the so-called ‘Hatshepsut Hole’ and ‘quarry’ adjacent to the temple causeway at Deir el-Bahri (Figure 1). Both depressions appear to have been formed to obtain landscaping material for Hatshepsut’s temple (Winlock Reference Winlock1923: 30–1; Reference Winlock1942: 154–55; Arnold Reference Arnold, Roehrig, Dreyfus and Keller2005: 273).
The Hatshepsut Hole was discovered during the 1922–1923 season (Winlock Reference Winlock1942: 68–99). The causeway to Thutmose III’s temple was constructed over this hole, hence it is the only context where Hatshepsut’s statues remained undisturbed since the reign of Thutmose III (Winlock Reference Winlock1942: 75–76, 201–203; Dorman Reference Dorman1991: 82, footnote 271). The statues found here (outlined in MMATE VIII: 22) include fragments from seven small kneeling statues, which are broken across the neck, waist and knees. Five of them sustained no damage to their faces and were recovered in full apart from their missing bases, while the remaining two consist of body and head fragments (accession number: MMA 31.3.162, MMA 31.3.161). There are also some small fragments of sandstone sphinxes (mostly uraei—sacred serpents worn on the headdress—and claws), as well as inscribed fragments from the base of a limestone sphinx (MMA 23.3.172) and numerous fragments from limestone Osiride statues (see below).
The hole was also filled with building material, votive objects and ostraca (pottery sherds with text scratched onto them) dating to the time of Hatshepsut and Thutmose III (Winlock Reference Winlock1923: 33–38; Hayes Reference Hayes1960). Hatshepsut’s statues were scattered throughout the debris, suggesting they were buried without much deliberation (Figure 5; Winlock Reference Winlock1923: 33). The statues, much like the building material and ostraca, appear to have been moved here to act as in-fill for the causeway’s construction.
Between 1926 and 1928, a larger collection of statues was uncovered in the quarry (Figure 6). Deposition here was likely an act of convenience—indeed, the bulk of the statues were found in the western and southern parts, which are the areas nearest to the temple. Smaller pieces of statues were often found above the edge of the quarry, with larger pieces from the same statues identified within the quarry itself, suggesting that many of the statues were broken up at the edge and then rolled into the quarry (Arnold Reference Arnold, Roehrig, Dreyfus and Keller2005: 273).
Plan of the quarry, with the approximate areas of the find spots indicated (figure by author, based on a plan produced by Dorothea Arnold; see OSM for further details).

As the statues were deposited over a vast area, they were subject to different taphonomic processes. Some were covered by other deposits within the Eighteenth Dynasty (c. 1550–1069 BC) (Dorman Reference Dorman1991: 84; MMATE VII: 181–82), while others were found in layers dating to the Graeco-Roman period or later (Winlock Reference Winlock1942: 158, 168–70). In Winlock’s documentation, most of the findspots are described in relation to features such as tomb entrances and an ancient well within the quarry. As a result, their exact locations are often ambiguous, and there is no clear delineation between the designated findspots. To account for this, the quarry is here divided into several general areas (Figure 6; see online supplementary material (OSM) for details of the findspots located within each area).
Fragments of Hatshepsut’s statues were also recovered from other areas in Deir el-Bahri, particularly in the three temple complexes and the brick buildings (referred to by Winlock as Priests’ Houses) constructed along the neighbouring cliffs (MMATE VIII: 18–20; Figure 1). Fragments have also been found as far as the necropolises of Sheikh Abd el-Qurna and the Asasif.
The taphonomy of Hatshepsut’s statues
In general, the statues of Hatshepsut recovered at Deir el-Bahri can be divided into three categories: architectural statues, sphinxes and freestanding statues. The architectural statues, which are made of sandstone or limestone, were integral features of niches and pillars. The recovered fragments largely originate from the head or the crown, and they tend to be heavily damaged. Among the 40 or so architectural statues recovered, only three have faces that remain largely intact (Cairo JE 56259A, 56260, 56261; the latter two have sustained damage to their noses).
Statues depicting Hatshepsut as sphinxes would have lined the avenue leading to her temple. Sandstone is the most common material, while examples made of limestone or granite are also attested (MMATE VIII: 59–148). Most of the finds consist of paw and head fragments. While the total number of sphinxes must have originally been in the hundreds, only one example (Cairo JE 53113) was recovered with its face essentially intact (Figure 7). In contrast, many of the freestanding statues, which depict Hatshepsut as a royal figure in masculine or feminine form and are typically made of granite or diorite, were recovered in near-complete condition. Half of them also have their faces virtually intact.
A limestone sphinx (Cairo JE 53113) found virtually intact in the quarry, with only minor damage to its uraeus, right paw and tail (photograph by Harry Burton, 1927; © The Metropolitan Museum of Art, Department of Egyptian Art Archives (M9C 14)).

The condition and recovery rate of statues can therefore be seen to vary based on their typology. At first glance, this appears to have been caused by differences in material—most of the freestanding statues, for example, were made of harder stone than the architectural statues. However, even if the architectural statues were more susceptible to damage and decay, it does not explain the disproportionate survival of head fragments, which were made of the same material as the rest of their body. Instead, this discrepancy appears to relate to the way in which each statue type was reused.
Architectural (Osiride) statues
The architectural statues are the largest in size among the three categories, each ranging from 3.13m to 7.35m in height (MMATE VII: 89, 108; Dziedzic & Caban Reference Dziedzic, Caban, Bakowska-Czerner and Czerner2019: 278–79). They depict Hatshepsut with her body tightly wrapped in a shroud, in a pose reminiscent of the mummiform deity Osiris. As a result, they are commonly referred to as ‘Osiride’ statues, although such a designation is contended (Leblanc Reference Leblanc1980).
As each statue was connected to an architectural feature, it is possible to deduce the original number of statues in the temple. Remarkably, most are represented in the archaeological record. Winlock’s excavation recovered face fragments for 22 of the 24 statues on the Upper Portico pillars, while nine mouth fragments were recovered for the 10 statues in the Upper Court (MMATE VII: 68B–83). Fragments have also been recovered from every architectural statue from the Main Sanctuary of Amun (four in total) and the Lower Portico (two) (MMATE VII: 61–62, 101).
Winlock’s documentation, which is often cursory, indicates that most of the recovered fragments originate from the head or crown (MMATE VIIl: 54–114; Figure 8). This over-representation is striking, given that the head constitutes only a small mass of material relative to the body in these statues. This pattern persisted decades later when more Osiride fragments of Hatshepsut were recovered in the temple of Thutmose III; head fragments (n > 20) outnumbered those from the torso (n = 14) and legs (which are the least numerous; Dąbrowski Reference Dabrowski1968: 132).
The head from an Osiride statue (MMA 31.3.153), partially restored with plaster: 478mm (h) × 381mm (w) × 473cm (d) (© The Metropolitan Museum of Art).

This idiosyncrasy seems to be related to the way these statues were constructed, and consequently how they were reused. Rather than being carved from a single block of stone, the architectural statues were formed using multiple stone courses held together by plaster. For instance, the Osirides at the Lower Portico consisted of eight courses of stone that formed their bodies, with other courses for their heads and crowns. To ease their removal, therefore, the statues were first dismantled into individual blocks. Tool marks left by workers indicate that they were searching for the joints between the stone courses that had been masked by plaster and paint (MMATE VII: 94a).
As these statues depict a tightly shrouded body, the courses below the neck are essentially uniform blocks of stone that are ideal for reuse. Indeed, the aforementioned stone house appears to have been constructed mostly from Osiride fragments (MMATE VIII: 23). In contrast, the irregular surfaces of the heads and crowns made them harder to repurpose, aiding their archaeological survival. Even if the surfaces were chipped off to produce reusable blocks, the refuse from this process would remain identifiable in the archaeological record.
Other factors could also have contributed to the often-fragmentary condition of the Osirides. The sheer size of these statues meant that the heads were likely to fall and sustain damage during the removal process. The heads of certain Osirides (e.g. those from the Upper Court) were also bonded to the wall using mortise and tenon (MMATE VII: 90–91). As a result, the most practical way to detach them might have been to demolish them in situ.
Sphinxes
Statues representing Hatshepsut as a sphinx are the most abundant category. Up to 120 sandstone sphinxes are represented among the finds (Winlock Reference Winlock1942: 212), though many are represented only by fragments from the paw or the head (MMATE VIII: 101–42; Shukanau Reference Shukanau2013: 159). This pattern of preservation is likely also related to reuse activities. Sphinxes are easily repurposed as building material, particularly if protruding parts such as the head and paws are removed. At Deir el-Bahri, some appear to have been recut into column drums (MMATE VIII: 101; Winlock Reference Winlock1942: 213). This practice is not unique to the sphinxes of Hatshepsut. Sphinx fragments recovered from Heliopolis, in Cairo, are dominated by front paws, with their bodies often recovered at distant sites after having been repurposed as masonry blocks (Connor Reference Connor, Barbash and Cooney2021: 91–94). Similar forms of reuse have been observed at the Luxor cachette (El-Saghir Reference El-Saghir1991: 41, 44) and in Hazor, Israel (Ben-Tor Reference Ben-Tor, Gitin, Wright and Dessel2006).
Hatshepsut’s sphinxes were often attached to an additional course of stone that formed their base. These bases must have been particularly prized for reuse, as they are not often attested in the archaeological record (MMATE VIII: 139; Smilgin Reference Smilgin2012). The fragments recovered often consist of thin, inscribed surfaces (e.g. MMA 23.3.172) which were probably chipped off before the base was reused.
Freestanding statues
Each freestanding statue was carved from a single block of stone. Winlock’s documentation of this statue type tends to be more detailed, making it possible to determine the rate of recovery for each body part. Overall, the head, torso and lower body were recovered at a generally proportional rate, while the statue bases are often missing (Table S1). This pattern likely reflects the fact that the bases were regular blocks that, unlike other parts of the statue, could be repurposed without substantial reworking (Laboury Reference Laboury1998: 167).
The reuse of freestanding statues appears to have begun during the reign of Thutmose III, since all examples found in the Hatshepsut Hole—which was covered beneath the causeway to the temple of Thutmose III—are missing their bases. Indeed, the fact that many statue bases are missing in their entirety suggests that they were not broken into smaller fragments but were taken away whole. As the contact area between the base and the body can be quite large (particularly for the seated statues), detaching the two parts cleanly would have required considerable skill.
Several characteristics are common to the treatment of the freestanding statues. All examples were broken across the neck, waist and feet, with some also broken across their beard (likely incidental to breakage across the neck), knees and crowns. Inscriptions of Hatshepsut’s name tend to be fully intact. The uraeus on the forehead was usually removed, in a manner similar to the treatment of the sphinxes and architectural statues.
As each statue was broken across several points, it is apparent that the agents of Thutmose III had the means to inflict damage to the faces, if there was such an inclination. However, among the 18 freestanding statues where at least part of the head has been recovered (Table S1), only nine have sustained facial damage that can be considered significant. The number of statues with intact faces is substantial, and this does not appear to have occurred by happenstance.
Based on the condition of their visage, the freestanding statues can be divided into two groups. Group A includes the nine statues that have sustained no facial damage, or only minor damage to their nose. The latter examples are included because nose damage is common in Egyptian royal statuary and could often be non-deliberate (Bleiberg Reference Bleiberg, Bleiberg and Weissberg2019). Group B is composed of the nine statues that have sustained significant facial damage, although the style of destruction varies. Seven of the statue heads are fragmented; for the remaining two, the head was recovered in a single piece, with damage limited to the surface (MMA 27.3.163, MMA 29.3.1).
The two groups also differ in their completeness and dispersion. In group A, seven statues were recovered in near-complete condition, with their base being the only missing element; in group B, none of the examples were recovered in near-complete condition (Tables 1 & 2). The pieces of these same seven statues in group A were all found within a small radius: each was either found entirely in the Hatshepsut Hole or within neighbouring areas of the quarry (Table 1). In contrast, fragments from the group B statues are all widely dispersed, with many found at a considerable distance away from the Hatshepsut Hole and quarry (Table 2). Their wide dispersal and missing parts suggest that group B was far more affected by reuse and other later modifications than group A. A correlation may therefore be seen between these extraneous processes and the destruction of statue heads.
Findspots of statues in group A. Statues that were recovered in virtually complete condition (except for the base) are marked with asterisks. Locations include Hatshepsut Hole (HH) and the areas listed in Figure 6 (1–5). Fragments recovered are divided into those from the head (H) and those from other body parts (B). See Table S2 for more details.


In other words, the facial damage to the freestanding statues was likely caused by later activities rather than Thutmose III. Indeed, in the Hatshepsut Hole, the only context with a terminus ante quem dating to the reign of Thutmose III, five of the six heads were recovered in pristine condition. The only exception is a head fragment that matches another fragment found at the west end of the quarry (MMA 31.3.162), though it remains unclear whether the damage was deliberate or incidental.
Obviously, the complexity of the evidence precludes any definitive conclusion. For instance, it could be argued that Thutmose III ordered the complete destruction of the statues’ visage, but this order was only partially carried out. While this scenario would also explain the current condition of the statues, it must be considered improbable due to the reasons outlined below.
In such a scenario, let us assume that Thutmose III’s agents had left nine statues with their faces damaged, and the other nine with their faces intact. From this point onwards, both groups were exposed to reuse and other forms of modifications. On the balance of probability, however, the characteristics displayed by the two groups do not seem to satisfy this sequence of events.
Firstly, the condition of a statue’s visage should have little effect on whether its other body parts were selected for reuse. In other words, statues with facial damage would be just as likely to be found in near–complete condition as statues with no facial damage. However, this is clearly not the case—every statue that was found in near–complete condition has sustained no significant damage to its visage.
In the same vein, statues with intact faces should be just as likely to have been scattered by later activities as those with damaged faces. However, it is evident that fragments from group B tend to be more widely dispersed. In fact, statue heads that were found away from the quarry and the Hatshepsut Hole (Cairo JE 53115, MMA 29.3.2, MMA 30.3.2 & MMA 30.3.3) or in post-Thutmose III contexts (Cairo JE 53115, MMA 29.3.2) have invariably sustained facial damage.
Egyptian royal statuary: exceptions and norms
In some ways, the treatment received by Hatshepsut’s statues is far from exceptional. The removal of the uraeus and beard is seen on the statuary of various Egyptian rulers (Connor Reference Connor2018: 161; Bleiberg Reference Bleiberg, Bleiberg and Weissberg2019: 42–45). In addition, statues of male pharaohs found at Deir el-Bahri (including Mentuhotep II, Senwosret III, Amenhotep I and Thutmose III) are typically broken across their neck, knees and/or ankles, with fragments often scattered across large areas (Naville Reference Naville1907: 57; Arnold & Winlock Reference Arnold and Winlock1979: 46–49; Lipińska Reference Lipińska1984: 14–6; Szafrański Reference Szafrański1985: 258–60). The same form of damage is also common in statue caches or favissae (Valbelle Reference Valbelle and Coulon2016; Charloux et al. Reference Charloux2017; Charloux & Ali Abady Mahmoud Reference Charloux, Ali Abady Mahmoud and Masson-Berghoff2019). Found in various parts of Egypt and Nubia, these deposits typically include images of various rulers, many of whom are not known to have been the victims of hostility (El-Saghir Reference El-Saghir1991: 42–43, 45–46, 62–64, 69–71; Bonnet & Valbelle Reference Bonnet and Valbelle2003; Jambon Reference Jambon and Coulon2016). This treatment is believed to be a form of ‘deactivation’ intended to neutralise the inherent power of the statues (Jambon Reference Jambon and Coulon2016: 153–63; Connor Reference Connor2022: 137–44).
Since their discovery, the statuary of Hatshepsut has often been interpreted in the context of the wider campaign of persecution enacted following her death. The damage observed is therefore easily inferred as the result of malignant destruction. Indeed, Hatshepsut’s damaged visage is so striking that it is easier to associate it with a deliberate attack, rather than mundane processes such as reuse or decay. The vividity of this impression, perhaps, reflects the part of the human psyche that iconoclastic attacks so often speak to.
Nevertheless, it appears that much of the facial damage on Hatshepsut’s statuary can be attributed to incidental damage during their removal (in the case of the architectural statues), as well as their reuse as a raw material and other extraneous interventions (freestanding statues and sphinxes). Once such damage has been discounted, their treatment is reminiscent of the ‘deactivated’ statues found in various caches. The treatment of both Hatshepsut’s statuary and the ‘deactivated’ statues of other rulers appears to have been driven by pragmatic considerations, which, from a modern perspective, can only be clumsily described as ritualistic or superstitious. That being said, the same form of damage does not negate the possibility of differing connotations: unlike the other rulers, Hatshepsut did suffer a programme of persecution, and its wider political implications cannot be overstated (Laboury Reference Laboury1998: 483–512; Arnold Reference Arnold, Roehrig, Dreyfus and Keller2005: 270–76). Yet, there is room for a more nuanced understanding of Thutmose III’s actions, which were perhaps driven by ritual necessity rather than outright antipathy.
Synthesis
In this article, I have focused on evidence that is, arguably, most cogent in differentiating the various activities contributing to the destruction of Hatshepsut’s statuary. Several variables—such as the effects of natural decay and the rate of sedimentation in the quarry—cannot be fully addressed due to limitations in the available data, hence emphasis is placed on the rate of recovery for body parts. In this way, this analysis assumes that fragments from the same statue would have been subjected to similar environmental conditions, thus missing parts are more likely to result from human activity. This assumption forms the foundation of the following reconstruction, which outlines the ‘afterlife’ of Hatshepsut’s statuary.
The removal of statues from Hatshepsut’s temple occurred at some point during the sole reign of Thutmose III (c. 1458–1425 BC). The quarry (and its surrounding area) contained the highest concentration of fragments and was most likely the primary area of deposition. Freestanding statues were broken across their neck, waist and feet; some sustained facial damage that may have been incidental to their transport and ‘deactivation’, though many had their visage intact. Perhaps because the statues had effectively been ‘deactivated’, it was no longer necessary to erase the names inscribed on them. The faces of the sphinxes and Osiride statues sustained heavier damage, possibly due to their forcible removal and reuse activities.
Subsequently, fragments from several statues (e.g. MMA 31.3.160, MMA 31.3.162) were moved from the quarry to the Hatshepsut Hole as a convenient fill for the construction of the causeway for Thutmose III’s temple. It is perhaps no coincidence that only the smallest of the freestanding statues were deposited here—once they had been ‘deactivated’, each fragment could be carried by a single individual. By the time the causeway was under construction, many of the prized parts of the sculptures had already been taken away for reuse. All the freestanding statues found in the Hatshepsut Hole are missing their bases, while the Osirides and sphinxes were represented primarily by less reusable fragments (head and claws).
At the quarry, the reuse of the statues would persist long after the reign of Thutmose III, leading to their dispersal to various parts of the necropolis. This period may also have seen deliberate but less systematic destruction of the statues, perhaps by individuals or groups fearing the inherent power of these images. In addition to these anthropic factors, further damage might have been caused by seismic activity, decay and other post-depositional phenomena. The current condition of the statues reflects the sum of these processes.
Acknowledgements
My deepest gratitude goes to all members of the Department of Egyptian Art at the Metropolitan Museum of Art, in particular Aude Semat and Dorothea Arnold. I am also thankful to Kristin Thompson and the reviewers for their feedback and comments.
Funding statement
This research was undertaken as part of an Andrew W. Mellon Fellowship at the Metropolitan Museum of Art, New York.
Archival abbreviation
MMATE: Metropolitan Museum of Art Theban Excavations. Vols. VII, VIII, IX of compendia containing the fieldnotes, drawings, photographs and correspondence of Herbert Winlock. Held at the Department of Egyptian Art Archives in the Metropolitan Museum of Art, New York.
Online supplementary material (OSM)
To view supplementary material for this article, please visit https://doi.org/10.15184/aqy.2025.64 and select the supplementary materials tab.


 Open access