





1. Introduction
In high-speed flow applications, shock-wave/turbulent boundary-layer interactions (STBLIs) play a critical role in determining overall performance and flow stability. Typical examples of systems affected by STBLIs include over-expanded rocket engine nozzles, supersonic inlets, fan and turbine blades of turbojet engines, transonic/supersonic airfoil surfaces and more. In the strong interaction regime, the adverse pressure gradient is strong enough to cause flow separation, which further results in other detrimental effects, such as engine inlet instability, reduced aerodynamic efficiency and severe mechanical/thermal load fluctuations on structures (Dolling Reference Dolling2001; Clemens & Narayanaswamy Reference Clemens and Narayanaswamy2014; Gaitonde Reference Gaitonde2015).
To mitigate the adverse effects of STBLI, a wide range of active and passive control techniques have been studied. Active control methods, such as active suction and pulsed jets, are proven to be effective but require additional energy and weight (Delery Reference Delery1985; Babinsky & Ogawa Reference Babinsky and Ogawa2008). Passive control methods, including shock-control bumps (Ogawa et al. Reference Ogawa, Babinsky, Pätzold and Lutz2008), secondary recirculation jets (Pasquariello et al. Reference Pasquariello, Grilli, Hickel and Adams2014; Wu et al. Reference Wu, Huang, Yan and Du2022) and vortex generators (Budich et al. Reference Budich, Pasquariello, Grilli and Hickel2013; Panaras & Lu Reference Panaras and Lu2015; Della Posta et al. Reference Della Posta, Blandino, Modesti, Salvadore and Bernardini2023), offer more robust and energy-efficient alternatives. Among these, micro-vortex generators (MVGs), typically sized to approximately 40 % of the boundary-layer thickness, are especially effective in delaying shock-induced flow separation by generating a pair of counter-rotating streamwise vortices that energise the near-wall flow (Babinsky & Ogawa Reference Babinsky and Ogawa2008).
Despite their advantages, many conventional passive control methods, including MVGs, are sensitive to installation location and may introduce considerable drag penalties in the absence of separation (Rybalko, Babinsky & Loth Reference Rybalko, Babinsky and Loth2012; Gaitonde & Adler Reference Gaitonde and Adler2023). These limitations are exacerbated at higher Reynolds numbers (Guo et al. Reference Guo, Fang, Zhang and Li2022). Consequently, there is strong motivation to study robust, location-insensitive, low-drag passive control strategies for high-speed flows.
In this context, surface roughness emerges as a promising passive control strategy. Spanwise heterogeneous roughness can induce large-scale secondary flow structures, i.e. streamwise vortices, within a turbulent boundary layer (Anderson et al. Reference Anderson, Barros, Christensen and Awasthi2015). Secondary flows can be classified into Prandtl’s secondary flow of the first kind and the second kind (Prandtl Reference Prandtl1931; Nikitin, Popelenskaya & Stroh Reference Nikitin, Popelenskaya and Stroh2021). The former is driven by pressure gradients induced by streamwise geometry variations; examples are the streamwise vortices over MVGs or convergent–divergent (C–D) riblets (Nugroho, Hutchins & Monty Reference Nugroho, Hutchins and Monty2013). In contrast, secondary flows of the second kind originate from turbulence anisotropy, specifically the imbalance between local production and viscous dissipation of turbulent kinetic energy, and occur only in turbulent flows.
Recent work by Guo et al. (Reference Guo, Fang, Zhang and Li2022) demonstrated that C–D riblets with a height less than 5 % of the boundary-layer thickness can reduce the mean separation area by 56 % in a Mach 2.9 compression-ramp interaction. Their results suggest that roughness-induced streamwise vortices can effectively control STBLI. However, C–D riblets also introduce pressure drag and must be carefully positioned relative to the shock impingement location to achieve optimal control performance.
An alternative approach is the use of ridge-type roughness, which can induce Prandtl’s second kind of secondary flow (Kadivar, Tormey & McGranaghan Reference Kadivar, Tormey and McGranaghan2021; Wu et al. Reference Wu, Laguarda, Modesti and Hickel2025b
). Compared with strip-type roughness, which relies on spanwise variations in wall shear stress, ridge-type roughness involves geometric elevation and an increase in wall area. The roughness edge causes the upward deflection of the spanwise motions in the valley, creating strong positive wall-normal velocity fluctuation $v^{\prime}$
above the crest and spanwise fluctuations
$v^{\prime}$
above the crest and spanwise fluctuations $w^{\prime}$
toward the valley (Hwang & Lee Reference Hwang and Lee2018). When applied in a streamwise-homogeneous fashion, ridge-type surfaces produce no additional pressure drag and are less sensitive to positioning. These characteristics make ridge-type roughness suitable for large-area applications in high-speed flow control. Several recent studies have examined the flow structures generated by ridge-type roughness. Zampiron, Cameron & Nikora (Reference Zampiron, Cameron and Nikora2020) experimentally demonstrate that ridge-type roughness can induce secondary currents, such as upwash over the ridges and downwash in the valleys, resulting in the spanwise modulation of low- and high-momentum pathways within the turbulent boundary layer. This mechanism was confirmed numerically by Zhdanov, Jelly & Busse (Reference Zhdanov, Jelly and Busse2024). Wangsawijaya et al. (Reference Wangsawijaya, Baidya, Chung, Marusic and Hutchins2020) further identified ridge spacing, width and height as key parameters influencing the intensity of the induced secondary motion. Moreover, Von Deyn et al. (Reference Von Deyn, Schmidt, Örlü, Stroh, Kriegseis, Böhm and Frohnapfel2022) showed that these secondary motions exhibit only weak sensitivity to Reynolds number.
$w^{\prime}$
toward the valley (Hwang & Lee Reference Hwang and Lee2018). When applied in a streamwise-homogeneous fashion, ridge-type surfaces produce no additional pressure drag and are less sensitive to positioning. These characteristics make ridge-type roughness suitable for large-area applications in high-speed flow control. Several recent studies have examined the flow structures generated by ridge-type roughness. Zampiron, Cameron & Nikora (Reference Zampiron, Cameron and Nikora2020) experimentally demonstrate that ridge-type roughness can induce secondary currents, such as upwash over the ridges and downwash in the valleys, resulting in the spanwise modulation of low- and high-momentum pathways within the turbulent boundary layer. This mechanism was confirmed numerically by Zhdanov, Jelly & Busse (Reference Zhdanov, Jelly and Busse2024). Wangsawijaya et al. (Reference Wangsawijaya, Baidya, Chung, Marusic and Hutchins2020) further identified ridge spacing, width and height as key parameters influencing the intensity of the induced secondary motion. Moreover, Von Deyn et al. (Reference Von Deyn, Schmidt, Örlü, Stroh, Kriegseis, Böhm and Frohnapfel2022) showed that these secondary motions exhibit only weak sensitivity to Reynolds number.
Most recently, Wu et al. (Reference Wu, Laguarda, Modesti and Hickel2025b
) applied streamwise-homogeneous ridge-type roughness to impinging STBLI at Mach 2 and friction Reynolds number $Re_\tau \approx 350$
and reported two important outcomes: the ridge-type roughness with relatively large spacing reduced the shock-induced flow separation, while the ridge-type roughness with relatively small spacing alleviated the pressure fluctuation peak near the separation-shock foot. This reduction in pressure unsteadiness is of direct engineering importance, since large-amplitude, low-frequency pressure fluctuations impose severe unsteady loads on thin-walled structures, potentially giving rise to strong fluid–structure interactions, resonance effects and accelerated structural fatigue (Spottswood et al. Reference Spottswood, Beberniss, Eason, Perez, Donbar, Ehrhardt and Riley2019; Laguarda et al. Reference Laguarda, Hickel, Schrijer and van Oudheusden2024a
). In this context, ridge-type roughness potentially offers passive means of alleviating the peak dynamic loads associated with the moving separation shock. However, whether the effect persists at higher Reynolds numbers remained an open question.
$Re_\tau \approx 350$
and reported two important outcomes: the ridge-type roughness with relatively large spacing reduced the shock-induced flow separation, while the ridge-type roughness with relatively small spacing alleviated the pressure fluctuation peak near the separation-shock foot. This reduction in pressure unsteadiness is of direct engineering importance, since large-amplitude, low-frequency pressure fluctuations impose severe unsteady loads on thin-walled structures, potentially giving rise to strong fluid–structure interactions, resonance effects and accelerated structural fatigue (Spottswood et al. Reference Spottswood, Beberniss, Eason, Perez, Donbar, Ehrhardt and Riley2019; Laguarda et al. Reference Laguarda, Hickel, Schrijer and van Oudheusden2024a
). In this context, ridge-type roughness potentially offers passive means of alleviating the peak dynamic loads associated with the moving separation shock. However, whether the effect persists at higher Reynolds numbers remained an open question.
The objective of the present study is to further explore the control effectiveness and the underlying mechanisms of ridge-type roughness, particularly at moderately high Reynolds numbers. To this end, two new rough-wall simulations are conducted at a friction Reynolds number of approximately 1200, based on the incoming turbulent boundary layer. The employed roughness maintains geometric similarity to a selected low-Reynolds-number case of Wu et al. (Reference Wu, Laguarda, Modesti and Hickel2025b ) in outer scaling for one simulation and in inner scaling for the other. Results are compared with corresponding baseline (uncontrolled) interactions on a smooth wall. This framework allows us to isolate the effects of Reynolds number, roughness scaling and surface condition on the STBLI flow, and to assess the efficacy of ridge-type roughness as a passive control method for mitigating shock-induced unsteadiness.
2. Numerical set-up
2.1. Numerical method
The three-dimensional, compressible Navier–Stokes equations are solved using our in-house finite-volume solver INCA (https://inca.cfd). Wall-resolved large-eddy simulations (LES) are performed using the adaptive local deconvolution method (ALDM). The ALDM is a nonlinear solution-adaptive finite-volume scheme that models subgrid-scale turbulence and shock waves holistically. It enables accurate propagation of smooth waves and turbulence without excessive numerical dissipation, achieving a similar spectral resolution as provided by a sixth-order central difference scheme. The ALDM captures discontinuities without oscillations using solution-adaptive stencil selection and an appropriate flux function (Hickel, Egerer & Larsson Reference Hickel, Egerer and Larsson2014). Gradients appearing in the viscous flux tensor are discretised using linear second-order central differences. An explicit third-order Runge–Kutta scheme is used for time marching. This solver has been extensively validated and successfully applied for various STBLI cases, including the compression ramp (Grilli et al. Reference Grilli, Schmid, Hickel and Adams2012), shock impingement (Pasquariello, Hickel & Adams Reference Pasquariello, Hickel and Adams2017; Laguarda et al. Reference Laguarda, Hickel, Schrijer and van Oudheusden2024a ,Reference Laguarda, Hickel, Schrijer and Van Oudheusden b ) and forward/backward facing steps (Hu et al. Reference Hu, Hickel and Van Oudheusden2021, Reference Hu, Hickel and van Oudheusden2022). A second-order cut-cell-based immersed boundary method (IBM) is utilised to represent the rough wall (Meyer et al. Reference Meyer, Devesa, Hickel, Hu and Adams2010a ; Örley et al. Reference Örley, Pasquariello, Hickel and Adams2015). With this cut-cell method, the finite-volume cells at the boundaries are re-shaped to locally conform to the wall boundary, which ensures the strict conservation of mass, momentum and energy, and a sharp representation of the fluid–solid interface. The accuracy, stability and convergence of this cut-cell IBM have been thoroughly verified through direct comparisons with results obtained on body-fitted grids in several previous studies (see, e.g. Meyer et al. Reference Meyer, Hickel and Adams2010b ; Başkaya et al. Reference Başkaya, Capriati, Turchi, Magin and Hickel2024).
(a) Schematics of the computational domain (including instantaneous streamwise velocity contours), and (b) schematic view of the investigated ridge-type rough walls with relevant geometric definitions.

2.2. Flow configuration, boundary conditions and grid distribution
We investigate the interaction of an impinging shock with an incoming turbulent boundary-layer flow, as illustrated in figure 1. This study considers five simulations: two low-Reynolds-number cases – one with a smooth wall ( $\mathcal{LS}$
) and one with a rough wall (
$\mathcal{LS}$
) and one with a rough wall ( $\mathcal{LR}$
) – and three moderately high-Reynolds-number cases, consisting of one smooth-wall case (
$\mathcal{LR}$
) – and three moderately high-Reynolds-number cases, consisting of one smooth-wall case ( $\mathcal{HS}$
) and two rough-wall cases (
$\mathcal{HS}$
) and two rough-wall cases ( $\mathcal{HR}1$
,
$\mathcal{HR}1$
, $\mathcal{HR}2$
), which share the same roughness geometry with
$\mathcal{HR}2$
), which share the same roughness geometry with $\mathcal{LR}$
in outer and inner scalings, respectively.
$\mathcal{LR}$
in outer and inner scalings, respectively.
All above simulations share identical inflow conditions: a Mach 2.0 turbulent boundary layer (TBL) that interacts with an oblique impinging-shock wave with a shock angle of $\phi =40.04^\circ$
. The dimensions of the computational domain for the smooth walls are
$\phi =40.04^\circ$
. The dimensions of the computational domain for the smooth walls are $L_x\times L_y\times L_z=45.4\delta _0 \times 16.5\delta _0 \times 4\delta _0$
, where
$L_x\times L_y\times L_z=45.4\delta _0 \times 16.5\delta _0 \times 4\delta _0$
, where $\delta _0$
is defined as the boundary-layer thickness at the inlet. The nominal impingement point
$\delta _0$
is defined as the boundary-layer thickness at the inlet. The nominal impingement point $x_{\textit{imp}}$
of the shock wave is located
$x_{\textit{imp}}$
of the shock wave is located $32\delta _0$
downstream of the inlet. The fluid is modelled as a perfect gas with constant specific heat ratio
$32\delta _0$
downstream of the inlet. The fluid is modelled as a perfect gas with constant specific heat ratio $\gamma =1.4$
and a constant Prandtl number
$\gamma =1.4$
and a constant Prandtl number $Pr=0.72$
; the dynamic viscosity depends on temperature via a
$Pr=0.72$
; the dynamic viscosity depends on temperature via a $T^{0.7}$
power-law model. Stagnation temperature and pressure are
$T^{0.7}$
power-law model. Stagnation temperature and pressure are $T_0=288.2\ \mathrm{K}$
and
$T_0=288.2\ \mathrm{K}$
and $p_0=355.6\ \mathrm{kPa}$
at the inlet. The flow parameters are summarised in the table 1.
$p_0=355.6\ \mathrm{kPa}$
at the inlet. The flow parameters are summarised in the table 1.
Summary of flow parameters of the incoming flow.

The Reynolds numbers $Re_{\delta _{0}}=\rho _{\infty }u_{\infty }\delta _0/\mu _{\infty }$
are
$Re_{\delta _{0}}=\rho _{\infty }u_{\infty }\delta _0/\mu _{\infty }$
are $11.6\times 10^3$
and
$11.6\times 10^3$
and $50.1\times 10^3$
at the inlet of the computational domain for the low- and higher-Reynolds-number cases, where
$50.1\times 10^3$
at the inlet of the computational domain for the low- and higher-Reynolds-number cases, where $\rho _{\infty }$
,
$\rho _{\infty }$
, $u_{\infty }$
,
$u_{\infty }$
, $\mu _{\infty }$
are density, velocity and dynamic viscosity of the free-stream flow. The corresponding friction Reynolds numbers
$\mu _{\infty }$
are density, velocity and dynamic viscosity of the free-stream flow. The corresponding friction Reynolds numbers $Re_{\tau ,0}=\delta _0/\delta _v$
are 250 and 935, respectively. The viscous length scale
$Re_{\tau ,0}=\delta _0/\delta _v$
are 250 and 935, respectively. The viscous length scale $\delta _v=\mu _{w}/(\rho _wu_{\tau })$
is computed with the parameters at the wall, with
$\delta _v=\mu _{w}/(\rho _wu_{\tau })$
is computed with the parameters at the wall, with $u_\tau =\sqrt {\tau _w/\rho _w}$
being the friction velocity, and
$u_\tau =\sqrt {\tau _w/\rho _w}$
being the friction velocity, and $\tau _w$
and
$\tau _w$
and $\rho _w$
the stress per plane area and the density of the fluid at the wall.
$\rho _w$
the stress per plane area and the density of the fluid at the wall.
The spanwise heterogeneous roughness consists of sinusoidal ridges with non-dimensional wavelength $\lambda /\delta _0$
, height
$\lambda /\delta _0$
, height $H/\delta _0$
and spacing
$H/\delta _0$
and spacing $D/\delta _0$
, while the roughness remains homogeneous in the streamwise direction, see figure 1(b). To systematically investigate the effect of Reynolds number, two rough walls were designed to maintain identical geometric parameters in either outer or inner scaling. In outer scaling, cases
$D/\delta _0$
, while the roughness remains homogeneous in the streamwise direction, see figure 1(b). To systematically investigate the effect of Reynolds number, two rough walls were designed to maintain identical geometric parameters in either outer or inner scaling. In outer scaling, cases $\mathcal{LR}$
and
$\mathcal{LR}$
and $\mathcal{HR}1$
share identical geometric parameters:
$\mathcal{HR}1$
share identical geometric parameters: $\lambda /\delta _0=0.2$
,
$\lambda /\delta _0=0.2$
, $H/\delta _0=0.1$
and
$H/\delta _0=0.1$
and $D/\delta _0=0.25$
. In inner scaling, cases
$D/\delta _0=0.25$
. In inner scaling, cases $\mathcal{LR}$
and
$\mathcal{LR}$
and $\mathcal{HR}2$
have identical parameters:
$\mathcal{HR}2$
have identical parameters: $\lambda ^+=\lambda /\delta _v=49.6$
,
$\lambda ^+=\lambda /\delta _v=49.6$
, $h^+=H/\delta _v=24.8$
and
$h^+=H/\delta _v=24.8$
and $d^+=D/\delta _v=62$
.
$d^+=D/\delta _v=62$
.
The bottom smooth or rough walls are modelled as adiabatic no-slip surfaces. A digital filter method (method A2 of Laguarda & Hickel Reference Laguarda and Hickel2024) is applied at the inflow plane to generate a synthetic TBL flow with well-defined space and time correlations. All the flow variables are linearly extrapolated at the outlet of the domain, and periodicity is imposed in the spanwise direction. A non-reflecting boundary condition based on Riemann invariants is used at the top boundary, where the oblique shock and trailing edge expansion fan are introduced using the Rankine–Hugoniot relations and Prandtl–Meyer theory.
The computational domain is discretised by a block-structured, piecewise Cartesian grid with an equal number of cells per block but varying grid spacing. As depicted in figure 2, the grid is gradually coarsened in the streamwise and spanwise directions as the distance from the wall increases. In the wall-normal direction, the mesh is progressively stretched with a very mild stretching factor of 1.02. The appropriateness of the grid resolution and domain size for the two smooth-wall cases has been conclusively validated by Laguarda et al. (Reference Laguarda, Hickel, Schrijer and Van Oudheusden2024b
) through grid- and domain-sensitivity studies. For the rough-wall cases, extra layers of blocks are added to enclose the computational fluid domain below $y=0$
and the grid is locally refined in the spanwise direction to fully resolve the geometry and turbulent structures around the roughness structure, see figure 2. This mesh yields grid-converged results, as demonstrated for the most challenging case,
$y=0$
and the grid is locally refined in the spanwise direction to fully resolve the geometry and turbulent structures around the roughness structure, see figure 2. This mesh yields grid-converged results, as demonstrated for the most challenging case, $\mathcal{HR}2$
, in Appendix A. The spatial resolution parameters are summarised in table 2.
$\mathcal{HR}2$
, in Appendix A. The spatial resolution parameters are summarised in table 2.
Case-dependent roughness geometric parameters and grid resolutions.

Block distribution of the numerical grid for the higher-Reynolds-number case $\mathcal{HR}1$
. In the zoom-in view of the right panel, the mesh lines are displayed in grey, with only every fourth line shown in the y- and z-directions for clarity.
$\mathcal{HR}1$
. In the zoom-in view of the right panel, the mesh lines are displayed in grey, with only every fourth line shown in the y- and z-directions for clarity.

All simulations were initialised using the inviscid shock reflection solution. After an initial transient period of approximately 2000 $\delta _0/u_{\infty }$
, all cases were integrated for more than 4000
$\delta _0/u_{\infty }$
, all cases were integrated for more than 4000 $\delta _0/u_{\infty }$
to obtain converged statistics for the low-frequency dynamics of STBLI. Flow statistics were computed by time averaging the instantaneous three-dimensional solutions. An array of numerical probes was placed at the top of the ridge in the mid-span plane, with a sampling rate of
$\delta _0/u_{\infty }$
to obtain converged statistics for the low-frequency dynamics of STBLI. Flow statistics were computed by time averaging the instantaneous three-dimensional solutions. An array of numerical probes was placed at the top of the ridge in the mid-span plane, with a sampling rate of $f_s\approx 46u_{\infty }/\delta _0$
. Additionally, instantaneous three-dimensional snapshots of the interaction region were saved at intervals of
$f_s\approx 46u_{\infty }/\delta _0$
. Additionally, instantaneous three-dimensional snapshots of the interaction region were saved at intervals of $\Delta t\approx \delta /u_{\infty }$
for post-processing, yielding an ensemble of approximately 4100 snapshots per case.
$\Delta t\approx \delta /u_{\infty }$
for post-processing, yielding an ensemble of approximately 4100 snapshots per case.
3. Results
3.1. Incoming turbulent boundary layer
Before examining the interaction, we first analyse the state of the incoming TBL upstream of the impingement point, which provides the physical basis for understanding the subsequent STBLI dynamics. A probing station is placed $20\delta _0$
upstream of the impingement point, away from the influence of downstream STBLI. Additionally, this station is located
$20\delta _0$
upstream of the impingement point, away from the influence of downstream STBLI. Additionally, this station is located $12\delta _0$
downstream of the inflow plane, ensuring that the turbulence has fully developed and reached an equilibrium state (Morgan et al. Reference Morgan, Larsson, Kawai and Lele2011; Laguarda & Hickel Reference Laguarda and Hickel2024).
$12\delta _0$
downstream of the inflow plane, ensuring that the turbulence has fully developed and reached an equilibrium state (Morgan et al. Reference Morgan, Larsson, Kawai and Lele2011; Laguarda & Hickel Reference Laguarda and Hickel2024).
To better compare the characteristics of the incoming TBLs over smooth and rough walls, a shifted wall-normal coordinate is considered (Chung et al. Reference Chung, Hutchins, Schultz and Flack2021), because the outer turbulent flow does not perceive its origin at $y=0$
if the wall is rough. The origin of the wall-normal coordinate is thus shifted to the average roughness elevation height above the valley of the rough wall. The average elevation is referred to as the meltdown height
$y=0$
if the wall is rough. The origin of the wall-normal coordinate is thus shifted to the average roughness elevation height above the valley of the rough wall. The average elevation is referred to as the meltdown height $H_{\textit{md}}$
.
$H_{\textit{md}}$
.
The functional relation between $y_s/\delta _0$
and
$y_s/\delta _0$
and $y/\delta _0$
can be written as
$y/\delta _0$
can be written as
 \begin{equation} y_s/\delta _0 = (y+H-H_{\textit{md}})/\delta _0, \end{equation}
as illustrated in figure 3. For the smooth-wall cases, $y_s/\delta _0$
reduces to
$y_s/\delta _0$
reduces to $y/\delta _0$
.
$y/\delta _0$
.
Definition of the shifted wall-normal coordinate $y_s$
and roughness meltdown height
$y_s$
and roughness meltdown height $H_{\textit{md}}$
.
$H_{\textit{md}}$
.

Figure 4 shows the van Driest-transformed mean streamwise velocity profile and density-scaled Reynolds stresses for the higher-Reynolds-number case $\mathcal{HS}$
evaluated at the streamwise location
$\mathcal{HS}$
evaluated at the streamwise location $(x-x_{\textit{imp}})/\delta _0=-20.0$
, which corresponds to a friction Reynolds number
$(x-x_{\textit{imp}})/\delta _0=-20.0$
, which corresponds to a friction Reynolds number $Re_{\tau }=\rho _{w}u_{\tau }\delta /\mu _{w}\approx 1000$
. The DNS data of Pirozzoli & Bernardini (Reference Pirozzoli and Bernardini2011) are also included as a reference. As observed, our LES results agree with the law of wall and the reference DNS data, in both the inner layer and the log-law region. The Reynolds stresses from the current LES are also in good agreement with the reference DNS data, particularly in the region of peak streamwise stress. The slightly lower resolved Reynolds stresses in the outer layer are expected in wall-resolved LES and are consistent with the use of coarser meshes compared with the fully resolved reference DNS. As shown in the grid-sensitivity study in Appendix A, the quantities of interest exhibit negligible dependence on grid resolution.
$Re_{\tau }=\rho _{w}u_{\tau }\delta /\mu _{w}\approx 1000$
. The DNS data of Pirozzoli & Bernardini (Reference Pirozzoli and Bernardini2011) are also included as a reference. As observed, our LES results agree with the law of wall and the reference DNS data, in both the inner layer and the log-law region. The Reynolds stresses from the current LES are also in good agreement with the reference DNS data, particularly in the region of peak streamwise stress. The slightly lower resolved Reynolds stresses in the outer layer are expected in wall-resolved LES and are consistent with the use of coarser meshes compared with the fully resolved reference DNS. As shown in the grid-sensitivity study in Appendix A, the quantities of interest exhibit negligible dependence on grid resolution.
Comparison of present LES (——) for the smooth-wall case and direct numerical simulation (DNS) ( $\square$
) of Pirozzoli & Bernardini (Reference Pirozzoli and Bernardini2011): (a) van Driest-transformed mean-velocity profiles and (b) density-scaled Reynolds stresses at
$\square$
) of Pirozzoli & Bernardini (Reference Pirozzoli and Bernardini2011): (a) van Driest-transformed mean-velocity profiles and (b) density-scaled Reynolds stresses at $M_{\infty }=2.0$
and
$M_{\infty }=2.0$
and $Re_{\tau }\approx 1000$
.
$Re_{\tau }\approx 1000$
.

The van Driest-transformed velocity profiles of the incoming TBLs for all of the cases.

The time- and spanwise-averaged van Driest-transformed velocity profiles of the rough walls are compared at the same probing station $(x-x_{\textit{imp}})/\delta _0=-20.0$
, in figure 5. Both low and higher-Reynolds-number cases with rough walls exhibit a profile downshift compared with their smooth-wall counterparts, which indicates a drag increase and momentum deficit because of the roughness. The downshift can be quantified using the roughness function
$(x-x_{\textit{imp}})/\delta _0=-20.0$
, in figure 5. Both low and higher-Reynolds-number cases with rough walls exhibit a profile downshift compared with their smooth-wall counterparts, which indicates a drag increase and momentum deficit because of the roughness. The downshift can be quantified using the roughness function $\Delta \langle u \rangle ^+_{\textit{vD}} = \langle u \rangle ^+_{\textit{vD,S}}-\langle u \rangle ^+_{\textit{vD,R}}$
, where
$\Delta \langle u \rangle ^+_{\textit{vD}} = \langle u \rangle ^+_{\textit{vD,S}}-\langle u \rangle ^+_{\textit{vD,R}}$
, where $\langle u \rangle ^+_{\textit{vD,S}}$
and
$\langle u \rangle ^+_{\textit{vD,S}}$
and $\langle u \rangle ^+_{\textit{vD,R}}$
are the van Driest-transformed mean-velocity profiles of the smooth and rough walls, respectively (Chung et al. Reference Chung, Hutchins, Schultz and Flack2021). For
$\langle u \rangle ^+_{\textit{vD,R}}$
are the van Driest-transformed mean-velocity profiles of the smooth and rough walls, respectively (Chung et al. Reference Chung, Hutchins, Schultz and Flack2021). For $\mathcal{LR}$
,
$\mathcal{LR}$
, $\Delta \langle u \rangle ^+_{\textit{vD}}$
is found to be 1.81, while
$\Delta \langle u \rangle ^+_{\textit{vD}}$
is found to be 1.81, while $\mathcal{HR}1$
and
$\mathcal{HR}1$
and $\mathcal{HR}2$
exhibit larger downshifts of 3.43 and 2.62, respectively. Consistent values of the roughness function are obtained when the velocity profiles are evaluated separately at ridge and valley locations; these additional results are provided in Appendix B. The mean drag increase can also be quantified using the skin-friction coefficient
$\mathcal{HR}2$
exhibit larger downshifts of 3.43 and 2.62, respectively. Consistent values of the roughness function are obtained when the velocity profiles are evaluated separately at ridge and valley locations; these additional results are provided in Appendix B. The mean drag increase can also be quantified using the skin-friction coefficient $\langle C_{\!f} \rangle$
measured at the probing station. For the rough walls with the same geometry in inner scaling, a drag penalty of around 20 % is observed. We note that the wall shear is strongly non-uniform in the spanwise direction: the ridge crests experience locally enhanced shear, whereas the valleys exhibit reduced friction. For this reason, the spanwise-averaged skin-friction coefficient
$\langle C_{\!f} \rangle$
measured at the probing station. For the rough walls with the same geometry in inner scaling, a drag penalty of around 20 % is observed. We note that the wall shear is strongly non-uniform in the spanwise direction: the ridge crests experience locally enhanced shear, whereas the valleys exhibit reduced friction. For this reason, the spanwise-averaged skin-friction coefficient $\langle C_{\!f}\rangle$
is computed using the total shear force over the projected wall area. Because the actual wetted area of the rough wall exceeds that of the smooth wall, this definition inherently yields a larger
$\langle C_{\!f}\rangle$
is computed using the total shear force over the projected wall area. Because the actual wetted area of the rough wall exceeds that of the smooth wall, this definition inherently yields a larger $\langle C_{\!f}\rangle$
. Thus, the increase in
$\langle C_{\!f}\rangle$
. Thus, the increase in $\langle C_{\!f}\rangle$
should not be interpreted as a uniformly higher near-wall momentum. To further clarify this point, we examine the shape factor
$\langle C_{\!f}\rangle$
should not be interpreted as a uniformly higher near-wall momentum. To further clarify this point, we examine the shape factor $H$
based on the spanwise-averaged velocity profile. For the rough-wall cases,
$H$
based on the spanwise-averaged velocity profile. For the rough-wall cases, $H$
is larger than in the smooth-wall baseline, consistent with a less full boundary-layer profile. The corresponding values, together with their relative changes compared with the smooth-wall reference cases, are listed in table 3. Despite having equal wetted areas, the increase of
$H$
is larger than in the smooth-wall baseline, consistent with a less full boundary-layer profile. The corresponding values, together with their relative changes compared with the smooth-wall reference cases, are listed in table 3. Despite having equal wetted areas, the increase of $\Delta \langle u \rangle ^+_{\textit{vD}}$
in
$\Delta \langle u \rangle ^+_{\textit{vD}}$
in $\mathcal{HR}1$
and
$\mathcal{HR}1$
and $\mathcal{HR}2$
indicates that the flow is more sensitive to roughness at the higher Reynolds number. It is worth noting that a small dip appears in the rough case profiles near the ridge crest, which is a consequence of intrinsic averaging. Intrinsic averaging accounts only for the fluid volume fraction of cells intersected by the geometry and inside the fluid domain, using these fractions as weights in the calculation of flow statistics. This approach results in an abrupt change in the volume fraction integral distribution, thereby causing the observed dip in the velocity profile and corresponding Reynolds-stress profiles.
$\mathcal{HR}2$
indicates that the flow is more sensitive to roughness at the higher Reynolds number. It is worth noting that a small dip appears in the rough case profiles near the ridge crest, which is a consequence of intrinsic averaging. Intrinsic averaging accounts only for the fluid volume fraction of cells intersected by the geometry and inside the fluid domain, using these fractions as weights in the calculation of flow statistics. This approach results in an abrupt change in the volume fraction integral distribution, thereby causing the observed dip in the velocity profile and corresponding Reynolds-stress profiles.
Summary of the shape factor H, roughness function, the skin-friction coefficients and their relative changes with respect to the smooth-wall reference cases.

Density-scaled Reynolds-stress profiles $\tau _{\textit{ij}}=\langle \rho \rangle \langle u^{\prime}_{i}u^{\prime}_{j}\rangle$
for the smooth-wall and rough-wall cases are reported in figure 6, where
$\tau _{\textit{ij}}=\langle \rho \rangle \langle u^{\prime}_{i}u^{\prime}_{j}\rangle$
for the smooth-wall and rough-wall cases are reported in figure 6, where $\langle \boldsymbol{\cdot }\rangle$
denotes Reynolds averaging. The Reynolds stresses are normalised by the local wall shear stress, which is calculated by integrating the wall shear stress in the spanwise direction over the wetted area and then normalising it by the projected (planar) area. Across both Reynolds numbers, the smooth- and rough-wall cases exhibit similar Reynolds-stress distributions in the outer layer, while marked deviations appear near the wall. This behaviour is consistent with the observations of Hwang & Lee (Reference Hwang and Lee2018) for TBLs over ridge-type roughness. The magnitudes of the
$\langle \boldsymbol{\cdot }\rangle$
denotes Reynolds averaging. The Reynolds stresses are normalised by the local wall shear stress, which is calculated by integrating the wall shear stress in the spanwise direction over the wetted area and then normalising it by the projected (planar) area. Across both Reynolds numbers, the smooth- and rough-wall cases exhibit similar Reynolds-stress distributions in the outer layer, while marked deviations appear near the wall. This behaviour is consistent with the observations of Hwang & Lee (Reference Hwang and Lee2018) for TBLs over ridge-type roughness. The magnitudes of the $\tau _{\textit{xx}}$
and
$\tau _{\textit{xx}}$
and $\tau _{xy}$
peaks reduce for the rough-wall cases compared with their corresponding smooth-wall case, and their locations move away from the wall, which suggests that the rough wall may reduce the momentum transfer from the outer part of the TBL to the near-wall region. Profiles of
$\tau _{xy}$
peaks reduce for the rough-wall cases compared with their corresponding smooth-wall case, and their locations move away from the wall, which suggests that the rough wall may reduce the momentum transfer from the outer part of the TBL to the near-wall region. Profiles of $\mathcal{LR}$
and
$\mathcal{LR}$
and $\mathcal{HR}2$
, which share the same geometric parameters in the inner scaling, agree well in the inner region (within
$\mathcal{HR}2$
, which share the same geometric parameters in the inner scaling, agree well in the inner region (within $y_s^+\approx 30$
). This agreement suggests that the near-wall flow is primarily modulated by the wall shape in inner scaling.
$y_s^+\approx 30$
). This agreement suggests that the near-wall flow is primarily modulated by the wall shape in inner scaling.
Density-scaled Reynolds-stress profiles of the incoming TBL at $(x-x_{\textit{imp}})/\delta _0=-20.0$
for smooth-wall and rough-wall cases.
$(x-x_{\textit{imp}})/\delta _0=-20.0$
for smooth-wall and rough-wall cases.

Mean flow (a) vertical velocity, (b) streamwise velocity and (c) streamwise Reynolds-stress distribution in a cross-stream plane at $(x-x_{\textit{imp}})/\delta _0=-20$
. The sonic line is shown in lime.
$(x-x_{\textit{imp}})/\delta _0=-20$
. The sonic line is shown in lime.

The mean vertical velocity distribution, shown in figure 7(a) for all cases, highlights the presence of streamwise vortices induced by the ridge-type roughness in all cases, i.e. upwash over the ridges and downwash in the valleys. This secondary flow structure is consistent with roughness-induced secondary motions previously observed in TBLs and channel flows with ridge-type roughness (Hwang & Lee Reference Hwang and Lee2018; Vanderwel et al. Reference Vanderwel, Stroh, Kriegseis, Frohnapfel and Ganapathisubramani2019; Stroh et al. Reference Stroh, Schäfer, Forooghi and Frohnapfel2020). Such secondary flows diminish for case $\mathcal{HR}2$
due to the spatial constraints imposed by the small roughness structure.
$\mathcal{HR}2$
due to the spatial constraints imposed by the small roughness structure.
The mean streamwise velocity $\langle u \rangle$
is presented in figure 7(b). Comparing
$\langle u \rangle$
is presented in figure 7(b). Comparing $\mathcal{HS}$
with
$\mathcal{HS}$
with $\mathcal{LS}$
, it is observed that for
$\mathcal{LS}$
, it is observed that for $\mathcal{HS}$
, the high-speed flow approaches closer to the wall, and the extent of the sonic region is reduced to approximately half of that in
$\mathcal{HS}$
, the high-speed flow approaches closer to the wall, and the extent of the sonic region is reduced to approximately half of that in $\mathcal{LS}$
. All the rough-wall cases exhibit a significantly enlarged subsonic region compared with their corresponding smooth-wall counterparts. The increased subsonic height involves a thicker layer of low-speed fluid near the wall, which allows the shock-induced pressure rise to extend over a longer streamwise distance. As a consequence, the resulting separation bubble that develops is predisposed to extend further upstream and become larger than in the smooth-wall baselines. In addition, the spanwise modulation associated with the ridge–valley pattern generates pockets of low-momentum fluid over the valleys, which precondition the flow for a locally weaker separation shock and a reduced pressure jump at those locations once the interaction is established. These upstream modifications set the stage for the altered separation structure and shock dynamics discussed in § 3.2.
$\mathcal{LS}$
. All the rough-wall cases exhibit a significantly enlarged subsonic region compared with their corresponding smooth-wall counterparts. The increased subsonic height involves a thicker layer of low-speed fluid near the wall, which allows the shock-induced pressure rise to extend over a longer streamwise distance. As a consequence, the resulting separation bubble that develops is predisposed to extend further upstream and become larger than in the smooth-wall baselines. In addition, the spanwise modulation associated with the ridge–valley pattern generates pockets of low-momentum fluid over the valleys, which precondition the flow for a locally weaker separation shock and a reduced pressure jump at those locations once the interaction is established. These upstream modifications set the stage for the altered separation structure and shock dynamics discussed in § 3.2.
Furthermore, in $\mathcal{HR}1$
, the high-speed flow penetrates more deeply into the valleys between ridges than in the
$\mathcal{HR}1$
, the high-speed flow penetrates more deeply into the valleys between ridges than in the $\mathcal{LR}$
case, despite both sharing the same rough-wall geometry in outer scaling. This behaviour is attributed to a higher Reynolds number in
$\mathcal{LR}$
case, despite both sharing the same rough-wall geometry in outer scaling. This behaviour is attributed to a higher Reynolds number in $\mathcal{HR}1$
and the stronger downwash effect of the streamwise vortices. As a result, the sonic line in
$\mathcal{HR}1$
and the stronger downwash effect of the streamwise vortices. As a result, the sonic line in $\mathcal{HR}1$
bends more closely along the wall surface. In contrast, for
$\mathcal{HR}1$
bends more closely along the wall surface. In contrast, for $\mathcal{HR}2$
, which shares the same rough-wall geometry in inner scaling, the sonic line largely remains relatively straight but is displaced further from the wall compared with
$\mathcal{HR}2$
, which shares the same rough-wall geometry in inner scaling, the sonic line largely remains relatively straight but is displaced further from the wall compared with $\mathcal{HS}$
.
$\mathcal{HS}$
.
The streamwise Reynolds stress, shown in figure 7(c), exhibits significant spanwise variation in the rough-wall cases, with markedly reduced intensity in the valley regions. This suggests that turbulence production is suppressed in these areas, and the near-wall flow lacks sufficient momentum exchange to resist an imposed adverse pressure gradient.
3.2. Interaction region
Time-averaged pressure fluctuation distribution on the $z=0$
plane is shown in figure 8. The shock system, sonic lines and zero streamwise velocity lines are superimposed on the contours to serve as a reference. The strongest pressure fluctuations are observed at two distinct locations: near the impingement point of the oblique shock on the shear layer, and in the vicinity of the separation shock, especially above the intersection between the impinging and separation shocks. The amplification of pressure fluctuations in these regions is primarily attributed to the inherent unsteadiness of the separation bubble and the low-frequency oscillations of the separation shock. It is evident that the separation shock emanates from deeper inside the incoming TBL for the higher-Reynolds-number cases. Between the two smooth-wall cases, the low-Reynolds-number case
$z=0$
plane is shown in figure 8. The shock system, sonic lines and zero streamwise velocity lines are superimposed on the contours to serve as a reference. The strongest pressure fluctuations are observed at two distinct locations: near the impingement point of the oblique shock on the shear layer, and in the vicinity of the separation shock, especially above the intersection between the impinging and separation shocks. The amplification of pressure fluctuations in these regions is primarily attributed to the inherent unsteadiness of the separation bubble and the low-frequency oscillations of the separation shock. It is evident that the separation shock emanates from deeper inside the incoming TBL for the higher-Reynolds-number cases. Between the two smooth-wall cases, the low-Reynolds-number case $\mathcal{LS}$
exhibits a slightly more upstream mean separation bubble with a marginally longer separation length. In addition, the front portion of its separation bubble is significantly thinner, a feature also reported by Laguarda et al. (Reference Laguarda, Hickel, Schrijer and Van Oudheusden2024b
). All rough-wall cases exhibit a larger reversed-flow bubble compared with their corresponding smooth-wall cases in the present
$\mathcal{LS}$
exhibits a slightly more upstream mean separation bubble with a marginally longer separation length. In addition, the front portion of its separation bubble is significantly thinner, a feature also reported by Laguarda et al. (Reference Laguarda, Hickel, Schrijer and Van Oudheusden2024b
). All rough-wall cases exhibit a larger reversed-flow bubble compared with their corresponding smooth-wall cases in the present $z=0$
plane at the ridge-top location. Even more pronounced separation occurs in the valley regions, which will be discussed in the following section.
$z=0$
plane at the ridge-top location. Even more pronounced separation occurs in the valley regions, which will be discussed in the following section.
Time-averaged pressure fluctuation distribution at $z=0$
plane. Solid line colour legend: zero streamwise velocity line (red), sonic line (lime) and shock system (black).
$z=0$
plane. Solid line colour legend: zero streamwise velocity line (red), sonic line (lime) and shock system (black).

Time- and spanwise-averaged wall surface variables along the streamwise direction are displayed in figure 9. The streamwise distributions of the mean skin-friction coefficient, in figure 9(a), show an extended separation region for all rough-wall cases compared with the baseline smooth-wall cases, regardless of the Reynolds number. The spanwise-averaged separation and reattachment locations are reported in table 4. The upstream distribution of $C_{\!f}$
exhibits a consistent trend with the roughness function
$C_{\!f}$
exhibits a consistent trend with the roughness function $\Delta \langle u \rangle ^+_{\textit{vD}}$
across all the cases.
$\Delta \langle u \rangle ^+_{\textit{vD}}$
across all the cases.
Summary of separation region characteristics for all cases. All locations are normalised by $\delta _0$
;
$\delta _0$
; $x_{\textit{sep}}$
,
$x_{\textit{sep}}$
, $x_{\textit{att}}$
,
$x_{\textit{att}}$
, $x_{p'_{\textit{max}}}$
,
$x_{p'_{\textit{max}}}$
, $x_{\boldsymbol{\nabla }p _{\textit{max}}}$
denote the streamwise coordinates of spanwise-averaged mean separation, reattachment, peak pressure fluctuation and peak pressure gradient, respectively;
$x_{\boldsymbol{\nabla }p _{\textit{max}}}$
denote the streamwise coordinates of spanwise-averaged mean separation, reattachment, peak pressure fluctuation and peak pressure gradient, respectively; $L_{\textit{sep}}$
,
$L_{\textit{sep}}$
, $A_{\textit{sep}}$
and
$A_{\textit{sep}}$
and $V_{rev}$
are the separation length, area and volume.
$V_{rev}$
are the separation length, area and volume.

Time- and spanwise-averaged (a) friction coefficient, (b) wall pressure, (c) wall-pressure fluctuation and (d) wall-pressure gradient along the streamwise direction. Pentagon markers show the separation/reattachment location, and star markers represent the location of maximum pressure fluctuation.

As shown in figure 9(b), for all rough-wall cases, the onset of the interaction moves upstream, accompanied by a reduction in the peak wall pressure downstream of the reattachment point, relative to their respective baseline configurations. It is worth noting that the onset of interaction in $\mathcal{HR}1$
is located approximately
$\mathcal{HR}1$
is located approximately $2\delta _0$
upstream of that in
$2\delta _0$
upstream of that in $\mathcal{HR}2$
. This upstream shift may be attributed to two reasons. The first is the reduced and more outward-distributed
$\mathcal{HR}2$
. This upstream shift may be attributed to two reasons. The first is the reduced and more outward-distributed $\tau _{xy}$
peak, which weakens the momentum transfer from the outer boundary layer toward the near-wall region, thereby diminishing the flow’s ability to resist separation. Second, an increase in the subsonic layer thickness leads to a longer upstream influence length, as noted by Délery & Bur (Reference Délery and Bur2000).
$\tau _{xy}$
peak, which weakens the momentum transfer from the outer boundary layer toward the near-wall region, thereby diminishing the flow’s ability to resist separation. Second, an increase in the subsonic layer thickness leads to a longer upstream influence length, as noted by Délery & Bur (Reference Délery and Bur2000).
Furthermore, as shown in figure 9(c), the wall-pressure fluctuation for all cases shows two peaks near the separation and reattachment points. The pressure fluctuation peak near the separation point has approximately the same value for $\mathcal{LS}$
and
$\mathcal{LS}$
and $\mathcal{HS}$
; however,
$\mathcal{HS}$
; however, $\mathcal{HS}$
exhibits a sharper spike, because the separation-shock foot is located closer to the wall at higher Reynolds number. More interestingly, results from
$\mathcal{HS}$
exhibits a sharper spike, because the separation-shock foot is located closer to the wall at higher Reynolds number. More interestingly, results from $\mathcal{HR}1$
and
$\mathcal{HR}1$
and $\mathcal{HR}2$
demonstrate that ridge-type roughness can reduce the wall-pressure fluctuation peak in higher-Reynolds-number flows, achieving a reduction of up to 27 %, which is significantly greater than that observed for the low-Reynolds-number case
$\mathcal{HR}2$
demonstrate that ridge-type roughness can reduce the wall-pressure fluctuation peak in higher-Reynolds-number flows, achieving a reduction of up to 27 %, which is significantly greater than that observed for the low-Reynolds-number case $\mathcal{LR}$
. We also note that the rough-wall cases exhibit a broader region of elevated wall-pressure fluctuations than the baseline, owing to the enlarged interaction region. However, this does not necessarily indicate a detrimental effect. In practice, different control strategies prioritise different performance metrics – such as reducing peak unsteady loads, minimising separation length or improving mean pressure recovery – depending on the specific application. Importantly, the present roughness design achieves a substantial reduction in the peak amplitude of the wall-pressure fluctuations, which is often the most critical metric for engineering applications.
$\mathcal{LR}$
. We also note that the rough-wall cases exhibit a broader region of elevated wall-pressure fluctuations than the baseline, owing to the enlarged interaction region. However, this does not necessarily indicate a detrimental effect. In practice, different control strategies prioritise different performance metrics – such as reducing peak unsteady loads, minimising separation length or improving mean pressure recovery – depending on the specific application. Importantly, the present roughness design achieves a substantial reduction in the peak amplitude of the wall-pressure fluctuations, which is often the most critical metric for engineering applications.
We observe that the reduction in peak pressure fluctuation is accompanied by a corresponding decrease in the peak pressure gradient in all rough-wall cases, as shown in figures 9(c) and 9(d), which suggests that rough-wall configurations mitigate peak pressure fluctuations by lowering peak pressure gradients, independent of the Reynolds number. This trend is consistent with the changes in the upstream boundary-layer topology discussed in § 3.1. In particular, the enlarged subsonic region and valley-induced low-momentum zones lead to a more gradual pressure rise, and consequently, a more diffused separation-shock foot. This finding also aligns with the principle proposed by Brusniak & Dolling (Reference Brusniak and Dolling1994), which emphasises that minimising fluctuating pressure loads caused by low-frequency unsteadiness involves reducing the magnitude of the streamwise pressure gradient. Our results also reveal that the peak of wall-pressure gradient in the streamwise direction is significantly larger for higher-Reynolds-number cases. Of particular interest is the observation that the peak wall-pressure fluctuation coincides closely with the location of the maximum pressure gradient for these cases, see figure 9(d) and table 4. In contrast, for the low-Reynolds-number cases, the peak in pressure fluctuations is found downstream of the pressure-gradient maximum. This distinction suggests that wall-pressure fluctuations are predominantly related to the shock motion at higher Reynolds numbers, whereas at low Reynolds numbers, both the shock motion as well as turbulent structures contribute significantly to the wall-pressure fluctuation peak.
Spanwise periodically averaged local skin-friction coefficient distribution projected on the horizontal plane. Black lines denote the location where $\langle C_{\!f} \rangle =0$
. Note that the spanwise (
$\langle C_{\!f} \rangle =0$
. Note that the spanwise ( $z$
) direction is magnified by a factor of 4 compared with the streamwise (
$z$
) direction is magnified by a factor of 4 compared with the streamwise ( $x$
) direction.
$x$
) direction.

The spanwise heterogeneous roughness significantly changes the distribution of the reverse-flow region, as reported by Wu et al. (Reference Wu, Laguarda, Modesti and Hickel2025b
): for large ridge spacing, the mean flow will reattach in the valley after a short secondary separation region; for the smaller ridge spacing, the flow separation starts more upstream, showing a highly corrugated mean separation line. In the present study, which employs a small ridge spacing, the spatial distribution of the skin-friction coefficient projected onto a wall-normal plane, see figure 10, reveals that the separation region in the valley extends in both the upstream and downstream directions, with the upstream extension being more pronounced. For $\mathcal{LR}$
and
$\mathcal{LR}$
and $\mathcal{HR}2$
(which share geometric parameters in inner scaling), the separation front exhibits a smoother, wider upstream protrusion in the valley region due to enhanced viscosity effects near the wall. In contrast,
$\mathcal{HR}2$
(which share geometric parameters in inner scaling), the separation front exhibits a smoother, wider upstream protrusion in the valley region due to enhanced viscosity effects near the wall. In contrast, $\mathcal{HR}1$
displays a distinctive two-spike separation front morphology, with the spikes precisely aligned at the ridge-valley corners. This enhanced separation stems from corner flow effects: the wall shear stress diminishes on both adjacent surfaces, resulting in a less momentum-rich boundary layer in these regions. It can also be observed that, in the smooth-wall cases, the mean skin-friction coefficient
$\mathcal{HR}1$
displays a distinctive two-spike separation front morphology, with the spikes precisely aligned at the ridge-valley corners. This enhanced separation stems from corner flow effects: the wall shear stress diminishes on both adjacent surfaces, resulting in a less momentum-rich boundary layer in these regions. It can also be observed that, in the smooth-wall cases, the mean skin-friction coefficient $\langle C_{\!f}\rangle$
is homogeneous in the spanwise direction, whereas the rough-wall cases exhibit pronounced spanwise heterogeneity. A high absolute value of
$\langle C_{\!f}\rangle$
is homogeneous in the spanwise direction, whereas the rough-wall cases exhibit pronounced spanwise heterogeneity. A high absolute value of $\langle C_{\!f} \rangle$
is observed along the ridge, where the surface protrudes into the high-speed flow. In contrast, the valley region exhibits lower absolute values of
$\langle C_{\!f} \rangle$
is observed along the ridge, where the surface protrudes into the high-speed flow. In contrast, the valley region exhibits lower absolute values of $\langle C_{\!f} \rangle$
, as the flow there is decelerated by the surrounding walls.
$\langle C_{\!f} \rangle$
, as the flow there is decelerated by the surrounding walls.
Spatio-temporal variation of $C_{\!f}$
. Panels show (a, b)
$C_{\!f}$
. Panels show (a, b) $\mathcal{LS}$
and
$\mathcal{LS}$
and $\mathcal{HS}$
at
$\mathcal{HS}$
at $z=0$
, (c, d)
$z=0$
, (c, d) $\mathcal{LR}$
, (e, f)
$\mathcal{LR}$
, (e, f) $\mathcal{HR}1$
, (g, h)
$\mathcal{HR}1$
, (g, h) $\mathcal{HR}2$
, at ridge and valley, respectively.
$\mathcal{HR}2$
, at ridge and valley, respectively.

The spatio-temporal structures of the skin-friction coefficient are presented in figure 11 to examine the unsteady dynamics of the separation bubble. Figures 11(a)and 11(b) shows the evolution of $C_{\!f}$
along the centreline (
$C_{\!f}$
along the centreline ( $z=0$
) for the smooth-wall cases at low and high Reynolds numbers. The oblique streaks observed upstream and downstream of the interaction correspond to the footprints of coherent structures in the TBL. The separation and reattachment lines exhibit distinctly different temporal behaviours: the separation onset undergoes a relatively small, gradual and slowly varying streamwise excursion, whereas the reattachment point is considerably more unsteady, with larger temporal excursions and a more intermittent, higher-frequency signature. Compared with
$z=0$
) for the smooth-wall cases at low and high Reynolds numbers. The oblique streaks observed upstream and downstream of the interaction correspond to the footprints of coherent structures in the TBL. The separation and reattachment lines exhibit distinctly different temporal behaviours: the separation onset undergoes a relatively small, gradual and slowly varying streamwise excursion, whereas the reattachment point is considerably more unsteady, with larger temporal excursions and a more intermittent, higher-frequency signature. Compared with $\mathcal{LS}$
, the
$\mathcal{LS}$
, the $\mathcal{HS}$
case displays a noticeably more compact temporal pattern, leading to a smoother and better-aligned separation front. Figures 11(c, e, g) and 11(d, f, h) show the spatio-temporal variation of
$\mathcal{HS}$
case displays a noticeably more compact temporal pattern, leading to a smoother and better-aligned separation front. Figures 11(c, e, g) and 11(d, f, h) show the spatio-temporal variation of $C_{\!f}$
at the ridge and valley locations for the three rough-wall cases. At the valley,
$C_{\!f}$
at the ridge and valley locations for the three rough-wall cases. At the valley, $C_{\!f}$
is consistently lower than at the ridge both upstream and downstream of the interaction region. The separation front at the ridge is more fragmented and exhibits larger streamwise excursions than that at the valley, indicating stronger temporal intermittency. In addition, the separation region at the valley extends further in both the upstream and downstream directions compared with that at the ridge, consistent with the time-averaged separation structure.
$C_{\!f}$
is consistently lower than at the ridge both upstream and downstream of the interaction region. The separation front at the ridge is more fragmented and exhibits larger streamwise excursions than that at the valley, indicating stronger temporal intermittency. In addition, the separation region at the valley extends further in both the upstream and downstream directions compared with that at the ridge, consistent with the time-averaged separation structure.
To further elucidate the structure of the reverse flow, we next examine the spanwise-averaged structure in the x–y plane, which reveals the internal organisation of the separation bubble beyond what can be inferred from the surface-based $C_{\!f}$
distributions. The mean reverse-flow region can be identified either by the condition
$C_{\!f}$
distributions. The mean reverse-flow region can be identified either by the condition $\langle u \rangle \lt 0$
or by a reverse-flow probability
$\langle u \rangle \lt 0$
or by a reverse-flow probability $\chi \gt 0.5$
, as illustrated in figure 12. The shapes of the separation bubble derived from both criteria agree well, although the latter yields a slightly larger separation volume. Interestingly, for case
$\chi \gt 0.5$
, as illustrated in figure 12. The shapes of the separation bubble derived from both criteria agree well, although the latter yields a slightly larger separation volume. Interestingly, for case $\mathcal{LS}$
, the separation bubble extends further upstream with a notably shallow leading edge. This observation aligns with the findings of Laguarda et al. (Reference Laguarda, Hickel, Schrijer and Van Oudheusden2024b
), despite the use of an isothermal wall boundary condition in their study. The rough-wall cases exhibit a significantly larger reverse-flow area on the x–y plane compared with their smooth-wall counterparts. The angles of the reverse-flow front edge
$\mathcal{LS}$
, the separation bubble extends further upstream with a notably shallow leading edge. This observation aligns with the findings of Laguarda et al. (Reference Laguarda, Hickel, Schrijer and Van Oudheusden2024b
), despite the use of an isothermal wall boundary condition in their study. The rough-wall cases exhibit a significantly larger reverse-flow area on the x–y plane compared with their smooth-wall counterparts. The angles of the reverse-flow front edge $\vartheta _{rev}$
and the post-shock flow deflection
$\vartheta _{rev}$
and the post-shock flow deflection $\vartheta _{def}$
are summarised in table 4. These angles characterise the degree of outer flow deflection and serve as indicators of separation-shock strength. Notably, the separation bubble grows in size for all rough-wall cases, and bubble slope and deflection of the outer flow are reduced.
$\vartheta _{def}$
are summarised in table 4. These angles characterise the degree of outer flow deflection and serve as indicators of separation-shock strength. Notably, the separation bubble grows in size for all rough-wall cases, and bubble slope and deflection of the outer flow are reduced.
Close-up view of the probability distribution of spanwise-averaged reverse-flow region above $y=0$
. The region of mean reverse flow is contoured by the solid blue lines, and dividing streamlines are marked with solid black lines. The green dashed lines show the isocontours of reverse-flow probability (
$y=0$
. The region of mean reverse flow is contoured by the solid blue lines, and dividing streamlines are marked with solid black lines. The green dashed lines show the isocontours of reverse-flow probability ( $\chi$
= 0.01, 0.5 and 0.8).
$\chi$
= 0.01, 0.5 and 0.8).

3.3. Wall-pressure fluctuation
While the time-averaged flow field provides a foundational understanding of the overall interaction characteristics, it offers only a partial picture of the complex dynamics inherent to STBLI. In particular, the unsteady behaviour near the separation-shock foot, marked by low-frequency shock motions and broadband fluctuations, plays a crucial role in shaping the instantaneous flow topology and directly impacts practical concerns such as aeroelasticity and structural fatigue. As highlighted by Délery & Dussauge (Reference Délery and Dussauge2009), the fluctuating nature of shock-induced interactions, despite their physical and practical significance, had long remained underexplored and only began receiving focused attention in recent decades (Dupont, Haddad & Debiève Reference Dupont, Haddad and Debiève2006; Souverein et al. Reference Souverein, Dupont, Debieve, Dussauge, Van Oudheusden and Scarano2010; Pasquariello et al. Reference Pasquariello, Hickel and Adams2017; Laguarda et al. Reference Laguarda, Hickel, Schrijer and Van Oudheusden2024b ). A closer examination of these unsteady features is therefore essential for advancing both physical insight and predictive capability.
Zoom-in view of pressure fluctuation distribution near the separation-shock foot and shear layer over the separation bubble. The black star denotes the location of the wall-pressure fluctuation peak near the separation-shock foot. The subsonic region is indicated by the lime line, while the reversed-flow bubble is marked with a red line.

The spanwise-averaged pressure fluctuation field in the vicinity of the separation-shock foot is shown in figure 13. While previous observations based on figure 8 indicate that the strongest pressure fluctuations occur near the apex of the separated shear layer and along the separation shock above the intersection point between the impinging and separation shocks, these disturbances are predominantly confined to the outer part of the interaction region and have limited impact on the wall. As shown in figure 13, the two main contributors of pressure fluctuation at the separation-shock foot can be identified as the shock unsteadiness and shear-layer dynamics for both low and higher-Reynolds-number cases. As discussed in § 3.2, the wall-pressure fluctuation peak coincides with the wall-pressure-gradient peak for the higher-Reynolds-number cases and is closely associated with the shock motion. We find that the wall-pressure fluctuation peak is directly beneath the separation-shock foot in higher-Reynolds-number flows. However, in low-Reynolds-number cases, the pressure fluctuation around the separation-shock foot is smeared out quickly when approaching the wall, while the pressure fluctuation coming from the detached shear layer is stronger; thus, the location of the wall-pressure fluctuation peak falls downstream of the separation-shock foot.
Spatio-temporal variation of wall-pressure and wall-pressure fluctuation. Left column: instantaneous wall-pressure signals $p$
at
$p$
at $z=0$
; middle column: wall-pressure fluctuations
$z=0$
; middle column: wall-pressure fluctuations $p^{\prime}$
at
$p^{\prime}$
at $z=0$
; right column: spanwise-averaged wall-pressure fluctuations
$z=0$
; right column: spanwise-averaged wall-pressure fluctuations $p_z^{\prime}$
for (a–c)
$p_z^{\prime}$
for (a–c) $\mathcal{LS}$
, (d–f)
$\mathcal{LS}$
, (d–f) $\mathcal{LR}$
, (g–i)
$\mathcal{LR}$
, (g–i) $\mathcal{HS}$
, (j–l)
$\mathcal{HS}$
, (j–l) $\mathcal{HR}1$
and (m–o)
$\mathcal{HR}1$
and (m–o) $\mathcal{HR}2$
.
$\mathcal{HR}2$
.

The spatio-temporal variations of the wall-pressure and wall-pressure fluctuations are shown in figure 14. Comparing the smooth- and rough-wall cases, it is evident that the rough-wall configurations exhibit a more gradual pressure rise at the shock foot, consistent with the more diffused separation-shock foot. The wall-pressure fluctuations at $z=0$
(ridge), shown in the middle column of figure 14, reveal the clear footprint of the low-frequency shock motion, characterised by large alternating positive and negative excursions in time near the separation-shock foot. The magnitude of these fluctuations is noticeably smaller for the rough-wall cases than for their smooth-wall counterparts, reflecting the suppression of shock strength by the spanwise heterogeneity. The high-Reynolds-number cases exhibit a sharper and shorter streamwise footprint of these fluctuations compared with the low-Reynolds-number counterparts, due to the more abrupt pressure jump associated with a fuller incoming boundary layer. Downstream of the shock foot, thin alternating bands of positive and negative fluctuations are observed; these structures correspond to the advective footprints of pressure disturbances generated by vortical shedding from the separated shear layer. The right column presents the spanwise-averaged results, in which the large-scale patterns appear clearer and less contaminated by local spanwise variation.
$z=0$
(ridge), shown in the middle column of figure 14, reveal the clear footprint of the low-frequency shock motion, characterised by large alternating positive and negative excursions in time near the separation-shock foot. The magnitude of these fluctuations is noticeably smaller for the rough-wall cases than for their smooth-wall counterparts, reflecting the suppression of shock strength by the spanwise heterogeneity. The high-Reynolds-number cases exhibit a sharper and shorter streamwise footprint of these fluctuations compared with the low-Reynolds-number counterparts, due to the more abrupt pressure jump associated with a fuller incoming boundary layer. Downstream of the shock foot, thin alternating bands of positive and negative fluctuations are observed; these structures correspond to the advective footprints of pressure disturbances generated by vortical shedding from the separated shear layer. The right column presents the spanwise-averaged results, in which the large-scale patterns appear clearer and less contaminated by local spanwise variation.
Pre-multiplied PSD maps of wall-pressure signals along the centreline. For the rough-wall cases, this corresponds to the ridge crest. The red lines denote the separation and reattachment locations, while the blue lines indicate the location of maximum pressure fluctuation.

To complement the spatial analysis, the frequency characteristics of the wall-pressure fluctuations are investigated via spectral analysis. Pre-multiplied power spectral density (PSD) maps of wall-pressure signals collected at the ridge crest in the mid-plane show significantly stronger low-frequency content for the high-Reynolds-number cases, see figure 15. Similar to how $\mathcal{LR}$
attenuates the low-frequency content in low -Reynolds-number STBLI flows, rough walls in higher-Reynolds-number interactions, especially
$\mathcal{LR}$
attenuates the low-frequency content in low -Reynolds-number STBLI flows, rough walls in higher-Reynolds-number interactions, especially $\mathcal{HR}2$
, exhibit attenuated low-frequency content near the separation-length-based Strouhal number
$\mathcal{HR}2$
, exhibit attenuated low-frequency content near the separation-length-based Strouhal number $St_{L_{sep}} = f L_{sep}/u_{\infty} = 0.05$
, the characteristic frequency of the low-frequency unsteadiness in STBLIs. We also notice that the wall-pressure fluctuation peak is located a bit downstream of the low-frequency content peak and overlaps with the location of strong high-frequency content in the low-Reynolds-number cases, which is consistent with the results shown in figure 13. On the other hand, the low-frequency content predominantly coincides with the peak wall-pressure fluctuation region for the higher-Reynolds-number cases.
$St_{L_{sep}} = f L_{sep}/u_{\infty} = 0.05$
, the characteristic frequency of the low-frequency unsteadiness in STBLIs. We also notice that the wall-pressure fluctuation peak is located a bit downstream of the low-frequency content peak and overlaps with the location of strong high-frequency content in the low-Reynolds-number cases, which is consistent with the results shown in figure 13. On the other hand, the low-frequency content predominantly coincides with the peak wall-pressure fluctuation region for the higher-Reynolds-number cases.
To better quantify the reduction across different frequency components, we examine the pre-multiplied spectra at the position of maximum wall-pressure fluctuation for all the cases, as shown in figure 16(a). As expected, there are two clearly distinct contributors in the frequency domain, the low-frequency content with $St_{L_{sep}} \leqslant 0.4$
and the high-frequency content with
$St_{L_{sep}} \leqslant 0.4$
and the high-frequency content with $\textit{St}_{L_{\textit{sep}}} \gt 0.4$
. The peak of the high-frequency content in the higher-Reynolds-number flows occurs at
$\textit{St}_{L_{\textit{sep}}} \gt 0.4$
. The peak of the high-frequency content in the higher-Reynolds-number flows occurs at $\textit{St}_{L_{\textit{sep}}} \approx 10$
, whereas in the low-Reynolds-number cases the peak shifts to a lower value of approximately 3. This shift is associated with the fact that the location of maximum pressure fluctuation in the low-Reynolds-number flows lies further downstream relative to the onset of interaction, where the characteristic frequencies of the amplified turbulence are reduced as the shear-layer structures evolve. At the peak pressure fluctuation location in
$\textit{St}_{L_{\textit{sep}}} \approx 10$
, whereas in the low-Reynolds-number cases the peak shifts to a lower value of approximately 3. This shift is associated with the fact that the location of maximum pressure fluctuation in the low-Reynolds-number flows lies further downstream relative to the onset of interaction, where the characteristic frequencies of the amplified turbulence are reduced as the shear-layer structures evolve. At the peak pressure fluctuation location in $\mathcal{LS}$
, the high-frequency components constitute the primary contribution, while the low-frequency contents play only a secondary role. The
$\mathcal{LS}$
, the high-frequency components constitute the primary contribution, while the low-frequency contents play only a secondary role. The $\mathcal{LR}$
configuration diminishes energy across the entire spectrum, with the most significant reduction occurring in the high-frequency range. It is worth noting that the peak of the low-frequency content in both
$\mathcal{LR}$
configuration diminishes energy across the entire spectrum, with the most significant reduction occurring in the high-frequency range. It is worth noting that the peak of the low-frequency content in both $\mathcal{LS}$
and
$\mathcal{LS}$
and $\mathcal{LR}$
does not coincide with the location of the maximum pressure fluctuation, but instead occurs slightly upstream, at
$\mathcal{LR}$
does not coincide with the location of the maximum pressure fluctuation, but instead occurs slightly upstream, at $(x-x_{\textit{imp}})/\delta _0=-7.6$
and
$(x-x_{\textit{imp}})/\delta _0=-7.6$
and $-10.5$
, respectively. Accordingly, the spectra at these upstream locations are shown in figure 16(b), demonstrating a clear suppression of the low-frequency peak at
$-10.5$
, respectively. Accordingly, the spectra at these upstream locations are shown in figure 16(b), demonstrating a clear suppression of the low-frequency peak at $\textit{St}_{L_{\textit{sep}}}\approx 0.05$
in
$\textit{St}_{L_{\textit{sep}}}\approx 0.05$
in $\mathcal{LR}$
, together with a reduction of spectral energy across the entire frequency range. For the higher-Reynolds-number cases, it is evident from figure 16(a) that
$\mathcal{LR}$
, together with a reduction of spectral energy across the entire frequency range. For the higher-Reynolds-number cases, it is evident from figure 16(a) that $\mathcal{HS}$
exhibits the strongest low-frequency peak. The introduction of spanwise heterogeneity reduces this component substantially:
$\mathcal{HS}$
exhibits the strongest low-frequency peak. The introduction of spanwise heterogeneity reduces this component substantially: $\mathcal{HR}1$
weakens the peak noticeably, and
$\mathcal{HR}1$
weakens the peak noticeably, and $\mathcal{HR}2$
suppresses it to less than one third of its original magnitude in
$\mathcal{HR}2$
suppresses it to less than one third of its original magnitude in $\mathcal{HS}$
. The two rough-wall cases also introduce a mild reduction in the high-frequency content, but its contribution remains relatively small compared with the dominant low-frequency suppression.
$\mathcal{HS}$
. The two rough-wall cases also introduce a mild reduction in the high-frequency content, but its contribution remains relatively small compared with the dominant low-frequency suppression.
Pre-multiplied PSD of wall-pressure signals: (a) at the location of peak wall-pressure fluctuations; (b) at $(x-x_{\textit{imp}})/\delta _0=-7.6$
and
$(x-x_{\textit{imp}})/\delta _0=-7.6$
and $-10.5$
for
$-10.5$
for $\mathcal{LS}$
and
$\mathcal{LS}$
and $\mathcal{LR}$
, respectively.
$\mathcal{LR}$
, respectively.

To elucidate the respective roles of low- and high-frequency components in wall-pressure fluctuations, and to assess the influence of ridge-type roughness, the filtered wall-pressure signals from the numerical point probes at the ridge are examined. The wall-pressure fluctuations at the valley are very similar to those at the ridge and are therefore omitted here for brevity. The wall-pressure fluctuation obtained by integrating the power spectral density function is shown in figure 17(a). Since it is derived from signals at a single spanwise location ( $z=0$
) without any spanwise averaging, it contains more noise than the pressure root mean square computed from the three-dimensional flow field. The ratio of spectral power in the low- to high-frequency ranges, figure 17(b), shows a clear influence of Reynolds number on the spectral composition of wall-pressure fluctuations: in higher-Reynolds-number flows, the fluctuations near the separation-shock foot are dominated by low-frequency components, whereas in low-Reynolds-number flows, high-frequency components prevail. Nevertheless, the difference in Reynolds number has a negligible impact on the spectral composition in the downstream regions of the separation-shock foot.
$z=0$
) without any spanwise averaging, it contains more noise than the pressure root mean square computed from the three-dimensional flow field. The ratio of spectral power in the low- to high-frequency ranges, figure 17(b), shows a clear influence of Reynolds number on the spectral composition of wall-pressure fluctuations: in higher-Reynolds-number flows, the fluctuations near the separation-shock foot are dominated by low-frequency components, whereas in low-Reynolds-number flows, high-frequency components prevail. Nevertheless, the difference in Reynolds number has a negligible impact on the spectral composition in the downstream regions of the separation-shock foot.
(a) Wall-pressure fluctuation obtained by integrating the PSD, (b) the ratio of spectral power in the low-frequency range (e.g. $St_{L_{sep}}\lt 0.4$
) to that in the high-frequency range (e.g.
$St_{L_{sep}}\lt 0.4$
) to that in the high-frequency range (e.g. $St_{L_{sep}}\gt 0.4$
), (c) wall-pressure fluctuation attributed to the low-frequency content and (d) wall-pressure fluctuation attributed to the high-frequency content. Wall-pressure signals are collected from the numerical probes at the ridge in the
$St_{L_{sep}}\gt 0.4$
), (c) wall-pressure fluctuation attributed to the low-frequency content and (d) wall-pressure fluctuation attributed to the high-frequency content. Wall-pressure signals are collected from the numerical probes at the ridge in the $z=0$
plane. Pentagon markers show the spanwise-averaged separation and reattachment locations, and star markers represent the location of maximum spanwise-averaged pressure fluctuation.
$z=0$
plane. Pentagon markers show the spanwise-averaged separation and reattachment locations, and star markers represent the location of maximum spanwise-averaged pressure fluctuation.

The streamwise distributions of wall-pressure fluctuations attributed to the low- and high-frequency content are shown in figures 17(c) and 17(d), respectively. Regardless of Reynolds number, both the low- and high-frequency components of wall-pressure fluctuations in rough-wall cases exhibit a decrease compared with those in smooth-wall cases. This attenuation is particularly pronounced in the low-frequency range for the higher-Reynolds-number cases. For these cases, the overall peak in wall-pressure fluctuations appears in the vicinity of the low-frequency maximum, consistent with the dominant role of low-frequency dynamics near the separation-shock foot. In contrast, for low-Reynolds-number flows, the peak shifts closer to the high-frequency maximum, reflecting the enhanced contribution of high-frequency components in that regime. A closer examination reveals that, for all cases, the peak of high-frequency pressure fluctuations consistently appears downstream of the low-frequency peak in the streamwise direction, which explains the observation in figure 9(d) that the wall-pressure fluctuation peak is located downstream of the mean wall-pressure-gradient peak in the low-Reynolds-number cases. It is interesting to notice that, compared with $\mathcal{HR}2$
,
$\mathcal{HR}2$
, $\mathcal{HR}1$
exhibits a smaller reduction in the low-frequency components but a larger reduction in the high-frequency components. Consequently, the overall reduction in wall-pressure fluctuations is comparable between these two cases.
$\mathcal{HR}1$
exhibits a smaller reduction in the low-frequency components but a larger reduction in the high-frequency components. Consequently, the overall reduction in wall-pressure fluctuations is comparable between these two cases.
The analysis reveals that wall-pressure fluctuations originate from two distinct mechanisms: (i) low-frequency components associated with the separation-shock motion (dominant in high-Reynolds-number flows) and (ii) high-frequency components generated by shock-amplified shear-layer turbulence (governing in low-Reynolds-number regimes). Ridge-type roughness effectively attenuates both spectral components, with particularly pronounced suppression of low-frequency wall-pressure fluctuations in the higher-Reynolds-number conditions, demonstrating enhanced flow control efficacy at elevated Reynolds numbers.
3.4. Low-frequency unsteadiness
The previous analysis highlights the prominent role of low-frequency unsteadiness in wall-pressure fluctuations, especially at higher Reynolds numbers; accordingly, we now focus on the dynamics of this low-frequency unsteadiness in the higher-Reynolds-number cases and the influence of ridge-type roughness on it.
(a) Time evolution of the normalised reversed-flow volume fluctuations, and (b) corresponding pre-multiplied and normalised PSD of the signals: (i) $\mathcal{HS}$
; (ii)
$\mathcal{HS}$
; (ii) $\mathcal{HR}1$
; (iii)
$\mathcal{HR}1$
; (iii) $\mathcal{HR}2$
.
$\mathcal{HR}2$
.

The time variations of the reversed-flow bubble volume signals for the higher-Reynolds-number cases ( $\mathcal{HS}$
,
$\mathcal{HS}$
, $\mathcal{HR}1$
, and
$\mathcal{HR}1$
, and $\mathcal{HR}2$
) are shown in figure 18(a), together with their respective spectral content in figure 18(b). The bubble volume signals for these three cases all exhibit aperiodic fluctuations with a local peak in spectra around
$\mathcal{HR}2$
) are shown in figure 18(a), together with their respective spectral content in figure 18(b). The bubble volume signals for these three cases all exhibit aperiodic fluctuations with a local peak in spectra around $\textit{St}_{L_{\textit{sep}}}=0.04{-}0.06$
, which is the characteristic frequency for low-frequency unsteadiness, despite the presence of several additional peaks at higher frequencies around
$\textit{St}_{L_{\textit{sep}}}=0.04{-}0.06$
, which is the characteristic frequency for low-frequency unsteadiness, despite the presence of several additional peaks at higher frequencies around $\textit{St}_{L_{\textit{sep}}}=0.10{-}0.20$
. This observation aligns with the findings of Morgan et al. (Reference Morgan, Duraisamy, Nguyen, Kawai and Lele2013) and Laguarda et al. (Reference Laguarda, Hickel, Schrijer and Van Oudheusden2024b
), which indicate that the low-frequency unsteadiness (
$\textit{St}_{L_{\textit{sep}}}=0.10{-}0.20$
. This observation aligns with the findings of Morgan et al. (Reference Morgan, Duraisamy, Nguyen, Kawai and Lele2013) and Laguarda et al. (Reference Laguarda, Hickel, Schrijer and Van Oudheusden2024b
), which indicate that the low-frequency unsteadiness ( $\textit{St}_{L_{\textit{sep}}}\lt 0.1$
) of the bubble volume is primarily associated with the expansion and contraction of the recirculation region, while the dominant contributors to the signal variance are the higher-frequency (
$\textit{St}_{L_{\textit{sep}}}\lt 0.1$
) of the bubble volume is primarily associated with the expansion and contraction of the recirculation region, while the dominant contributors to the signal variance are the higher-frequency ( $\textit{St}_{L_{\textit{sep}}}\approx 0.1-0.2$
) flapping motions of the shear layer.
$\textit{St}_{L_{\textit{sep}}}\approx 0.1-0.2$
) flapping motions of the shear layer.
(a) Time evolution of the spanwise-averaged wall-pressure fluctuation at the location of its maximum amplitude, and (b) corresponding pre-multiplied and normalised PDS of the signals: (i) $\mathcal{HS}$
; (ii)
$\mathcal{HS}$
; (ii) $\mathcal{HR}1$
; (iii)
$\mathcal{HR}1$
; (iii) $\mathcal{HR}2$
.
$\mathcal{HR}2$
.

(a) Time evolution of the spanwise-averaged separation-shock location at $y=2.0\ \delta _0$
, and (b) corresponding pre-multiplied and normalised PSD of the signal: (i)
$y=2.0\ \delta _0$
, and (b) corresponding pre-multiplied and normalised PSD of the signal: (i) $\mathcal{HS}$
; (ii)
$\mathcal{HS}$
; (ii) $\mathcal{HR}1$
; (iii)
$\mathcal{HR}1$
; (iii) $\mathcal{HR}2$
.
$\mathcal{HR}2$
.

The time histories of the spanwise-averaged wall-pressure and separation-shock-location fluctuations are presented in figures 19 and 20, respectively. The instantaneous wall-pressure signal is extracted at the location of maximum wall-pressure fluctuation, as discussed in § 3.3, while the instantaneous shock location is determined from three-dimensional snapshots by identifying the local maximum of the density gradient ( $|\boldsymbol{\nabla }\rho |$
) within a wall-normal plane at
$|\boldsymbol{\nabla }\rho |$
) within a wall-normal plane at $y=2.0\delta _0$
, as illustrated in figure 21. The wall-pressure and shock-location signals exhibit a high degree of similarity in shape but with opposite trends, indicating that higher wall-pressure fluctuations correspond to upstream shock motion, and vice versa. Consequently, the PSDs of wall pressure and shock location for all three cases display nearly identical spectral characteristics, with a pronounced peak occurring in the low-frequency range around
$y=2.0\delta _0$
, as illustrated in figure 21. The wall-pressure and shock-location signals exhibit a high degree of similarity in shape but with opposite trends, indicating that higher wall-pressure fluctuations correspond to upstream shock motion, and vice versa. Consequently, the PSDs of wall pressure and shock location for all three cases display nearly identical spectral characteristics, with a pronounced peak occurring in the low-frequency range around $\textit{St}_{L_{\textit{sep}}}=0.04{-}0.05$
.
$\textit{St}_{L_{\textit{sep}}}=0.04{-}0.05$
.
The cross-correlations between the fluctuations of reversed-flow bubble volume, wall pressure and separation-shock location were computed, and their cross-correlation coefficients and corresponding time lags are summarised in table 5. As shown in the table, the wall pressure and reversed-flow volume are quite strongly positively correlated, with maximum correlation coefficients $R_{\textit{max}}$
in the range of 0.61–0.72 and a positive time lag, indicating that the growth of the reversed-flow bubble precedes a pressure rise at the separation-shock foot. Notably,
$R_{\textit{max}}$
in the range of 0.61–0.72 and a positive time lag, indicating that the growth of the reversed-flow bubble precedes a pressure rise at the separation-shock foot. Notably, $\mathcal{HS}$
exhibits the shortest time lag, whereas
$\mathcal{HS}$
exhibits the shortest time lag, whereas $\mathcal{HR}1$
shows the longest, which can be attributed to the greater distance over which disturbances in the bubble must propagate from roughly the centre of the separation bubble to the point of maximum wall-pressure fluctuation.
$\mathcal{HR}1$
shows the longest, which can be attributed to the greater distance over which disturbances in the bubble must propagate from roughly the centre of the separation bubble to the point of maximum wall-pressure fluctuation.
Maximum (positive or negative) cross-correlation coefficient $R_{\textit{max}}$
and time lag (
$R_{\textit{max}}$
and time lag ( $\Delta t \boldsymbol{\cdot }u_{\infty }/\delta _0$
) between reversed-flow volume (RFV), wall-pressure fluctuation (WP) and shock-location (SL) fluctuation in the
$\Delta t \boldsymbol{\cdot }u_{\infty }/\delta _0$
) between reversed-flow volume (RFV), wall-pressure fluctuation (WP) and shock-location (SL) fluctuation in the $\mathcal{HS}$
,
$\mathcal{HS}$
, $\mathcal{HR}1$
and
$\mathcal{HR}1$
and $\mathcal{HR}2$
cases.
$\mathcal{HR}2$
cases.

Schematic of the relations between reversed flow, wall pressure and separation-shock location. Dotted lines indicate the characteristic lines (the orange line indicates the characteristic line emanating above the point of maximum wall-pressure fluctuation), and solid green and red lines represent the sonic and separation lines, respectively.

In addition, the spanwise-averaged separation-shock location and wall-pressure signals exhibit a very significant negative correlation with $|R_{\textit{max}}|$
up to at least 0.94. This high correlation aligns with the pronounced similarity in the temporal evolutions of the wall-pressure and shock-location signals. The time lags between the above two signals are approximately
$|R_{\textit{max}}|$
up to at least 0.94. This high correlation aligns with the pronounced similarity in the temporal evolutions of the wall-pressure and shock-location signals. The time lags between the above two signals are approximately $2.5\delta _0/u_{\infty }$
for all three cases, which is attributed to the similar propagation distance from the wall to the mean shock location at the
$2.5\delta _0/u_{\infty }$
for all three cases, which is attributed to the similar propagation distance from the wall to the mean shock location at the $y=2.0\delta _0$
plane. A set of characteristic lines near the shock foot is extracted from the mean flow field, delineating the right boundary of the domain of dependence of the mean shock at
$y=2.0\delta _0$
plane. A set of characteristic lines near the shock foot is extracted from the mean flow field, delineating the right boundary of the domain of dependence of the mean shock at $y=2.0\delta _0$
, as illustrated in figure 21. The integration times along the characteristic line emanating from the sonic line and passing above the point of wall-pressure fluctuation peak are 2.57, 2.54 and 2.56 for the cases
$y=2.0\delta _0$
, as illustrated in figure 21. The integration times along the characteristic line emanating from the sonic line and passing above the point of wall-pressure fluctuation peak are 2.57, 2.54 and 2.56 for the cases $\mathcal{HS}$
,
$\mathcal{HS}$
, $\mathcal{HR}1$
and
$\mathcal{HR}1$
and $\mathcal{HR}2$
, respectively. These integration times closely match the corresponding correlation time lags, thereby supporting the reliability of the correlation-based time lag estimation. The observed positive time lag also indicates that wall-pressure fluctuations at the shock foot precede the shock motion, suggesting that the commonly used phrasing – stating that low-frequency shock excursions cause pressure fluctuations near the shock foot – may be an oversimplification, despite the widely acknowledged understanding that the separation-shock results from the coalescence of compression waves that deflect the mean flow. These phenomena also agree with Erengil (Reference Erengil1993), who found that the oscillation of the separation point precedes the movement of the separation shock.
$\mathcal{HR}2$
, respectively. These integration times closely match the corresponding correlation time lags, thereby supporting the reliability of the correlation-based time lag estimation. The observed positive time lag also indicates that wall-pressure fluctuations at the shock foot precede the shock motion, suggesting that the commonly used phrasing – stating that low-frequency shock excursions cause pressure fluctuations near the shock foot – may be an oversimplification, despite the widely acknowledged understanding that the separation-shock results from the coalescence of compression waves that deflect the mean flow. These phenomena also agree with Erengil (Reference Erengil1993), who found that the oscillation of the separation point precedes the movement of the separation shock.
Based on the above analysis, it is evident that three key physical quantities involved in the low-frequency unsteadiness of STBLI follow a distinct temporal sequence, as shown in figure 21: the evolution of the reversed-flow bubble precedes the wall-pressure fluctuations at the separation-shock foot, which in turn drive the motion of the separation shock. Therefore, it is not surprising that the separation-shock location also exhibits a strong correlation with the reversed-flow bubble volume, accompanied by a larger time lag compared with that of the wall pressure, as shown in table 5. The observed correlation between the separation-shock location and the reversed-flow bubble volume is consistent with the findings of Wu & Martin (Reference Wu and Martin2008) and Laguarda et al. (Reference Laguarda, Hickel, Schrijer and Van Oudheusden2024b ).
We also find that the time lag between the reversed-flow bubble volume and either the wall pressure at the shock foot or the shock location increases almost linearly as the mean shock position shifts further upstream in the two rough-wall cases, $\mathcal{HR}2$
and
$\mathcal{HR}2$
and $\mathcal{HR}1$
. This trend is consistent with the downstream influence mechanism, wherein acoustic disturbances require a longer upstream propagation time to reach the shock foot. Accordingly, the presence of roughness increases the time lag between changes in the reversed-flow region and the shock motion, primarily due to the extended propagation path induced by the upstream extension of separation.
$\mathcal{HR}1$
. This trend is consistent with the downstream influence mechanism, wherein acoustic disturbances require a longer upstream propagation time to reach the shock foot. Accordingly, the presence of roughness increases the time lag between changes in the reversed-flow region and the shock motion, primarily due to the extended propagation path induced by the upstream extension of separation.
3.5. Secondary flow structures downstream of reattachment
From the above analysis, we provide compelling evidence supporting that a so-called downstream mechanism is responsible for the large-scale low-frequency shock motion. This is also aligned with Grilli et al. (Reference Grilli, Schmid, Hickel and Adams2012) and Clemens & Narayanaswamy (Reference Clemens and Narayanaswamy2014) in the sense that STBLI with a large separation bubble is mainly driven by a downstream mechanism. Priebe et al. (Reference Priebe, Tu, Rowley and Martín2016) and Pasquariello et al. (Reference Pasquariello, Hickel and Adams2017) argue that Görtler-like vortices may play a key role in driving the low-frequency variation of the separation bubble size. Laguarda et al. (Reference Laguarda, Hickel, Schrijer and Van Oudheusden2024b ) also reported the presence of large-scale streaky structures, characterised by alternating low- and high-speed streamwise velocity streaks, originating near the separation-shock foot and convecting downstream. In line with these findings, we observe the footprint of large-scale vortical structures downstream of the fragmented reattachment line, as shown in figure 22. Animations corresponding to this figure are available in our data repository (Wu et al. Reference Wu, Laguarda, Hickel and Modesti2025a ). These structures have a characteristic width of the order of the boundary-layer thickness, exhibit vigorous swirling motion and lateral oscillations and evolve into alternating streaks of high and low skin friction.
Instantaneous skin-friction distribution of cases ( $\textit {a}$
)
$\textit {a}$
) $\mathcal{HS}$
; (
$\mathcal{HS}$
; ( $\textit {b}$
)
$\textit {b}$
) $\mathcal{HR}1$
; (
$\mathcal{HR}1$
; ( $\textit {c}$
)
$\textit {c}$
) $\mathcal{HR}2$
. Black lines denote the region of reverse flow.
$\mathcal{HR}2$
. Black lines denote the region of reverse flow.

To better investigate the dynamics of these vortices, a modal analysis was carried out using sparsity promoting dynamic mode decomposition (SPDMD) based on 4101 two-dimensional snapshot slices of the flow field extracted from the $(x-x_{\textit{imp}})/\delta _0=8$
plane, spanning a time interval of
$(x-x_{\textit{imp}})/\delta _0=8$
plane, spanning a time interval of $tu_{\infty }/\delta _0\approx 4000$
and sampled at a non-dimensional frequency of
$tu_{\infty }/\delta _0\approx 4000$
and sampled at a non-dimensional frequency of $f_s\delta _0/u_{\infty }\approx 1.0$
. The resulting frequency resolution spans the range of
$f_s\delta _0/u_{\infty }\approx 1.0$
. The resulting frequency resolution spans the range of $2.5\times 10^{-4}\lt \textit{St}_{\delta _0}\lt 0.5$
. The SPDMD enhances interpretability of DMD by promoting sparsity in the mode selection process, automatically identifying the dynamically most relevant modes from the full DMD spectrum. The reader is referred to Schmid (Reference Schmid2010) and Jovanović et al. (Reference Jovanović, Schmid and Nichols2014) for algorithmic details. By tuning the regularisation parameter of the SPDMD algorithm, 35 modes are retained for each case.
$2.5\times 10^{-4}\lt \textit{St}_{\delta _0}\lt 0.5$
. The SPDMD enhances interpretability of DMD by promoting sparsity in the mode selection process, automatically identifying the dynamically most relevant modes from the full DMD spectrum. The reader is referred to Schmid (Reference Schmid2010) and Jovanović et al. (Reference Jovanović, Schmid and Nichols2014) for algorithmic details. By tuning the regularisation parameter of the SPDMD algorithm, 35 modes are retained for each case.
Normalised amplitudes (black lines) of all the positive dynamic mode decomposition (DMD) modes at $(x-x_{\textit{imp}})/\delta _0=8$
from (
$(x-x_{\textit{imp}})/\delta _0=8$
from ( $a$
)
$a$
) $\mathcal{HS}$
, (
$\mathcal{HS}$
, ( $b$
)
$b$
) $\mathcal{HR}1$
and (
$\mathcal{HR}1$
and ( $c$
)
$c$
) $\mathcal{HR}2$
. Red lines indicate an SPDMD subset of 17 positive modes.
$\mathcal{HR}2$
. Red lines indicate an SPDMD subset of 17 positive modes.

For brevity, only the results for the high-Reynolds-number cases are presented. The modal amplitudes $\psi _{i}$
, which are normalised by the mean mode amplitude, are shown in figure 23. Considering the symmetric distribution of DMD modes, only the positive-frequency components are presented. A first observation for cases
$\psi _{i}$
, which are normalised by the mean mode amplitude, are shown in figure 23. Considering the symmetric distribution of DMD modes, only the positive-frequency components are presented. A first observation for cases $\mathcal{HS}$
and
$\mathcal{HS}$
and $\mathcal{HR}2$
is that SPDMD selects modes in a frequency range starting at approximately
$\mathcal{HR}2$
is that SPDMD selects modes in a frequency range starting at approximately $\textit{St}_{L_{\textit{sep}}}=0.06$
, which is a bit higher than the typical low-frequency unsteadiness range. In contrast, modes at lower frequencies are selected by SPDMD for case
$\textit{St}_{L_{\textit{sep}}}=0.06$
, which is a bit higher than the typical low-frequency unsteadiness range. In contrast, modes at lower frequencies are selected by SPDMD for case $\mathcal{HR}1$
. Note that several very-low-frequency modes (e.g. the mode at
$\mathcal{HR}1$
. Note that several very-low-frequency modes (e.g. the mode at $\textit{St}_{L_{\textit{sep}}}\approx 0.003$
) appear in the SPDMD results. However, because their frequencies lie near the resolution limit of SPDMD and may not be statistically robust, we refrain from assigning physical significance to these very-low-frequency features.
$\textit{St}_{L_{\textit{sep}}}\approx 0.003$
) appear in the SPDMD results. However, because their frequencies lie near the resolution limit of SPDMD and may not be statistically robust, we refrain from assigning physical significance to these very-low-frequency features.
Real part of a representative low-frequency mode from $\mathcal{HS}$
(
$\mathcal{HS}$
( $\textit{St}_{L_{\textit{sep}}}=0.079$
),
$\textit{St}_{L_{\textit{sep}}}=0.079$
), $\mathcal{HR}1$
(
$\mathcal{HR}1$
( $\textit{St}_{L_{\textit{sep}}}=0.023$
) and
$\textit{St}_{L_{\textit{sep}}}=0.023$
) and $\mathcal{HR}2$
(
$\mathcal{HR}2$
( $\textit{St}_{L_{\textit{sep}}}=0.056$
): (
$\textit{St}_{L_{\textit{sep}}}=0.056$
): ( $a$
–
$a$
– $c$
) streamwise velocity; (
$c$
) streamwise velocity; ( $d$
–
$d$
– $f$
) vertical velocity; (
$f$
) vertical velocity; ( $g$
–
$g$
– $i$
) spanwise velocity, at
$i$
) spanwise velocity, at $(x-x_{\textit{imp}})/\delta _0=8$
. The contours are plotted in arbitrary units (normalised by the maximum mode amplitude). The arrows superimposed in (
$(x-x_{\textit{imp}})/\delta _0=8$
. The contours are plotted in arbitrary units (normalised by the maximum mode amplitude). The arrows superimposed in ( $d$
,
$d$
, $g$
) indicate the orientation of the velocity fluctuations from the selected mode.
$g$
) indicate the orientation of the velocity fluctuations from the selected mode.

Figure 24 shows representative modes shapes for cases $\mathcal{HS}$
,
$\mathcal{HS}$
, $\mathcal{HR}1$
and
$\mathcal{HR}1$
and $\mathcal{HR}2$
, corresponding to frequencies of
$\mathcal{HR}2$
, corresponding to frequencies of $\textit{St}_{L_{\textit{sep}}}=0.079, 0.023, 0.056$
, respectively. Visualised as contours of the three velocity components, the modes reveal the presence of coherent streamwise vortices. For example, the first column of figure 24 shows the mode structure of case
$\textit{St}_{L_{\textit{sep}}}=0.079, 0.023, 0.056$
, respectively. Visualised as contours of the three velocity components, the modes reveal the presence of coherent streamwise vortices. For example, the first column of figure 24 shows the mode structure of case $\mathcal{HS}$
, where the streamwise velocity fluctuation
$\mathcal{HS}$
, where the streamwise velocity fluctuation $u$
exhibits alternating low- and high-speed streaks, consistent with the upwash and downwash patterns in the wall-normal velocity
$u$
exhibits alternating low- and high-speed streaks, consistent with the upwash and downwash patterns in the wall-normal velocity $v$
. Taking into account the spanwise velocity
$v$
. Taking into account the spanwise velocity $w$
, two pairs of counter-rotating vortices can be easily identified in the modes of
$w$
, two pairs of counter-rotating vortices can be easily identified in the modes of $\mathcal{HS}$
and
$\mathcal{HS}$
and $\mathcal{HR}2$
. In contrast, the selected low-frequency mode of
$\mathcal{HR}2$
. In contrast, the selected low-frequency mode of $\mathcal{HR}1$
only exhibits one pair of such vortices. However, several higher-frequency modes, e.g. at
$\mathcal{HR}1$
only exhibits one pair of such vortices. However, several higher-frequency modes, e.g. at $\textit{St}_{L_{\textit{sep}}}=0.156$
, recover the two-pair structure. Despite these differences, the consistent presence of these vortices across all cases suggests that their formation is largely unaffected by the investigated roughness geometries.
$\textit{St}_{L_{\textit{sep}}}=0.156$
, recover the two-pair structure. Despite these differences, the consistent presence of these vortices across all cases suggests that their formation is largely unaffected by the investigated roughness geometries.
These structures align with the Görtler-like vortices previously reported by, e.g. Priebe et al. (Reference Priebe, Tu, Rowley and Martín2016), Pasquariello et al. (Reference Pasquariello, Hickel and Adams2017) and Laguarda et al. (Reference Laguarda, Hickel, Schrijer and Van Oudheusden2024b ). In our DMD of our present simulations, they are observed over a broad frequency range that extends well above the typical low-frequency unsteadiness of STBLI. Therefore, our results neither confirm nor rule out a causal relationship between the two phenomena, as in Laguarda et al. (Reference Laguarda, Hickel, Schrijer and Van Oudheusden2024b ).
4. Conclusions
This study has systematically explored the effects of spanwise heterogeneous streamwise-aligned ridge-type roughness on STBLI at both low and high Reynolds numbers. Two classes of rough surfaces were considered, designed to maintain consistent geometric characteristics under either inner or outer scaling, and their effects were compared with smooth-wall baselines under identical flow conditions.
The results demonstrate that ridge-type roughness substantially alters both the mean and unsteady flow characteristics of STBLI. Roughness-induced secondary flow in the form of streamwise vortices is observed in the upstream boundary layer. These structures do not appear to directly influence wall-pressure fluctuations near the separation-shock foot. Instead, the secondary flow modulates the upstream momentum transport and the roughness increases the thickness of the subsonic region, thereby influencing the onset and extent of separation. The rough surfaces also incur a moderate drag penalty, with mean skin-friction coefficients increased by approximately 20 % relative to the smooth-wall baselines, consistent with the downward shift of the van Driest–transformed velocity profile.
We identified that wall-pressure fluctuations near the separation-shock foot consist of a low-frequency component associated with shock motion and a high-frequency component associated with shear-layer turbulence, and their relative contributions vary with Reynolds number: at low Reynolds number, the high-frequency component prevails, whereas at higher Reynolds number, the low-frequency component becomes dominant. Our spectral analysis showed that roughness effectively suppresses both low- and high-frequency components of wall-pressure fluctuations, with the suppression of low-frequency dynamics being more pronounced at higher Reynolds numbers. This enhanced attenuation is linked to a more diffused shock foot produced by the less-full incoming TBL and the subsonic flow region within the valleys. As a result, the streamwise pressure gradient at the wall is weakened in regions of strong shock unsteadiness, thereby reducing the amplitude of the associated low-frequency fluctuations. At the investigated moderately high Reynolds number, rough walls lead to a notable reduction of up to 27 % in peak wall-pressure fluctuations.
The cross-correlation analyses established a clear temporal sequence in the low-frequency dynamics: expansion of the reverse-flow bubble precedes wall-pressure build-up, which in turn drives the motion of the separation shock. This temporal ordering supports a downstream-influence mechanism for low-frequency unsteadiness. Moreover, dynamic mode decomposition confirmed the presence of large-scale, Görtler-like vortices at reattachment in all cases. These vortices are observed over a wide range of modal frequencies, and they appear largely insensitive to variations in the roughness geometry.
Overall, the findings suggest that spanwise heterogeneous roughness – if properly designed – can serve as a robust and passive method to mitigate wall-pressure unsteadiness over a broad range of frequencies in high-speed flows, albeit at the cost of a moderate drag increase. The results provide new physical insight into the interplay between roughness, Reynolds-number effects and the low-frequency STBLI dynamics, and highlight the potential of roughness-based flow control for supersonic vehicles.
Acknowledgements
We acknowledge SURF and NWO for providing access to the Dutch National Super-computer Snellius, Amsterdam.
Funding Statement
Open access funding provided by Delft University of Technology.
Declaration of interests
The authors report no conflict of interest.
Appendix A. Grid-independence study
A grid-independence study was conducted to examine the sensitivity of the results to spatial resolution. The assessment was performed separately in the streamwise and spanwise directions: the streamwise refinement is performed for case $\mathcal{HS}$
, for which DNS reference data are available. The spanwise refinement is performed for case
$\mathcal{HS}$
, for which DNS reference data are available. The spanwise refinement is performed for case $\mathcal{HR}2$
, which is expected to benefit most from increased spanwise resolution. A summary of the grid parameters and key outcomes is provided in table 6.
$\mathcal{HR}2$
, which is expected to benefit most from increased spanwise resolution. A summary of the grid parameters and key outcomes is provided in table 6.
Numerical parameters and results of the grid-independence study. Baseline cases are $\mathcal{HS}$
and
$\mathcal{HS}$
and $\mathcal{HR}2$
, respectively. Percentage deviations from the baseline cases are reported in brackets.
$\mathcal{HR}2$
, respectively. Percentage deviations from the baseline cases are reported in brackets.

For the streamwise refinement, case $\mathcal{HS}_{x2}$
doubles the number of cells of
$\mathcal{HS}_{x2}$
doubles the number of cells of $\mathcal{HS}$
in the streamwise direction, reducing
$\mathcal{HS}$
in the streamwise direction, reducing $\Delta x_{\textit{min}}^+$
from 39 to 19.5. This refinement confirms that the streamwise resolution is appropriate for wall-resolved LES. The velocity and Reynolds stresses profiles of the upstream TBL at
$\Delta x_{\textit{min}}^+$
from 39 to 19.5. This refinement confirms that the streamwise resolution is appropriate for wall-resolved LES. The velocity and Reynolds stresses profiles of the upstream TBL at $(x-x_{\textit{imp}})/\delta _0$
are compared in figure 25. The LES results from
$(x-x_{\textit{imp}})/\delta _0$
are compared in figure 25. The LES results from $\mathcal{HS}$
and
$\mathcal{HS}$
and $\mathcal{HS}_{x2}$
both agree well with the reference DNS data. The mean-velocity profile and the locations and magnitudes of the Reynolds-stress peaks are captured very well. This confirms that our LES are indeed wall resolved. However, wall-resolved LES does not aim to resolve 100 % of the turbulence kinetic energy in the log layer. A slight under-prediction of the resolved Reynolds stresses is the expected result consistent with using coarser meshes than the fully resolved reference DNS. As expected,
$\mathcal{HS}_{x2}$
both agree well with the reference DNS data. The mean-velocity profile and the locations and magnitudes of the Reynolds-stress peaks are captured very well. This confirms that our LES are indeed wall resolved. However, wall-resolved LES does not aim to resolve 100 % of the turbulence kinetic energy in the log layer. A slight under-prediction of the resolved Reynolds stresses is the expected result consistent with using coarser meshes than the fully resolved reference DNS. As expected, $\mathcal{HS}_{x2}$
slightly improves the agreement with the DNS.
$\mathcal{HS}_{x2}$
slightly improves the agreement with the DNS.
The influence of streamwise grid resolution on the STBLI is illustrated in figure 26. The mean skin-friction coefficient, wall pressure and wall-pressure-gradient distributions are largely unaffected by mesh refinement, except for a slightly earlier onset of the interaction region. A small discrepancy in the pressure fluctuations is observed upstream and within the interaction region, which is partly attributed to the limitations of the digital-filter inflow, particularly its imperfect reproduction of pressure fluctuations and partly to the highly aperiodic nature of the STBLI. Overall, these results confirm that the streamwise resolution of the baseline grid is fully appropriate.
Streamwise grid-sensitivity study of the upstream TBL: (a) van Driest-transformed mean-velocity profiles and (b) density-scaled Reynolds-stress components. The baseline case $\mathcal{HS}$
is shown as a solid red line, and the refined case
$\mathcal{HS}$
is shown as a solid red line, and the refined case $\mathcal{HS}_{x2}$
as a blue dashed line. Reference DNS data from Pirozzoli & Bernardini (Reference Pirozzoli and Bernardini2011) are shown as squares.
$\mathcal{HS}_{x2}$
as a blue dashed line. Reference DNS data from Pirozzoli & Bernardini (Reference Pirozzoli and Bernardini2011) are shown as squares.

Streamwise grid-sensitivity study of the interaction region: streamwise distributions of (a) skin-friction coefficient, (b) wall pressure, (c) wall-pressure fluctuation and (d) wall-pressure gradient. The baseline case $\mathcal{HS}$
is shown as a solid red line, and the refined case
$\mathcal{HS}$
is shown as a solid red line, and the refined case $\mathcal{HS}_{x2}$
as a blue dashed line.
$\mathcal{HS}_{x2}$
as a blue dashed line.

Spanwise grid-sensitivity study of the upstream TBL: (a) van Driest-transformed mean-velocity profiles and (b) density-scaled Reynolds-stress components. The baseline case $\mathcal{HR}2$
is shown as a solid red line, and the refined case
$\mathcal{HR}2$
is shown as a solid red line, and the refined case $\mathcal{HR}2_{z2}$
as a blue dashed line.
$\mathcal{HR}2_{z2}$
as a blue dashed line.

Spanwise grid-sensitivity study of the interaction region: streamwise distributions of (a) skin-friction coefficient, (b) wall pressure, (c) wall-pressure fluctuation and (d) wall-pressure gradient. The baseline case $\mathcal{HR}2$
is shown as a solid red line, and the refined case
$\mathcal{HR}2$
is shown as a solid red line, and the refined case $\mathcal{HR}2_{z2}$
as a blue dashed line.
$\mathcal{HR}2_{z2}$
as a blue dashed line.

For the spanwise refinement, case $\mathcal{HR}2_{z2}$
doubles the number of cells of
$\mathcal{HR}2_{z2}$
doubles the number of cells of $\mathcal{HR}2$
in the spanwise direction, reducing
$\mathcal{HR}2$
in the spanwise direction, reducing $\Delta z_{\textit{min}}^+$
from 4.9 to 2.45 – well below the typical requirement for LES – and increasing the number of cells per ridge from 12 to 24. This ensures that the rough-wall geometry is very well resolved. Figure 27 shows that the mean-velocity and Reynolds-stress profiles are unaffected by spanwise grid refinement. The same insensitivity is observed in the mean skin-friction coefficient, wall-pressure and wall-pressure-gradient distributions of the STBLI flow, which are shown in figure 28. Thus, the spanwise resolution of the baseline grid is also fully appropriate.
$\Delta z_{\textit{min}}^+$
from 4.9 to 2.45 – well below the typical requirement for LES – and increasing the number of cells per ridge from 12 to 24. This ensures that the rough-wall geometry is very well resolved. Figure 27 shows that the mean-velocity and Reynolds-stress profiles are unaffected by spanwise grid refinement. The same insensitivity is observed in the mean skin-friction coefficient, wall-pressure and wall-pressure-gradient distributions of the STBLI flow, which are shown in figure 28. Thus, the spanwise resolution of the baseline grid is also fully appropriate.
Appendix B. Velocity profiles at ridge and valley
The velocity profiles at the ridge and valley locations, for both the low- and high-Reynolds-number cases, are shown in figure 29. We note that the wall-normal coordinate is not shifted here. The profiles collapse well from the logarithmic region outward, demonstrating outer-layer similarity across spanwise locations. This collapse outside the log layer further indicates that the roughness function remains effectively unchanged between the ridge and valley. In all cases, the velocity at $y^+ = 1$
is noticeably higher in the valley region, owing to both the larger physical wall-normal distance and the influence of secondary flows that transport high-momentum fluid downward into the valley.
$y^+ = 1$
is noticeably higher in the valley region, owing to both the larger physical wall-normal distance and the influence of secondary flows that transport high-momentum fluid downward into the valley.
Comparison of upstream boundary-layer velocity profiles at the ridge and valley locations for (a) low-Reynolds-number cases and (b) high-Reynolds-number cases. Subscripts in the legend indicate ridge (r) and valley (v).



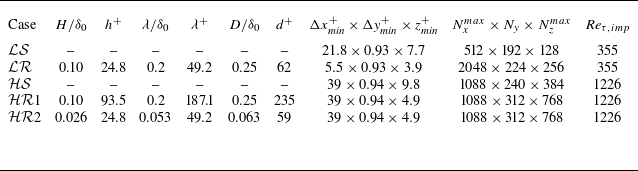
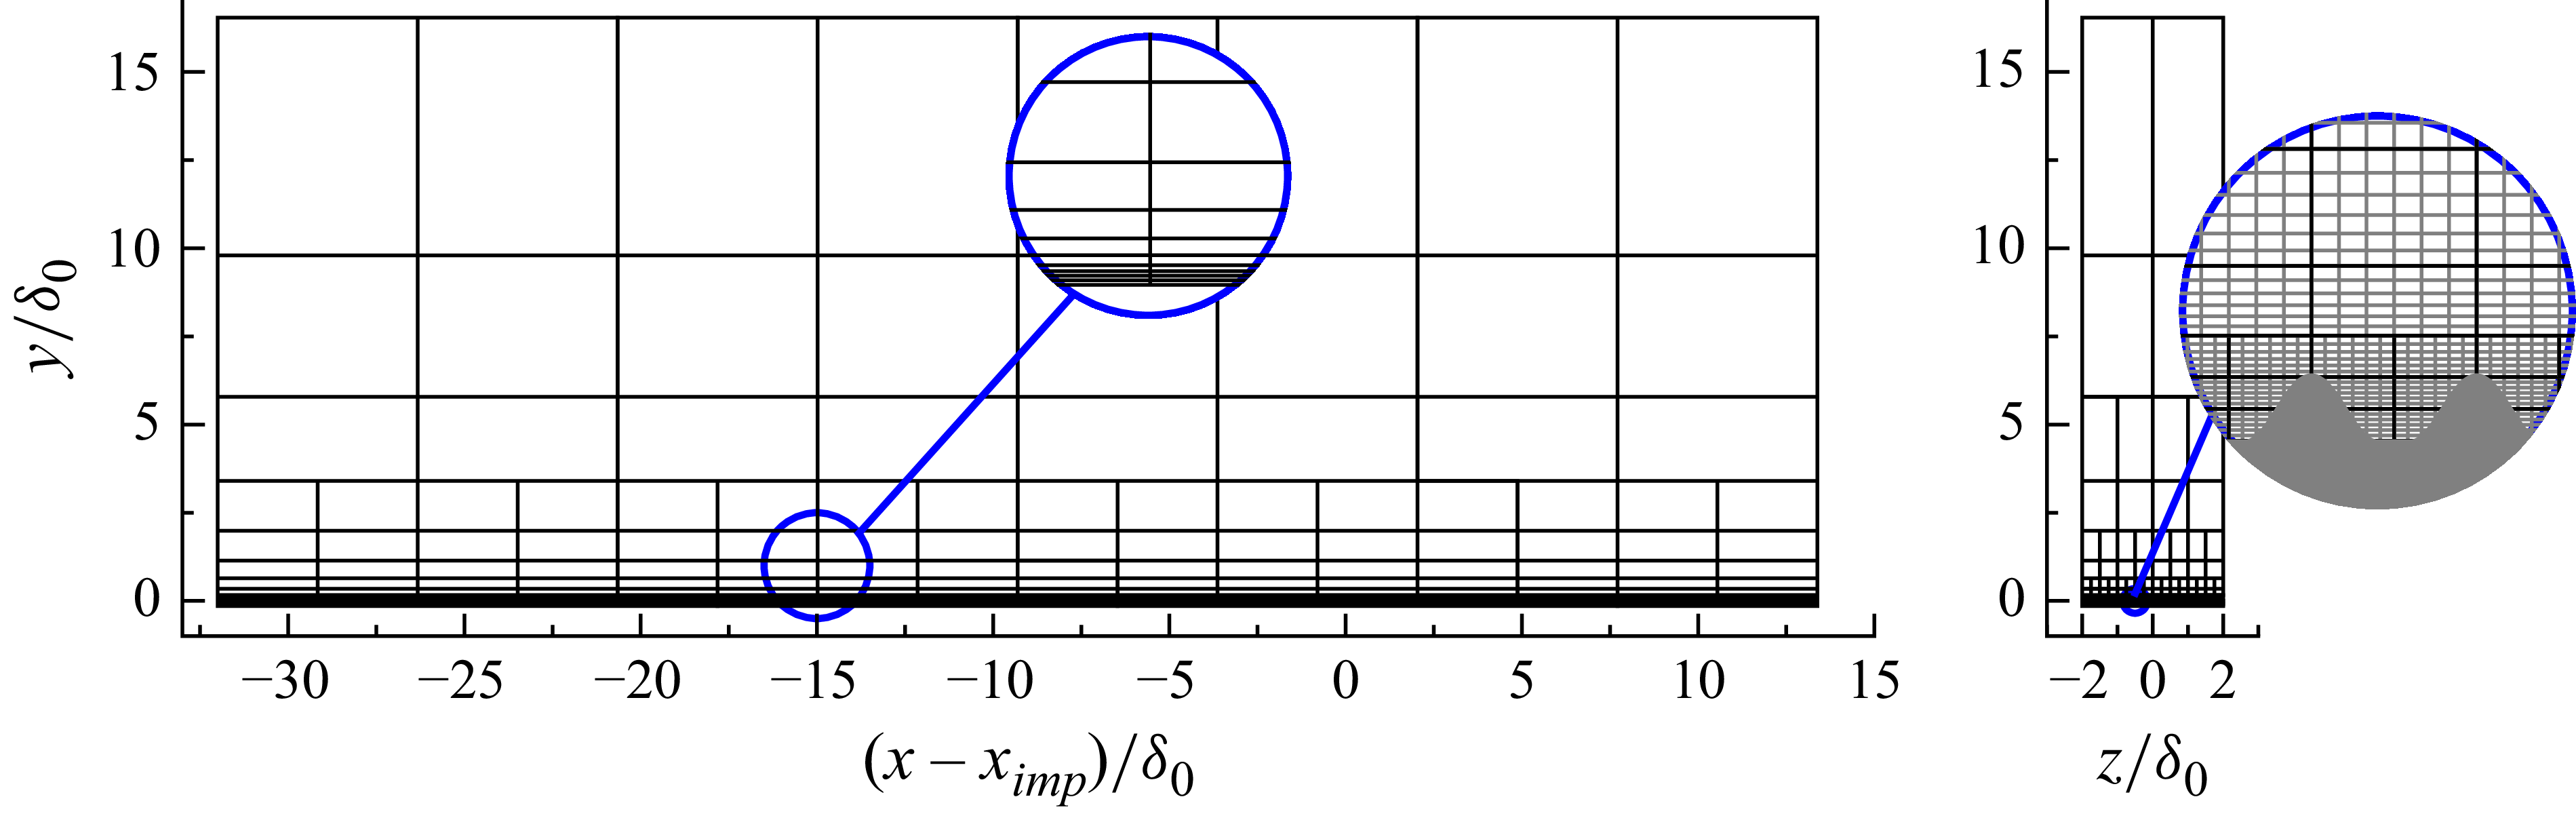

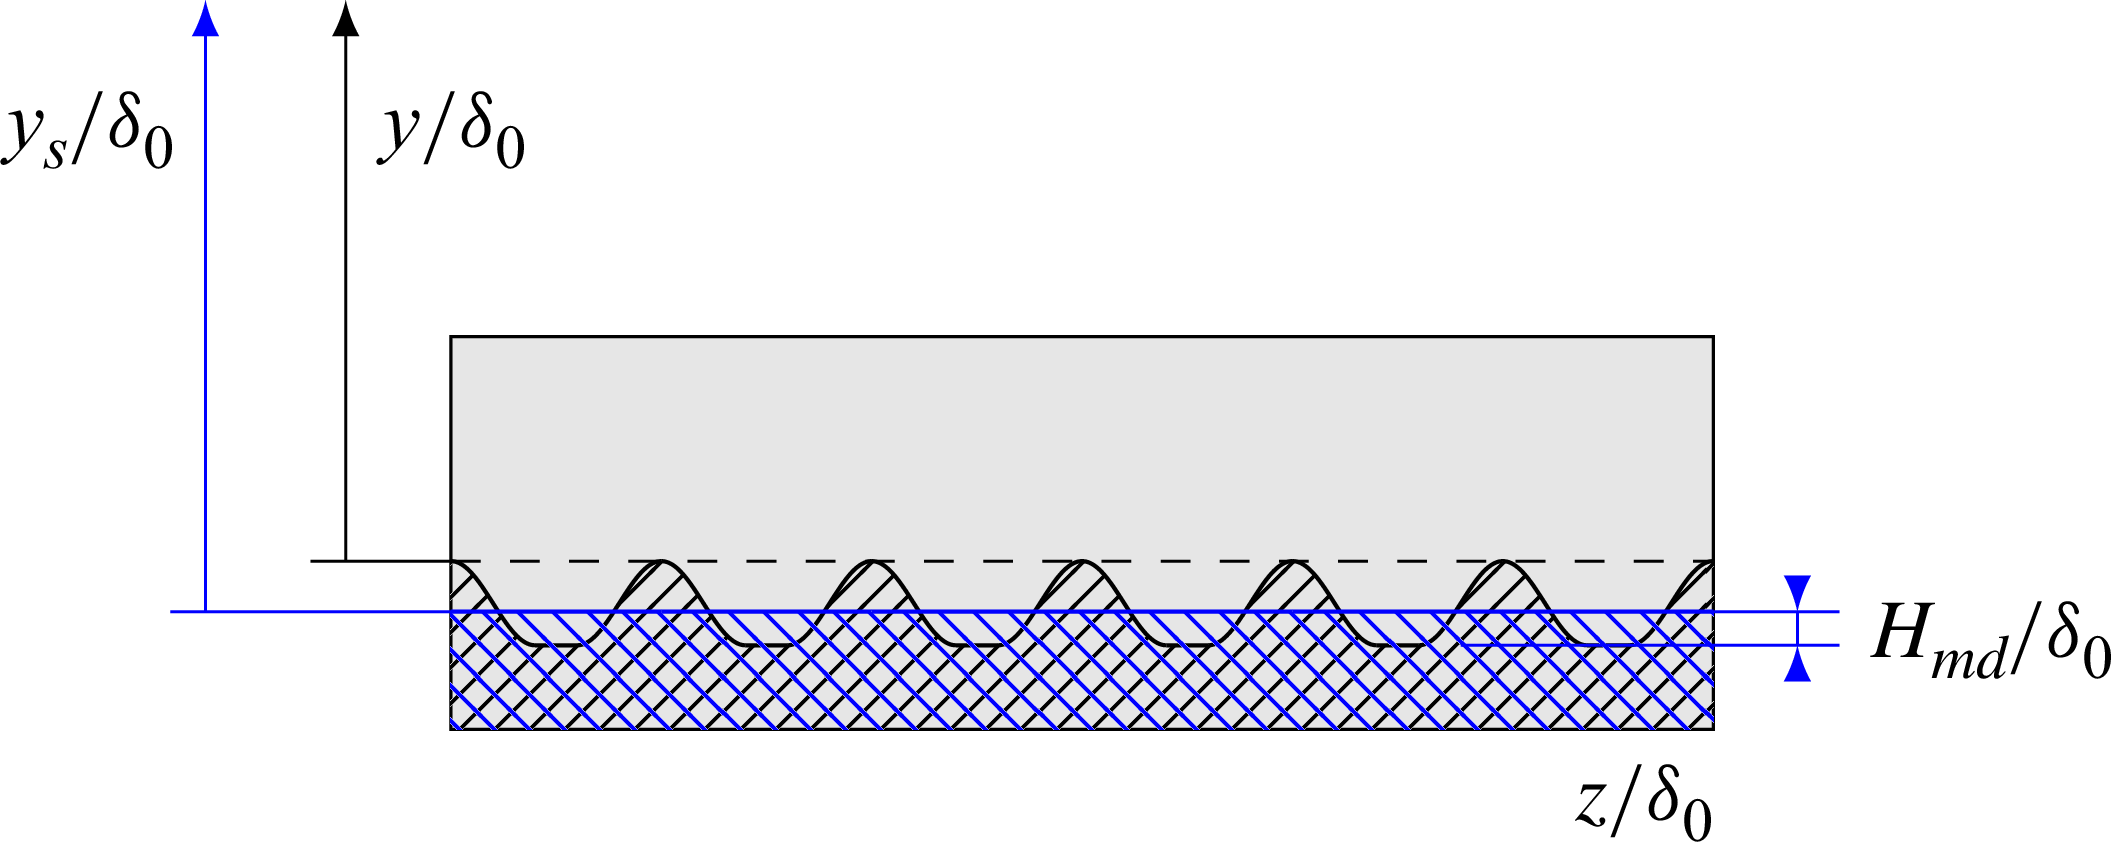


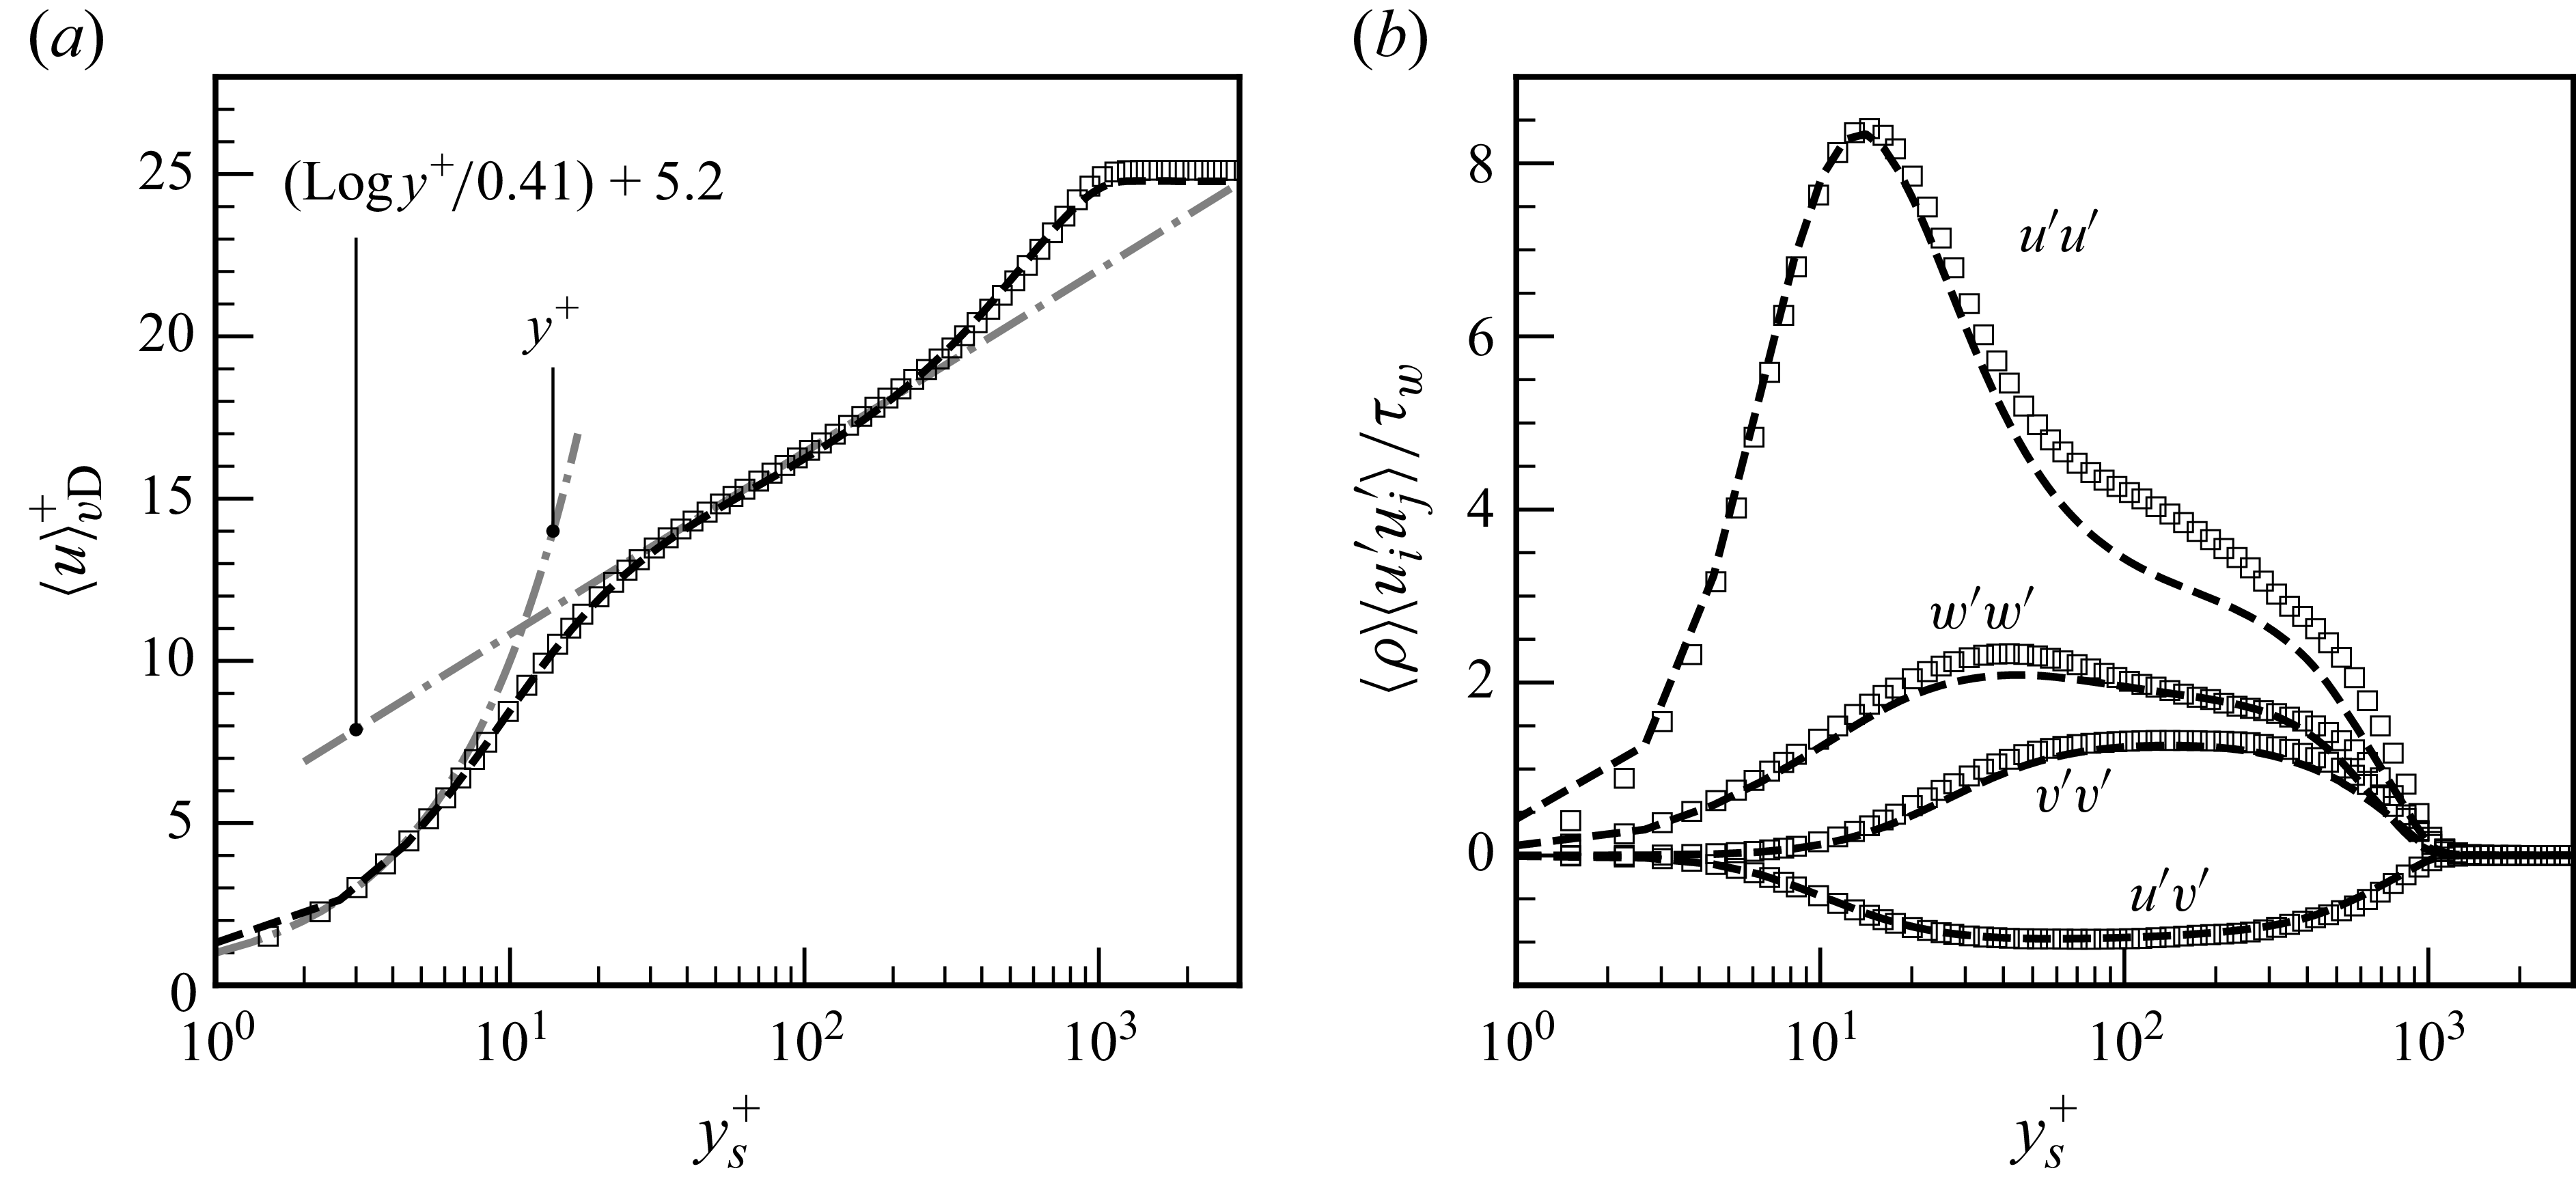


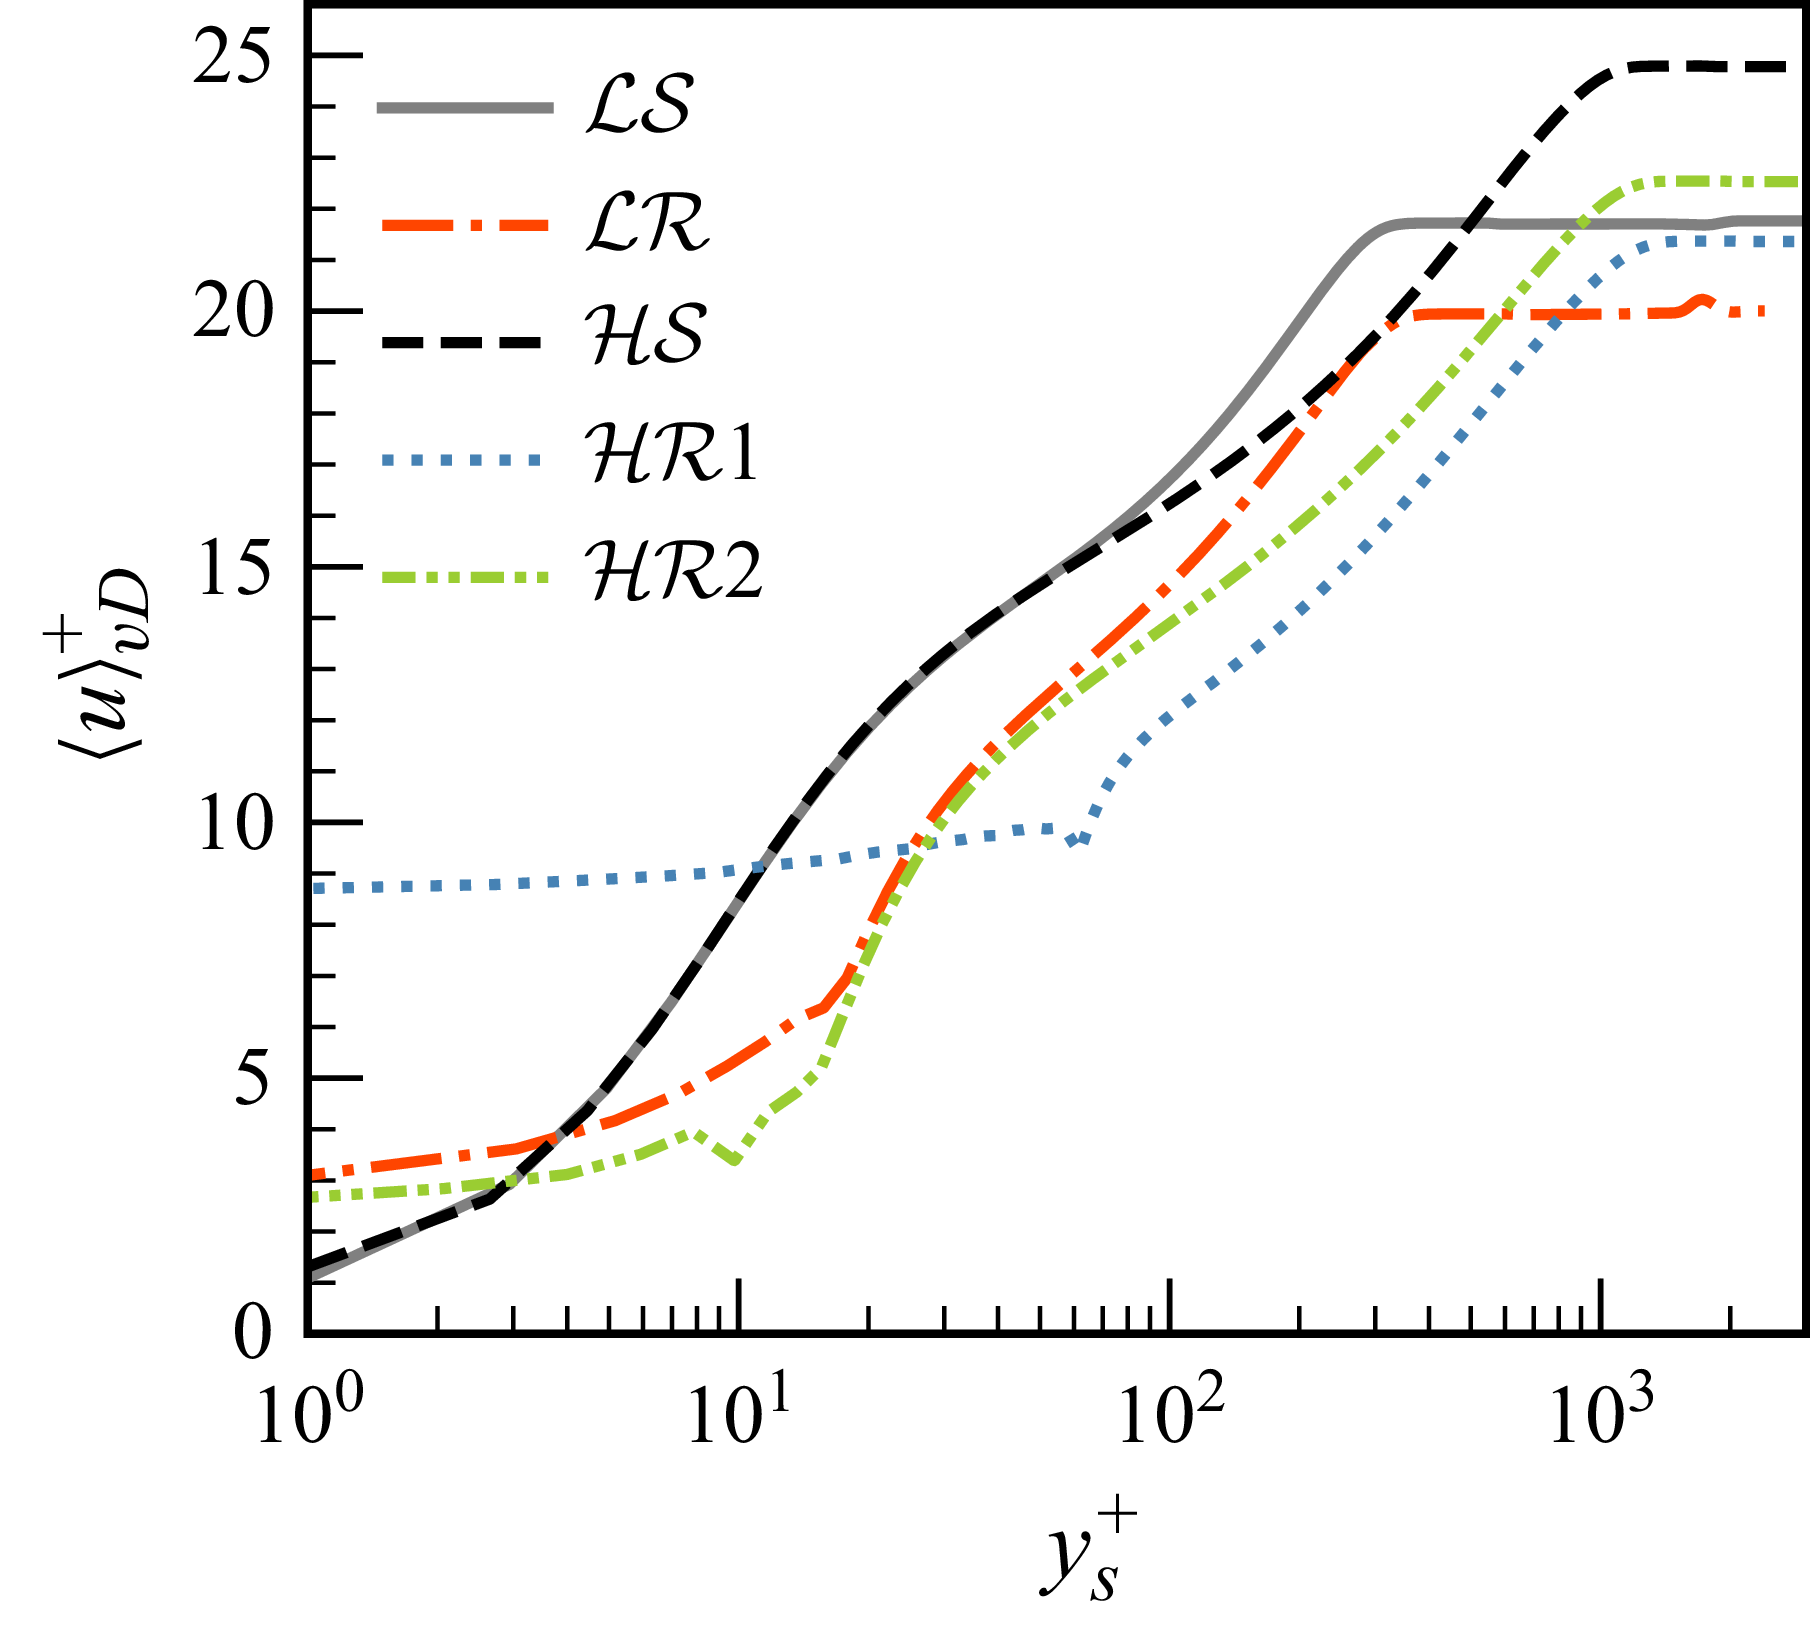
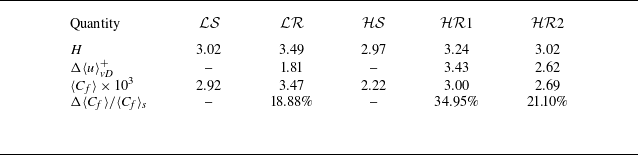


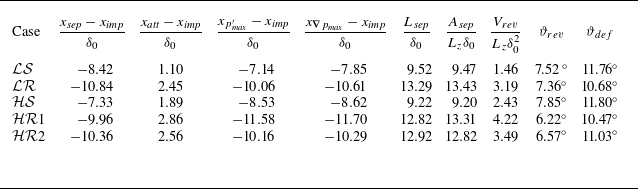


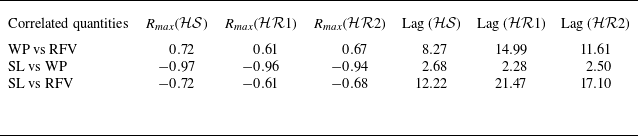


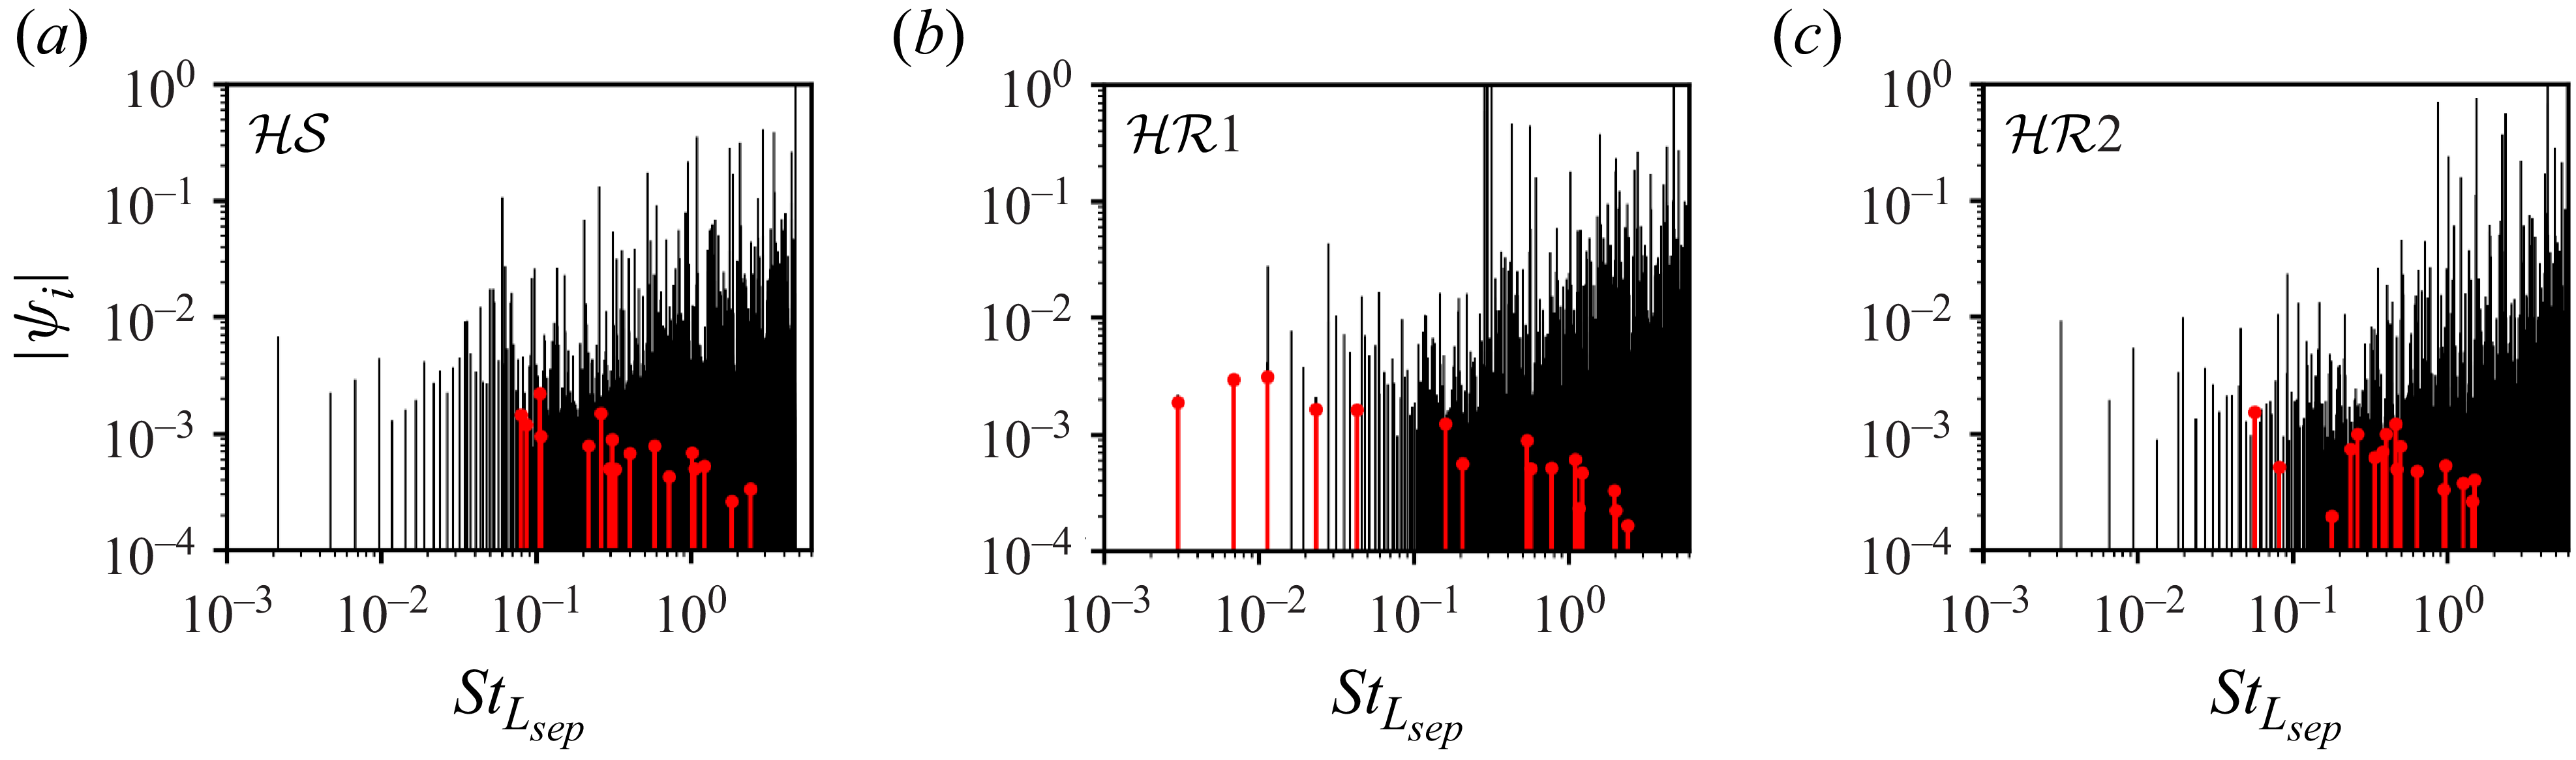


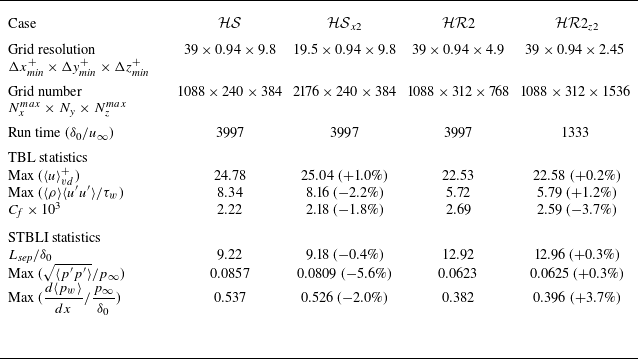


 Open access

