
12 Animated speech: research progress and applications
12.1 Background
This chapter is dedicated to Christian Benoît, who almost single-handedly established visible speech as an important domain of research and application. During and after his residence in our laboratory for the academic year 1991–92, Christian and his endearing partner Elisabeth were an important part of our lives. We shared in their marriage and the births of their two children, as well as in many professional challenges and puzzles. We hope that this book provides a legacy for Christian’s family and friends, and helps maintain a memory of his personal and professional value.
The human face presents visual information during speech production that is critically important for effective communication. While the voice alone is usually adequate for communication (and can be turned into an engaging instrument by a skilled storyteller), visual information from movements of the lips, tongue, and jaws enhances intelligibility of the message (as is readily apparent with degraded auditory speech). For individuals with severe or profound hearing loss, understanding visible speech can make the difference between communicating effectively with others or a life of relative isolation. Moreover, speech communication is further enriched by the speaker’s facial expressions, emotions, and gestures (Massaro Reference Massaro1998b, Chapters 6, 7, 8).
One goal of our research agenda is to create animated agents that produce accurate auditory and visible speech, as well as realistic facial expressions, emotions, and gestures. The invention of such agents has awesome potential to benefit virtually all individuals, but especially those with hearing problems, including the millions of people who acquire age-related hearing loss every year, and for whom visible speech and facial expression take on increasing importance. The animated characters that we are developing can be used to train individuals with hearing loss to “read” visible speech, to improve their processing of limited auditory speech, and to enhance their speech production, and will thereby facilitate access to online information presented orally, and improve face-to-face communication with either real people or lifelike computer characters.
For the past 24 years, we at the Perceptual Science Laboratory at University of California at Santa Cruz (PSL-UCSC) have been improving the accuracy of visible speech produced by Baldi, an animated talking agent (Massaro Reference Massaro1998b, Chapter 13). Baldi has been used effectively to provide curricular instruction and to teach vocabulary to profoundly deaf children at the Tucker Maxon Oral School in Portland Oregon, in a project funded by an NSF Challenge Grant (Massaro, et al. Reference Massaro, Cohen, Beskow, Cassell, Sullivan, Prevost and Churchill2000; Barker Reference Barker2003). The Baldi technology in the service of vocabulary learning has been tested in several studies. A detailed review of these tests with deaf and hard-of-hearing students in the learning of speech and language is given in Massaro Reference Massaro, Spencer and Marshark2006a, Reference Massaro, Bernsen, Dybkjaer and van Kuppevelt2006b. Several evaluation experiments showed that both hard-of-hearing and autistic children learned many new words, grammatical constructions, and concepts (Massaro and Bosseler Reference Massaro and Bosseler2003; Massaro and Light Reference Massaro and Light2004a), proving that the application provided an effective learning environment for these children. The research strategy insured that any learning was due to the intervention itself rather than from outside of the lesson environment. Students learned all of the items that they were specifically tutored on and not the items that were only tested. In addition, a delayed test given more than 30 days after the learning sessions took place showed that the children retained over 85 percent of the words that they learned. This learning and retention of new vocabulary, grammar, and language use is a significant accomplishment for these children.
Massaro (Reference Massaro, Bernsen, Dybkjaer and van Kuppevelt2006b) used the same multisensory approach with a computer-animated agent to evaluate the effectiveness of teaching vocabulary to beginning elementary students learning English as a second language. Children, whose native language was Spanish, were tutored by Timo,1 a new animated character based on Baldi, and tested on English words they did not know. The children learned the words when they were tutored but not words that were simply tested. This result replicates the previous studies carried out on hard-of-hearing and autistic children with Baldi as the animated conversational tutor. In other experiments, we have also observed that Baldi’s unique characteristics allow a novel approach to tutoring speech production to both children with hearing loss (Massaro and Light Reference Massaro and Light2004b) and adults learning a new language (Massaro and Light Reference Massaro and Light2003).
Given the success of the tutoring program, it is important to assess whether the facial animation is a significant influence on learning vocabulary. To evaluate this question, an experiment compared to what extent the face facilitated vocabulary learning relative to the voice alone (Massaro and Bosseler Reference Massaro and Bosseler2006). The vocabulary learning consisted of both the receptive identification of pictures and the production of spoken words. Five autistic children were tutored in vocabulary with and without the face. Each child continuously learned to a criterion two sets of words with the face and voice and two sets with just the voice and without the face. The rate of learning was significantly faster and the retention was better with than without the face. Although two of the children did not show a large advantage with the face, the research indicates that at least some autistic children benefit from the face. The better learning and retention with the face was most likely due to the additional information provided by the face but it is still possible that the face was more engaging and motivating which in turn would benefit performance. In either case, it shows the value of animated tutors in the teaching of vocabulary.
The same pedagogy and technology has been employed for language learning with autistic children (Bosseler and Massaro Reference Bosseler and Massaro2004). While Baldi’s visible speech and tongue movements probably represent the best of the state of the art in real-time visible speech synthesis by a 3D talking face, speech perception experiments have shown that Baldi’s visible speech is still not as effective as video recordings of human faces. Thus, we face the challenge of improving animated speech even more to match that produced by real persons.
12.2 Visible speech synthesis
Visible speech synthesis is a subfield of the more general areas of speech synthesis and computer facial animation. The goal of the visible speech synthesis in the PSL-UCSC has been to obtain a mask with realistic motions, not to duplicate the musculature of the face to control this mask. Our choice is to develop visible speech synthesis in a manner that has proven most successful for audible speech synthesis. We call this technique terminal analogue synthesis because its goal is to simply mimic the final speech product rather than the physiological mechanisms that produce it. Our own current software (Cohen and Massaro Reference Cohen, Massaro, Thalmann and Magnenat-Thalmann1993, Reference Cohen and Massaro1994a; Cohen et al.Reference Cohen, Walker and Massaro1995; Massaro Reference Massaro1998b) is a descendant of Parke’s (Reference Parke1974, Reference Parke1975, Reference Parke1982) software and his particular 3D talking head. Our modifications over the last 15 years have included additional and modified control parameters, texture mapping, three generations of a tongue (which was lacking in Parke’s model), a new visual speech synthesis coarticulatory control strategy, controls for paralinguistic information and affect in the face, text-to-visible speech synthesis, alignment with natural speech, direct auditory speech to visible speech synthesis, and bimodal (auditory–visual) synthesis (Massaro Reference Massaro1998b; Massaro et al.Reference Massaro, Cohen, Beskow, Cassell, Sullivan, Prevost and Churchill2000). Most of our current parameters move vertices (and the polygons formed from these vertices) on the face by geometric functions such as rotation of the jaw or translation of the vertices in one or more dimensions (such as lower and upper lip height, or mouth widening). Other parameters work by interpolating between two different face subareas. Many of the face shape parameters such as cheek, neck, and forehead shape, as well as some affect parameters such as smiling use interpolation.
Consisting of about 40 000 lines of C code, the synthesis program runs in realtime on both SGI and PC platforms. Our talking head is available for research purposes to educational and governmental institutions free of charge. When combined with the other modules in the CSLU toolkit,2 for example, students and researchers can productively explore problems in speech science and computer-animated agents. We have also added to the toolkit additional modules for stimulus manipulation, response recording, and data analyses for psychology experiments in speech and language processing,3 allowing even more access to and utilization of our technology and research findings.
In our synthesis algorithm, each segment is specified with a target value for each facial control parameter. Coarticulation, defined as changes in the articulation of a speech segment due to the influence of neighboring segments, is based on a model of speech production using rules that describe the relative dominance of the characteristics of the speech segments (Saltzman and Munhall Reference Saltzman and Munhall1989; Löfqvist Reference Löfqvist, Hardcastle and Marchal1990). For each control parameter of a speech segment, there are also temporal dominance functions dictating the influence of that segment on the control parameter. These dominance functions determine independently for each control parameter how much weight its target value carries against those of neighboring segments, which will in turn decide how the target values are blended. Figure 12.1 illustrates how this approach works for a lip-protrusion control parameter for the word “stew.” The dashed curve illustrates a simple ogival interpolation between the segment target values (indicated by circles in the bottom panel), which is at odds with what actually occurs in speech production (Kent and Minifie Reference Kent and Minifie1977; Perkell and Chiang Reference Perkell and Chiang1986). The top panel shows the dominance functions for lip protrusion for each phoneme in the word. Because the functions for /s/ and /t/ are relatively weak compared to that for /uw/, the resulting protrusion (illustrated by the solid curve in the bottom panel) for /uw/ comes earlier in time.

Figure 12.1 Top panel shows dominance functions for lip protrusion for the phonemes in the word “stew.” Bottom panel shows the resulting function of the coarticulated control parameter based on these dominance functions (solid line) versus a function based on an ogival interpolated non-coarticulated pattern (dashed line).
Our coarticulation algorithm also produces realistic speech with changes in speaking rate. When the speaking rate is increased, the durations for segments are decreased but we need not otherwise change dynamic parameters of the dominance functions. By shrinking segment durations, the dominance functions move closer to each other and overlap more. This outcome produces undershooting of the target values, which also occurs when natural speech is articulated more quickly. Thus, the model can handle changes in speaking rate in a natural fashion. The PSL-UCSC coarticulation algorithm has been successfully used in American English and Mexican Spanish (Massaro Reference Massaro1998b, Bands 1.1, 12.5), and French (Le Goff and Benoît Reference Le Goff and Benoît1997). More recently, Baldi now speaks Italian (Cosi et al.Reference Cosi, Cohen and Massaro2002b) and Arabic (Ouni et al.Reference Ouni, Massaro, Cohen, Young and Jesse2003).
Important extensions of our dominance function-based algorithm have been implemented and tested by several researchers (Le Goff Reference Le Goff1997; Le Goff and Benoît Reference Le Goff and Benoît1997; Cosi et al.Reference Cosi, Caldognetto, Perin and Zmarich2002a). Rather than use a single exponential-based dominance function form, Le Goff (Reference Le Goff1997) generalized the shape of that dominance function, yielding several wider functions. In addition, the target values and dynamic parameters of the system were automatically trained using facial parametric measurements of a corpus consisting of short French utterances of the form “c’est pas V1CV2CV1z?” where V1 and V2 were from the set /a,I,y/ and C was from the set /b,d,g,l,R,v,w,z/. Similar explorations were carried out by Cosi et al. (Reference Cosi, Caldognetto, Perin and Zmarich2002a), who added some additional terms to the dominance functions to represent temporal resistance of particular segments to the influence of neighbors, and also some further shape variations to the dominance function. This system was trained on six facial parameters measured from a small set of symmetric VCV utterances. Although the fit to these parameters was good, it is uncertain how well the results might generalize to a larger corpus, since in that work a plethora of parameters were highly trained on the small set of utterances.
More parsimonious implementations of coarticulation have also been proposed. In the RULSYS procedure of Gränstrom et al. (2002), a control parameter is either defined or undefined for a given segment. If undefined, the control parameter would not be specified for that phoneme and, therefore, it would be free to take on the value of the segment’s context. Rounding for /r/ is undefined, for example, because it can be rounded or not depending on context. The undefined parameters take on the values determined by linear interpolation between the closest segments that have defined parameters. We look forward to new solutions to implementing coarticulation and their empirical evaluation.
A central and somewhat unique quality of our work is the empirical evaluation of the visible speech synthesis, which is carried out hand-in-hand with its development. These experiments are aimed at evaluating the realism of our speech synthesis relative to natural speech. Realism of the visible speech is measured in terms of its intelligibility to members of the linguistic community. The goal of this research is to learn how our synthetic visual talker falls short of natural talkers and to modify the synthesis accordingly in order to bring it more in line with natural visible speech. Successive experiments, data analyses of the confusion matrices, and modifications of the synthetic speech based on these analyses have led to a significant improvement in the quality of our visible speech synthesis (Massaro Reference Massaro1998b).
12.3 Illustrative experiment of evaluation testing
Analogous to the evaluation of auditory speech synthesis (Benoît and Pols Reference Benoît, Pols, Bailly, Benoît and Sawallis1992), evaluation is a critical component of visible speech synthesis. As described in Massaro (Reference Massaro1998b), several decisions had to be made about the test items and data analysis. As with most decisions of this type, there are trade-offs and conflicting constraints so that there is no apparently unique solution. In deciding what test items to present to subjects, arguments can be made for the use of speech segments, words, or sentences. Speech segments in the form of nonsense words have the advantage of being purely sensory information with no possible contribution from top-down context. Sentences, in contrast, represent a situation that is more analogous to the use of speech in real-world contexts. In our initial series of evaluations, we chose the intermediate level of single words for a number of reasons. Test words make use of the text-to-speech component of the synthesis and permit the testing of consonant and vowel segments as well as consonant clusters and diphthongs. Test words are also very easy to score if we require that subjects give only single words as responses. Because we want to compare our synthetic talker to a real talker, we use a bimodally recorded test list of one-syllable words in natural speech (Bernstein and Eberhardt Reference Bernstein and Eberhardt1986b).
Our illustrative study uses the methodology of Cohen et al. (Reference Cohen, Walker, Massaro, Stork and Hennecke1996) and Massaro (Reference Massaro1998b) in which a direct comparison is made between people’s ability to speechread a natural talker and our synthetic talker. We presented silently for identification monosyllabic English words (such as sing, bin, dung, dip, seethe) produced either by a natural speaker (Bernstein and Eberhardt Reference Bernstein and Eberhardt1986b) or our synthetic talker, randomly intermixed. Each evaluation test used a unique set of parameter values and dominance functions for each phoneme as well as our blending function for coarticulation. The AT&T text-to-speech (TtS) module was utilized to provide the phonemic representation for each word and the relative durations of the speech segments, in addition to synthesizing the auditory speech presented as feedback (Sproat Reference Sproat1998). Other characteristics such as speaking rate and average acoustic amplitude were equated for the natural and synthetic talker. The speech on the videodisk was articulated in citation form and thus had a relatively slow speaking rate. The most recent evaluation experiments are presented in Massaro (Reference Massaro1998b, Chapter 13). With three successive iterations of modifying Baldi’s control parameters, the overall difference in viseme accuracy between the natural talker and Baldi was decreased from .22 to .18 to .10; baseline performance was roughly .74.
In a new modification, we defined two new control parameters for retraction and rounding, which simulate facial muscle actions. For each point involved in the parameter, the parameter value is multiplied by three coefficients for x, y, and z of a vector that is then added to the original point location. Such a mechanism might also be characterized as a patch morph. A change in each of these parameter values modifies the face from one neutral shape (for example, unrounded) to another shape (rounded). These two control parameters allow us to characterize the visible speech in terms of more phonetically based terms, which should allow us to more easily simulate actual speech. The coefficients for these two parameters were derived from physical measurements of one speaker, although we might also derive them from high resolution laser scans of speakers making these particular gestures.
Twelve college students who were native speakers of American English served as subjects, in two 40-minute sessions each day for two days. Up to four at a time were tested in separate sound attenuated rooms under control of the SGI-Crimson computer, with video from the laserdisk (the human talker) or the computer being presented over 13″ color monitors. On each trial they were first presented with a silent word from one of the two faces and then typed in their answer on a terminal keyboard. Only actual monosyllabic English words were accepted as valid answers from a list of about 12 000 derived mainly from the Oxford English Dictionary. After all subjects had responded, they received feedback by a second presentation of the word, this time with auditory speech (natural or synthetic depending on whether the face was natural or synthetic) and with the word in written form on the left side of the video monitor.
There were 264 test words, and each word was tested with both synthetic and natural speech, for a total of 2 × 264 = 528 test trials. For the counterbalancing of the test words and presentation modes, the subjects were split into two groups. Each group received the same random order of words but with the assignment of the two faces reversed. Five unscored practice trials using additional words preceded each experimental session of 132 test words.
By comparing the overall proportion correct and analyzing the perceptual confusions, we can determine how closely the synthetic visual speech matches the natural visual speech. The questions to be answered are what is the extent of confusions, and how similar are the patterns of confusions for the two talkers. This analysis can be simplified by ignoring confusions that take place between visually similar phonemes. Because of the data-limited property of visible speech in comparison to audible speech, many phonemes are virtually indistinguishable by sight, even from a natural face, and so are expected to be easily confused. To eliminate these likely confusions from consideration, we group visually indistinguishable phonemes into categories called visemes. The concept of viseme has been traditionally used to parallel that of phoneme – in other words, a difference between visemes is significant, informative, and categorical to the perceiver; a difference within a viseme class is not. In general, then, we expect confusions to take place within visemes but not between them. However, some confusion does take place between viseme categories. This is partly because of the difficulty of speechreading. But also, as with most categories, visemes are not sharply defined (they are “fuzzy”), and any sharp definitions imposed are therefore somewhat arbitrary and inaccurate. Even so, it is worthwhile to use some standard viseme groupings in order to assess how well the more meaningful visible speech differences are perceived. As in our previous studies (Massaro Reference Massaro1998b), we grouped the consonants into nine viseme categories. The results were first pooled across experimental sessions and subjects to increase their reliability.
Figure 12.2 presents the word-initial consonant viseme accuracy and confusions for natural (left panel) and synthetic (right panel) speech. The area of each circle indicates the proportion of each response to a given stimulus. As can be seen in the figure, the overall level of performance is relatively comparable for the two talkers, except for two major limitations of the synthetic speech. The initial segment /T/ (as in thick) was frequently identified as /t/ or /l/, and initial /r/ was often identified as /f/ or /v/. The overall proportion of correct identification of the initial segment for natural speech (.689) was slightly higher than that for the synthetic talker (.652). The overall difference in viseme accuracy between the natural talker and Baldi was .086, indicating that we achieved a small improvement over our previous set of control parameters. The correlation of the synthetic and natural talker data yielded a correlation of r = .927. The ratio of correct identifications for the synthetic and natural talkers for visemes was 0.946. We turn now to our current work to improve the animated speech.

Figure 12.2 Viseme accuracy and confusions for natural and synthetic visual speech.
12.4 The use of synthetic speech and facial animation
In a few instances, individuals have reacted negatively to the use of synthetic auditory speech in our applications. Not only did they claim it sounded relatively robotic (in some cases, people thought there was a resemblance to our California governor in his previous life as a terminator), they were worried that children may learn incorrect pronunciation or intonation patterns from this speech. However, this worry appears to be unnecessary. In agreement with the positive outcomes of direct experimental evaluations described below, Baldi has been used in many different pedagogical applications at the Tucker-Maxon School of Oral Education (www.tmos.org), where Baldi tutored quite successfully with about sixteen hard-of-hearing children who were about 8 to 14 years of age (Barker Reference Barker2003). The students had either hearing aids or cochlear implants, and were tutored by Baldi an average of about 20 minutes per day. Baldi taught these children receptive vocabulary directly, and also was used in various applications reinforcing the school’s curriculum.
As part of the vocabulary tutor, there were recorded speech tasks in which these students imitated and elicited words prompted by Baldi’s synthetic speech models. The teachers’ impressions were that these children did use Baldi’s synthetic speech to produce fairly intelligible words. These students had severe-to-profound hearing losses (90 dB HL or greater) with varying degrees of speech intelligibility and delayed vocabulary skills. Productions of these new words spoken by Baldi seemed to be no better or no worse than their normal articulatory patterns, but the teachers thought these production tasks were beneficial to the students. In addition, the teachers were able to correct the speech synthesizer’s pronunciation of a word when it was initially mispronounced by modifying the text input. This was necessary because they noticed that when Baldi mispronounced a word or gave it inappropriate accenting, students were likely to pronounce or intone the word in a similar manner. A number of these students, also described in Barker (Reference Barker2003), who began using Baldi and synthetic speech 7 years ago now have graduated from high school. Obviously, they were still able to achieve academically despite regular exposure to synthetic speech at a fairly young age (Barker Reference Barker2003). It should be noted that the primary goal was to improve deficit language bases among deaf and hard-of-hearing children, which was believed to be much more critical to academic achievement than perfect pronunciation. For example, a student could read and write quality assignments even though some of the words would be mispronounced. But, in fact, many of the children’s receptive vocabulary work with the tutor carried over into intelligible expressive vocabularies.
In addition to these observations, experimental tests demonstrated that hard-of-hearing children improved their pronunciations of words as a direct result of Baldi’s tutoring (see Massaro Reference Massaro, Spencer and Marshark2006a, for a review). In vocabulary lessons, the children not only improved in their receptive vocabulary but also in their productions of these words (Massaro and Light Reference Massaro and Light2004a). In speech production tutoring on specific speech segments such as /s/, /z/, /t/, and /d/, the application was successful in teaching correct pronunciation of the target words and also generalized to the segments in novel words (Massaro and Light Reference Massaro and Light2004b). This is gratifying because the value of synthetic speech like our animated visible speech tutor is that anything can be said at any time by simply entering the appropriate written text. Natural speech would require that the content be prerecorded by voice talent. This constraint would negate the just-in-time feature of creating lessons. Finally, notwithstanding these justifications, synthetic auditory speech has improved considerably and the synthetic voice of the newer Timo is much more natural sounding than Baldi’s original voice.
Analogous arguments exist for facial animation. We have shown that Baldi can be speechread almost as accurately as a real person. In the Jesse et al. (Reference Jesse, Vrignaud, Cohen and Massaro2000/01) study described earlier, one of 65 auditory sentences was randomly presented in noise on each trial, and the hearing participants were asked to watch and listen to each sentence and to type in as many words as they could for each sentence. There were three presentation conditions: auditory, auditory paired with the face of the original talker, and auditory paired with the face of Baldi. Pairing the original talker with the auditory speech improved performance by 54% whereas pairing Baldi with the auditory speech gave a 47% improvement. Thus, the large and similar improvement in the two conditions demonstrates that Baldi provides respectable visible speech even though he is synthetic. Although Timo is based on Baldi, research is in progress to test whether Timo’s visible speech is as effective as Baldi’s. Given this foundation in educational practice, we now turn to the importance of science vocabulary, the unique difficulties it poses, the perceptual and cognitive underpinnings responsible for these difficulties, and how instruction can ameliorate them.
12.5 New structures and their control
We have added internal structures both for improved accuracy and to pedagogically illustrate correct articulation. Although there is a long history of using visible cues in speech training for individuals with hearing loss, these cues have usually been abstract or symbolic rather than direct representations of the vocal tract and articulators. The IBM Speechviewer III application4 (Mahshie Reference Mahshie1998), for example, uses cartoon-like displays to illustrate speech articulation accuracy. Our goal is to create a simulation that is as accurate as possible, and to assess whether this information can guide speech production. We know from children born without sight that the ear can guide language learning. Our question is whether the eye can do the same, or at least the eye supplemented with degraded auditory information.
One immediate motivation for developing a hard palate, velum, teeth, and tongue is their potential utility in language training. Hard-of-hearing children require guided instruction in speech perception and production. Some of the distinctions in spoken language cannot be heard with degraded hearing – even when the hearing loss has been compensated by hearing aids or cochlear implants. To overcome this limitation, one application of our technology is to use visible speech to provide speech targets for the child with hearing loss. Given that many of the subtle distinctions among segments are not visible on the outside of the face, a speech therapist cannot easily illustrate how articulation should occur. The skin of our talking head, on the other hand, can be made transparent or eliminated so that the inside of the vocal tract is visible, or we can present a cutaway view of the head along the sagittal plane. The articulators can also be displayed from different vantage points so that the subtleties of articulation can be optimally visualized. The goal is to instruct the child by revealing the appropriate articulation via the hard palate, velum, teeth, and tongue, in addition to views of the lips and perhaps other aspects of the facial structure.
Visible speech instruction poses many issues that must be resolved before training can be optimized. We are confident that illustration of articulation will be useful in improving the learner’s speech, but, of course, this hypothesis must be tested, and it will be important to assess how well learning transfers outside the instructional situation. Another issue is whether instruction should be focused on visible speech or whether it should include auditory input. If speech production mirrors speech perception, then we expect that multimodal training should be beneficial, as suggested by Summerfield (Reference Summerfield, Dodd and Campbell1987). We expect that the child could learn multimodal targets, which would provide more resolution than either modality alone. Another issue concerns whether the visible speech targets should be illustrated in static or dynamic presentations. We plan to evaluate both types of presentation and expect that some combination of modes would be optimal. Finally, the size of the instructional target is an issue. Should instruction focus on small phoneme and open syllable targets, or should it be based on larger units of words and phrases? Again, we expect training with several sizes of targets would be ideal.
12.5.1 Tongue, teeth, hard palate, and velum
We have implemented a palate, realistic teeth, and an improved tongue with collision detection in our talking head, Baldi. Figure 12.3 shows our new palate and teeth. A detailed model of the teeth and hard palate was obtained (Viewpoint Datalabs) and adapted to the talking head. To allow realtime display, the polygon count was reduced using a surface simplification algorithm (Cohen et al.Reference Cohen, Beskow and Massaro1998) from 16 000 to 1600 polygons. This allowed a faster rendering of both the face and articulators. We also plan to implement a moveable velum in the hard palate structure. Figure 12.4 displays the velum in three different states of opening.

Figure 12.3 New palate and tongue embedded in the talking head.

Figure 12.4 Half of palate with velum in three different states of opening.
12.5.2 Controlling the tongue
Our synthetic tongue is constructed of a polygon surface defined by sagittal and coronal b-spline curves. The control points of these b-spline curves are moved singly and in pairs by speech articulation control parameters. Figure 12.5 illustrates the development system for our third-generation tongue. In this image, taken from the Silicon Graphics computer screen, the tongue is in the upper left quadrant, with the front pointing to the left. The upper right panel shows the front, middle, and back parametric coronal sections (going right to left) along with blending functions just below, which control where front, mid, and back occur. There are nine sagittal and 3 × 7 coronal parameters, which can be modified with the pink sliders in the lower right panel. The lower left part of Figure 12.5 partially illustrates the sagittal b-spline curve and how it is specified by the control points. For example, to extend the tip of the tongue forward, the pair of points E and F is moved to the right, which then pulls the curve along. To make the tip of the tongue thinner, points E and F can be moved vertically toward each other.

Figure 12.5 Tongue development system (see text for description).
12.5.3 Handling collisions
The tongue, teeth, and palate introduce some geometric complications, since we need to make sure that the tongue hits the teeth and palate appropriately and does not simply travel through them (because they are virtual rather than real). To control the tongue appropriately, we have developed a fast method to detect and correct tongue areas that would intrude into areas of the teeth and palate.
The general principle is that once a point P on the tongue surface is found to be on the wrong side of a boundary (the palate–teeth surface), it is moved back onto that surface. Thus the problem is decomposed into two main parts: detection and correction. Detection is determined by taking the dot product between the surface normal and a vector from P to the surface. The sign of this dot product tells us what side P is on. To correct the point onto the surface, we have examined several strategies with varying computational requirements. One strategy is to compute a parallel projection of the point onto the closest polygon, or onto an edge or a vertex if it does not lie directly above a polygon. This has the drawback that the corrected points will not always be evenly distributed. If the boundary surface is convex, the corrected points could be clustered on vertices and edges of the boundary surface. This approach is also relatively slow (about 40 ms for the entire tongue). A more precise (but even slower) solution takes the vertex normals at the corners of the triangle into account to determine the line of projection, resulting in a better distribution of corrected points. In both of the above methods, a search is required to find the best polygon to correct to.
Collision testing can be performed against the actual polygon surface comprising the palate and teeth, but corrections should only be made to a subset of these polygons, namely the ones that make up the actual boundary of the mouth cavity. To cope with this, we created a liner inside the mouth, which adheres to the inner surface. The liner was created by extending a set of rays from a fixed origin point O inside the mouth cavity at regular longitudes and latitudes, until the rays intersect the closest polygon on the palate or teeth. The intersection points thus form a regular quadrilateral mesh, the liner, illustrated in Figure 12.6. The regular topology of the liner makes collision handling much faster (several ms for the entire tongue), and we can make all corrections along a line towards O. With this algorithm, we can omit the polygon search stage, and directly find the correct quadrilateral of the liner by calculating the spherical coordinates of a point which would protrude through the palate relative to O.

Figure 12.6 Teeth and palate, showing regular quadrilateral mesh liner.
Since the hard palate and the teeth don’t change shape over time, we can speed up the collision testing by pre-computing certain information. The space around the internals is divided into a set of 32 × 32 × 32 voxels, which contain information about whether that voxel is ok, not ok, or borderline for tongue points to occupy. This provides a preliminary screening; if a point is in a voxel marked ok, no further computation need be done for that point. If the voxel is borderline, we need to perform testing and possibly correction, if it is not ok we go straight to correction. Figure 12.7 illustrates an example of the screening voxel space. In this set of voxels, the shade of each point indicates the voxel class marking.

Figure 12.7 Voxel space around the left jaw region, with the anterior end to the right in the picture. Black dots toward the bottom indicate areas where the tongue points are okay, gray dots toward the top where the tongue points are not okay, and white dots for points that are borderline (neither okay nor not okay).
12.5.4 Tongue shape training
A minimization approach has been implemented to train our synthetic tongue to correspond to observations from natural talkers. The left panel of Figure 12.8 shows the synthetic b-spline curve along with a contour extracted from an MRI scan in the sagittal plane of a speaker articulating a /d/. The first step in any minimization algorithm is to construct an appropriate error metric between the observed and synthetic data. For the present case, we construct a set of rays from the origin (indicated in Figure 12.8 by the “+” marks interior to the tongue outline) through the observed points and the parametric curve. The error can then be computed as the sum of the squared lengths of the vectors connecting the two curves. Given this error score, the tongue control parameters (including tip advancement, tip thickness, top advancement) are automatically adjusted using a direct search algorithm (Chandler Reference Chandler1969) so as to minimize the error score. This general approach can be extended to the use of three-dimensional data, although the computation of an error metric is considerably more complex.

Figure 12.8 Sagittal curve fitting. The left panel shows the sagittal outlines of the synthetic tongue (solid line) and an outline of a /d/ articulation (points connected by line) from an MRI scan. The lettered circles give the locations of the synthetic b-spline curve control points. The center part shows the error vectors between the observed and synthetic curves prior to minimization. The bottom part shows the two curves following the minimization adjustment of control parameters of the synthetic tongue.
12.5.5 Ultrasound measurements
In addition to MRI measurements, we are using data from three-dimensional ultrasound measurements to train tongue movements. These data correspond to the upper tongue surfaces for eighteen continuous English sounds (Stone and Lundberg Reference Stone and Lundberg1996). Four of these ultrasound surfaces are shown in Figure 12.9. These measurements are in the form of quadrilateral meshes assembled from series of 2D slices measured using a rotary ultrasound transducer attached under the chin. It should be noted that the ultrasound technique cannot measure areas such as the tip of the tongue because there is an air cavity between the transducer and the tongue body. We adjust the control parameters of the model to minimize the difference between the observed tongue surface and the surface of the synthetic tongue. To better fit the tongue surface, we have added some additional sagittal and coronal parameters as well as three different coronal sections (for the front, middle and rear sections of the tongue) instead of the prior single coronal shape. The control parameters that best fit the observed measurements can then be used to drive visual speech synthesis of the tongue.

Figure 12.9 Four typical ultrasound-measured tongue surfaces (for segments /a, i, N, T/) with synthetic palate and teeth, and EPG points (data from Stone and Lundberg Reference Stone and Lundberg1996).
A browser in the upper right part of the control panel in Figure 12.5 allows one to select from available ultrasound surface data files. The upper left panel of Figure 12.9 shows the æ ultrasound surface and synthetic tongue simultaneously after some fitting has occurred for the vowel as in bat. Figure 12.10 gives a more detailed view, but part of the ultrasound surface is embedded and cannot be seen. The error (guiding the fitting) is computed as the sum of the squared distances between the tongue and ultrasound along rays going from (0,0,0) to the vertices of the ultrasound quad mesh. A neighboring polygon search method to find tongue surface intersections with the error vectors is used to speed up (~800 ms/cycle) the error calculation after an exhaustive initial search (about 30 s). To prepare for this method the triangular polygon mesh of the tongue is cataloged so that given any triangle we have a map of the attached neighboring triangles. On each iteration of the search process we find which triangle is crossed by an error vector from the ultrasound mesh. Given an initial candidate triangle, we can ascertain whether that triangle intersects the error vector, or if not, in which direction from that triangle the intersecting triangle will occur. We can then use the map of neighboring triangles to get the next triangle to test. Typically, we need to examine only a few such triangles to find which is intersected. We are now also (optionally) constraining the total tongue volume in the fitting process. We compute the volume of the tongue on each iteration, and add some proportion of any change from the original tongue volume to the squared error total controlling the fit. Thus, any parameter changes that would have increased the tongue volume will be compensated for by some other parameters to keep the volume constant.

Figure 12.10 3D fit of tongue to ultrasound data. Top and bottom panels show the two surfaces before and after minimization. Error vectors are shown on the right half of the tongue. The size of the sphere on each error vector indicates the distance between the ultrasound and synthetic tongue surfaces.
12.5.6 Synthetic electropalatography
Another source of data for training the tongue is electropalatography (EPG). This type of data is collected from a natural talker using a plastic palate insert that incorporates a grid of about a hundred electrodes that detect contact between the tongue and palate at a fast rate (a full set of measurements 100 times per second). Building on the tongue–palate collision algorithm, we have constructed software for measurement and display of synthetic EPG data. Figure 12.11 shows the synthetic EPG point locations on the palate and teeth. Figure 12.12 shows our synthetic talker with the new teeth and palate along with an EPG display at the left during articulation of /N/ (as in sing). In this display, the contact locations are indicated by points, and those points that are contacted by the synthetic tongue are drawn as larger squares. Comparison of these real EPG data (top left) with synthetic EPG data (bottom left) provides an additional constraint used in training our synthetic tongue. The discrepancy between the number of real and synthetic EPG contacts provides an additional error metric that, together with the ultrasound and volume change error metrics, guide the automatic adjustment of the tongue control parameters to synthesize accurate tongue shapes.

Figure 12.11 EPG points on the synthetic palate.

Figure 12.12 Face with new palate and teeth with natural (top left) and synthetic (bottom left) EPG displays for /N/ closure. The smaller dots indicate uncontacted points and the larger squares indicate contacted points. Half of the head is shown cut at the midsagittal plane, except that the full ultrasound target surface shape is displayed.
12.6 Reshaping the canonical head
Our development of visible speech synthesis is based on facial animation of a canonical head, called Baldi. In addition to the original version, which had only the front part of the head, we now have also sculpted a canonical head with somewhat higher resolution that includes the polygons for the back of the head and additional polygons around the mouth. The synthesis, parameter control, coarticulation scheme, and rendering engine are specific to Baldi. It is valuable to be capable of controlling other faces and, therefore, we have developed software to reshape our canonical head to match various target heads. These target heads include both commercial models, such as Viewpoint Data Labs, and 3D Cyberware laser scans. A laser scan of a new target head produces a very high polygon count (hundreds of thousands of polygons) representation. Rather than trying to animate this very high resolution head (which is impossible to do in realtime with current hardware), our software uses these data to reshape our canonical head (the source) to take on the shape of the new target head. In this approach, the facial landmarks on the target head are marked by an operator, and our canonical head is then warped until it assumes as closely as possible the shape of the target head, with the additional constraint that the landmarks of the canonical face move to positions corresponding to those on the target head.
The algorithm used is based on the work of Kent et al. (Reference Kent, Parent and Carlson1992), and Shepard (Reference Shepard1968). In this approach, all the triangles making up the source and target models are projected on a unit sphere centered at the origin. The models must be convex or star-shaped so that there is at least one point within the model from which all vertices of all triangles are visible. This can be confirmed by a separate vertex visibility test procedure that checks for this requirement. If a model is non-convex or not star-shaped (for example, the shape of the ear, the surface of which crosses a ray from the center of the head several times) then it is necessary to modify these sections of the model in order to meet this requirement, or alternatively, to handle such sections separately.
In our application, the ears, eyes, and lips are handled separately. First, we translate all vertices so that the center point of the model (determined by the vertex visibility test mentioned above) coincides with the coordinate system origin. We then move the vertices so that they are at a unit distance from the origin. At this point, all the vertices of all triangles making up the model are on the surface of the unit sphere. The weighted influence of each landmark is then calculated to determine each source vertex’s new position. Then, for each of these source vertices we determine the appropriate location of the projected target model to which a given source vertex projects. This gives us a homeomorphic mapping (one-to-one and onto) between source and target datasets, and we can thereby determine the morph coordinate of each source vertex as a barycentric coordinate of the target triangle to which it maps. This mapping guides the final morph between source and target datasets.
In general, the source and target models may not be in the same coordinate system. In this case, the target model must be transformed to ensure that it lies in the same coordinate space as the source. Even if the models are in the same coordinate spaces, it is unlikely that the respective features (lips, eyes, ears, and nose) are aligned with respect to one another. Shepard (Reference Shepard1968) interpolation, a scattered data interpolation technique, is used to help align the two models with respect to one another. A different technique is used to interpolate polygon patches, which were earlier culled out of the target model because they are non-convex. These patches are instead stretched to fit the new boundaries of the culled regions in the morphed head. Because this technique does not capture as much of the target shape’s detail as Shepard interpolation, we try to minimize the size of the culled patches. This provides the user with the final complete source model duly morphed to the target model, with all the patches in place. To output the final topology we patch together all the source polygonal patches and then output them in a single topology file. The source connectivity is not disturbed and is the same as the original source connectivity.
The morph itself is a one-to-one correspondence between all points on the source model and unique locations on the target model. We establish absolute coordinate mappings by computing barycentric coordinates and carrying them back to the original models to compute the locations to which each point on the source model should morph. The final morphing actually transforms the source model to the required target model in a smooth fashion. Figure 12.13 illustrates the application of our software, morphing our canonical head based on a Viewpoint Data Labs target head.

Figure 12.13 Original canonical head (left), a target head (center), and the morphed canonical head (right) derived from our morphing software.
12.7 Training speech articulation using dynamic 3D measurements
To improve the intelligibility of our talking heads, we have developed software for using dynamic 3D optical measurements (Optotrack) of points on a real face while talking (Cohen et al.Reference Cohen, Massaro and Clark2002). At ATR in Kyoto, Japan in April 2001, with the help of Eric Vatikiotis-Bateson and Takaaki Kuratate, we recorded a large speech database with 19 markers affixed to the face of DWM (see Figure 12.14).
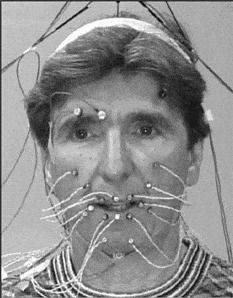
Figure 12.14 Speaker DWM with OPTOTRAK measurement points.
Fitting of these dynamic data occurred in several stages. To begin, we assigned points on the surface of the synthetic model that best corresponded to the Optotrack measurement points. There were 19 points on the face in addition to 4 points off the top of the head that were used to remove head motion from these 19 points. Two of the 19 points (on the eyebrows) were not used; the other 17 points were used to train the synthetic face. These correspondences are illustrated in Figure 12.15 with model points (3–4 mm off the synthetic skin surface corresponding to the LED thicknesses) shown as dark spheres, and Optotrack points as white spheres. Before training, the Optotrack data were adjusted in rotation, translation, and scale to best match the corresponding points marked on the synthetic face.
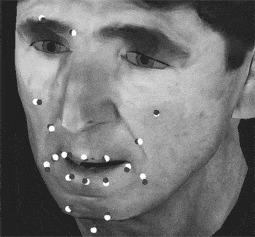
Figure 12.15 Illustrates placement of the points for the new model of WM, which corresponds to Baldi’s wireframe morphed into the shape of DWM. These dark points are placed 3mm (4mm for the chin point) off the synthetic surface and the placements of the corresponding measured OPTOTRAK points are given in white.
The data collected for the training consisted of 100 CID sentences recorded by DWM speaking in a fairly natural manner. In the first stage fit, for each time frame (30 fps) we automatically and iteratively adjusted 10 facial control parameters (shown in Table 12.1) of the face to get the best fit (measured by the root mean square (RMS) of the sum of squared distances) between the Optotrak measurements and the corresponding point locations for the synthetic face. The fit of a given frame was used as the initial values for the next frame. A single jaw rotation parameter was used, but the other 10 parameters were fit independently for the two sides of the face. This yielded 19 best-fitting parameter tracks that could be compared to our standard parametric phoneme synthesis and coarticulation algorithm to synthesize the parameter tracks of the same 100 CID sentences. We used Viterbi alignment on the acoustic speech data of each sentence to obtain the phoneme durations that are required for the synthesis. The difference between the first stage fit and the parametric synthesis with our initial segment definitions gave an RMS error between these curves (normalized for parameter range) of 26 percent.
Table 12.1 The 10 facial control parameters.

The 19 best-fitting parameter tracks were then used as the inputs to the second stage fit. In the second stage fit, the goal was to tune the segment definitions (parameter targets, dominance function strengths, attack and decay rates, and peak strength time offsets) used in our coarticulation algorithm (Cohen and Massaro Reference Cohen, Massaro, Thalmann and Magnenat-Thalmann1993) to get the best fit with the parameter tracks obtained in the first stage fit. The computed parameter tracks of this second stage fit were compared with the parameter tracks obtained from the first stage fit, the error computed, and the parameters (target values and dynamic characteristics) for the 39 phoneme segments adjusted until the best fit was achieved. The RMS for the second stage fit was 12 percent, which shows that the new trained parameter targets, dominance function strengths, attack and decay rates, and peak strength time offsets used in our coarticulation algorithm were reasonably accurate in describing the Optotrak data.
In addition to the phoneme definition fit, we have also used phoneme definitions conditional on the following phoneme. In the CID sentences there were 509 such pairs and these context-sensitive phoneme definitions provided an improved match to the parameter tracks of the first stage fit, with an RMS of 6 percent. In summary, we see that using data-driven synthesis can improve the accuracy of our synthesis algorithm. Further work is being carried out to determine how well these trained segment definitions generalize to the synthesis of new sentences by the same speaker, and to speech by other speakers. In addition, intelligibility testing will be carried out as an additional evaluation measure.
12.8 Some applications of electropalatography to speech therapy
As stated earlier, one of our goals is to use visible speech for speech training. This type of training would be similar in some respects to the applied use of electropalatography (EPG). Although initially created as a tool for basic speech research, EPG has been found to be useful in many clinical settings. Research at Queen Margaret College in Edinburgh has shown that many speech disorders can be helped through therapy using EPG (Dent et al. Reference Dent, Gibbon and Hardcastle1995; Hardcastle and Gibbon Reference Hardcastle, Gibbon, Ball and Code1997). It has been suggested that although the initial cost of the artificial palate (for the patient) and of the equipment (for the institution or therapist) is relatively high, the savings on clinical time are advantageous both financially and in terms of patient motivation (Nairn et al.Reference Nairn, Hardcastle, Gibbon, Razzell, Crampin, Harvey, Reynolds, Massen and Groenen1999).
EPG is useful in clinical settings because it provides direct visual feedback (in the form of a computer display) on the contact between the tongue and the palate during speech production. The patient wears a custom-fitted artificial palate embedded with electrodes, and the therapist may wear one as well. The therapist can show a target pattern (perhaps producing the target sound him- or herself), which the patient must try to achieve. For instance, the patient may be presented with a typical contact pattern for /s/: this has much contact at the sides of the palate, with a narrow constriction towards the front of the palate. Certain speech pathologies result in /s/ being produced as a pharyngeal fricative. This would show up on the screen as a lack of contact on the hard palate. The therapist can then instruct the patient as to how to achieve the target pattern. Dent et al. (Reference Dent, Gibbon and Hardcastle1995) provide a case study where EPG therapy improved the production of lingual stops and fricatives in a patient who had undergone pharyngoplasty.
EPG has also proven useful in clinical assessment by confirming or modifying therapists’ intuitions about the nature of the speech pathology presented by a particular speaker (Dent et al.Reference Dent, Gibbon, Hardcastle, Leahy and Kallen1992). For instance, following the repair of a cleft palate, a patient’s speech was still perceived as being nasal during the production of both alveolar and labial stops and fricatives. An EPG examination of the patient’s speech showed velar closure during the articulation of all such segments. Once this problem of velar closure was pointed out to the patient, therapy focused on removing the extraneous articulation, and a more natural-sounding production of the alveolar and labial stops and fricatives was achieved.
The production of grooves and affricates can be particularly problematic in many speech pathologies. Dent et al. (Reference Dent, Gibbon and Hardcastle1995) describe two patients whose productions of /s, ∫, t∫/ (as in bass, bash, batch) were perceived as abnormal. In one case, the articulations were perceived as being too dental, and in the other case as being too palatal. An examination of EPG patterns confirmed these perceptions, and therapy focused on achieving correct articulations for these sounds.
Of the twenty-three children examined in the Dent et al. (Reference Dent, Gibbon and Hardcastle1995) study, EPG therapy was unsuccessful for five of these children. Two of the patients were unable to continue wearing the palate (one lost a tooth to which the palate wire was attached, and the other could not tolerate the palate), and the other three were judged to be less mature emotionally, and less motivated to improve their speech. The authors suggested that given the high cost of obtaining a custom-made artificial palate, therapists and patients must be confident that EPG therapy will succeed and the patient must show sufficient motivation and maturity to proceed with the therapy.
Edwards et al. (Reference Edwards, Gibbon and Fourakis1997) discuss the usefulness of EPG in examining covert contrasts of alveolar and velar consonants in speech acquisition. Covert contrasts (Hewlett Reference Hewlett1988) are phonetic-level contrasts made by a child speaker; these contrasts are not perceptible at the phoneme level by an adult hearer. For instance, a child may produce a significant difference in voice onset time (VOT) for the /p/ and /b/ as in pet and bet (Macken and Barton Reference Macken and Barton1980; Scobbie et al.Reference Scobbie, Gibbon, Hardcastle and Fletcher1998). However, to the adult hearer, both productions fall into the phoneme category /b/, because in neither utterance is the VOT sufficiently long.
Gibbon et al. (Reference Gibbon, Dent and Hardcastle1993, Reference Gibbon, Whitehill, Hardcastle, Stokes, Nairn, Ziegler and Deger1998) examined two sisters, one of whom had been judged as having acquired the alveolar-velar distinction between /d/ and /g/, and one whose productions of /d/ and /g/ were all judged to be [g]. An EPG study showed that both sisters made an articulatory contrast between /d/ and /g/, and that both had simultaneous velar and alveolar closure during /d/. The difference in perceived phonetic output was found to be due to the sequence of release of the double articulation. If the velar closure was released before the alveolar closure, the stop was perceived as alveolar (as intended). If the alveolar closure was released before the velar closure, the stop was perceived as velar. Moreover, Forrest et al. (Reference Forrest, Weismer, Hodge, Dinnsen and Elbert1990) found that there are spectral differences between a [t] produced for a /t/ and a [t] produced for a /k/. Despite this acoustic contrast, even phonetically trained listeners can disagree on whether a given token is /t/ or /k/ when such double articulations are involved (Gibbon et al.Reference Gibbon, Dent and Hardcastle1993). Similar results have been reported for covert contrasts between /s/ and /T/, and for the deletion of /s/ in clusters.
EPG is particularly useful in the treatment of cleft palate speech (Gibbon et al.Reference Gibbon, Whitehill, Hardcastle, Stokes, Nairn, Ziegler and Deger1998). Cleft palate speech is characterized by double articulations, such as the alveolar-velar double articulation described above; generally weak consonant articulation – for instance, a lack of complete closure for stop consonants as has also been noted in speech affected by acquired dysarthria; abnormally broad or posterior tongue placement; and much lateralization which allows airflow through the sides of the tongue. All of these characteristics can be readily observed in the EPG contact patterns.
EPG is also useful in the description of segments perceived as lateralized fricatives. There is a very wide range of contact patterns for such segments. Some contact patterns show gaps along the sides of the palate where air might escape, and some do not. Most of the contact patterns show complete closure across the palate, although this is not necessarily a characteristic of lateralized fricatives that occur in normal speech (such as those in Welsh). Moreover, the location of the contact varies from speaker to speaker in fricatives, which are perceived as being laterals in disordered speech.
Gibbon et al. (Reference Gibbon, Whitehill, Hardcastle, Stokes, Nairn, Ziegler and Deger1998) studied language-specific effects on cleft palate speech. They showed that overall, the most likely consonants to be affected are coronal and velar obstruents, followed by liquids, and finally bilabial stops. However, there were slight differences within a given language. For instance, Cantonese speakers are more likely to replace the alveolar fricative /s/ with a bilabial fricative and to delete initial consonants than are English speakers. It could be hypothesized that the greater tendency to delete initial consonants is due to the functional load of tone contrasts in Cantonese, since tone contrasts do not exist in English. It is not clear to what extent the size and typology of the consonant phoneme inventory affects the compensatory articulations employed by cleft palate speakers of a given language.
EPG therapy has also proven to be useful in teaching deaf children to produce normal-sounding lingual consonants (Fletcher et al.Reference Fletcher, Dagenais and Critz-Crosby1991; Dagenais et al.Reference Dagenais, Critz-Crosby, Fletcher and McCutcheon1994; Crawford Reference Crawford1995). The visual feedback from the EPG is deemed to be extremely important to the significant improvement in production. Similarly EPG has been shown to be most successful in teaching older children with functional articulation disorders to produce normal-sounding fricatives, stops, and affricates (Dagenais et al.Reference Dagenais, Critz-Crosby, Fletcher and McCutcheon1994; Dent et al.Reference Dent, Gibbon and Hardcastle1995). Children whose /s/ productions were perceived as being lateralized, palatalized, and pharyngalized all showed significant improvement. None of these children could produce the anterior groove configuration necessary for an /s/, so therapy focused on achieving this groove.
Most of the phenomena discussed above can be classified as spatial distortions of speech (see Hardcastle and Gibbon Reference Hardcastle, Gibbon, Ball and Code1997, for an extensive discussion). However, certain speech disorders, such as stuttering (Harrington Reference Harrington, Peters and Hulstijn1987) or speech affected by acquired apraxia, show temporal distortions. Temporal or serial ordering difficulties occur when the spatial configuration of the EPG pattern looks normal, but there is an error in the duration or sequence of the gesture. At times, a gesture may intrude during speech that is not expected, and is not perceived by the listener or therapist because of its short duration and because it is not expected in the sequence. Hardcastle and Gibbon (Reference Hardcastle, Gibbon, Ball and Code1997) give the example of a stutterer’s production of the sequence /εkstɪ/ (as in extinct) transcribed as [εkst∴t∴ɪ]. The EPG trace shows not only the multiple repetitions of the /t/ together with the long duration of the /s/, but also an intrusive velar closure between the alveolar fricative and the first alveolar stop. This may have been a “carryover” gesture from the velar stop preceding the fricative. At other times, a gesture may intrude during closure for a consonant. For instance, apraxic speakers often have a velar gesture intruding before, during, or after an alveolar gesture; if the intrusive gesture occurs during closure for an alveolar stop, the minimal acoustic energy would result in a lack of audible cues. EPG is particularly useful in these instances.
Other speech difficulties that can be quantified using EPG include transitional difficulties, typical of speakers with acquired apraxia and dysarthria. Transition times between various segments become excessively long; this could result in stop consonants being perceived as released where release is inappropriate, for instance.
Given the success of EPG in speech training, we believe that the visible speech from Baldi could be used for the tutoring of speech production. Although there are both temporal and spatial errors in speech production, the speech tutor developed here focuses only on spatial aspects of speech production, since this is easier to quantify in visual terms.
12.9 Development of a speech tutor
Our speech tutor for deaf children uses Baldi’s internal productions, which are based on EPG and ultrasound measurements as described in Section 12.5.5. By making the skin transparent or by showing a sagittal view, Baldi can illustrate pronunciation of sounds that are not normally visible. This section outlines the approach used to develop the tutor. The initial stages of this work required the categorization of a set of “internal visemes.” As the name suggests, an internal viseme consists of a group of phonemes that cannot be distinguished from each other, but can be distinguished from all other phonemes, based on an internal view of the oral cavity. It should be stressed that this definition includes only the tongue and the passive articulators in the oral cavity (in other words, the teeth, the alveolar ridge, and the hard palate). The larynx is not included in this scheme, nor is the soft palate (velum). For these reasons, an internal viseme includes both voiced and voiceless cognates, as well as nasals. The scheme is currently limited to consonants.
Ten internal visemes were defined, based primarily on the representation of consonant articulations using EPG data. These internal visemes were interdental, alveolar fricative, post-alveolar fricative, post-alveolar affricate, alveolar stop, velar stop, lateral, rhotic, palatal approximant, and labio-velar approximant. A single phoneme was chosen to represent each viseme. These were, respectively, /θ/ /s/ /∫/ /t / /d/ /ɡ/ /l/ /r/ /j/ /w/. Voiced and voiceless phonemes were included in the same viseme. Thus, the viseme /θ/ also included /ð/ (as in this), /s/ also included /z/, /∫/ also included /Ʒ/ (as in rouge), /t∫/ also included /dʒ/ (as in judge), /d/ also included /t/ and /n/, and /g/ also included /k/ and /ŋ/ (see Table 12.2).
All of the internal visemes can be presented as static targets, with the exception of /t∫/, which has two phases of production: complete closure in the post-alveolar region, followed by a release into the post-alveolar fricative /∫/. The closure portion of /t∫/ can be presented statically to show that the place of articulation for this consonant is further back than for the alveolar stop /t/.
The second stage of this work involved the development of appropriate views of the oral cavity for the presentation of the internal visemes. Four basic views were developed in the first stages of this work. All views consisted only of the teeth, palate, tongue, and, in some cases, the lips (see below for clarification of when the lips were used). The skin and eyes were removed. The first view was a direct frontal view of the mouth (front view), with 50 percent transparency, and highlighting in yellow of contact between the tongue and the palate. This was intended to partially mimic a typical presentation of the face in lipreading. The second view was of the side of the mouth (side view), again with 50 percent transparency and highlighting of contact between the tongue and the palate. This view was mainly included to contrast /d/ and /l/, since, in principle, the former has contact between the sides of the tongue and the palate, while the latter has no such contact. The third view was called “side cut,” and was similar to side view except that a midsagittal view of the oral cavity was presented (as though the tongue and palate were cut in half). This view was included since it is a typical presentation of consonant and vowel articulations in textbooks of phonetics and speech, and in X-ray drawings of the oral cavity. Tongue highlighting was again present, but transparency was not used (i.e. the representation was solid). The mass of the tongue was presented as bright purple, and contact as a thin yellow line at the top of the tongue. Grooving along the tongue was visible as an earth-colored layer between the mass of the tongue and the contact between the tongue and the palate. The fourth and final view was from the top of the oral cavity (top view). Tongue highlighting was again presented, and transparency was again set at 50 percent. This view was included since it is used to represent tongue–palate contact.
All four views could be presented either with or without the lips. The lips were presented if the viseme involved active rounding of the lips, which included /∫/, /t∫/, /r/, and /w/.
Each internal viseme was then examined in each of the four views, and an attempt was made to determine which views suited which viseme best. A maximum of two views was chosen for a given viseme. The results are presented in Table 12.2. The top row consists of the internal viseme categories, and the first column lists the different views. A cross indicates that that view gives appropriate and useful information for that viseme. The numbers in each column correspond to prototypical instructions, which can accompany the presentation of the viseme. These instructions are also given in Table 12.2. The number is placed next to the view that is deemed to be more useful in the presentation of the viseme.
Table 12.2 The views which best illustrate which views best suit each internal viseme (a category of different phonemes that have very similar internal visible speech). No more than two views were chosen for a given viseme, although their views could also be effective. The top row consists of the internal viseme categories, and the first column lists the different views. A cross indicates that that view gives appropriate and useful information for that viseme. The numbers in each column correspond to the following instructions, which may accompany the presentation of the viseme: Make sure the tongue doesn’t touch the top front teeth too much. Keep the tongue flat. The air needs to escape between the tongue and the top front teeth. See where the tongue tip is pointing at the lower teeth. See how there is a deep groove along the tongue. See how the tongue tip is pointing quite low. See the deep groove along the tongue. See how the tongue is bunched higher up and further back in the mouth than for /s/. Don’t forget to round your lips. The part of your tongue just behind the tip is called the blade. Put the blade where the picture shows you – not right behind the teeth, but a little bit away from the teeth. Keep your tongue bunched up. As you take the blade away from the roof of the mouth, try to keep a deep groove along the tongue, like you practiced for the /sh/. See how the tongue presses behind the top teeth. See how there is lots of contact between the sides of the tongue all along the mouth. See how the tongue is pressed against the roof of the mouth at the back. See how the tip of the tongue is pressing against the teeth, but the sides of the tongue aren’t touching anything. See how the back of the tongue is pushed back in the mouth, towards the throat. See how the tongue tip curls up in the middle of the mouth, without touching the roof. Don’t forget to round your lips. You need to push the tongue up and back in the mouth, but don’t let it press against the roof. Don’t forget to round your lips. See how the tongue is raised in the middle of the mouth. The sides of the tongue touch the teeth and the roof, but not the center part.

The purpose of this tutor is to instruct the speaker to produce segments whose internal articulations are not easily viewed by the lipreader. Although the front view was not judged to be useful for any of these internal visemes, it would be useful for the viseme /v/ to show the upper teeth covering the lower lip. The side view was also not judged to be very useful. This was perhaps due to the fact that it repeated much of the information present in the side cut, but without the same level of clarity. (The difference in lateral contact between /d/ and /l/ could be shown clearly using the top view.)
The information presented in Table 12.2 can be used when the viseme is presented in isolation, or as part of a CV sequence. However, when direct comparisons are made between two visemes, it was not always clear what the difference is between them in a given view. For instance, in a top view of /s/ and /∫/, there appears to be little difference in contact patterns. However, a side cut view shows that there is a difference, with bunching and raising of the tongue for /∫/ but not /s/. For this reason, direct comparisons were made for each possible pair of visemes. Given the results in Table 12.2, only top view and side cut were considered as possible views. These appropriate views are marked by an X in Table 12.3. The view with the lips is presented if either or both of the visemes involve lip rounding. If neither viseme involves lip rounding, it is not presented. It can be seen that for most combinations, both top view and side view can be presented. An X in parentheses, (X), denotes that it is not clear whether this view is useful or not. Testing will be necessary to determine the usefulness of these views in particular, as well as of all the views.
The information in Table 12.3 can also be used in CVC sequences such as the word “sash” or “Seth.” The commentaries for the single internal visemes (Table 12.3) can be incorporated for these pairs. For instance, if the word is “Seth,” the views would be presented with the following instructions: “For the /s/, see where the tongue tip is pointing at the lower teeth. And see how there is a deep groove along the tongue.” Then, “For the /T/, make sure the tongue doesn’t touch the top front teeth too much. Keep the tongue flat. The air needs to escape between the tongue and the top front teeth.” Although vowels are not explicitly discussed here, for didactic purposes, all vowels would be presented with either the side cut or side cut with lips view (according to whether rounding is being taught or not).
Table 12.3 Optimal view to be chosen when direct comparisons are being made between two visemes.

12.10 Empirical Studies
This system was initially developed for the presentation of the internal visemes to deaf children, and the initial application gave very valuable and effective results (Massaro and Light Reference Massaro and Light2004b). It has also been successfully used for native Japanese speakers learning English /r/ and /l/ (Massaro and Light Reference Massaro and Light2003).
More recently, we examined (1) whether speech perception and production of a new language would be more easily learned by ear and eye relative to by ear alone, and (2) whether viewing the tongue, palate, and velum during production is more beneficial for learning than a standard frontal view of the speaker. In addition, we determine whether differences in learning under these conditions are due to enhanced receptive learning from additional visual information, or to more active learning motivated by the visual presentations. Studies were carried out in three different languages: Mandarin, Arabic, and Spanish. Test stimuli were two similar vowels in Mandarin, two similar stop consonants in Arabic, and the two Spanish phonemes absent in English /r/ and /rr/. All of the training and test items were presented in different word contexts. Participants were tested with auditory speech and were either trained (1) unimodally with just auditory speech or bimodally with both auditory and visual speech (Arabic and Spanish studies), and (2) a standard frontal view versus an inside view of the vocal tract (Mandarin study). The visual speech was generated by the appropriate multilingual versions of Baldi, Arabic Badr, Mandarin Bao, and Spanish Baldero. The results test the effectiveness of visible speech for learning a new language. We expected that visible speech would contribute positively to acquiring new speech distinctions and promoting active learning. However, the results did not support that expectation. Rather than forgoing our commitment to visible speech, however, we in retrospect saw many reasons why our short training and testing experiments did not produce positive results. A post mortem analysis produced support for implementing the following embellishments to our training procedure:
1. Tutorial and scrubbing feature on our audiovisual text-to-speech system Bapi (Ouni et al.Reference Ouni, Cohen and Massaro2005). The animation literature indicates that people learn more from animation when it is demonstrated and explained to them – for example, how it corresponds to what they are supposed to do, what it represents, etc. So with this in mind, we considered ways for participants to learn how the Baldi videos demonstrate what they are supposed to be doing with their articulators. This may be especially relevant with the sagittal view. Suggestions included a brief tutorial at the beginning of the experiment where the experimenter brings attention to relevant features of the video, like where Baldi places his tongue. We could also ask participants to imitate this. An additional possibility is to let participants play with the scrubbing feature on Bapi, which allows the learner to control the time course of the animation by simply moving the mouse.
2. Motivation. Motivation is a potential problem with our experiment: for example, the learning has little context, meaning, or usefulness, and participants are not really accountable for learning, since testing is isolated and no feedback is given regarding pronunciation. One solution that was discussed is to tell participants that they will be tested afterwards by the experimenter. This inter-personal sort of test might motivate participants because they will not want to look ignorant in front of an actual person.
3. Compatibility between training and testing. In the Arabic and Spanish experiments, there is an incompatibility between the training and the testing prompt (training is with the sagittal view, testing is with a frontal view), while this isn’t the case in the control condition in which both the training and testing are in a frontal view. Learning is usually optimal when the training and test conditions are equivalent. This discrepancy might hide some of the learning that is potentially gained by experiencing the sagittal view during training.
12.10.1 Baldi on the iPhone and iPad
The Baldi app on the iPhone and the iBaldi app on the iPad transforms any text into Baldi-animated speech. The animation is done locally, which is the only iPhone or iPad application of its kind at this time. Given some text, the user simply presses Play to have Baldi’s face and voice communicate the message. One can easily change Baldi’s size and orientation using the touch screen interface.
In the Settings view, you can change the audio volume and the speaking rate, as well as show Baldi in a standard Outside View or an Inside View that shows the tongue and inside the mouth (this view is valuable for language learning). You can change Baldi’s emotions by varying the sliders for six basic emotions. You can change several at the same time to give a mixture of different emotions.
The text you import can come from Notes, Web pages, RSS feeds, and so on. In all cases, simply select and copy the text from the application, and start Baldi. You can then paste the text. You can also permanently save your favorite texts in your Notes app, and then copy and paste one into the i-Baldi app.
It is possible to show visual cues to help people who are deaf or hard of hearing. The app can show the visual cues alongside of Baldi that would show on the iGlasses we are developing (see the following section). There are two sets of cues: Facial cues on Baldi’s face: red nostrils indicate Nasal sounds like m or n; clouds of dots coming out of the mouth indicate Frication sounds like s and sh; and circles indicate Voicing sounds like the sounds of d and v. Disk cues on the side of Baldi’s head signal the same Nasal, Frication and Voicing information by lighting up red, white, and blue, respectively.
12.10.2 iGlasses
The need for language aids is pervasive in today’s world. There are millions of individuals who have language and speech challenges, and these individuals require additional support for communication and language learning. Currently, however, the needs of these persons, such as limited understanding in face-to-face communication, are not being met. One problem that the people with these disabilities face is that there are not enough skilled teachers, interpreters, and professionals to give them the one-on-one attention that they need. One of our current goals is to develop and implement a pair of eyeglasses (iGlasses) that will facilitate face-to-face communication particularly for hard-of-hearing persons and in difficult hearing situations. The iGlasses project develops technology to supplement the common face-to-face language interaction to enhance intelligibility, understanding, and communication.5
Given the limitation of hearing speech for many individuals, the iGlasses will supplement the sound of speech and speechreading with an additional informative visual input. Acoustic characteristics of the speech will be transformed into readily perceivable visual characteristics. The goal is to develop and test the technology required to design a device seamlessly worn by the listener, which will perform continuous real-time acoustic analysis of his or her interlocutor’s speech. This device would transform several continuous acoustic features of the talker’s speech into continuous visual features, which will be simultaneously displayed on the speechreader’s eyeglasses. These acoustic features provide important linguistic information not directly observed on the face and are transformed into visual cues intended to enhance intelligibility and ease of comprehension. This wearable computing device does not require any learning on the part of the talker and is perceptually and linguistically motivated because it is directly based on acoustic and phonetic properties of speech and gives continuous rather than only categorical information.
This work will advance engineering research and speech science by developing a real-time system to automatically detect and track robust characteristics of auditory speech and to transform these continuous acoustic features into continuous supplementary visible features. Previous research and pilot research have demonstrated that neural networks can detect and track robust characteristics of speech. The proposed research extends this work and implements a complete system of transforming continuous acoustic features into continuous supplementary visible features displayed on eyeglasses during face-to-face communication. Pilot research indicates that people can learn to combine these visual cues with the visual information from the face to enhance intelligibility and comprehension. The proposed work will evaluate the learning of several potential visible features in real-world contexts.
The proposed activity will benefit society by providing a research and theoretical foundation for a system that would be naturally available to almost all individuals at a very low cost. It does not require automatic speech recognition, and will always be more accurate regardless of the advances or lack of advances in speech recognition technology. It does not require literate users because no written information is presented as would be the case in a captioning system; it is age-independent in that it might be used by toddlers, adolescents, and throughout the life span; it is functional for all languages because all languages share the corresponding acoustic characteristics; it would provide significant help for people with hearing aids and cochlear implants; and it would be beneficial for many individuals with language challenges and even for children learning to read.
For more information, see www.speechspecs.org/welcome.html
12.11 Additional potential applications
Although our development of a realistic palate, teeth, and tongue is aimed at speech training for persons with hearing loss, several other potential applications are possible. Language training more generally could utilize this technology, as in the learning of non-native languages and in remedial instruction with children with language challenges. Speech therapy during the recovery from brain trauma could also benefit. Finally, we expect that children with reading disabilities could profit from interactions with our talking head.
In face-to-face conversation, of course, the hard palate, the back of the teeth, and much of the tongue are not visible. Thus, we have not had the opportunity to learn the functional validity of these structures in our normal experience with spoken language. We might speculate whether an infant nurtured by our transparent talking head would learn that these ecological cues are functional. If their functional validity was learned, then deaf persons without any hearing at all might be able to completely understand language spoken by a transparent talking head.
Finally, although we have characterized our approach as terminal analogue synthesis, this work brings us closer to articulatory synthesis. The goal of articulatory synthesis is to generate auditory speech via simulation of the physical structures of the vocal tract. It may be that the high degree of accuracy of the internal structures would allow articulatory synthesis based on the synthetic vocal tract shape. Thus we see something of a convergence between the terminal analogue and articulatory-based approaches.
The improvements obtained from measures of real talking faces and documented in the evaluation testing will be codified, incorporated, and implemented in current uses of the visible speech technology. Baldi has achieved an impressive degree of initial success as a language tutor with deaf children (Massaro et al.Reference Massaro, Cohen, Beskow, Cassell, Sullivan, Prevost and Churchill2000; Barker Reference Barker2003). The same pedagogy and technology has been employed for language learning with autistic children (Massaro et al.Reference Massaro, Bosseler and Light2003; Bosseler and Massaro Reference Bosseler and Massaro2004; Massaro and Light Reference Massaro and Light2004a). A new Speech Training Tutor is being designed with our colleagues at the Tucker-Maxon Oral School (TMOS) to teach deaf and hearing-impaired children to perceive and produce spoken words, the skills needed for ordinary communication in everyday contexts. One tutor consists of three parts: Same–different discrimination, in which two words are presented and the student decides if they are the same word or two different words; Identification, in which a single word is presented and the student must choose the spoken word from a set of pictures or printed words; and Production, in which the student is presented with a printed word or picture and must pronounce the word. A goal of the Speech Training Tutor is to enable teachers to design specialized applications quickly for individual students. Applications can test a student’s ability to discriminate specific sounds in words, to provide training as needed using enhanced auditory and visual features, and continue training and testing until desired performance is achieved with unaltered stimuli. Ultimately, improved visible speech in computer-controlled animated agents will allow all users to extract information from orally delivered presentations. This is especially important for enhanced acquisition of speechreading in newly deafened adults, language acquisition together with word enunciation in children with hearing loss, and those learning a new language.
12.12 Acknowledgments
The research and writing of this chapter were supported by grants from National Science Foundation (Grant No. CDA-9726363, Grant No. BCS-9905176, Grant No. IIS-0086107), Public Health Service (Grant No. PHS R01 DC00236), a Cure Autism Now Foundation Innovative Technology Award, and the University of California, Santa Cruz (Cota-Robles Fellowship). The authors would like to thank Maureen Stone for valuable collaboration on implementing the EPG and Ultrasound measurements, Eric Vatikiotis-Bateson for hosting us for the Optotrak recordings, and Slim Ouni for help on the manuscript.


